There are several different ways you can access the View Recurrent Invoice pop-up window in MobiWork.
The following sections demonstrate some common methods of how to access the View Recurrent Invoice pop-up window from your MobiWork web platform.
Recurrent Invoice List Page
The easiest way to access the View Recurrent Invoice pop-up window is through the Recurrent Invoice feature page. For more information on how to access the Recurrent Invoice feature page, please see the Recurrent Invoice List section.
Once you are on the Recurrent Invoice feature page, there are four different ways to access the View Recurrent Invoice pop-up window:
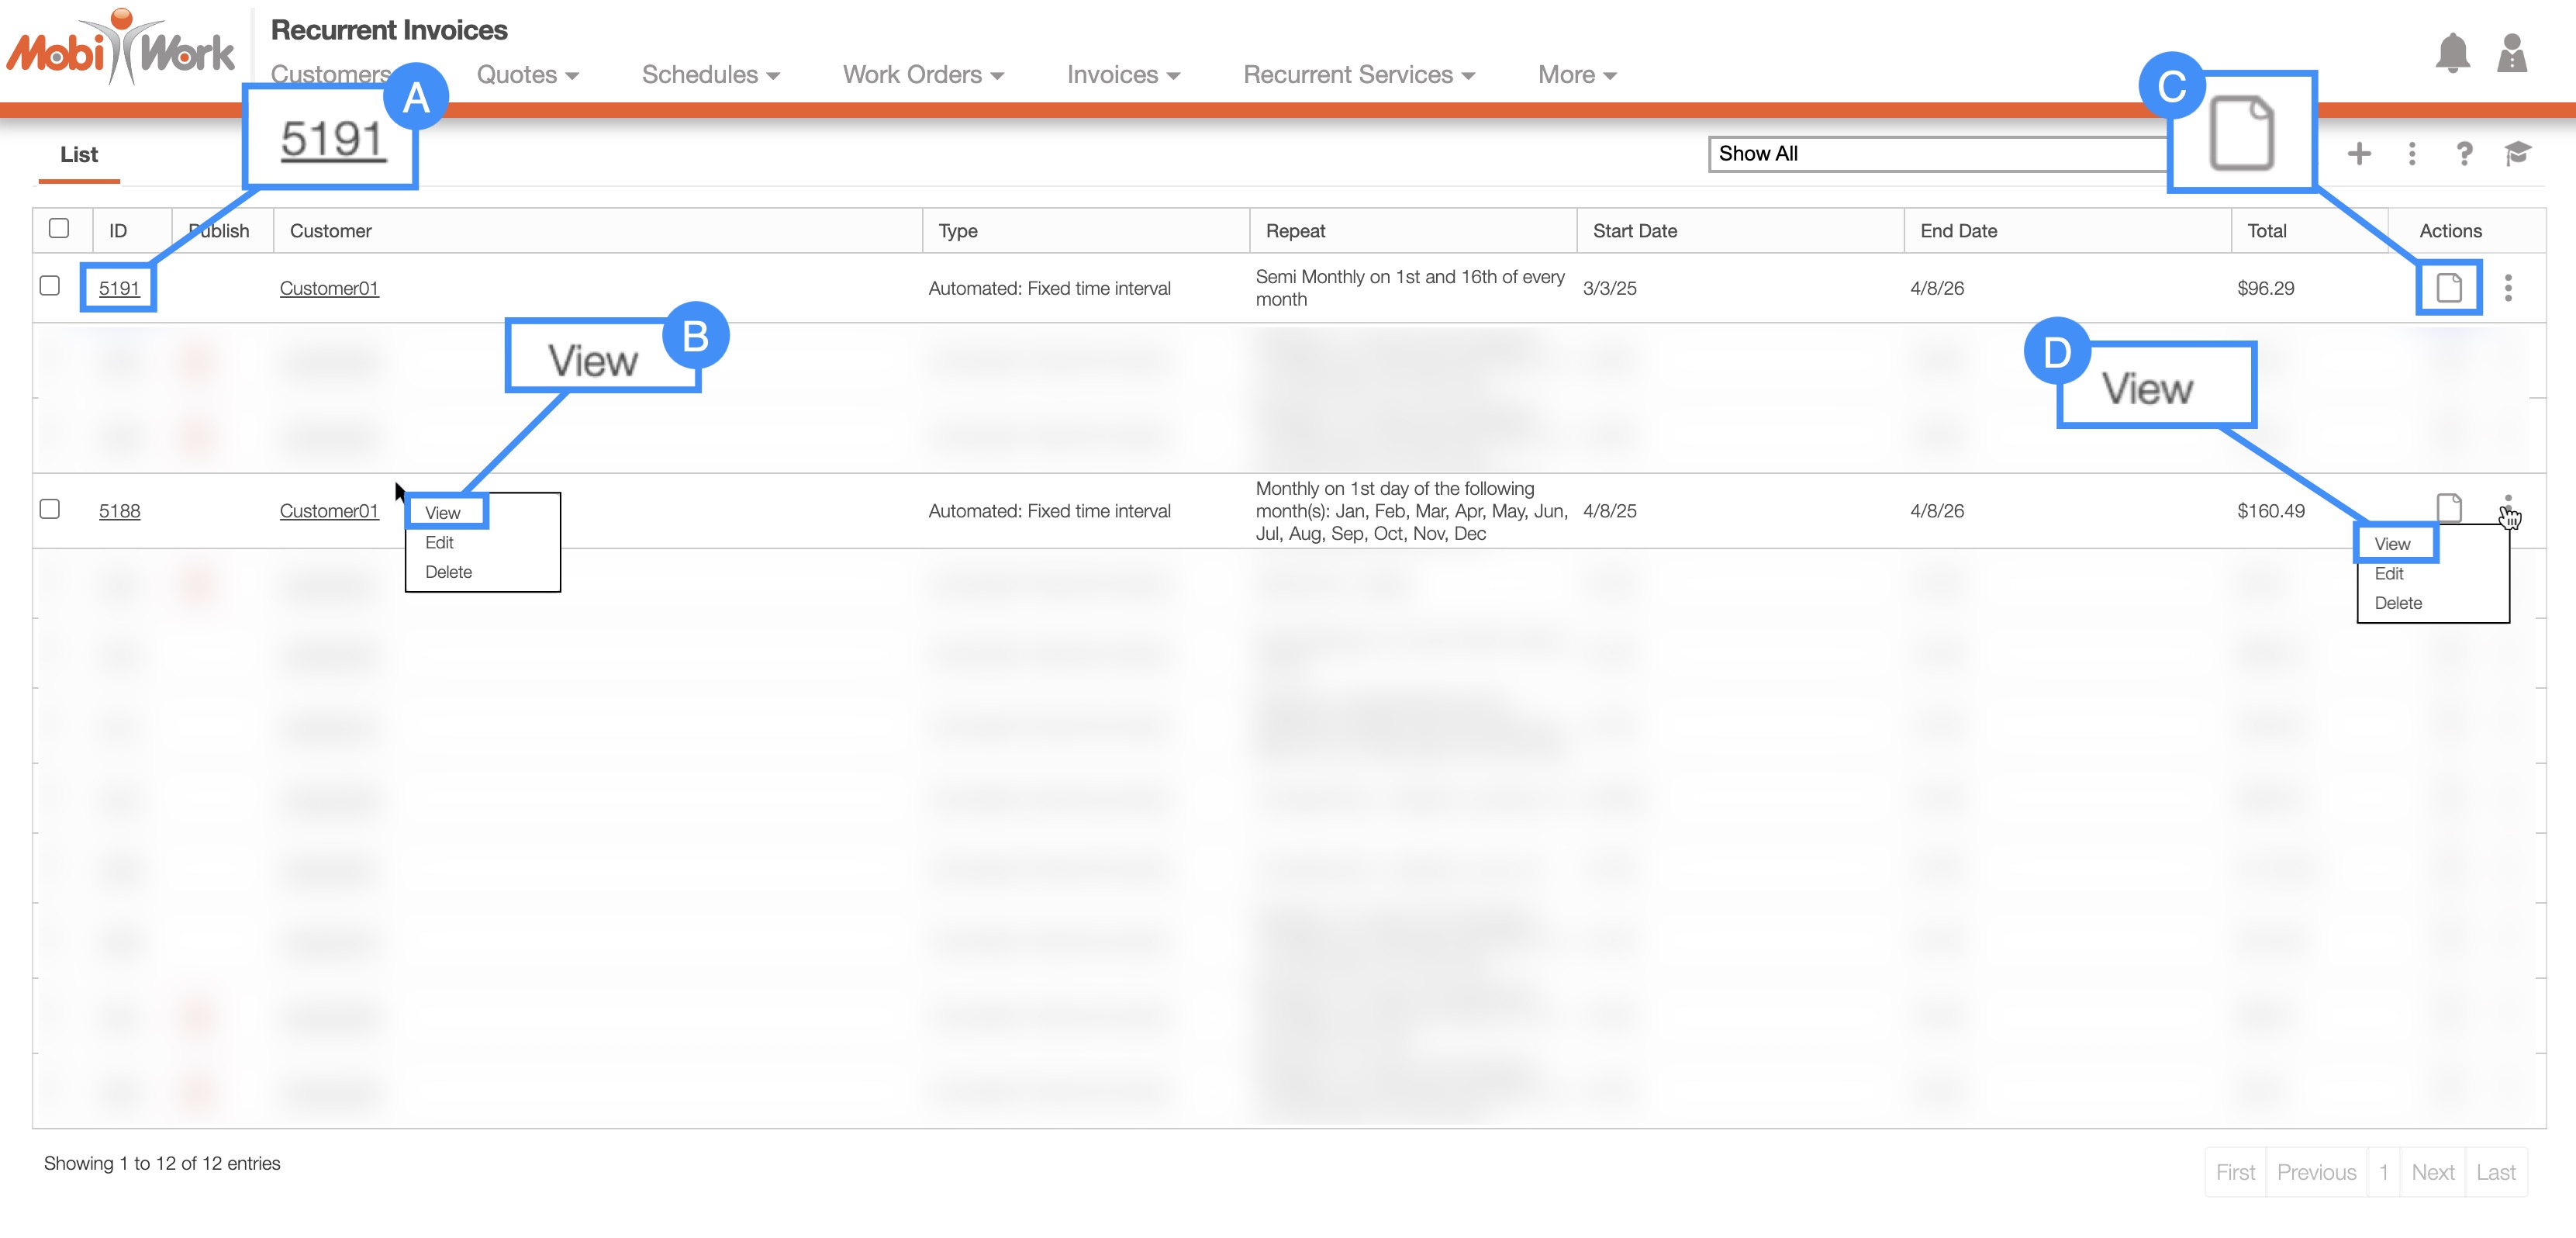
Right-click on the selected recurrent invoice and click on the "View" option from the drop-down
Select the View icon under the "Actions" column.
Select the desired recurrent invoice ID.
Click on the "View" option from the Individual Actions drop-down.
Recurrent Services
Another way you can access the View Recurrent Invoice pop-up window is through the View Recurrent Service pop-up window. For more information on how to access the View Recurrent Service pop-up window please see the View Recurrent Service page:
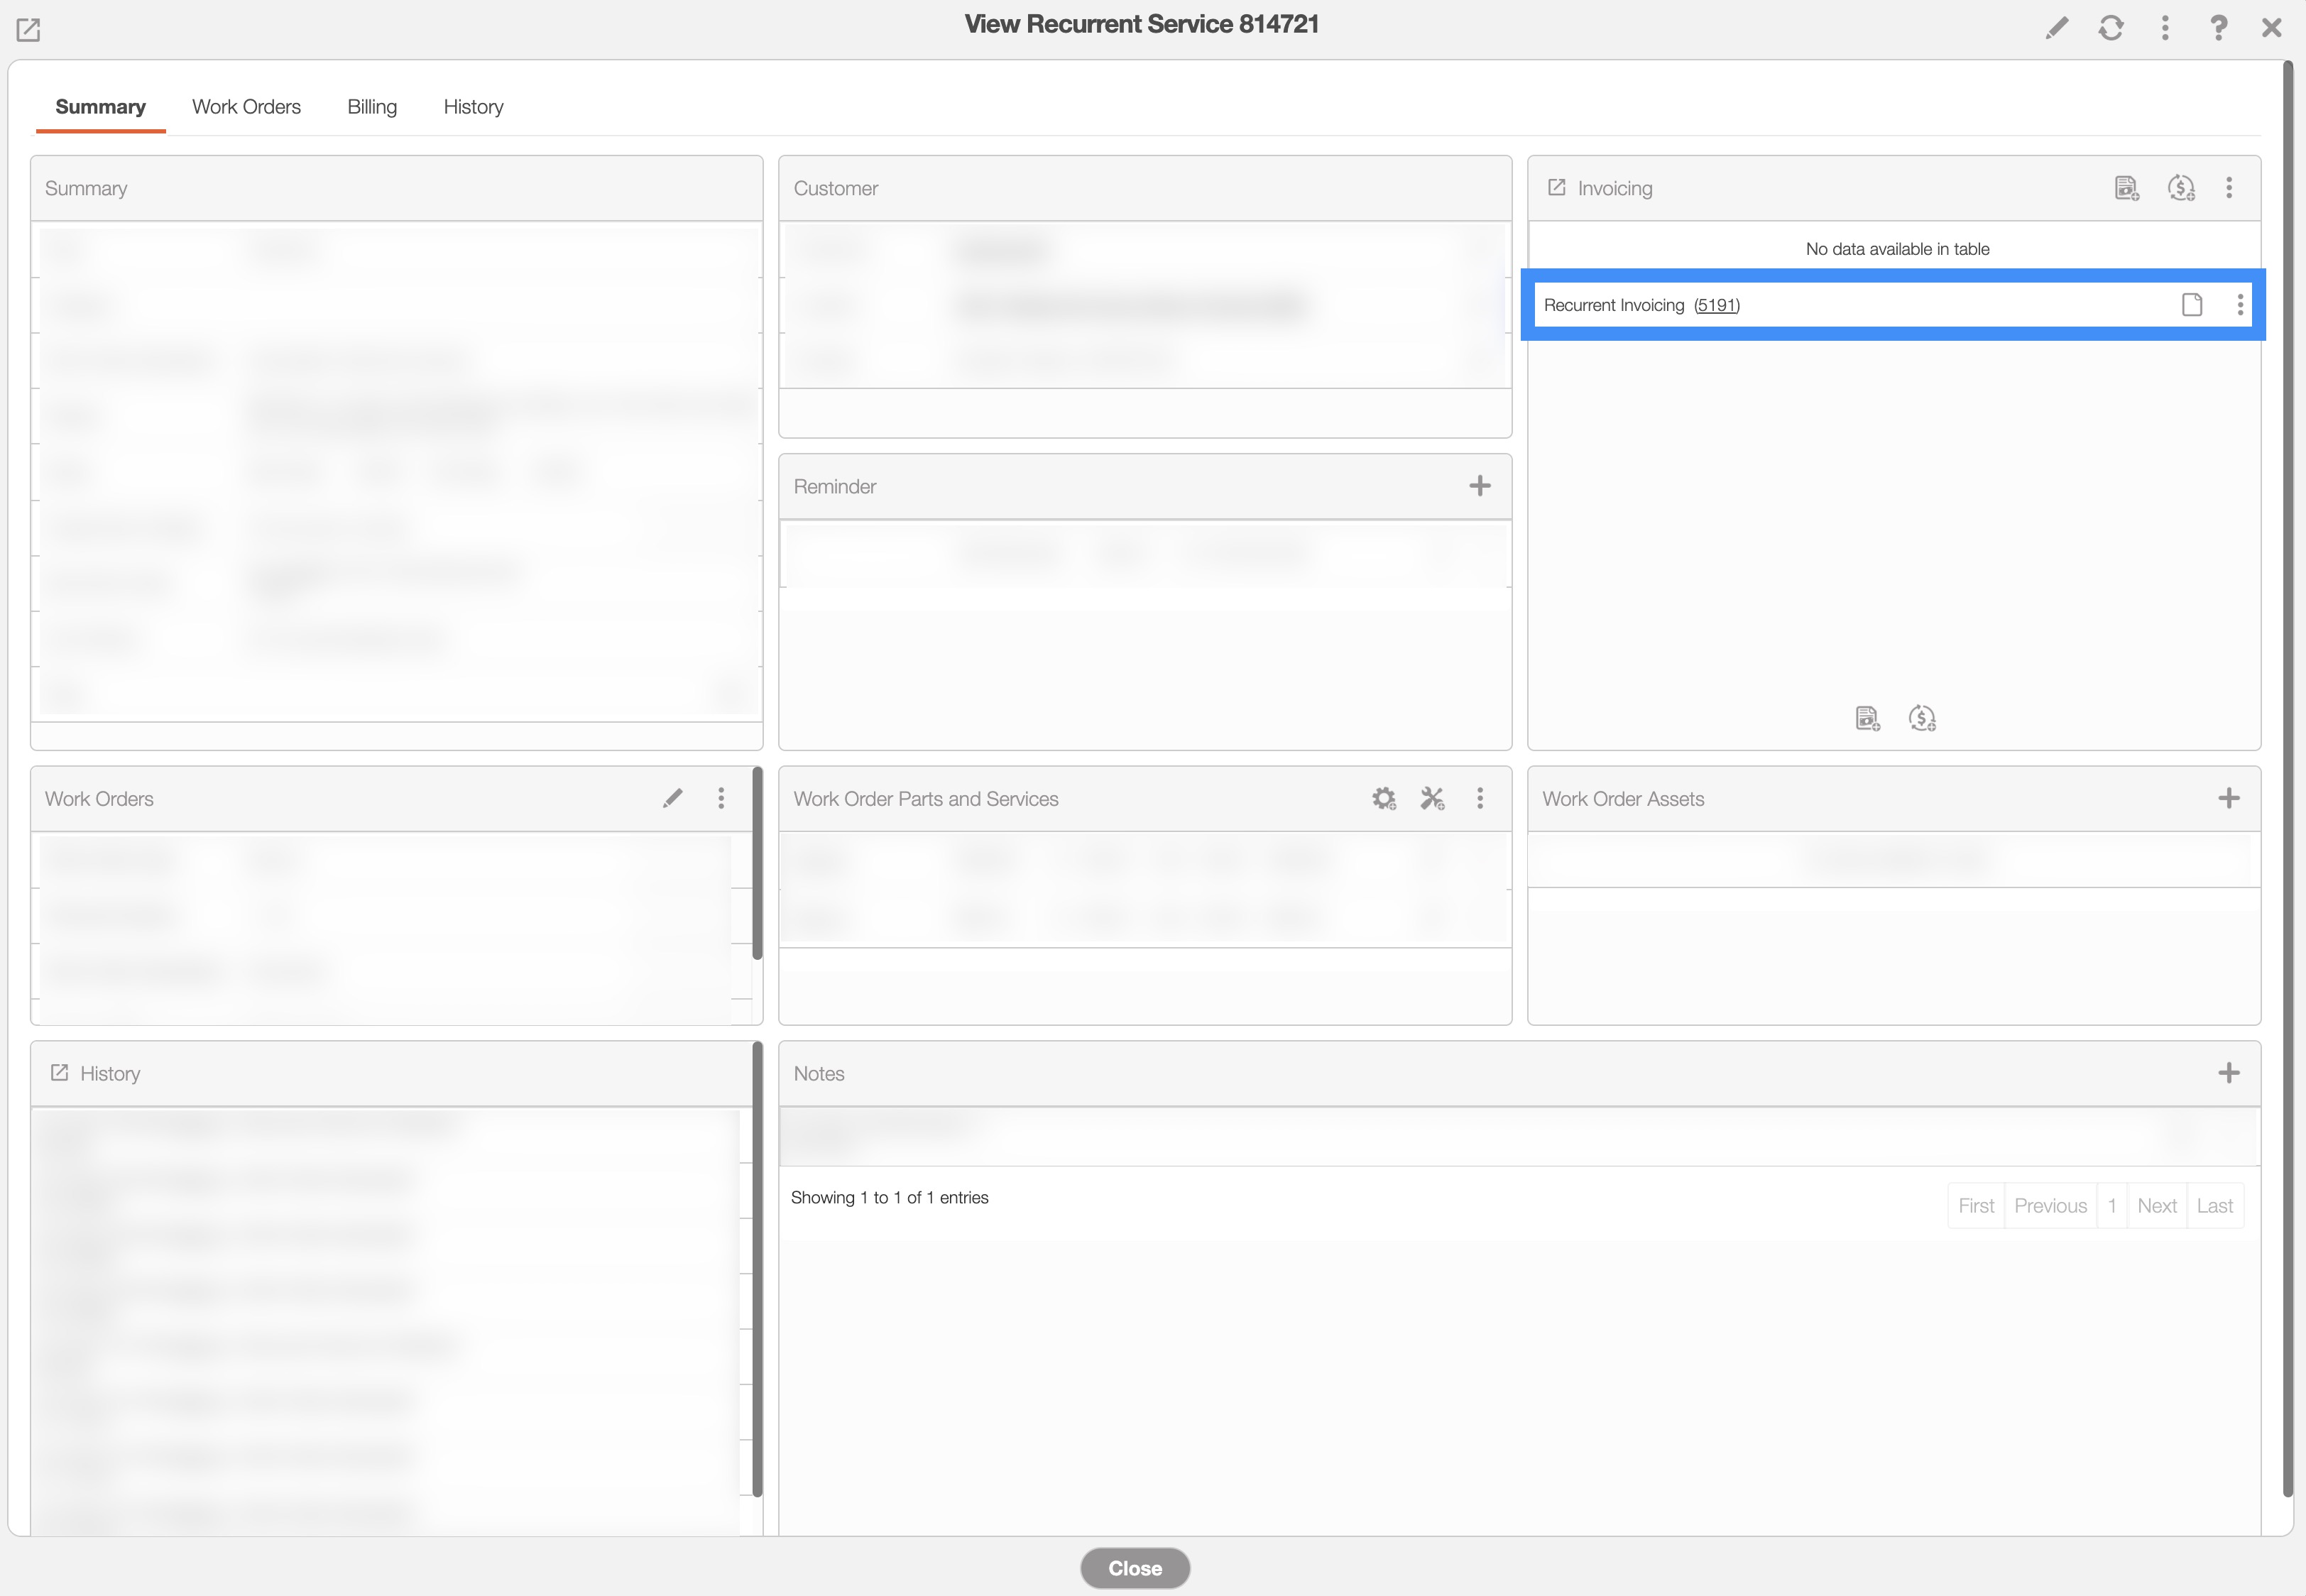
Both invoices and recurrent invoices will be listed in this panel. You can access the desired recurrent invoice, by clicking on the invoices labeled "Recurrent Invoicing." You will then be able to access the following actions:
Select the desired recurrent invoice ID.
Select the View icon under the "Actions" column.
Click on the "View" option from the Individual Actions drop-down.
The sections below will provide a detailed overview of the various features available in the Recurrent Invoice pop-up window.
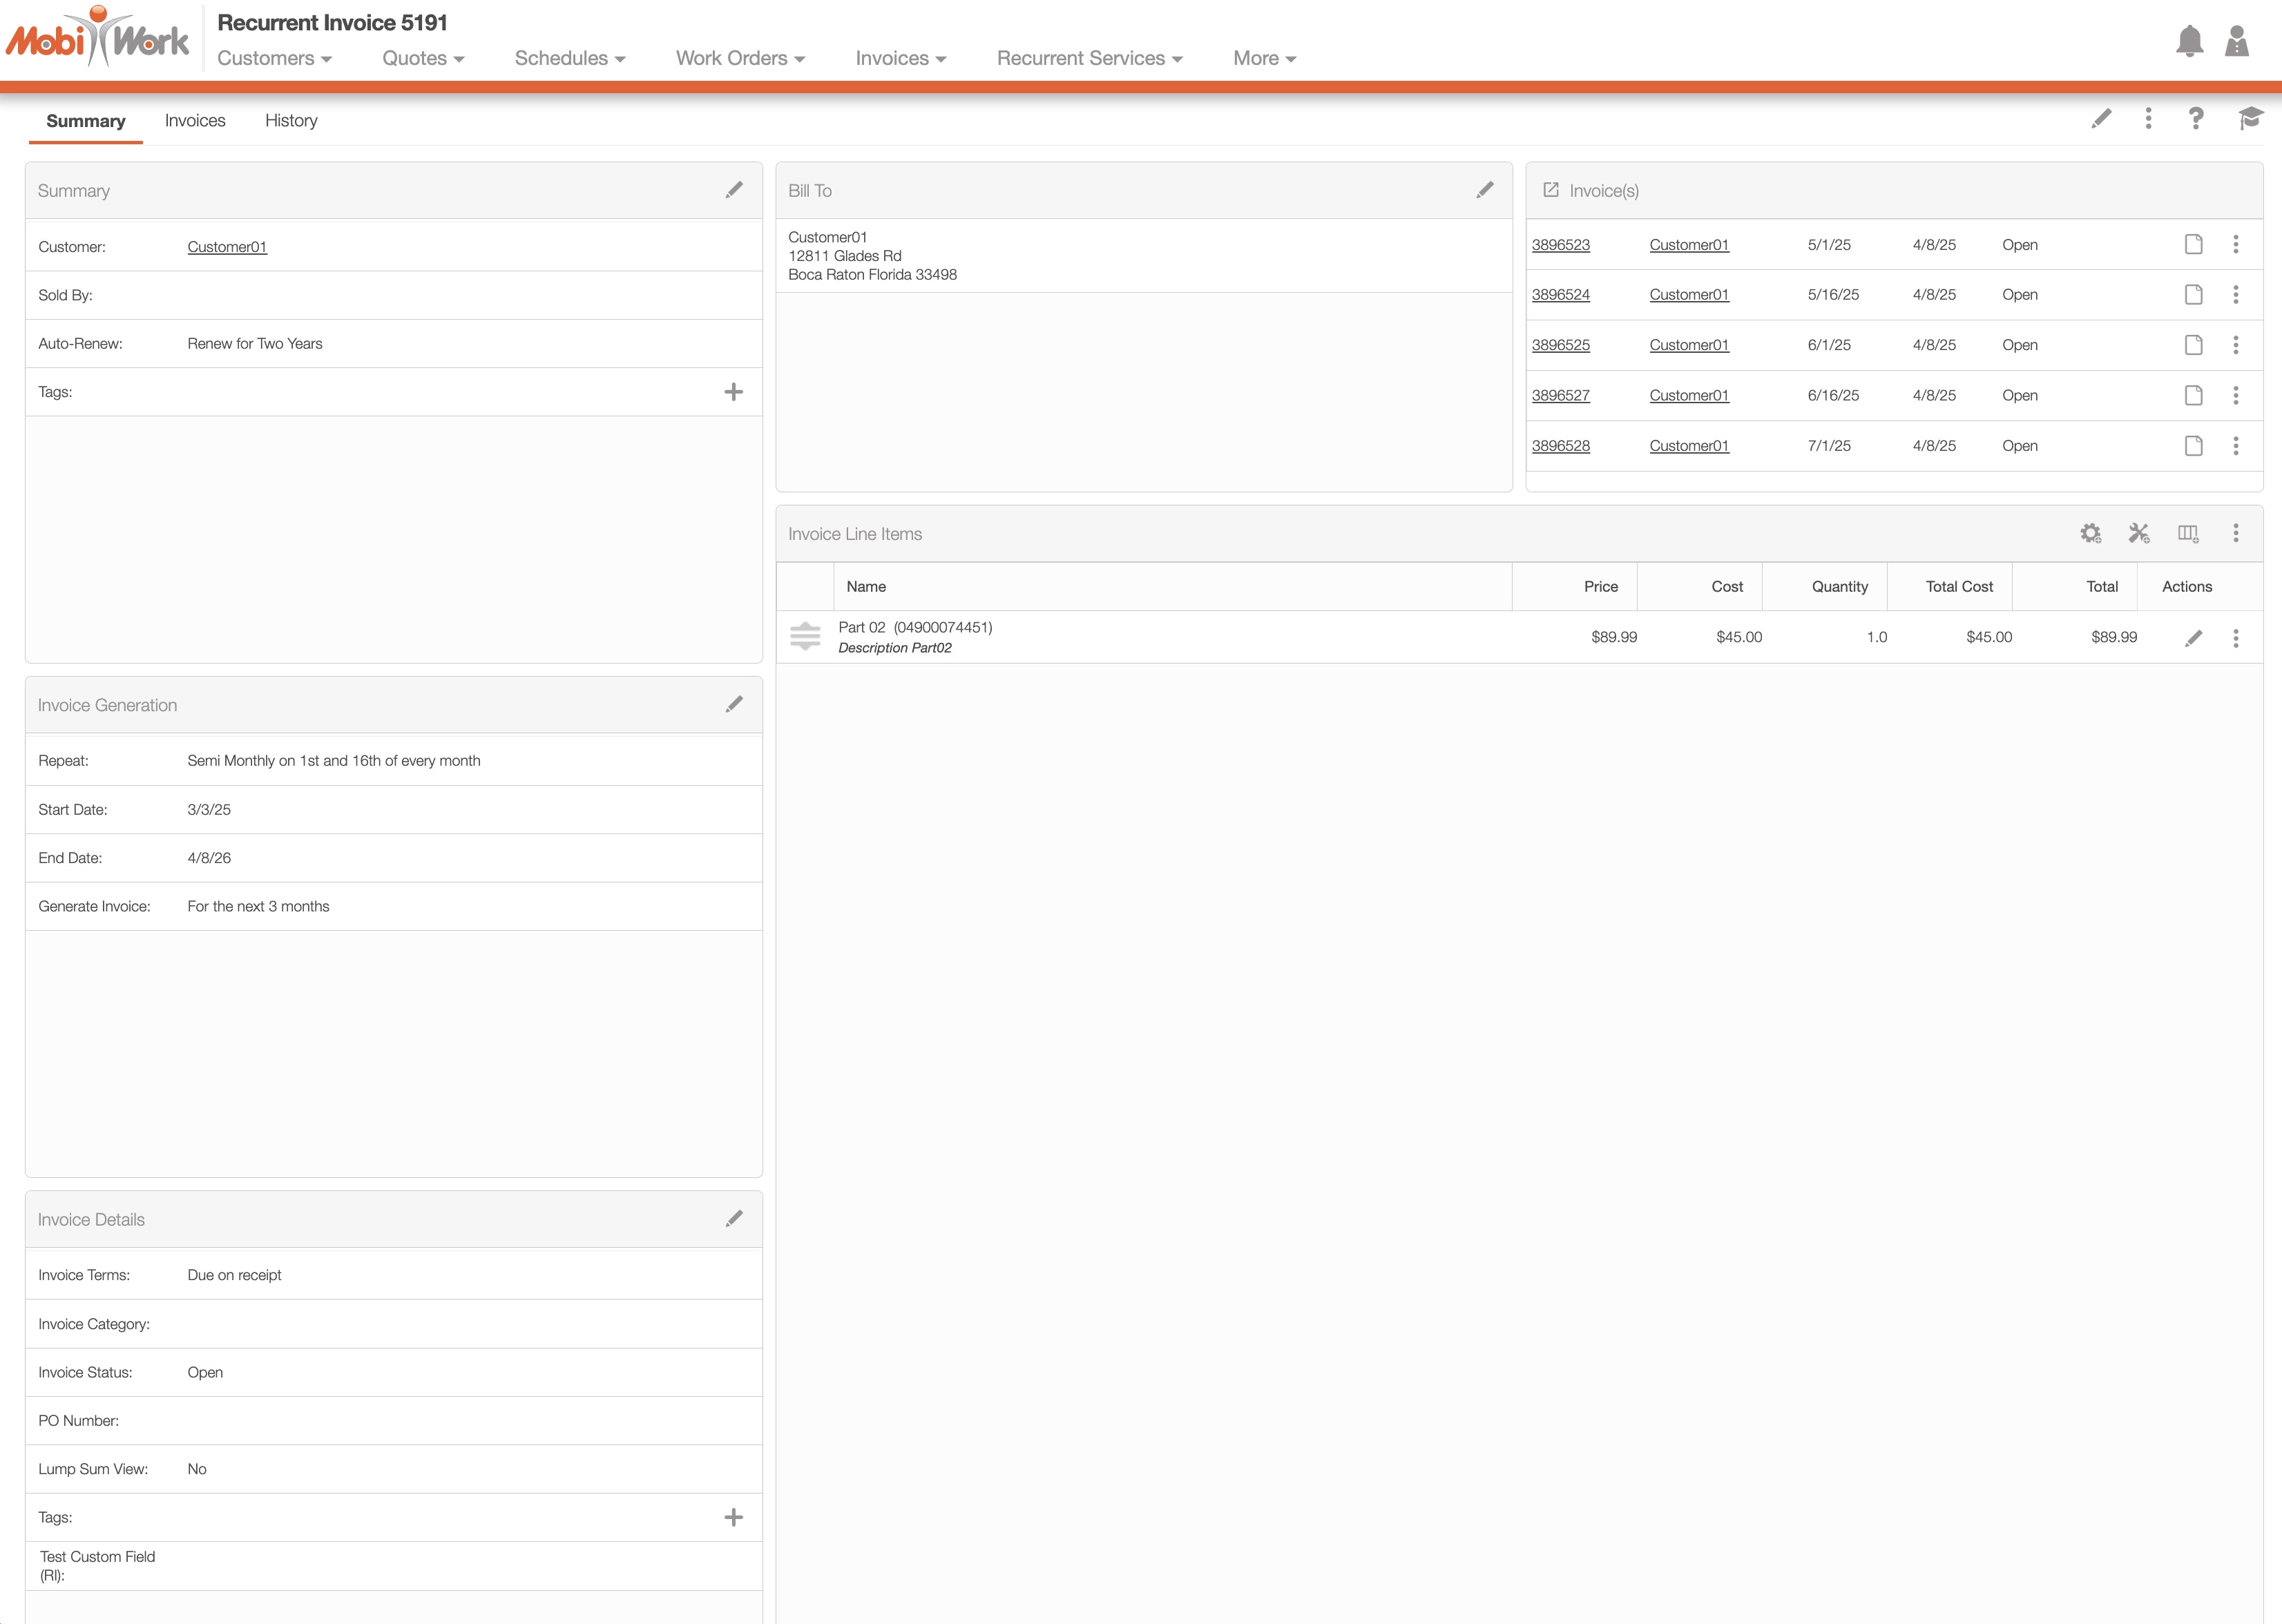
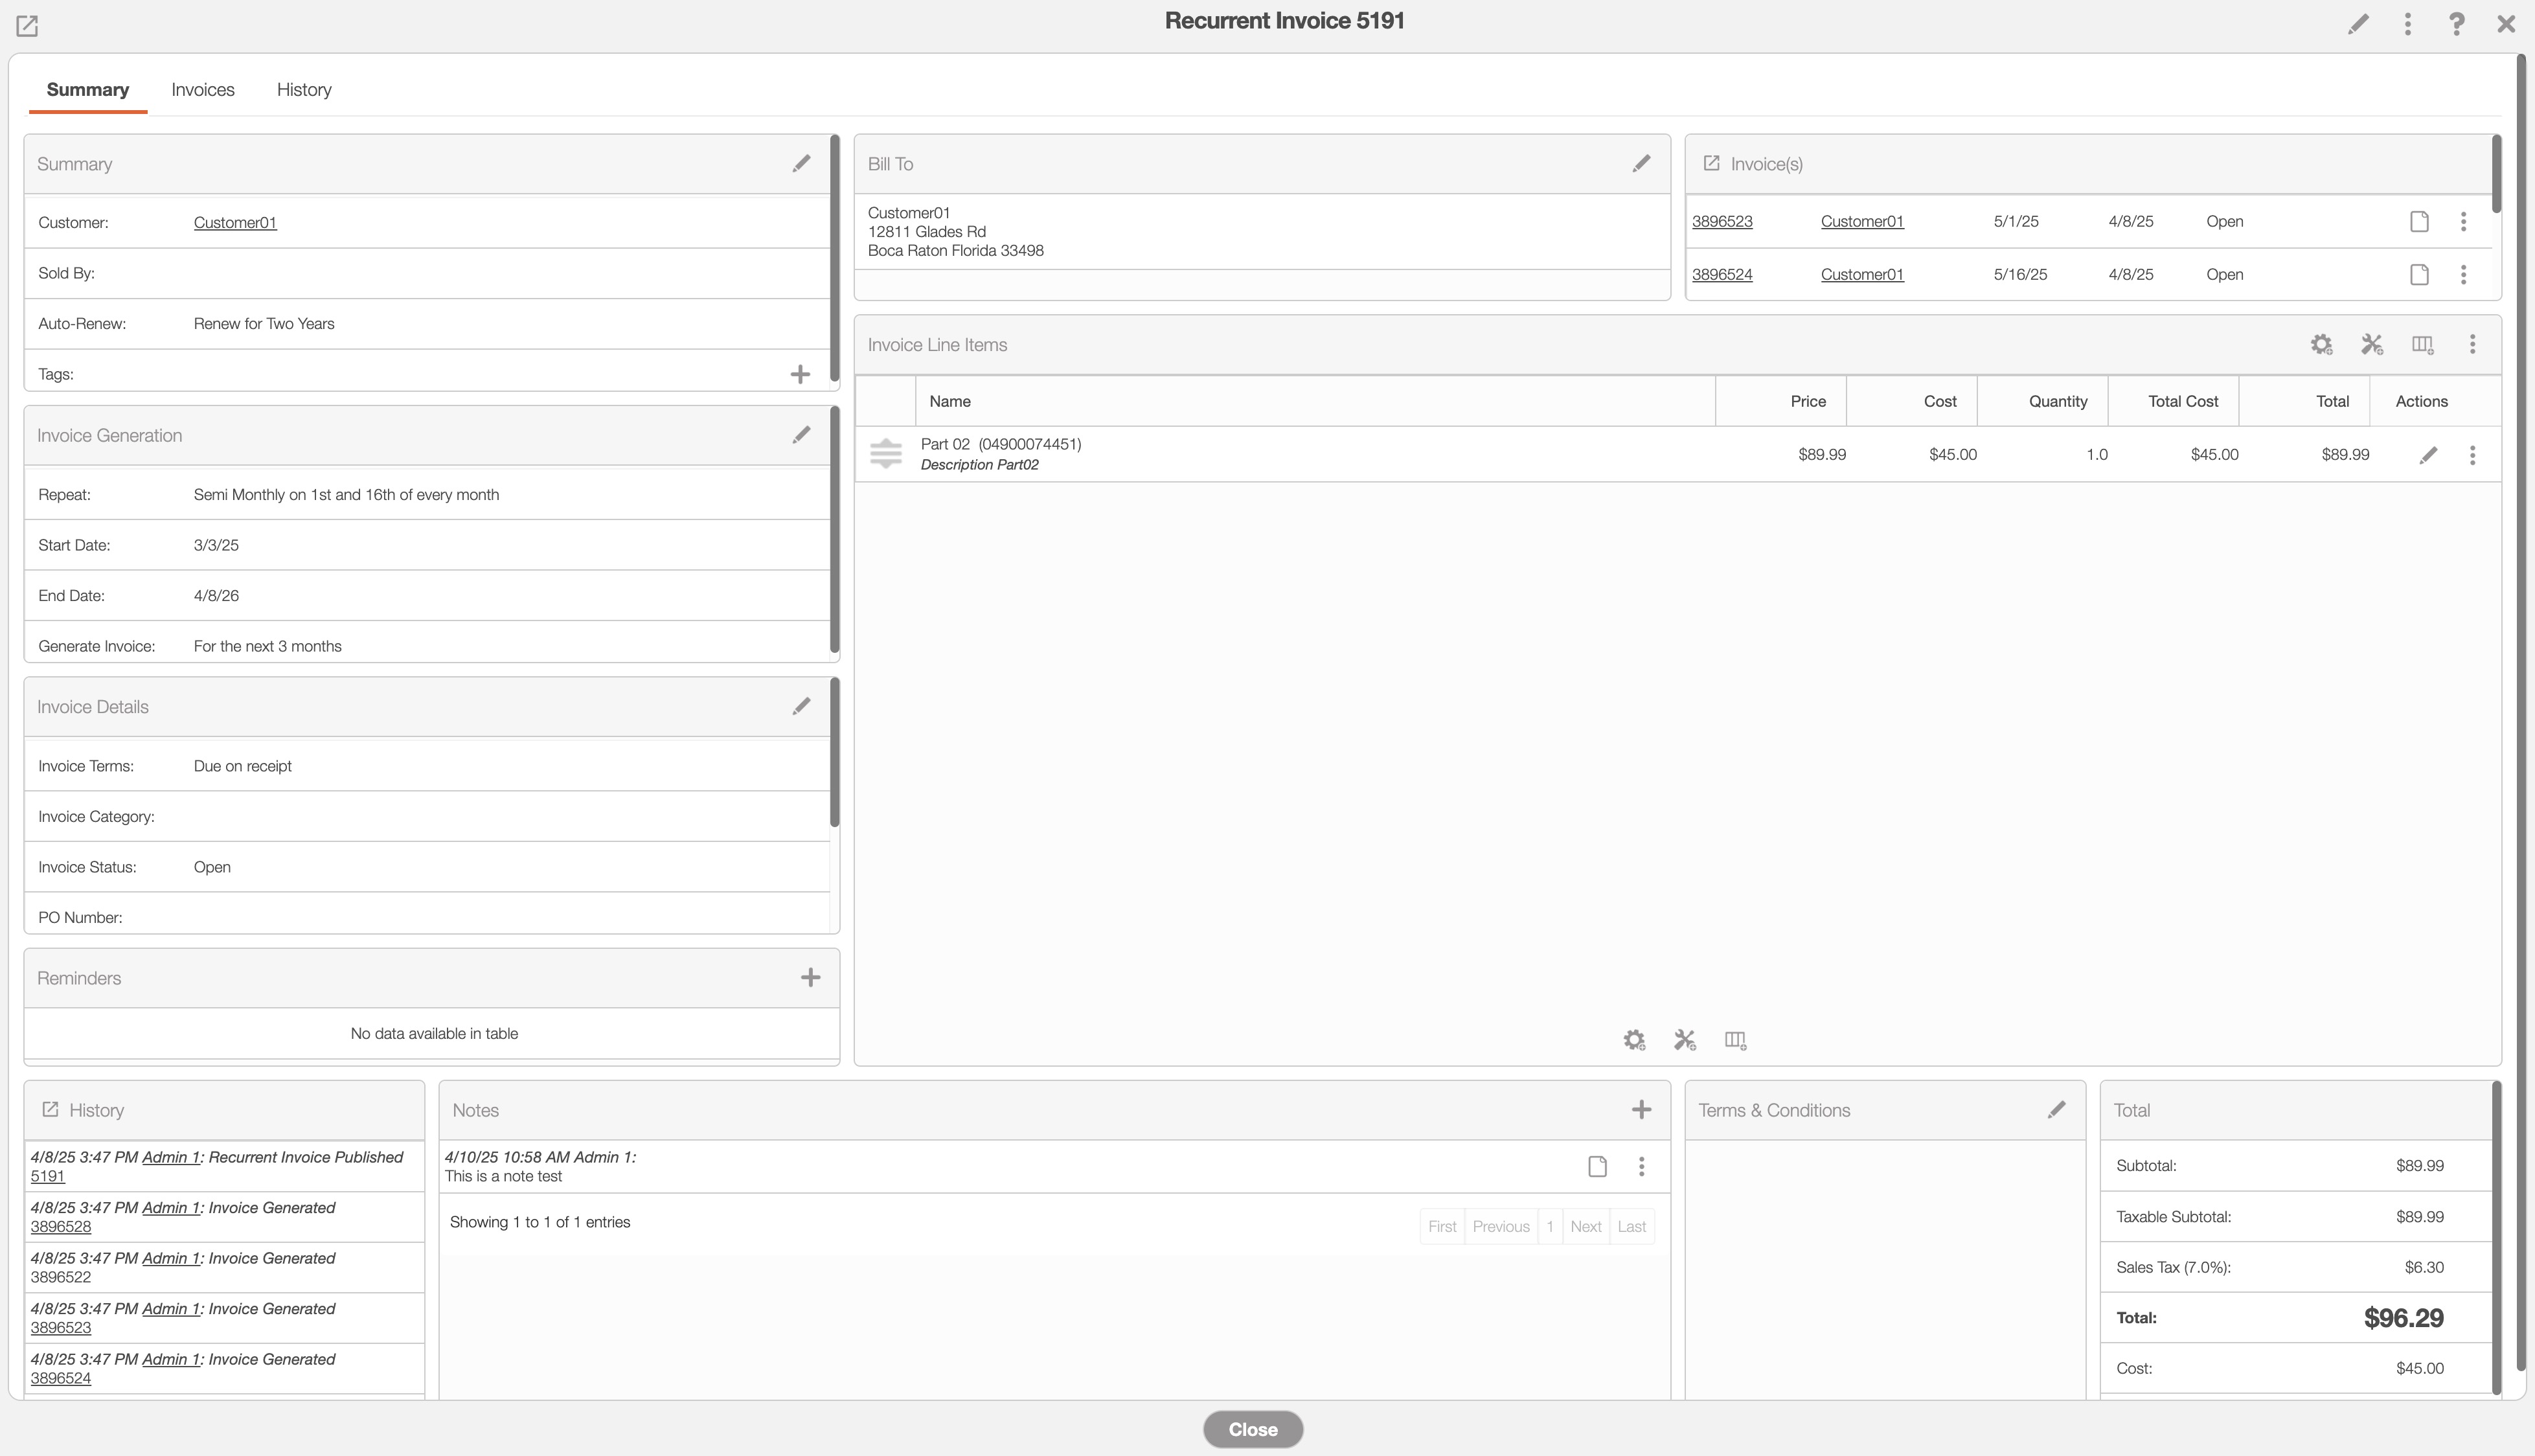
Once you open the View Recurrent Invoice pop-up window, you will be automatically directed to the "Summary" tab:

These features are available in the tabs and both the pop-up window and the full-size view:
Recurrent Invoice Full-Size View
Recurrent Invoice Tabs
Recurrent Invoice ID
Upper Right Corner Actions
Please note that if you would like to easily close this pop-up window, you can click on the esc button from your keyboard.
Recurrent Invoice Full-Size View
By clicking on the upwards arrow in the left-hand corner, you can expand the View Recurrent Invoice pop-up window so that it is full-size:

Recurrent Invoices Tabs
The View Recurrent Invoice pop-up window has four different tabs; each tab displays different information regarding the recurrent invoice:

You can navigate to other tabs by clicking on the desired tab.
Recurrent Invoice ID
The Recurrent Invoice ID will be displayed towards the top of the View Recurrent Invoice pop-up window:

Upper Right Corner Actions
The Recurrent Invoices' Upper Right Corner Actions can be found in the top-right corner of the View Recurrent Invoice pop-up window. These actions are located in this section, regardless of the tab you are on:
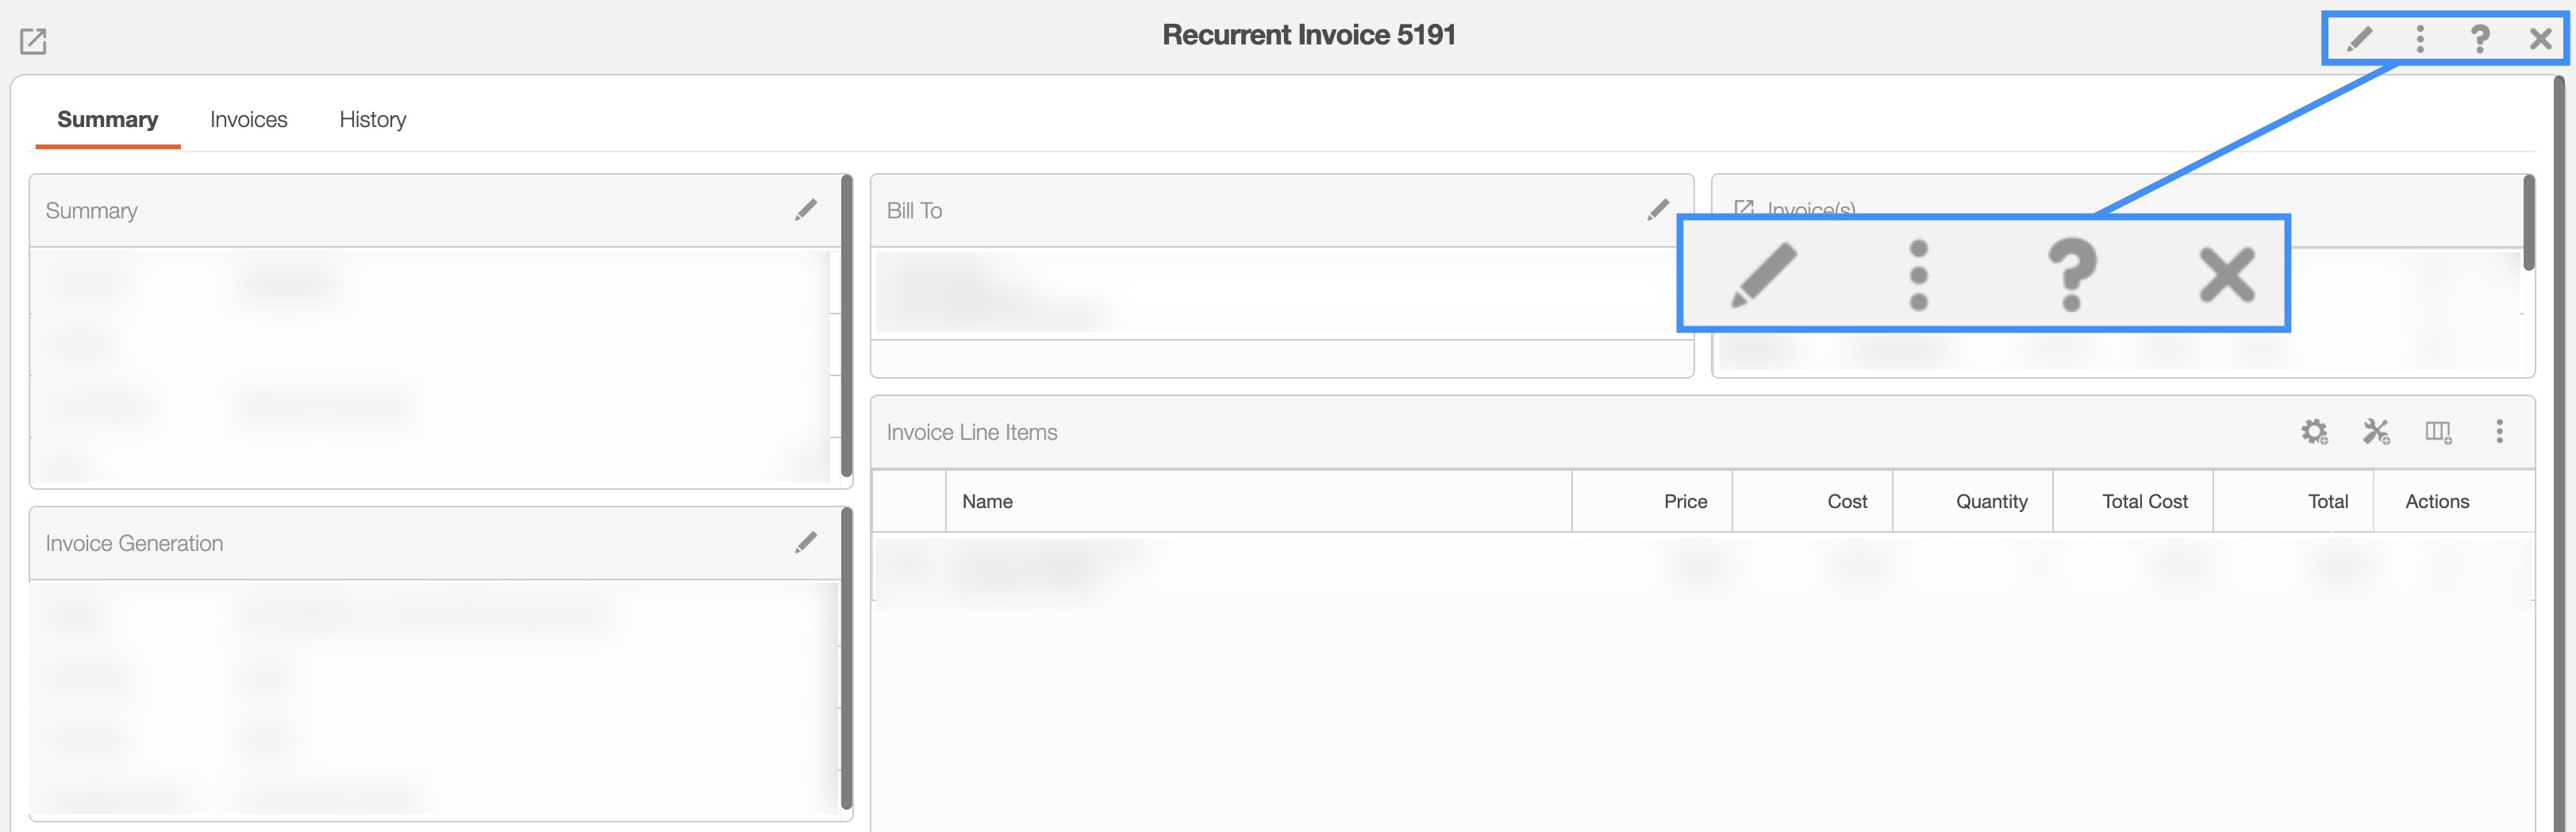
The Upper Right Corner Actions section includes:
The Pencil button will allow you to edit the recurrent invoice.
The Individual Actions button will allow you to perform various actions.
The Question Mark button which will direct you to the respective MobiWork Features page.
The X will close out of the View Recurrent Invoice pop-up window.
After clicking on the vertical three dots in the top-right corner, the Individual Actions drop-down menu will appear:
From the Individual Actions drop-down menu, you can select various actions that will help manage the specified recurrent invoice.
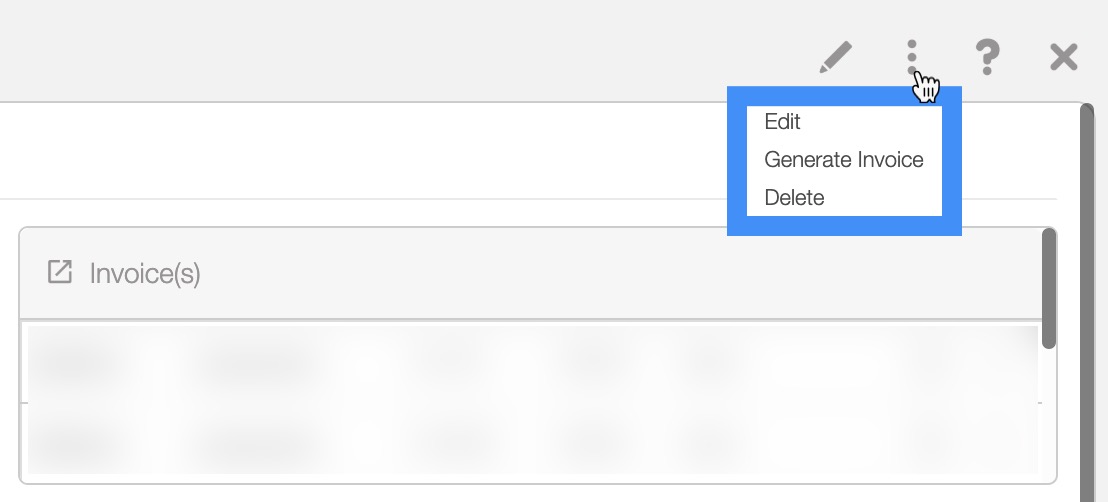
The complete list of actions found in the Individual Actions drop-down menu are defined below:
| Name: | Description: |
|---|---|
| "Edit" | Allows the user to edit the specified recurrent invoice. |
| "Generate Invoice" | Allows you to manually generate a single instance of an invoice, if there are no invoices generated for the recurrent invoice. |
| "Delete" | Deletes the recurrent invoice. |
The "Summary" tab is the default tab that will appear once you open the View Recurrent Invoice pop-up window. This tab will display all the requisite information regarding the recurrent invoice; the information is also displayed in an accessible and practical manner.
The panels found on the "Summary" tab will summarize the data from the other tabs found in the View Recurrent Invoie pop-up window:
Where applicable, you can edit or add additional information directly in the "Summary" tab:
The Arrow icon (found in the top left of designated boxes) will open the corresponding tab in the View Recurrent Invoice pop-up window.
The Individual Actions button (the three dots) will display different options (e.g., view, edit, delete, etc.) depending on the corresponding panel.
The View icon will allow you to view the selected data in a separate window.
The Plus Sign icon will allow you to add additional terms and conditions or notes.
The Trash Can icon will allow you to delete the selected data.
Summary Panel
The "Summary" panel displays key details about the recurrent invoice, including the associated customer, the user who sold the invoice, auto-renewal information, and tags for the overall recurrent invoice. By clicking the Pencil icon in the top right corner, you will be able to access the Edit Recurrent Invoice pop-up window.
The information found in the "Summary" panel are described below:
| Name: | Description: |
|---|---|
| "Customer" | The customer profile associated with the recurrent invoice. |
| "Sold By" | The user who created or oversees the recurrent invoice. |
| "Auto-Renew" | The auto-renewal date, which updates the end date of the recurrent invoice. |
| "Tags" | This tag will be placed on the overall recurrent invoice. Tags act as a visual indicator of a custom status or category, thus improving organizational clarity with the ability to identify specified tagged recurrent invoices at a glance. |
Invoice Generation
The "Invoice Generation" panel displays key details about the invoice schedule, including the frequency of generation, start and end dates, and the specific dates when invoices are created. By clicking the Pencil icon in the top right corner, you will be able to access the Edit Recurrent Invoice pop-up window.
The information found in the "Invoice Generation" panel are described below:
| Name: | Description: |
|---|---|
| "Repeat" | How often the invoice for the recurrent invoice is scheduled to repeat. |
| "Start Date" | The initial scheduled date for the recurrent invoice. | "End Date" | The final scheduled date for the recurrent invoice. |
| "Generate Invoice" | The invoice generation setting, which allows for automatic creation based on a specific time interval. |
Invoice Details
The "Invoice Details" panel displays information about each individual invoice, including its status, invoice terms, and other relevant details.
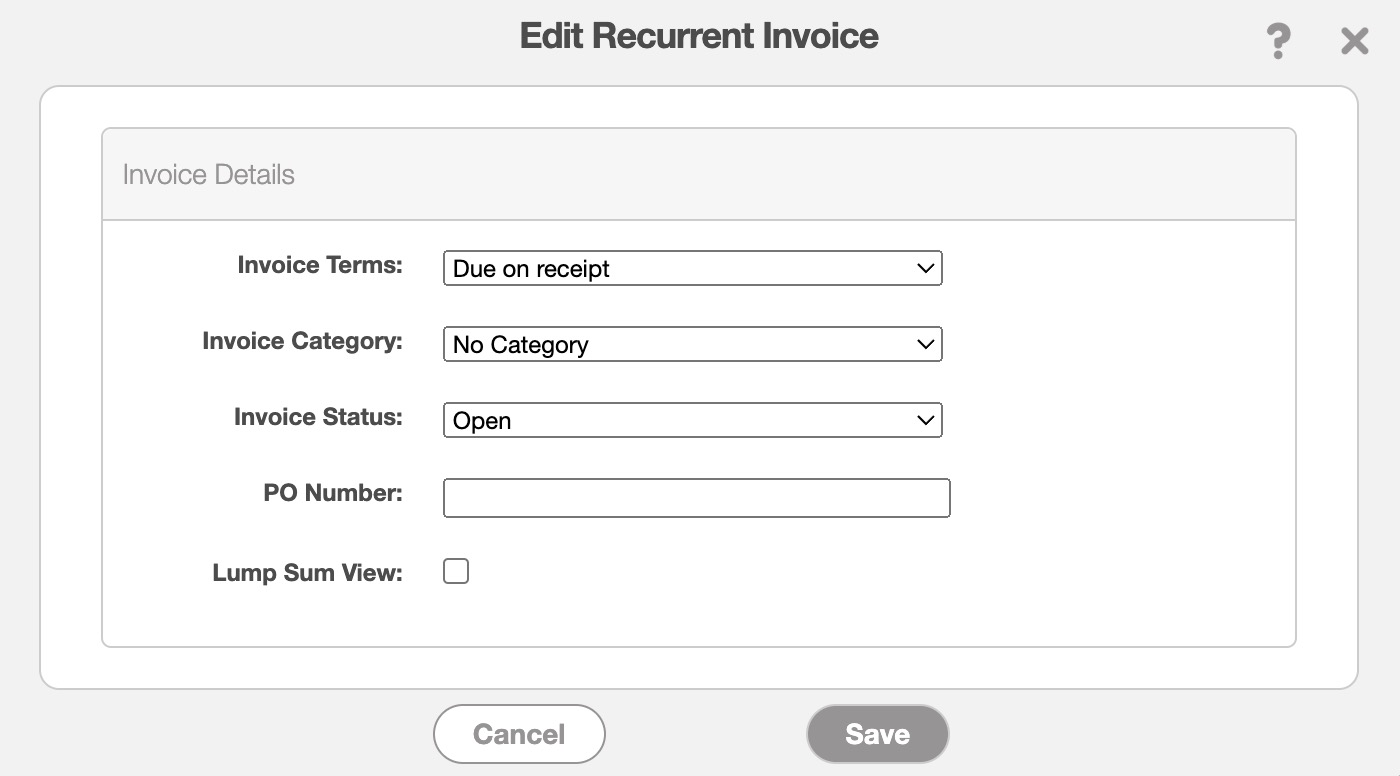
By clicking on the Pencil icon in the top-right corner, you will be able to access the Edit Recurrent Invoice pop-up window. In this pop-up window you will be able to update the invoice terms, category, and more:
The information found in the "Invoice Details" panel are described below:
| Name: | Description: |
|---|---|
| "Invoice Terms" | Select the Terms of your invoice. The terms and conditions of how the invoice should be paid, (e.g. due on receipt, net 15, net 20, etc.). If there are "net" terms and no due date MobiWork will automatically be able to calculate the due date based on the "net" selected. |
| "Invoice Category" | The category to which the invoice belongs. |
| "Invoice Status" | The status of the invoice (i.e., "Open," "Checked Out," "Service Completed," "Customer Invoiced," "Paid," and "Cancelled") which demonstrates various stages of the invoicing process. For more information about the Invoice Status please see the View an Invoice page. |
| "PO Number" | The unique identification number assigned to the purchase order. |
| "Lump Sum View" | Indicates if lump sum view is selected for the invoices. If you prefer not to display individual prices and costs for line items, you can use the "Lump Sum View" option. |
| "Tags" | These tags will be placed on the individual invoices. Tags act as a visual indicator of a custom status or category, thus improving organizational clarity with the ability to identify specified tagged invoices at a glance. |
Reminders Panel
The "Reminders" panel will contain the scheduled reminders for the selected user(s). To add a reminder, click the Plus Sign in the upper right corner. To edit a reminder, click on the Pencil icon or if you would like to delete a reminder, click on the Trash Can icon.
When adding or editing a reminder, you can specify both the date for sending the reminder and the priority level of the task that the user(s) is being reminded of.
History
The "History" panel will contain the historical data of the recurrent invoice (e.g., when the recurrent invoice was published, when the recurrent invoice was edited, and more). The data in this panel will automatically generate when a specified event or status is reached.
Bill To Panel
The "Bill To" panel will contain the billing information of the customer or contact receiving the bill.
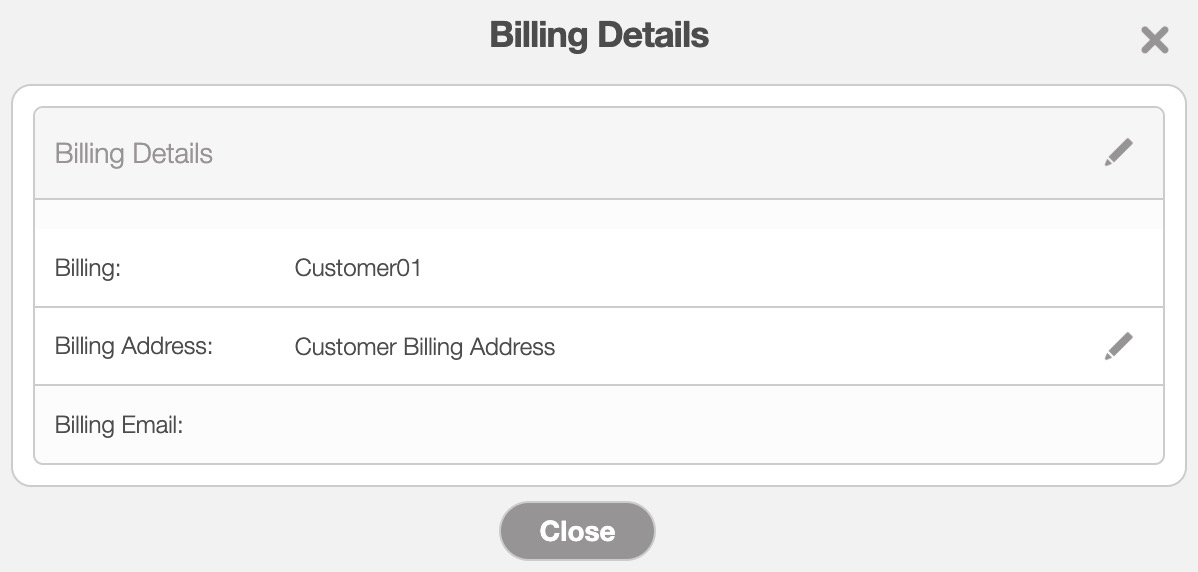
When you click on the Pencil icon in the "Bill To" panel, the Billing Details pop-up window will appear:
If the invoice is being billed to another entity (e.g., the parent customer) you will be able to indicate the bill to entity here. For more information on how to change the bill to information, please see the Edit an Invoice page.
The other information can be found in the Billing Details pop-up window are described below:
| Name: | Description: |
|---|---|
| "Billing" | Allows you to view or edit bill to details of the invoice (i.e., the customer will be invoiced, the parent customer will be invoiced, the invoice will be sent to another customer, or input another billing name and email). |
| "Billing Address" | Allows the user to view or edit the billing address of the invoice. |
| "Billing Email" | Allows the user to view or edit the billing email address of the invoice. |
Note: Please note that if you adjust the bill-to information from this panel, it will only apply to this invoice. To change the bill-to information for all future invoices, it will need to be updated in the customer profile. For more information about customer billing, please see the View Customer page.
Invoice Line Items
The "Invoice Line Items" panel will allow you to add the parts, services, markups, and discounts to the recurrent invoice. You can also add a section divider to help keep the invoice line items organized.
By clicking on the Individual Actions of a specified part, service, markup, discount, or section you can edit the information or remove it entirely.
The columns found in the "Invoice Line Items" panel are defined below:
| Name: | Description: |
|---|---|
| "Name" | The name of the part or service (this will also include the SKU information if available). |
| "Price" | The list price of the part or service; this is the price that the customer will be charged. |
| "Cost" | The cost of the part; this value represents the amount that your company has to spend on procuring the part or product. |
| "Quantity" | How much of a part is needed for the invoice. In regard to services, this value refers to how many hours the user has worked and is charging the customer for. |
| "Discount" | The discount of an individual part or service. This is different from the overall discount that can be applied to the invoice as a whole. |
| "Total" | The total amount of the individual part or service which calculates the price, quantity, and discount. The total amount of the invoice (including overall discounts and markups) can be located in the "Total & Balance" panel. |
| "Actions" | Will allow you to edit or remove the specified part or service. |
For more information on how to add, edit, or delete line items, please see the corresponding pages, Add an Invoice, Edit an Invoice, or Delete an Invoice.
You can also easily add a part, service, section, or payment to the invoice's line items by clicking on the respective icon:
![]()
For more information about adding line items to your recurrent invoice, please see the Add Recurrent Invoice page.
Notes Panel
The "Notes" panel will allow you to add and manage notes related to recurrent invoice. To add a note, click the Plus Sign in the upper right corner.
The Add Note pop-up window will then appear:
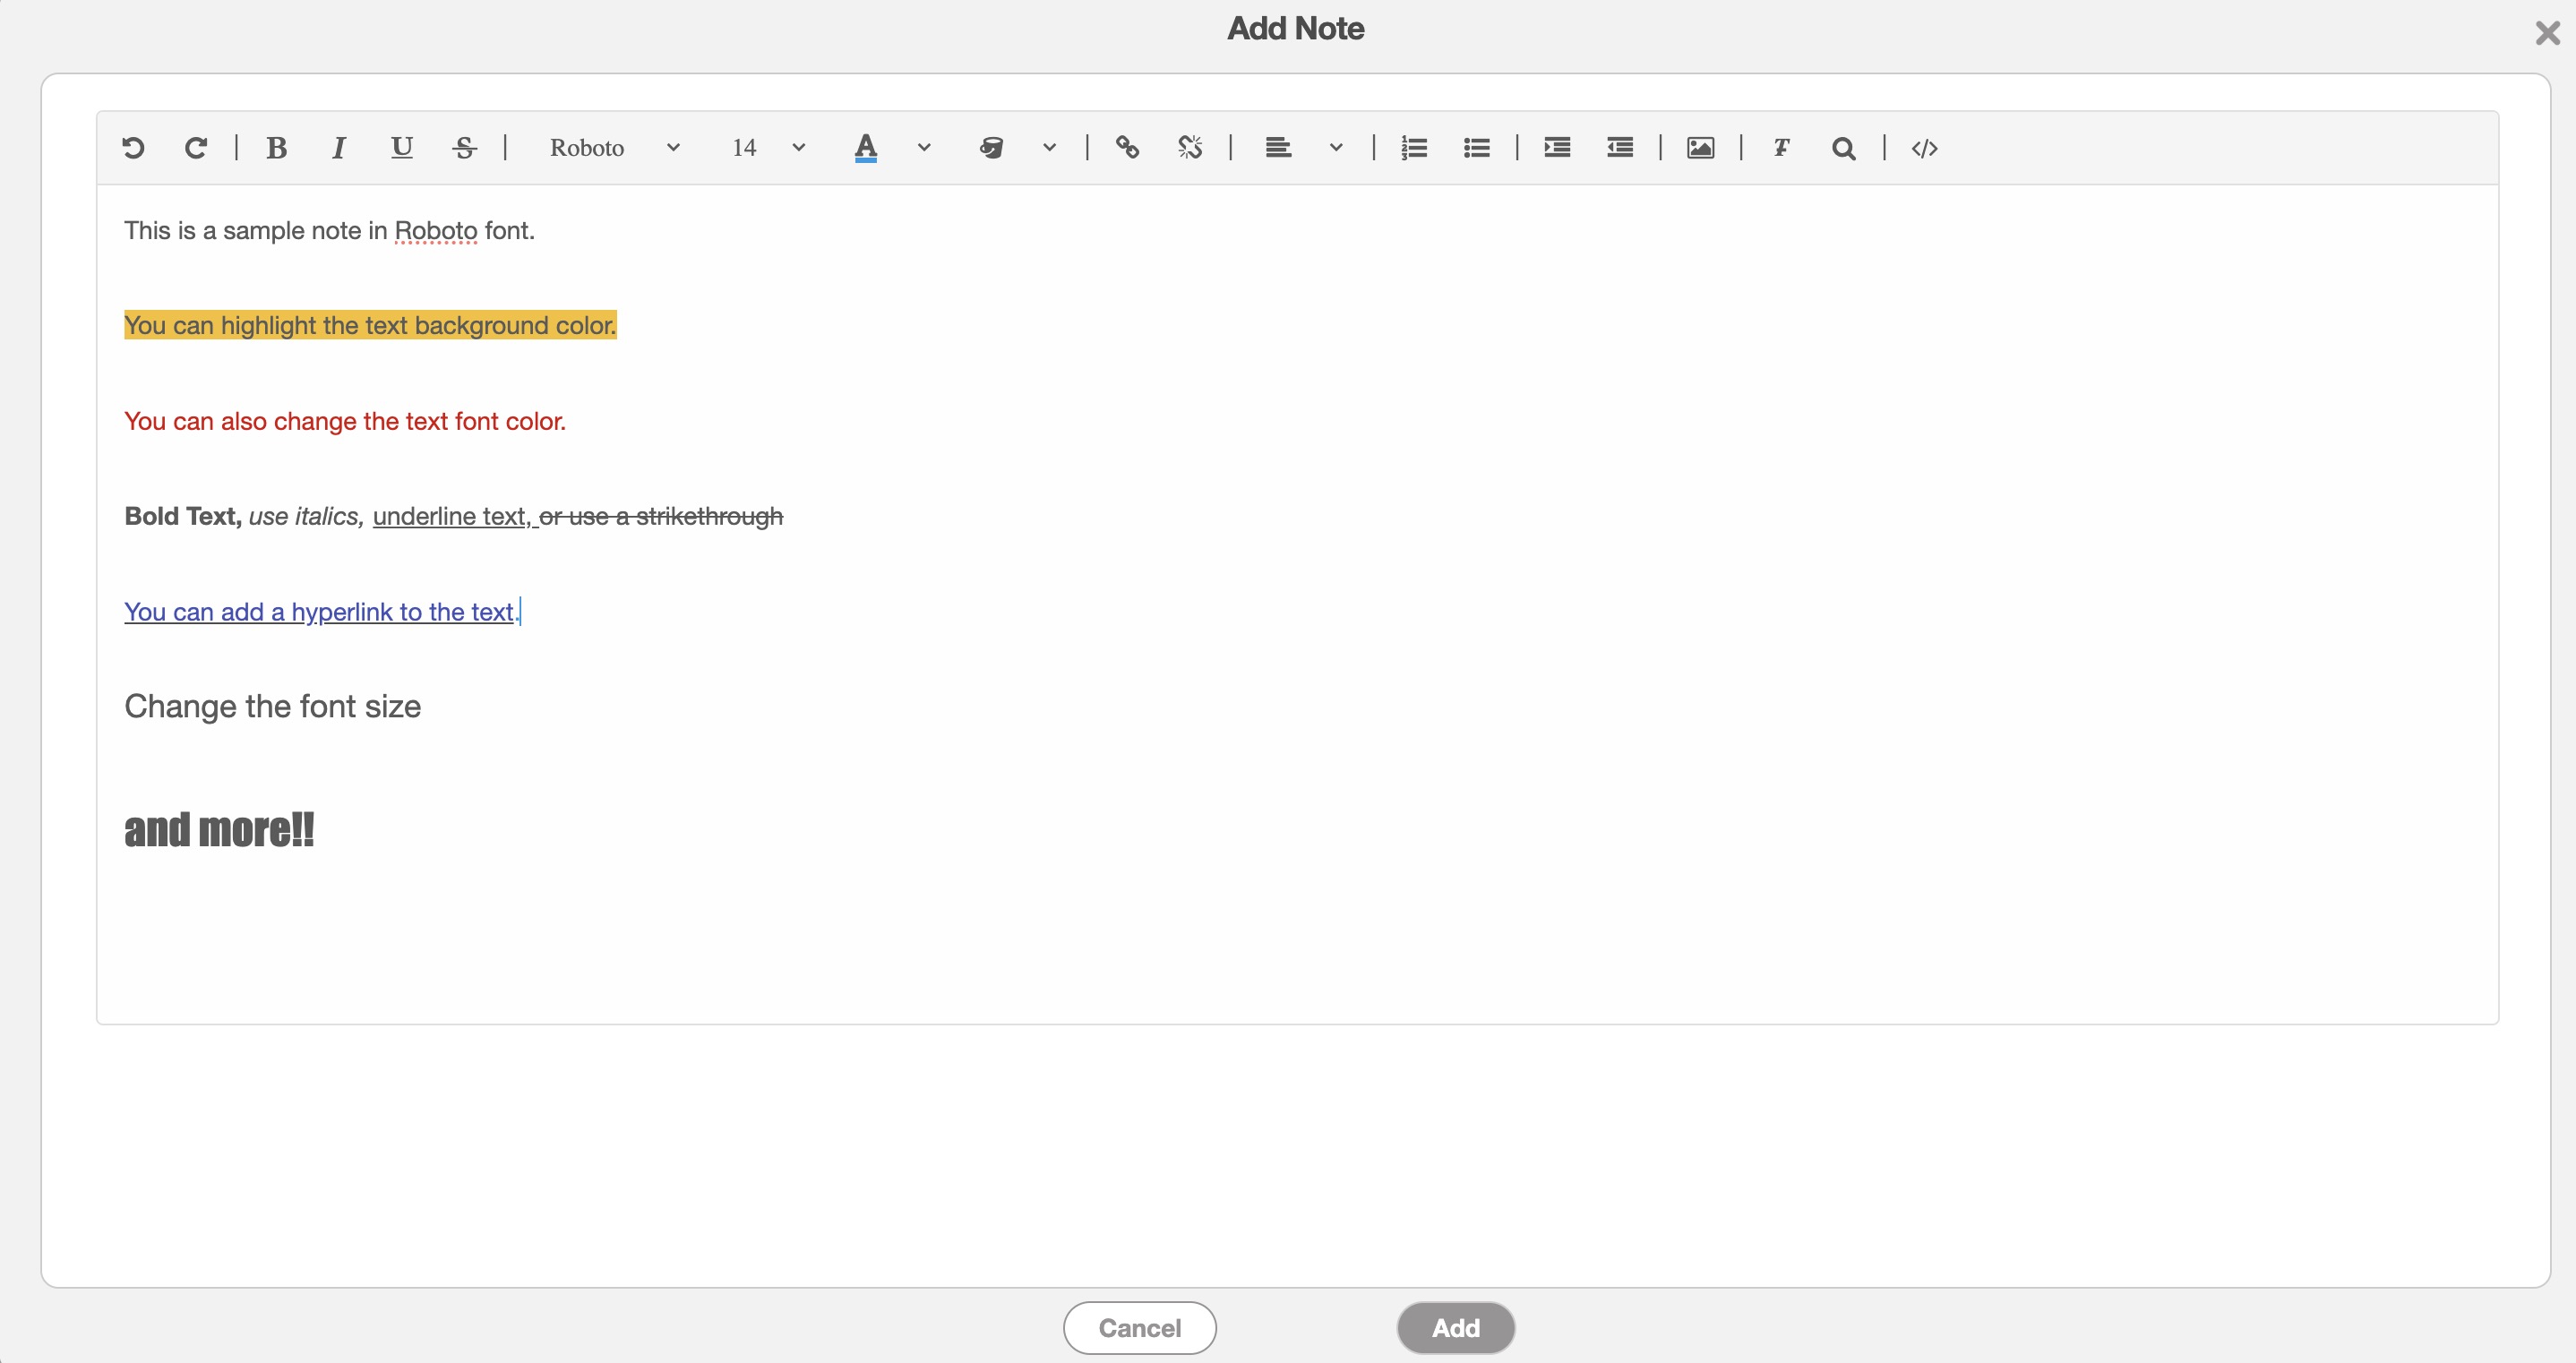
In this pop-up window, you will be able to format your text, insert hyperlinks, and more.
To edit or delete a note, return to the "Notes" panel and click the Individual Actions button. From the drop-down, you can then select the "Edit" or "Delete" option to either update or remove the note.
Terms & Conditions
The Terms and Conditions section for invoices, will allow you to create a template that will input specified terminology and phrases for the selected invoice. For more information about creating terms & conditions, and adding them to the invoice, please see the Invoice Terms & Conditions section.
Total & Balance
The "Total & Balance" panel will contain the subtotal, sales tax, any payments applied to the recurrent invoice, the overall discounts, and markups, and more. The complete list of terms found in the "Total & Balance" panel are defined below:
| Name: | Description: |
|---|---|
| "Subtotal" | Represents the subtotal of the invoice, before the calculation of any discounts or markups. |
| "Taxable (Subtotal)" | The subtotal amount of the recurrent invoice that is subject to taxes. |
| "Sales Tax" | The sales tax being calculated by the invoice. |
| "Total" | The total amount of the individual part or service which calculates the price, quantity, and discount. The total amount of the invoice (including overall discounts and markups) can be located in the "Total & Balance" panel. |
| "Payment" | The payment amount applied to the invoice. |
| "Balance" | The remaining balance of the invoice after any payments have been applied. If no payments have been made on the invoice, the "Balance" will show the total amount. |
| "Cost" | The total cost incurred by your company when procuring the part or product. |
| "Profit" | The financial gain obtained from the invoice after subtracting all associated costs. |
The data in the "Total & Balance" panel is automatically calculated from the parts, services, overall markups, discounts etc. that are listed on the recurrent invoice.
The "Invoices" tab displays all scheduled invoices associated with the recurrent invoice, with the next upcoming invoice listed at the top and the most recently generated one at the bottom:
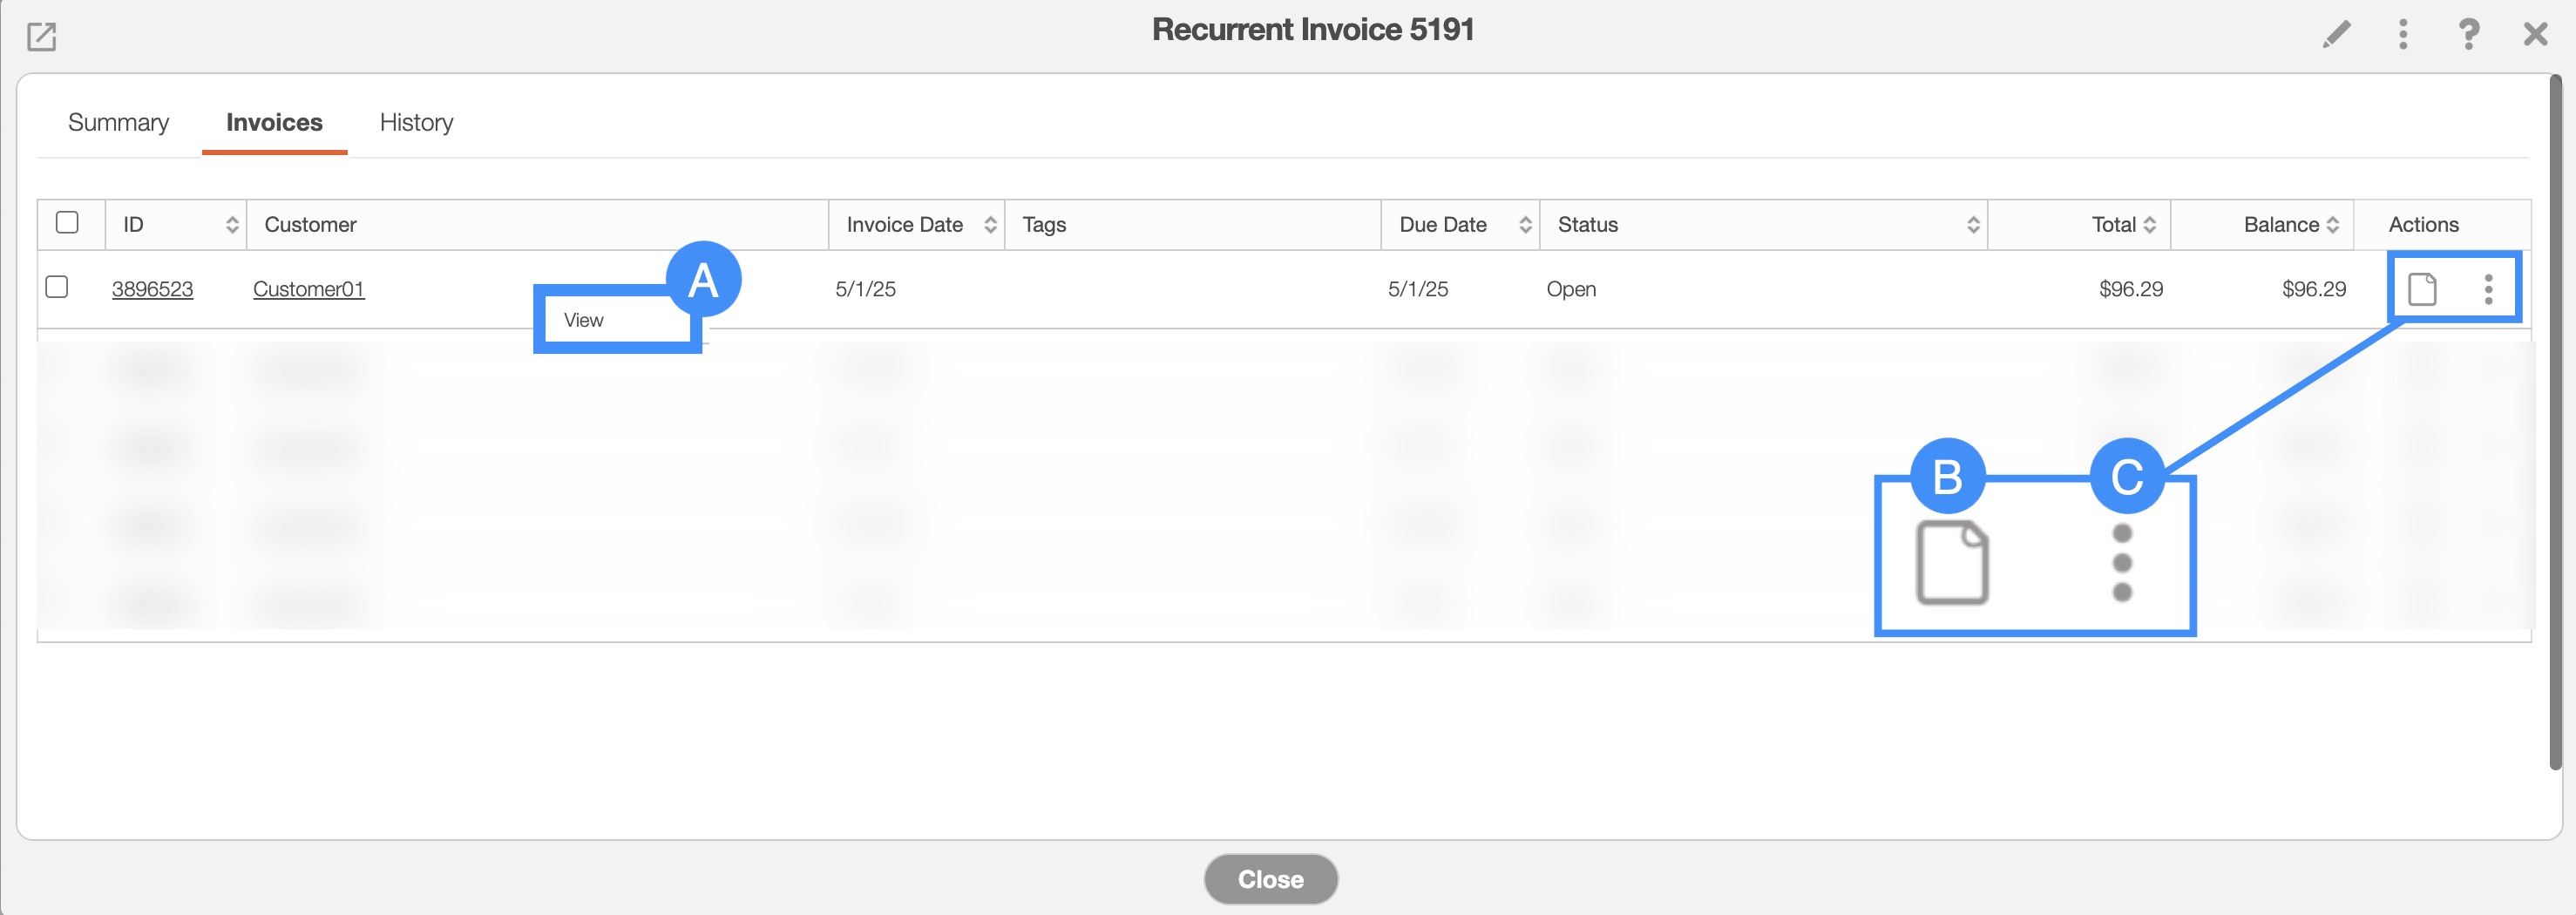
From this tab, you will be able to perform the following actions:
By right-clicking you will bring up the right-click actions. These actions are identical to the Individual Actions and will allow you to view the invoice.
The View icon will open the View Invoice pop-up window.
The Individual Actions (the three dots next to the View icon) are identical to the right-click actions and will allow you to view the invoice.
The complete list of terms found in the "Total & Balance" panel are defined below:
| Name: | Description: |
|---|---|
| "ID" | The identification number assigned to an invoice for tracking and reference purposes. |
| "Customer" | The customer profile associated with the invoice. |
| "Invoice Date" | The invoice date is the date that the invoice was invoiced. |
| "Tags" | Tags act as a visual indicator of a custom status or category, thus improving organizational clarity with the ability to identify specified tagged invoices at a glance. These tags can be added from the "Invoice Terms" panel on the "Summary" tab. |
| "Due Date" | The date that the invoice payment is due from the customer. |
| "Status" | The status of the invoice that indicates which stage the invoice currently is in (i.e., "Open," "Checked Out," "Service Completed," "Customer Invoiced," "Paid," and "Cancelled". For more information about the invoice status please see the View an Invoice page. |
| "Total" | The total amount of the individual part or service which calculates the price, quantity, and discount. The total amount of the invoice (including overall discounts and markups) can be located in the "Total & Balance" panel. |
| "Balance" | The remaining balance of the invoice after any payments have been applied. If no payments have been made on the invoice, the "Balance" will show the total amount. |
| "Actions" | The View icon and the Individual Actions button; either option will allow you to view the invoice. |
The "History" tab lists the historically recorded details of the recurrent invoice:
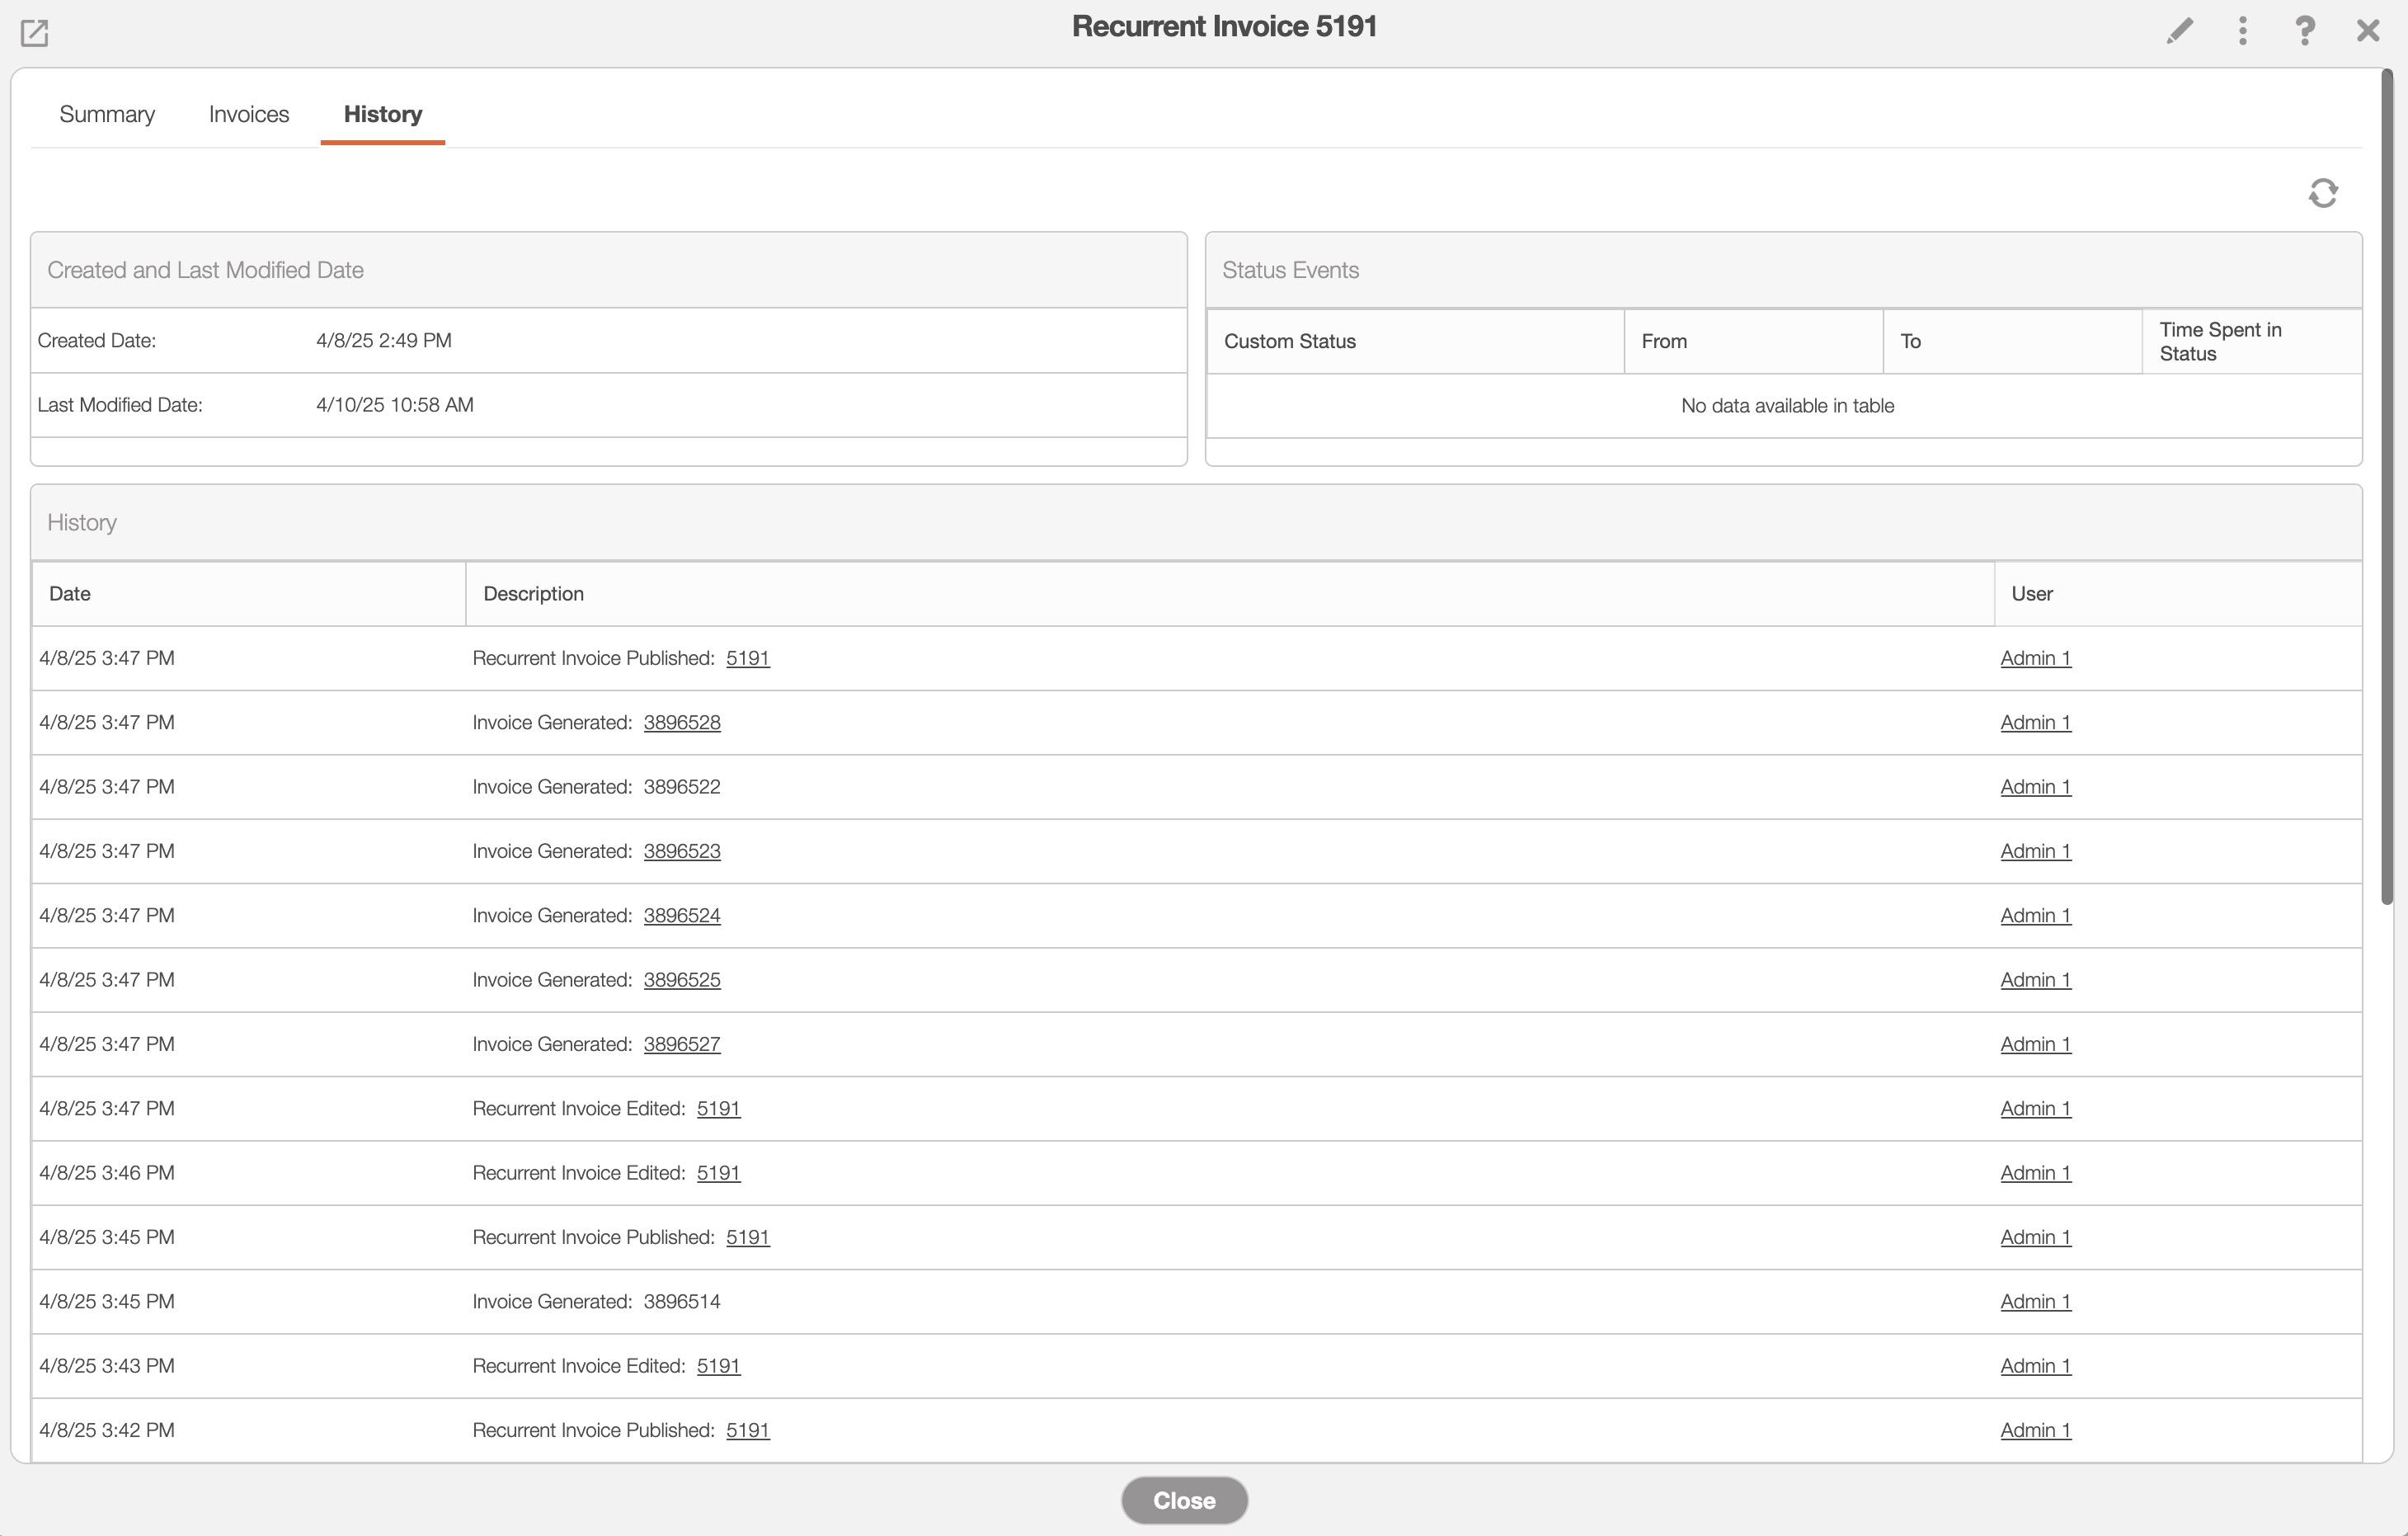
Created and Last Modified Date
The "Created and Last Modified Date" will list the date that the recurrent invoice was generated in the system as well as the date the invoice service information was last modified.
Status Events
The "Status Events" panel will list the duration that the recurrent invoice has been in a custom status.
History
The "History" panel will display the history details of the recurrent invoice, including when the recurrent invoice was last published and when invoices were generated.
All the terms from the "History" panel are defined below:
| Name: | Description: |
|---|---|
| "Date" | The date an activity occurred on the recurrent invoice. |
| "Description" | The description of the event. |
| "User" | The user who initiated the event. |