There are several ways you can edit a recurrent invoice within MobiWork. You can edit the recurrent invoice through the View Recurrent Invoice pop-up window, the View Recurrent Service pop-up window, and through the Recurrent Invoice feature page. The subsections listed below will highlight how to edit the overall recurrent invoice details.
When editing a recurrent invoice you will also be able to update the generation frequency, the line items, and more. The corresponding sections will delve into more detail concerning how to update each of these aspects of the recurrent invoice.
From the Recurrent Invoice Drop-Down
The most direct way to update a recurrent invoice is through the Recurrent Invoice feature page. For more information on how to access this page, please see the Recurrent Invoice section for more information. Once, you are on the Recurrent Invoice feature page, there are several different ways you can edit a recurrent invoice:
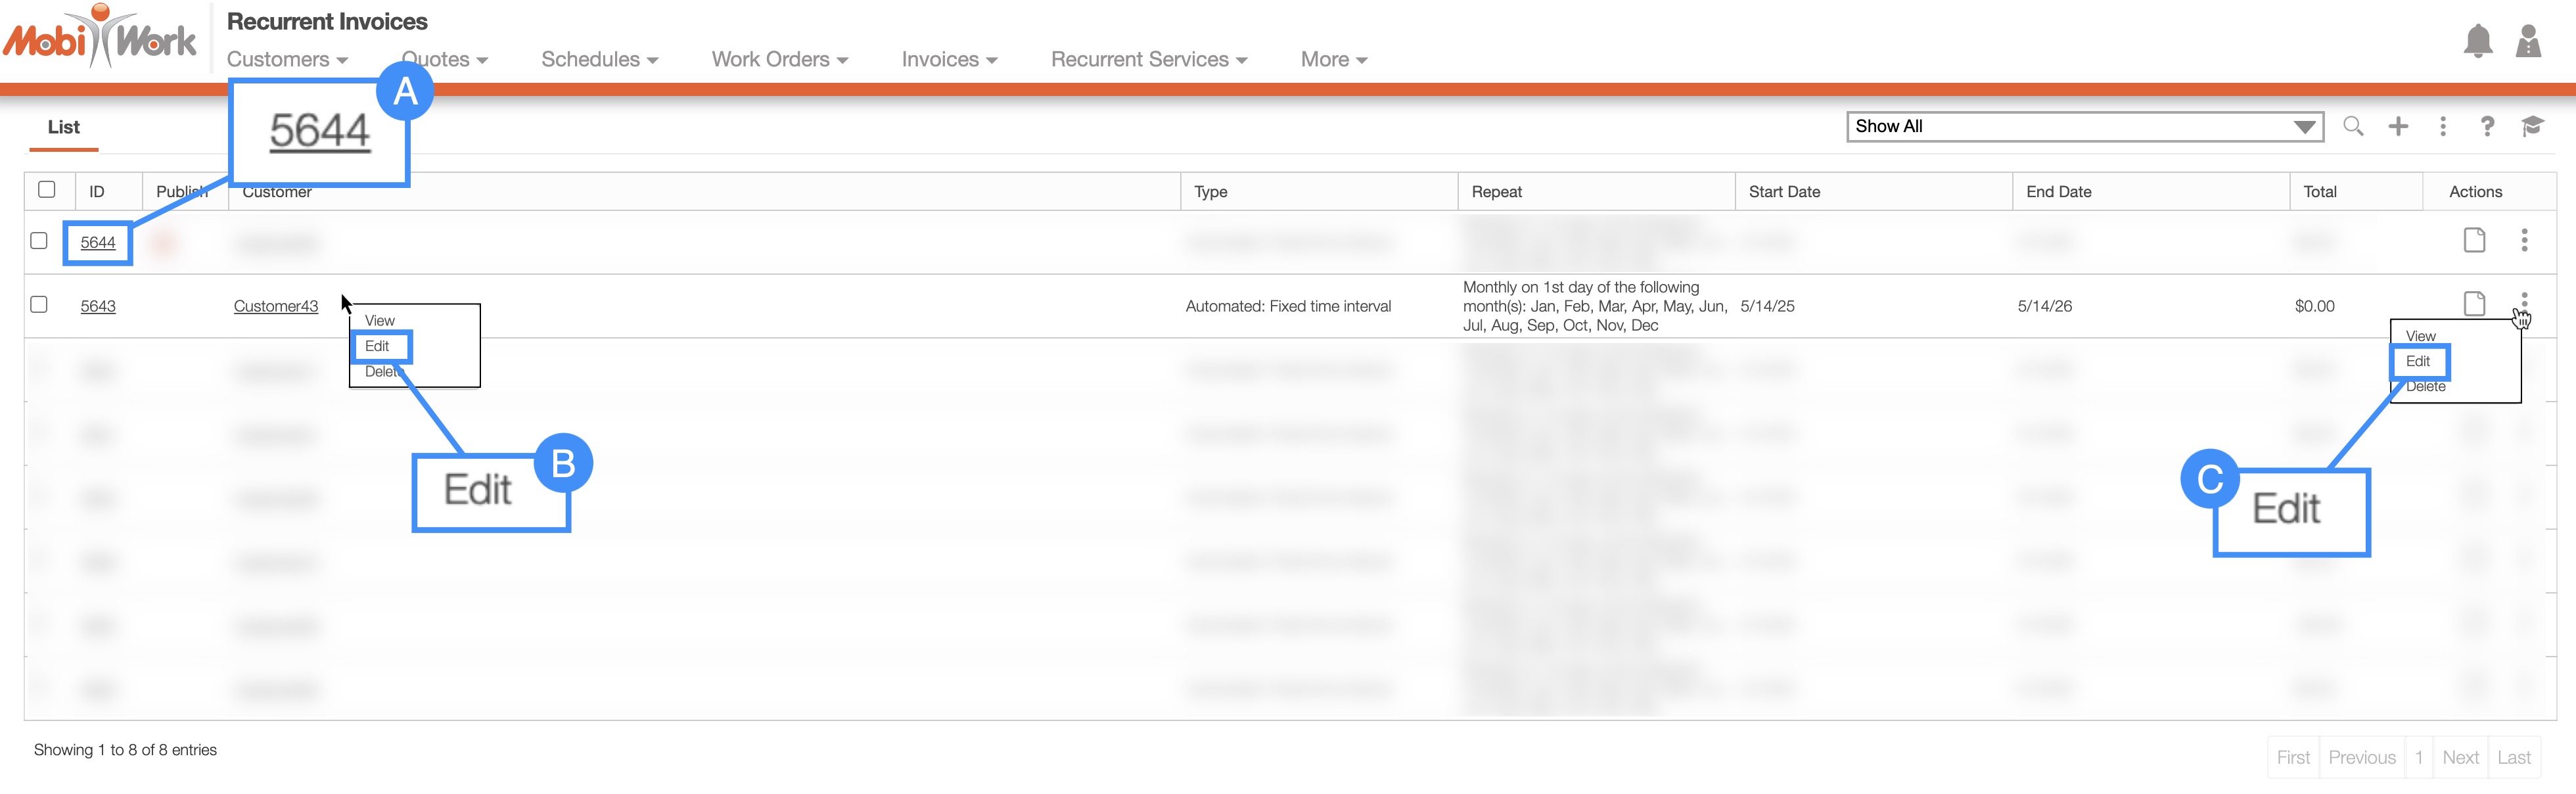
- Click on the Recurrent Invoice ID to open the Recurrent Invoice pop-up window. Then click on the Individual Actions button and from the drop-down select either the Pencil icon or the "Edit" option:
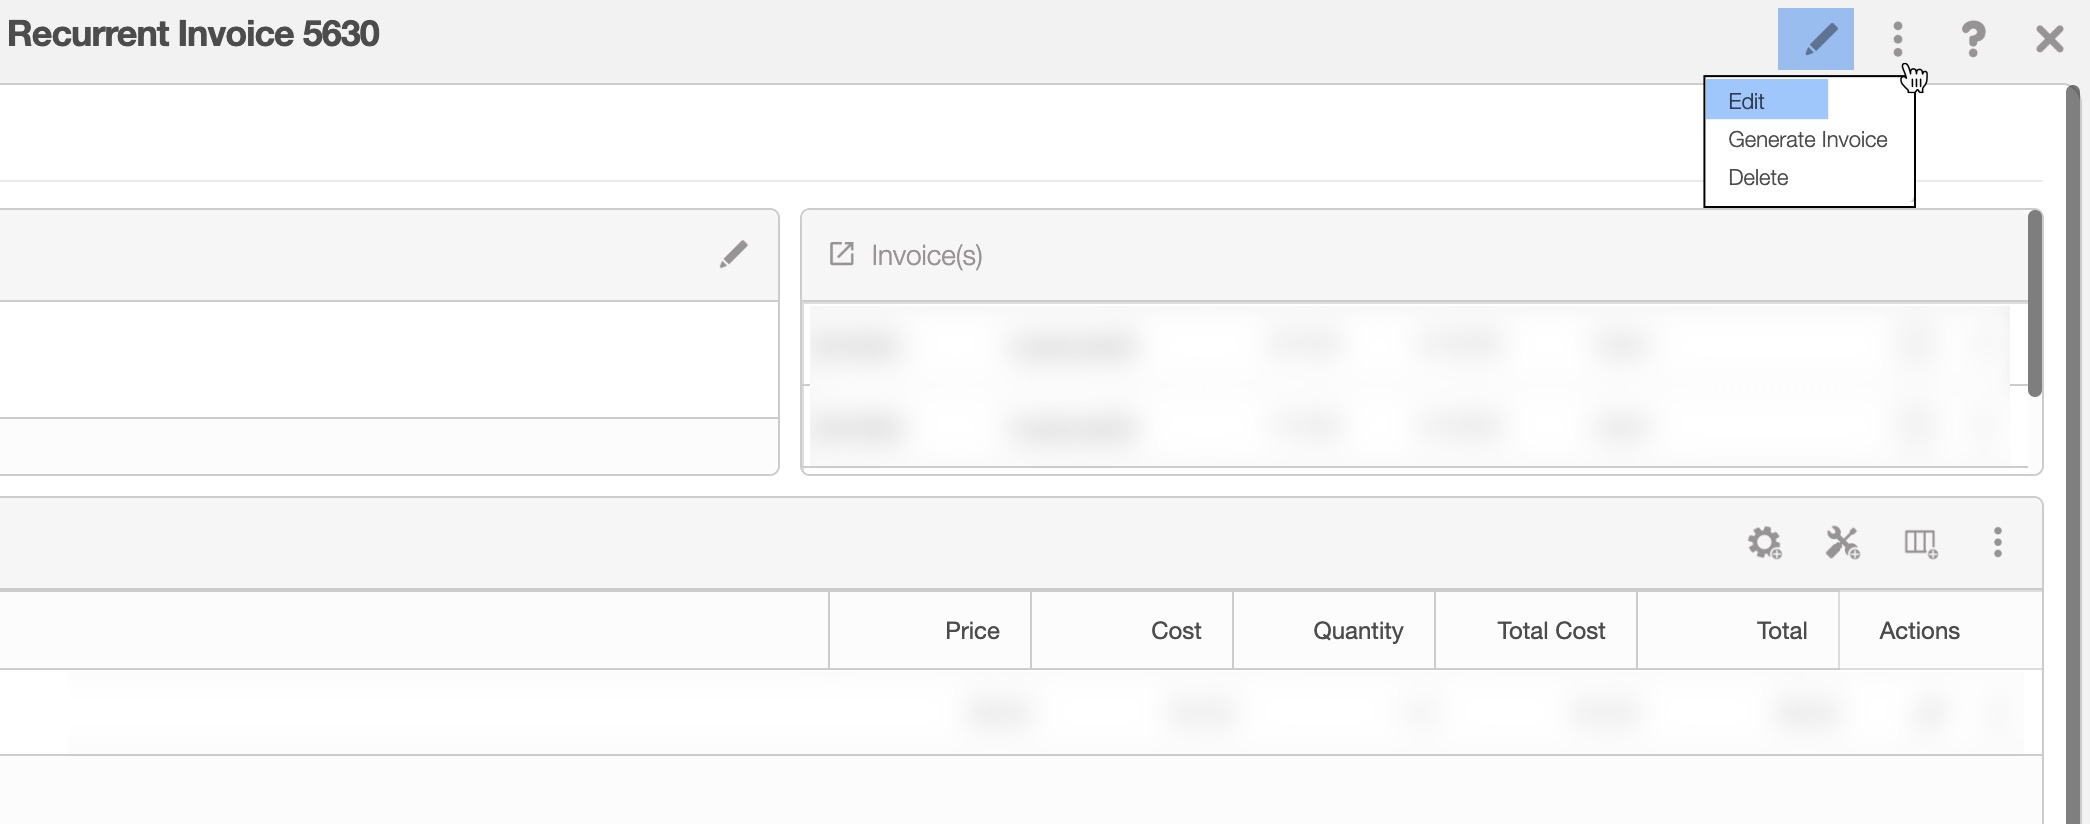
- In the upper right-corner of the View Recurrent Invoice pop-up window, you will see the Individual Actions button. From the drop-down you can select the "Edit" option. You can also click directly on the Pencil icon to edit the recurrent invoice:
- You can also acccess the Recurrent Invoice pop-up window by clicking on the Pencil icon from the "Summary" or "Invoice Generation" panels:
- Please note that there are several ways that you can access the Recurrent Invoice pop-up window. Please see the View Recurrent Invoice page for the different ways that you can open the Recurrent Invoice pop-up window.
Right-click on a recurrent invoice to open the right-click drop-down and select the "Edit" option. (The options that are displayed when you right-click on a recurrent invoice are also available when you select the Individual Actions button.)
Click on the Individual Actions button (the three vertical dots) from the "Actions" column and select the "Edit" option. (The options that are displayed from the Individual Actions button are the same as when you right-click on a recurrent invoice.)
From the Recurrent Invoice List
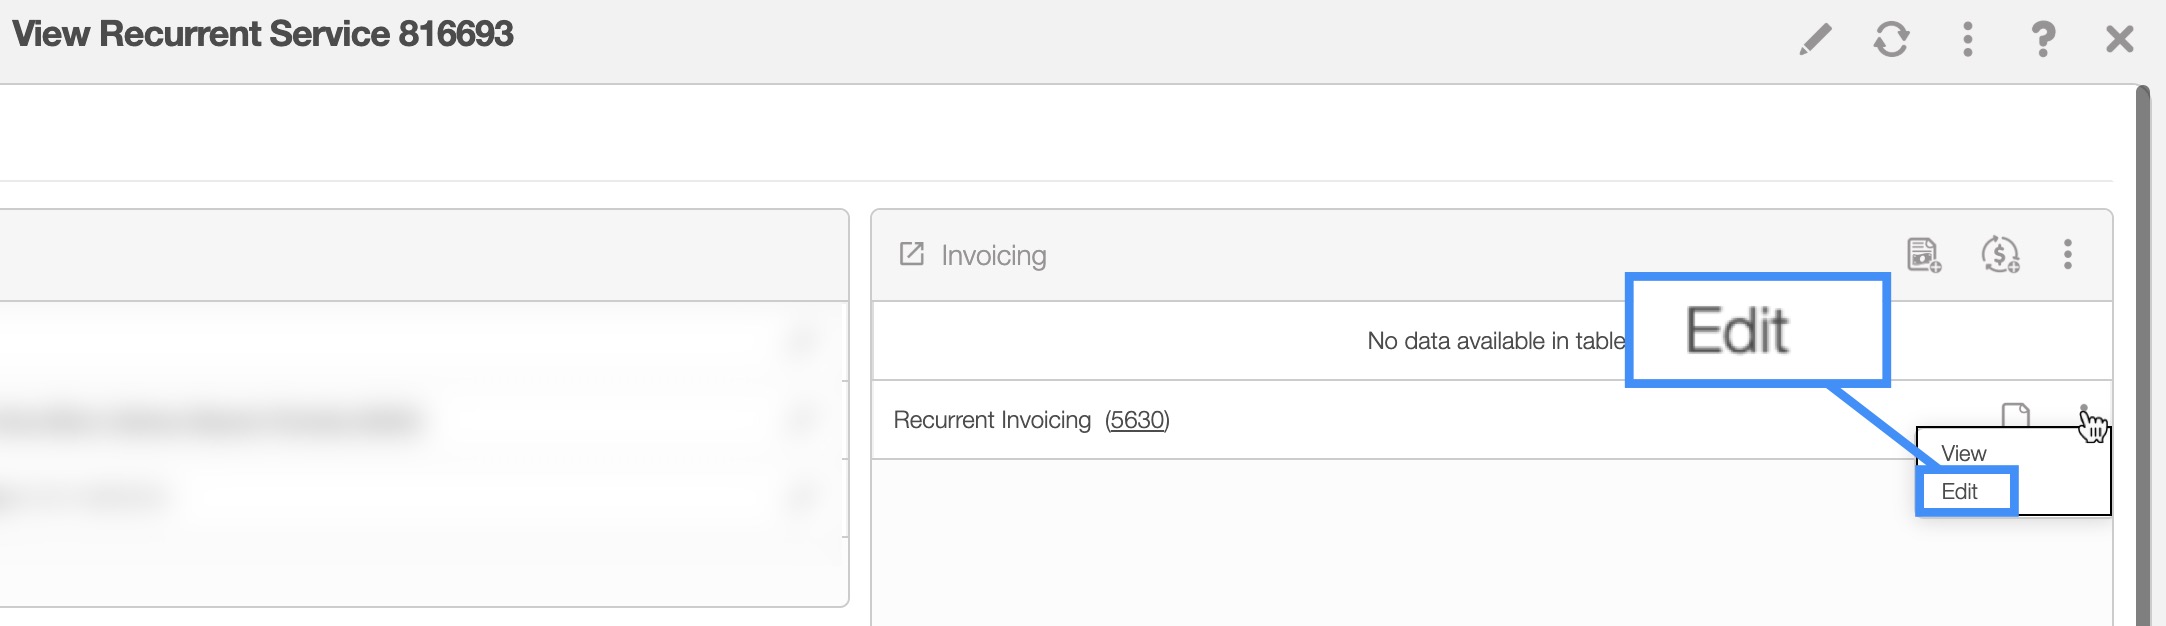
You can also edit a recurrent invoice from the View Recurrent Service pop-up window's "Invoicing" panel. Click on the Individual Actions button of the desired recurrent invoice, and from the drop-down select the "Edit" option:
As outlined in the How to Access the Page subsection above, there are several different ways you can access the Edit Recurrent Invoice pop-up window. This pop-up window allows you to modify the terms of the recurrent invoice. Once the Edit Recurrent Invoice pop-up window appears, update the fields that you would like to change for the selected recurrent invoice.
If you need to update the recurrent invoice line item details, please refer to the Edit Line Items section for further details or if you need to update the billing information, please see the Edit the Billing Address section.
When you are finished updating the selected fields, click on the Save button:
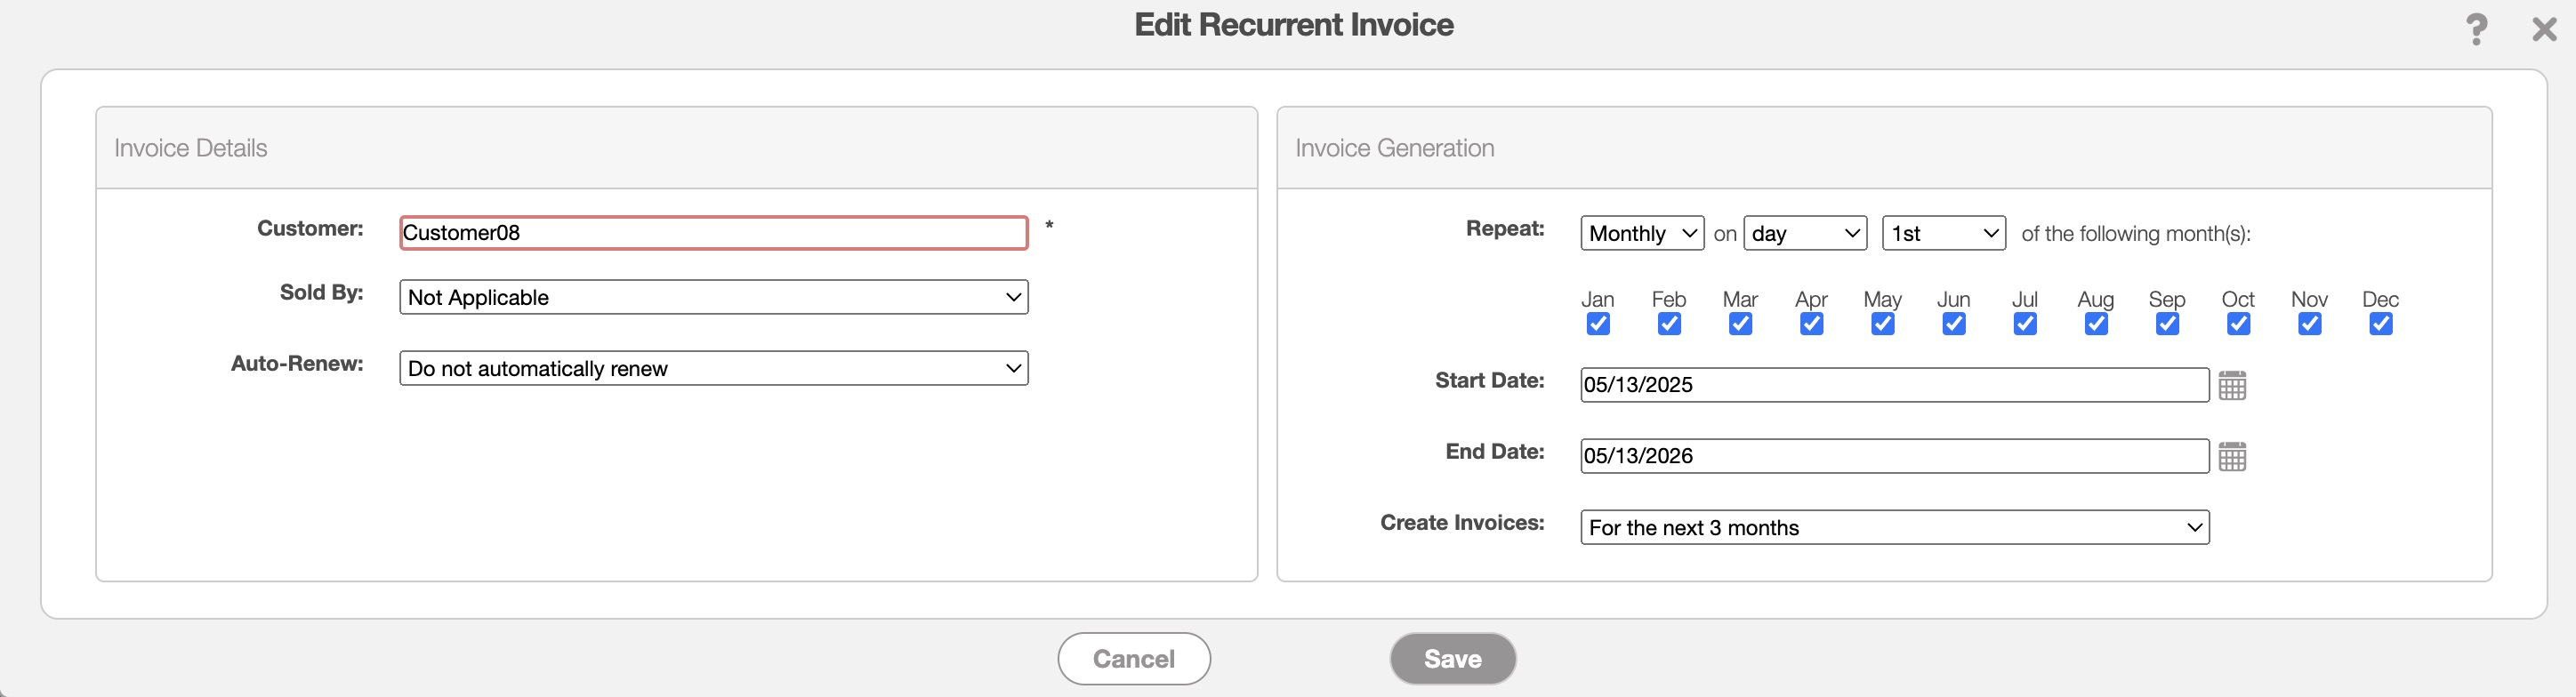
| Name: | Description: |
|---|---|
| "Customer" | The customer associated with the recurrent invoice. |
| "Sold By" | The user assigned to the recurrent invoice who will earn the commission. |
| "Auto-Renew" | The auto-renewal date, which updates the end by date of the recurrent invoice. Depending on the setting selected, you can extend the end by date of the recurrent invoice so that once it reaches the specified date it will renew. You will be able to select the following options: to not have the recurrent invoice automatically renew, have it automatically renew for six months, a year, or two years. |
| "Repeat" | Specifies the interval in days, weeks, or months at which the recurrent invoice is scheduled to repeat. |
| "Start Date" | The date that the recurrent invoice is set to begin. |
| "End Date" | The date that the recurrent invoice is set to end. |
| "Create Invoices" | Sets the frequency at which invoices are automatically generated. |
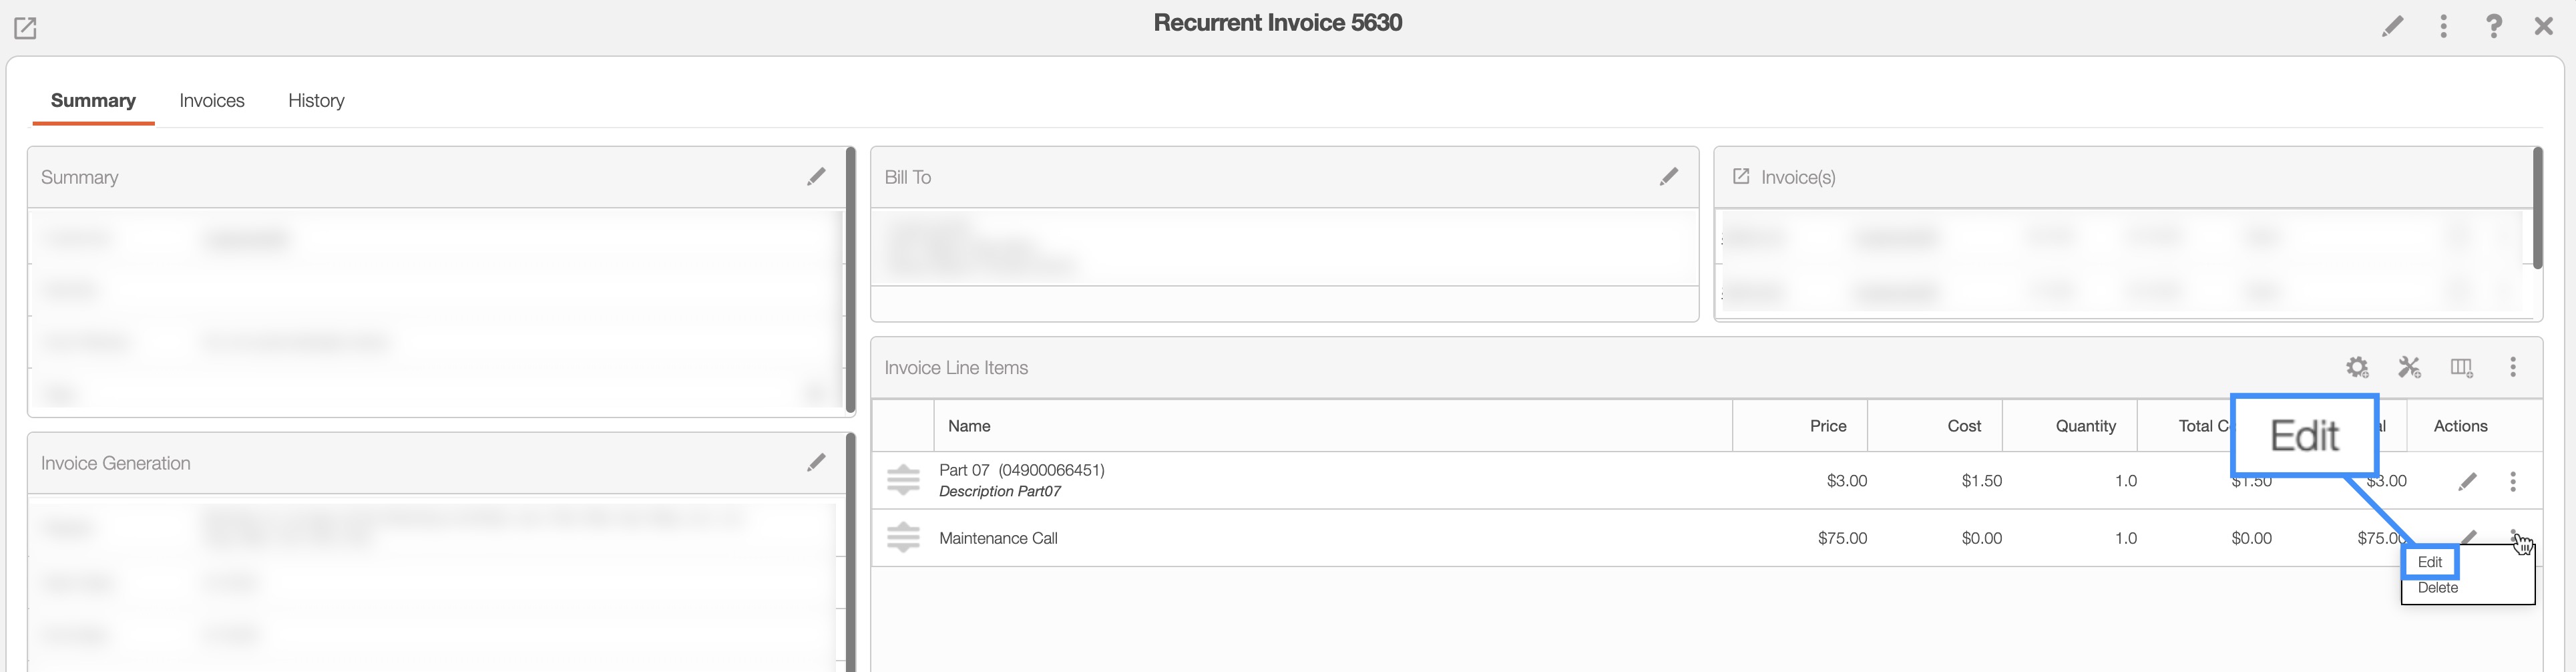
You will be able to edit the parts, services, and sections listed in the recurrent invoice's line items. The following subsections will illustrate how to edit these different line item entries.
Edit Part
In the "Line Items" panel click on the selected part's Individual Actions. From the Individual Actions' drop-down menu that appears, select the "Edit" option. You can also click on the Pencil icon:
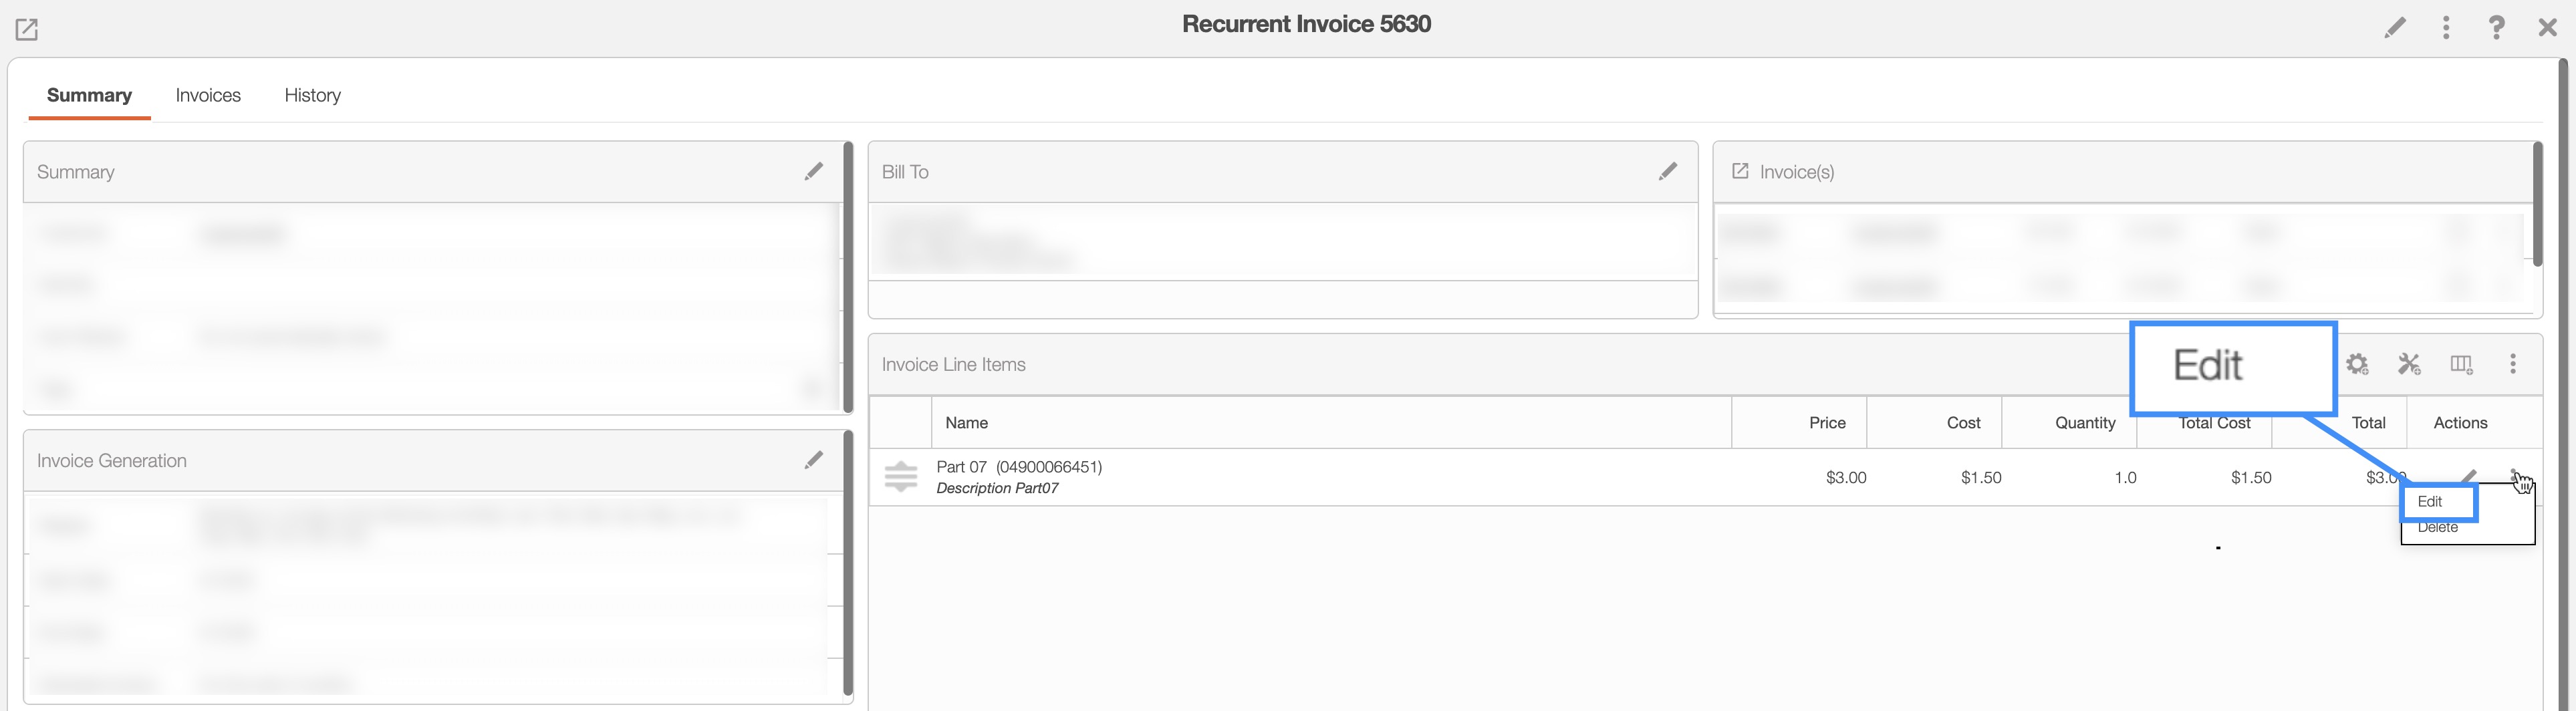
Once you click on the "Edit" option or the Pencil icon, the Edit Part pop-up window will appear:
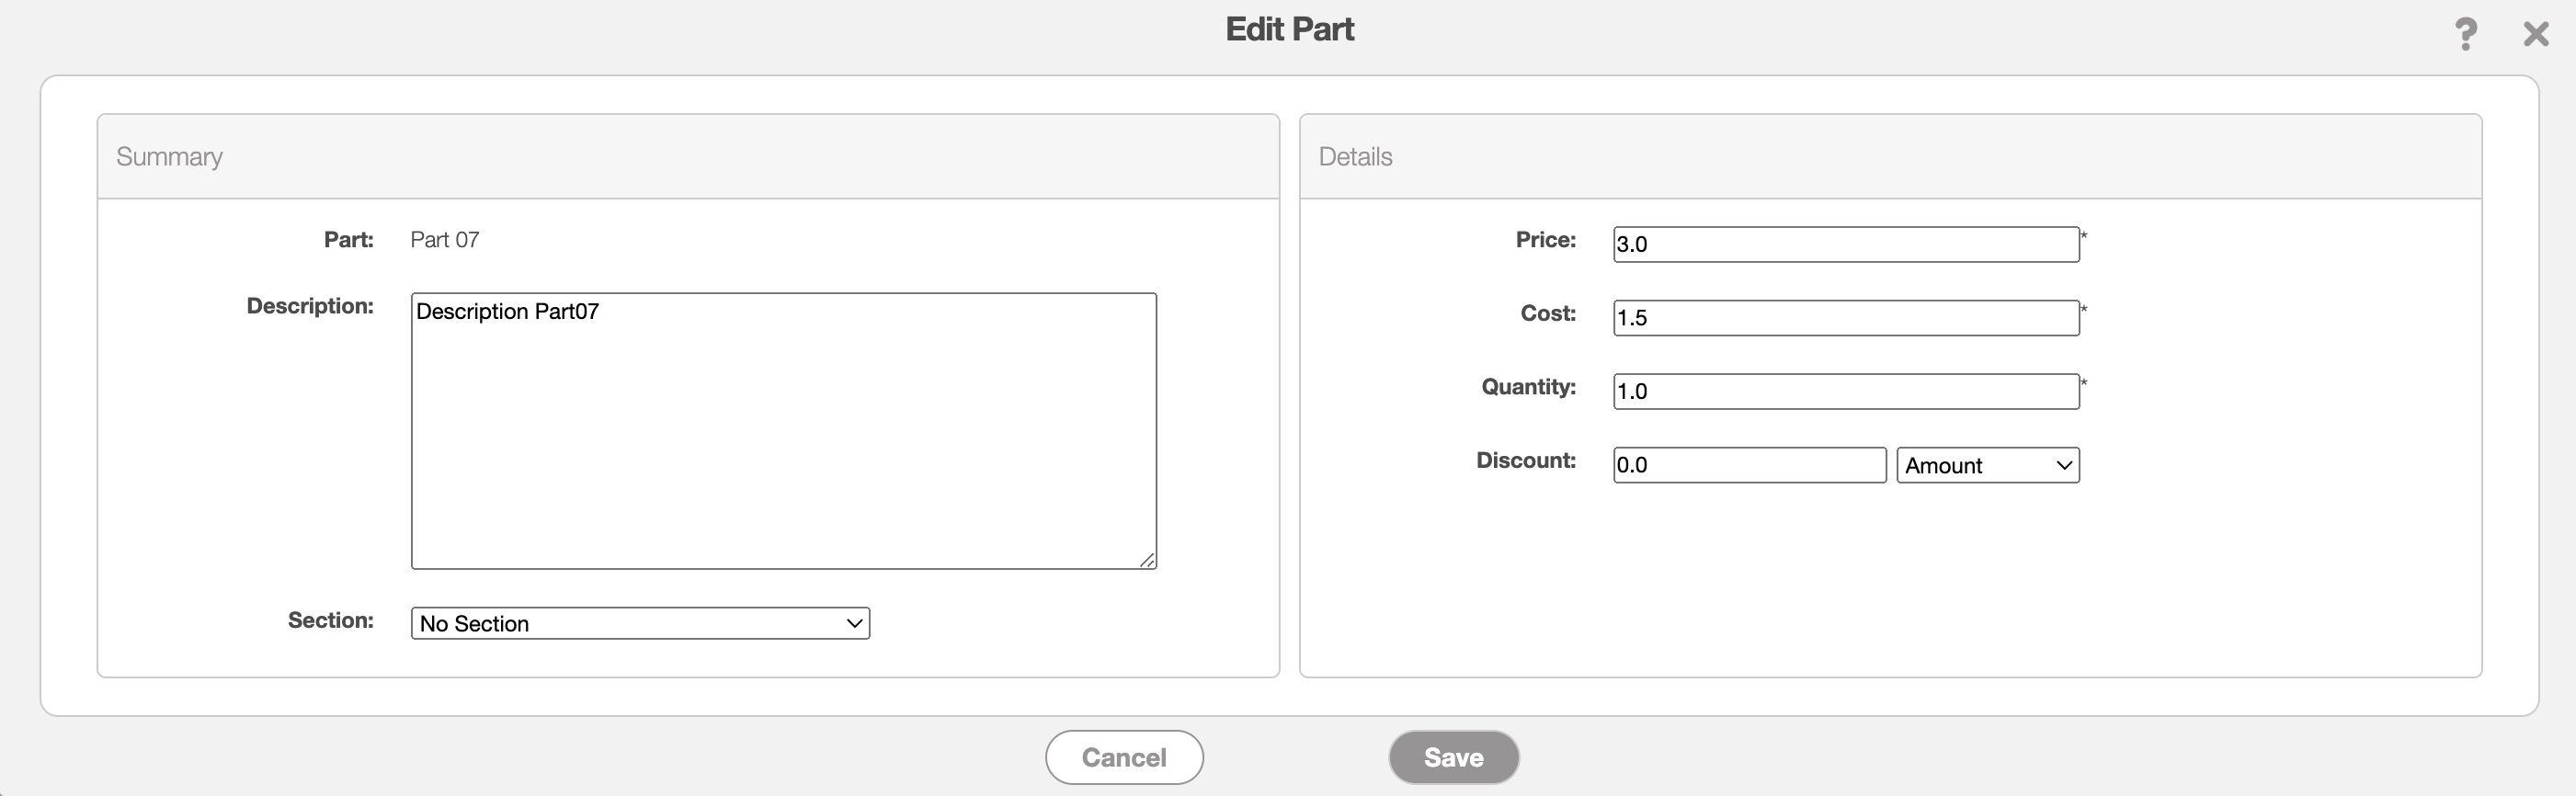
In this pop-up window you can edit the following details:
Description- You can edit the description of the part or product. This field is optional.
Price and Cost- These fields will be automatically filled based on the saved data you have in your parts catalog; however, you can directly edit the price and cost. For more information about your parts catalog, please see the Parts List (Catalog) page.
Quantity- Specify the quantity of the part or product needed for the invoice.
Discount- If applicable, you can edit the individual discount for the selected part.
Service Completed Date- Signifies the date on which the work order was completed. Please note that this date will not update automatically upon closing the work order and will need to be updated in this pop-up window.
Section- You can also move the part to a specific section for better organization of the invoice line items.
Edit Service
In the "Line Items" panel click on the selected service's Individual Actions. From the Individual Actions' drop-down menu that appears, select the "Edit" option. You can also click on the Pencil icon:
Once you click on the "Edit" option or the Pencil icon, the Edit Service pop-up window will appear:
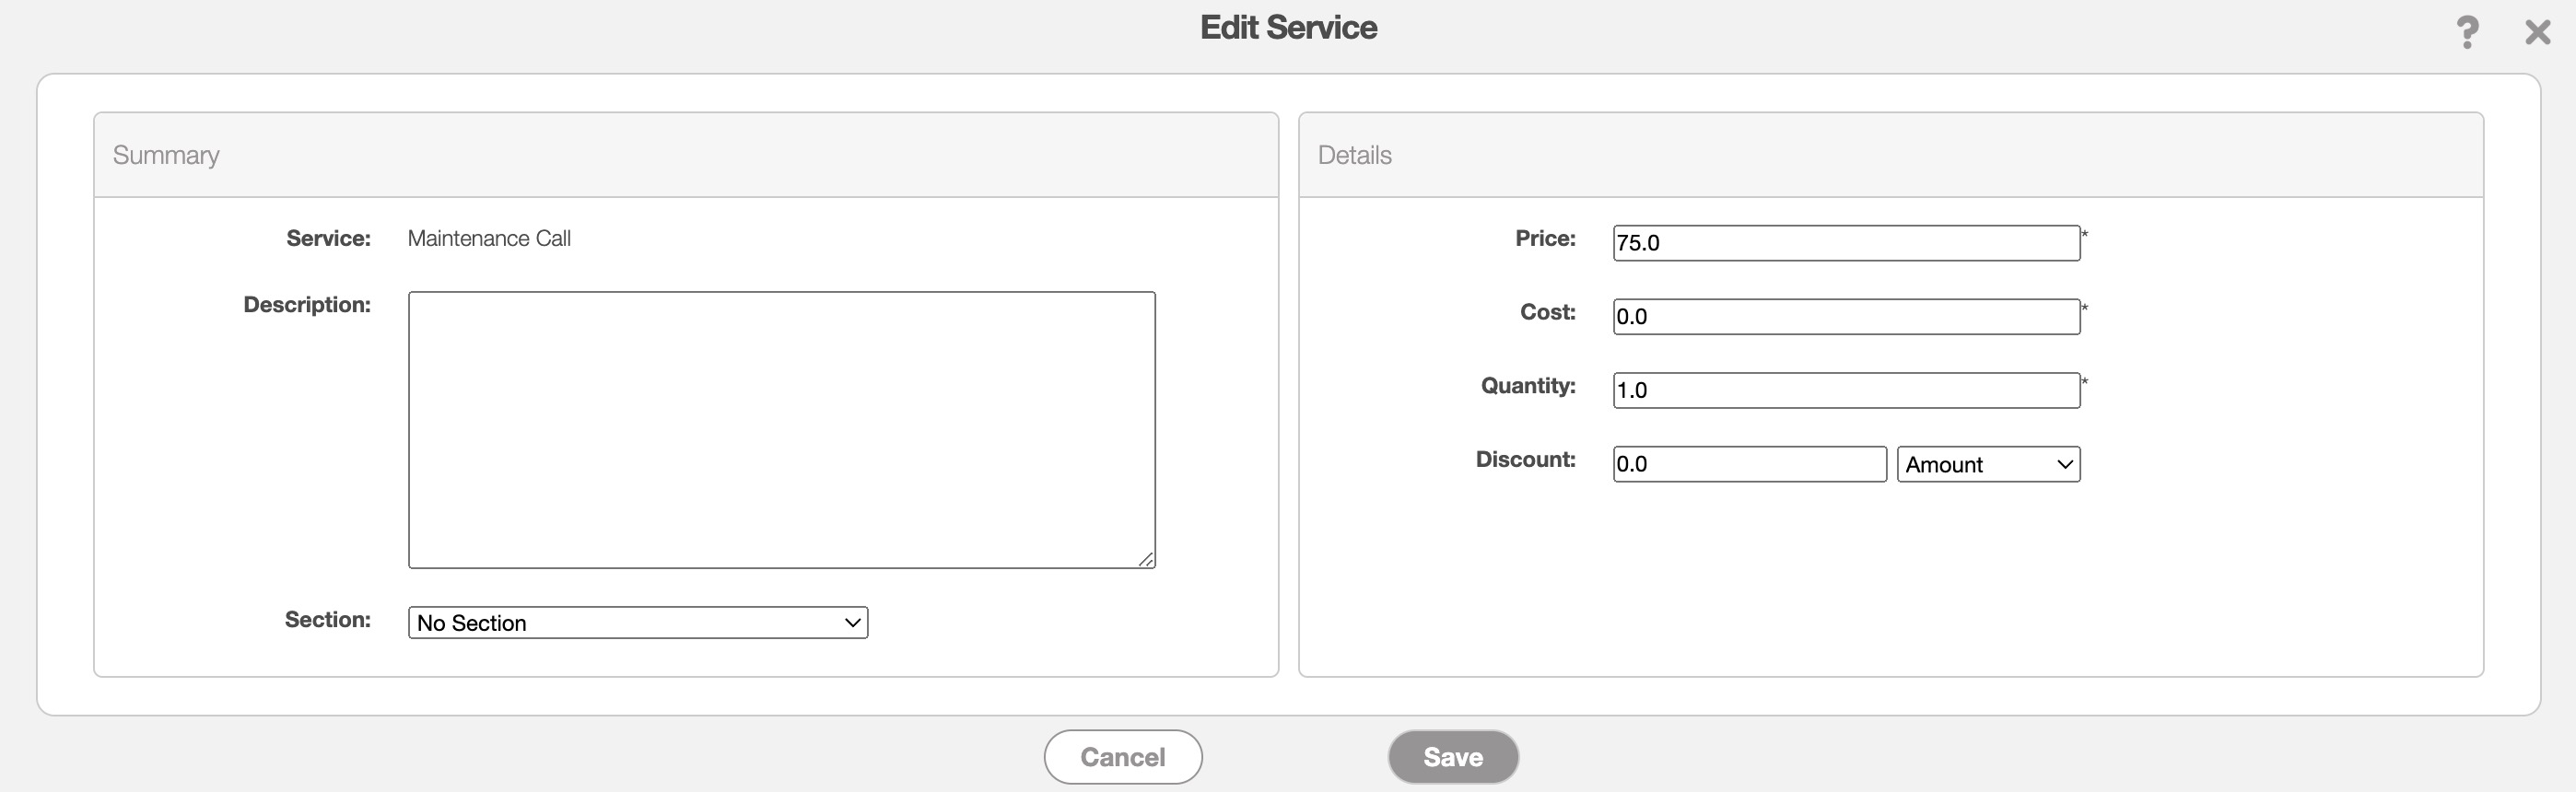
In this pop-up window you can edit the following details:
Description- You can edit the description of the service. This field is optional.
Price and Cost- These fields will be automatically filled based on the saved data you have in your services catalog; however, you can directly edit the price and cost. For more information about your services catalog, please see the Services Catalog (list) page.
Quantity- Specify the hours worked by the user for the service indicated.
Discount- If applicable, you can edit the individual discount for the selected service.
Service Completed Date- Signifies the date on which the work order was completed. Please note that this date will not update automatically upon closing the work order and will need to be updated in this pop-up window.
Section- You can also move the service to a specific section for better organization of the invoice line items.
Edit Section
In the "Line Items" panel click on the selected section's Individual Actions. From the Individual Actions' drop-down menu that appears, select the "Edit" option.
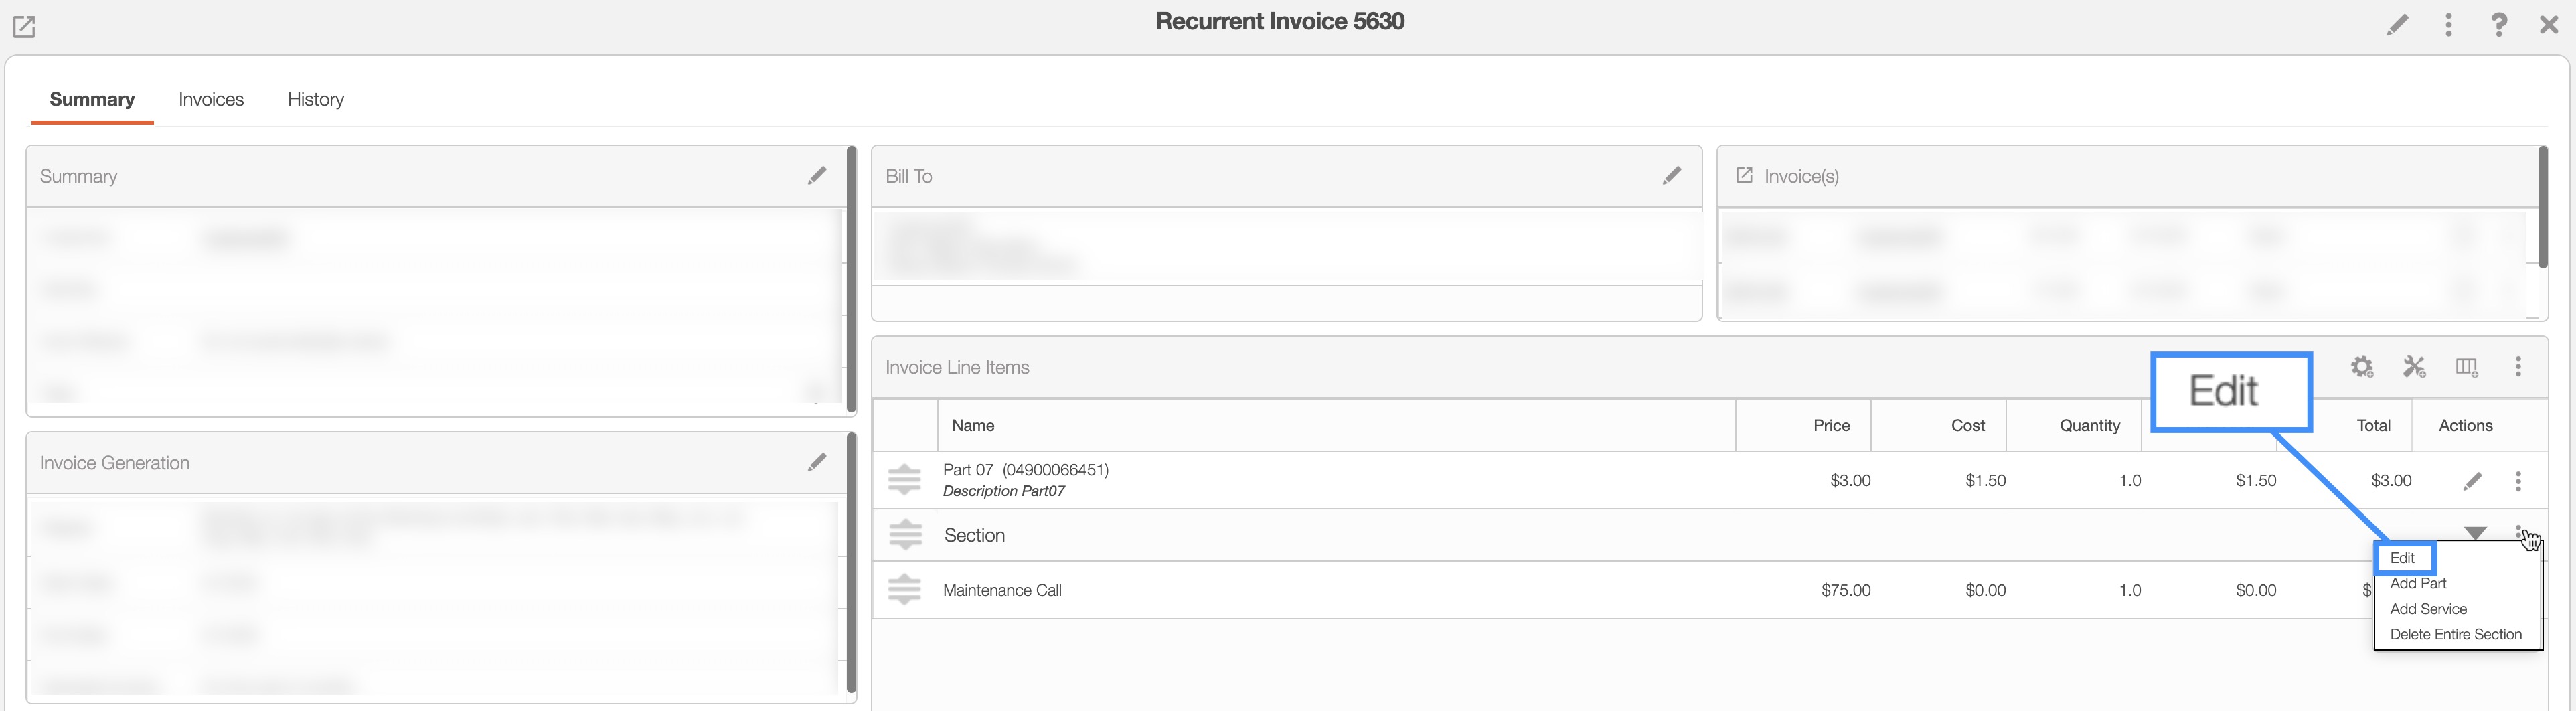
Once you click on the "Edit" option, the Edit Section pop-up window will appear:
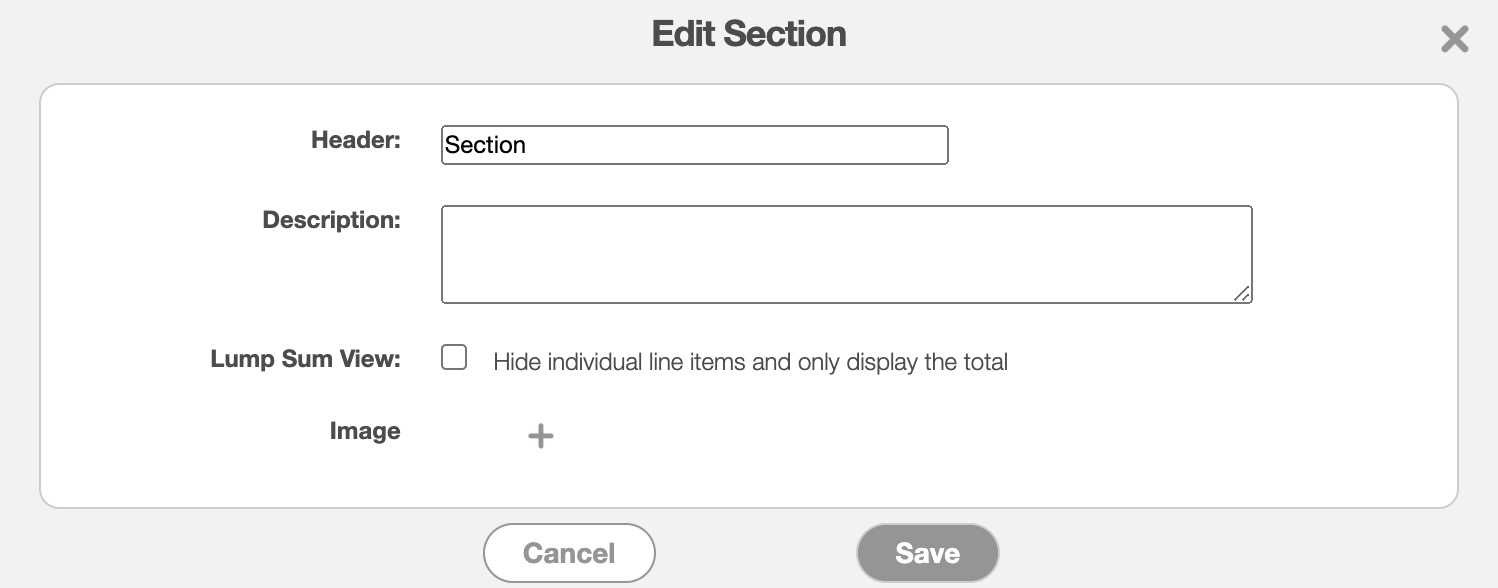
In this pop-up window you can edit the following details:
Header- You can edit the name of the section.
Description- You can edit the description of the section.
Lump Sum View- You can choose to uncheck or check the "Lump Sum View" option. By clicking on the lump sum view for the Edit Section pop-up window, you will be able to hide the individual line items for the items listed in the specified section. This option is different from the "Lump Sum View" checkbox in the Add Recurrent Invoice pop-up window and the Edit Recurrent Invoice pop-up window; this lump sum view will apply to the entire recurrent invoice.
Image- Allows you to upload a small image for the section.
You can move the parts or services to a specified section through the Edit Part or Edit Service pop-up window and selecting the desired section from the "Section" drop-down.
Note: Please note that you cannot edit an overall discount or markup. If you would like to replace a specific discount or markup, you will first need to delete the selected discount or markup and then add the desired discount or markup. For more information on adding or deleting discounts and markups, please see the Add a Recurrent Invoice and Delete a Recurrent Invoice pages.
If you would like to only edit the billing address or billing details of a recurrent invoice, you will be able to do so through the View Recurrent Invoice pop-up window. To see how to access this pop-up window, please see the View a Recurrent Invoice page.
In the "Bill To" panel, click on the Pencil icon:

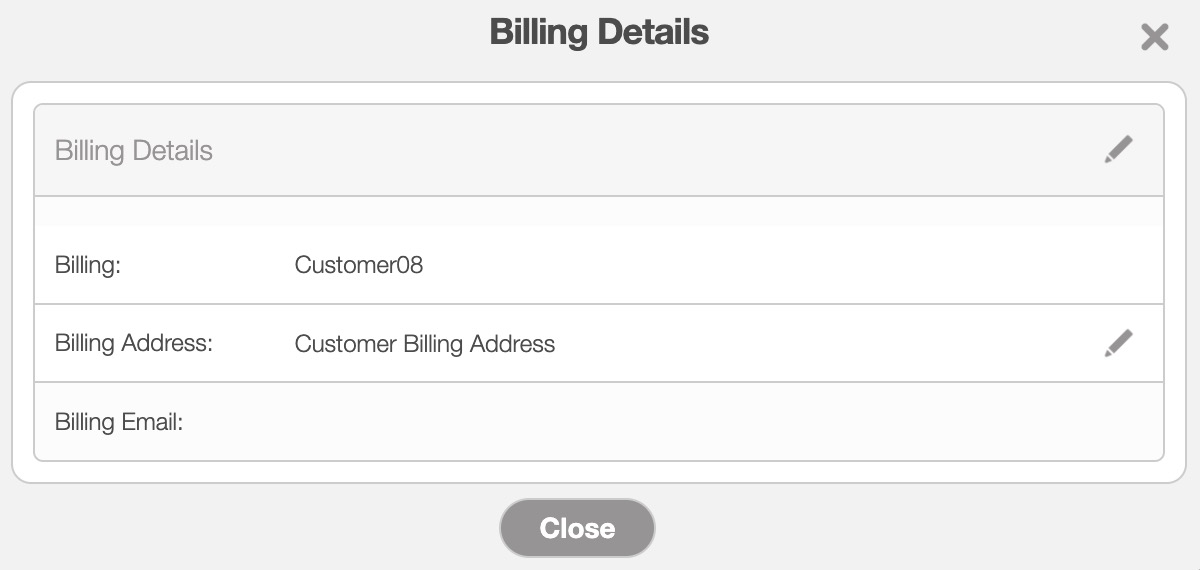
The Billing Details pop-up window will then appear. In this pop-up window, you will be able to update the billing address or billing details of the recurrent invoice:
Send Bill to
To update which individual recieves the bill of the recurrent invoice, click on the Pencil icon in the "Billing Details" column:
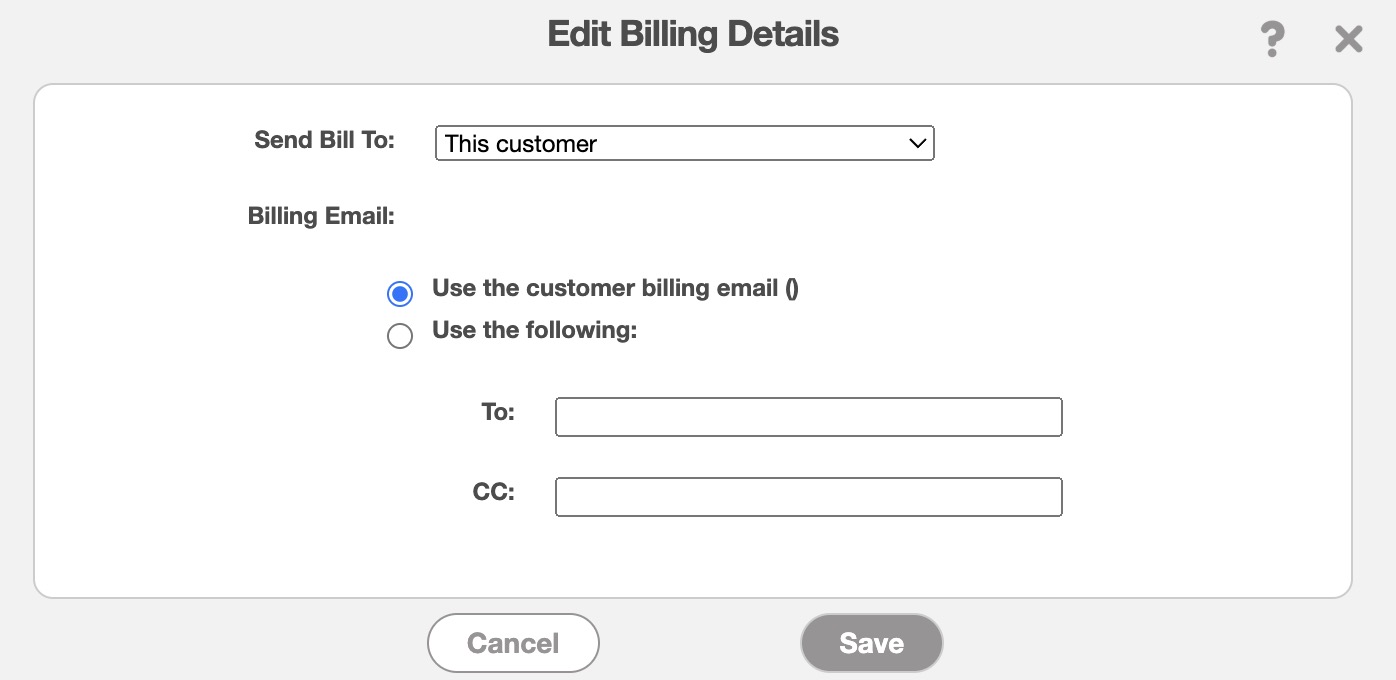
The Edit Billing Details pop-up window will then appear. In this window, you can select who recieves the bill for the recurrent invoice. The choices are defined below:
This Customer- The recurrent invoice will be billed to the customer.
The Parent Customer- The recurrent invoice will be billed to the parent customer (or the entity that has control or ownership over the child or subsidiary customer).
Another Customer- The recurrent invoice will be billed to another customer in your MobiWork customer database. You can use the Asterisk (*) on your keyboard to search through all your services for a specific customer.
Other- The recurrent invoice will be billed to another entity. You will need to enter the billing name and billing email address when choosing this option.
Once you are done, click the Save button to finish making changes to the billing contact.
Billing Address
If you would like to only update the billing address, you can do so by clicking on the Pencil icon in the "Billing Address" column.
The Edit Billing Address pop-up window will then appear; you can choose to use the "Customer Billing Address" or a "Different Address:"
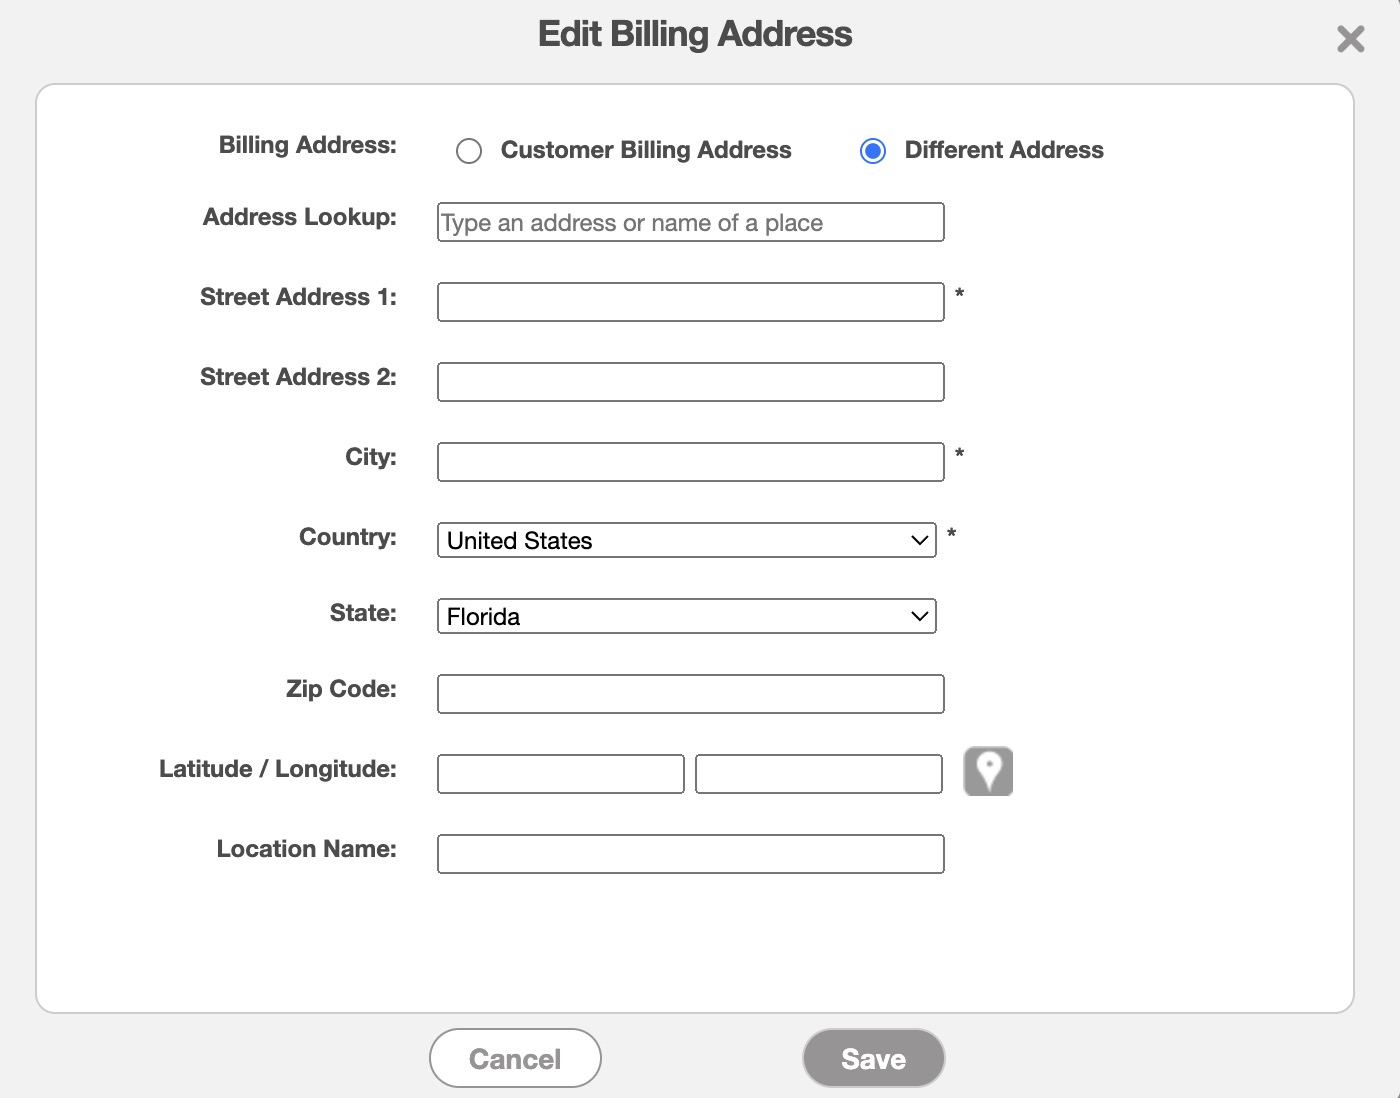
If you choose to use the "Different Address" option you will then need to input the location name, street address, city, country, state, and zip code of the location where you would want the recurrent invoice addressed to.
Once you are done, click the Save button to finish making changes to the billing address.
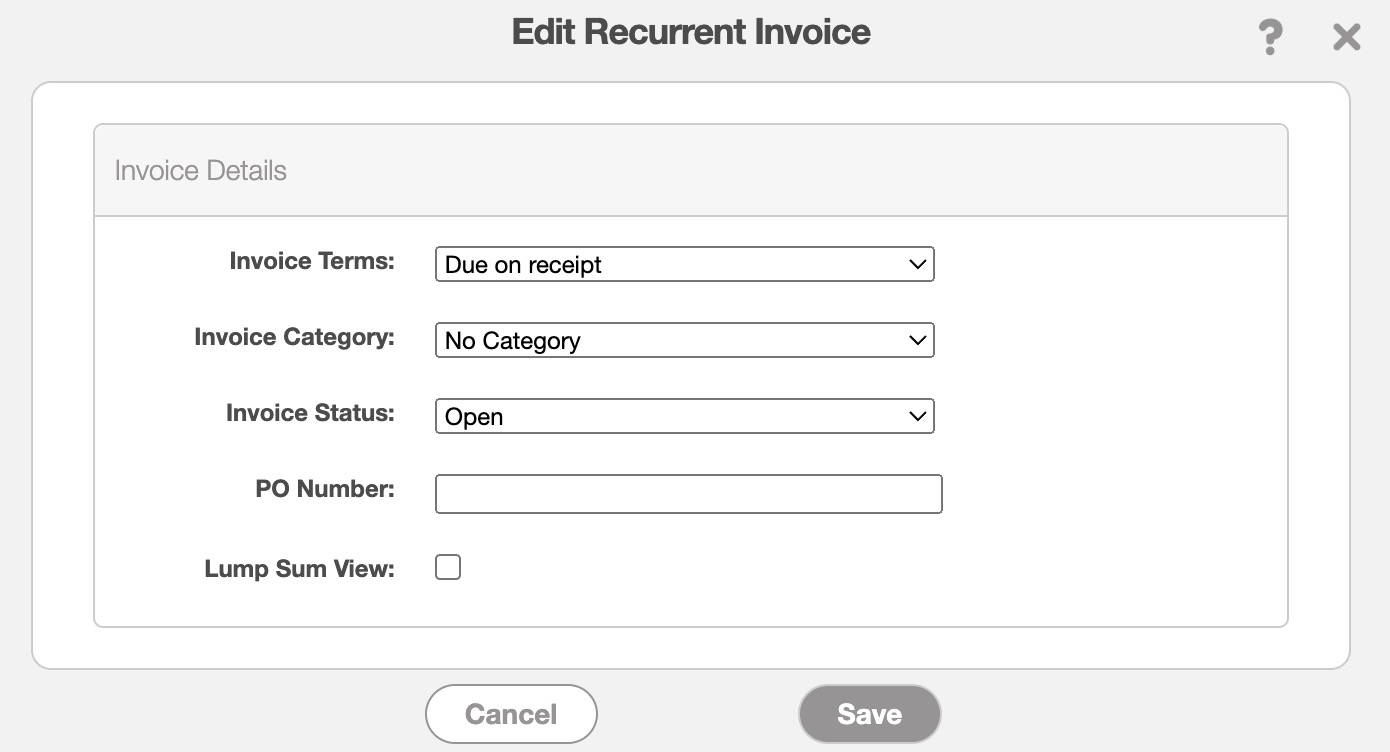
To update the invoice details of the invoices that compose each individual invoice, click on the Pencil icon in the "Invoice Details" panel.
You will then be able to access the Edit Recurrent Invoice pop-up window. In this pop-up window you will be able to update the invoice terms, category, and more:
Any changes that are made to a recurrent invoice are not official until you publish the recurrent invoice.
If there are recurrent invoices that have been updated but not published, a Caution Sign icon will appear next to the recurrent invoice:
![]()
Once you publish a recurrent invoice, it becomes ready to use within MobiWork and an invoice will automatically be generated or updated.
Publish Single Recurrent Invoice
Any changes that are made to a recurrent invoice are not official until you publish the recurrent invoice. You can publish a single invoice service by accessing the View Recurrent Invoice pop-up window. From this pop-up window, you can click on the Publish button from the red ribbon:
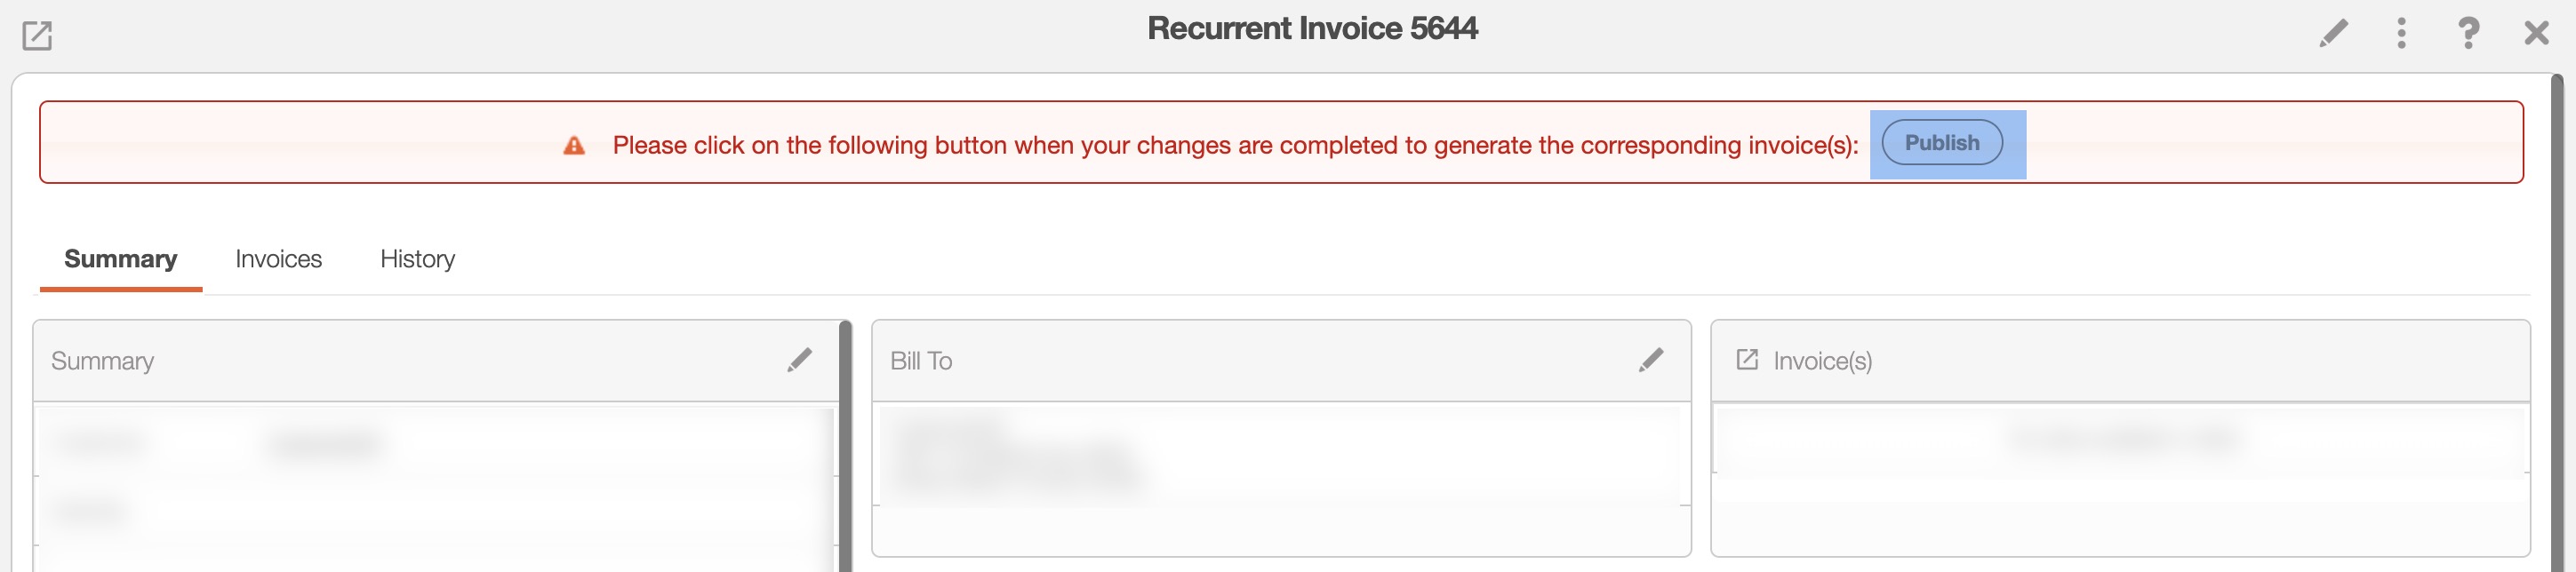
Please note that the red ribbon for the Publish button will only be available after changes are made to the recurrent invoice.
Publish Multiple Recurrent Invoices
You can publish multiple recurrent invoices at once from the Recurrent Invoice List page, by clicking on the More Actions button and selecting the "Publish Selected Recurrent Invoices" option from the drop-down:
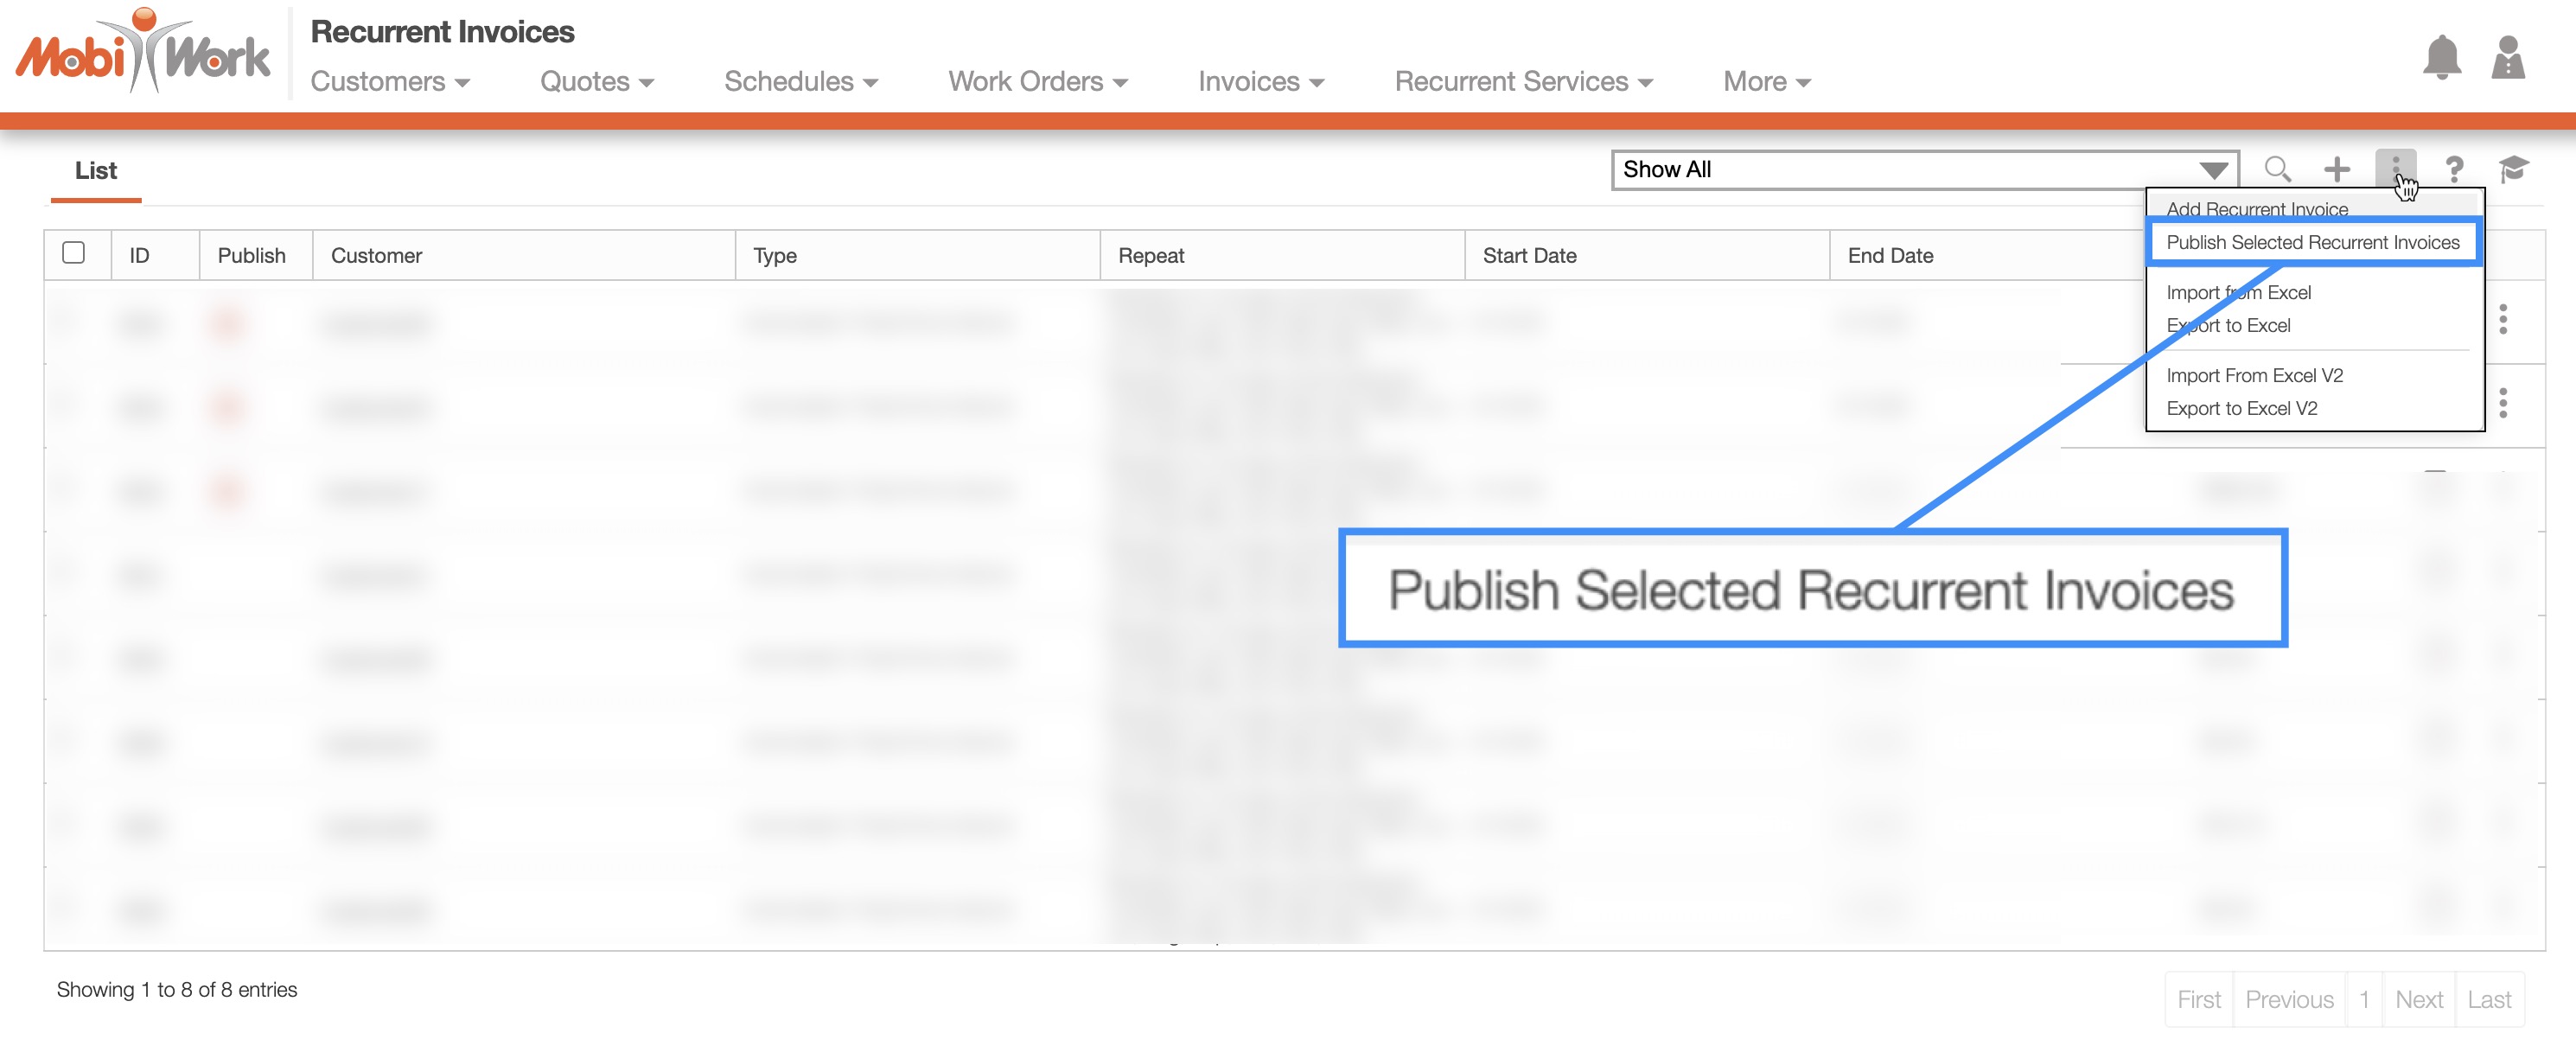
The selected recurrent invoices will then be automatically published.