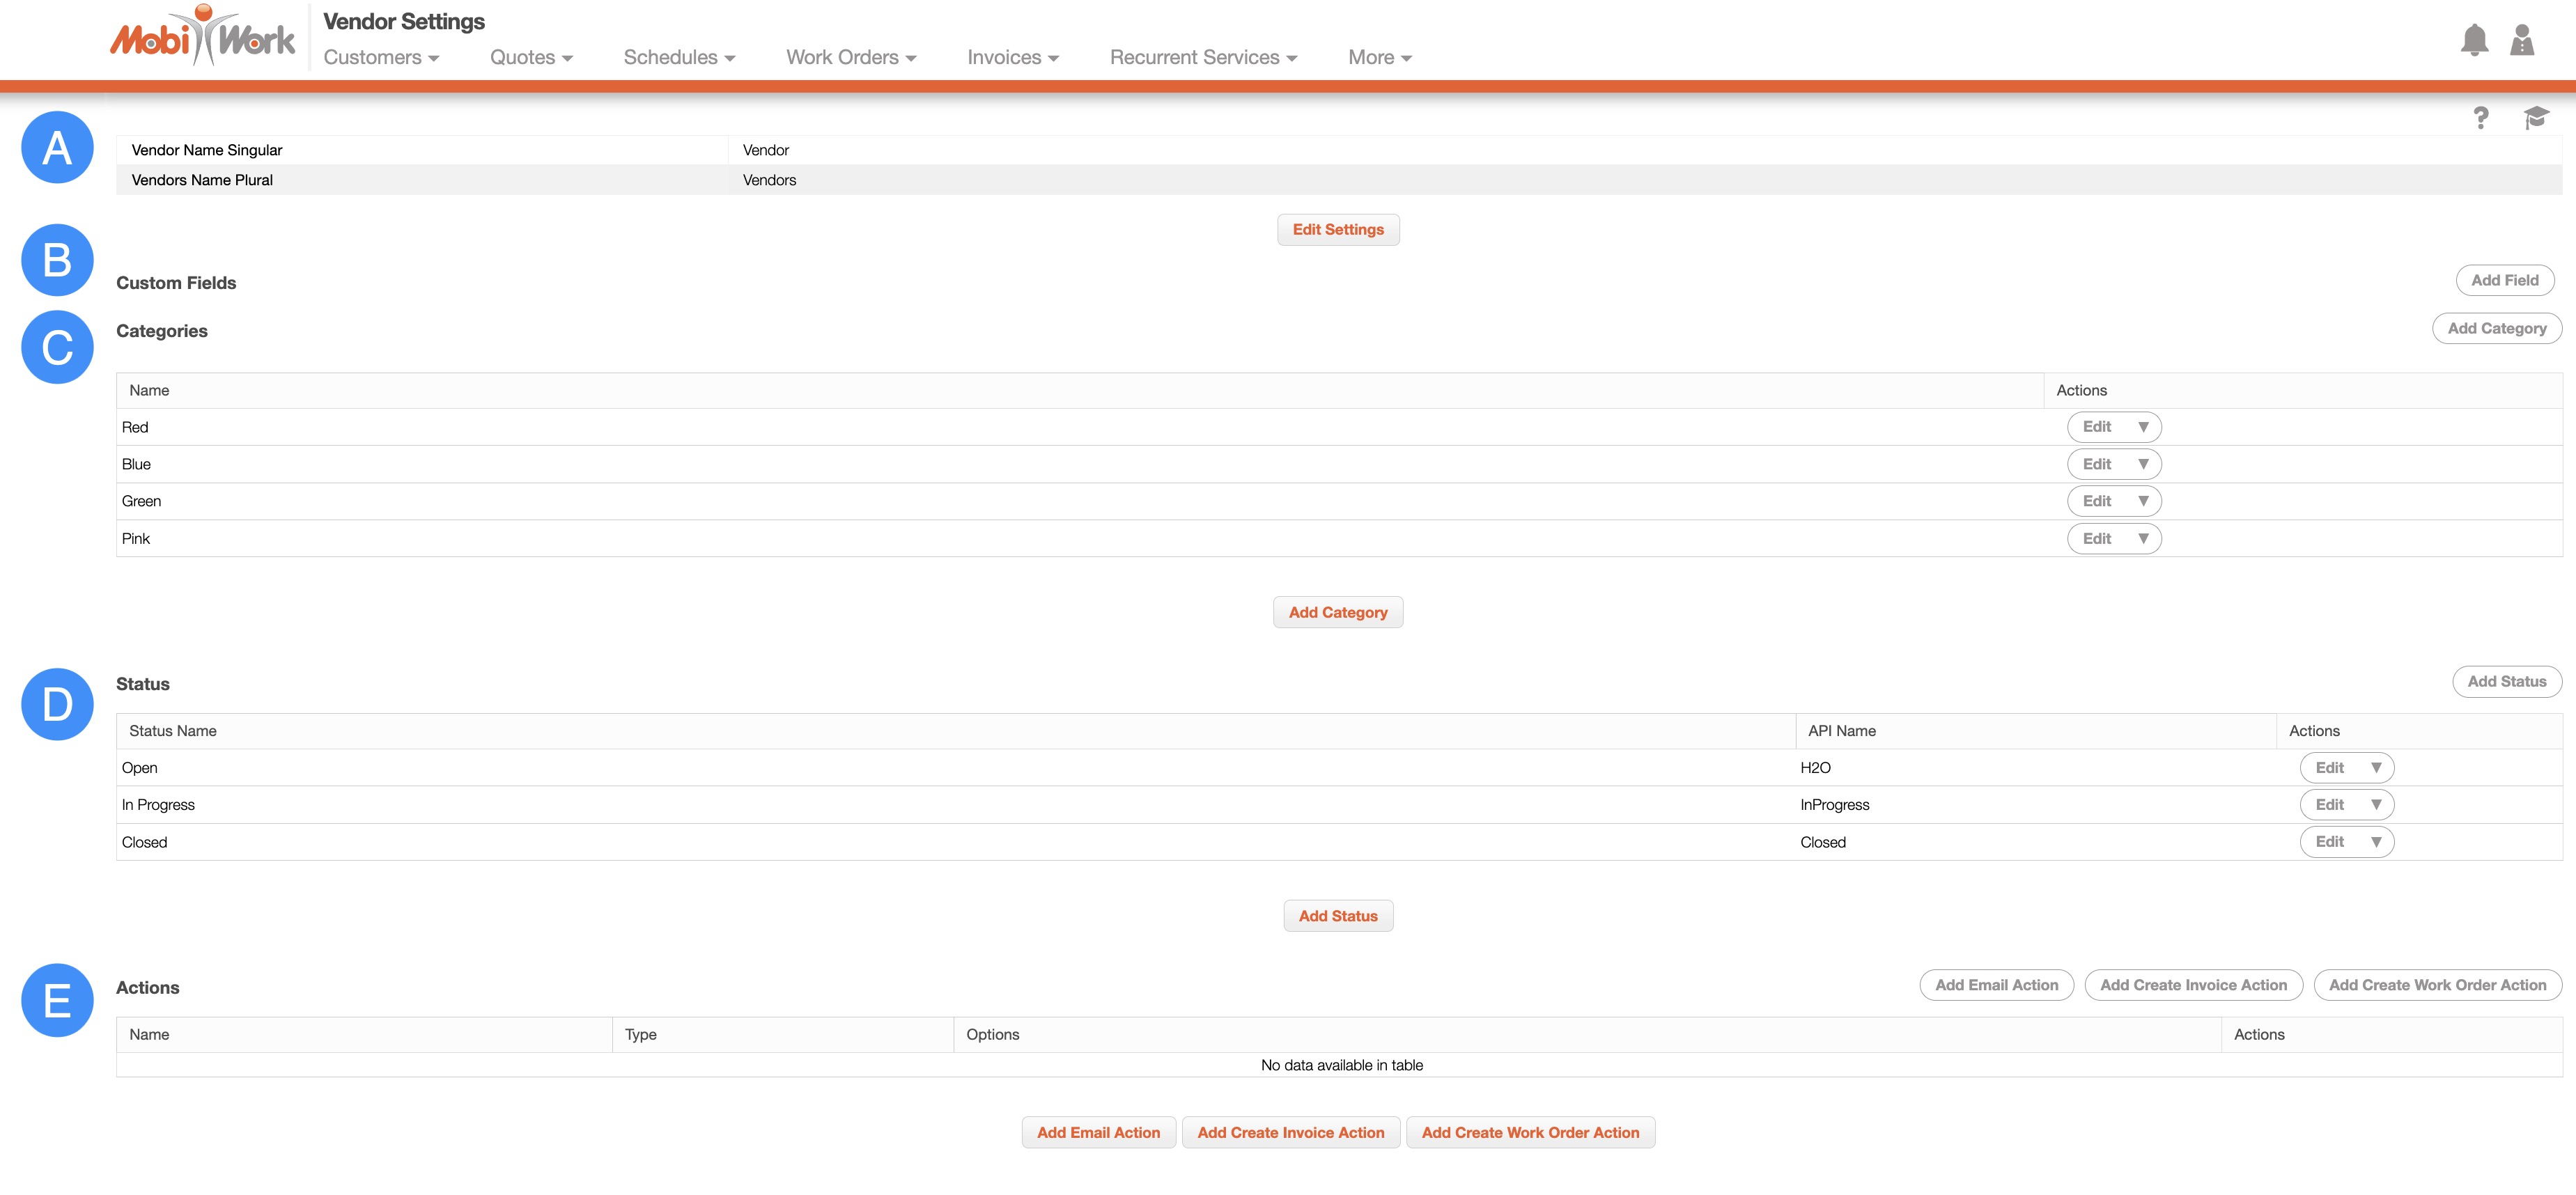
The "Custom Fields" section will display the fields that can be added to the vendor; these fields are searchable, appear once or multiple times, be open ended, is required or optional, and can be customer-visible.
| Name: | Description: |
| "Name" |
The name of the custom field. |
| "Type" |
is the type of custom field which include string, number, decimal, date, yes/no, multiple choice, QR code, signature, header, image capture, notes, phone number, phone number plus extension, SSN, time field, text area, vertical separator, vertical spacing, multiple QR code, customer field, product field, user field, project field, asset field, store field, dynamic header, and multiple option dropdown. |
| "Required" |
Indicates if the custom field is required to fill or not. |
| "Searchable" |
If checked, the custom field will become searchable within the New Search pop-up window. (It will not be searchable in the Free Text Search bar) |
| "Actions" |
include view, edit, and delete. |
| Name: |
Description: |
| "Name" |
The name of the custom field. |
| "Type" |
The type of custom field which includes string, number, decimal, date, yes/no, multiple choice, QR code, signature, header, image capture, notes, phone number, phone number plus extension, SSN, time field, text area, vertical separator, vertical spacing, multiple QR code, customer field, product field, user field, project field, asset field, store field, dynamic header, and multiple option drop-down. |
| "String" |
The field where the user can enter text. The field supports limiting the number of characters that can be entered. |
| "Number" |
is a number field that does not accept decimals. The maximum and minimum number for the field can be defined. |
| "Decimal" |
is a number field that accepts decimals. The maximum and minimum number for the field can be defined. |
| "Date" |
is a field that allows the selection of the date from a pop-up calendar or a 3-field layout. It can be specified whether the current date will automatically appear and cannot be edited. |
| "Yes/No" |
is a yes/no field indicated by a checkbox. |
| "Multiple Choice" |
is a multiple-choice field where the values within it can be specified within "Select Values" by placing a comma between each value. You can indicate if the first value is invalid. For instance, if in the first value you want to give instructions for the multiple choice such as, "Please select from the following." |
| "QR Code" |
is a field that captures barcode/QR code data (only for the device). |
| "Signature" |
is a signature capture field to capture signatures (only for the device). |
| "Header" |
is a bold label that does not allow input. |
| "Image Capture" |
is an image capturing field that displays in the mobile device that allows photos to be taken to upload into the field or uploads existing images from the mobile device's gallery into the field. It can be specified to not allow images from the device gallery. |
| "Notes" |
adds notes to the notes list for the entity. For example, if a form is filled for a work order, then the note field content will be added to the work order notes list. |
| "Phone Number" |
is a phone number field that can be indicated if the phone number will appear in one or three fields. |
| "Phone Number Plus Extension" |
is a phone number field that allows for an extension to be entered. It can be indicated if the phone number plus extension will appear in one or four fields. |
| "SSN" |
allows the inputting of the social security number within 3 fields (###-##-#### format). |
| "Time Field" |
Allows you to specify a 12- or 24-hour time format |
| "Text Area" |
is a larger text field for multiple sentences, notes, etc. |
| "Vertical Separator" |
is a vertical line separator for the web only. |
| "Vertical Spacing" |
places spacing between rows for the web only. |
| "Multiple QR Code" |
allows the scanning and inputting of multiple QR codes continuously in this field. |
| "Customer Field" |
allows the selection of the customers available in the Permissions to appear in the field. |
| "Product Field" |
allows the selection of the products available in the Permissions to appear in the field. |
| "User Field" |
allows the selection of the users available in the Permissions to appear in this field. Default to device user, if selected, will display the user who is logged in on the device within the field. |
| "Project Field" |
allows the selection of the projects available in the Permissions to appear in the field. |
| "Asset Field" |
allows the selection of the assets available in the Permissions to appear in the field. Associate asset with work order, if selected, and if a custom field or form is associated to a work order then it will associate the asset with the work order. |
| "Store Field" |
allows the selection of the stores available in the Permissions to appear in the field. |
| "Dynamic Header" |
allows you to show data from the associated work order or customer (such as work order description, customer's name, etc.). |
| "Multiple Option Dropdown" |
is a drop-down where you can select multiple options. |
| "Required" |
Indicates if the custom field is required to fill or not. |
| "Searchable" |
If checked, the custom field will become searchable within the New Search pop-up window. (It will not be searchable in the Free Text Search bar). |
| "Customer Visible" |
will allow customers to view the form field on the Customer Portal. |
| "Number of Times" |
include once which will show the form field one time or multiple open ended which will add the form field multiple times. |
| "Device Read Only" |
means the field cannot be edited on the device. |
| "Web Read Only" |
means the field cannot be edited on the web. |
| "Long Question Type" |
is for the label of the field. It is a user interface setting which gives more space for the label on the device. |
| "Field Description" |
are any comments that describe the field. |
| "Show Advanced Options" |
include QuickBooks Field Name, Label CSS, and Initial Value for this Field. |
| "QuickBooks Field Name" |
only applies to customer forms/custom fields. This refers to the name of the corresponding field in QuickBooks which is used during the import/sync. |
| "Label CSS" |
is a web only feature which allows the entered HTML CSS attributes to be applied to the field label (for example, showing the label of the field in red with a font size of 20 px). |
| "Initial Value for this Field" |
sets the initial value of this field when the form is added/opened on the device. At present, this needs to be configured by MobiWork's Professional Services team. |