There are many ways you can access the View User pop-up window; for example, if the username is a hyperlink, you can click on the text and the View User pop-up window will automatically appear.
You can also access the View User pop-up window from the following features.
User List Page
The easiest way to access the View User pop-up window is through the "List" tab. For more information on how to access the "List" tab, please see the User List page.
Once you are on the "List" tab, there are four different ways to access the View User pop-up window:
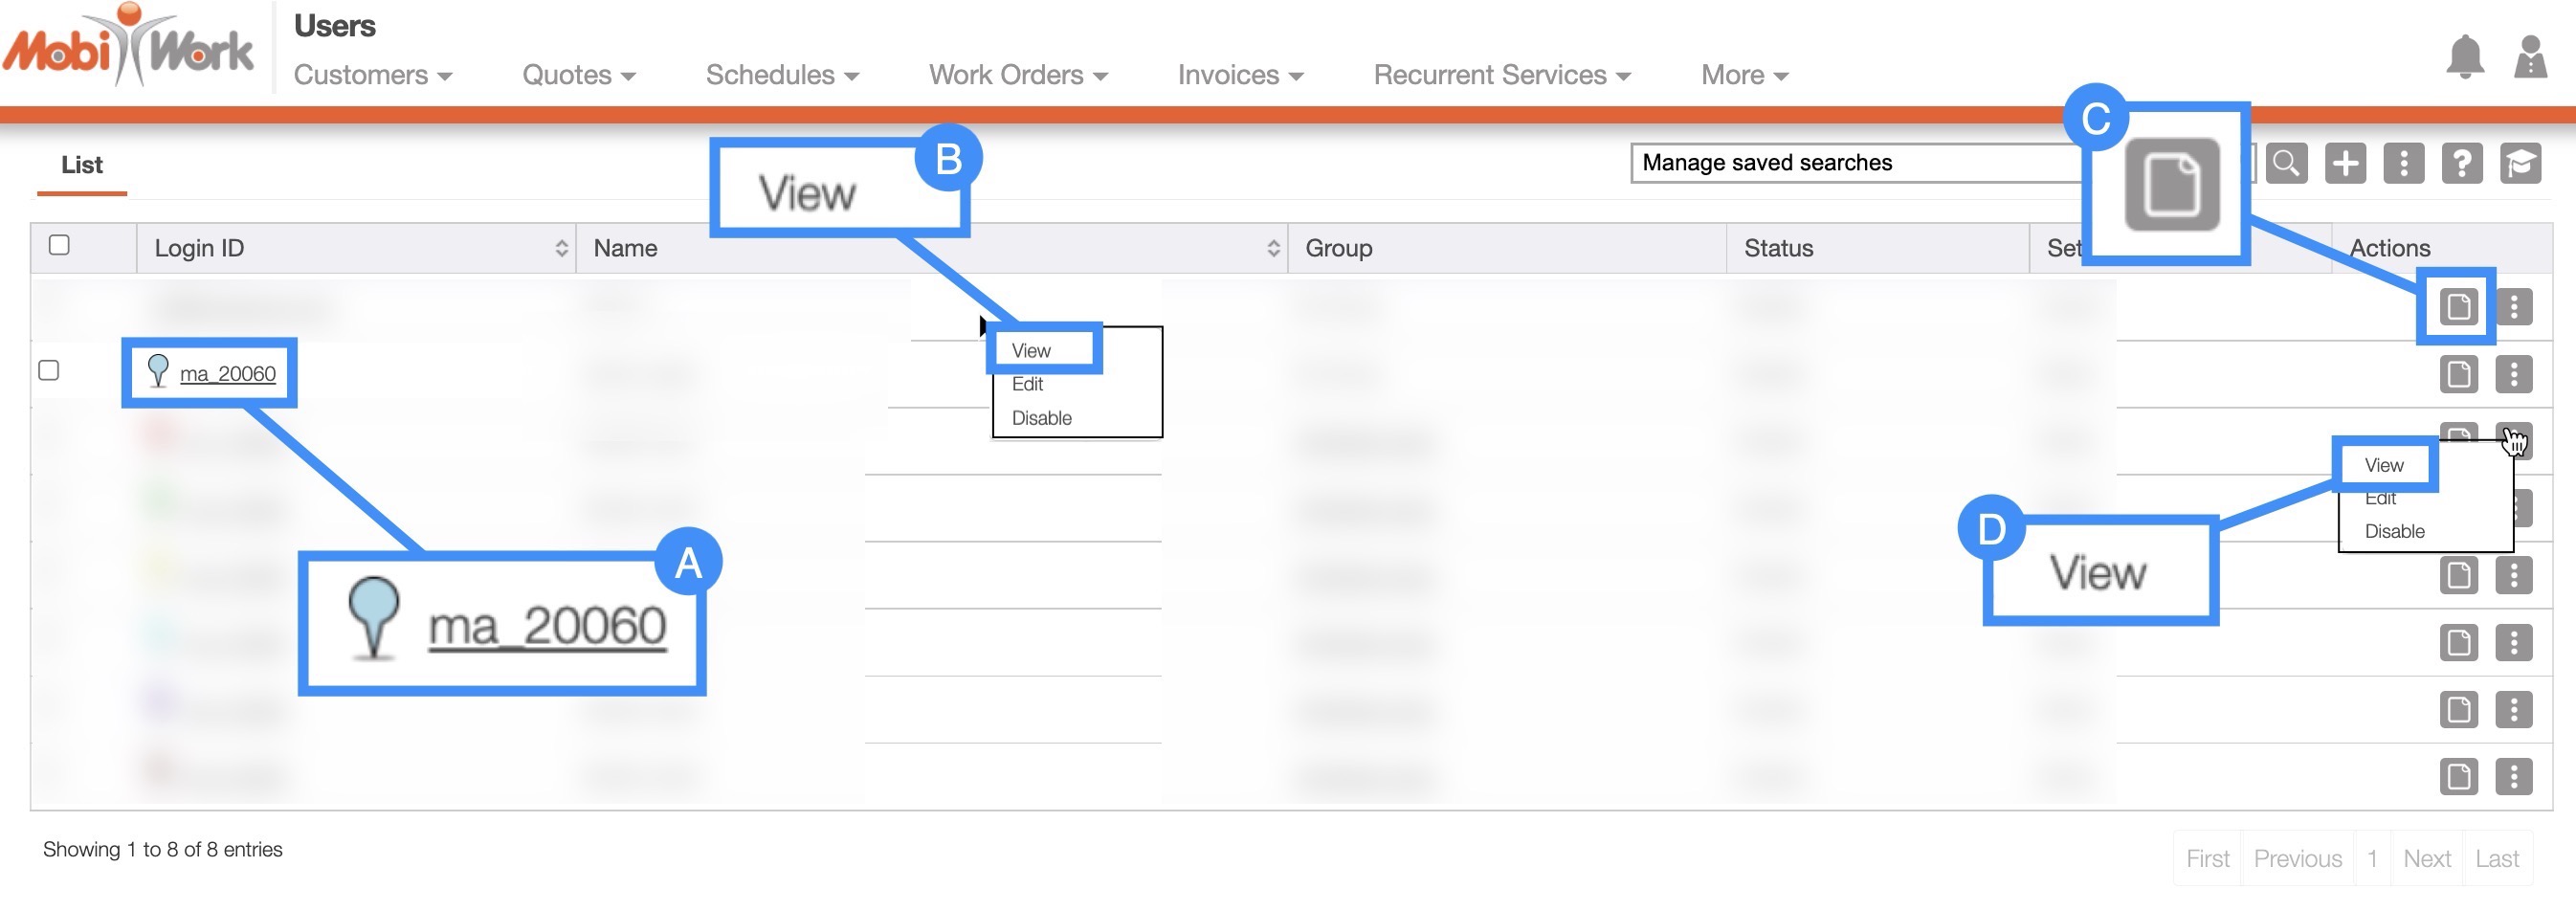
Select the desired User Login ID
Right-click on the selected user and click on the "View" option from the drop-down..
Click on the "View" option from the Individual Actions drop-down.
Select the View icon under the "Actions" column
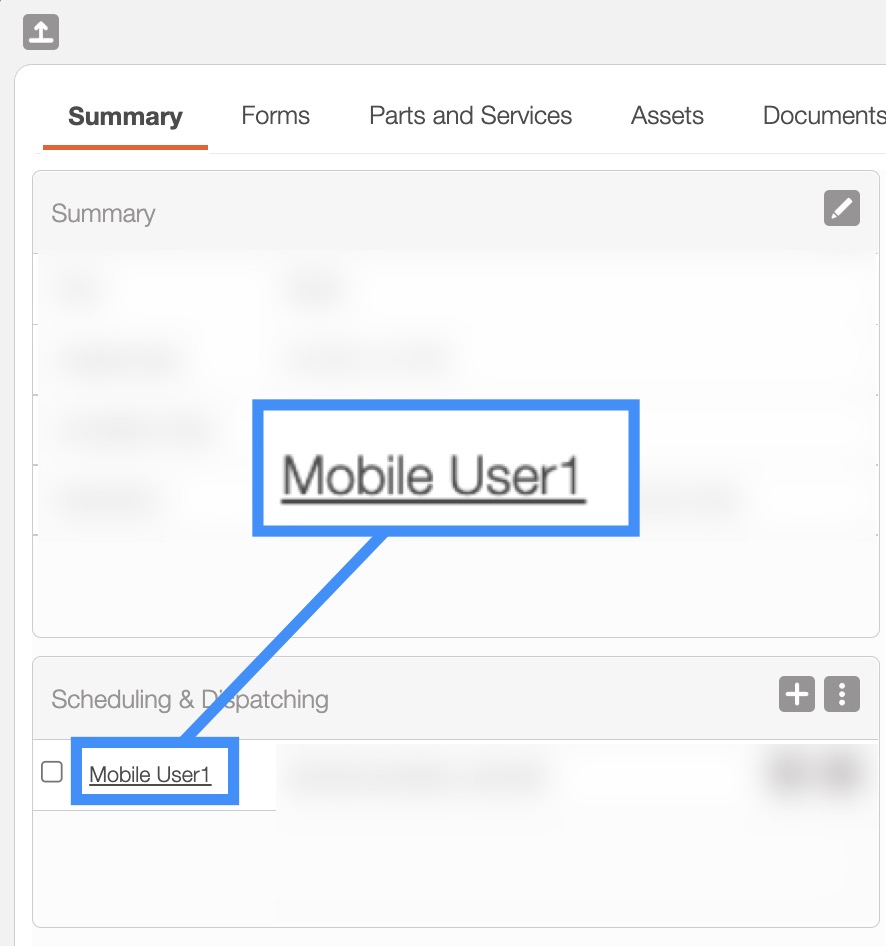
Customer
You can access the View User pop-up window through many of the tabs found in the View Customer pop-up window. For more information about how to access the View Customer pop-up window, please see the View Customer page.
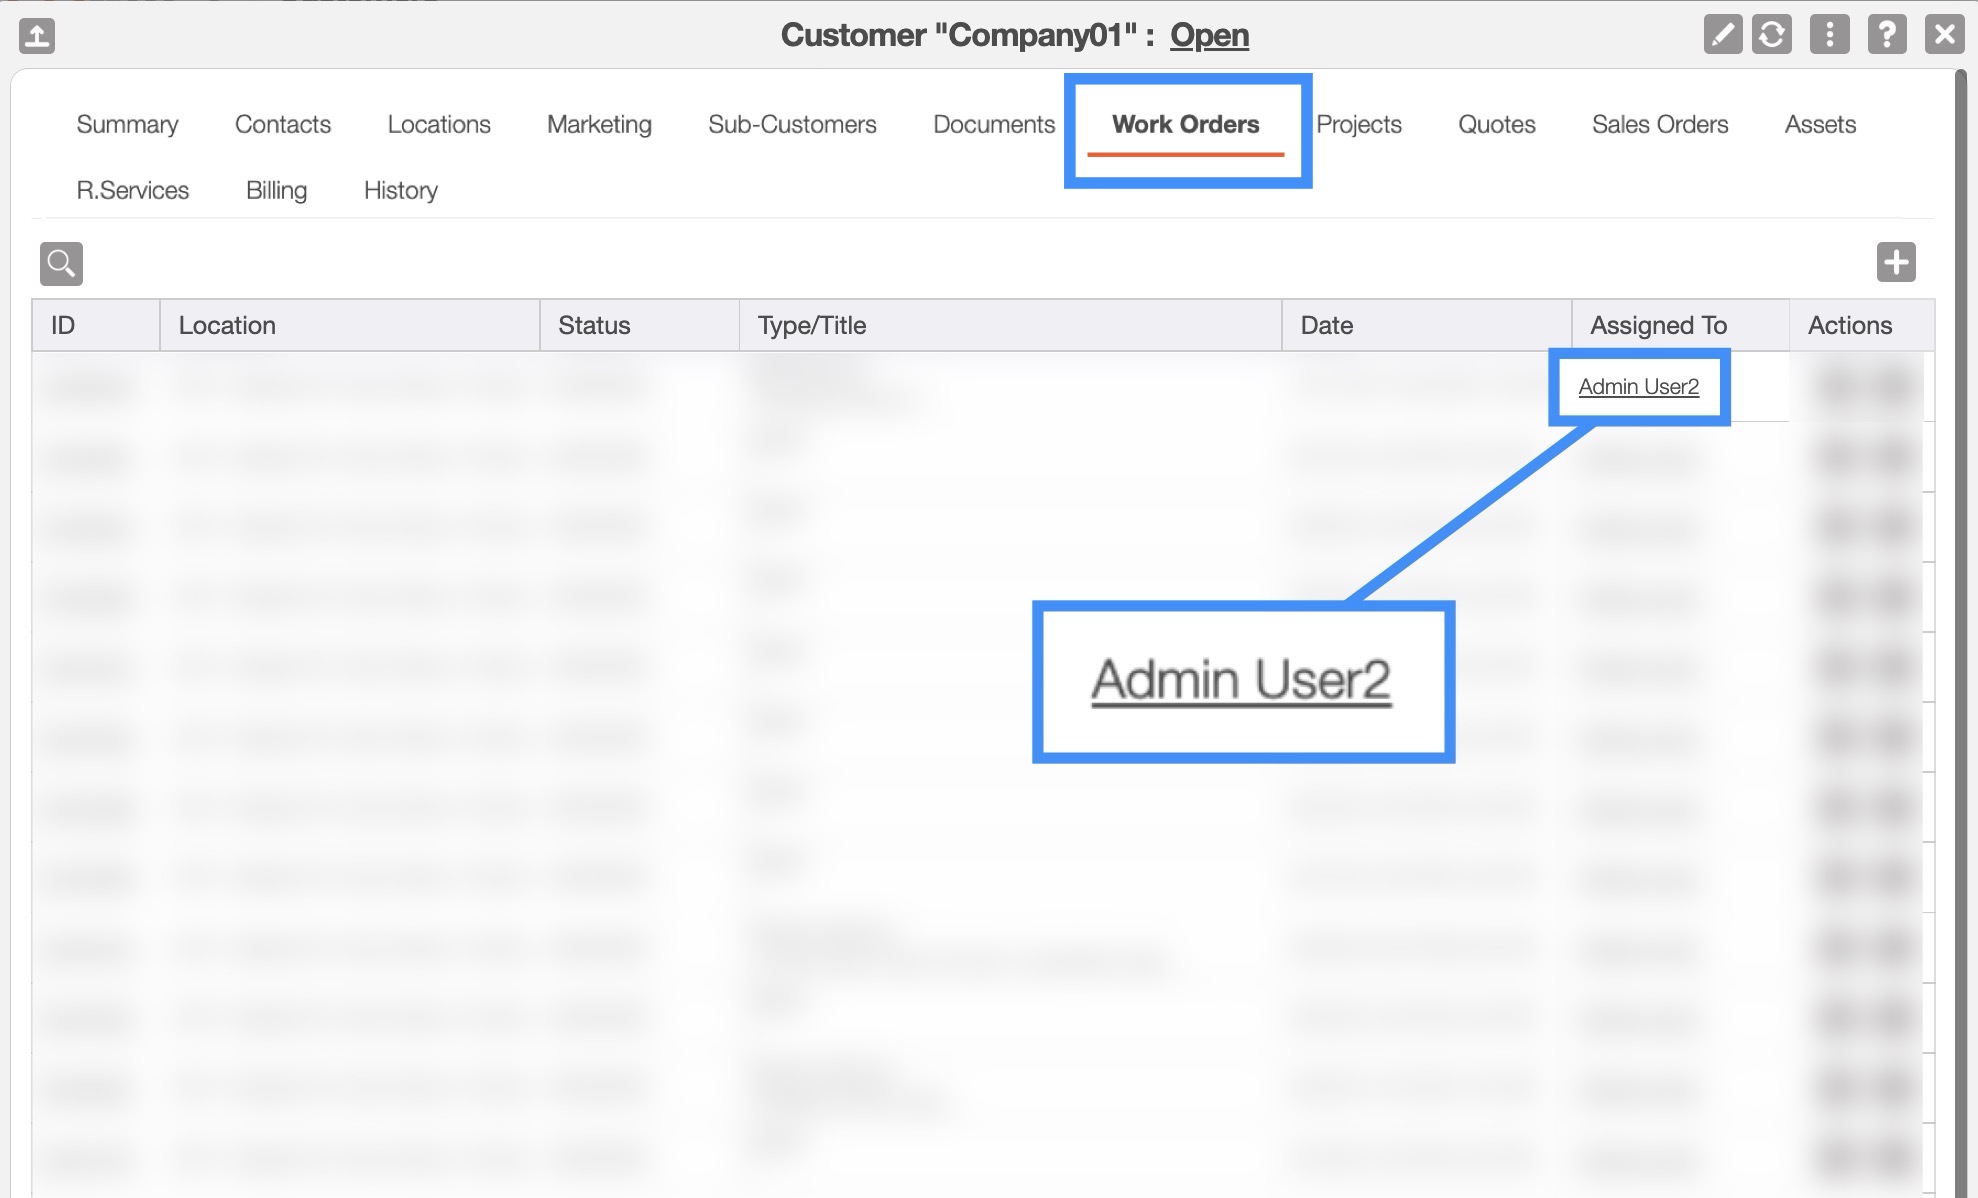
On the View Customer "Work Order" tab, you will be able to access the View User pop-up window by clicking on the desired user underneath the "Assigned To" column:
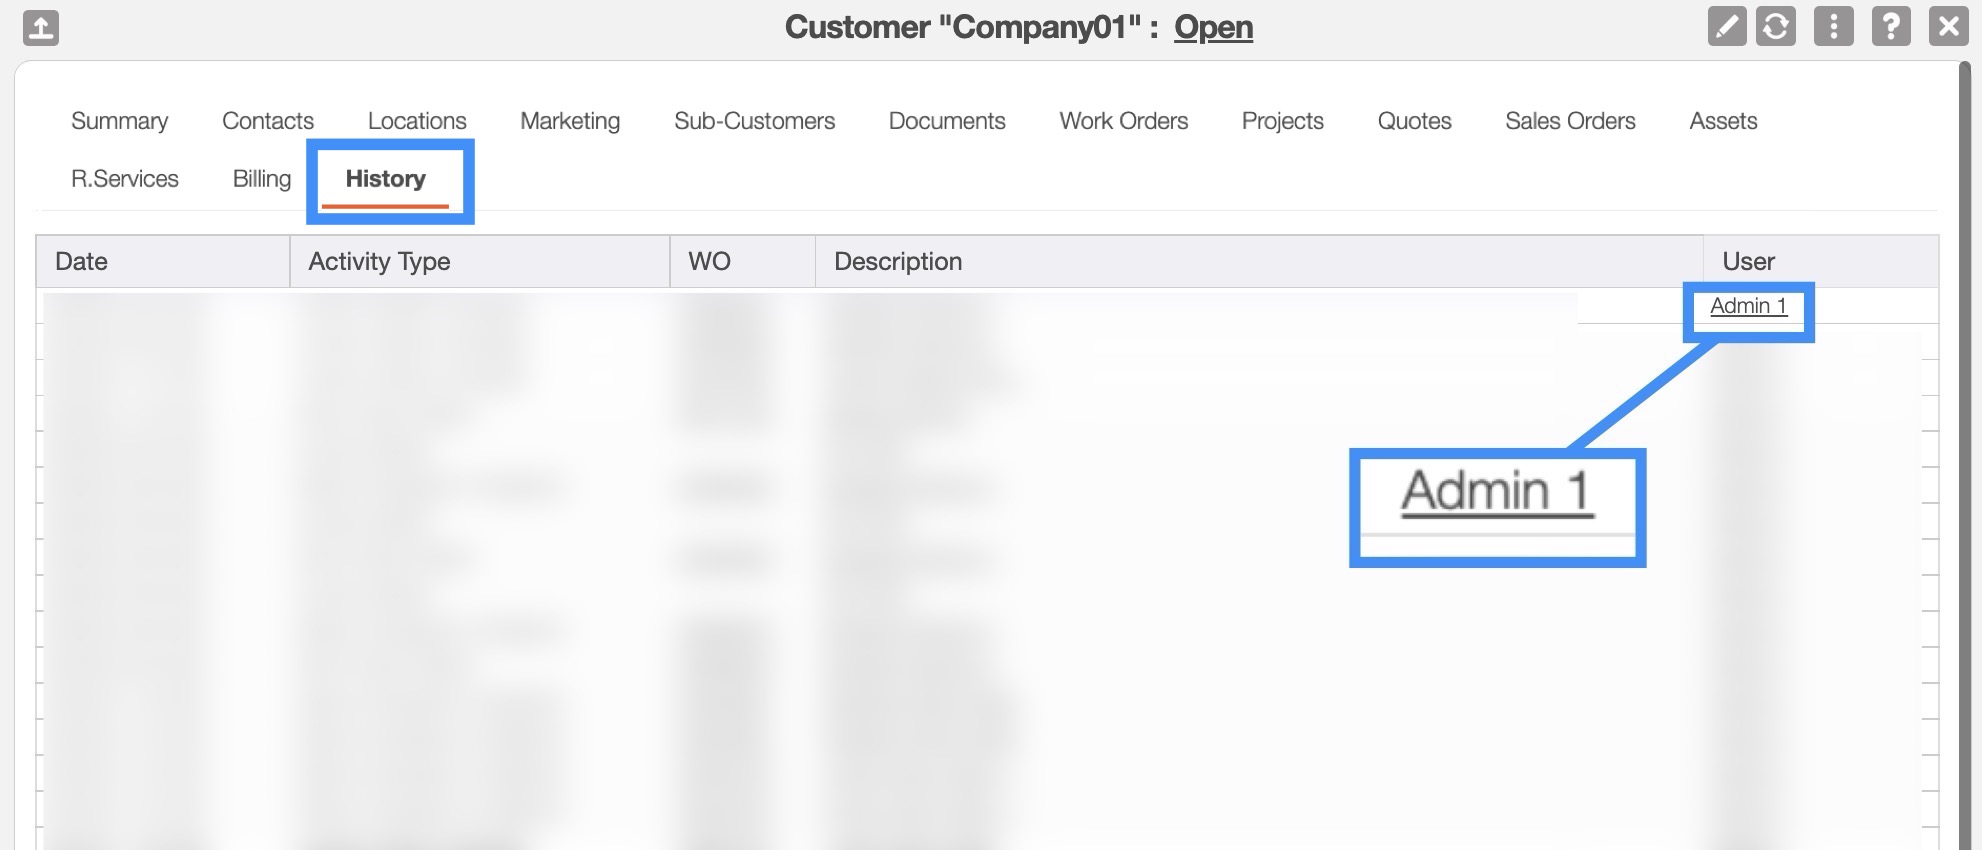
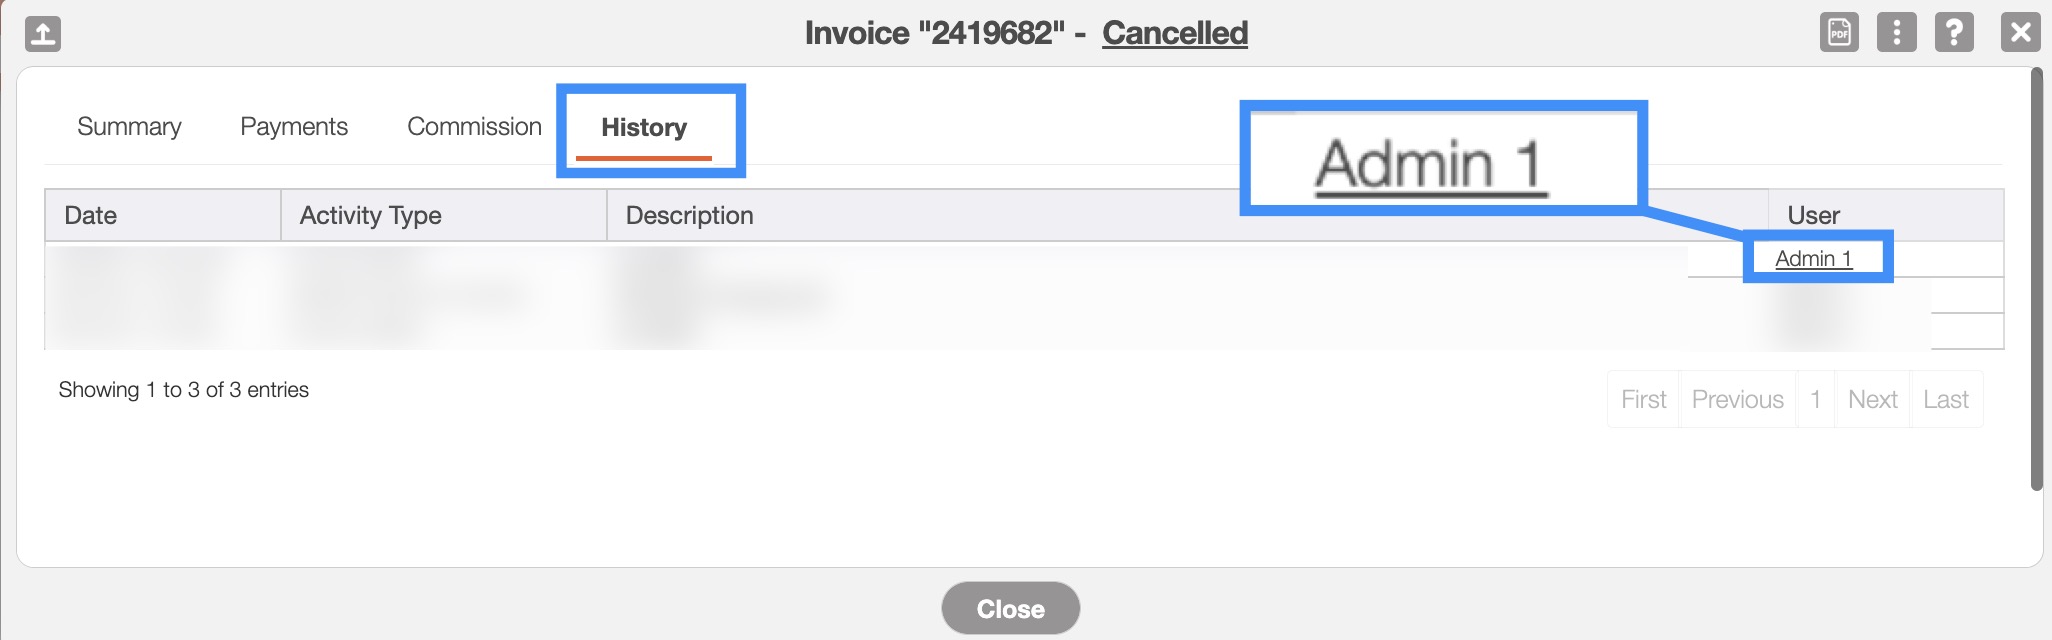
On the View Customer "History" tab, you will be able to access the View User pop-up window by clicking on the desired user underneath the "User" column:
Quotes
On the View Quote pop-up window, there are also a few ways you can access the View User pop-up window. For more information on how to access the View Quote pop-up window, please see the View Quotes page.
On the View Quote "Summary" tab, you will be able to access the View User pop-up window from any notes left there by the user:
- Click on the hyperlink text of the user's name:
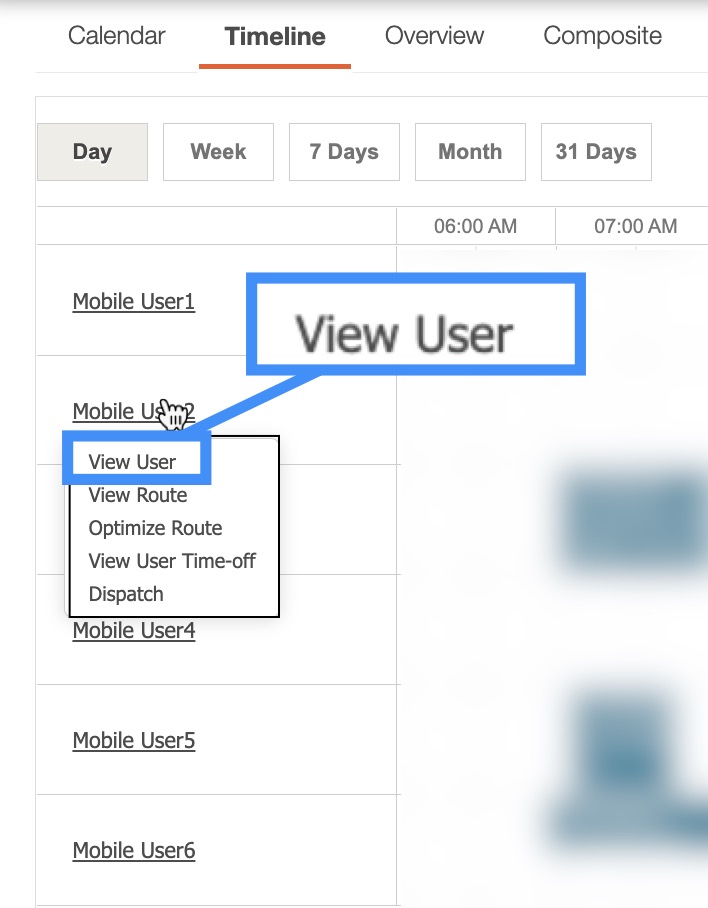
Schedule
On the Schedule feature page, there are also a few ways you can access the View User pop-up window. For more information on how to access the Schedule feature page, please see the Schedule List page.
When you are on the "Timeline" tab, the "Overview" tab, or the "Composite" tab, you can view the View User pop-up window by clicking on the desired user from the list. From the drop-down, select the "View User" option:
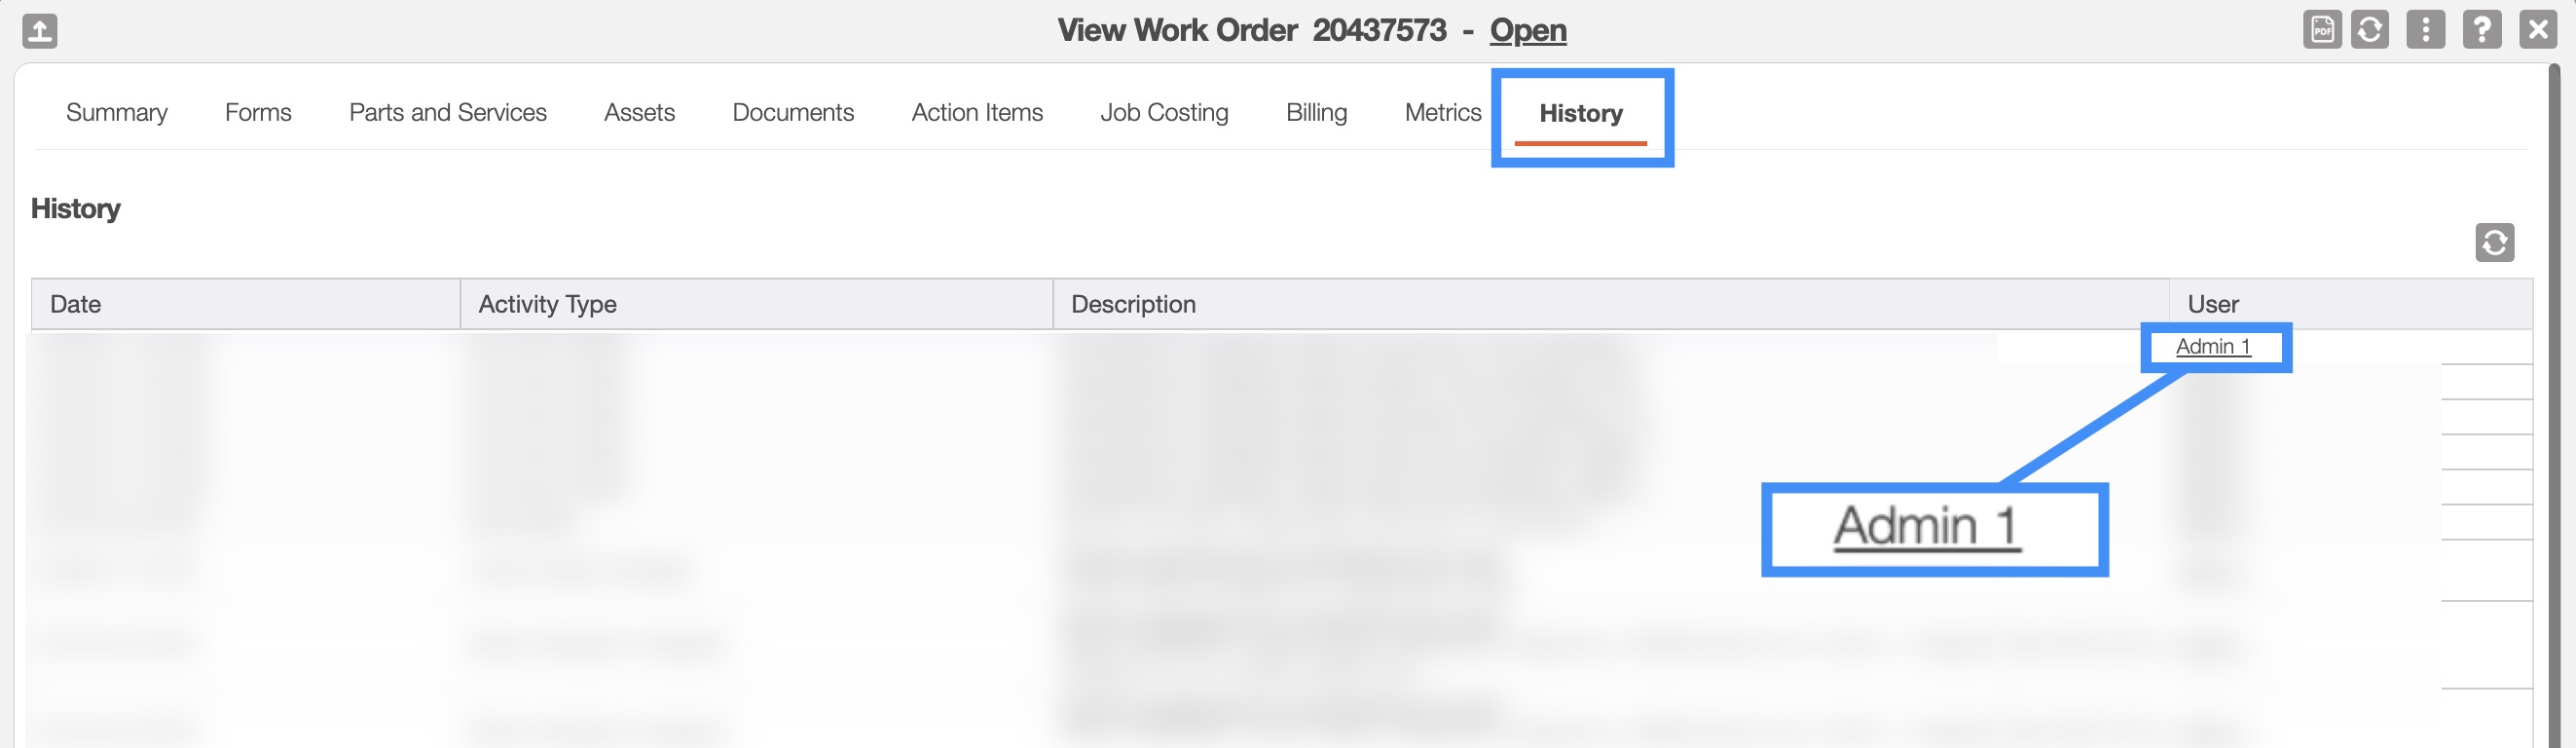
Work Orders
On the View Work Order pop-up window, there are also a few ways you can access the View User pop-up window. For more information on how to access the View Work Order pop-up window, please see the View Work Order page.
On the View Work Order "Summary" tab, you will be able to access the View User pop-up window from the following locations:
The username in the Schedule section
The username in the Read On Device section
The username in any notes posted in the Notes section
On the View Work Orders "History" tab, you will be able to access the View User pop-up window by clicking on the desired user under the "User" column:
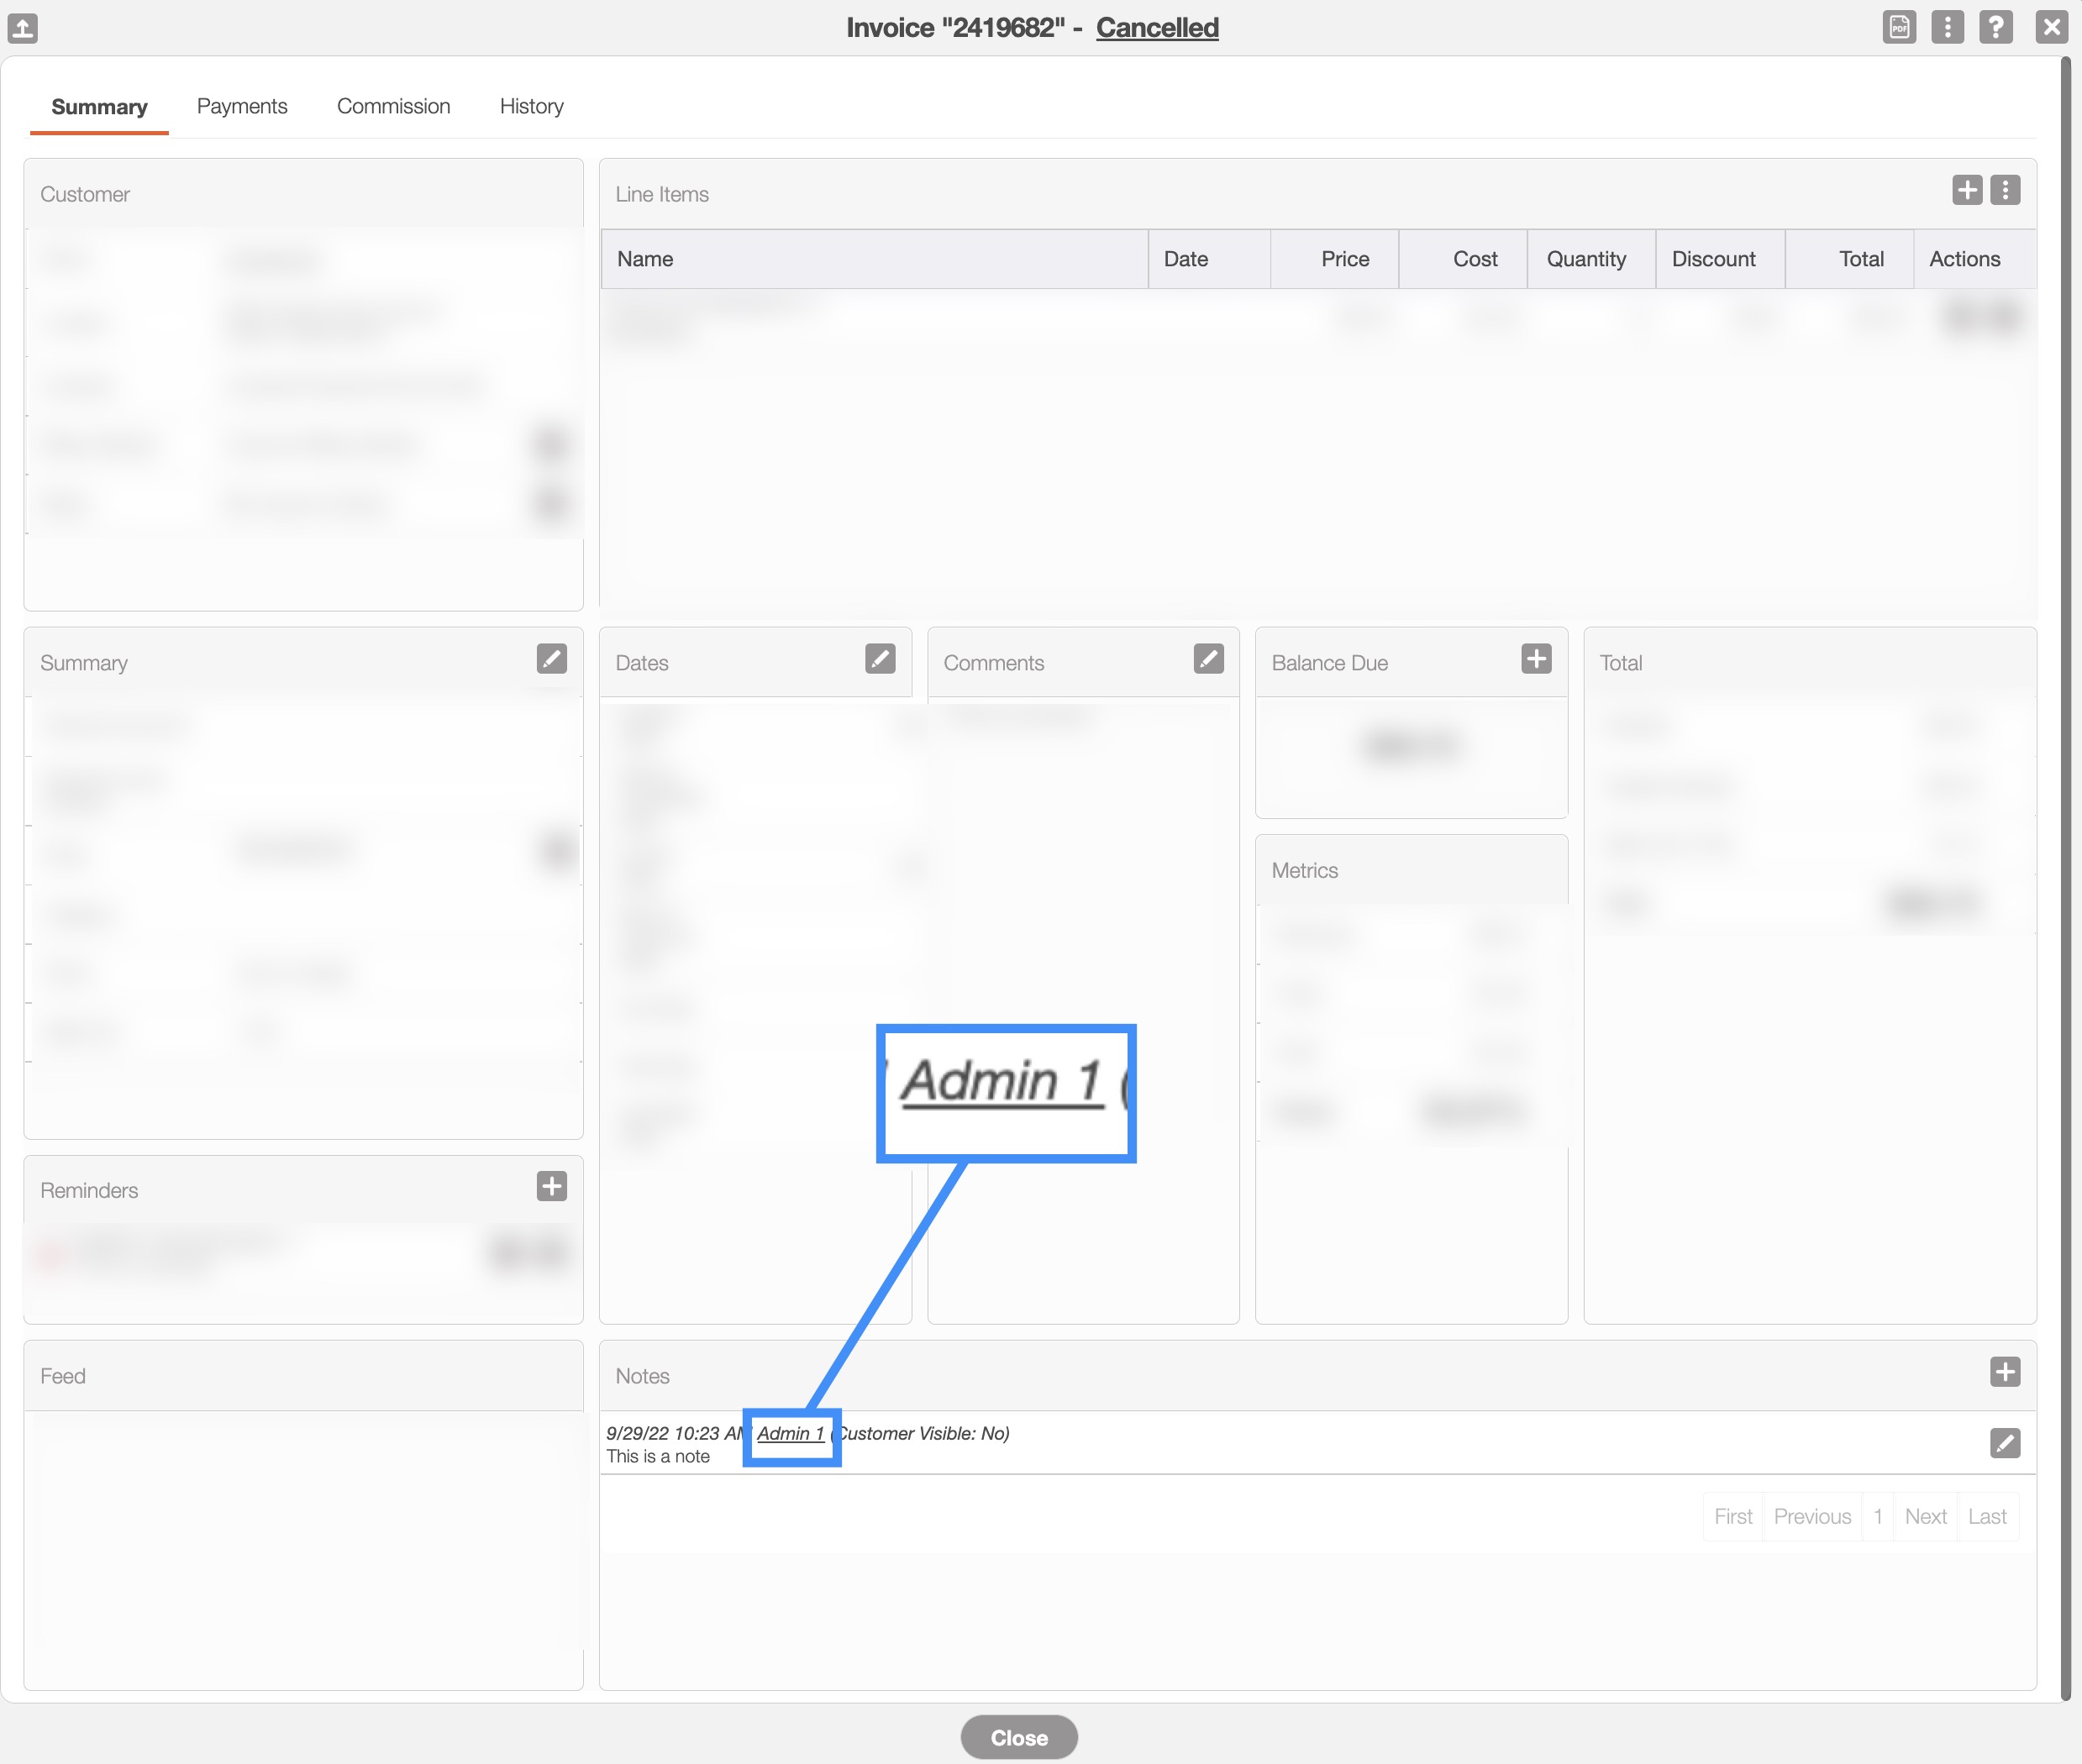
Invoices
On the View Invoice pop-up window, there are also a few ways you can access the View User pop-up window. For more information on how to access the View Invoice pop-up window, please see the View an Invoice page.
On the View Invoice "Summary" tab, you will be able to access the View User pop-up window from any notes left there by the user:
On the View Invoice "History" tab, you will be able to access the View User pop-up window by clicking on the desired user underneath the "User" column:
Overview and Layout
Once you open the View User pop-up window, you will be automatically directed to the "Details" tab:

These features are available in all eleven tabs and in both, the pop-up window and the full-size view:
Please note that if you would like to easily close this pop-up window, you can click on the esc button from your keyboard.
User Full-Size View
By clicking on the upwards arrow in the left-hand corner, you can expand the View User pop-up window so that it is full-size:
The full-size View User pop-up window can be seen below. All the tabs, buttons, and features are identical to how they would appear in the pop-up window:

User Tabs
There are eleven tabs in all for the View User pop-up window; each tab displays different information regarding the user:

You can navigate to other tabs by clicking on the desired tab.
User Name
The User's name will be displayed here:

Upper Right Corner Actions
In the upper right corner of the View User pop-up window there will be four buttons that will allow you to perform additional actions on the user:
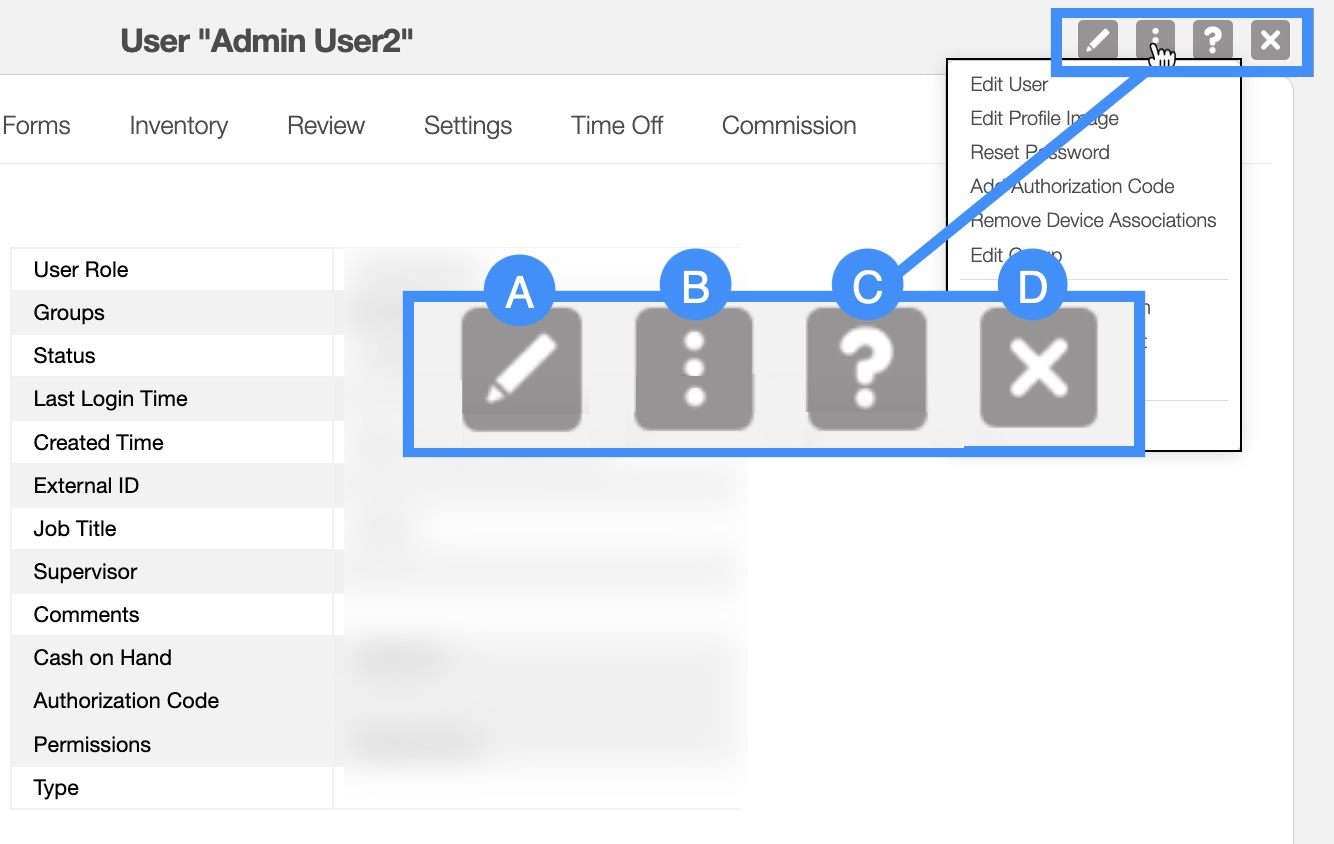
The Pencil button will allow you to edit the user.
The Individual Actions button will allow you to perform various actions, such as:
Editing the user
Editing the image that is used for the user profile
Resetting the user's password
Editing the user's permissions (access) to limit or increase the ability to add, edit, view, etc., features within MobiWork
Adding an authorization code for the user
Removing the devices (e.g., phones, tablets, etc.) that the user has access to
Editing the group that the user is associated with
Displaying the last known location of the user
Allows you to view the time sheet associated with the user
Allows you to view the routes and paths associated with the user
Viewing the Settings page
The Question Mark button which will direct you to the respective MobiWork Features page.
The X will close out of the View User pop-up window.
The User's Upper Right Corner Actions can be found in the top-right corner of the View User pop-up window. These actions are located in this section, regardless of the tab you are on:
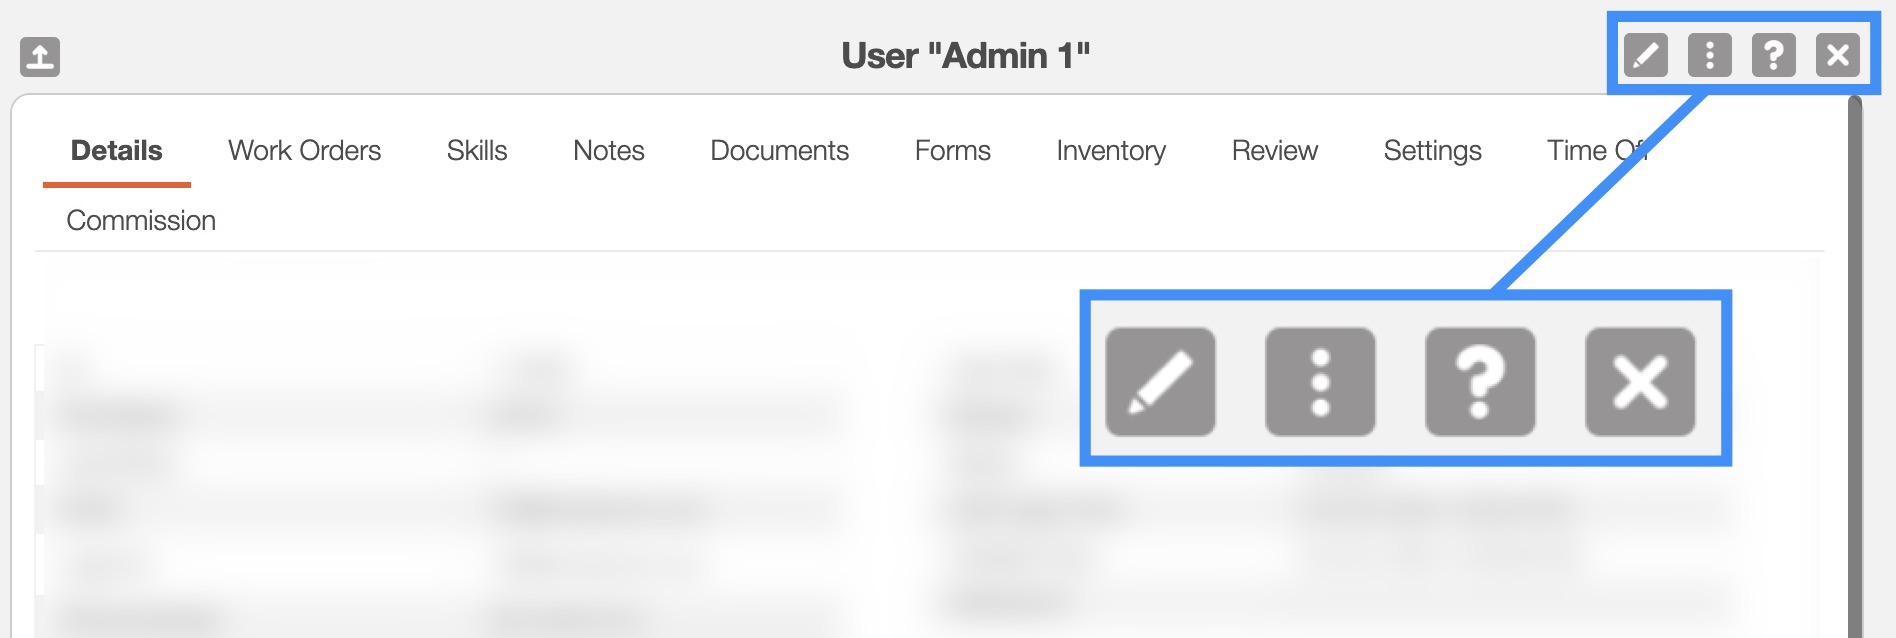
The Upper Right Corner Actions section includes:
The Pencil button will allow you to edit the user.
The Individual Actions will allow you to perform various actions.
The Question Mark button which will direct you to the respective MobiWork Features page.
The X will close out of the View User pop-up window.
After clicking on the vertical three dots in the top-right corner, the Individual Actions drop-down menu will appear:

From the Individual Actions drop-down menu, you can select various actions that will help manage the specified user.
The complete list of actions found in the Individual Actions drop-down menu are defined below:
| Name: | Description: |
|---|---|
| "Edit User" | Allows the user to edit the specified user |
| "Edit Profile Image" | Allows the user to edit the specified user's profile image |
| "Reset Password" | Resets the password for the specified user |
| "Add Authorization Code" | Adds an authorization code for the user |
| "Remove Device Associations" | Removes the user's association with a device |
| "Edit Group" | Edits the group that the user is associated with |
| "Last Known Location" | The last known location of the user |
| "View MobiTimesheet" | Views the timesheet of the user |
| "View MobiPath" | Views the path of the user |
| "Settings" | Directs the user to the Users Settings page |
Overview and Layout
The "Details" tab is the default tab that will appear once you open the View User pop-up window. It will display the data associated with the user along with a list of devices that the user has access to:
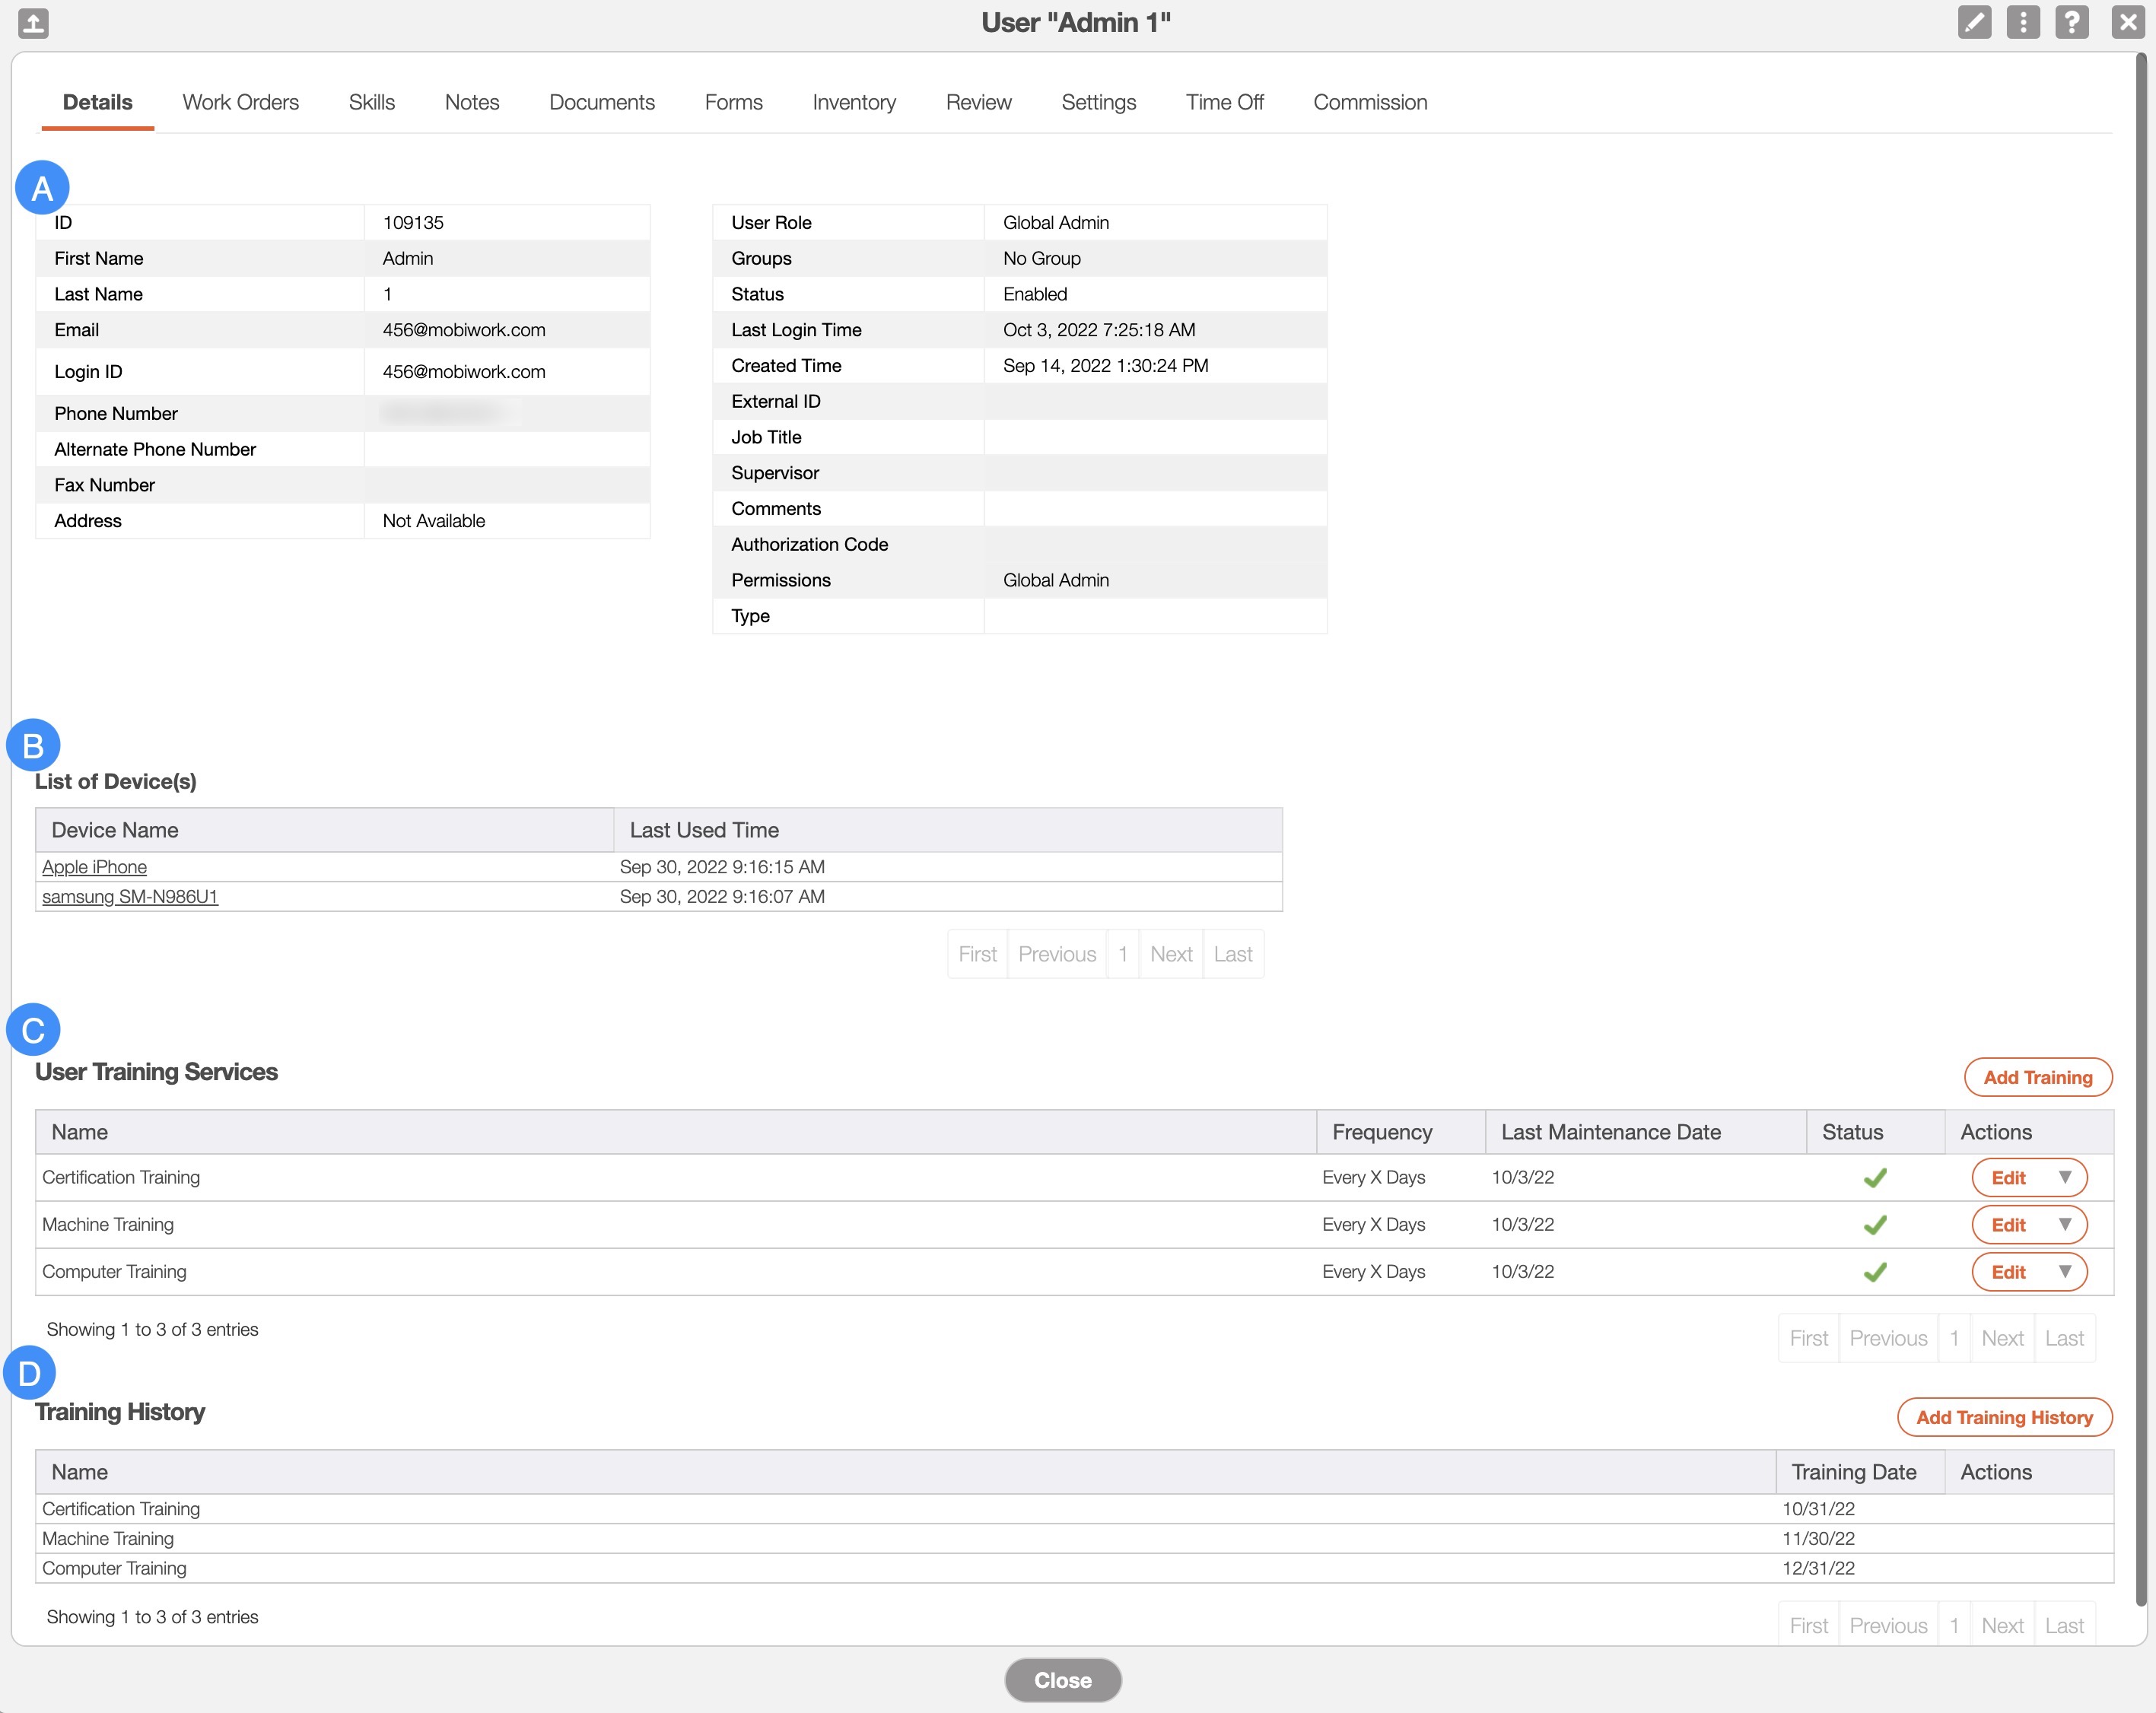
The "Details" tab will allow you to:
Information Panel- See the user ID, name, login ID, phone number, address, role, and more
List of Devices- Will display all the devices that the user has access to and the time that they were last utilized
User Training Services- Will allow you to set up scheduled training for specific skills; you can set up the frequency of training, and the overdue and reminder dates for the user
Training History- Will display the dates when the user's training was scheduled
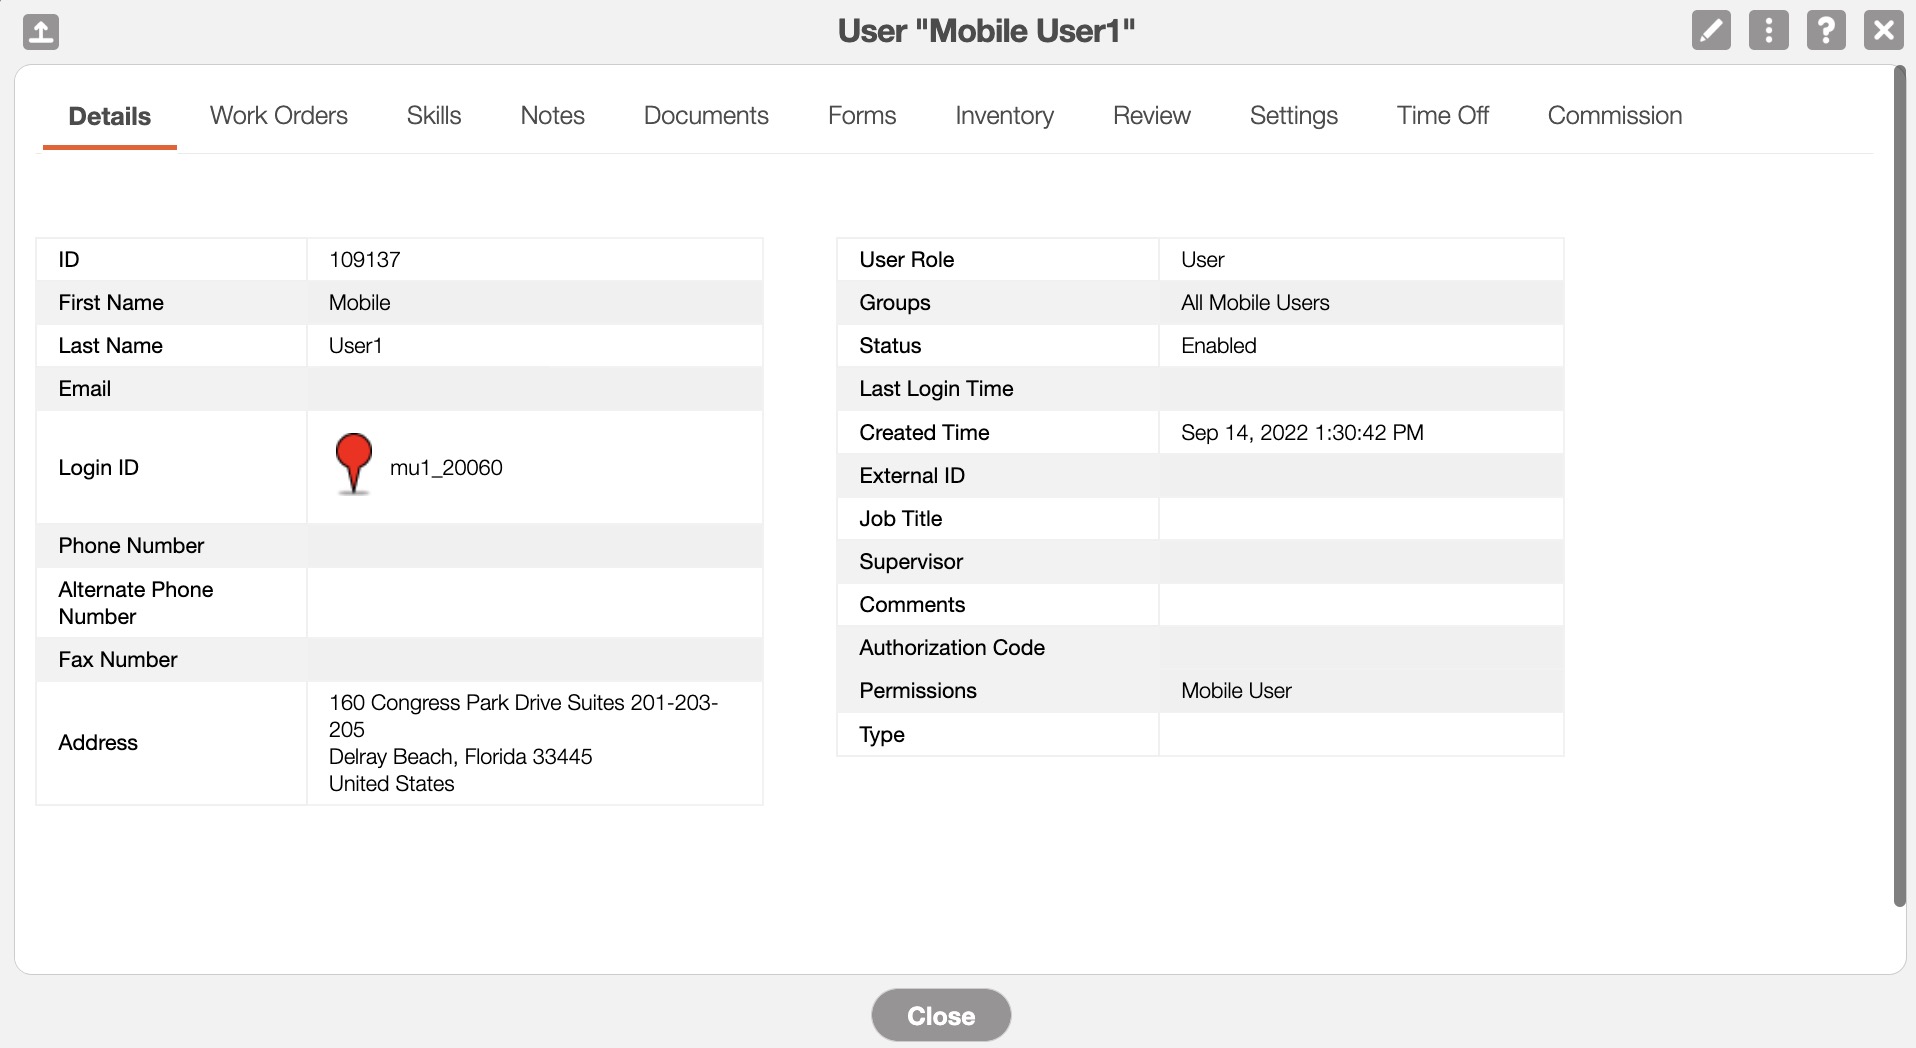
Information Panel
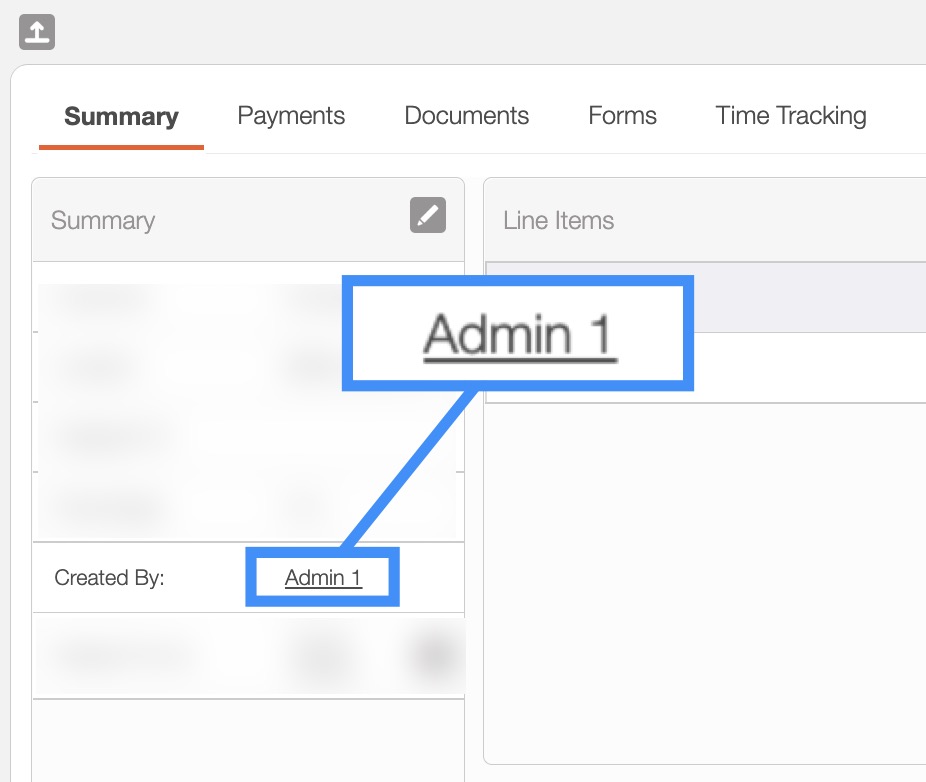
The "Information Panel" is in the top section of the "Details" tab. It contains the generic user information including the address, the user ID, login information, and more.
The supervisor for the user, the date that the user was created, and the date that the user last logged in will also be displayed in this section:
All the terms from the "Information Panel" are defined below:
| Name: | Description: |
|---|---|
| "ID" | The ID number of the user |
| "First Name" | The user's first name. |
| "Last Name" | The user's last name. |
| "Email" | The Email address associated with the user. |
| "Login ID" | The MobiWork login ID of the user. |
| "Phone Number" | The user's main phone number. |
| "Alternate Phone Number" | The user's alternate phone number. |
| "Fax Number" | The fax number associated with the user. |
| "Address" | The address associated with the user. |
| "User Role" | The user's role. Can either user or global admin. User's permissions can be edited whereas global admins have access to all actions within MobiWork. |
| "User Group" | Lists the groups associated with the user. |
| "Status" | Lists the status of the user. Can be enabled (can login to the system), disabled (cannot login to the system), registration incomplete, or awaiting confirmation. |
| "Last Login Time" | The last time the user logged in to MobiWork. |
| "Created Time" | The date and time that the user was created. |
| "External ID" | The external ID (outside of MobiWork) associated with the user. |
| "Job Title" | The job title of the user. |
| "Supervisor" | The supervisor of the user; the supervisor can access and take action on the user. |
| "Comments" | Any comments associated with the user |
| "Authorization Code" | The authorization code associated with the user. This code is required when a user with the "Edit Sales Item Price Needs Authorization" restriction tries to change the price of a sales item. |
| "Permissions" | |
| "Type" |
List of Devices
The list of devices that the user has access to will be displayed here. You will be able to view the last time that the user logged on to the specified device, as well as, see a more in-depth analysis once you click on the device:

Once you click on the selected device, you will be redirected to the Device page. This page will display the data associated with the selected device.
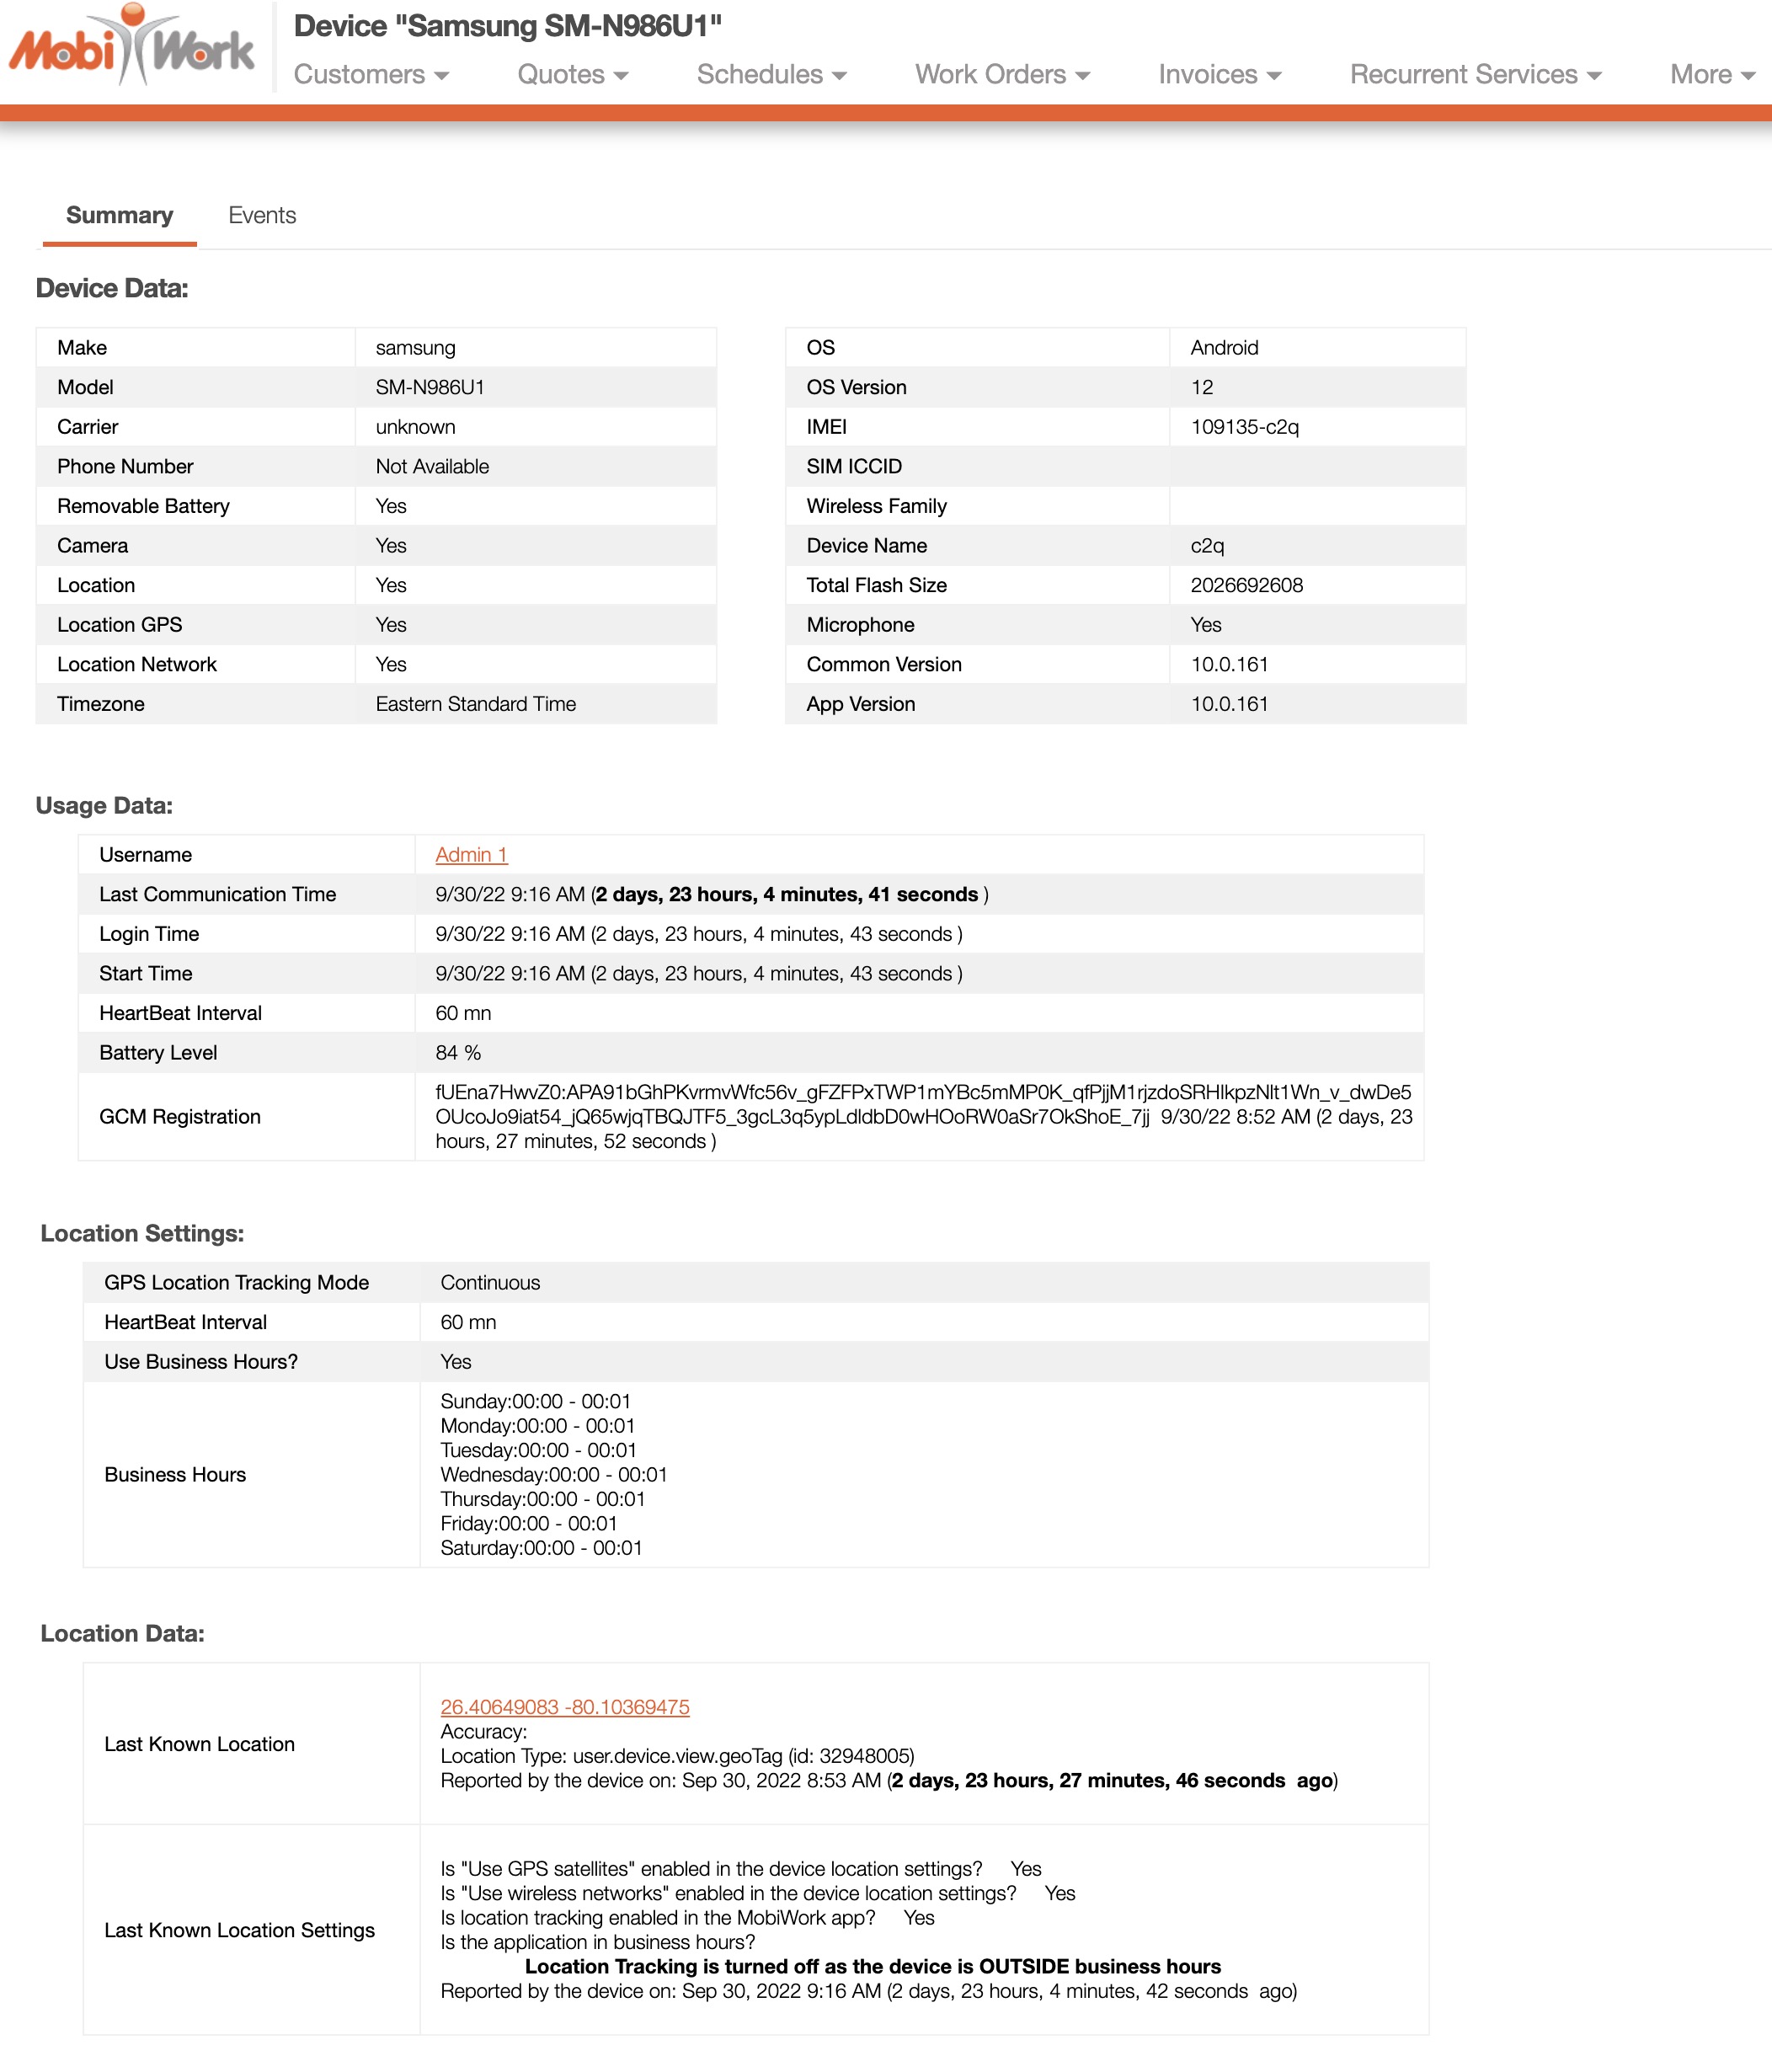
More information about this page can be found in the Devices Overview page.
User Training Services
The "User Training Services" section will allow you to schedule training for your users. In order for this section to appear in the View User pop-up window, you must first set it up in the User Training Types in your User Settings page.
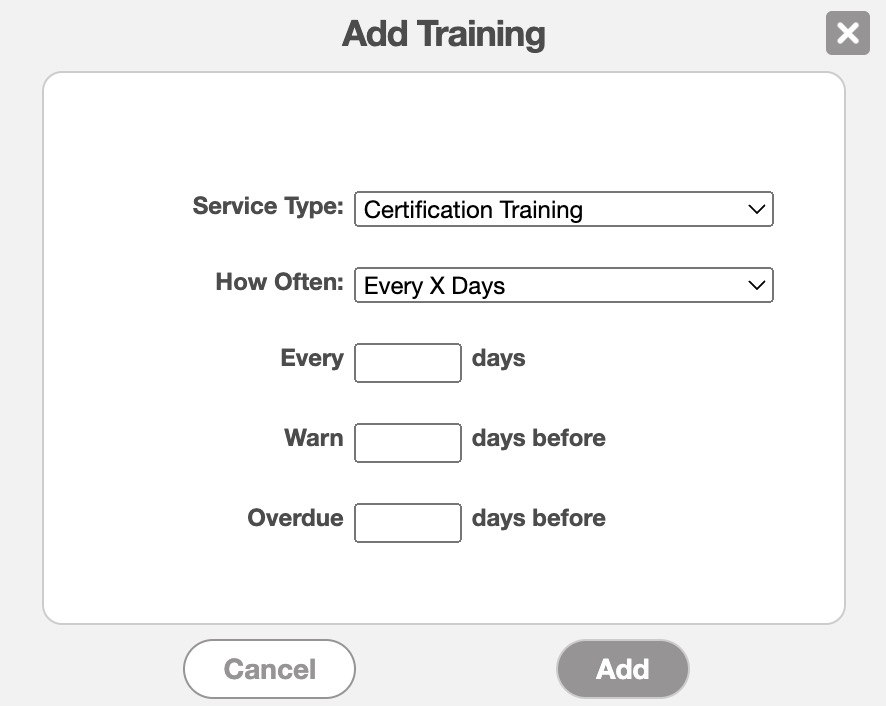
Once you have the "User Training Services" set up, you can use the Add Training button to schedule the specified training for your users:

In the Add Training pop-up window that appears, enter the service type, how often training should occur, the warning/overdue dates:
You can edit or delete the training by selecting the desired option from the "Actions" column.
Training History
The "Training History" section will display the dates that training occurred. In order for this section to appear in the View User pop-up window, you must first set it up in the User Training Types in your User Settings page.

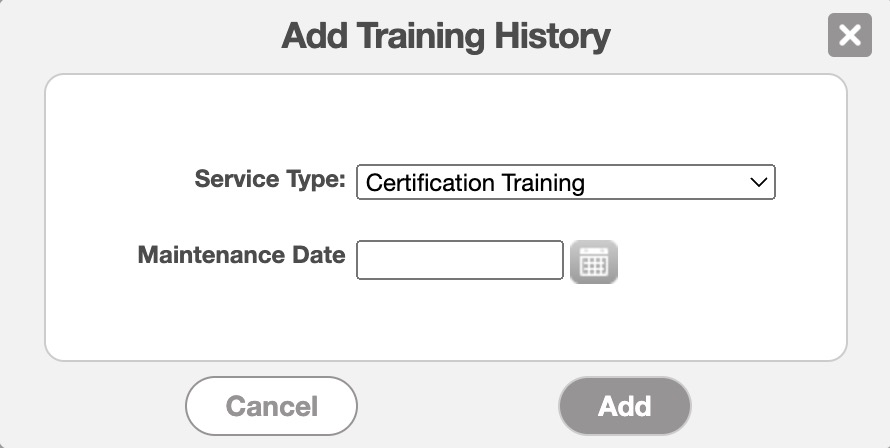
To set up the scheduled training date, click the Add Training History button. Select the desired service type and the date that training should occur:
The "Work Orders" tab is the second tab located in the View User pop-up window. This tab will display all the work orders that are assigned to the user:
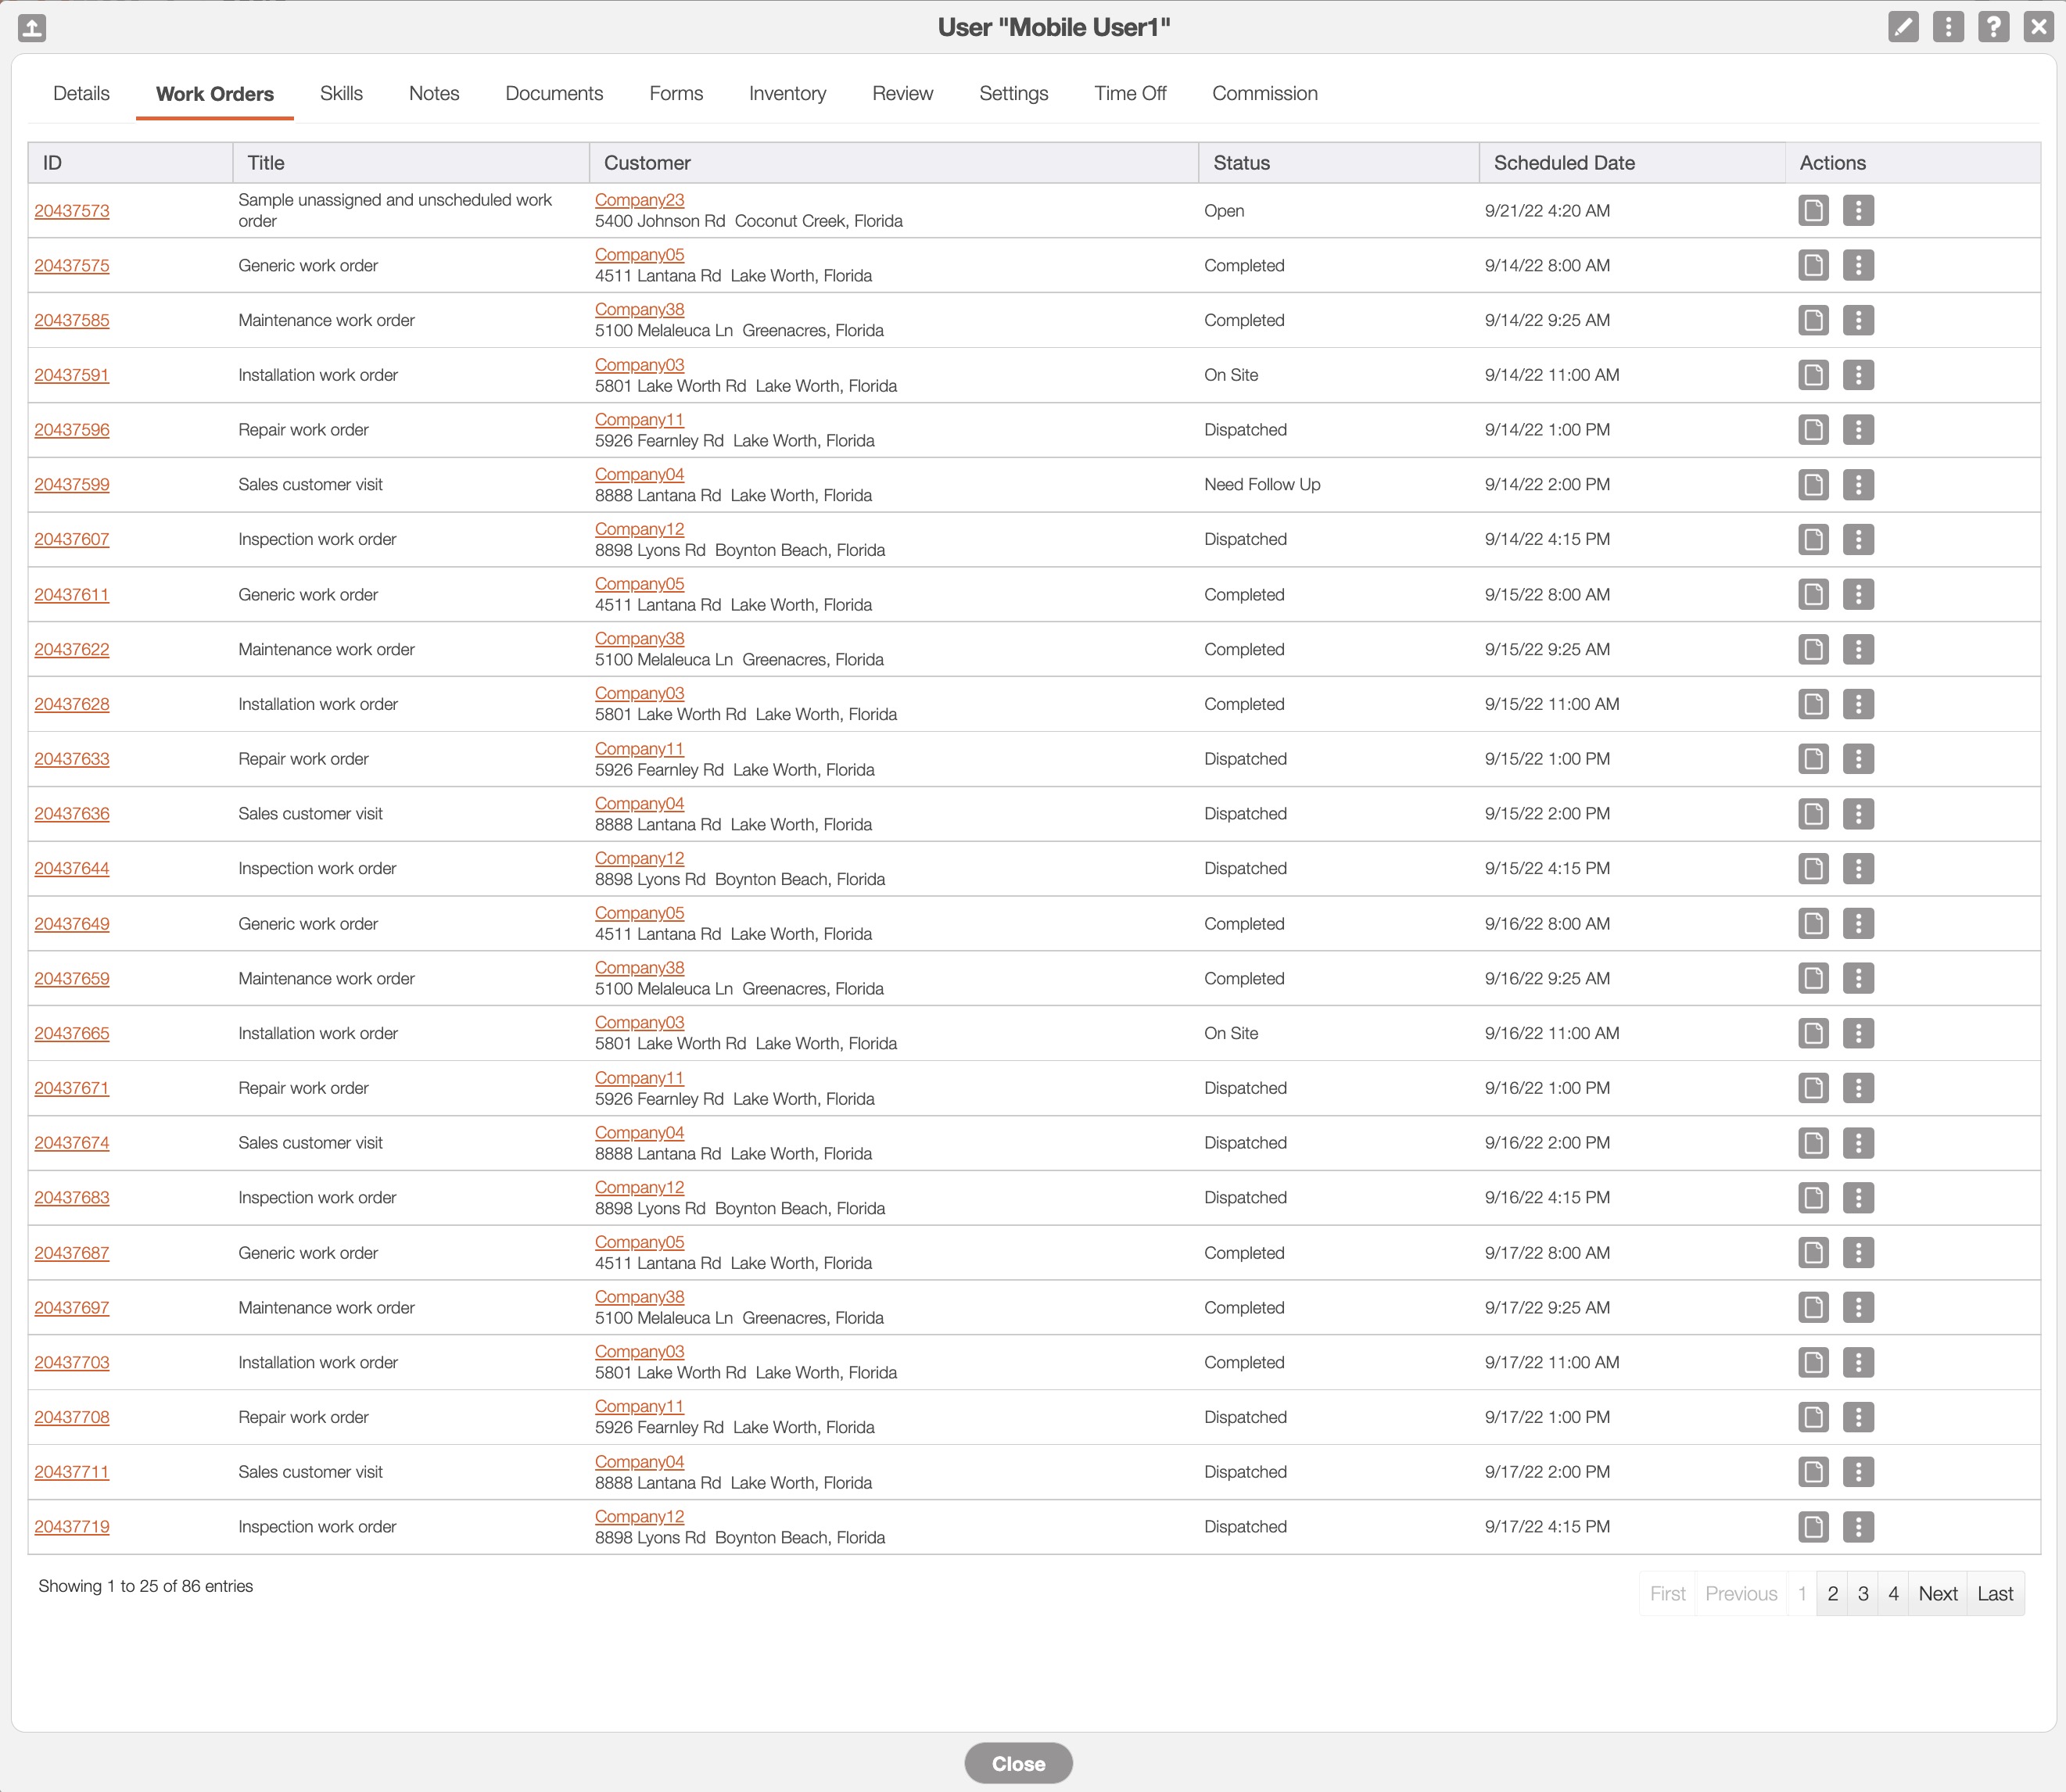
You can click on the Work ID to directly open the corresponding work order or on the customer's name to open the View Customer pop-up window.
You will also be able to view type of work order, the status of the work order, when it is scheduled, etc.
The columns for the "Work Orders" tab are defined below:
| Name: | Description: |
|---|---|
| "ID" | The ID of the work order. |
| "Title" | The type of work order that is being performed (e.g., repair, installation, etc.). |
| "Customer" | The customer that the work order is being performed for. |
| "Status" | The status of the work order associated with the user. |
| "Scheduled Date" | The scheduled date and time of the work order associated with the user. |
| "Actions" | By clicking on the View icon or the Individual Actions button you will be able to access the "View" or "Repeat" option. The "Repeat" option allows you to repeat a work order; please see the Add Work Order section for more information about repeating work orders. |
The "Skills" tab will list any specialized skills or certifications that the user possess:
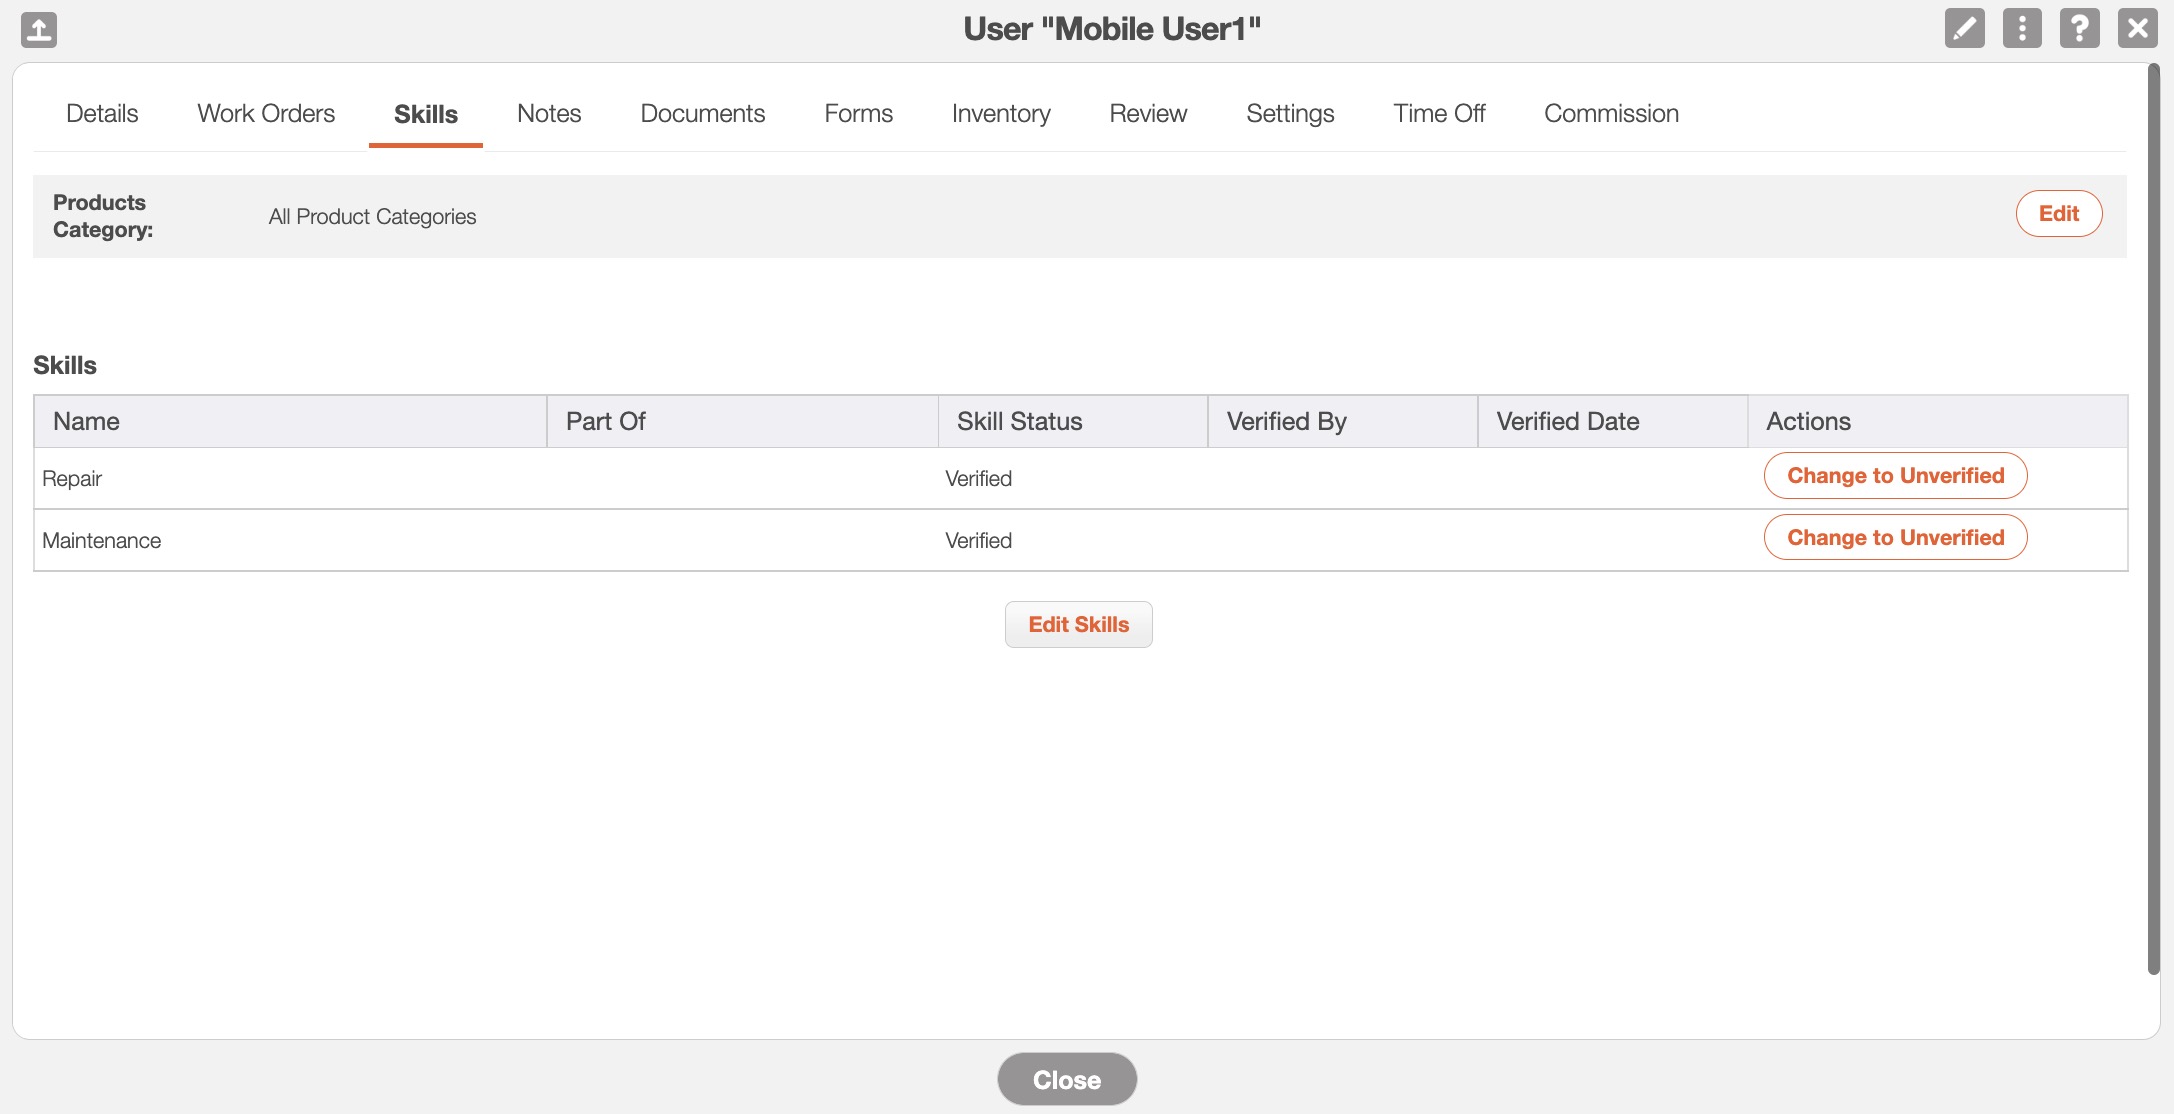
Please note that the first time you access the "Skills" tab, it will be blank. You will need to create the necessary skills from the Settings page; for more information on how to create skills, please see the User Settings page.
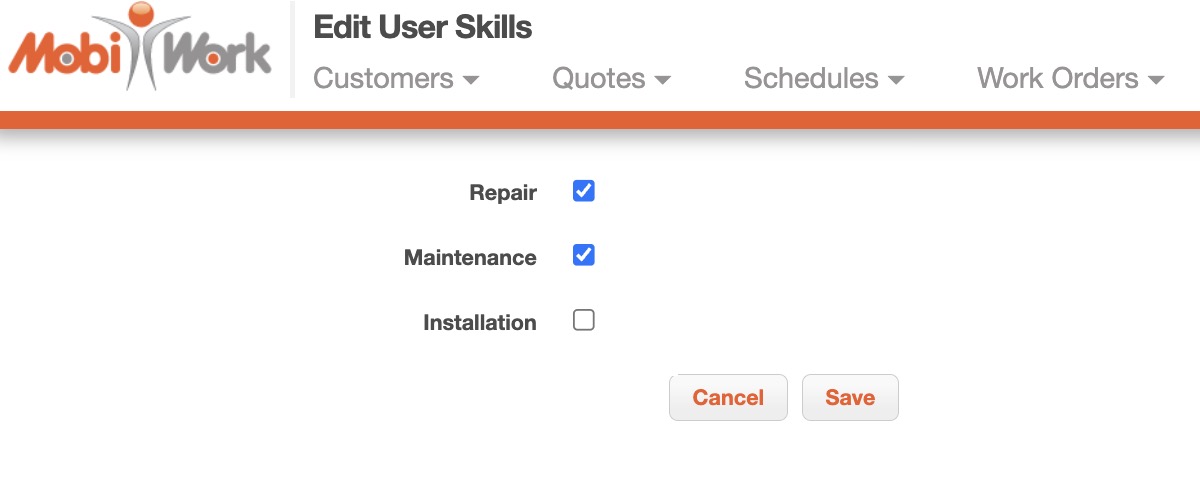
After you have added the skills into MobiWork, you can associate them with a user. Click on the Edit Skills button to associate the skills with the user.
You will be redirected to the Edit User Skills page; use the checkmarks to indicate which skills you would like to associate with the user:
When you are ready to finalize, click the Save button:
The columns for the "Skills" tab are defined below:
| Name: | Description: |
|---|---|
| "Name" | The name of the skill |
| "Part Of" | The skill part of the overall skill. For instance, leak detection part of pool service and drain cleaning part of plumbing. |
| "Skill Status" | Displays if the user is verified and unverified for the skill |
| "Verified By" | The individual who verified the user's skill |
| "Verified Date" | The date and time that the skill was verified |
| "Actions" | Will allow you to update the user's skill to verified or unverified. |
The "Notes" tab will list any notes associated with the user:
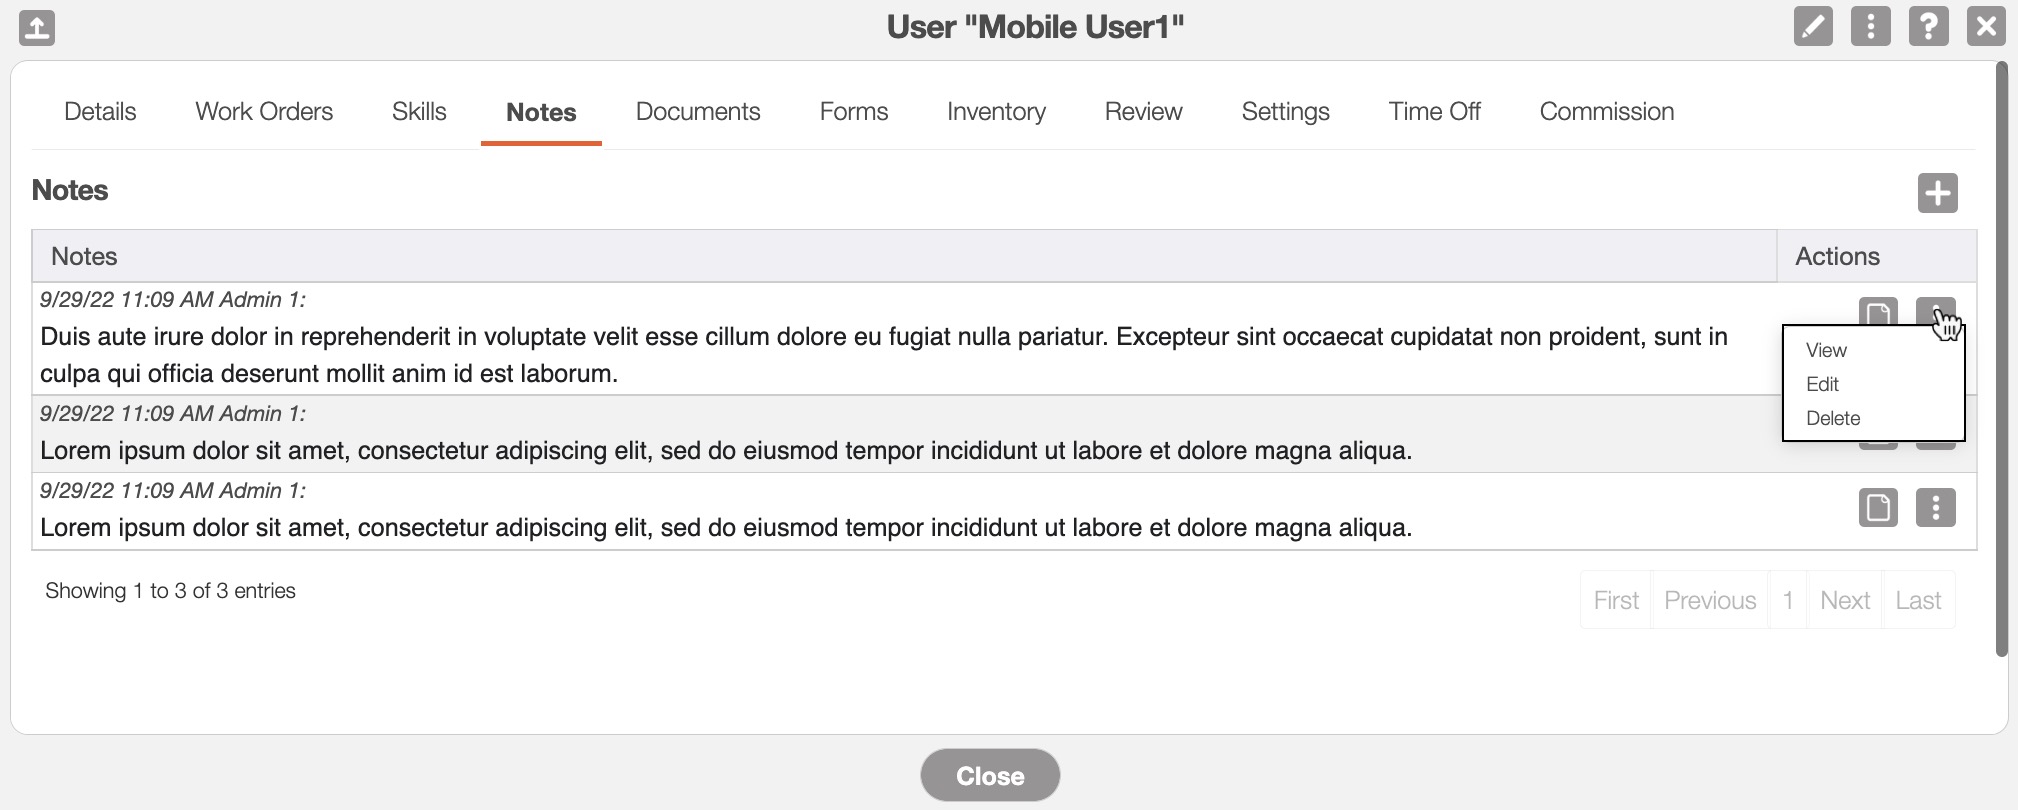
To add a new note, simply press the Plus Sign button in the top right-corner.
If you would like to view the note in a read-only window, you can click on the View icon or select the "View" option from the Individual Actions button.
The Individual Actions button will also allow you to edit or delete the specified note.
The "Documents" tab will contain any documentation associated with the user. This tab will display the type of document listed, the user who posted the document, and more:
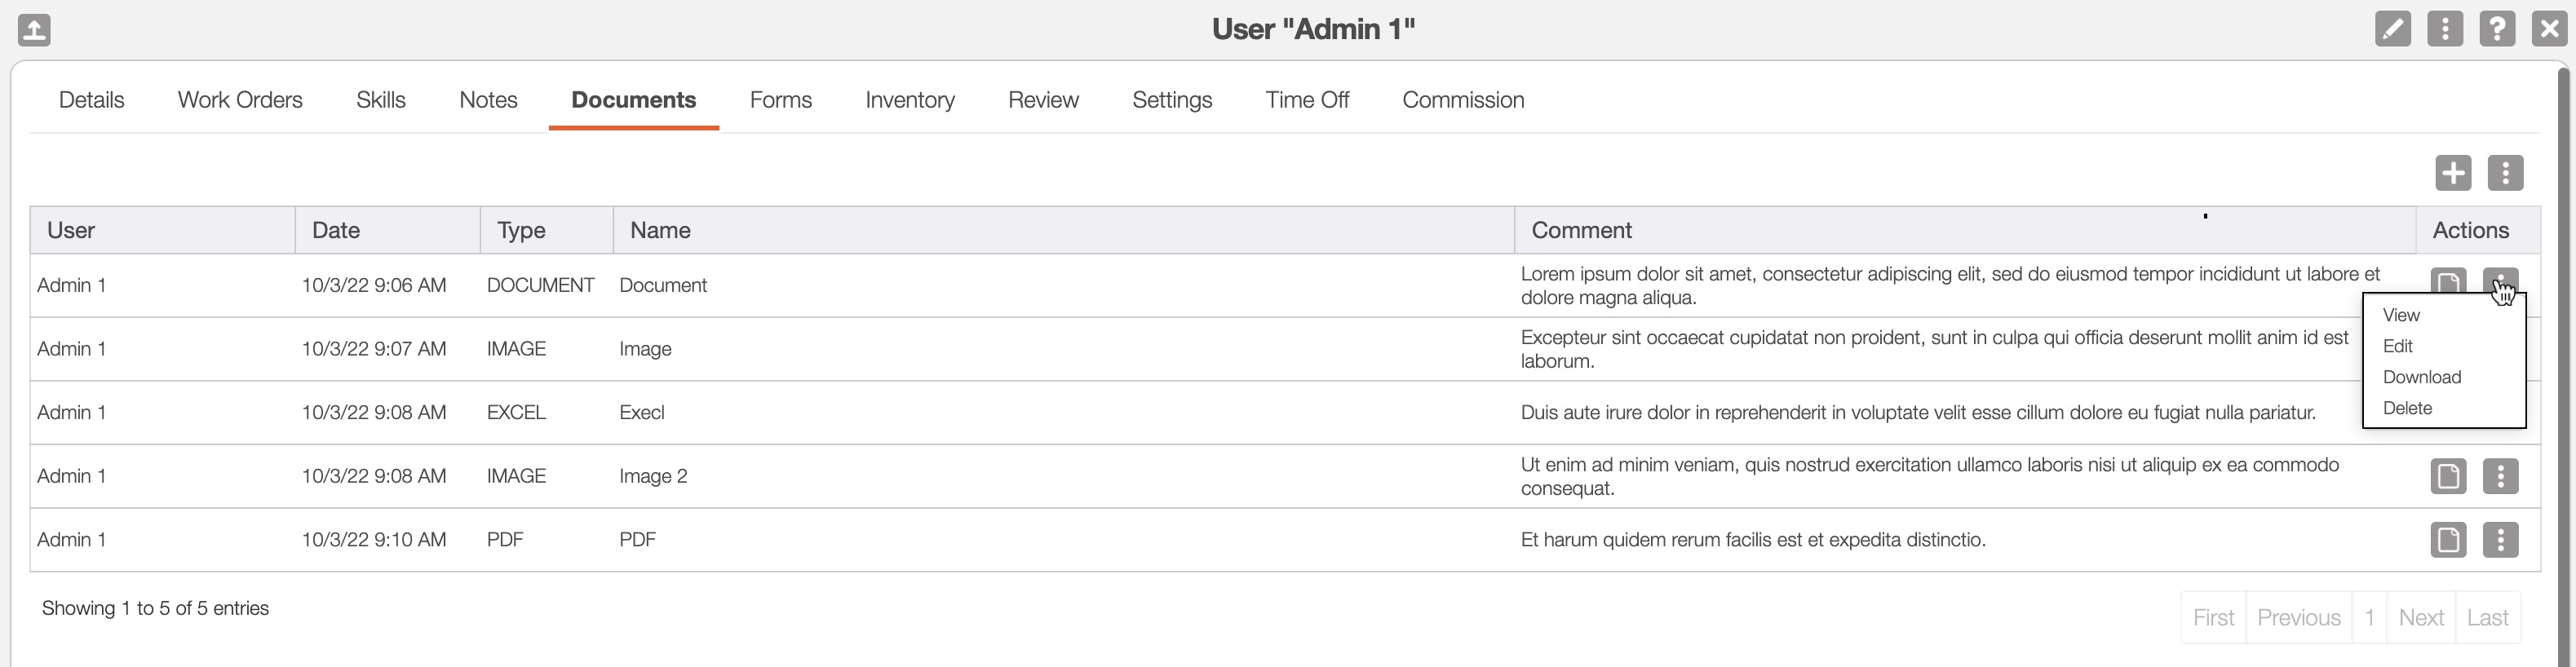
You can use the Plus Sign button or the More Actions button to add a new document for the user.
The columns for the "Documents" tab are defined below:
| Name: | Description: |
|---|---|
| "User" | The user who posted the document |
| "Date" | The date and time that the document was posted to the user |
| "Type" | The type of document that is associated with the user |
| "Name" | The name of the document associated with the user |
| "Comment" | Any comments associated with the document |
| "Actions" | Will allow you to view, edit, download, or delete the specified document |
The "Forms" tab will display all the forms associated with the user and any form where the user is referenced:
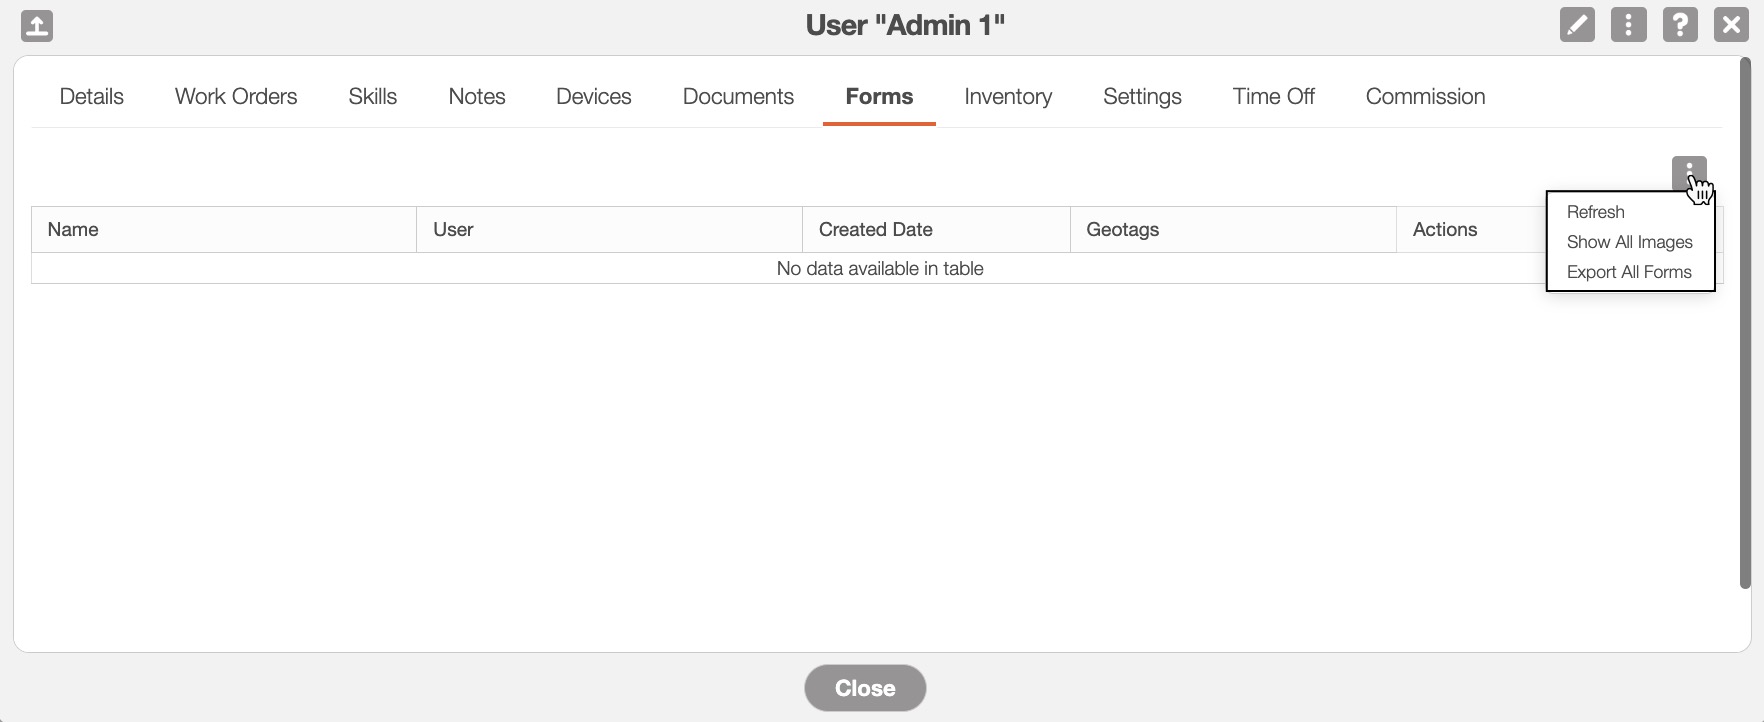
The columns for the "Forms" tab are defined below:
| Name: | Description: |
|---|---|
| "Name" | The name of the form associated with the user |
| "User" | The user who uploaded the form. |
| "Created Date" | The date the form was created |
| "Geotags" | The geographical locations of where the form was created |
| "Actions" | Will allow you to view, edit, or export MobiForm to PDF |
| "Individual Actions" | Will allow you to refresh, show all images, or export all forms |
The "Inventory" tab will list all the parts/products or assets that the specified user has on hand. The "Inventory" tab is divided into two sections, "Assets" and "Parts:"
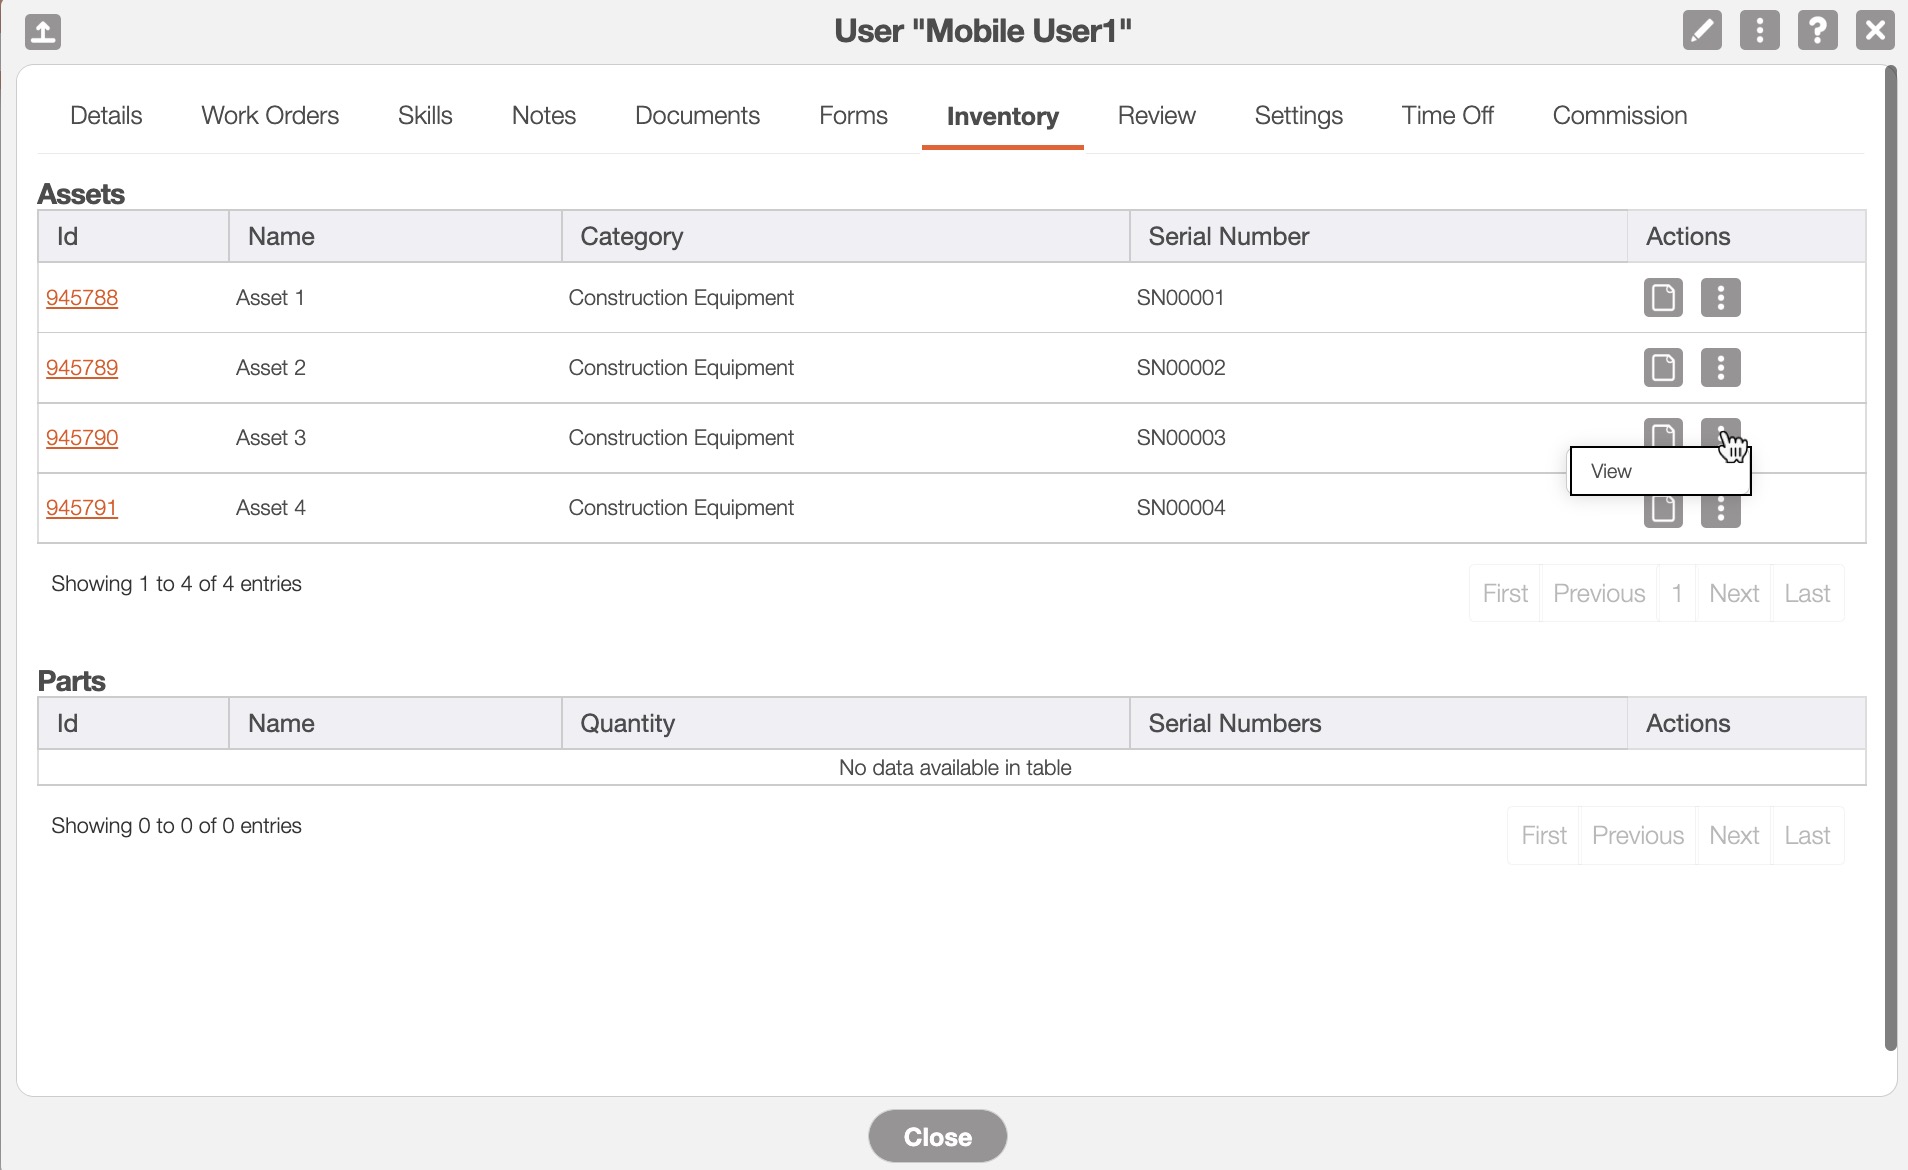
To associate an asset with a user, you will first need to transfer the selected assets to the user. Please see the Transfer Assets page, to see how to associate your assets to your users.
The columns for the "Inventory" tab are defined below:
| Name: | Description: |
|---|---|
| "ID" | The ID of the part or the asset |
| "Name" | The name of the part or the asset |
| "Category" | |
| "Serial Number" | The serial number of the part or asset |
| "Actions" |
The "Review" tab will list the customer evaluation of the user. It will display the customer who posted the review, the date that the review was posted, the star-rating, any comments, and more:
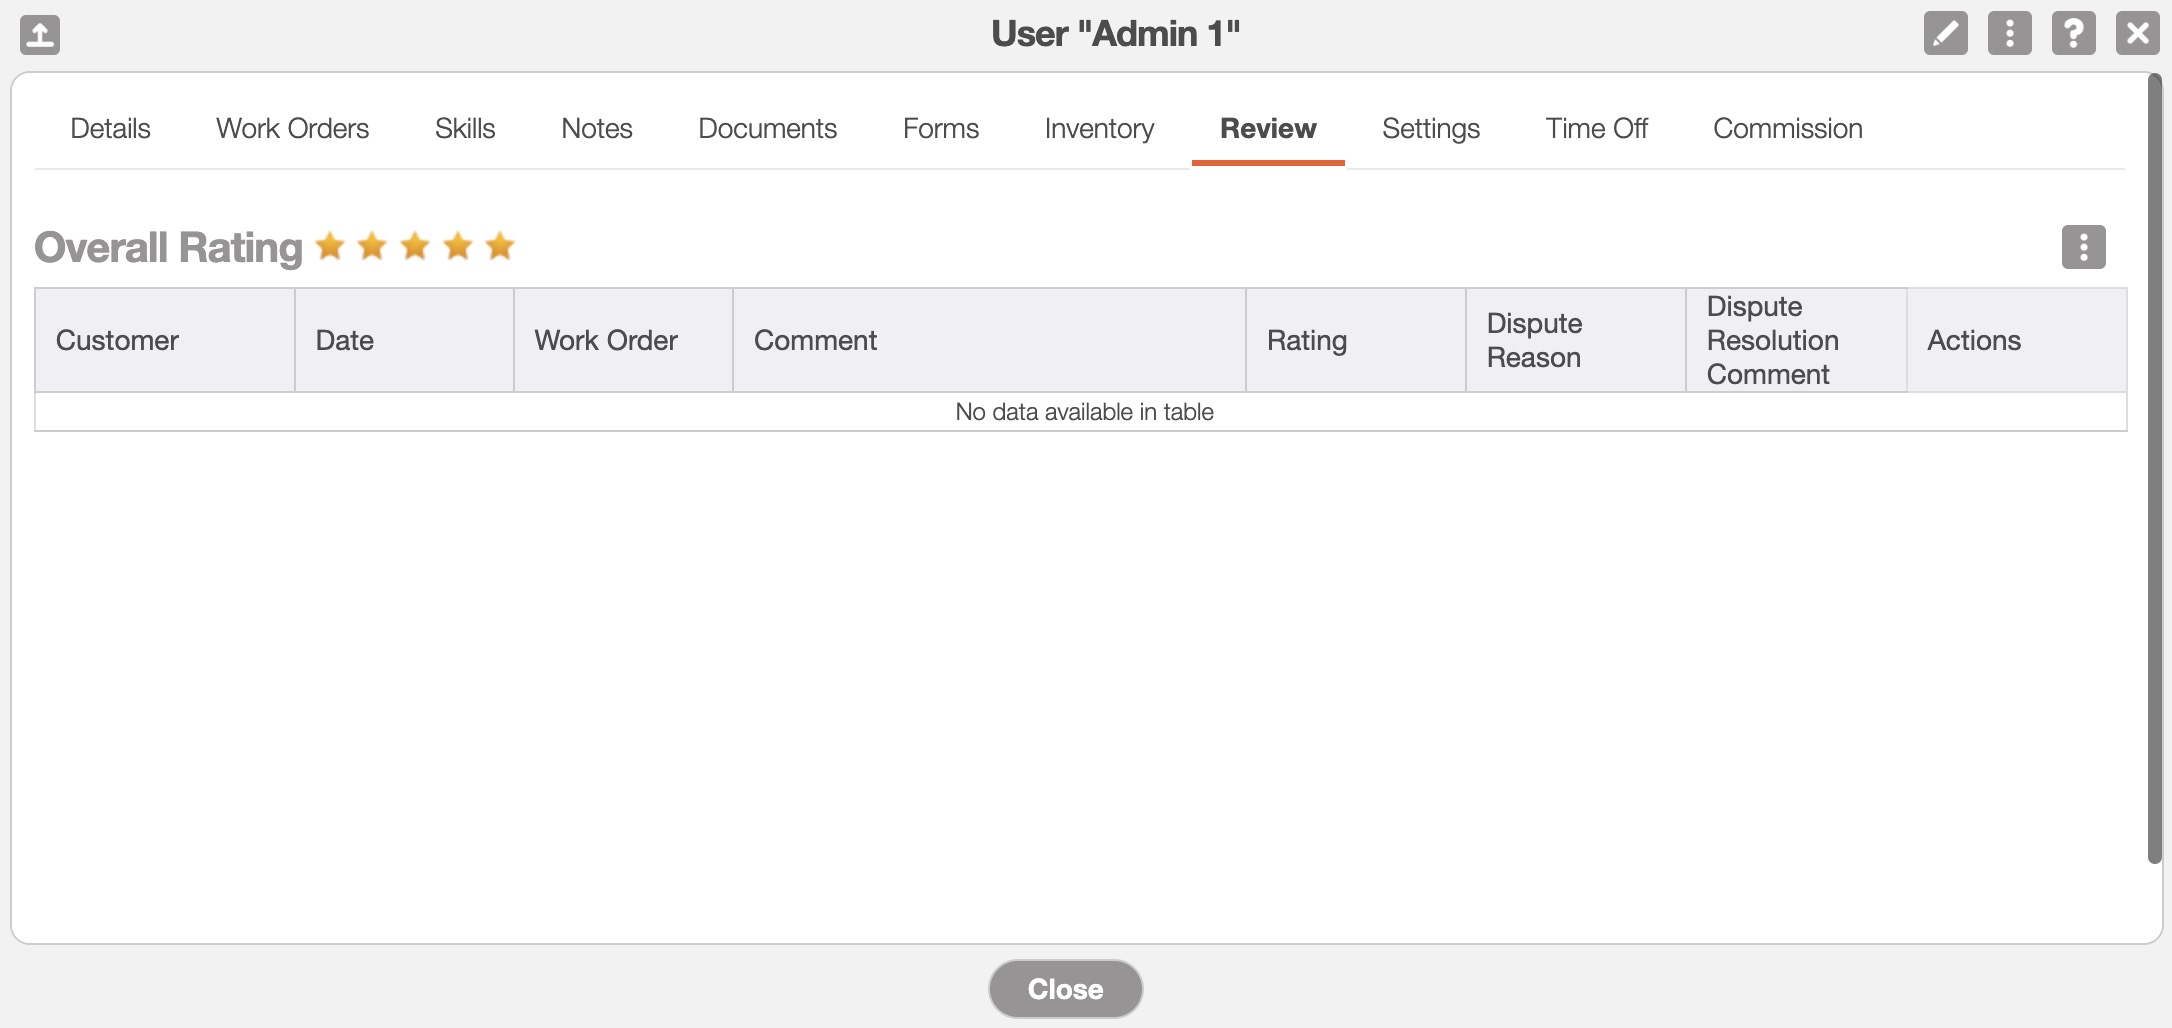
The columns for the "Review" tab are defined below:
| Name: | Description: |
|---|---|
| "Customer" | The customer who reviewed the user |
| "Date" | The date and time that the review was posted |
| "Work Order" | The work order associated with the customer's review |
| "Comment" | The comments associated with the customer's review |
| "Rating" | The rating of the user (with 5 being the best and 1 being the worst) |
| "Dispute Reason" | Lists the reason why the user is disputing the customer's review. The user can dispute a review (bad or good) and the supervisor administrator can meditate/correct in the User Review tab. |
| "Dispute Resolution Comment" | Lists the dispute resolution comments (from the supervisor administrator) regarding the customer's review |
| "Actions" | Will allow you to edit the review (allows the admin to change the rating and comment) or hide (hides the comment) |
| "Edit Overall Rating" | Will allow you to edit the overall rating for the user, which can be between 1-5 stars (with 5 being the best and 1 being the worst) |
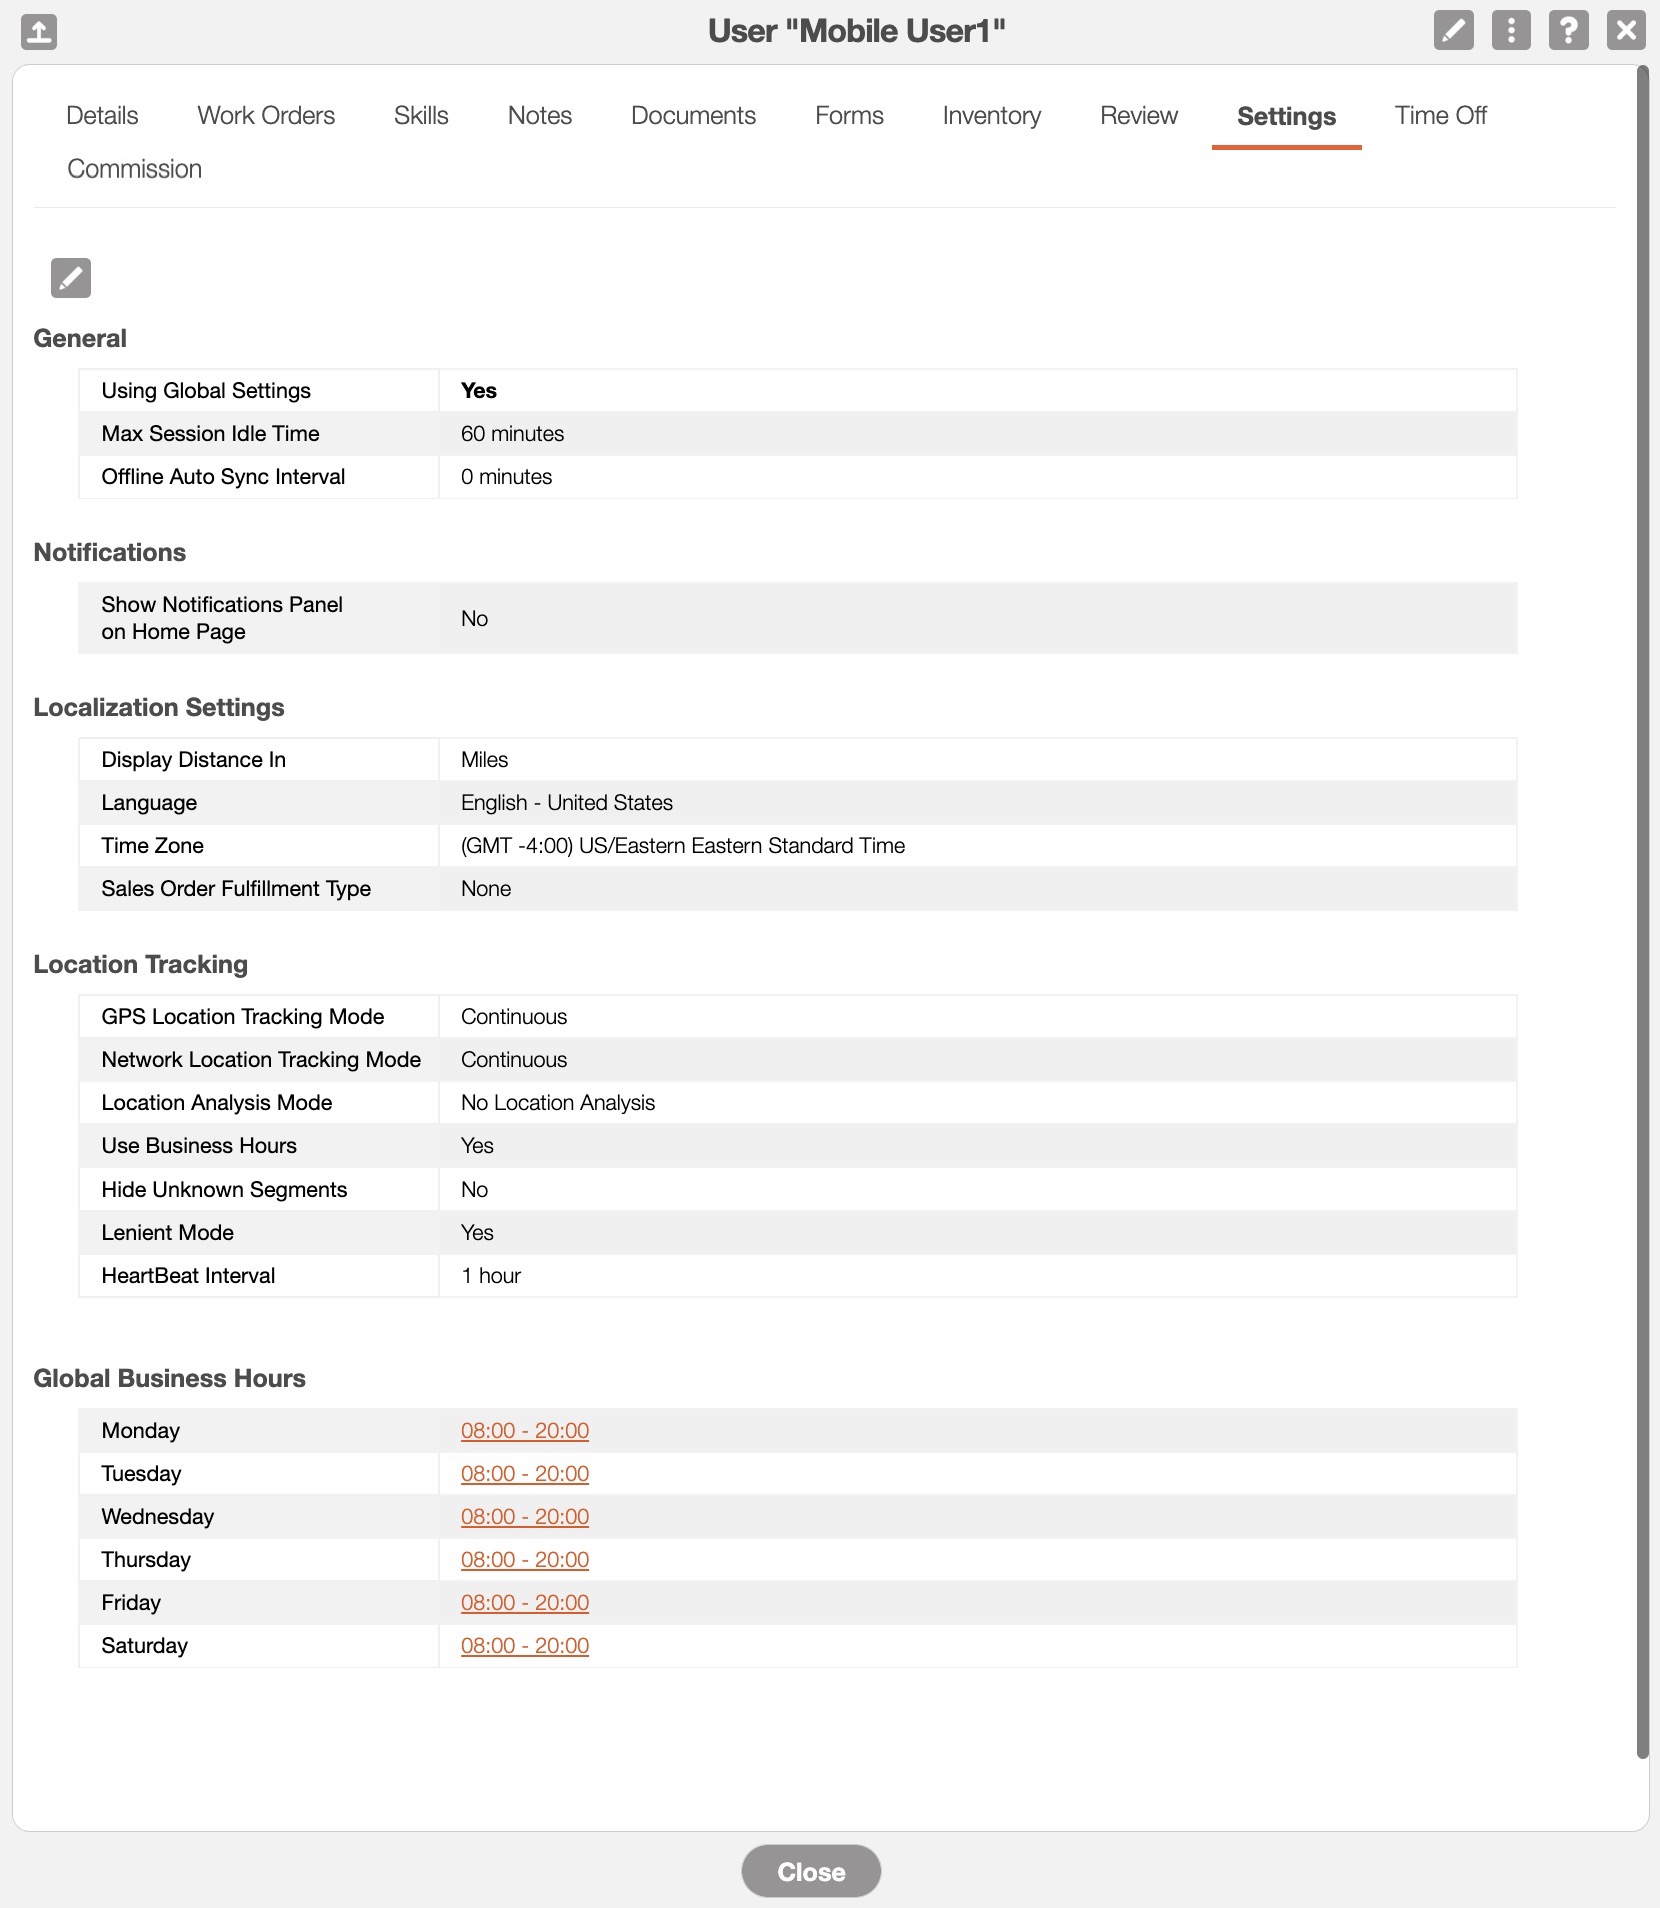
The "Settings" tab will allow you to view the specified settings for the user; you can utilize the global settings for the user, or you can customize the settings accordingly:
To edit the settings for the user, click on the Pencil icon above the "General Section." You will then be redirected to Edit Settings for User page:
To input settings that differ from the Global Settings for the specific user, uncheck the "User Global Settings" option:

Once the "User Global Settings" option is unchecked, you will be able to make the necessary changes to the specified user's settings. Once you are satisfied with the changes, click on the Save button:
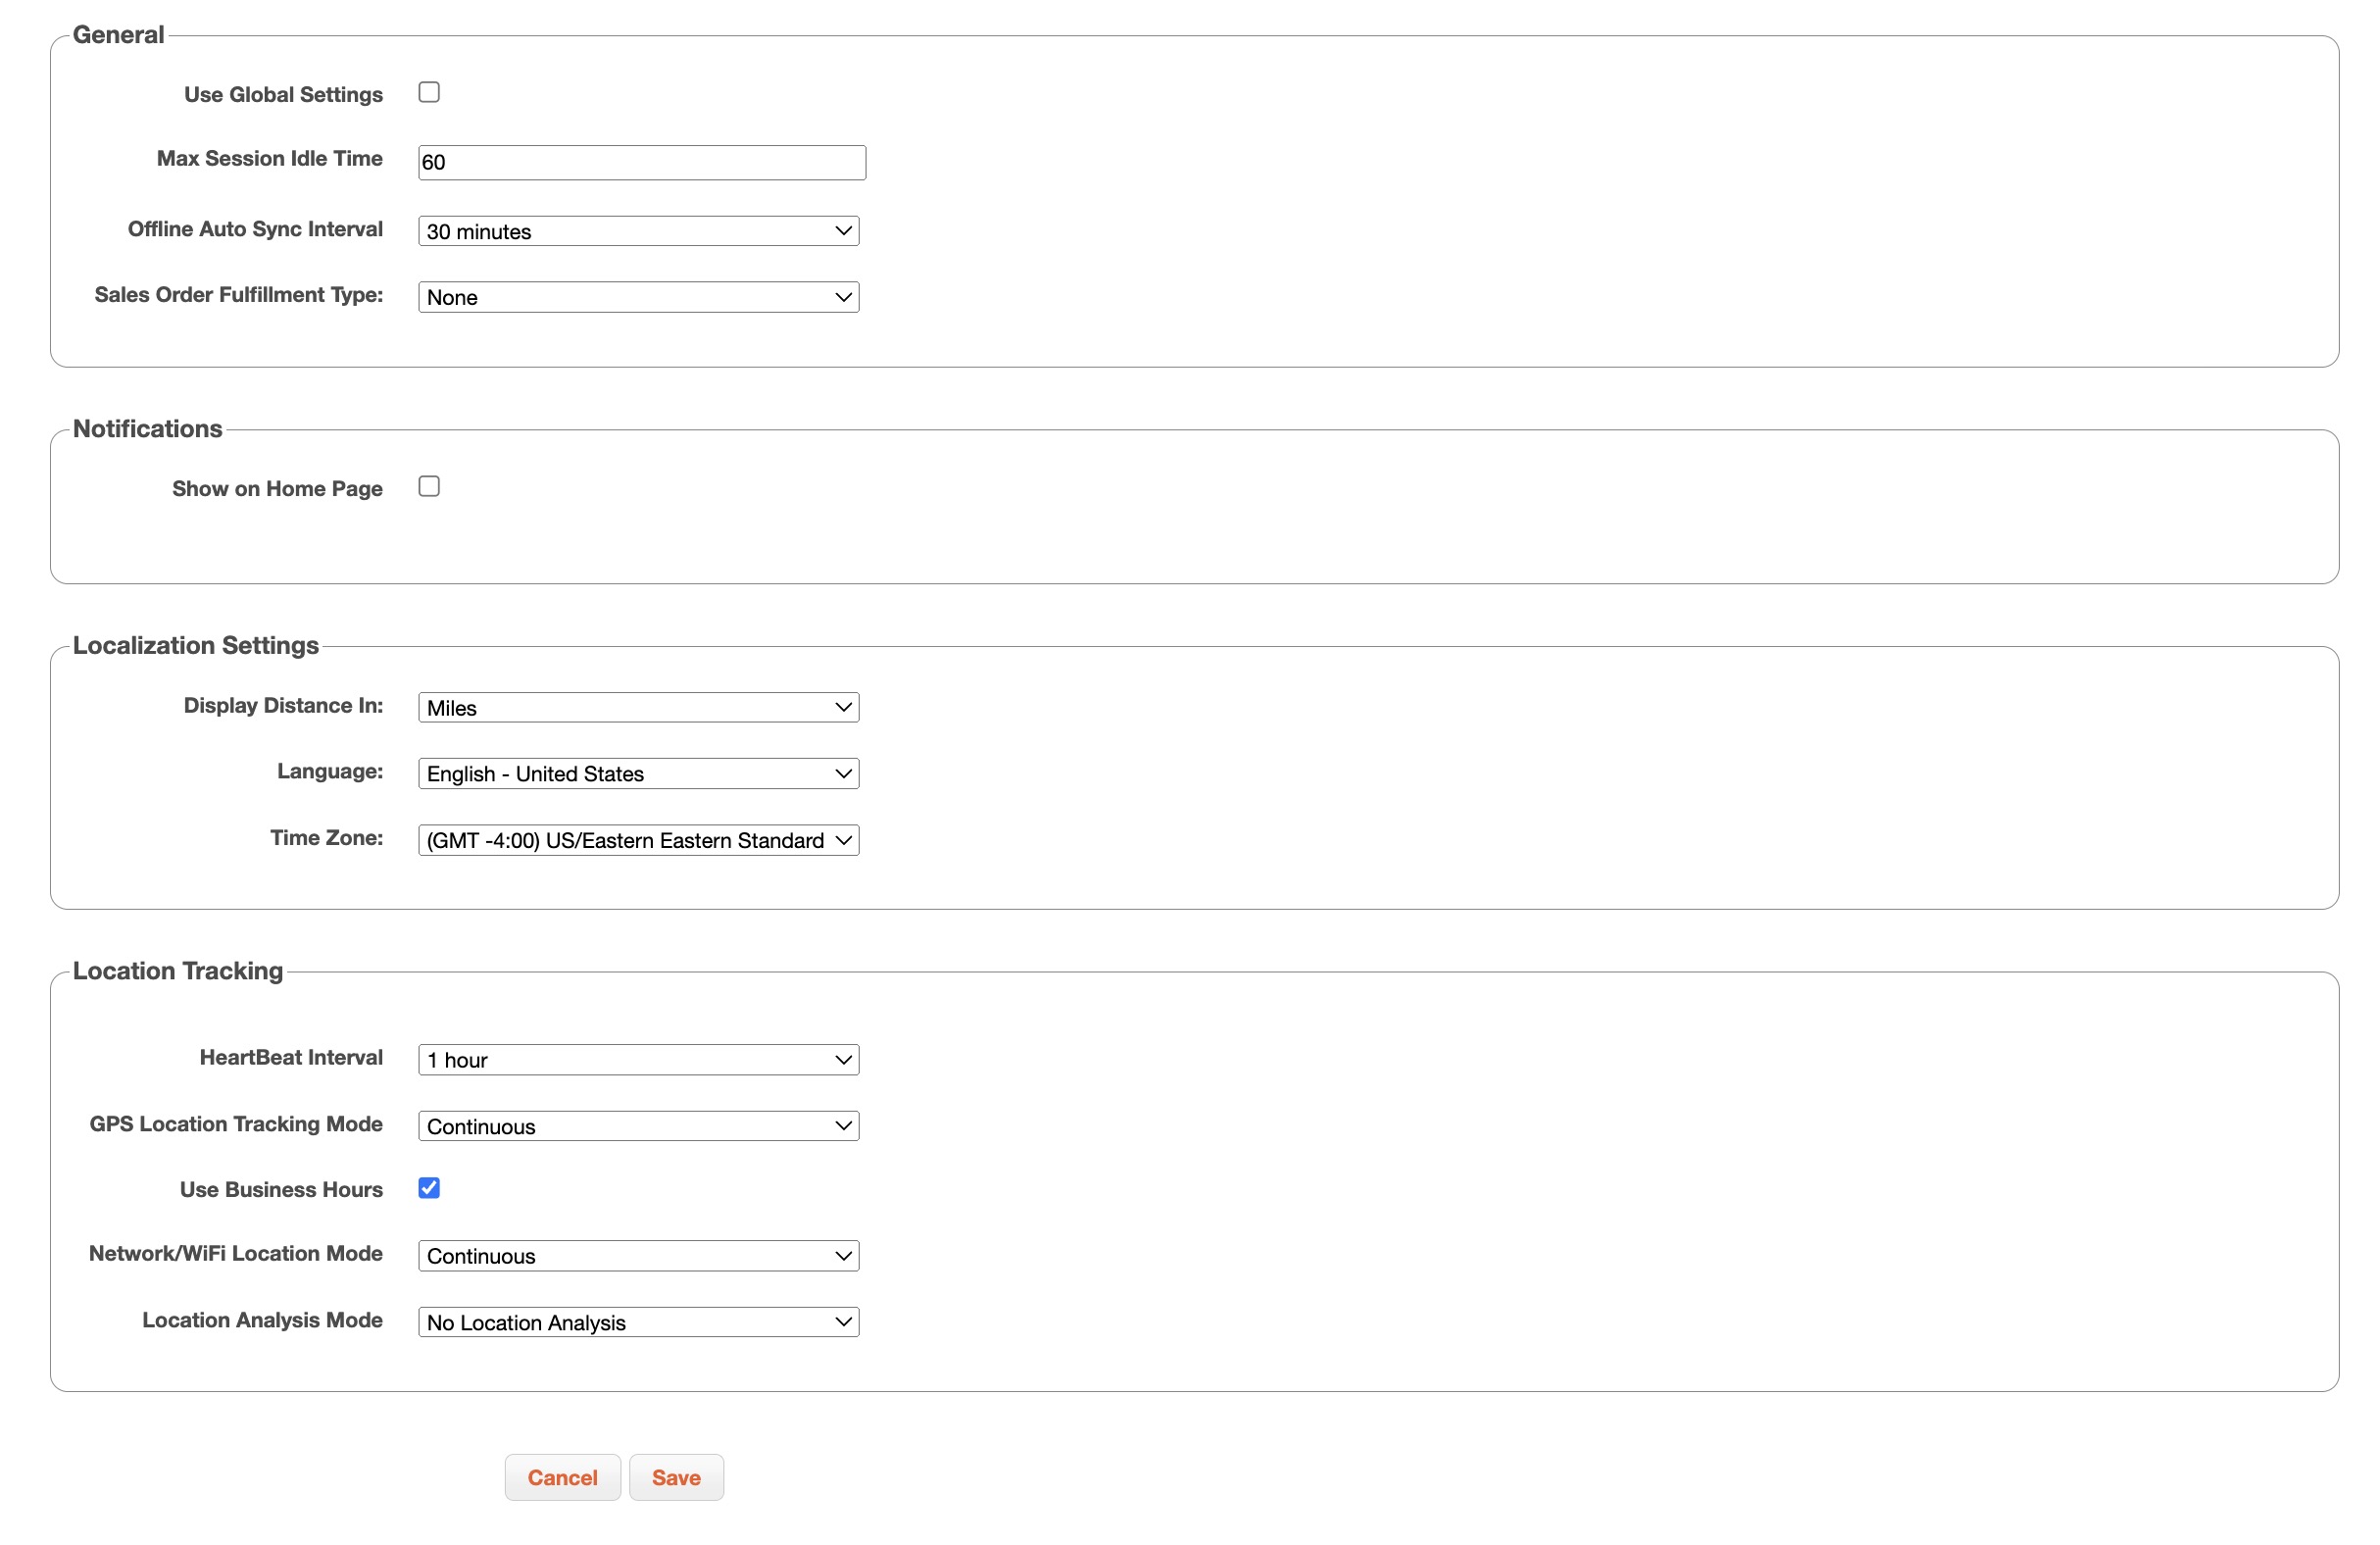
The columns for the "Settings" tab are defined below:
| Name: | Description: |
|---|---|
| "Use Global Settings" | Uses the settings configured at the company level. If unchecked the settings will be tuned for the specified user |
| "Max Session Idle Time" | The max session idle time before MobiWork automatically logs out |
| "Offline Auto Sync Interval" | How often the device will try to communicate with the server when it is in offline mode |
| "Sales Order Fulfillment Type" | Indicates how the user can fulfill a sales order (i.e., from their personal inventory or the backend process) |
| "Show on Home Page" | Shows the notification panel on the home Page |
| "Display Distance In" | The measurement of distance that will display for the user in MobiPath, MobiTimesheet, and work order assignments by location |
| "Language" | The language that the text within MobiWork will be displayed in |
| "Time Zone" | The time zone the user is in |
| "HeartBeat Interval" | How often location information from the user's device will be sent to MobiWork |
| "GPS Location Tracking Mode" | The continuous, no location tracking, frequency mode (at defined intervals), or on demand (on the device, the user can specify when they want to be tracked) |
| "Use Business Hours" | The user will be tracked during business hours. If unchecked, the user will be tracked 24/7 |
| "Global Business Hours" | The business hours for the user |
| "Network/WIFI Location Tracking Mode" | Determines how often the user can be tracked. (i.e., continuous, no location tracking, a set number of minutes, or on demand). For "On Demand" the user can specify when they want to be tracked |
| "Location Analysis Mode" | Allows you to analyze all locations, analyze POI locations only, or no location analysis |
The "Time Off" tab will allow you to view or add time off notifications for the specified user. Please note that if you would like an approval process for the time off feature, contact our Sales team at Sales@mobiwork.com; otherwise, the time off feature will not have an approval process where the manager approves the employee's time off:
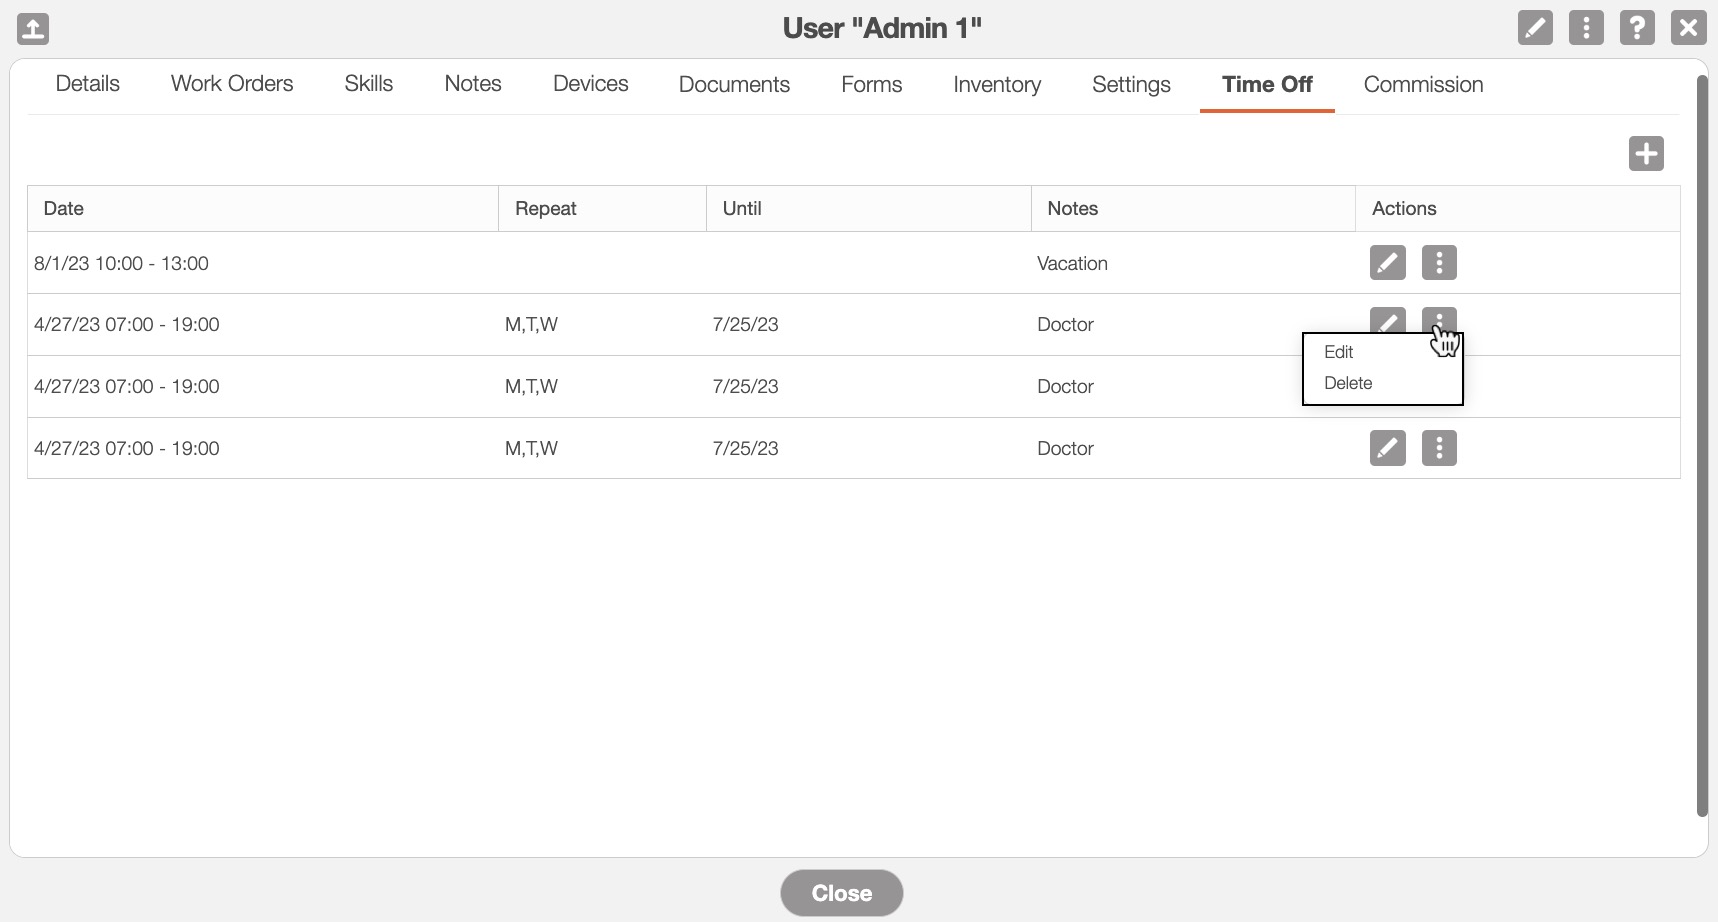
To add a new time off notification, click on the Plus Sign button. Once you click on this button, the Add Time Off pop-up window will appear:
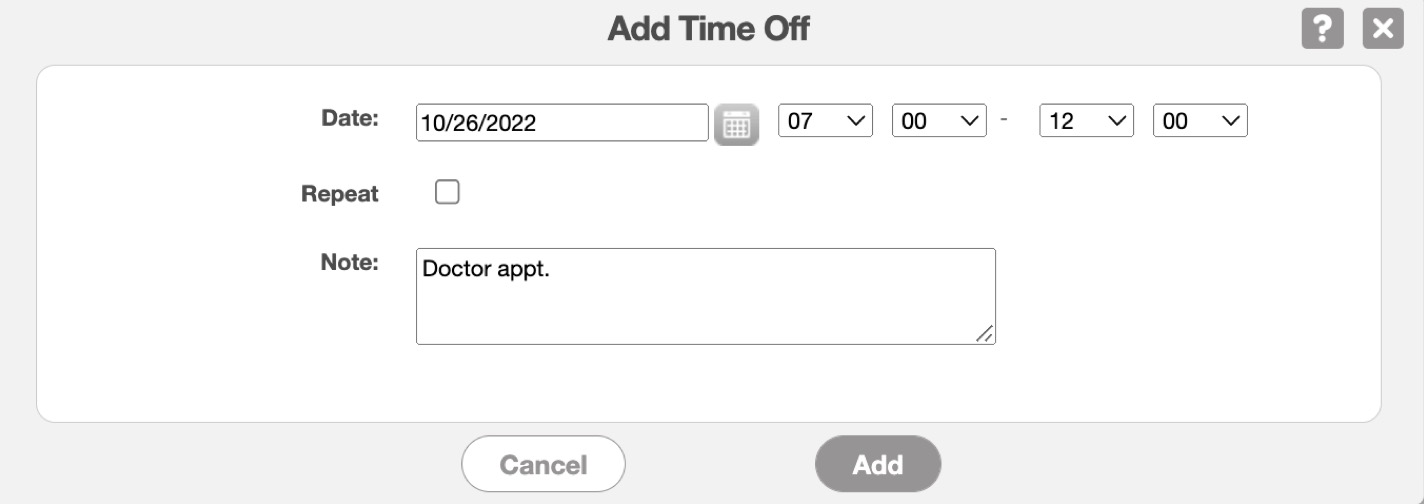
Input the time frame and date of the notification, if it will be recurring, and a note. Once you are satisfied with the information you have entered, click the Add button.
The columns for the "Time Off" tab are defined below:
| Name: | Description: |
|---|---|
| "Date" | The time and date range of the notification |
| "Repeat" | If the time off notification repeats for a specified series of days |
| "Until" | When the time off notification will end after a specified series of days |
| "Notes" | Any notes related to the time off notification (e.g., if it's a doctor's appointment or vacation day) |
| "Actions" | Allows you to edit or delete the time off notification |
When viewed in the Schedule feature, a work order cannot overlap the entered time off duration:
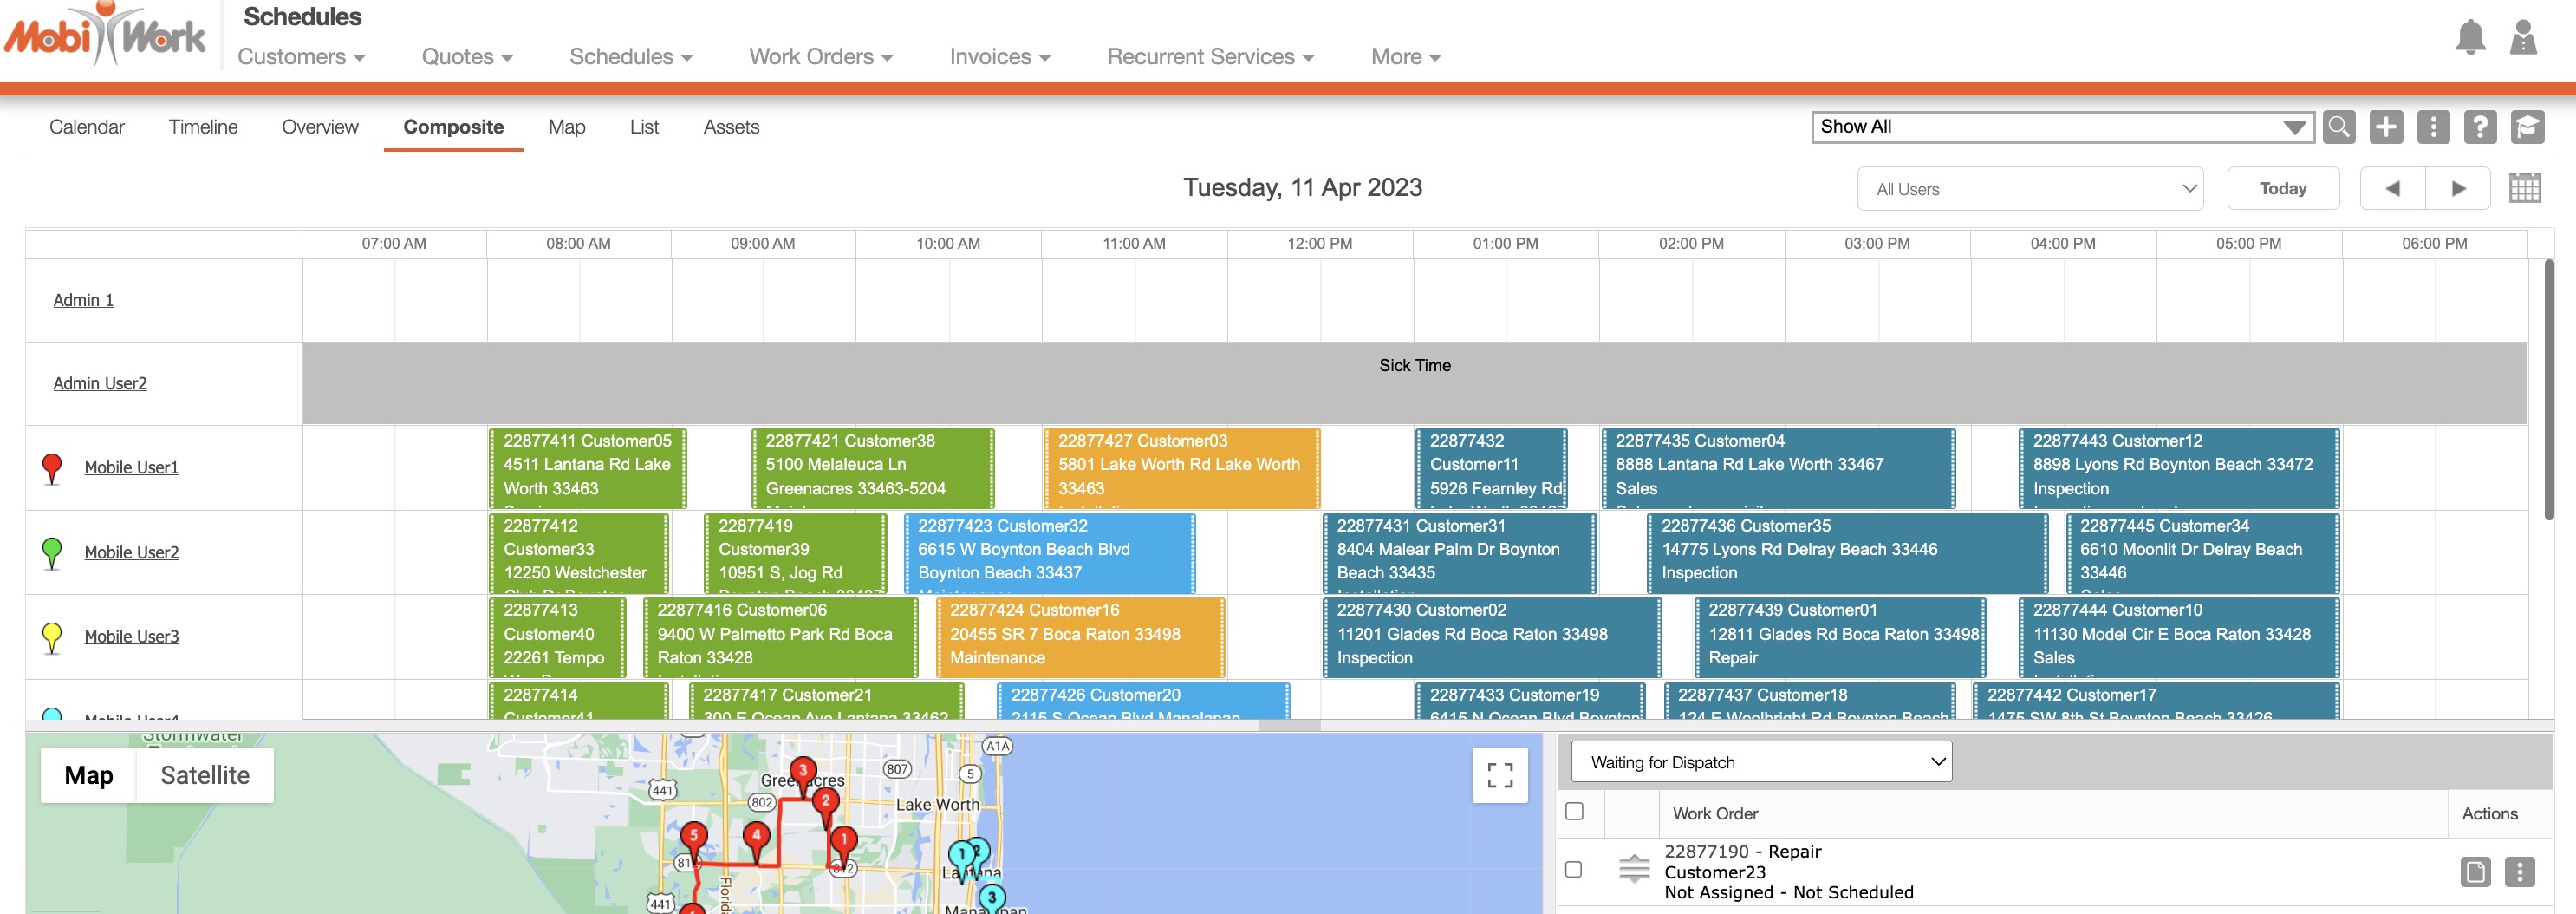
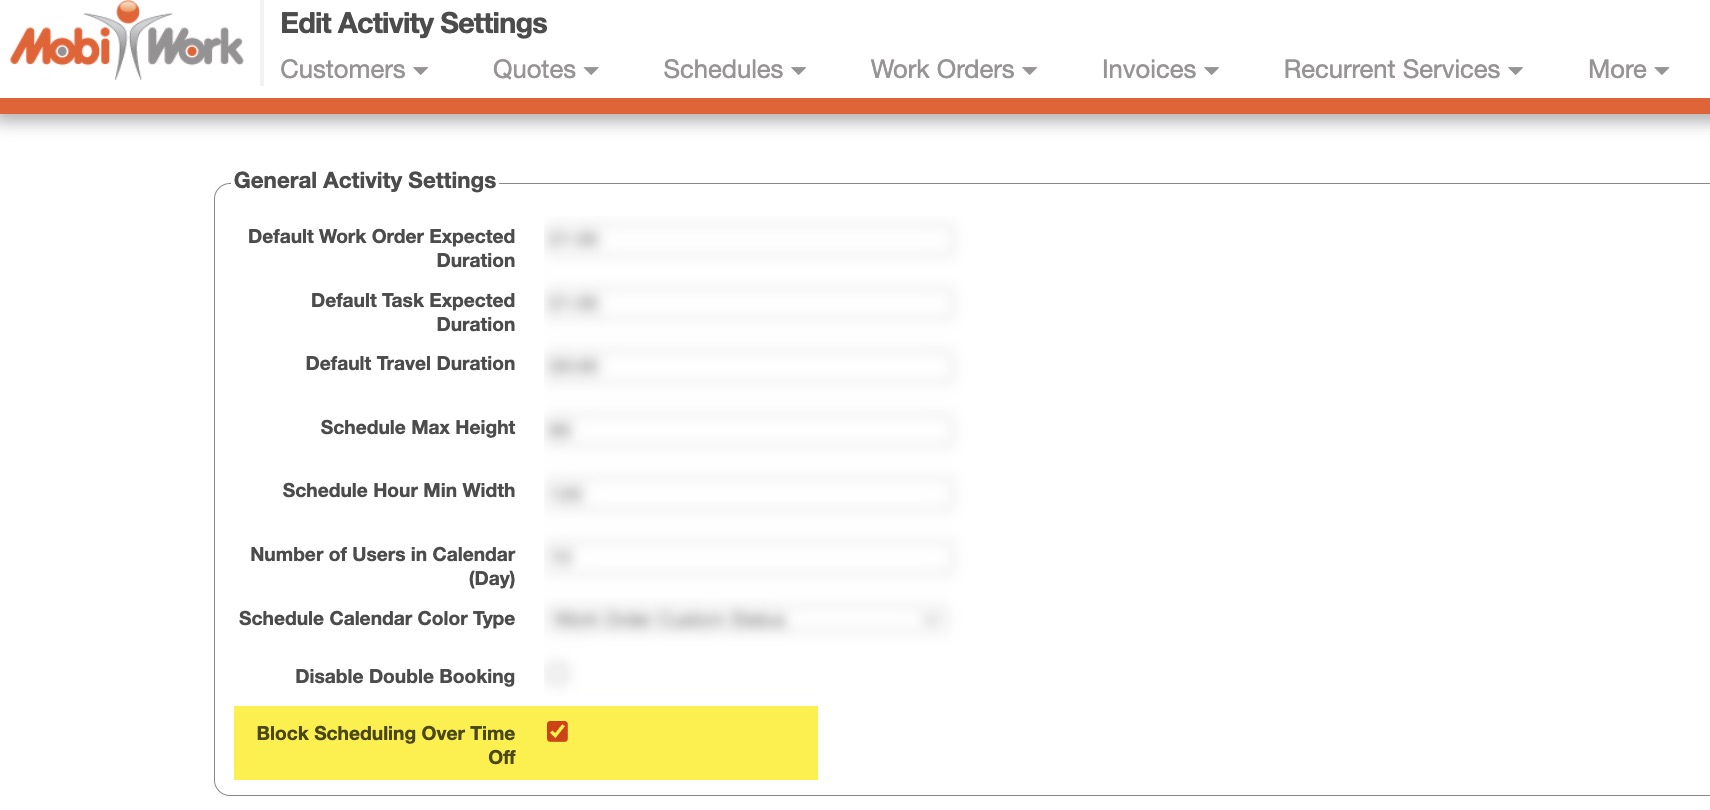
In the Schedule Settings page, if you enable the "Block Scheduling Over Time Off" option:
Work orders cannot be dragged over the designated time off period
Work orders cannot be dispatched during the designated time off period
For more information about the Schedule Settings page, please see the Schedule Settings page:
In the Schedule Settings page, if you disable the "Block Scheduling Over Time Off" option:
Work orders can be dragged over the designated time off period
Work orders can be dispatched during the designated time off period
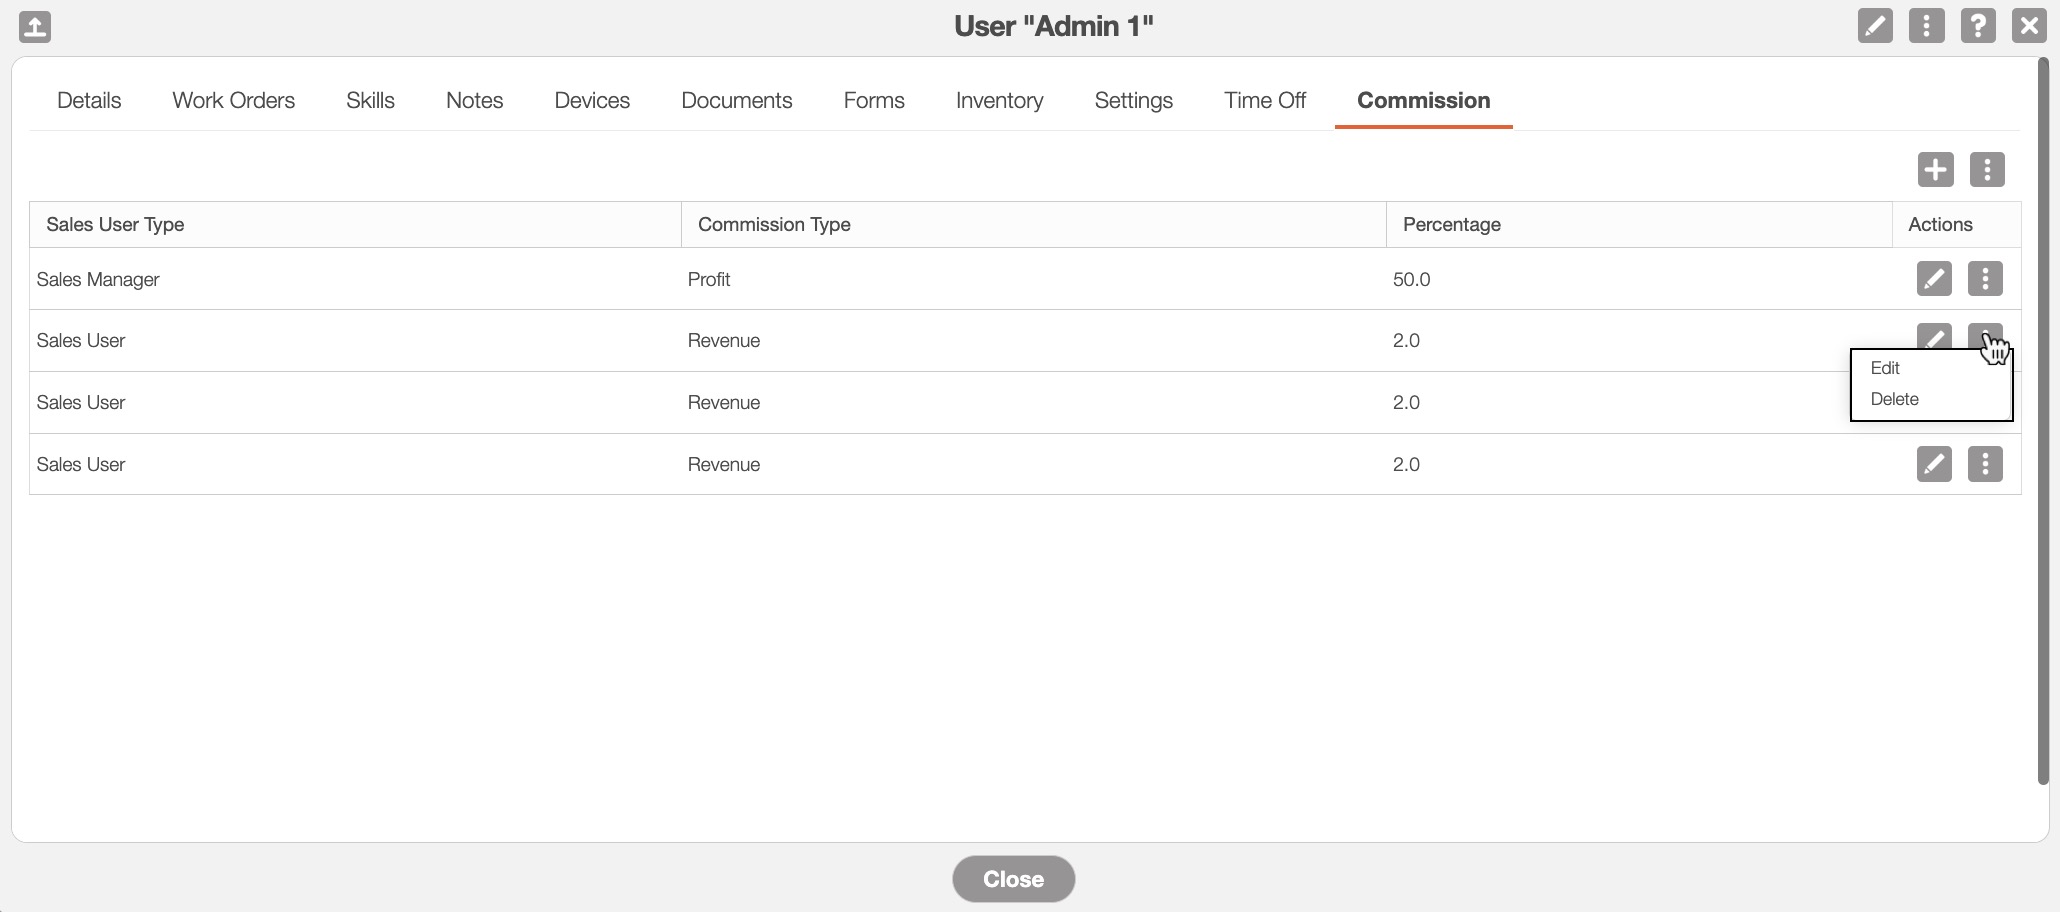
The "Commission" tab will display the commission rates and types that are associated with the user:
To add a new commission, you can click on the Plus Sign button or the More Actions button and select the "Add Commission" option from the drop-down:
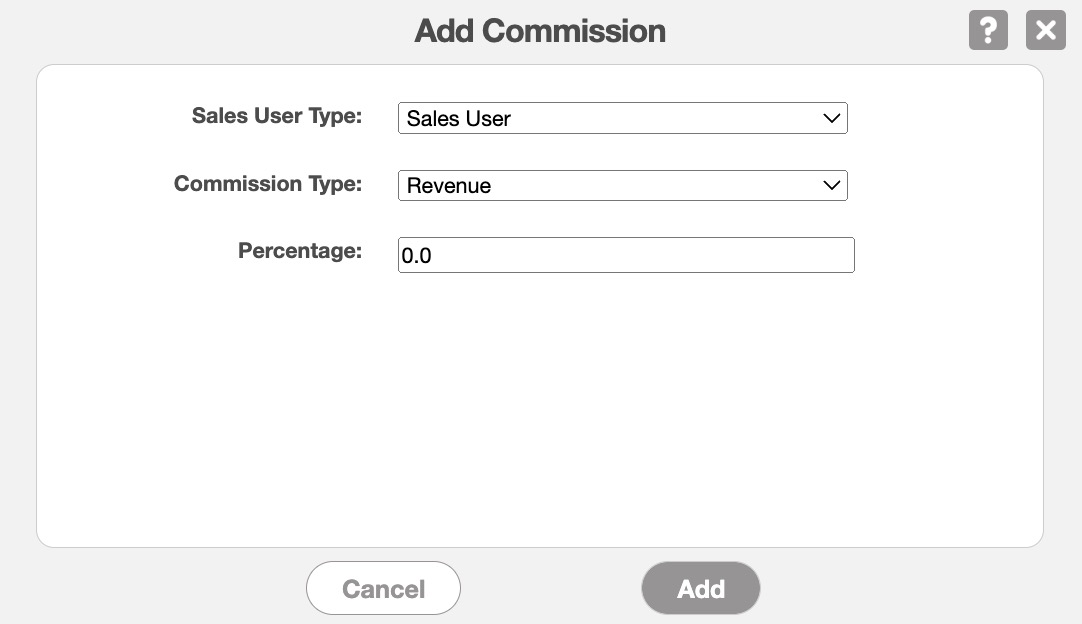
Once you choose to add a new commission, the Add Commission pop-up window will appear. Input the type of sales user, the commission type, and the percentage. Once you are satisfied with the data that you entered, click the Add button.
The terms found in the "Commission" tab are defined below:
| Name: | Description: |
|---|---|
| "Sales User Type" | The type of sales user performing the action (i.e., Sales User or Sales Manager) |
| "Commission Type" | How the commission is categorized in regard to the user (i.e., Profit or Revenue) |
| "Percentage" | The percentage of the commission being allotted to the user |
| "Actions" | Allows you to edit or delete the commission |