There are several different ways you can access the View Work Order pop-up window in MobiWork.
The following sections demonstrate some common methods of how to access the View Work Order pop-up window from your MobiWork web platform.
Work Order List Page
The easiest way to access the View Work Order pop-up window is through the "List" tab. For more information on how to access the "List" tab, please see the Work Order List page.
Once you are on the "List" tab, there are four different ways to access the View Work Order pop-up window:
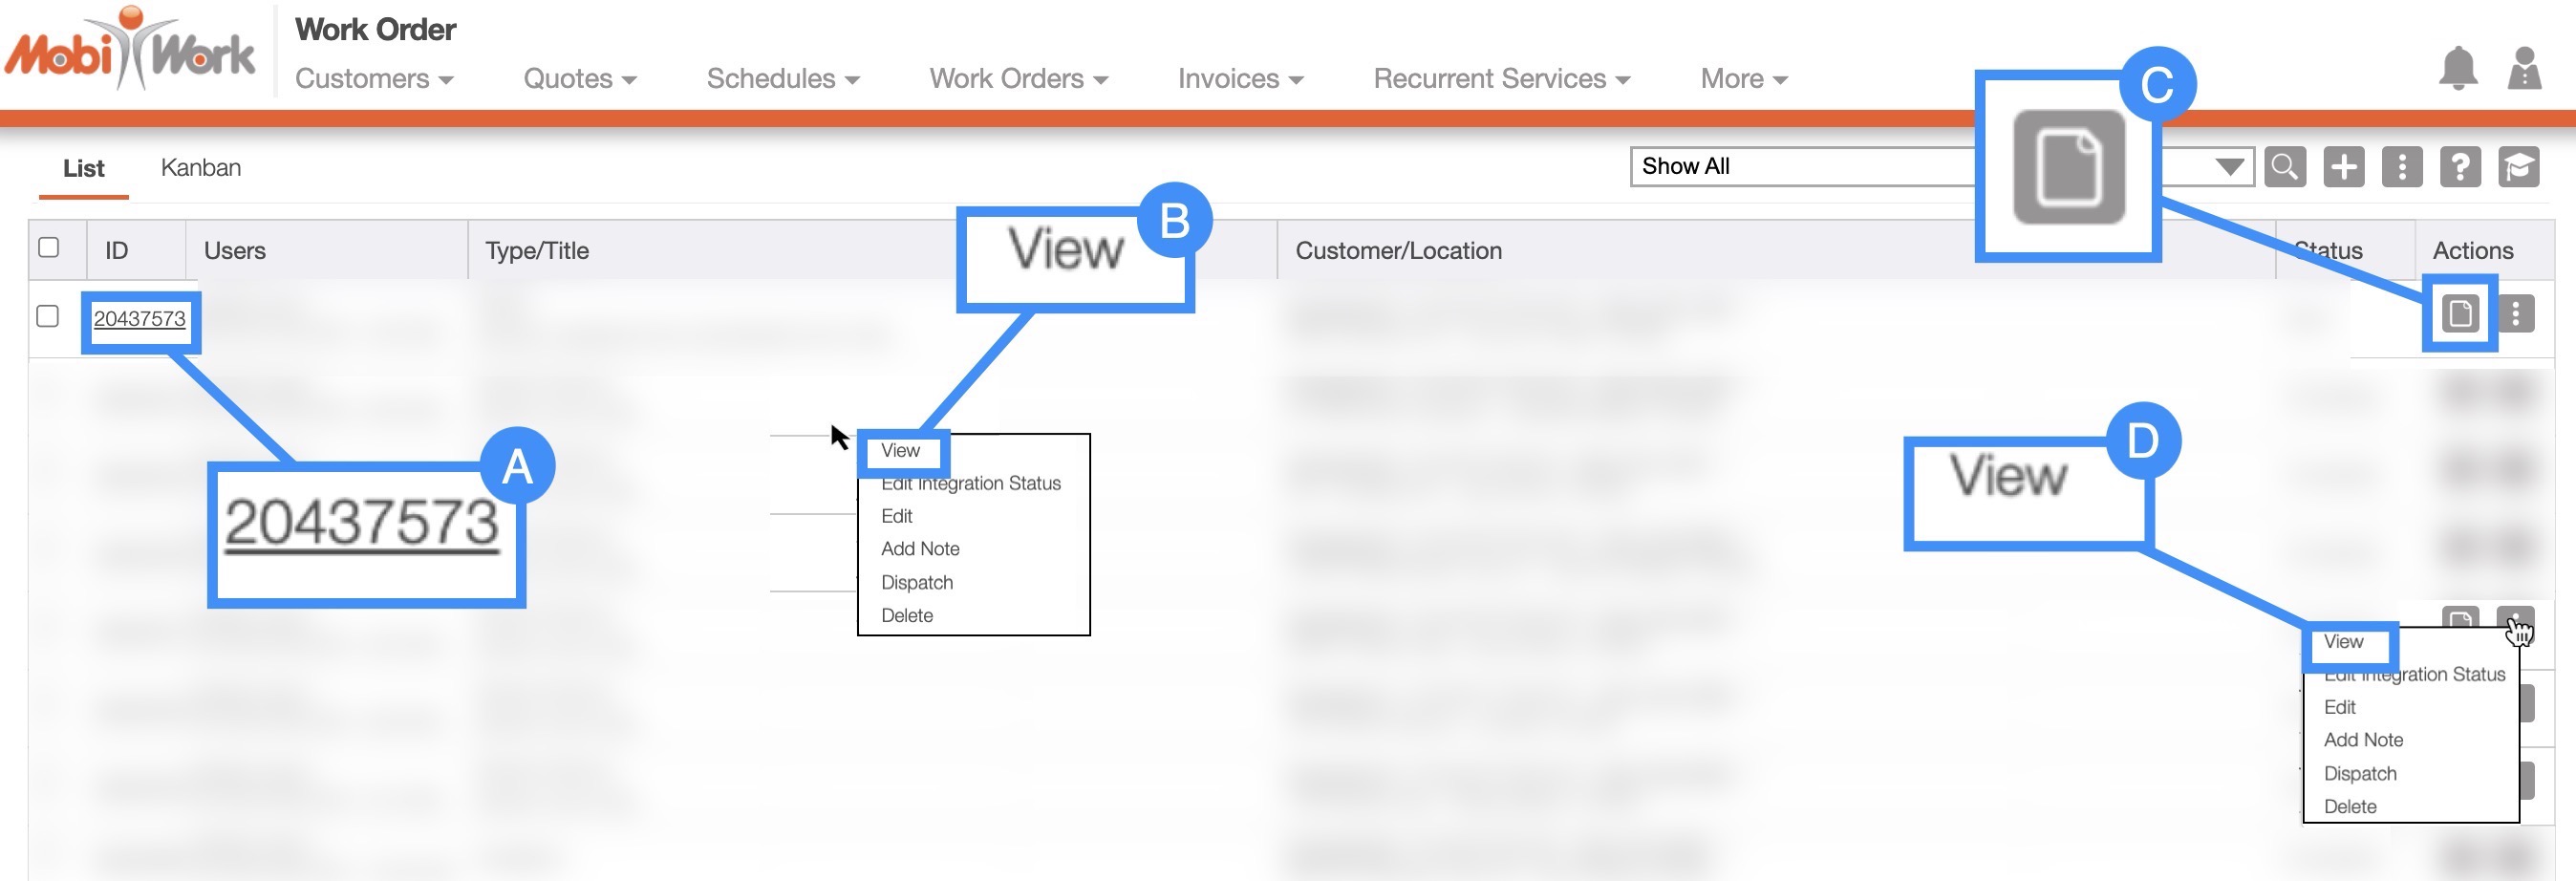
Select the desired work order ID.
Right-click on the selected work order and click on the "View" option from the drop-down.
Click on the "View" option from the Individual Actions drop-down.
Select the View icon under the "Actions" column.
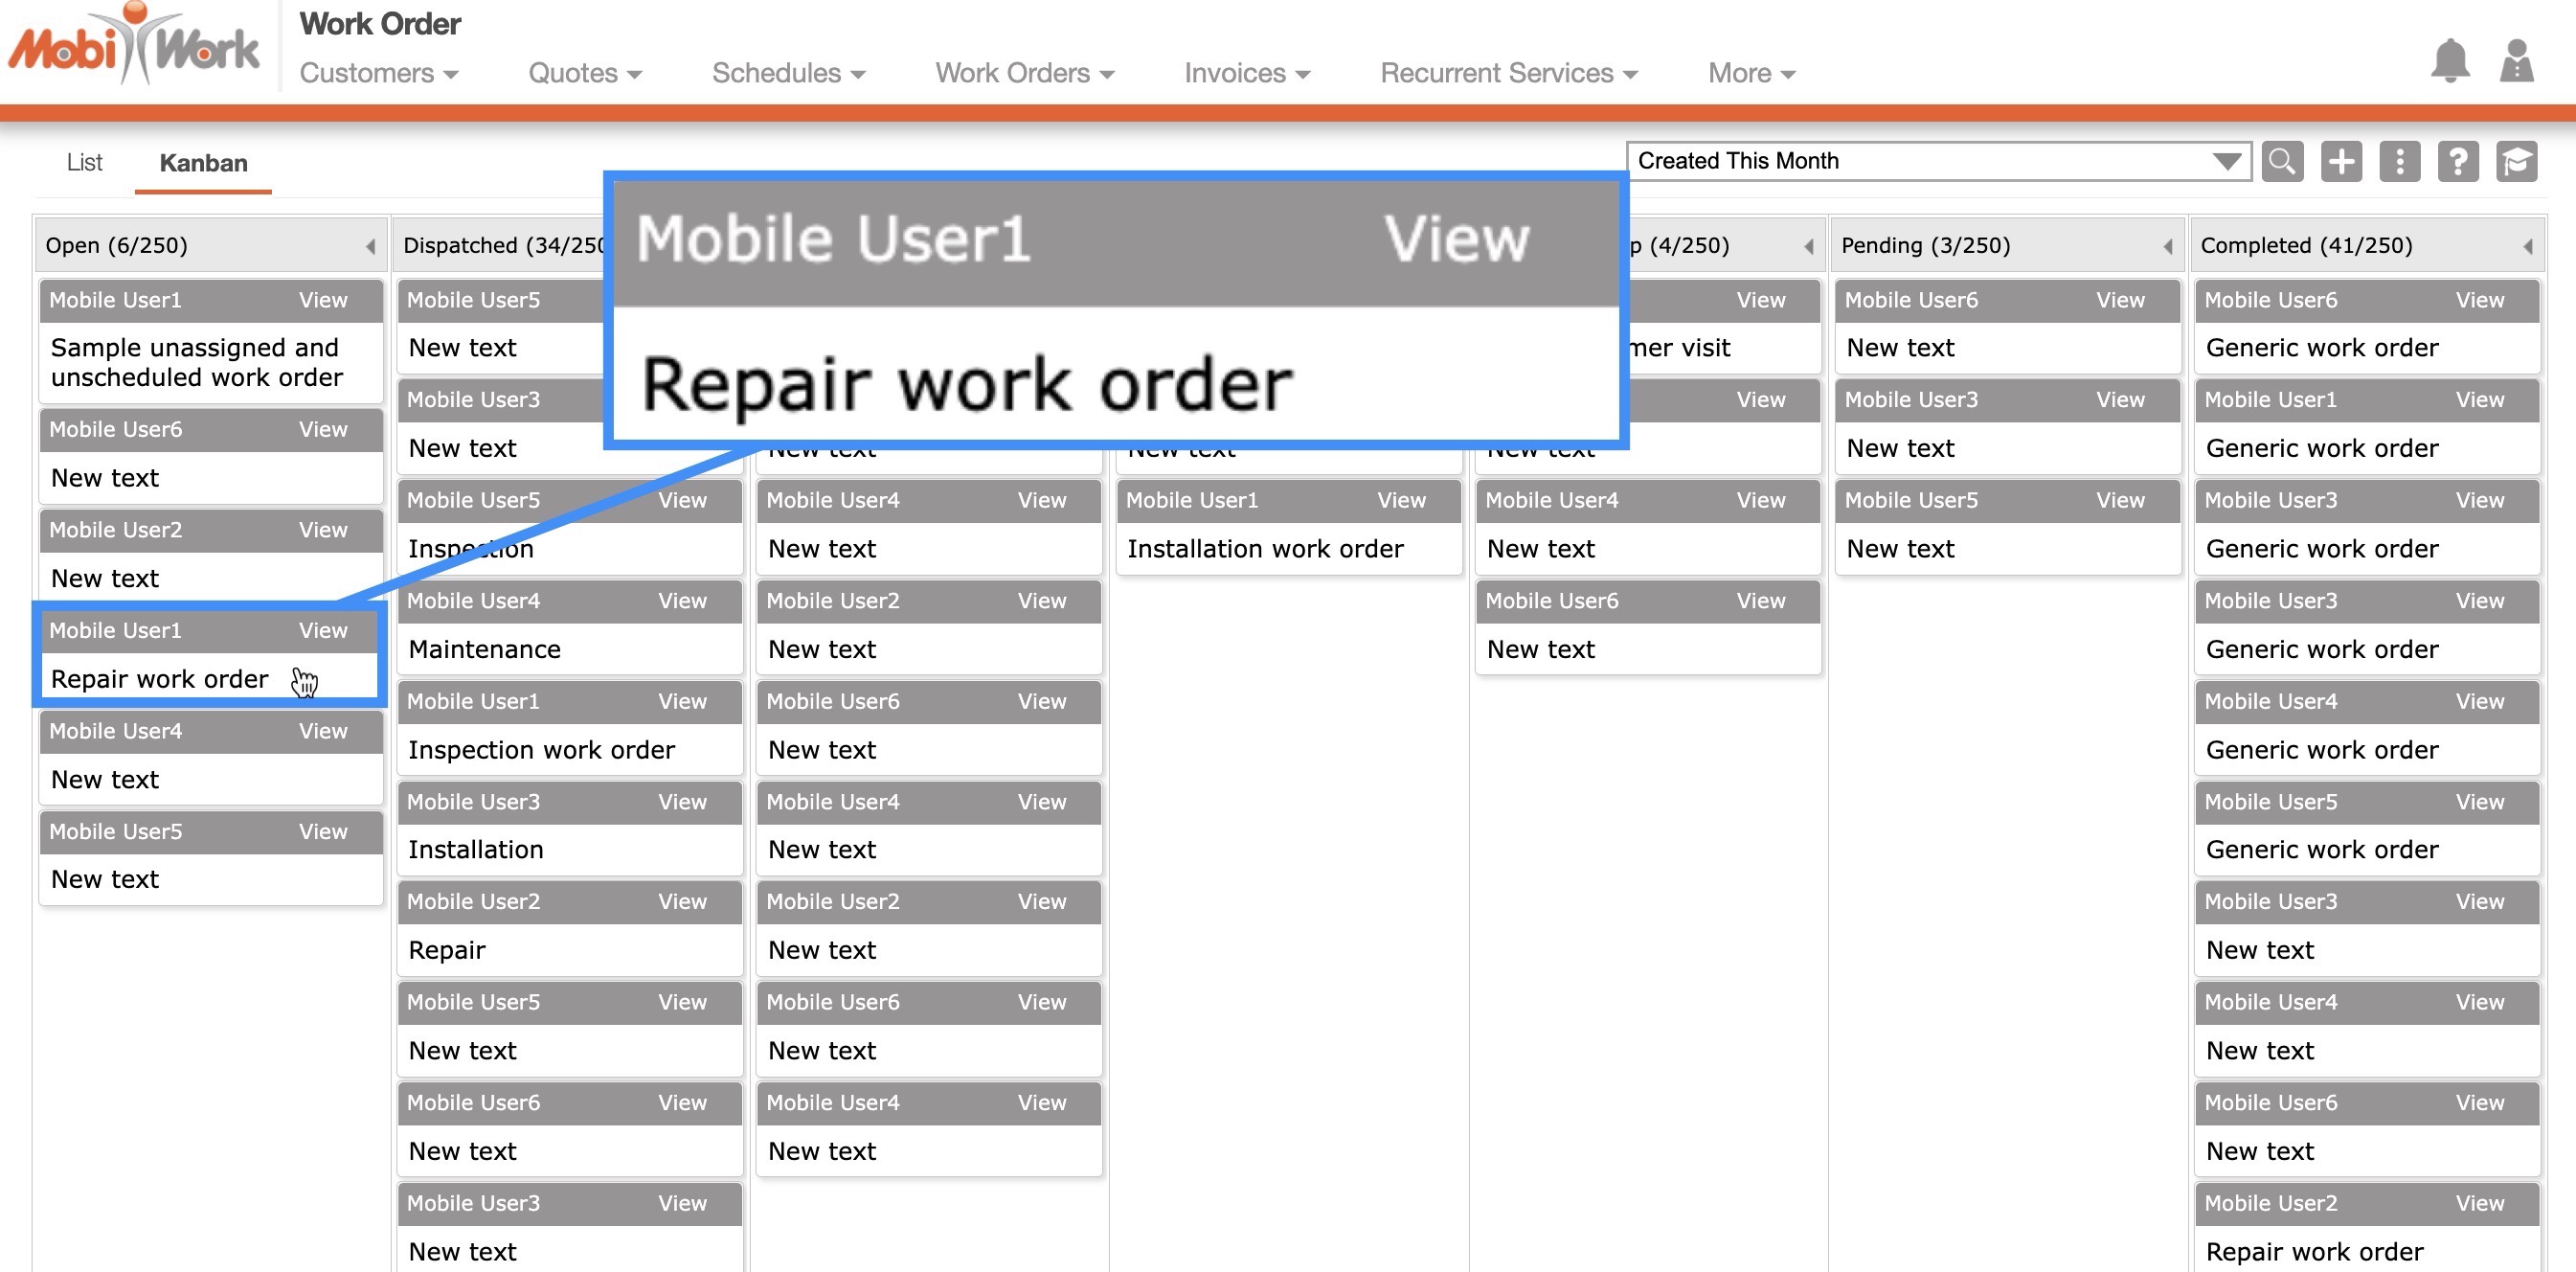
Work Orders Tab: Kanban
In the "Kanban" tab, you will be able to view the View Work Order pop-up window differently.
Click on the desired work order to open the View Work Order pop-up window:
Customers
Another way you can access the View Work Orders pop-up window is through the View Customer pop-up window. For more information on how to access the View Customer pop-up window please see the View Customer page.
Once you are on this page select the "Work Orders" tab:

All the work orders associated with the customer will be displayed on this tab. To access an individual work order and open its View Work Order pop-up window please see the following actions:
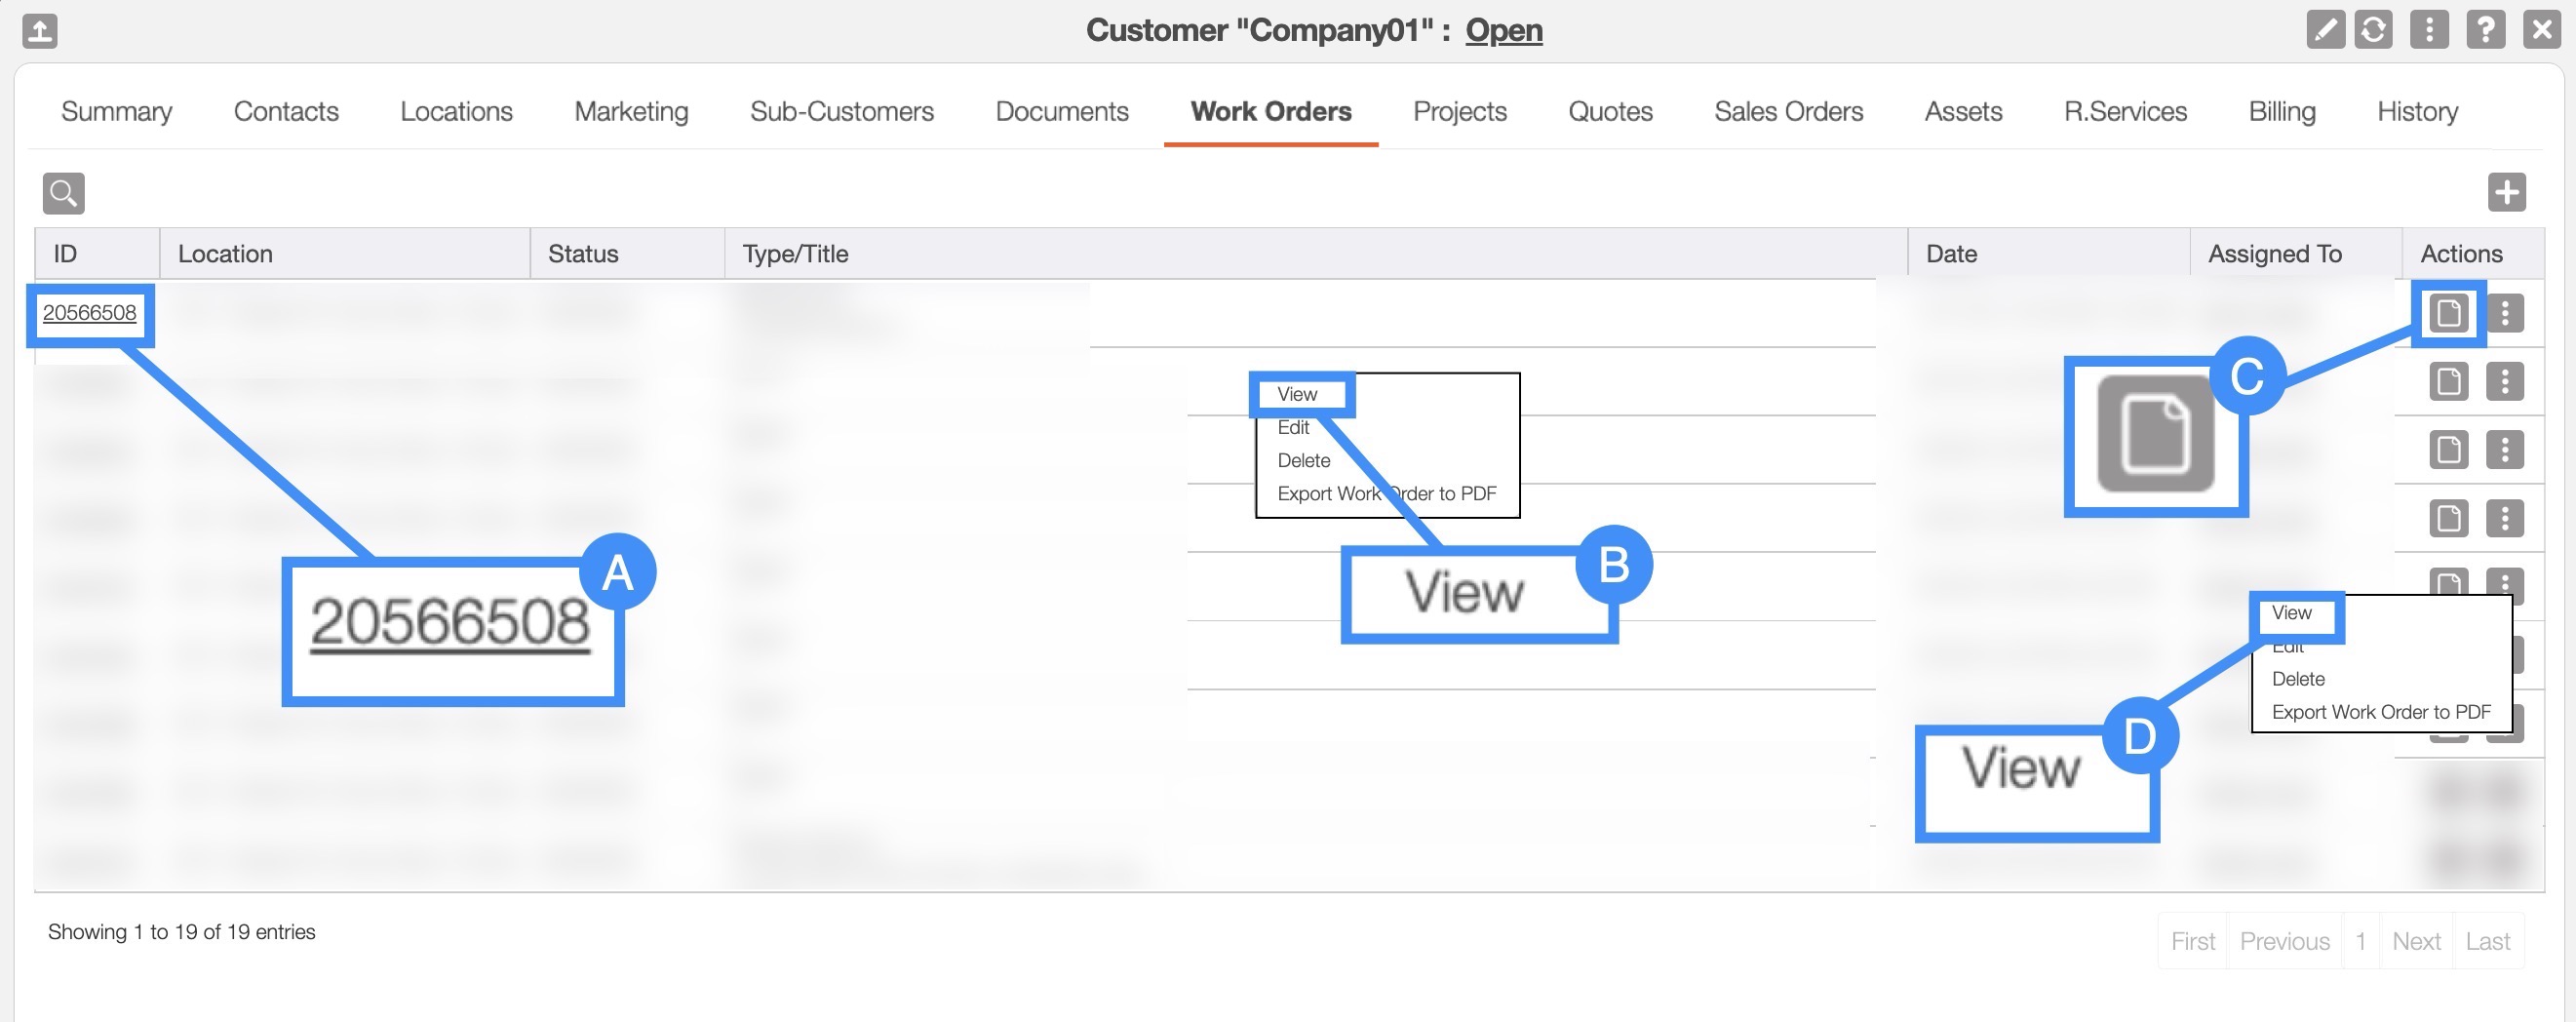
Select the desired work order ID.
Right-click on the selected work order and click on the "View" option from the drop-down.
Select the View icon under the "Actions" column.
Select the "View" option from the Individual Actions drop-down.
Schedules
For more information about how to access the Schedules feature page, please see the Schedule List page.
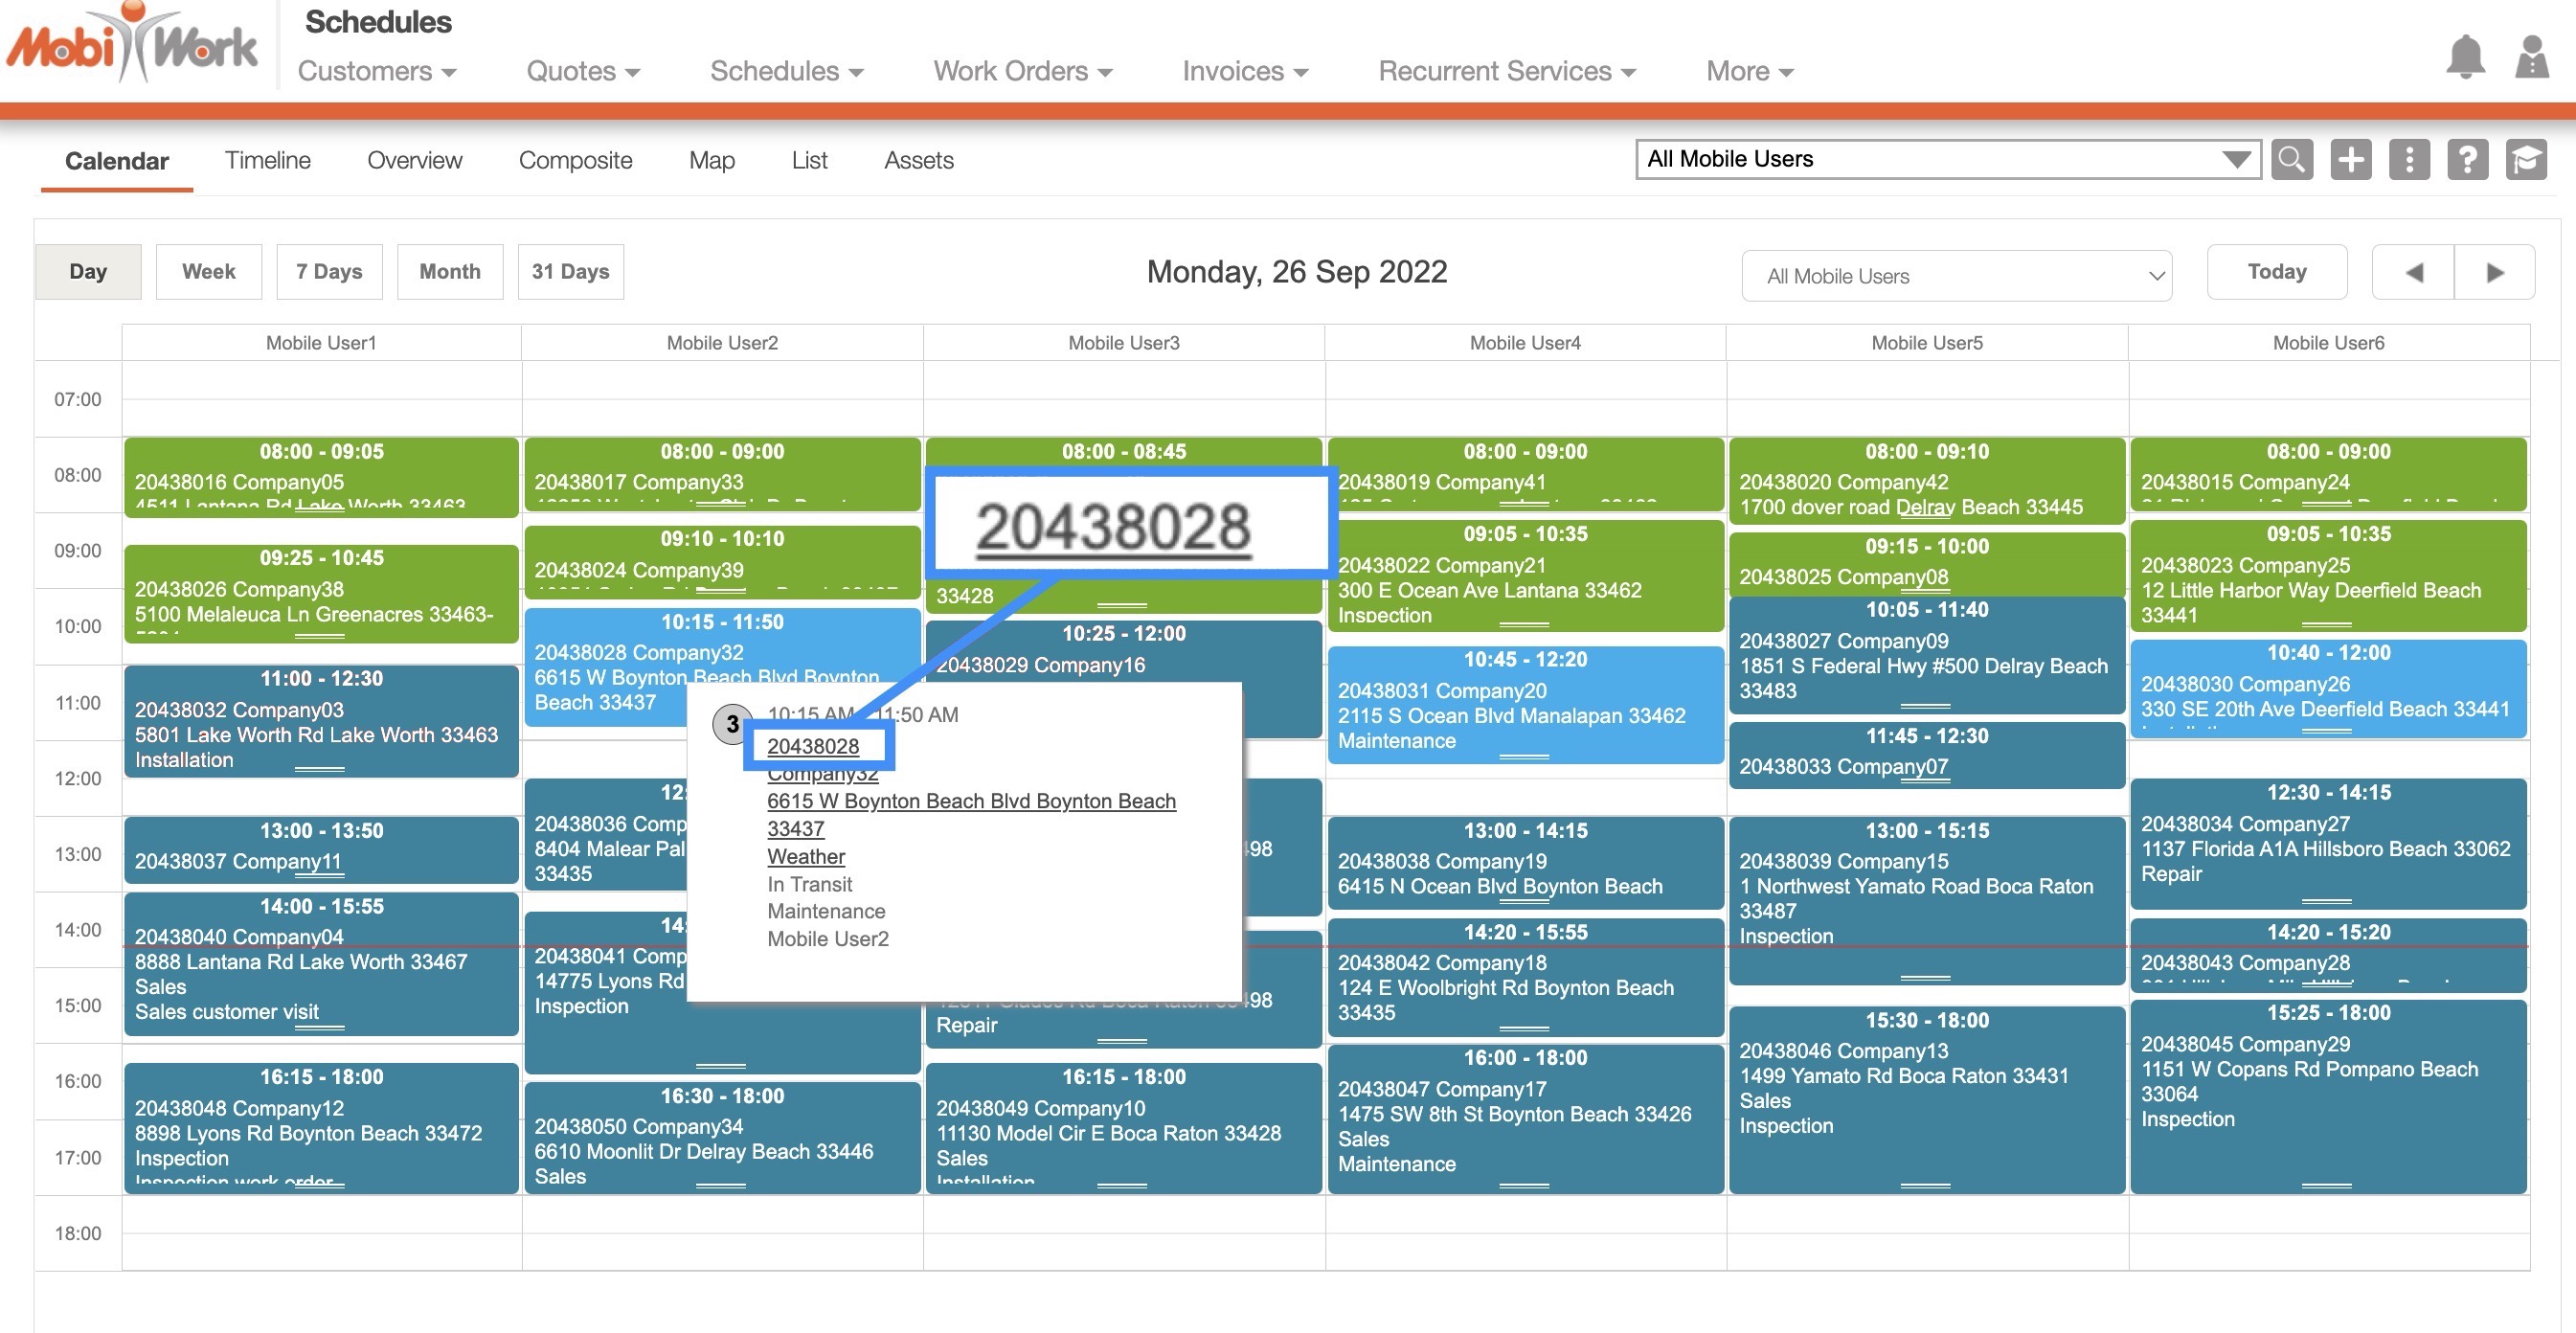
Regardless of the Schedule tab that you are in, you will be able to access the View Work Order pop-up window by clicking on the work order ID from its respective boxes.
On the Schedules "Map" tab to access the View Work Order pop-up window you can:
- Click the work order ID from the list of work orders located below the tab view; you can access this section from any of the schedule tabs.
- You can filter the statuses of work orders listed, by clicking on the desired status from the drop-down:
You can click on the work order ID from the Work Order column.
Or you can click on the View icon.
You can also click on the Individual Actions and select the "View" option from the drop-down.
You can click on one of the pins in the "Composite" tab or "Map" tab, to bring up the work order details; from the window that appears you can click on the work order ID:

- Or you can hover over the colored boxes in the "Calendar," "Timeline," or "Overview" tabs and from the window that appears select the work order ID:
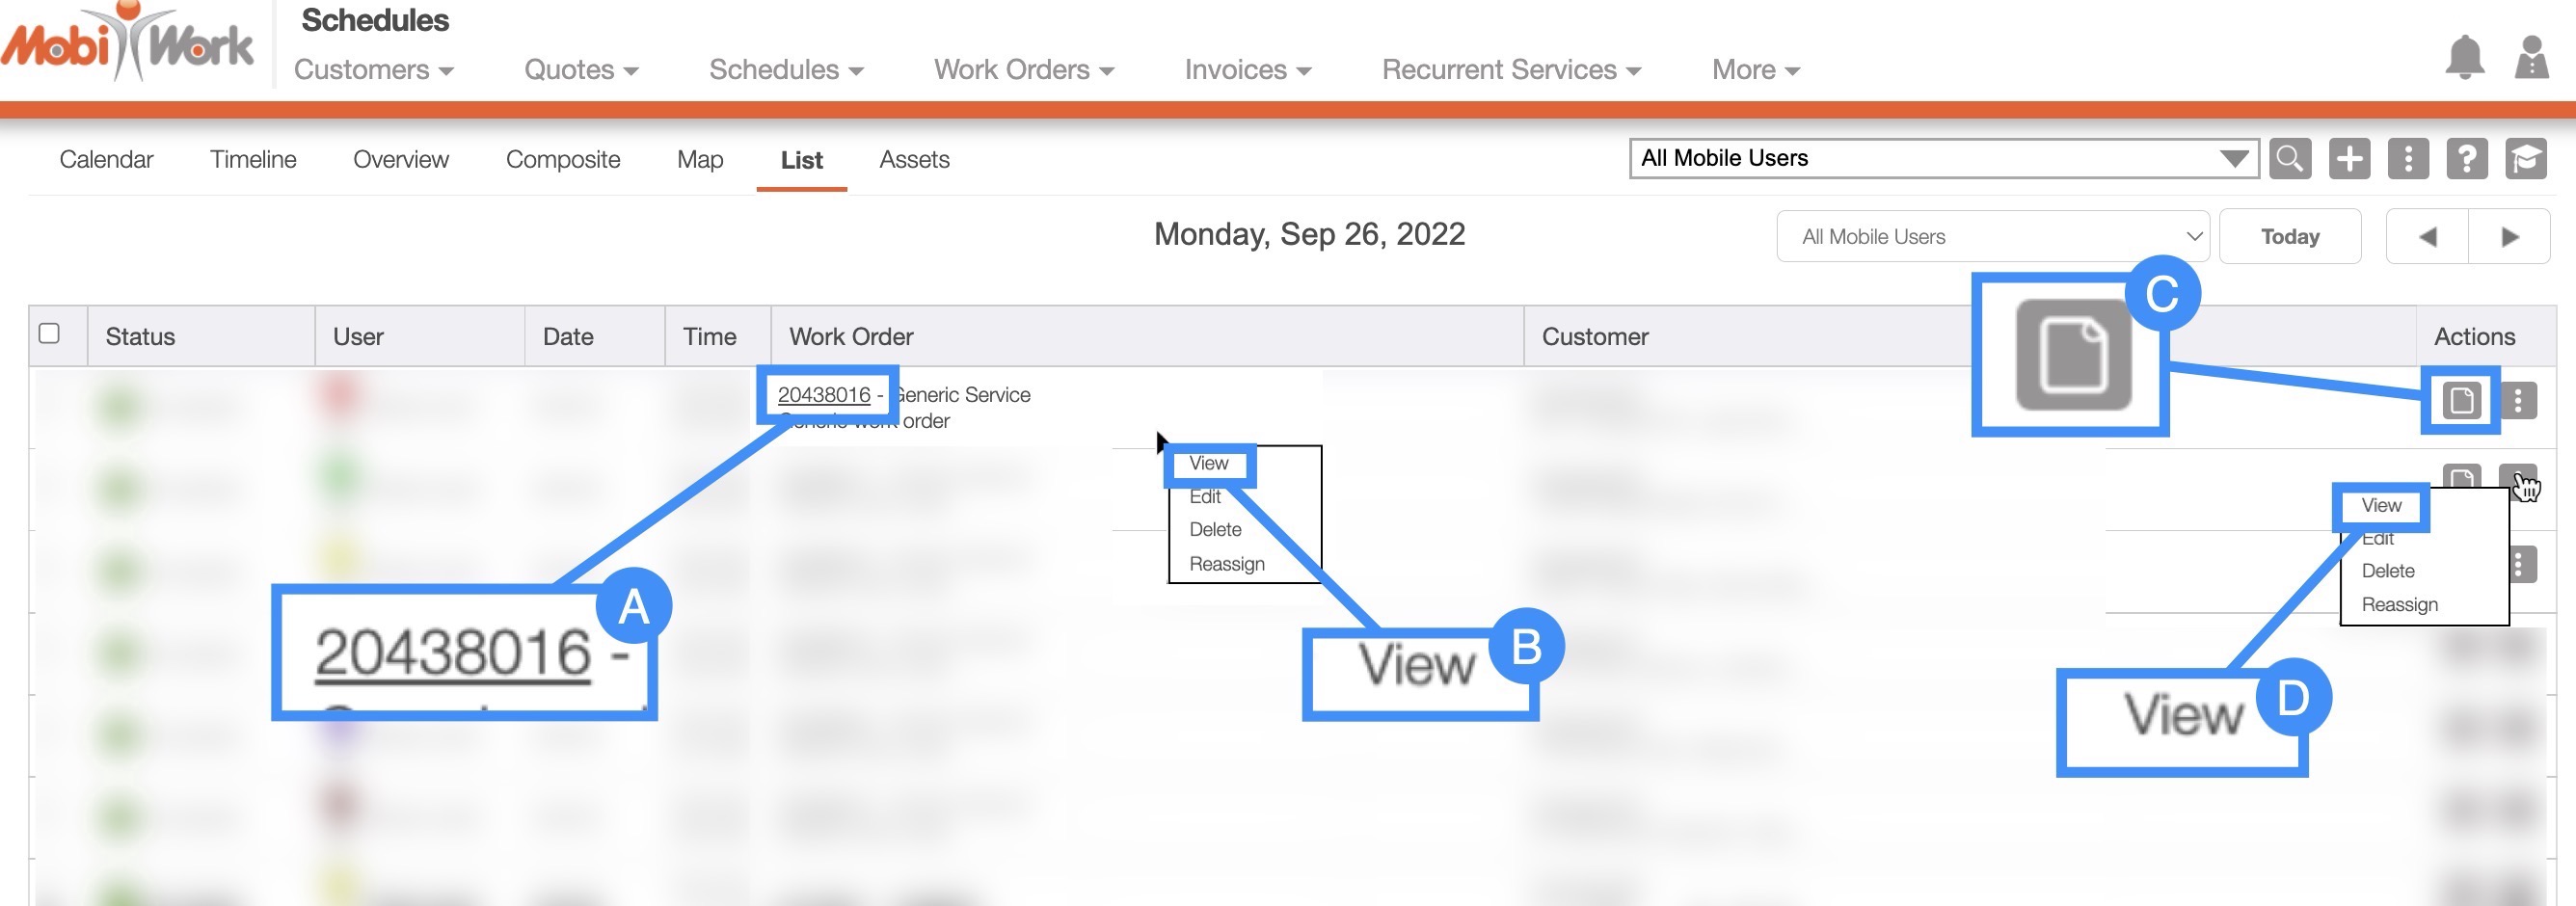
By clicking on the work order ID from the "Work Order" column.
You can click on the View icon.
Or you can click on the Individual Actions and select the "View" option from the drop-down.
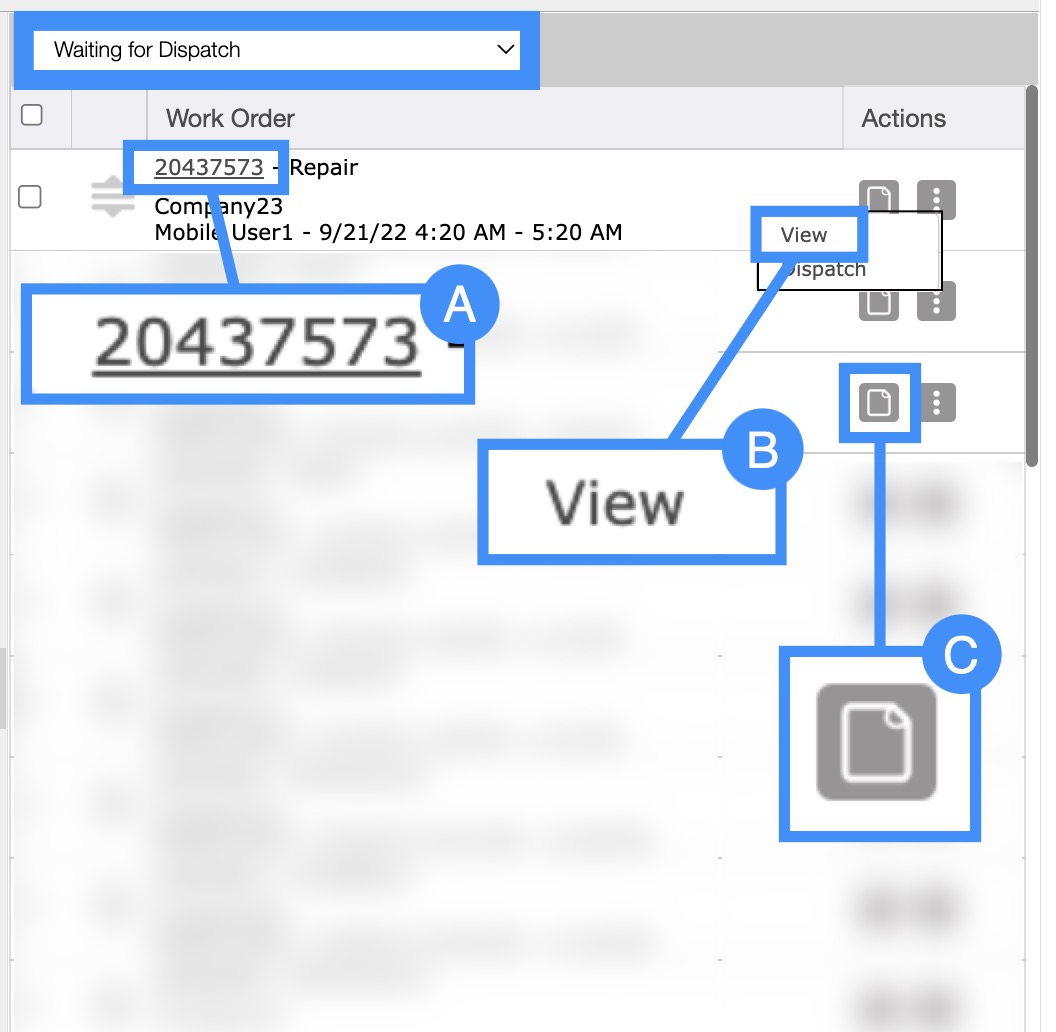
On the Schedules "List" tab there are three different ways you can access the View Work Order pop-up window:
Invoices
Another way you can access the View Work Orders pop-up window is through the View Invoice pop-up window. For more information on how to access the View Invoice pop-up window please see the View Invoice page.
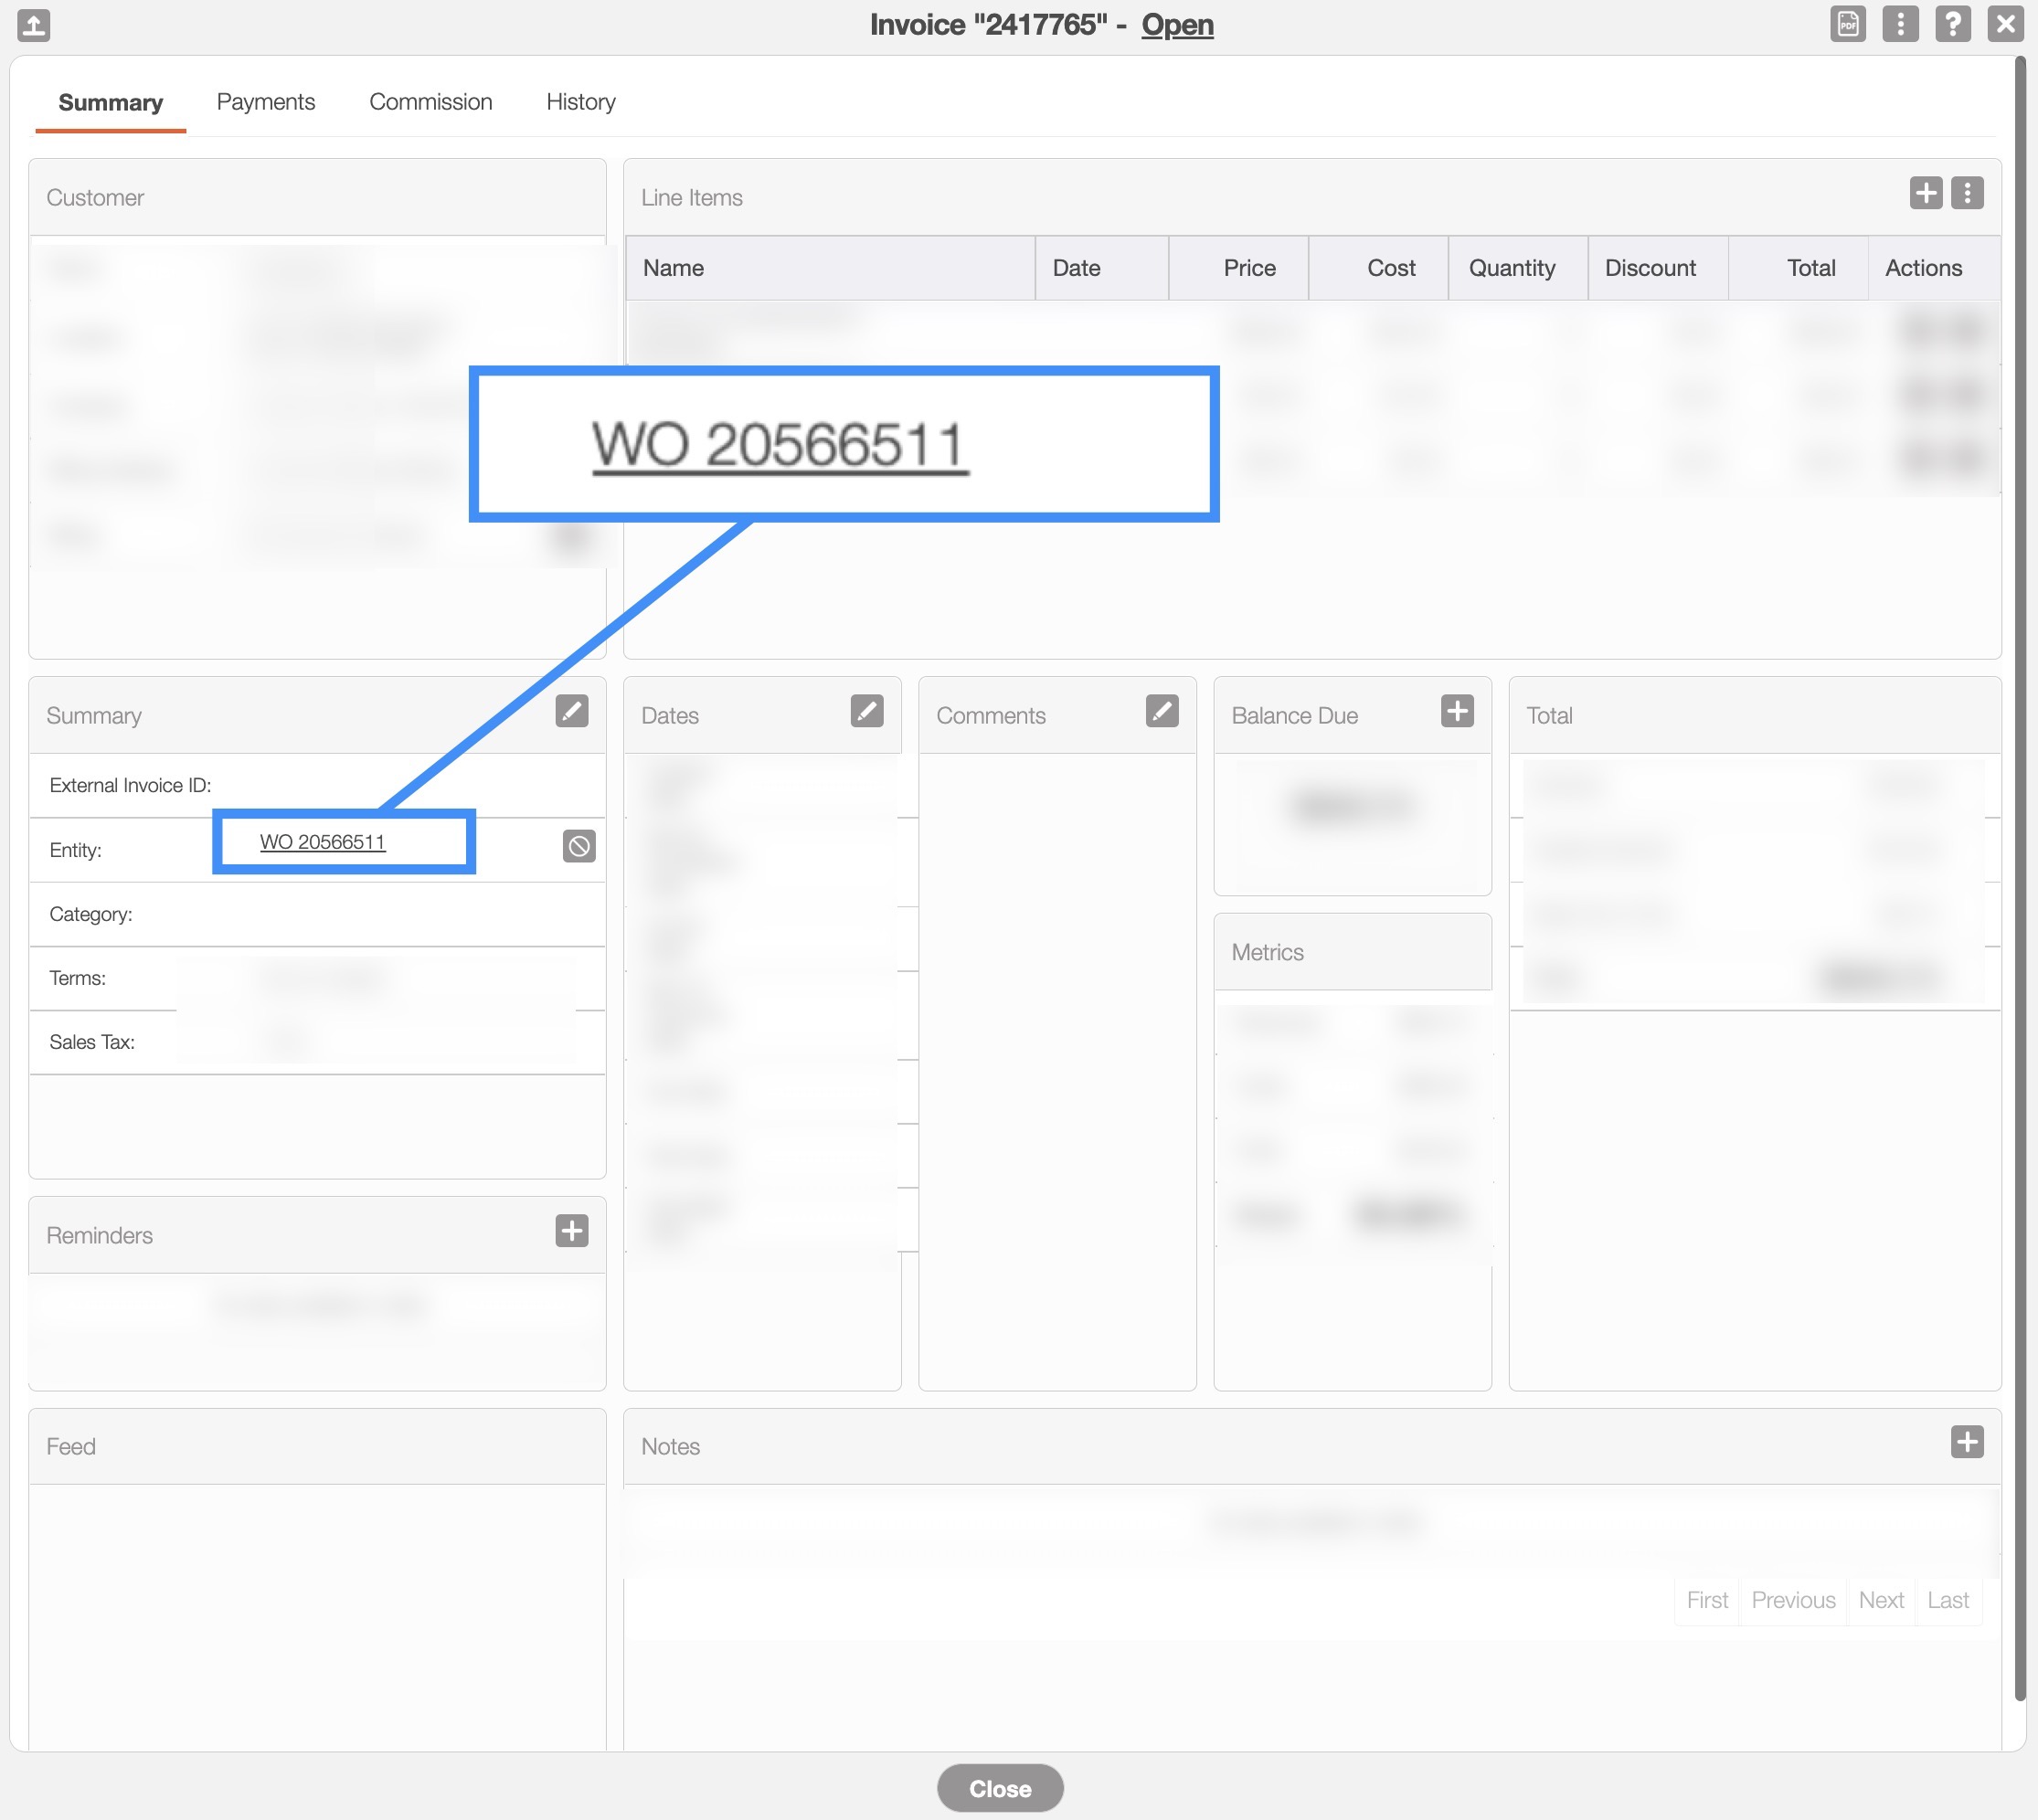
If the invoice was generated from a work order, you can click on the work order ID directly from the "Summary" tab; this action will open the View Work Order pop-up window:
Regardless of the method that you choose to access the View Work Order pop-up window, it will automatically appear.
Overview and Layout
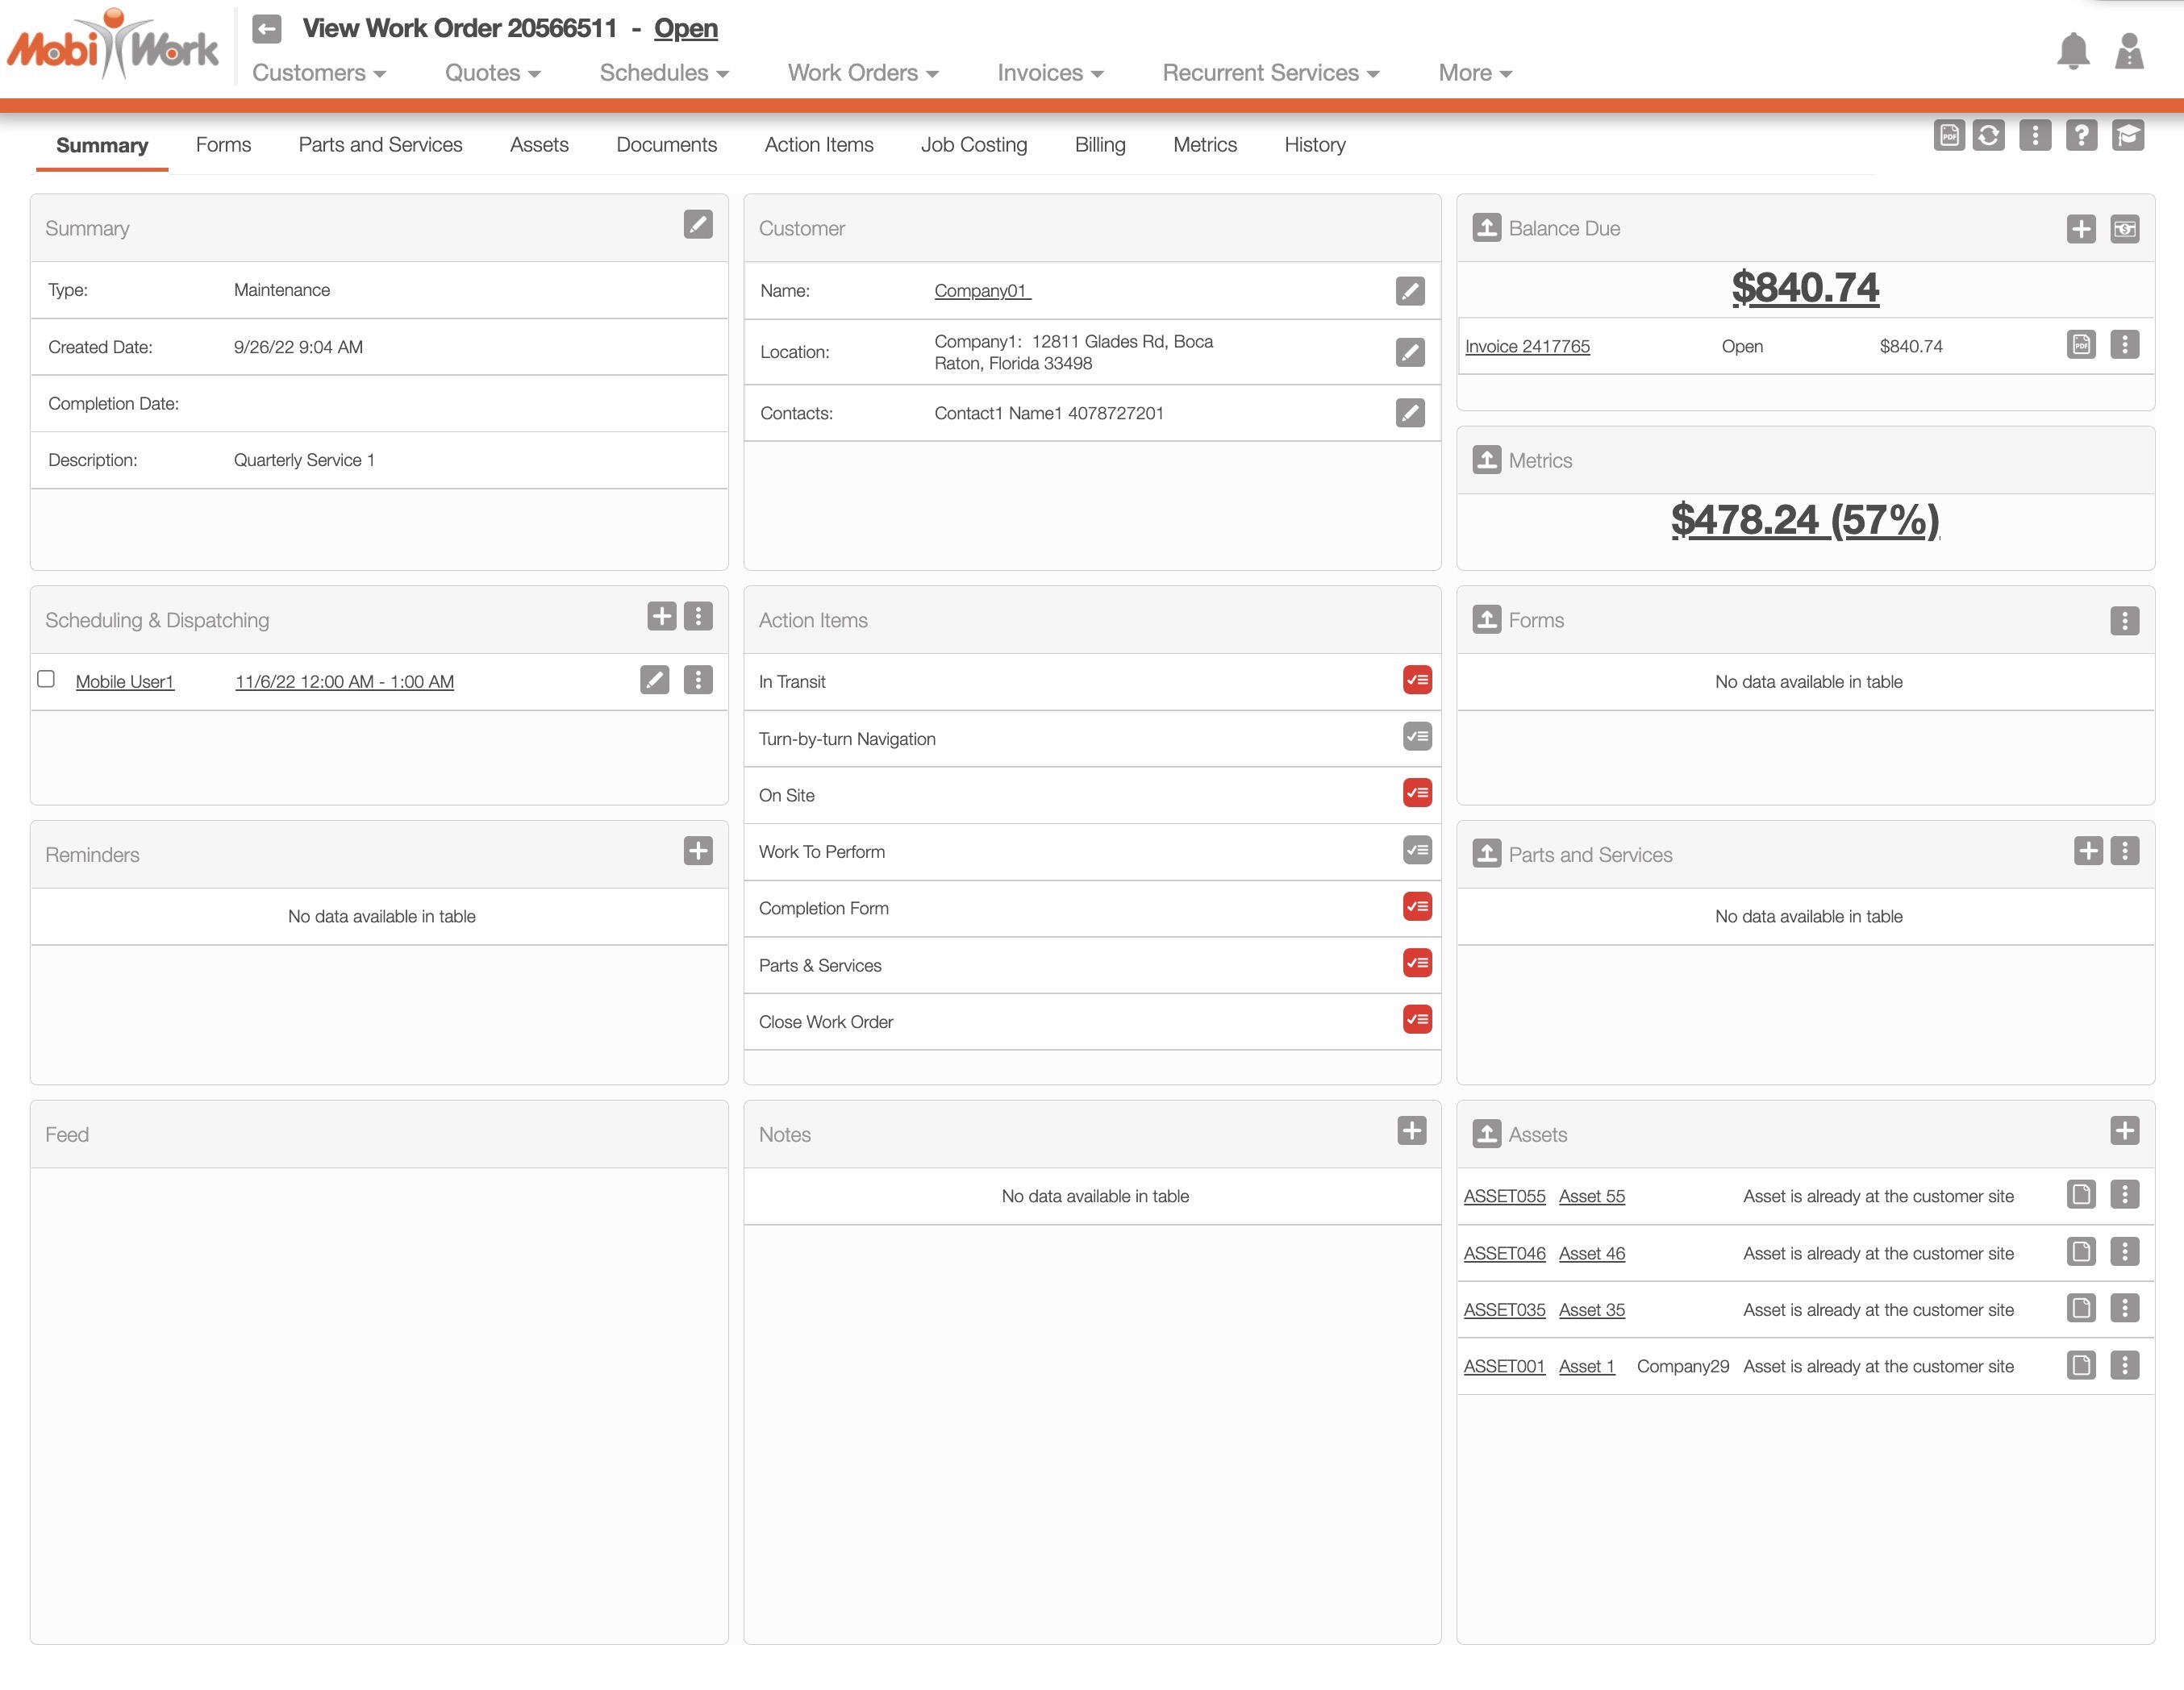
Once you open the View Work Order pop-up window, you will be automatically directed to the "Summary" tab:

These features are available in all ten tabs and in both, the pop-up window, and the full-size view:
Please note that if you would like to easily close this pop-up window, you can click on the esc button from your keyboard.
Work Order Full-Size View
By clicking on the upwards arrow in the left-hand corner, you can expand the View Work Order pop-up window so that it is full-size:
![]()
The full-size View Work Order pop-up window can be seen below. All the tabs, buttons, and features are identical to how they would appear in the pop-up window:
Work Order Tabs
There are ten tabs in all for the View Work Order pop-up window; each tab displays different information regarding the work order:

You can navigate to other tabs by clicking on the desired tab.
Work Order ID and Status
The work order ID and the status will be displayed towards the top of the View Work Order pop-up window:
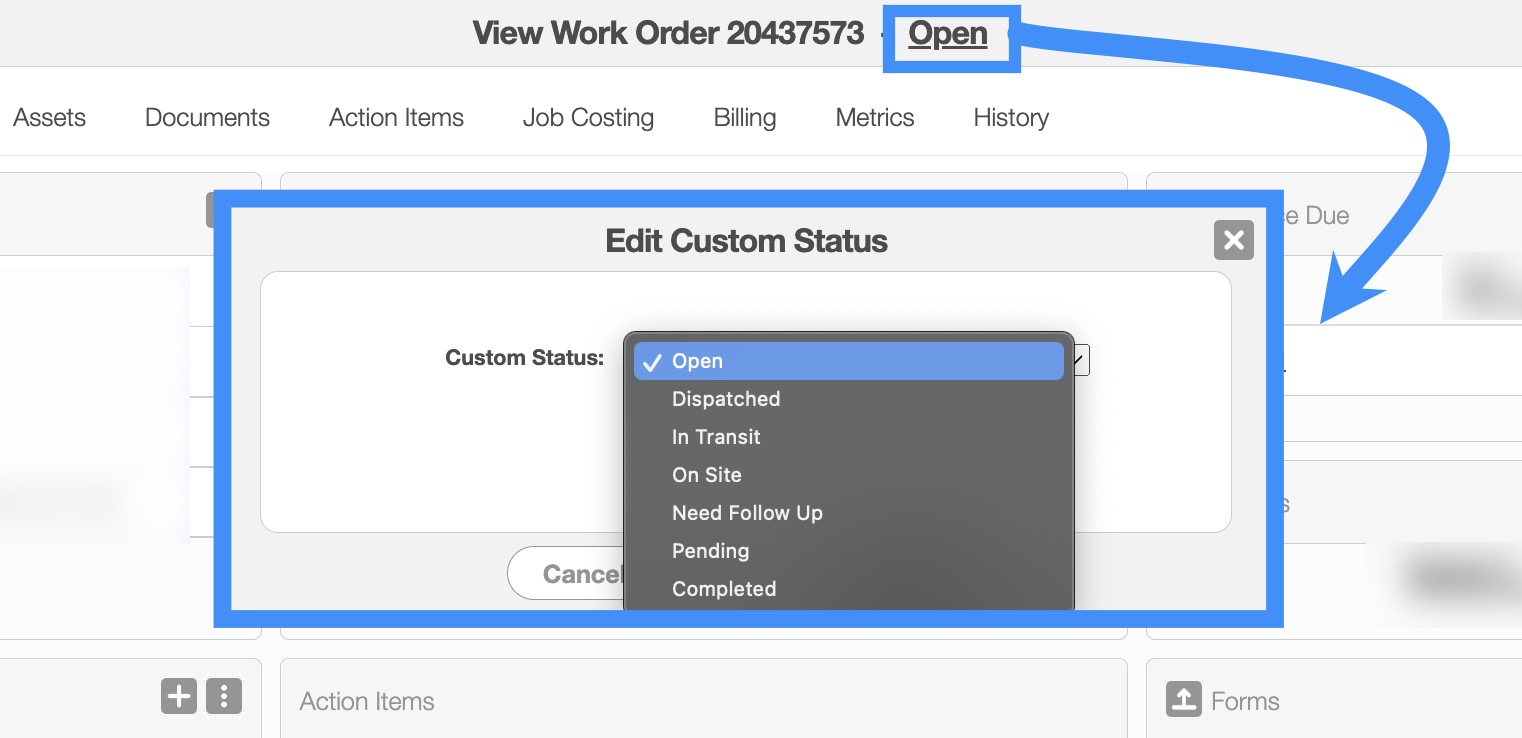
You can quickly change the status of the work order by clicking on the status and selecting the desired new status.
The statuses that are available are:
Open
Dispatched
In Transit
On Site
Need Follow Up
Pending
Completed
Upper Right Corner Actions
In the upper right corner of the View Work Order pop-up window there will be four buttons that will allow you to perform additional actions on the work order:
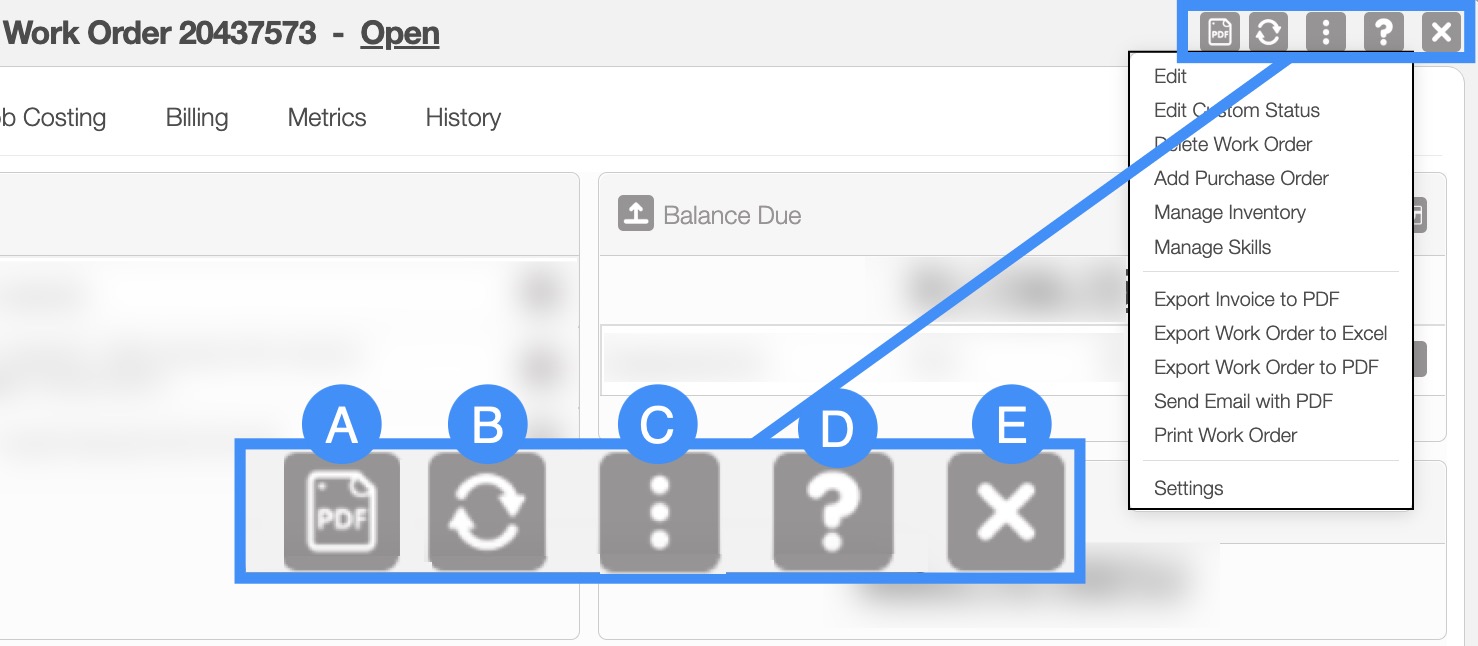
The PDF button will allow you to download a PDF copy of the work order.
The Refresh button will allow you to refresh the work order's data to the most up-to-date version.
The Individual Actions button will allow you to perform various actions, such as:
Editing the work order.
Editing the work order's status.
Deleting Work Order.
Adding Purchase Order.
Managing Skills.
Exporting the first invoice created for the work order into a PDF.
Exporting Work Order to Excel.
Exporting Work Order to PDF.
Sending Email with PDF.
Printing Work Order.
Viewing the Settings page.
The Question Mark button which will direct you to the respective MobiWork Features page.
The X will close out of the View Work Order pop-up window.
The Work Order's Upper Right Corner Actions can be found in the top-right corner of the View Work Order pop-up window. These actions are located in this section, regardless of the tab you are on:
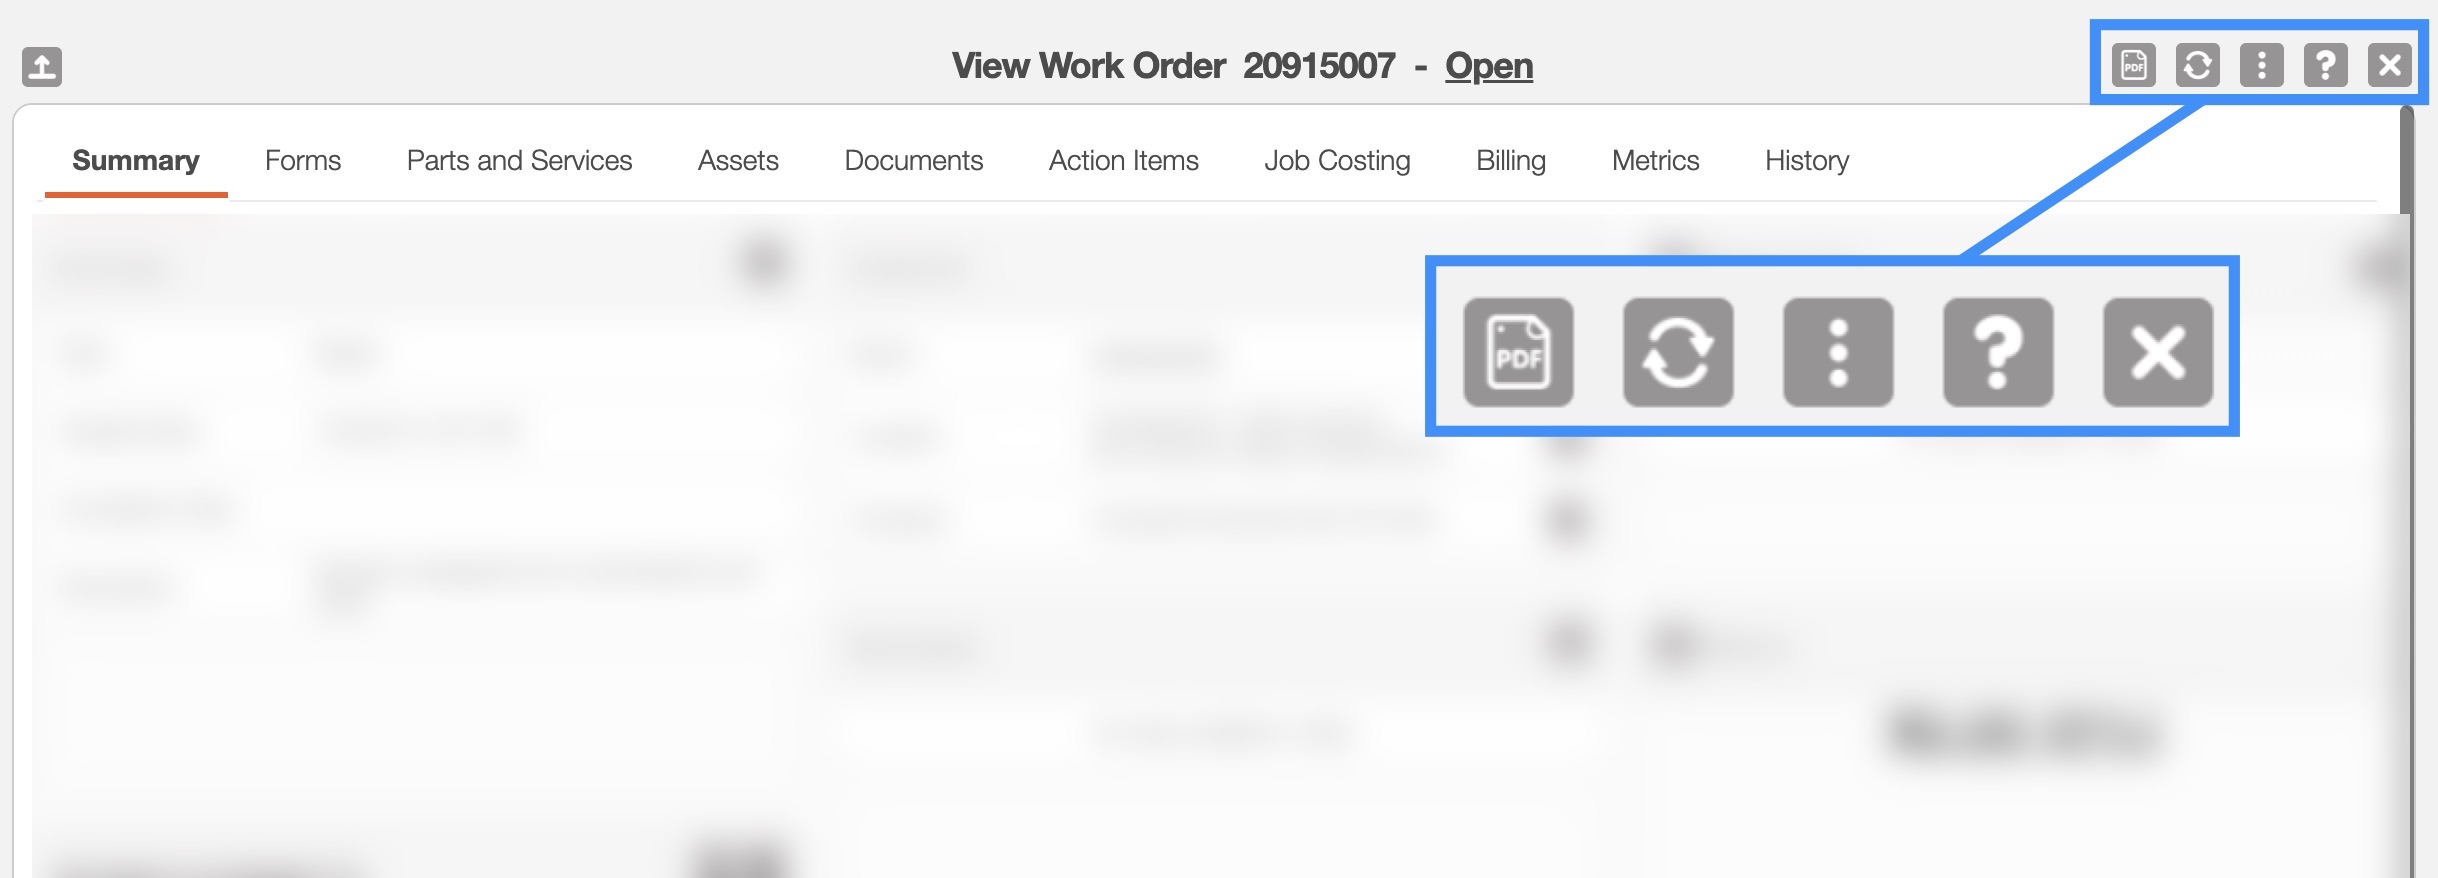
The Upper Right Corner Actions section includes:
The Pencil button will allow you to edit the work order.
The Refresh button will allow you to refresh the work order's data to the most up-to-date version.
The Individual Actions button will allow you to perform various actions.
The Question Mark button which will direct you to the respective MobiWork Features page.
The X will close out of the View Work Order pop-up window.
After clicking on the vertical three dots in the top-right corner, the Individual Actions drop-down menu will appear:
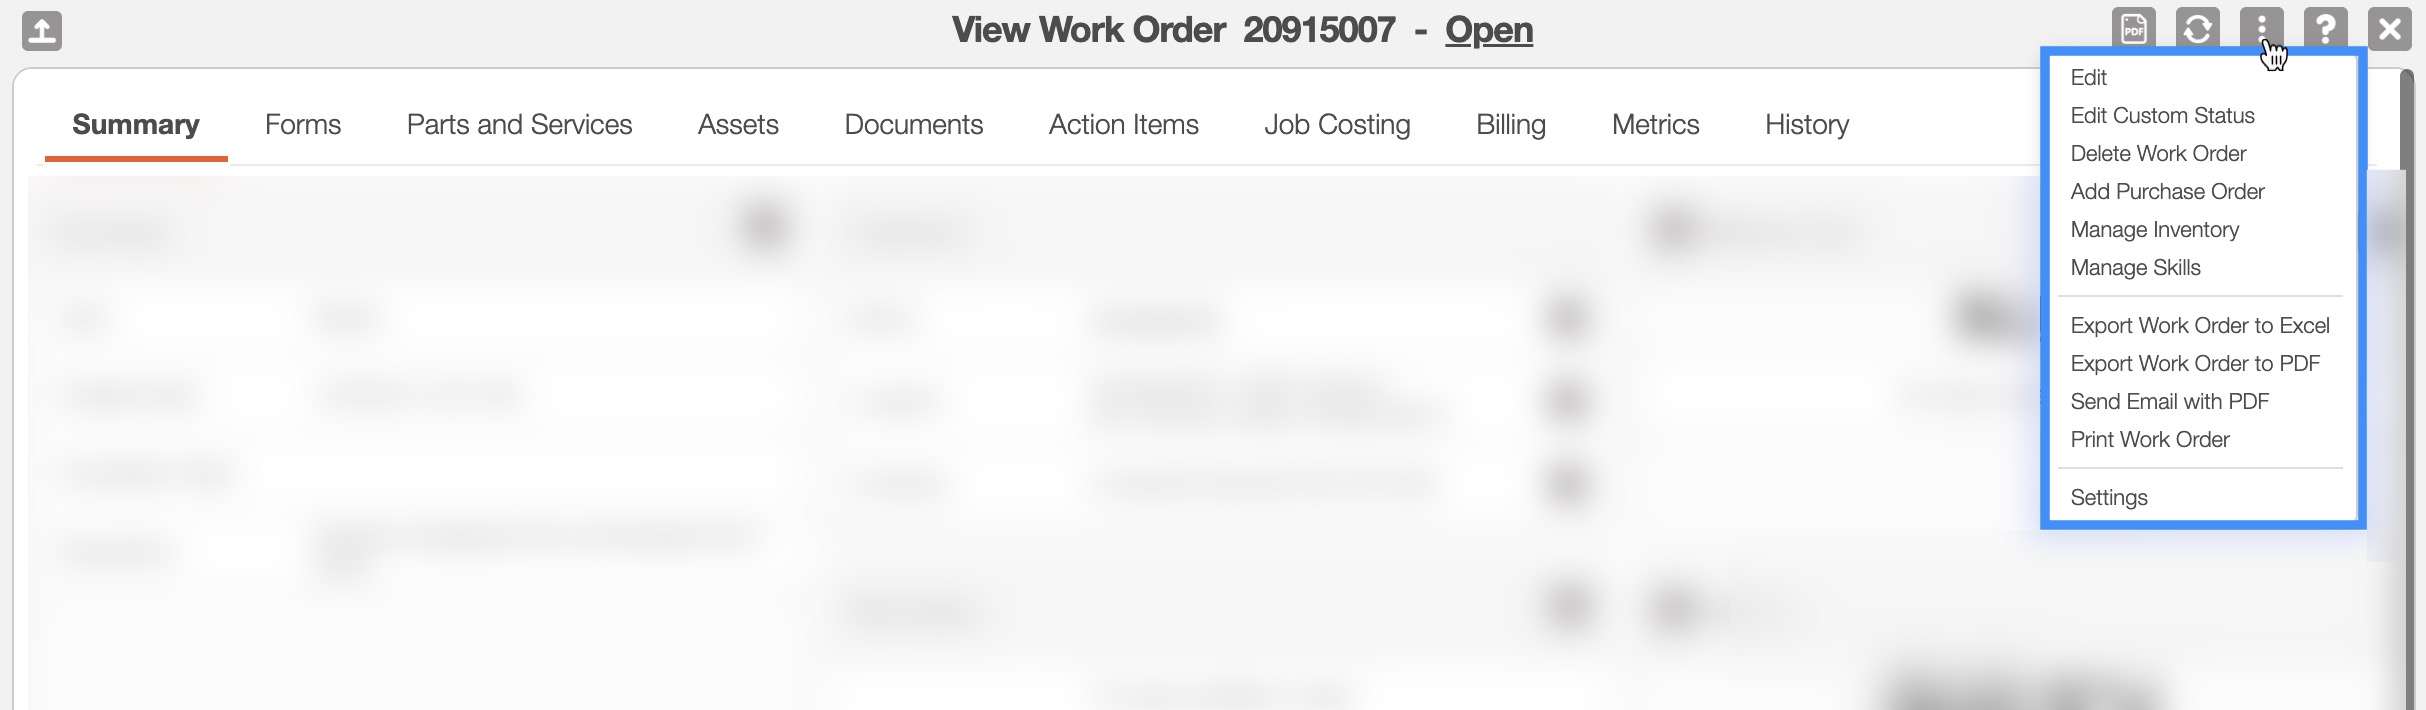
From the Individual Actions drop-down menu, you can select various actions that will help manage the specified work order.
The complete list of actions found in the Individual Actions drop-down menu are defined below:
| Name: | Description: |
|---|---|
| "Edit" | Allows the user to edit the specified work order. |
| "Edit Status" | Allows the user to edit the status of the specified work order. |
| "Delete Work Order" | Deletes the work order. |
| "Add Purchase Order" | Adds a purchase order to the specified work order. |
| "Manage Inventory" | Manages the inventory items that are associated with the work order. |
| "Manage Skills" | Manages the skills needed for the work order. |
| "Export Work Order to Excel" | Exports the work order to an Excel document |
| "Export Work Order to PDF" | Exports the work order to a PDF document. |
| "Send Email With PDF" | Sends an email with the work order as a PDF to the customer. |
| "Print Work Order" | Prints the work order. |
| "Settings" | Directs the user to the Work Orders Settings page. |
Overview and Layout
The "Summary" tab is the default tab that will appear once you open the View Work Order pop-up window. This tab will display all the requisite information regarding a work order; the information is also displayed in an accessible and practical manner.
The panels found on the "Summary" tab will summarize the data from the other tabs found in the View Work Order pop-up window:
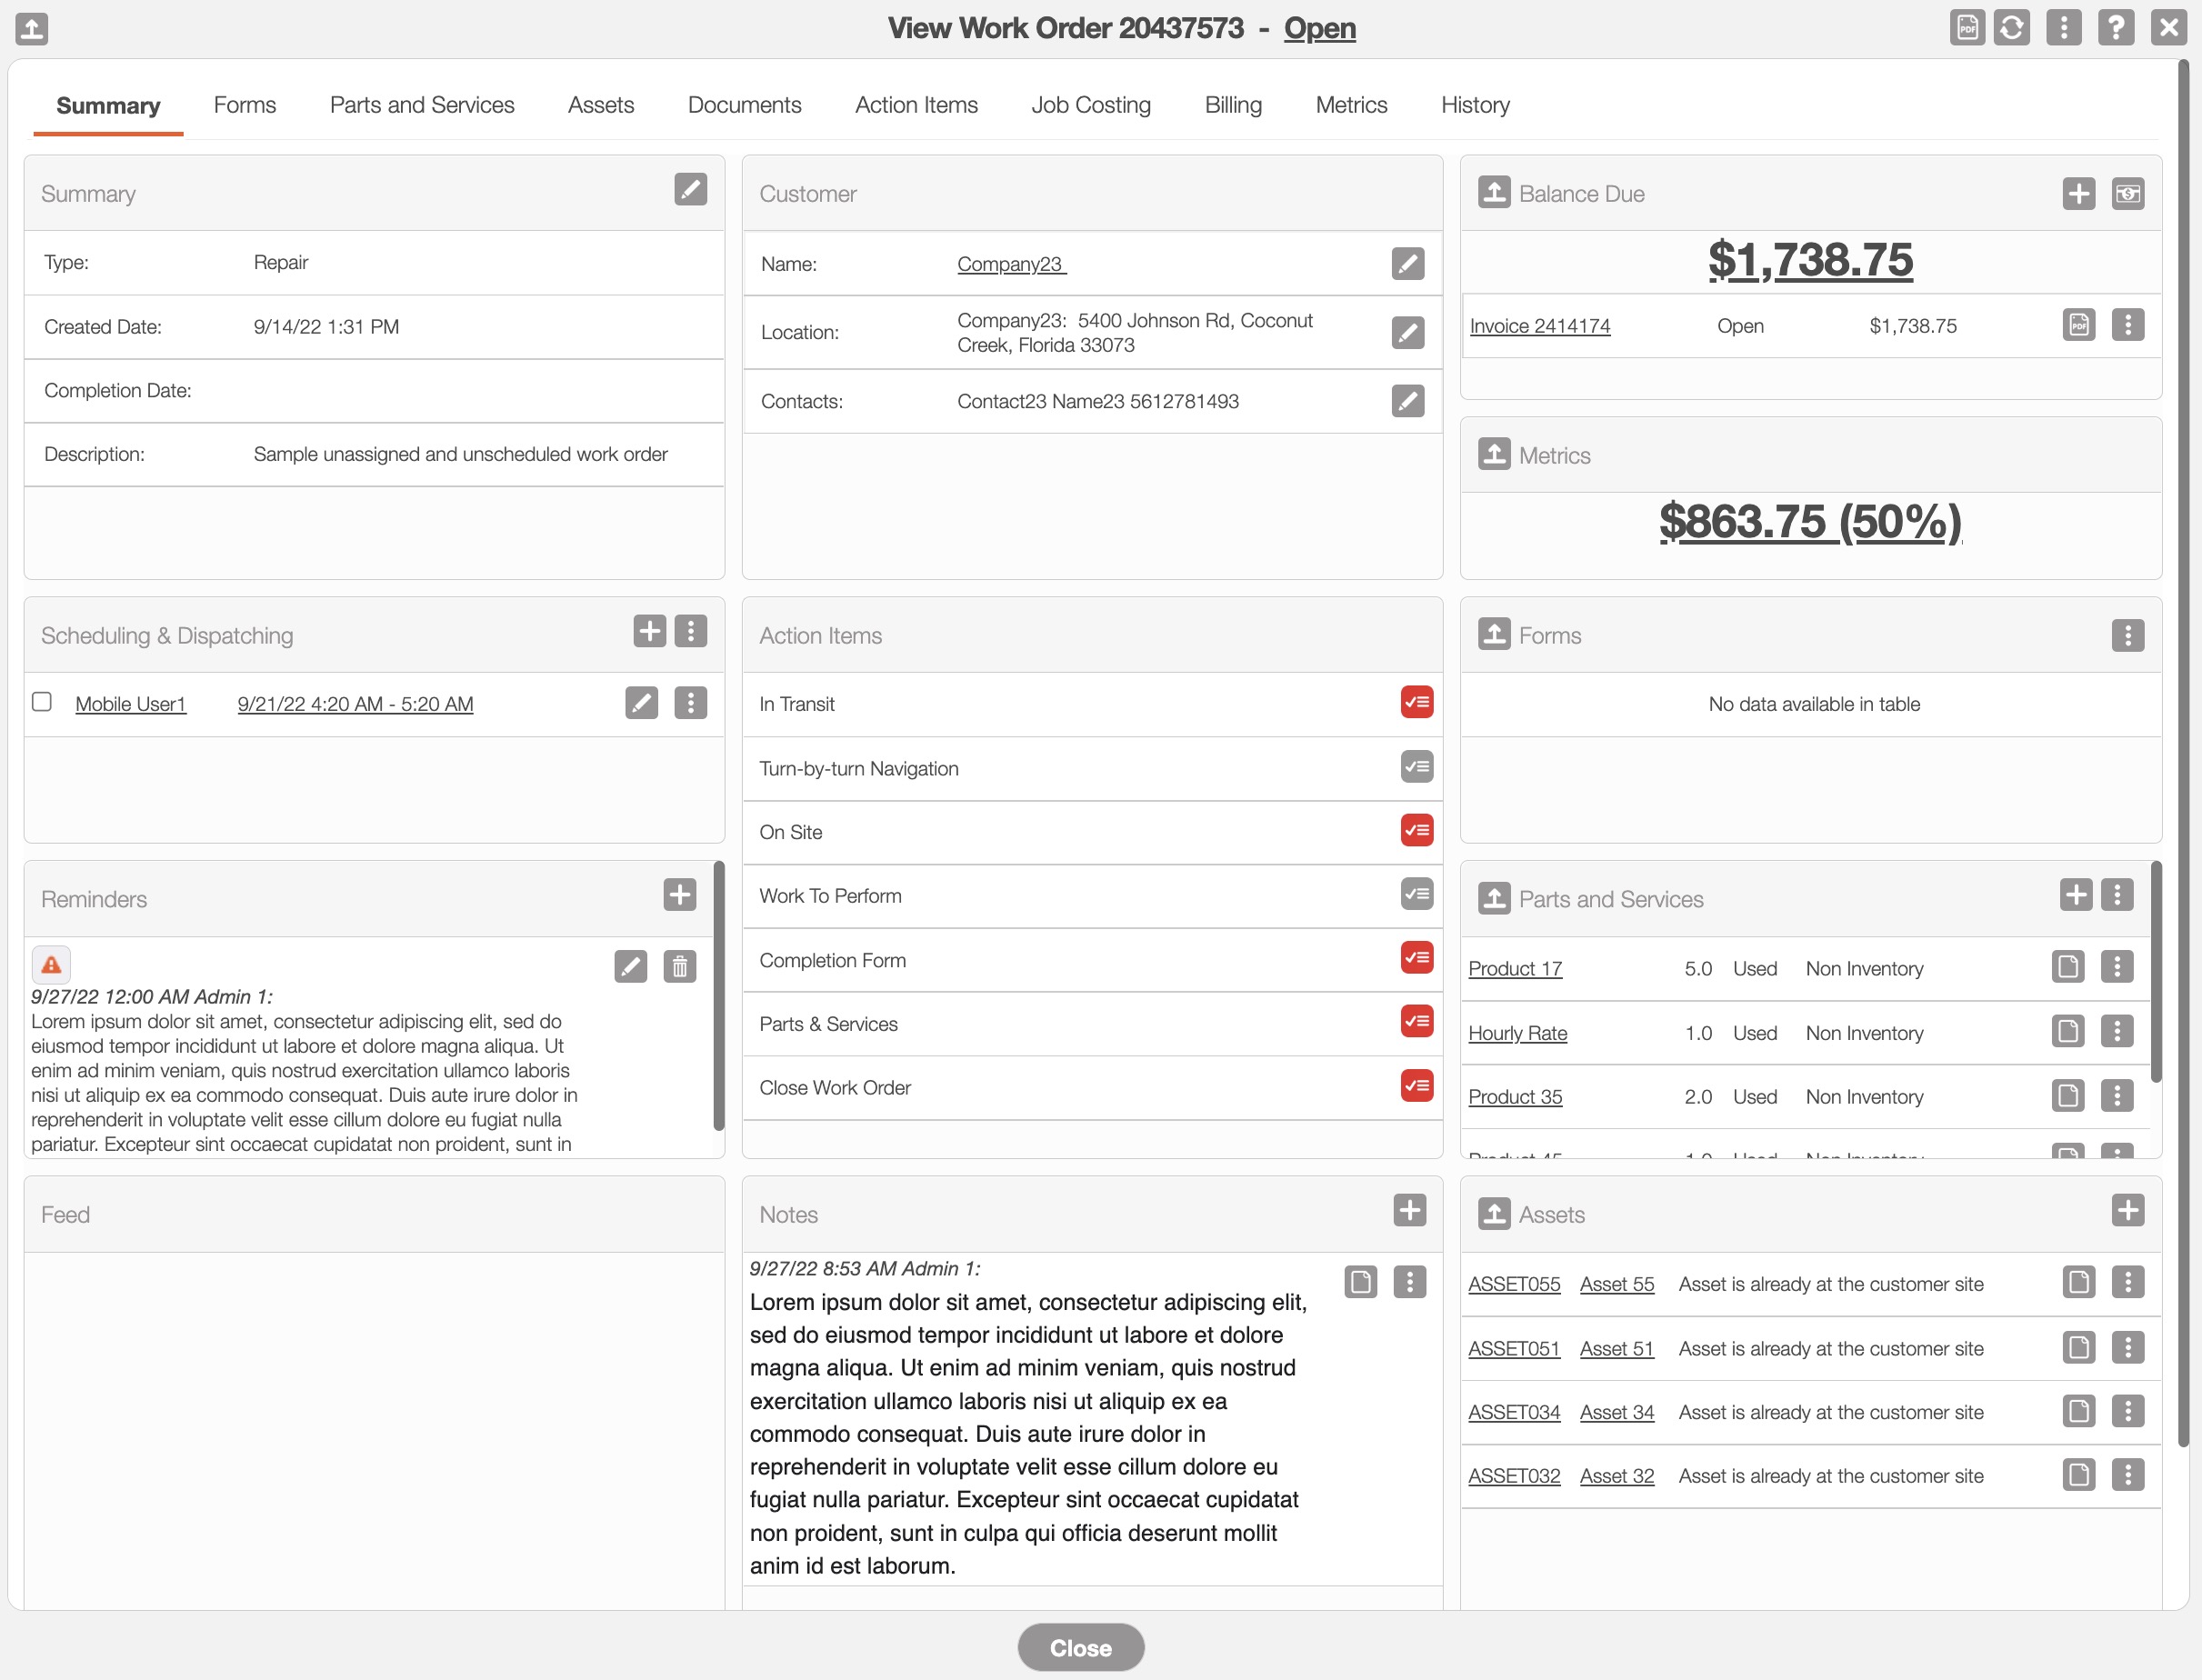
Where applicable, you can edit or add additional information directly in the "Summary" tab:
The Arrow icon (found in the top left of designated boxes) will open the corresponding tab in the View Work Order pop-up window.
The Individual Actions button (the three dots) will display different options (e.g., view, edit, delete, etc.) depending on the corresponding panel.
The View icon will allow you to view the selected data in a separate window.
The Plus Sign icon will allow you to add additional data or notes.
The Trash Can icon will allow you to delete the selected data.
The Dollar Sign icon will allow you to add additional payments to the work order's invoice.
The "Forms" tab will display any forms that are associated with the work order. Forms are tied to the work order type and once the work order is generated the default work order forms will be included in the work order's Action Items. Forms are usually completed in the field by the user while they are working on the work order (e.g., a PDF checklist for safety).
When there is more than one form, then the forms will be ordered in a list-view. This view will show the name of the form, the user who filled it, when it was filled, and (if available) the geotag of the location:

The More Actions drop-down will allow you to refresh, show all images, export work order forms, and export all the forms listed on the work order.
Once you have a new document added to the form, you can view, edit, or export the form to PDF.
By clicking on the Add button you can add a new document to the form listed.
| Name: | Description: |
|---|---|
| "Name" | The name / type of form associated with the work order. |
| "User" | The user who uploaded the form to the work order. |
| "Created Date" | The date and time that the form was uploaded to the work order. |
| "Geotags" | The geographical location of where the form was created. |
| "Actions" | Will allow you to view, edit, or export the MobiForm to PDF. |
The "Parts" tab will display all the product information associated with a work order from a sales order, invoice, etc.
In this section you will be able to perform the following actions on the listed parts and services used in the work order:
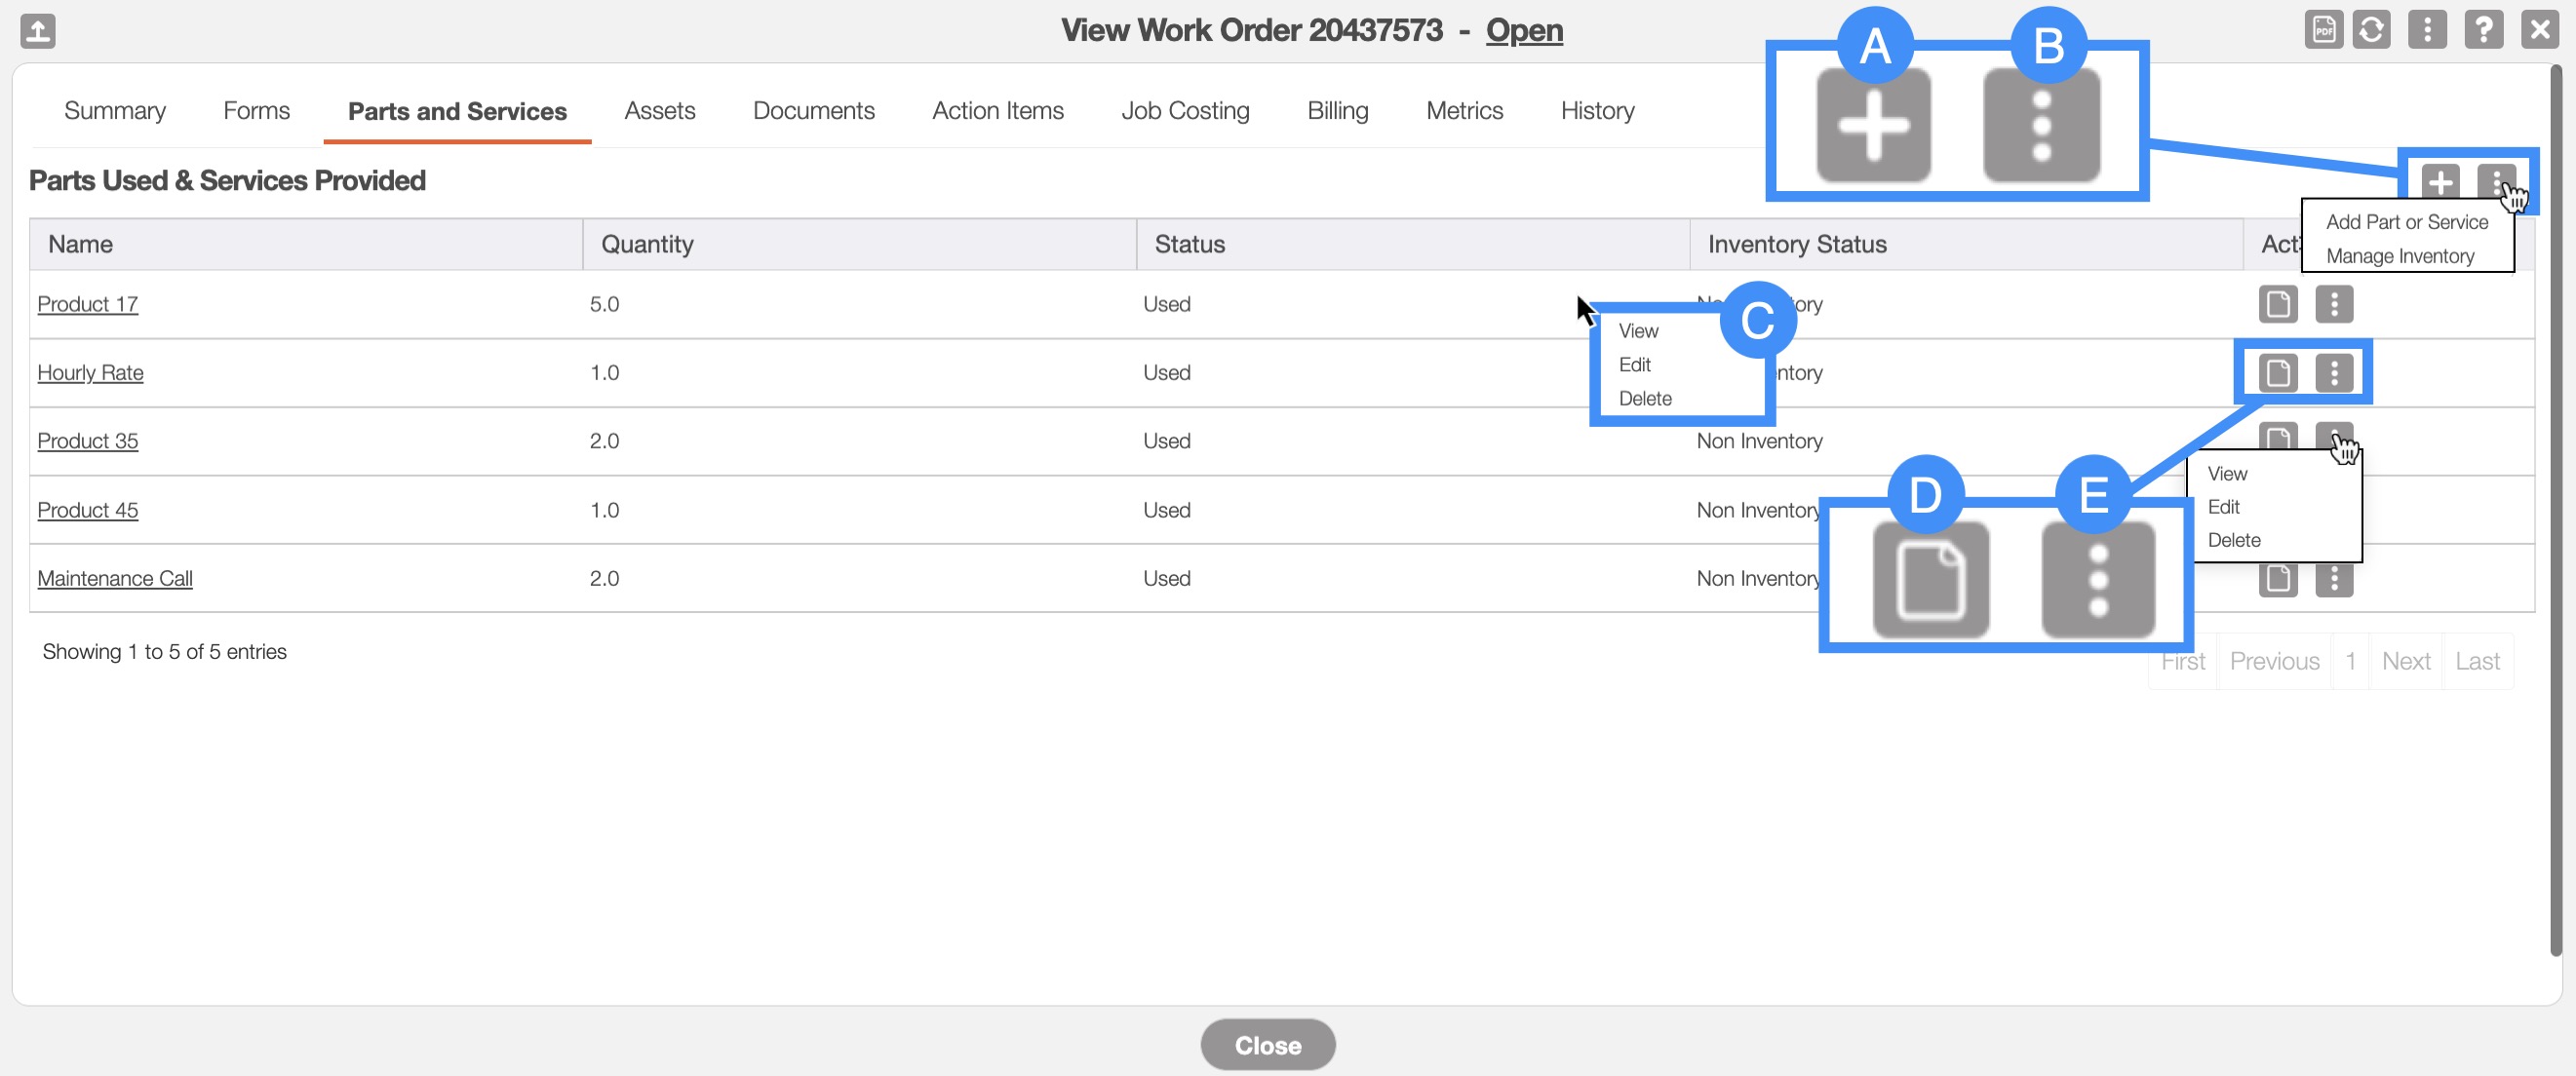
The Plus Sign will add a new used part/service.
The More Actions icon will allow you to add a new part or service or to manage the inventory of the parts/services already listed on the work order.
By right-clicking you will bring up the right-click actions. These actions are identical to the Individual Actions and will allow you to view, edit, or delete the listed parts or services.
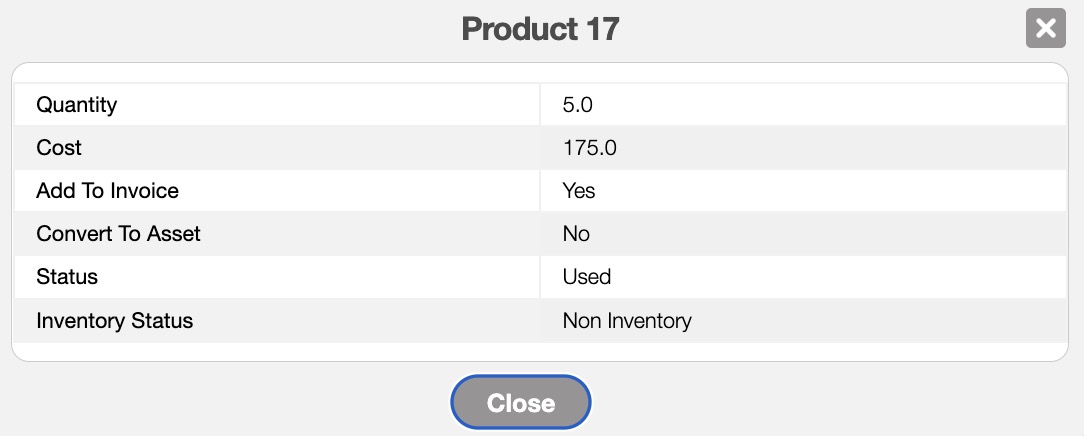
- The View icon will allow you to view the listed parts or services used in the work order:
The Individual Actions (the three dots next to the View icon) are identical to the right-click actions and will allow you to view, edit, or delete the listed parts or services.
The terms found in this section are defined below:
| Name: | Description: |
|---|---|
| "Name" | The name of the part associated with the work order. |
| "Quantity" | The number of parts or services being used for the work order. |
| "Status" | Indicates how the part was used or will be used for the work order (i.e., Used, Recommended, Required, Missing, or Waiting For Delivery). |
| "Inventory Status" | The status of the part in regard to inventory (e.g., if the part is reserved for the specified work order). |
| "Actions" | Allows you to view, edit, or delete the parts or services. |
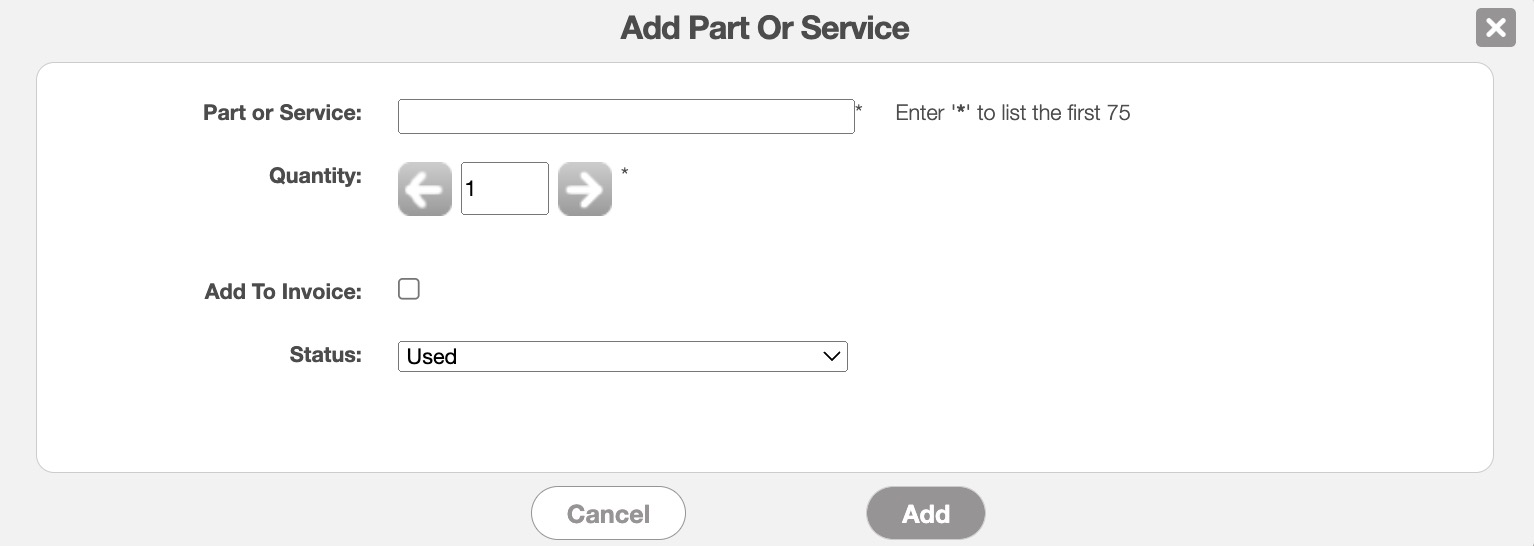
Add Part or Service
You can add a part or service by clicking the Plus Sign in the top right of the section. In the Add Part Used or Service Performed pop-up window, you can use the asterisk (*) to search through your parts/services.
If you would like to add the part/services used to the invoice, click on the "Add To Invoice" option. Once you are satisfied with your entry use the Add button to save:
Manage Inventory
When clicking on the "Manage Inventory" option from the More Actions button, the Manage Inventory pop-up window will appear.
In this pop-up window you will be able to update the usage status of the part/service, update the inventory status of the part/service, indicate the location where the part originates from, and if applicable, the warehouse of origin:

Once you are satisfied with your changes, click the Save button.
Assets, unlike parts, are items that your company tracks internally, such as trucks or computers. The "Assets" tab will allow you to add and view any assets associated with the work order.
You can add and edit assets associated within a work order, as well as, assign users to an asset:
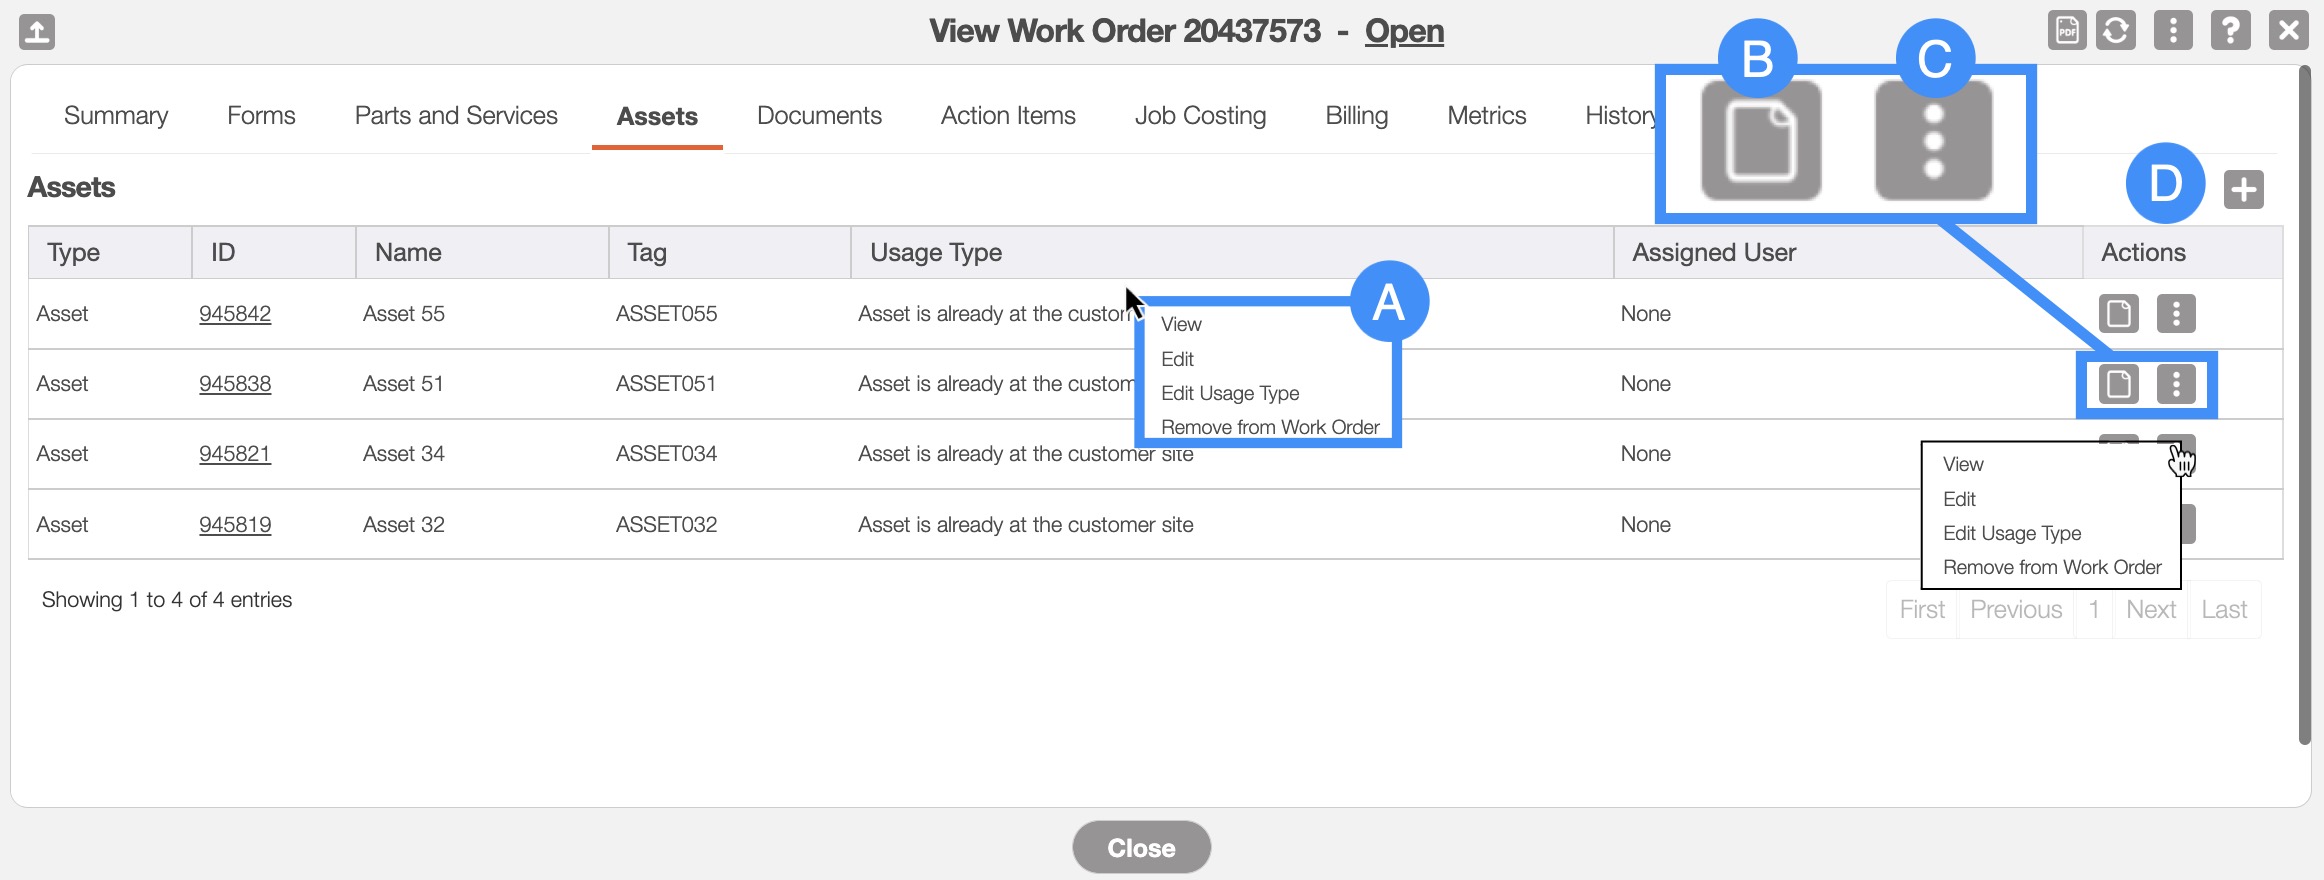
By right-clicking you will bring up the right-click actions. These actions are identical to the Individual Actions and will allow you to view, edit, edit the usage type, or remove the asset from the work order.
The View icon will allow you to open the View Asset pop-up window.
The Individual Actions (the three dots next to the View icon) are identical to the right-click actions and will allow you to view, edit, edit the usage type, or remove the asset from the work order.
The Plus Sign button will associate an asset to the work order.
| Name: | Description: |
|---|---|
| "Type" | Indicates the type of asset listed (i.e., if the asset is a serialized asset or a part). |
| "ID" | The ID number of the asset. |
| "Name" | The name of the asset. |
| "Tag" | The tag identifier number of the asset. |
| "Usage Type" | How the asset will be deployed to the work order location (i.e., the asset must be delivered to the customer, the asset is already at the customer location, the asset will be picked up from the customer location, or the asset will be used at the customer site). |
| "Assigned User" | The user assigned to the asset. |
| "Actions" | Allows you to view, edit, edit the usage type, or remove the associated asset from the work order. |
Associate an Asset to a Work Order
When you click on the Plus Sign icon, you will be able to associate an asset to the work order. The Add Asset pop-up window will appear:
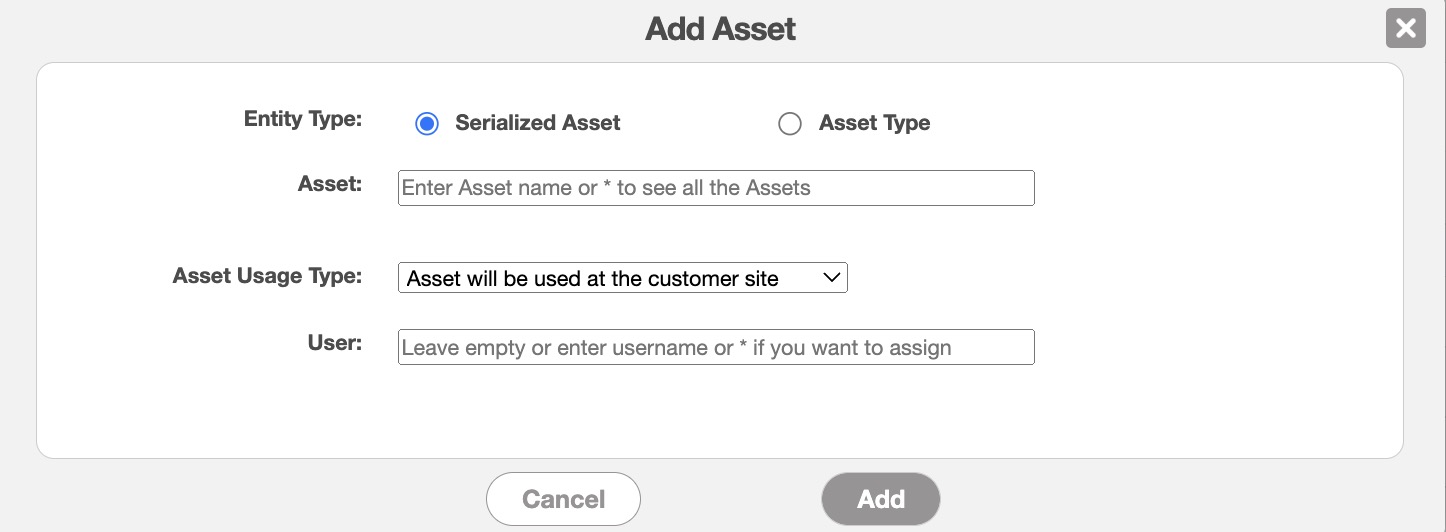
In this pop-up window:
Select if the asset is a "Serialized Asset" (a specific individual asset, e.g., a car with the license plate 123ABC) or if the asset is an "Asset Type" (a generic asset, e.g., any type of car).
Enter the asset name.
Use the drop-down to input how the asset will be delivered to the desired location.
Enter the user who is in charge of the asset.
Once you are satisfied, click the Add button to associate the asset with the work order.
When associating an asset to a work order, the maximum number of viewable assets is 250; this limit helps to prevent performance lags.
Edit the Asset Usage for a Work Order
You can update how the asset is deployed to the desired location by selecting the "Edit Usage Type" option when you right-click or click on the Individual Actions button.
Once you select the "Edit Usage Type" option, the Edit Asset Association pop-up window will appear:
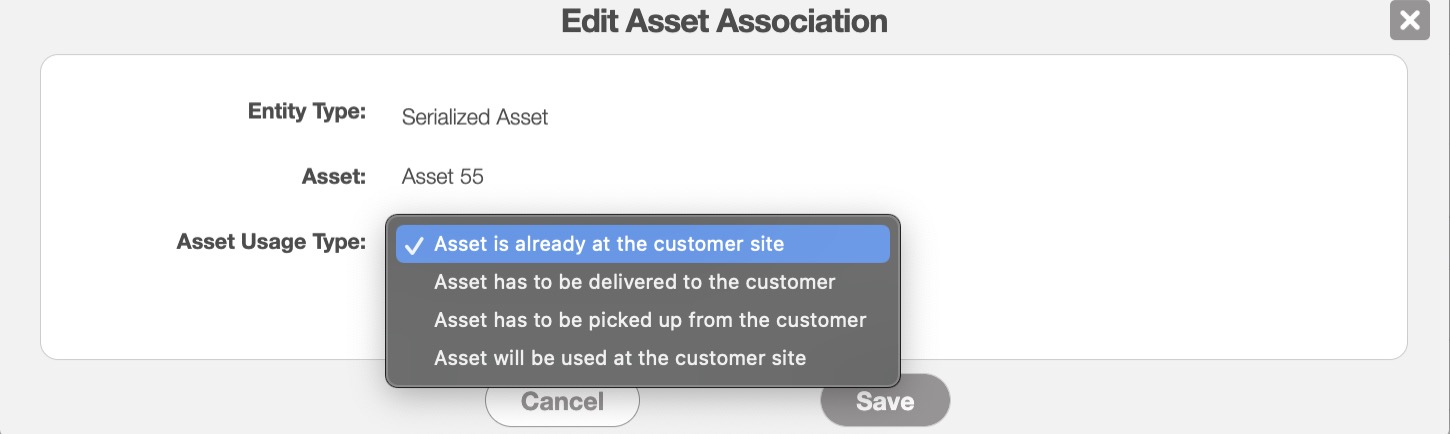
Use the "Asset Usage Type" drop-down to select the new asset usage. Once you are satisfied with the new value, click the Save button.
The "Documents" tab will allow you to store work order-specific documentation (e.g., contracts, photos, etc.) for future use. This tab will also list the type of document file, the date it was uploaded, the user who uploaded it, and more.
To add a new document or file, you must click on the Plus Sign button and then drag & drop or choose a file to upload.
Only after you upload a file or document to this tab will you be able to access the Action options:
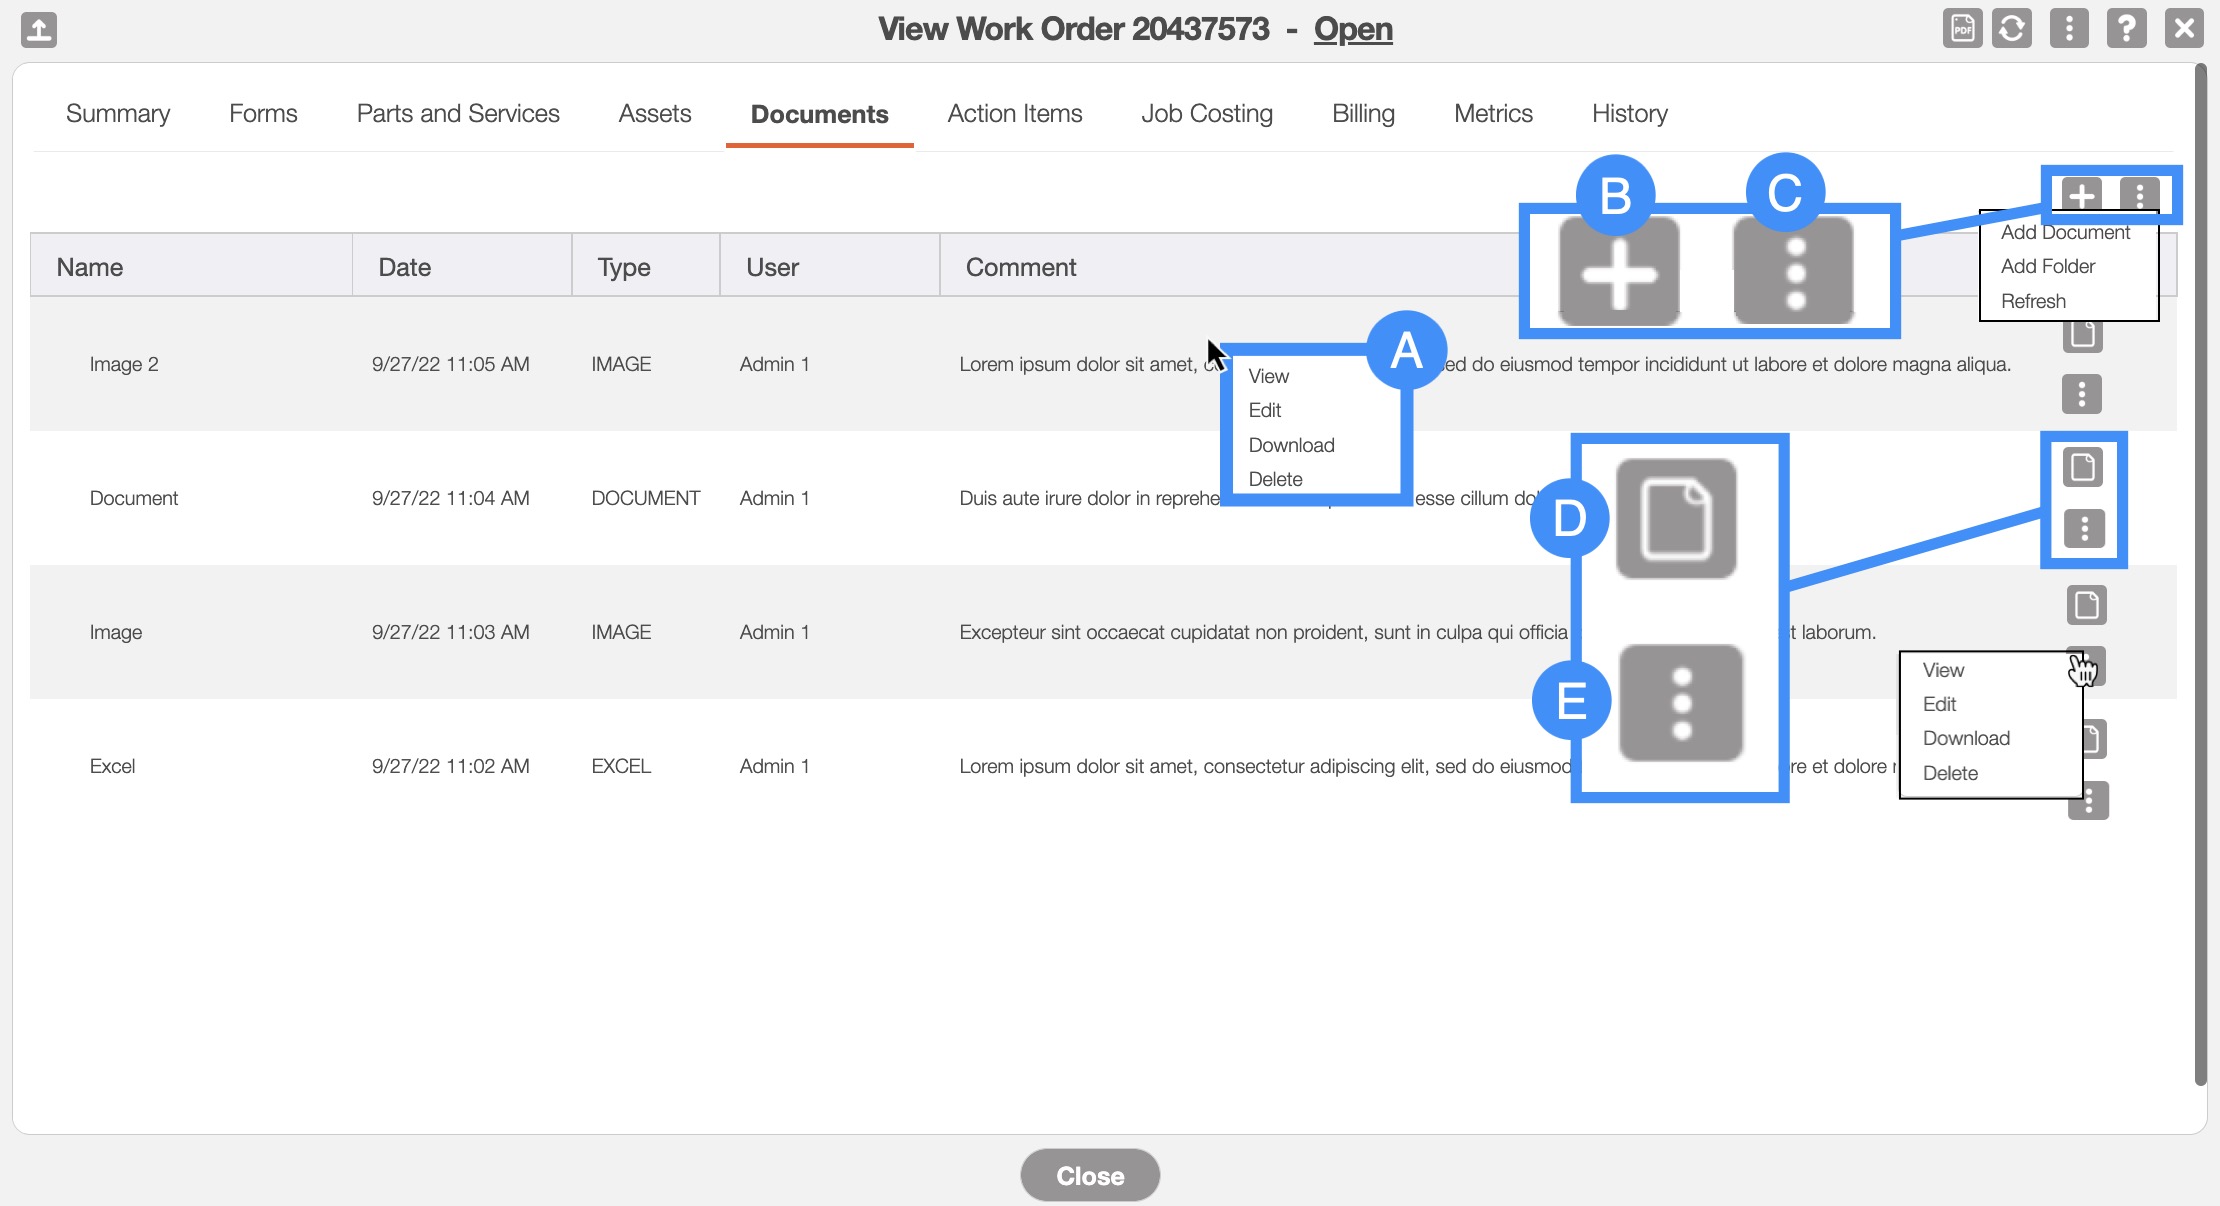
By right-clicking you will bring up the right-click actions. These actions are identical to the Individual Actions and will allow you to view, edit, download, or delete the document.
The Plus Sign will add a new document or file.
The topmost Individual Actions will allow you to add a new document, a new folder, or refresh the tab. To add a document to any created folder, first edit the selected document and use the "Select Folder" drop-down to choose the desired folder. Then click the Edit button to save the new destination.
The View icon will allow you to view the image file in a new tab, window, or allow you to download the document.
The Individual Actions (the three dots next to the View icon) are identical to the right-click actions and will allow you to view, edit, download, or delete the document.
| Name: | Description: |
|---|---|
| "Name" | The name of the document. |
| "Date" | The date that the document or image file was uploaded. |
| "Type" | The type of document (e.g., PDF, Word, image, Excel, etc.). |
| "User" | The user who uploaded the document or file. |
| "Comment" | Any comments or notes associated with the document. |
| "Actions" | Allows you to view, edit, download, or delete the document. |
The "Action Items" tab will allow you to add or remove tasks for the mobile device, in relation to a specific work order (e.g., "In Transit," "Invoice," etc.).
Action Items Layout
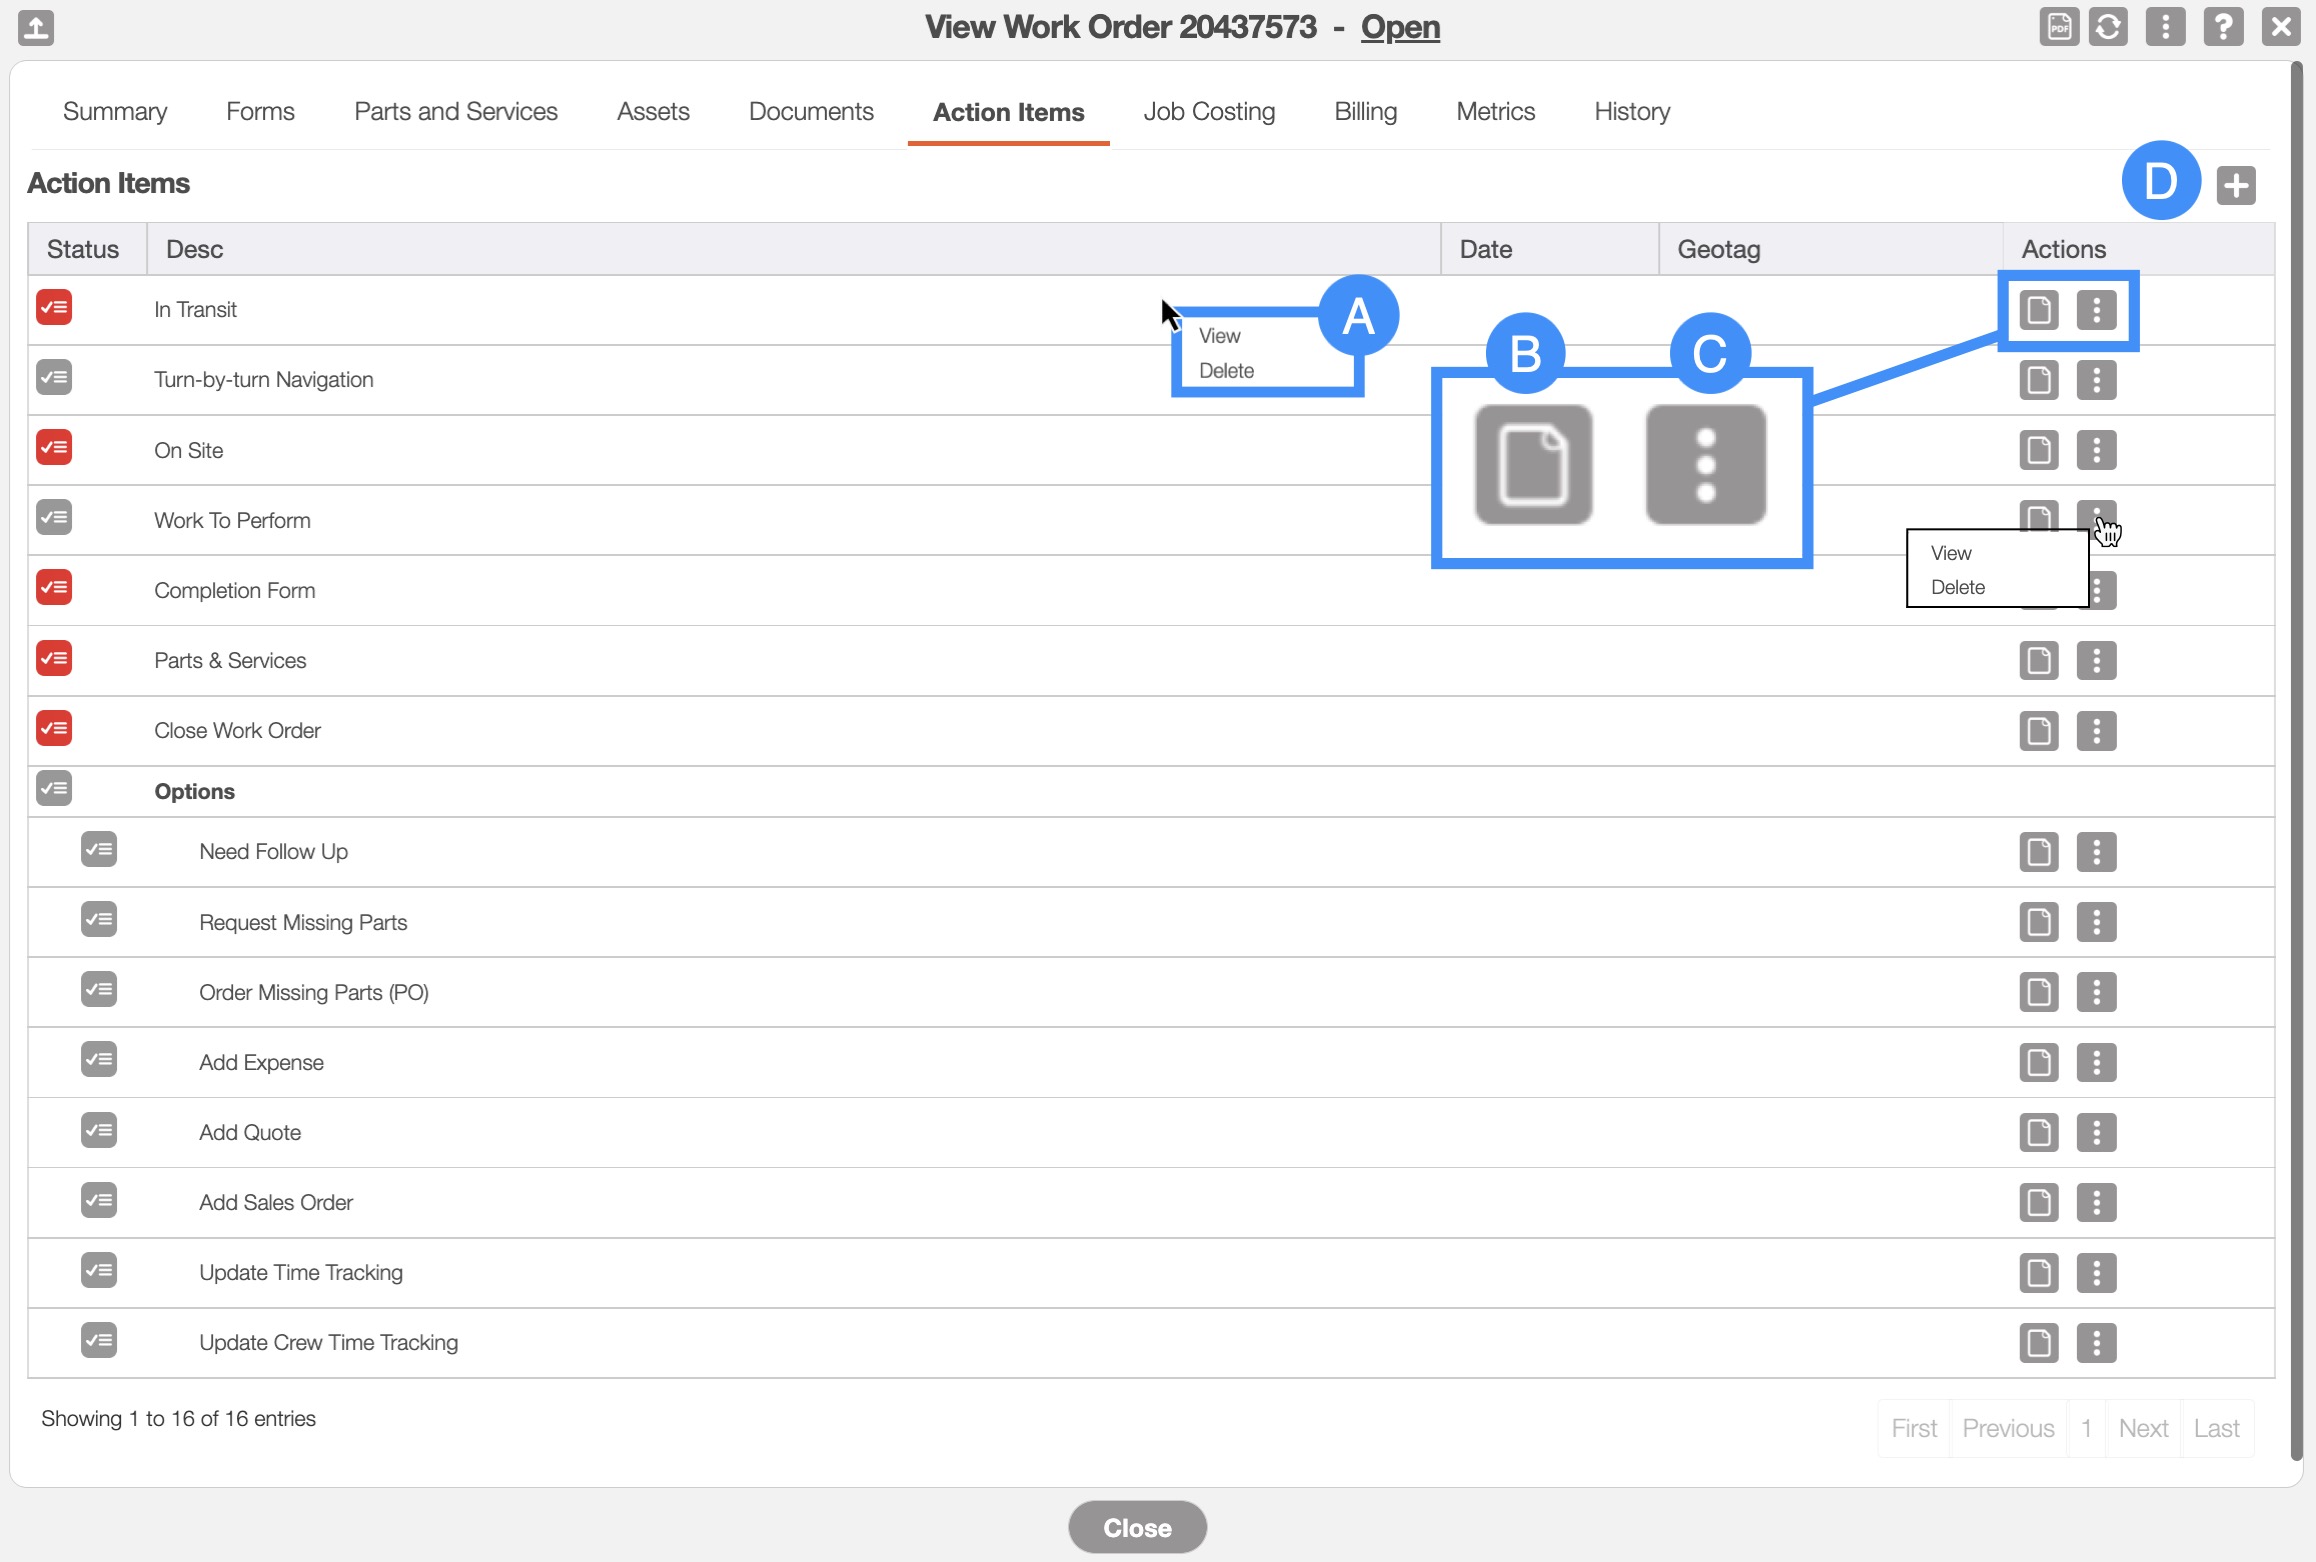
By right-clicking you will bring up the right-click actions. These actions are identical to the Individual Actions and will allow you to view or delete the desired action item.
- The View icon will allow you to view the details of the action item:
The Individual Actions (the three dots next to the View icon) are identical to the right-click actions and will allow you to view or delete the desired action item.
The Plus Sign will add a new action item. The subsection, "Add a New Action Item" will go into more detail regarding the process of adding a new action item for your user to complete on their work order.

The terms for the "Action Items" tab are defined below:
| Name: | Description: |
|---|---|
| "Status" | The status of the action item (e.g., if it has been completed or not). |
| "Desc" | The description and name of the action item. |
| "Date" | The date that the action item was performed. |
| "Geotag" | The location of where the action item was completed. |
| "Actions" | Allows you to view or delete the action item. |
Add a New Action Item
To add a new action item, first press the topmost Plus Sign as illustrated in the image below:
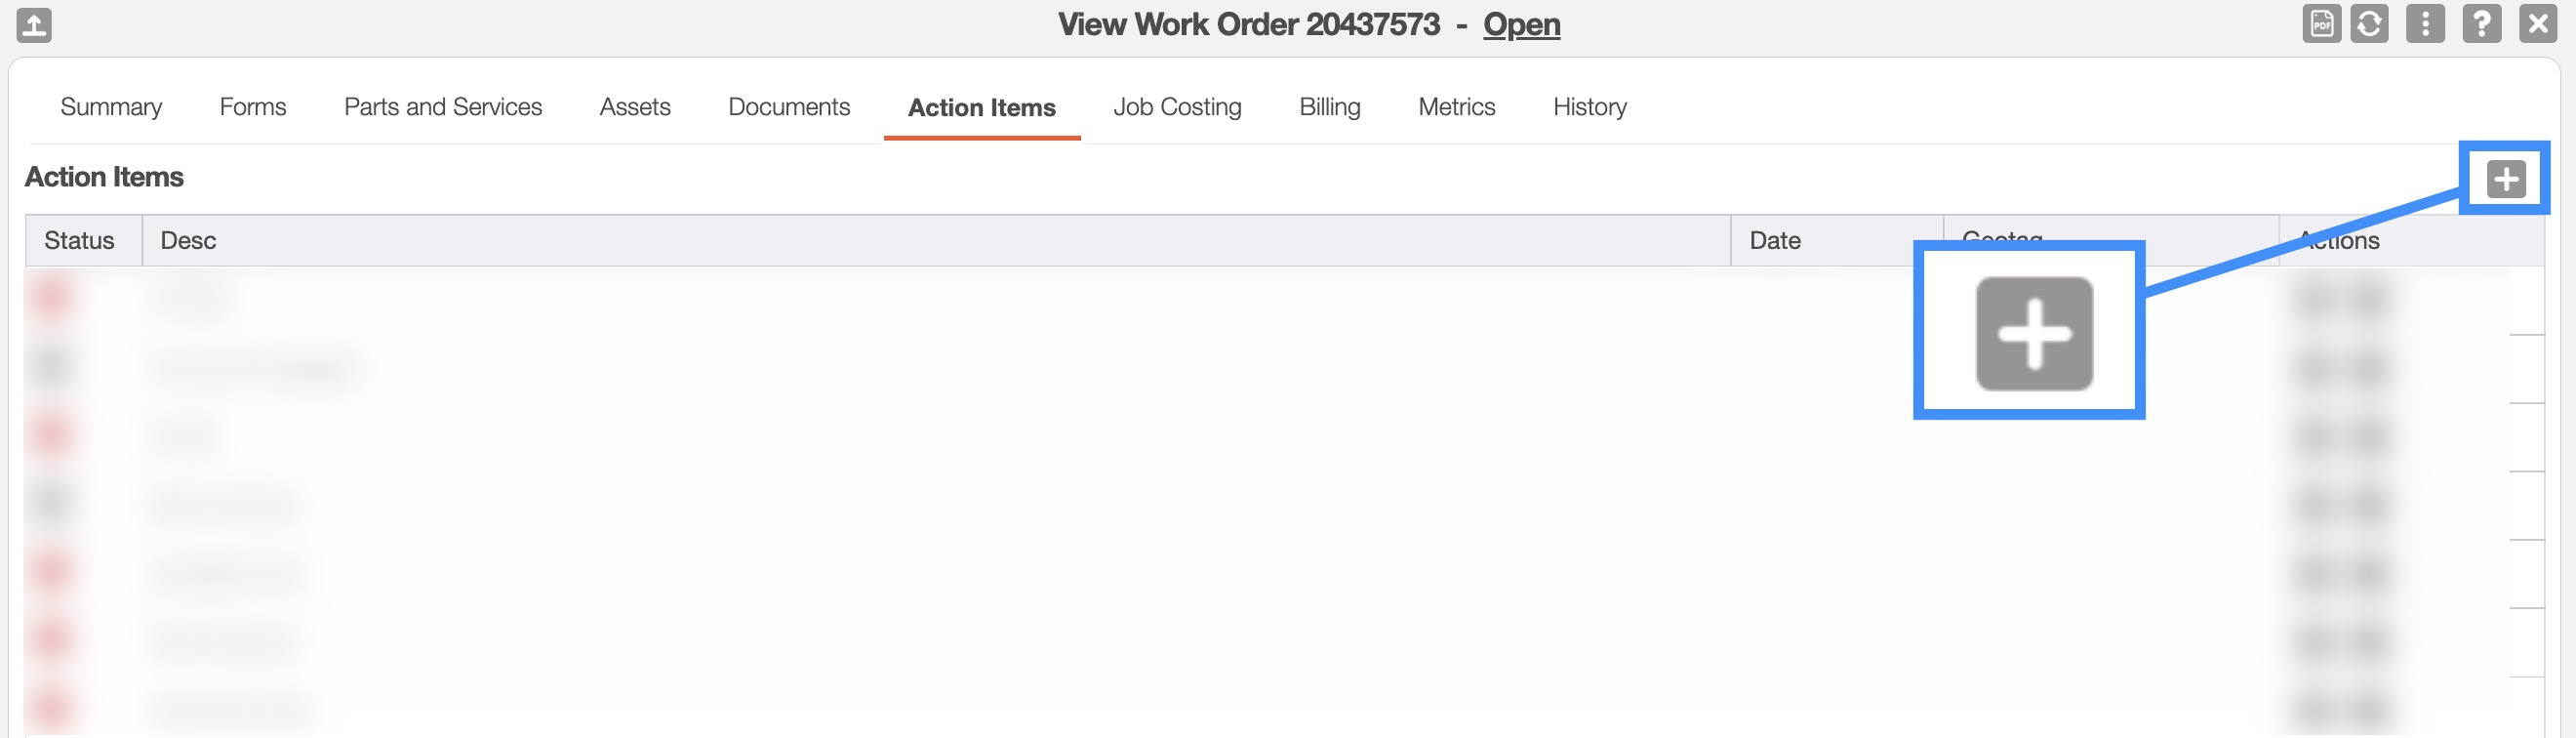
Once you click on the Plus Sign you will be automatically redirected to the Add Action Item page:
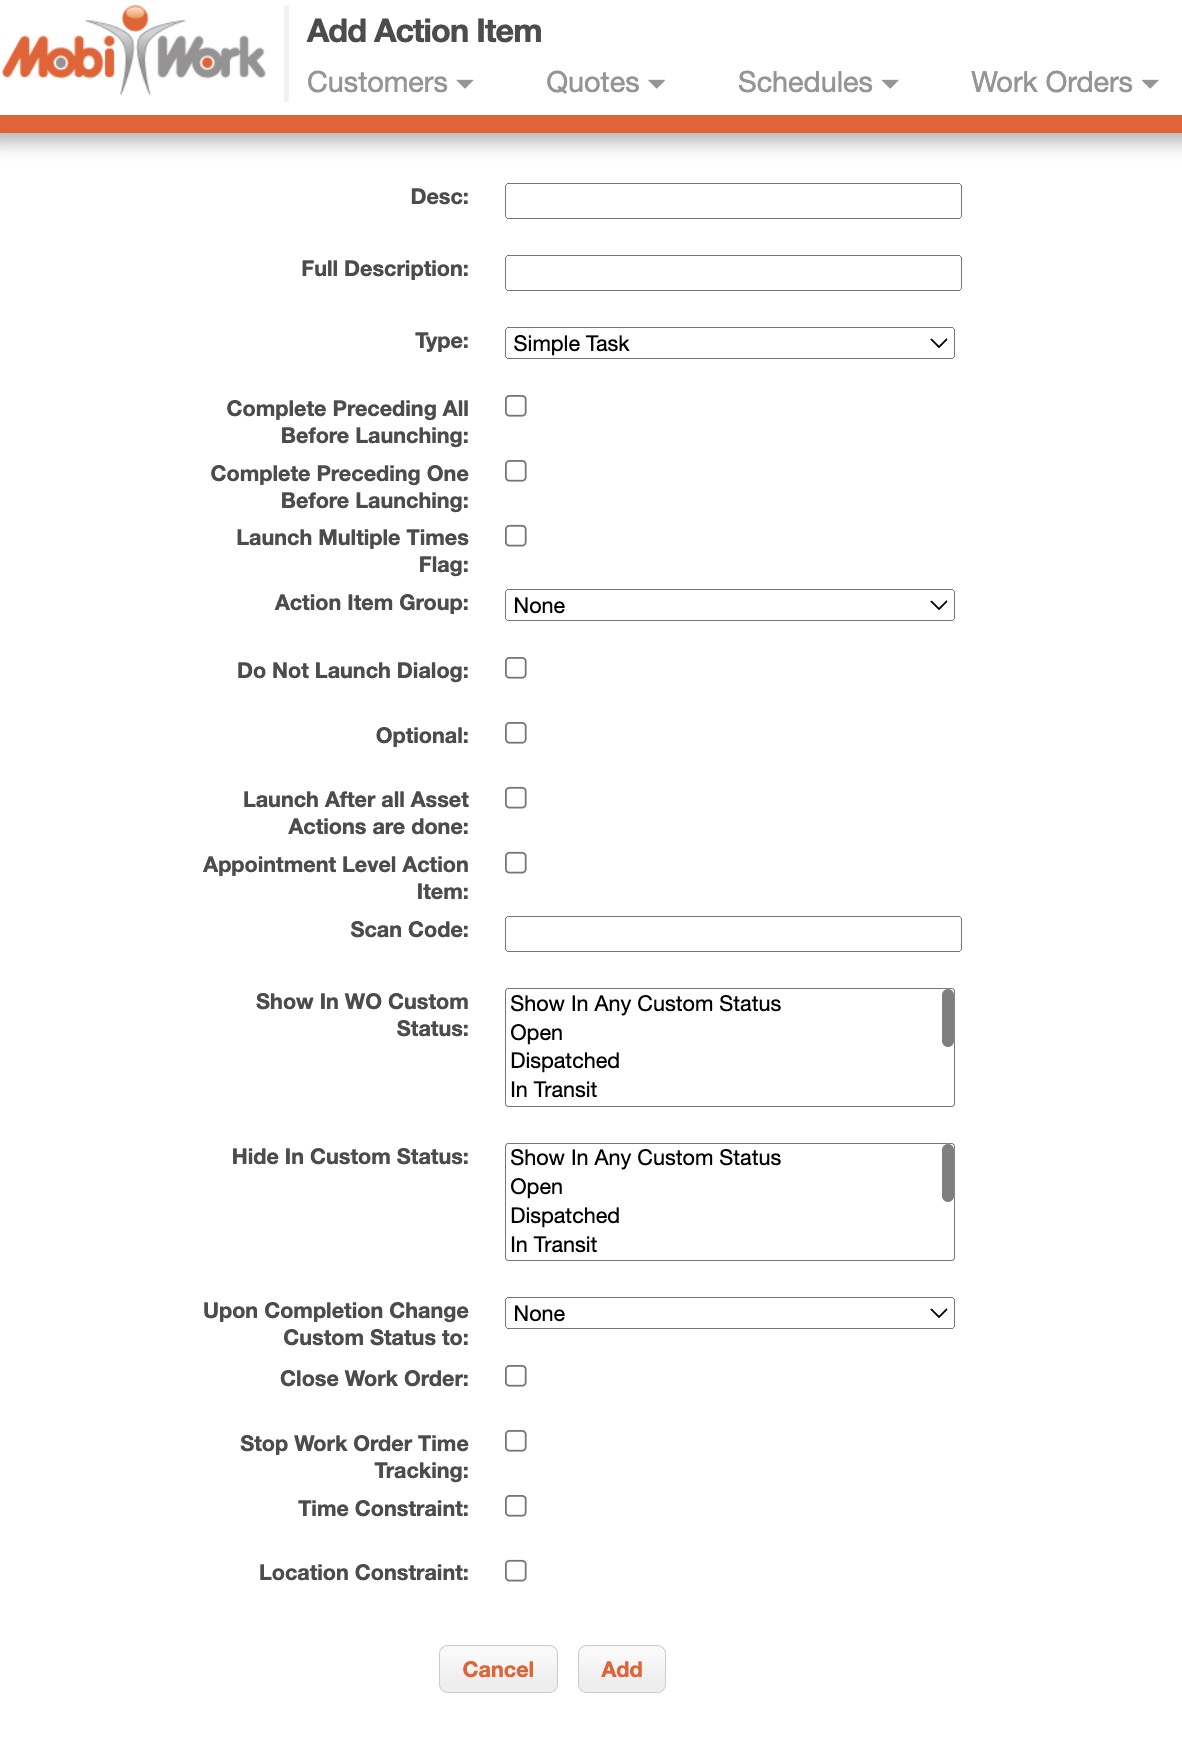
From this page you can specify the requirements of your new action item, such as:
Desc- Enter the description for the new action item; this will also serve as the name of the new action item.
Full Description- The full description of the new action item and what it will do.
Type- The type of action that is being performed and measured by the action item.
Time Tracking Action- If time tracking should be applied for the listed action item (e.g., if it should start, stop, etc. when the action item commences).
Complete Preceding ALL Before Launching- If the action items listed prior to the new one must be completed before the new action item can be started.
Complete Preceding ONE Before Launching- If the action item directly listed prior to the new one must be completed before the new action item can be started.
Launch Multiple Times Flag- This option will allow the user to tap the selected action item multiple times.
Action Item Group- This feature will group selected action items together when required.
Do Not Launch Dialog- Does not launch a dialog box when selecting the desired action item.
Optional- If the new action item is optional.
Launch After All Asset Actions are Done-
Show in WO Custom Status- This feature will hide the action item in everything but the designated custom status.
Hide in Custom Status- This feature will show the action item in everything but the designated custom status.
Upon Completion Change Custom Status to- Once the new action item is activated it will change the custom status of the work order.
Close Work Order- Once the new action item is activated, it will close the work order.
Stop Work Order Time Tracking- Once the new action item is activated, it will stop tracking time for the user.
Time Constraint- If there are any time constraints involved with the work order (e.g., the work order can only be completed during a certain time schedule).
Location Constraint- If there are any location constraints involved with the work order (e.g., the work order can only be completed at a certain area).
The "Job Costing" tab will list all the expenses (e.g., the time a user spent on a work order, the cost of parts and services used on a work order, etc.)
The "Job Costing" tab is comprised of three sections: "Expenses," "Parts and Services," and "Time Tracking:"
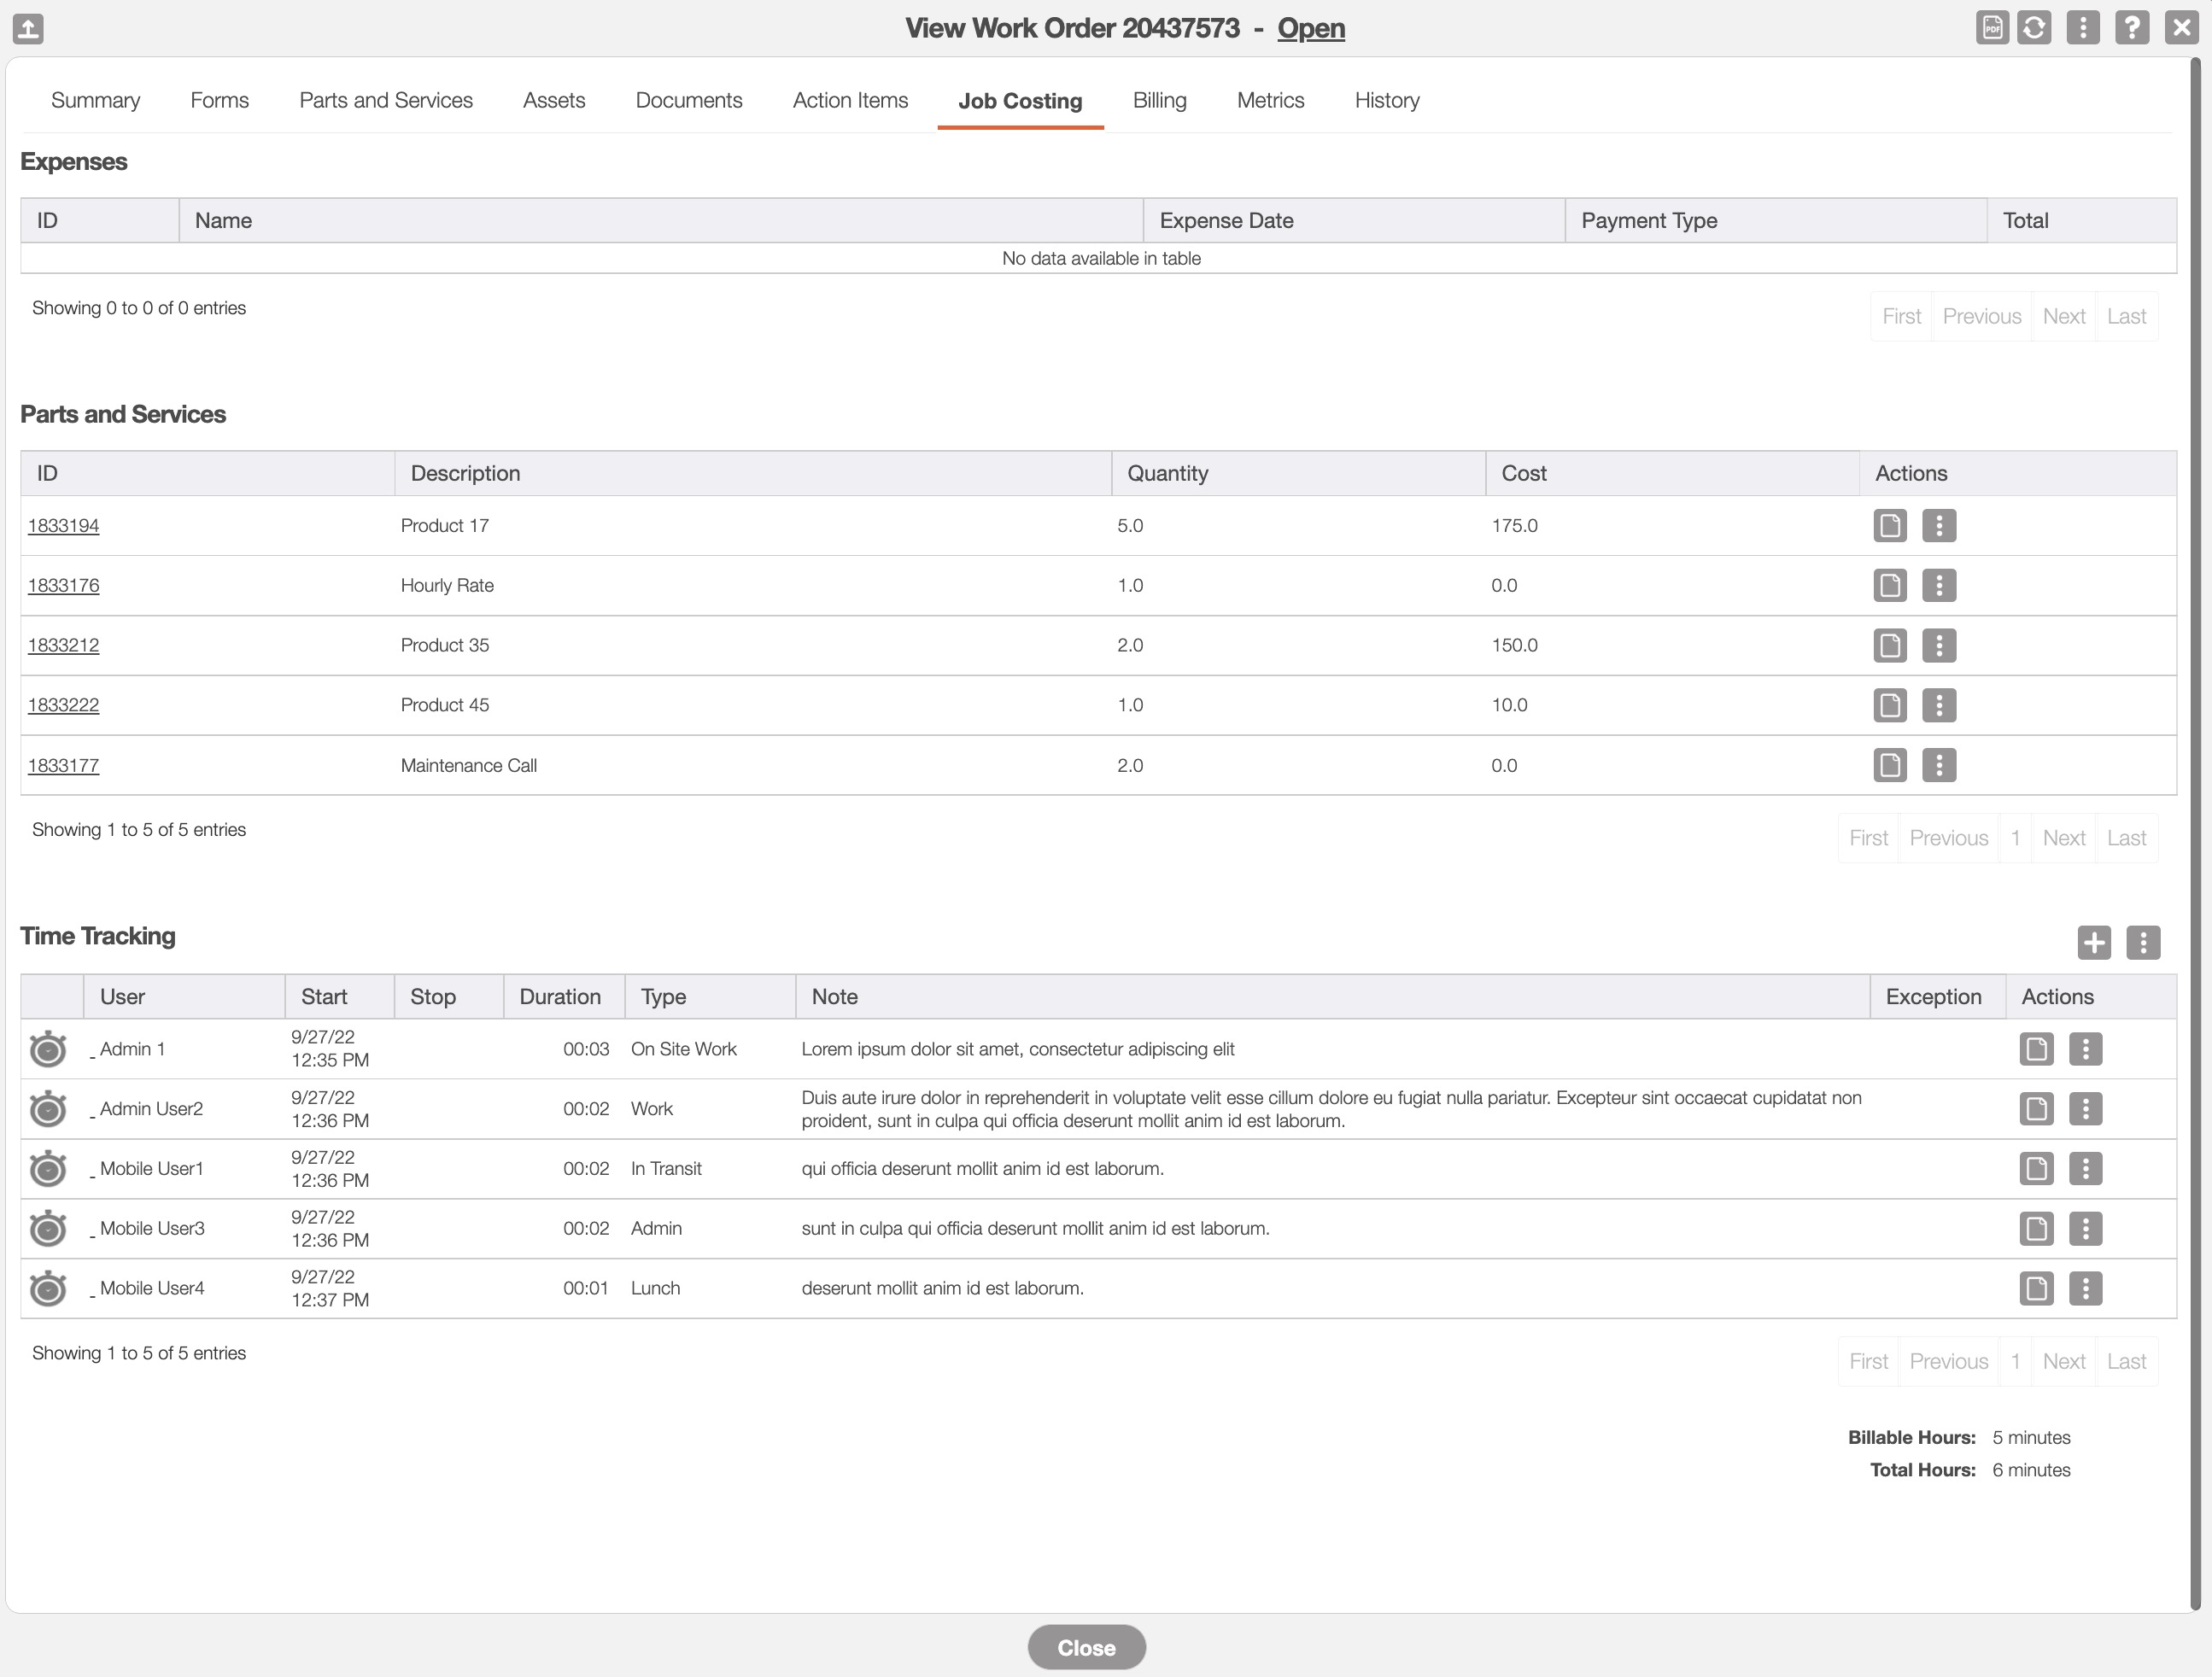
Expenses
The "Expenses" section will list the expenses that the users encountered while executing the work order tasks (e.g., gas for mileage when traveling to jobs):

The terms found in the "Expenses" section are defined below:
| Name: | Description: |
|---|---|
| "ID" | The identification number of the expense. |
| "Name" | The name of the user who incurred the expense. |
| "Expense Date" | The date the expense was incurred. |
| "Payment "Type" | How the expense was paid (e.g., credit card, cash, etc.). |
| "Total" | The total expense amount for the user. |
Parts and Services
The "Parts and Services" section will detail the parts and services that are used in the work order. Please note that you will be unable to modify the items that appear in this section:
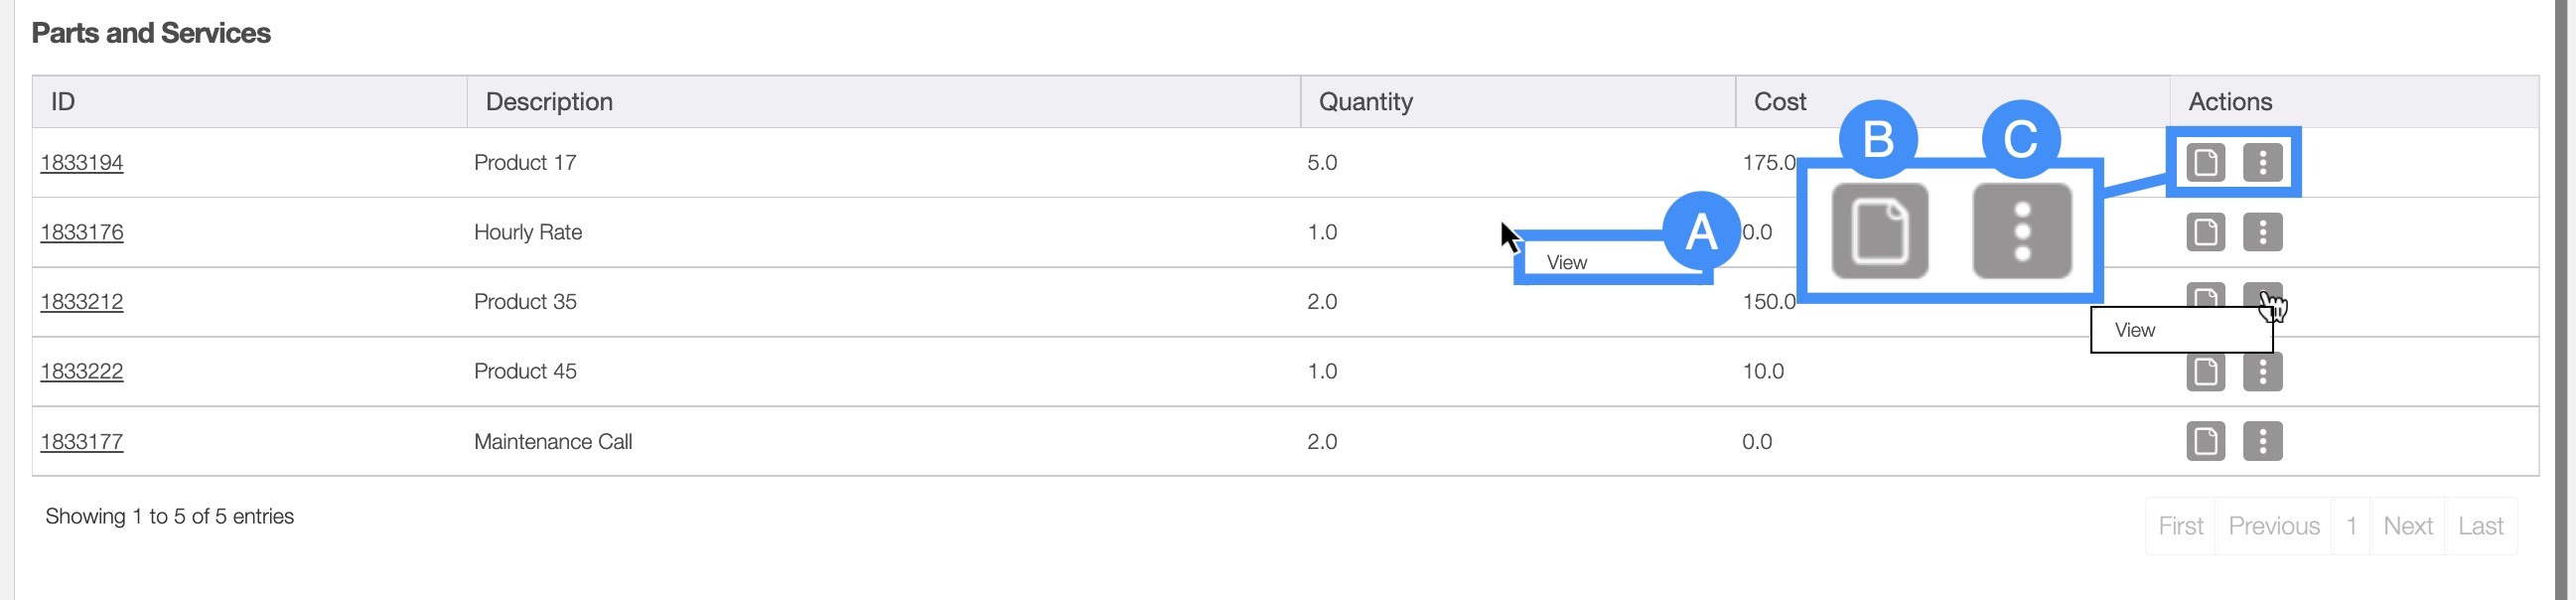
In this section, you can view the parts or services used in the work order through the following methods:
Right-click and selecting the "View" option.
Click on the View icon to view the selected parts or services.
Click on the Individual Actions and select the "View" option.
If you would like to learn how to add parts and services to a work order please see the Parts tab section.
The terms found in the "Parts and Services" section are defined below:
| Name: | Description: |
|---|---|
| "ID" | The identification number for the part or service. |
| "Description" | A description of the part or service. |
| "Quantity" | The number of parts or services used for the work order. |
| "Cost" | The cost of parts or services used for the work order. |
| "Actions" | Allows you to view the parts or services in a read-only format. |
Time Tracking
Within the "Time Tracking" section, you will be able to keep track of the time that the users have spent on the work order; this section not only allows you to track user hours but also enables you to start/stop their worked hours, specify the nature of the work, view time duration, and more for enhanced visibility and control.
Time Tracking (Ongoing)
You can see that the time tracking for a user is ongoing when it has the Clock icon. As demonstrated below, the actions in this ongoing stage vary slightly from the stopped time tracking:
![]()
The Plus Sign will add a new time tracking for a user and the topmost Individual Actions will allow you to start the time tracking, add a new time tracking for a user, or refresh the tab.
By right-clicking on an ongoing time interval, you will bring up the right-click actions. These actions are identical to the Individual Actions for an ongoing time interval, and will allow you to stop the clock, view the hours in a read-only format, edit the time, or delete the time.
The View icon will allow you to view the hours in a read-only format.
The Individual Actions for an ongoing time interval are identical to the right-click actions for an ongoing time interval, and will allow you to stop the clock, view the hours in a read-only format, edit the time, or delete the time.
Time Tracking (Stopped)
You can see that the time tracking for a user is stopped when it has the Checkmark icon. As shown below, the actions in this stopped stage vary slightly from the ongoing time tracking:
![]()
By right-clicking on a stopped time interval, you will bring up the right-click actions. These actions are identical to the Individual Actions for a stopped time interval and will allow you to view the hours in a read-only format, edit the time, or delete the time.
The View icon will allow you to view the hours in a read-only format.
The Individual Actions for a stopped time interval (the three dots next to the View icon) are identical to the right-click actions for a stopped time interval and will allow you to view the hours in a read-only format, edit the time, or delete the time.
The terms found in the "Time Tracking" section are defined below:
| Name: | Description: |
|---|---|
| "User" | The user associated with the respective time tracking. |
| "Start" | The start time and date of the activity or task. |
| "Stop" | The stop time and date of the activity or task. |
| "Duration" | How long (from Start to Stop) the activity or task lasts. |
| "Type" | The type of activity or task that is being measured by the time tracking. |
| "Note" | A brief note regarding the time tracking activity or task. |
| "Exception" | If any error occurs between time tracking events (e.g., an exception) the error icon will be visible here. |
| "Actions" | For an ongoing time interval, the Actions drop-down will allow you to stop the clock, view the hours in a read-only format, edit the time, or delete the time. For a stopped time interval, the Actions drop-down will allow you to view the hours in a read-only format, edit the time, or delete the time. |
The "Billing" tab will display all the invoices associated with the work order regardless of the invoice status:
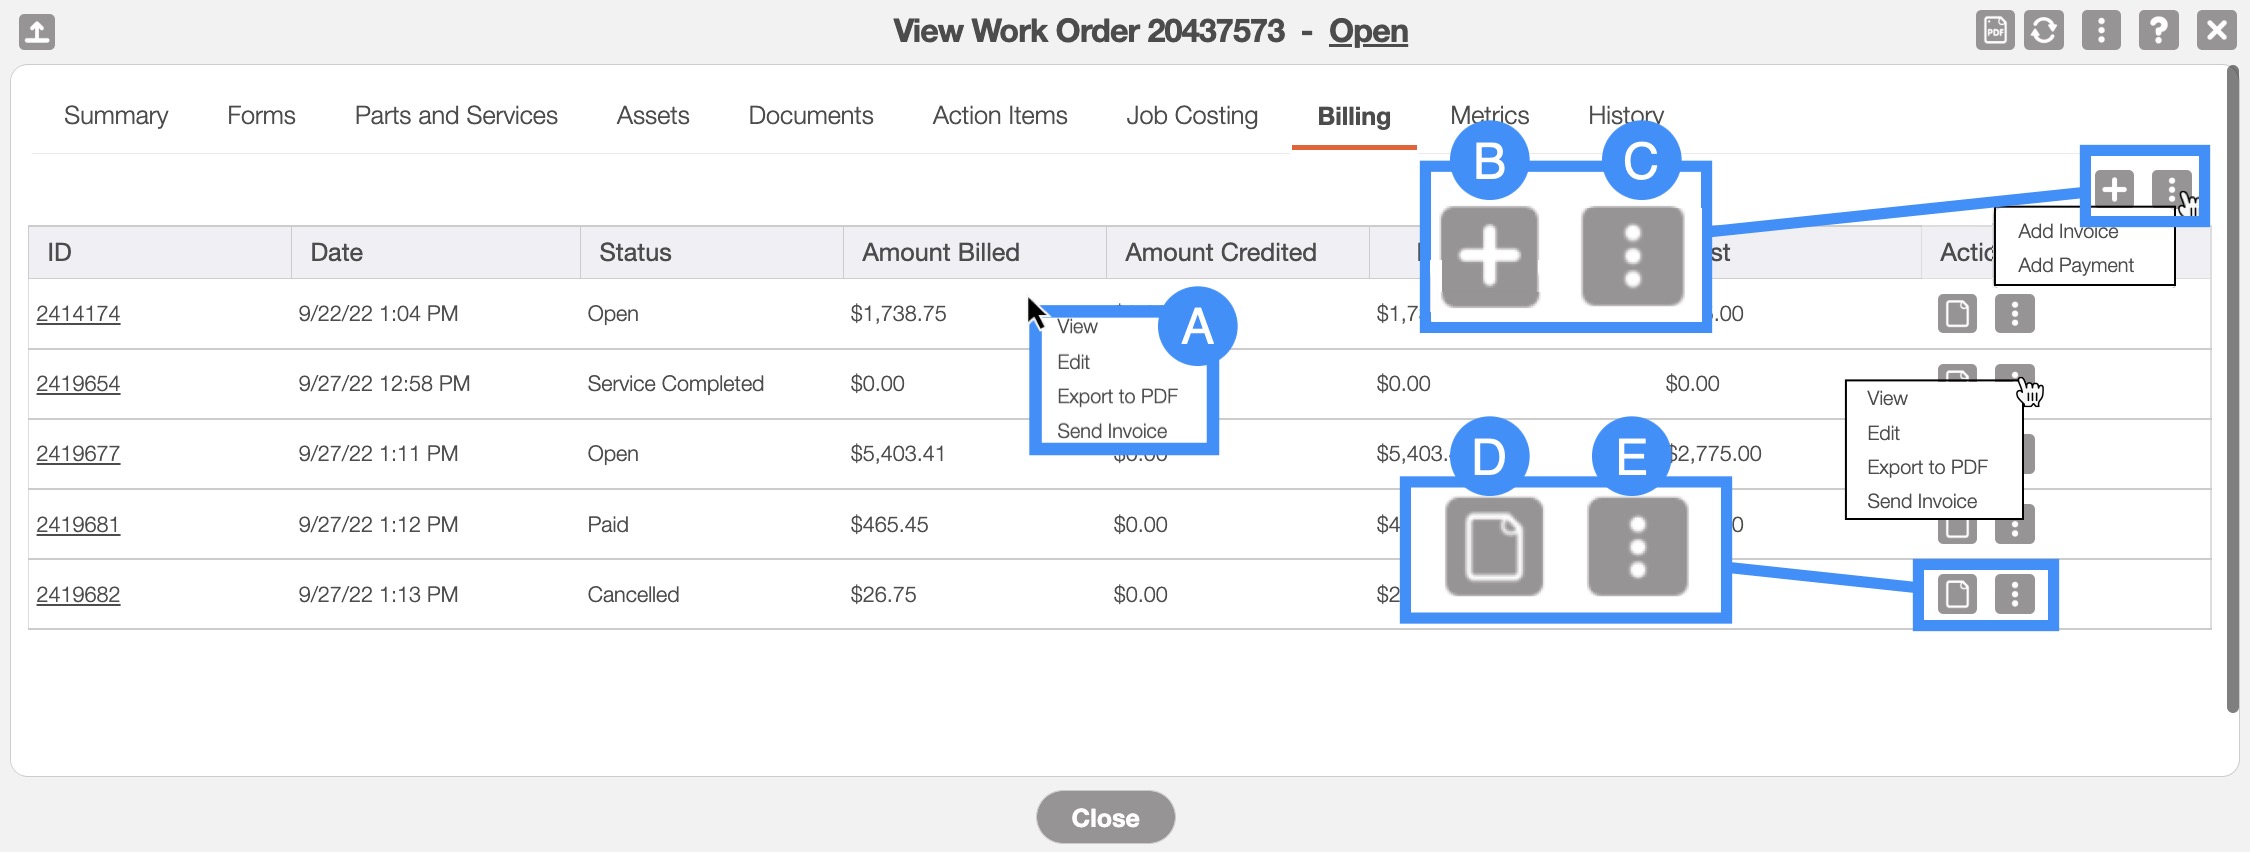
In this tab you will be able to:
Right-click to bring up the right-click actions. These actions are identical to the Individual Actions and will allow you to view the invoice, edit the invoice, export the invoice to PDF, or send the invoice to the customer.
Add a new invoice that is associated with the work order.
Use the topmost Individual Actions to add an invoice to the work order or a payment to a selected invoice in the work order.
You can use the View icon to open the View Invoice pop-up window of the selected invoice.
Use the Individual Actions (the three dots next to the View icon). This button is identical to the right-click actions and will allow you view the invoice, edit the invoice, export the invoice to PDF, or send the invoice to the customer.
| Name: | Description: |
|---|---|
| "ID" | The external ID (outside of MobiWork) of the invoice; used for organization and record-keeping. This number can be from QuickBooks or another third-party accounting software. |
| "Date" | The creation date of the invoice. |
| "Status" | The status of the invoice (i.e., "Open," "Checked Out," "Service Completed," "Customer Invoiced," "Paid," and "Cancelled"). |
| "Amount Billed" | The amount the customer is being billed for the invoice. |
| "Amount Credited" | The amount being credited to the invoice. |
| "Balance" | The remaining balance due on the invoice. |
| "Cost" | The total cost of the listed product or service. |
| "Actions" | Allows you to view the invoice, edit the invoice, export the invoice to PDF, or send the invoice to the customer. |
The "Metrics" tab will display the profit, revenue, costs, and margin associated with the work order:
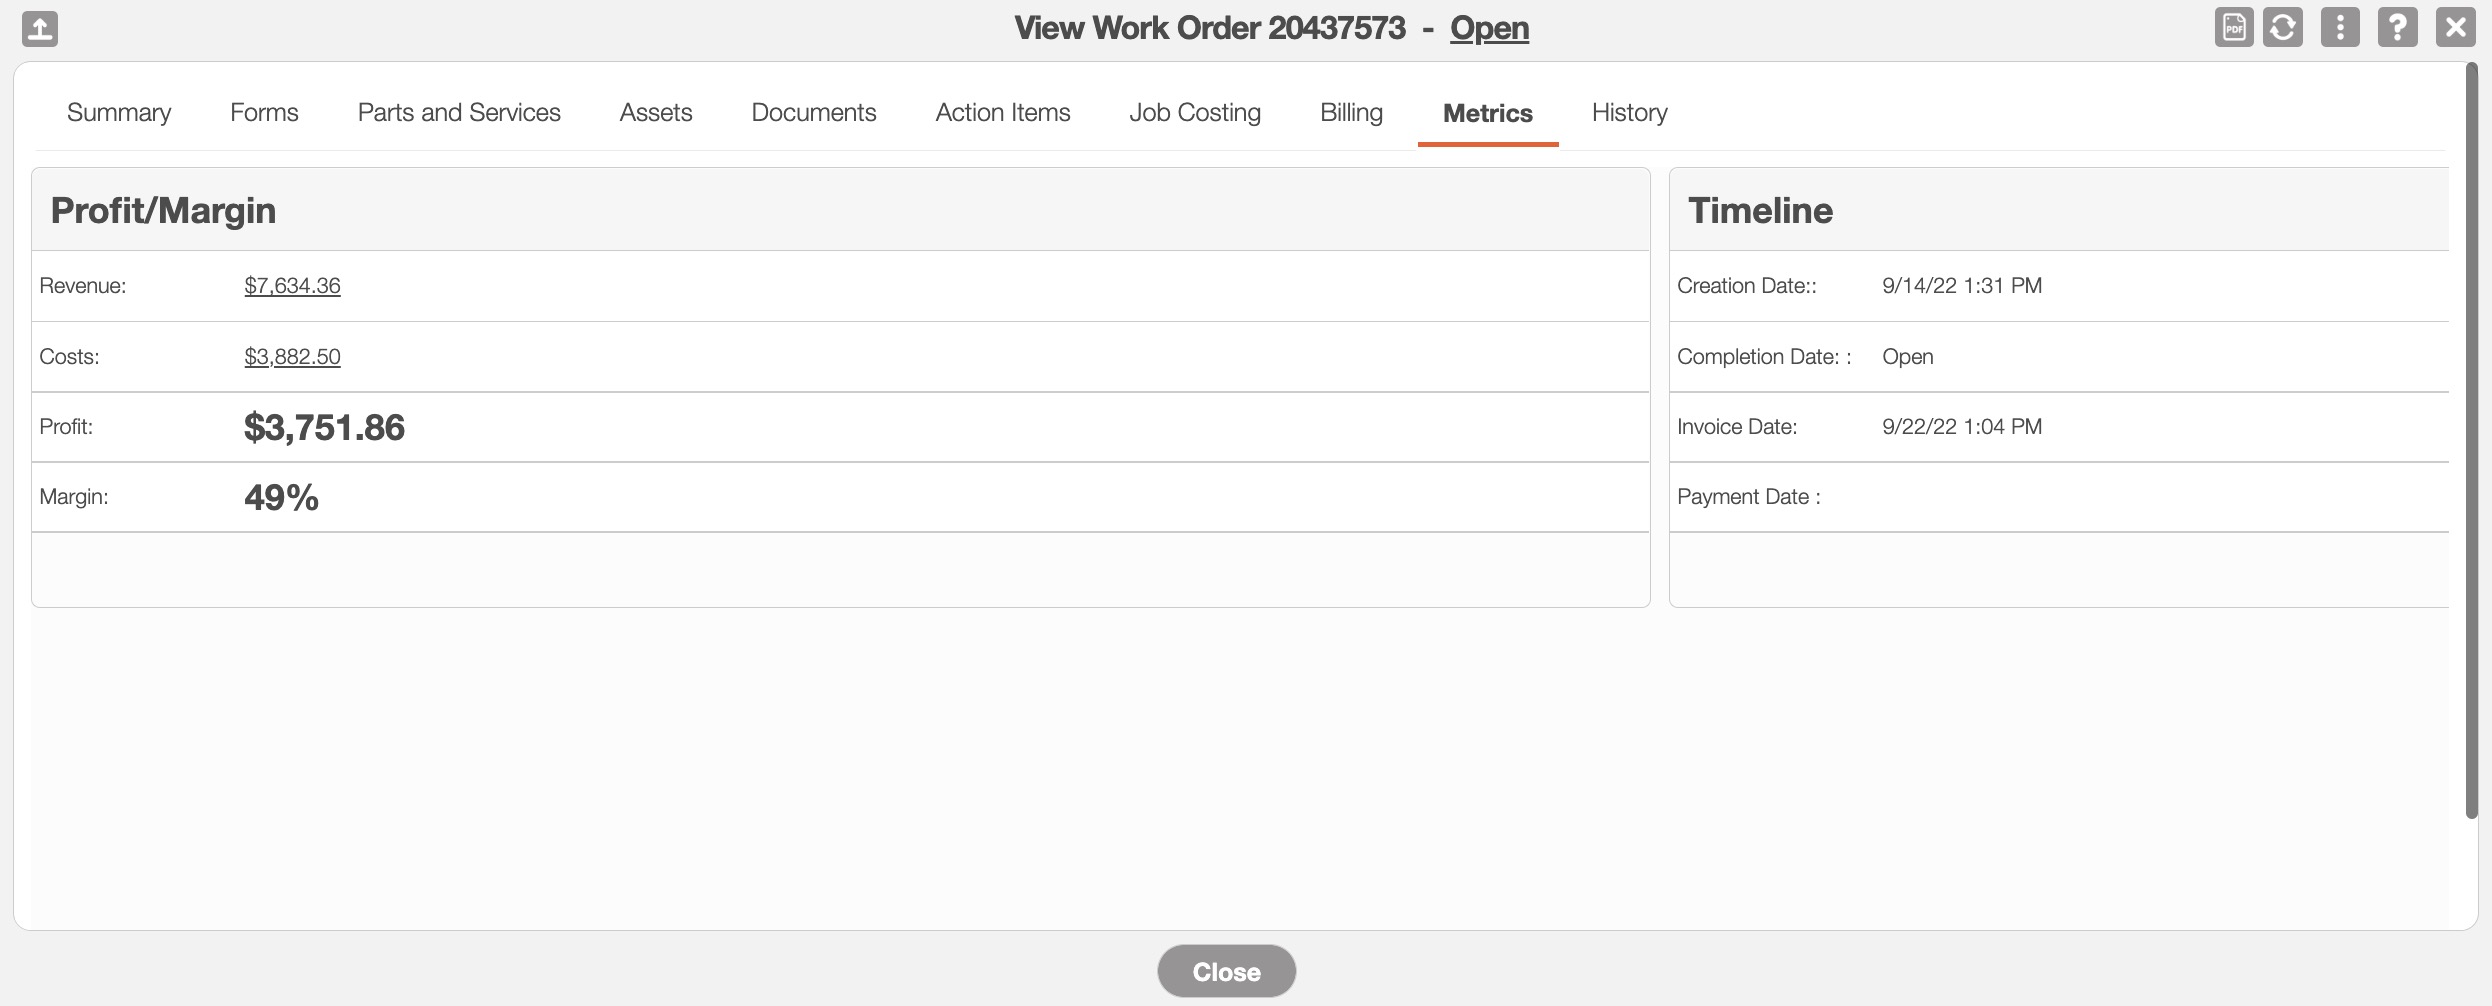
The time, creation date, invoice date, and payment dates will also be displayed in this tab.
The "History" tab lists the historically recorded details of the work order, including status dates, the time duration of the status, description of any updates, and more:
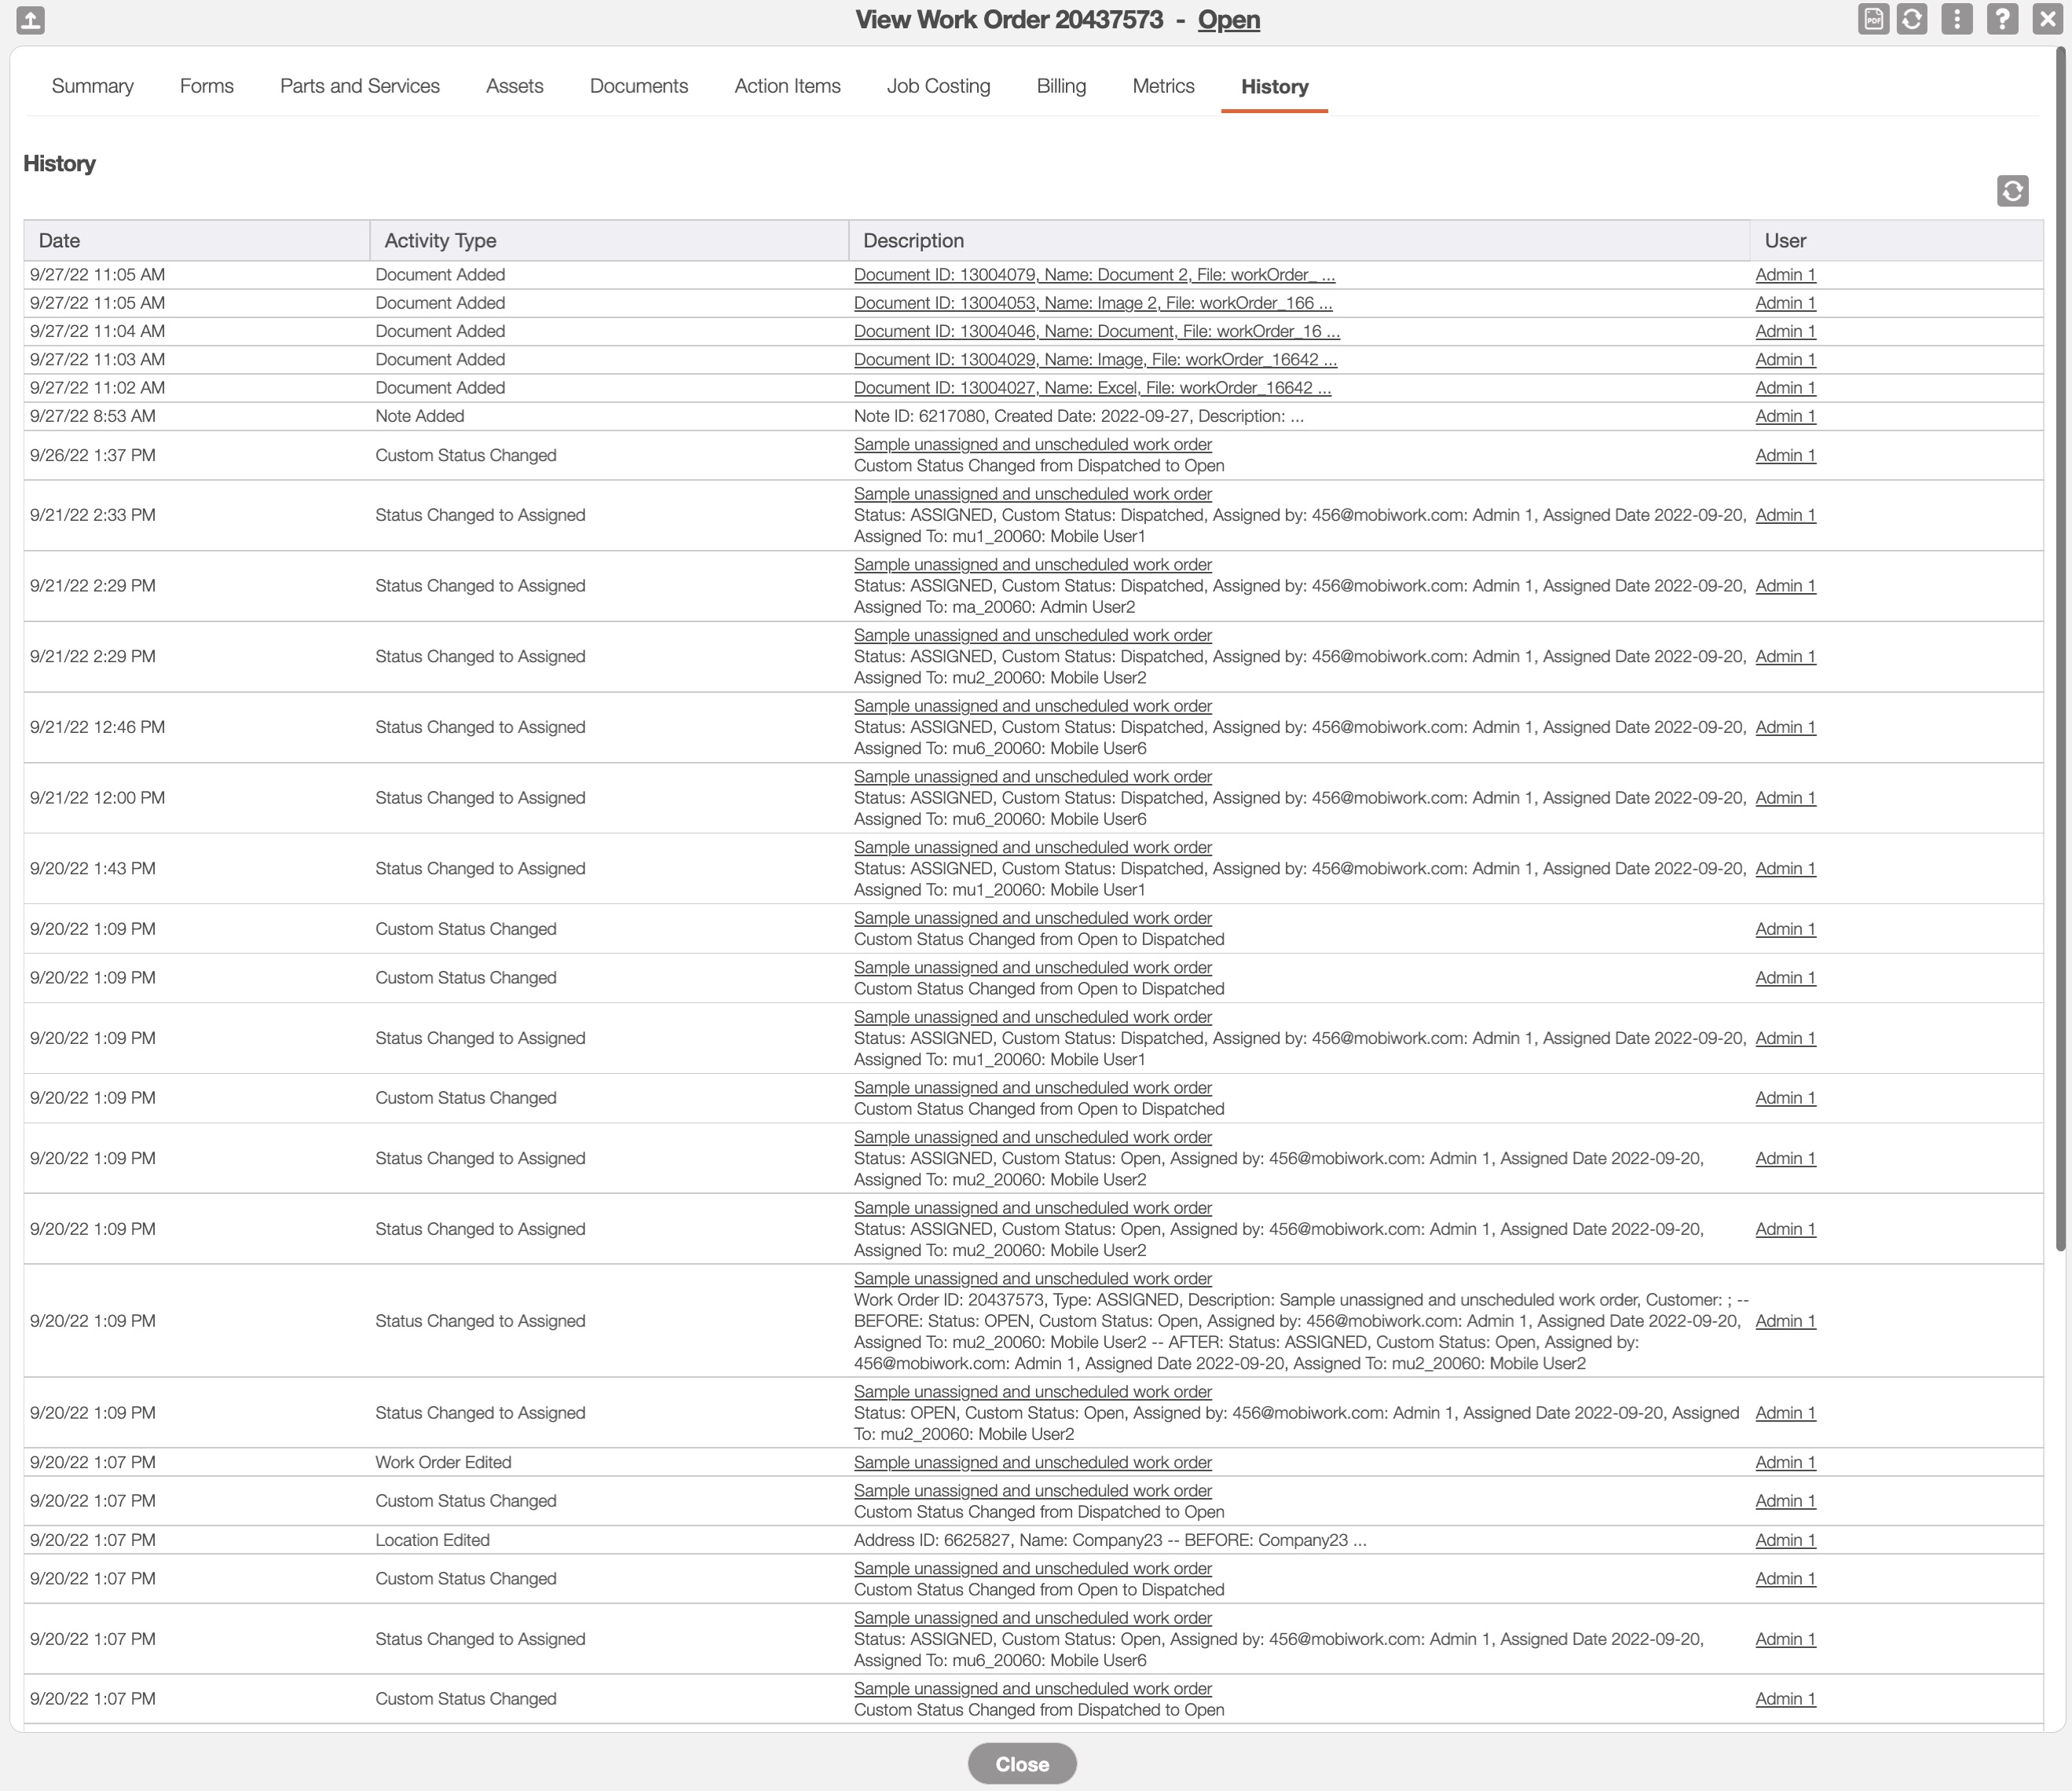
The terms found in the "History" tab are defined below:
| Name: | Description: |
|---|---|
| "Date" | The listed activity date indicates when the work order took place. |
| "Activity Type" | What kind of activity was performed on the work order. |
| "Description" | The description of the activity. |
| "User" | The user who performed the activity. |