- Overview
- Account Settings
- Assets
- Connectors Framework
- Overview
- QuickBooks Online
- QuickBooks Desktop Web Connector
- Azure AD
- Salesforce Integration
- FleetNet Connector
- Avalara Connector
- Inbound REST API
- Outbound REST API
- Mailchimp Connector
- Text Messaging Connector
- Clearent Connector
- Stripe Connector
- HubSpot Connector
- UKG Connector
- Paylocity Connector
- UKG Connector
- Gusto Connector
- iSolved Payroll Connector
- Customer Portal
- Customers
- Dashboards
- Devices
- Dispatching
- Forms
- Inventory
- Invoices & Billing
- Locations
- Payments
- Parts
- Projects
- Quotes
- Recurrent Routes
- Recurrent Services
- Reports
- Sales Orders
- Schedule
- Services
- Tasks
- Text Messaging
- Time Tracking
- Users
- Work Orders
There are six different ways that you will be able to add or import invoices into MobiWork:
- Adding an invoice from the Invoice List
- Adding an invoice from a Work Order
- Adding an invoice through the View Customer pop-up window
- Adding an invoice by converting a Quote
- Importing an invoice through Excel
- Importing an invoice through QuickBooks
There are various ways you can add an invoice into MobiWork. You can add an invoice through the Invoice List View, through the "Billing" tab, or even by converting a quote or generating an invoice from a sales order. The subsections below will go into further detail about the different ways you can add a new invoice.
From the Invoice Drop-Down
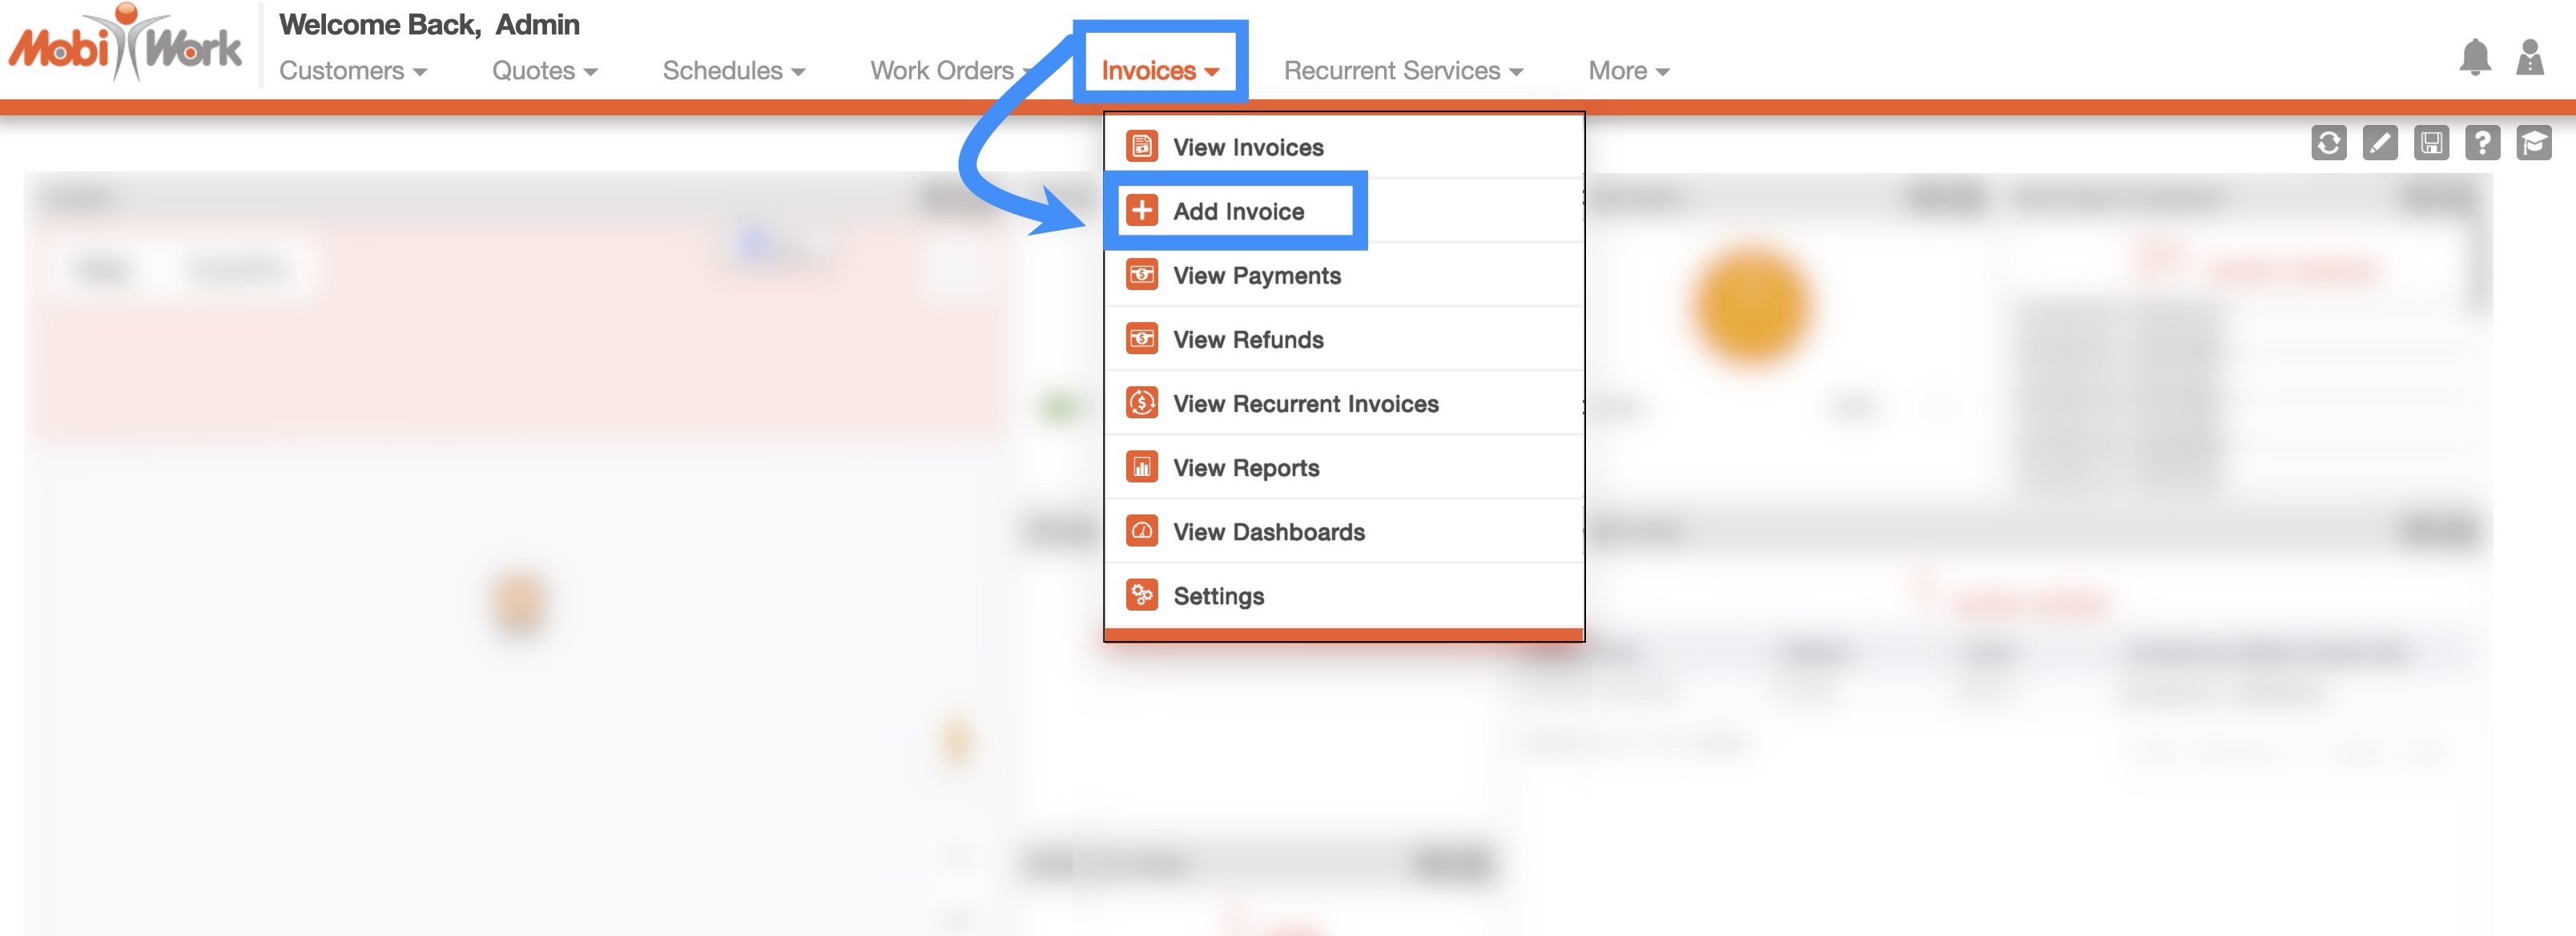
The fastest and easiest way to add an invoice is by accessing the drop-down menu from the Invoice feature from your MobiWork menu:
- Hover over the Invoice feature from your MobiWork menu:
- Select the "Add Invoice" option from the drop-down.
- The Add Invoice pop-up window will then appear.
From the Invoice List
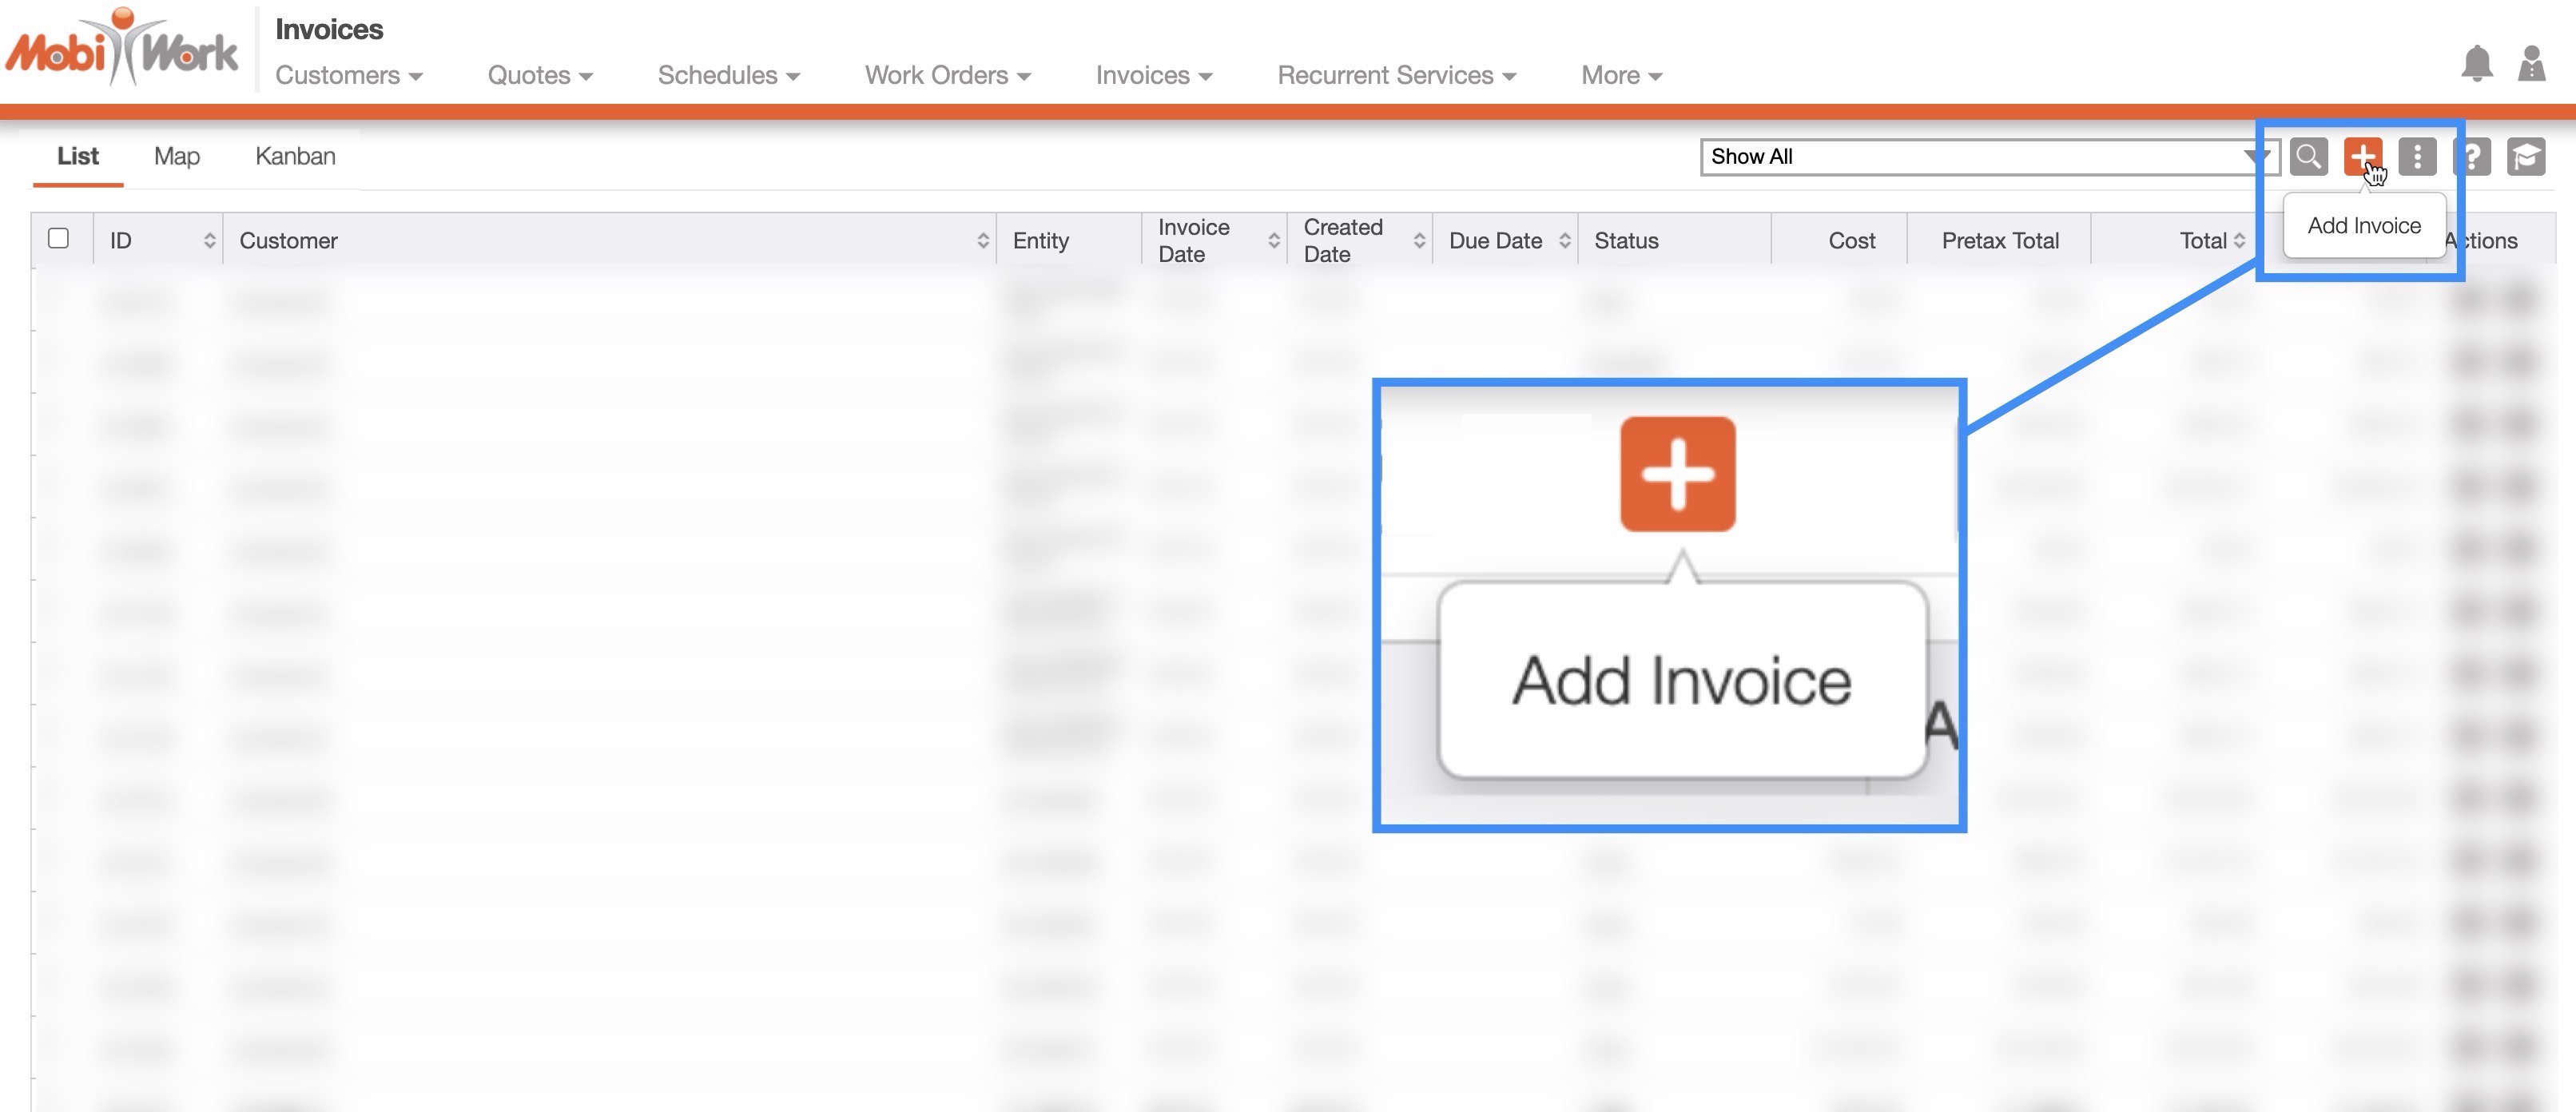
Another convenient way to add an invoice is by accessing the "List" tab. Please see Invoices List for more information on how to access this page.
On the "List" tab, you will also be able to import multiple invoices into Excel or sync your invoices to QuickBooks:

Plus Sign- Adds an invoice.
More Actions- Allows you to access the import drop-down actions (which will allow you to add multiple invoices at once)
For more information on how to import multiple invoices, please see the Import Invoices section.
To add an invoice from the "List" tab, please see the steps below:
- Once you are on the "List" tab click on the Plus Sign or select "Add Invoice" from the Individual Actions drop-down menu to add a new invoice:
- The Add Invoice pop-up window will then appear.
From an Invoice Template
You can add an invoice from an invoice-generated template; this will have the added benefit of having your invoice already formatted with the terms and details for a specific situation.
To add an invoice from a template you must first be on the Invoice Templates page. For more information on how to access this page and about invoice templates please see the Invoice Templates page:

Click on the desired invoice template ID and from the View Invoice Template pop-up window click on the Individual Actions button and from the drop-down select the "Add Invoice" option:
Right-click on the selected invoice template and choose the "Add Invoice" option from the drop-down.
Click on the Individual Actions button and from the drop-down choose the "Add Invoice" option.

From a Work Order
You can add an invoice through the View Work Order pop-up window. For more information on how to access the View Work Order pop-up window, please see the View Work Order page.
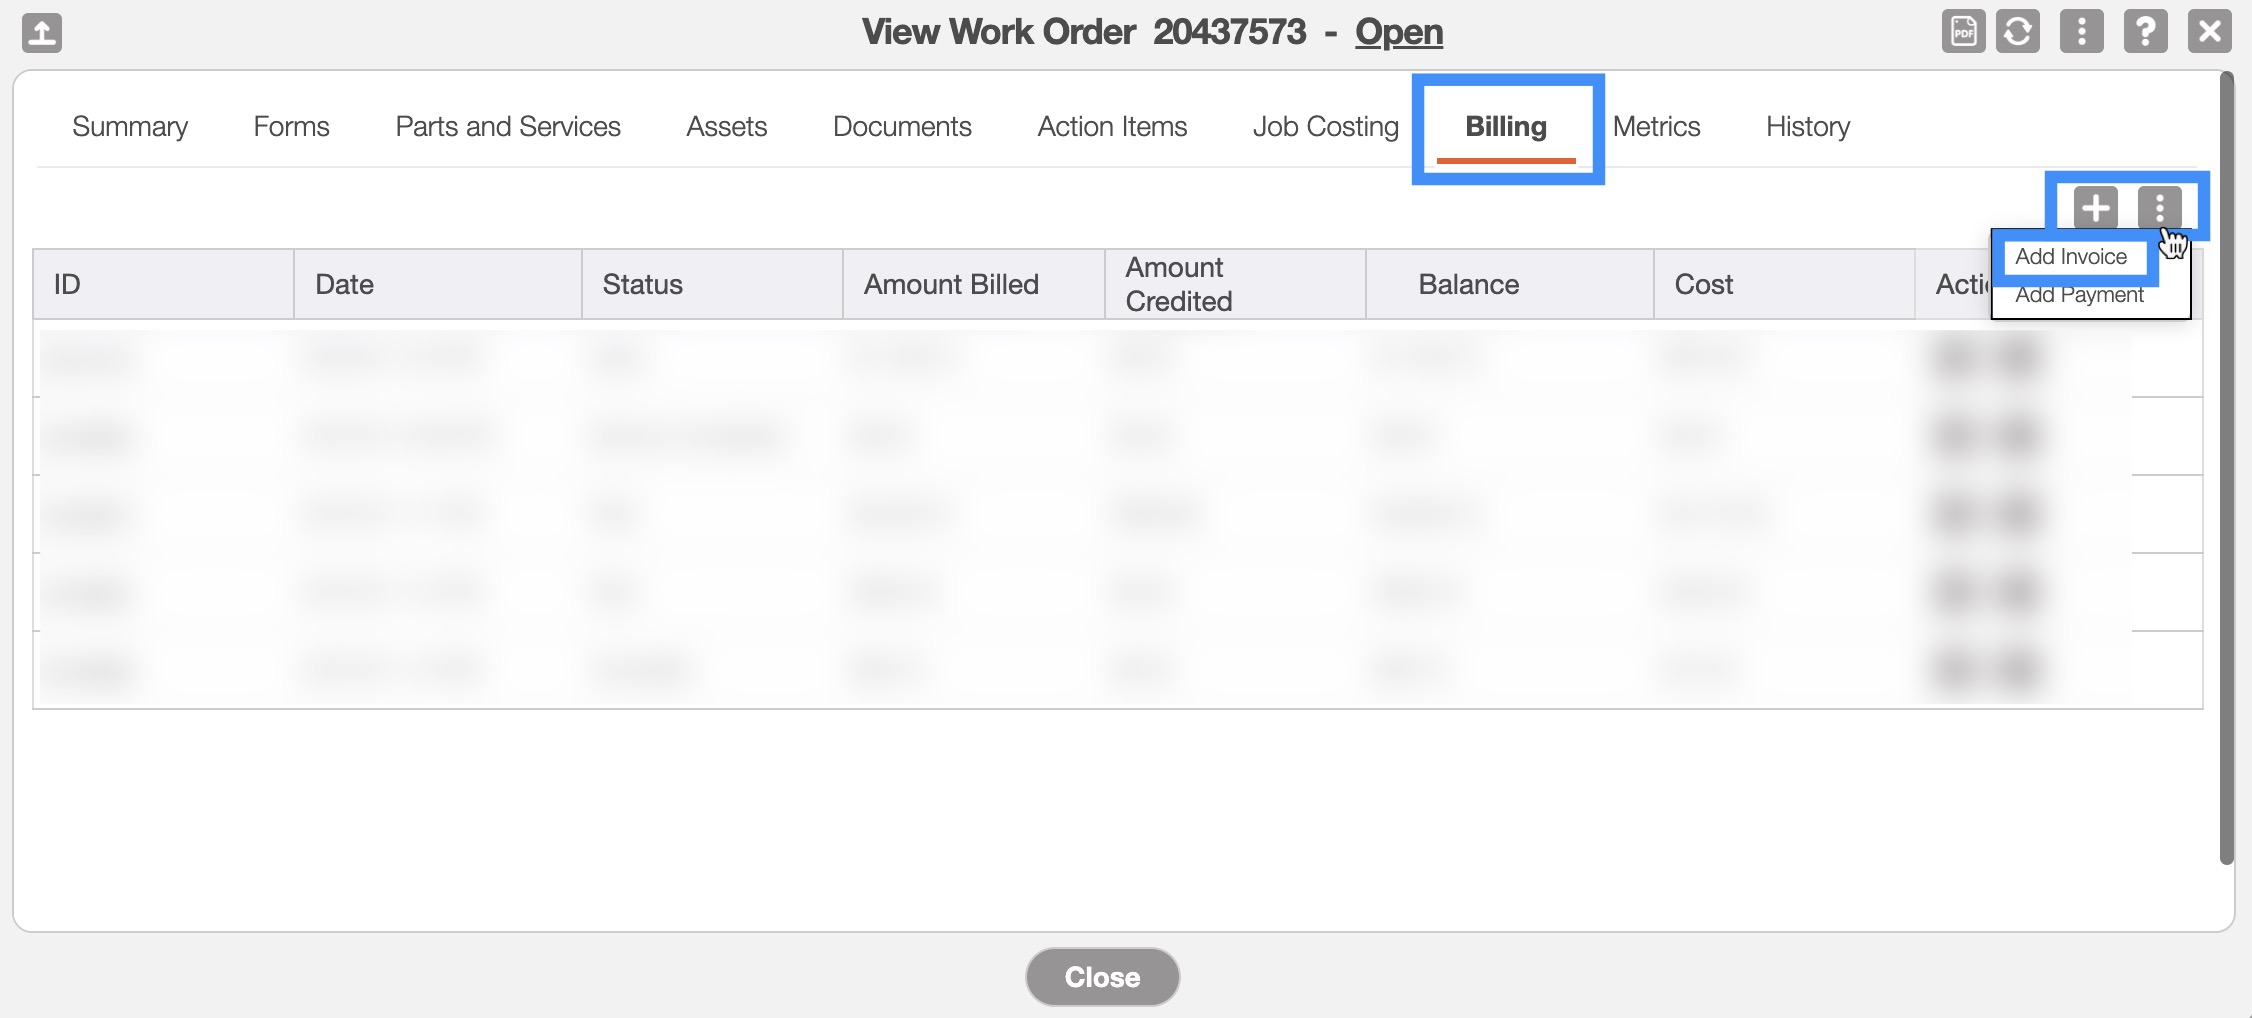
Once you are on the View Work Order pop-up window, select the "Billing" tab:
When you are on the "Billing" tab, select the Plus Sign or select the "Add Invoice" option from the Individual Actions drop-down menu.
The Add Invoice pop-up window will then appear.
By Converting a Quote
You can add an invoice through the View Quote pop-up window. For more information on how to access the View Quote pop-up window, please see the View Quote page.
Once you open the View Quote pop-up window, click on the More Actions button, and from the drop-down select the "Create Invoice" option:

Please note that once you convert a quote to an invoice, the quote status will then be changed to "Approved."
Once you select the "Create Invoice" option, a quote-specific Add Invoice pop-up window will appear. In the pop-up window you can select the remaining total of the invoice:

If you prefer not to allocate the invoice's pending payments toward the remaining total, you can choose to apply them to the invoice's line items instead. Additionally, if you have any invoice templates available, you can apply them when creating the invoice from the quote.
From the Customer Profile
You can add an invoice through the View Customer pop-up window. For more information on how to access the View Customer pop-up window, please see View Customer for more information.
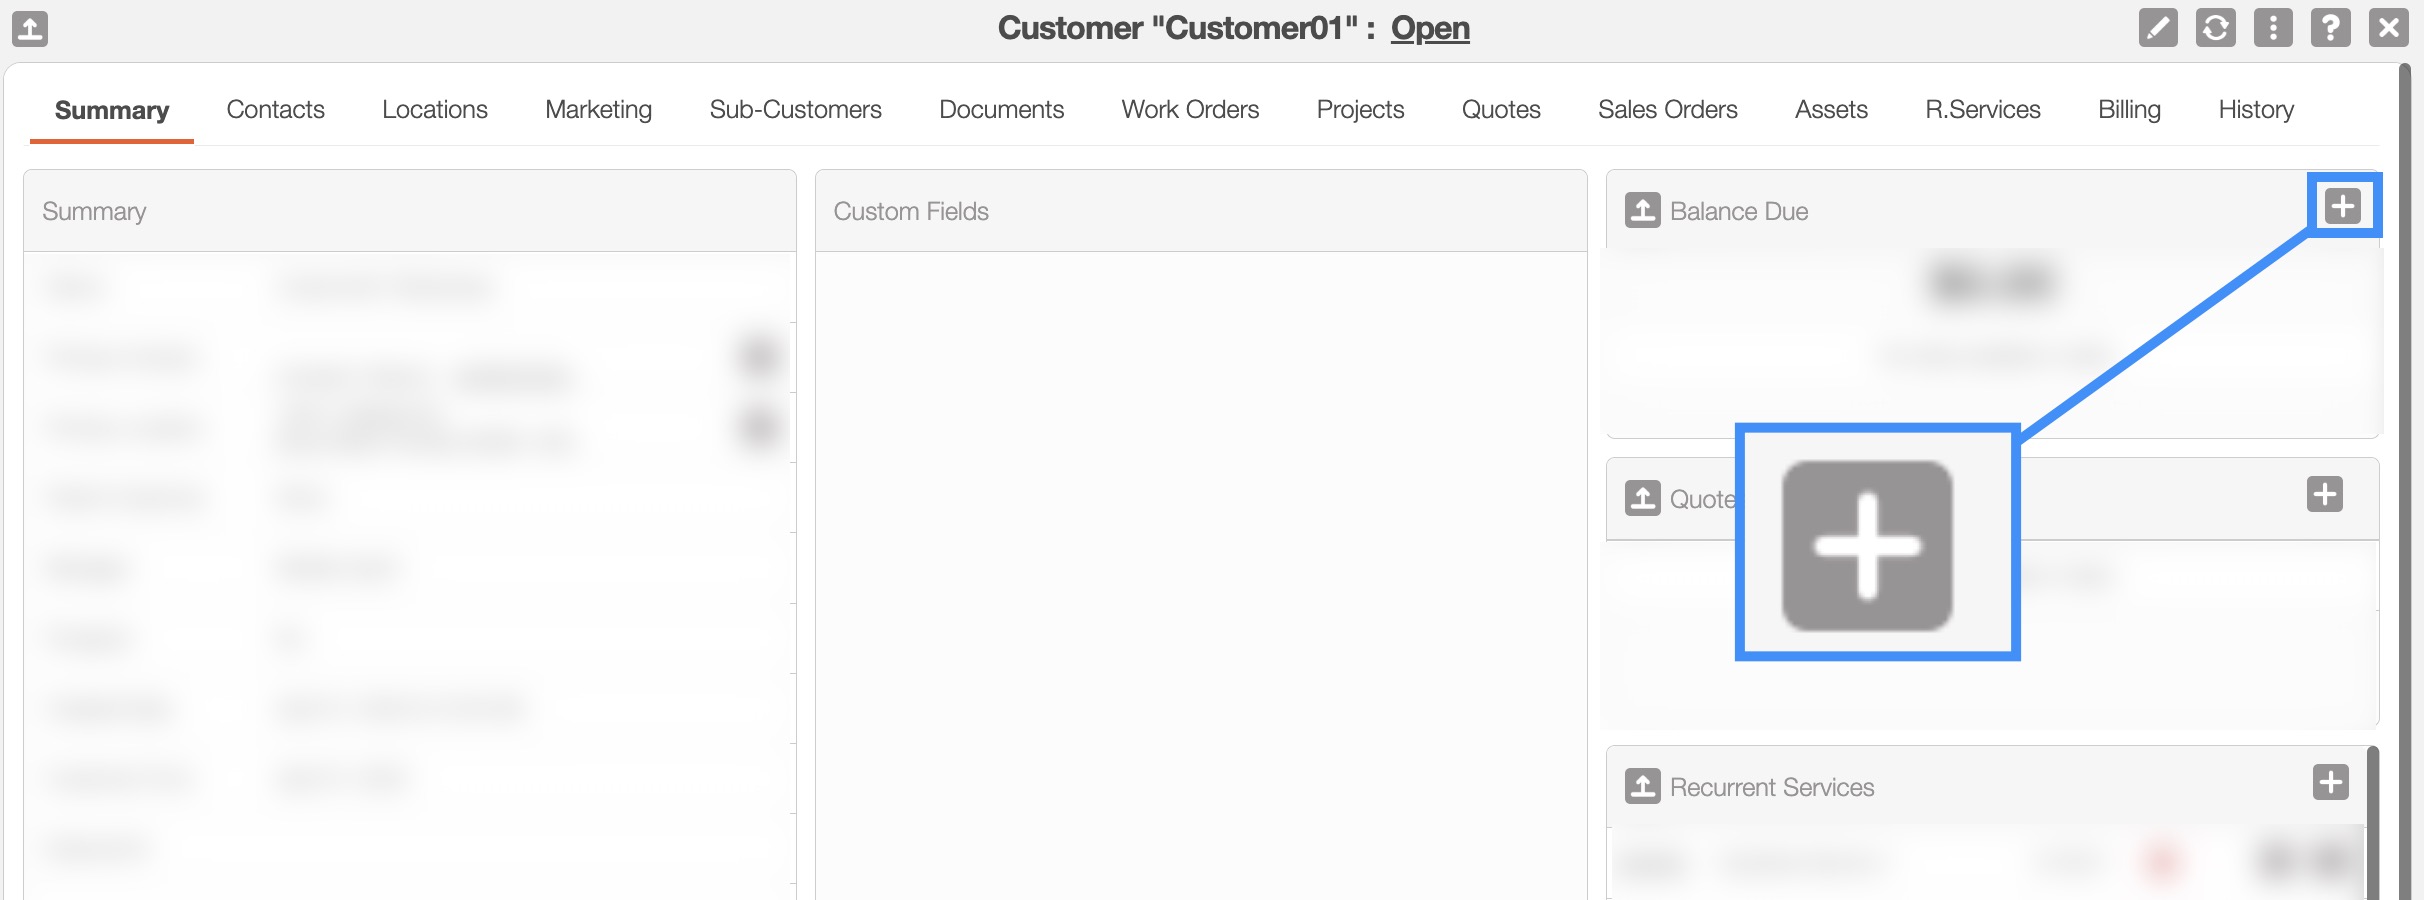
- There are two different ways you can add an invoice from the View Customer pop-up window:
You can add an invoice from the "Summary" tab's "Balance Due" section:
Or you can navigate to the "Billing" tab's "Invoices" section:
Once you are either tab, press the designated Plus Sign to add a new invoice.

From a Sales Order
When you check out a sales order, an invoice will also automatically be created. The newly generated invoice will have the sales order number in the Entity row, linking the sales order with the new invoice:

For more information on how to generate a sales order, please see the Add Sales Order page.
If you choose to add an invoice through the Invoice feature drop-down, the "List" tab, the View Work Order, or View Customer pop-up windows the Add Invoice pop-up window will then appear.
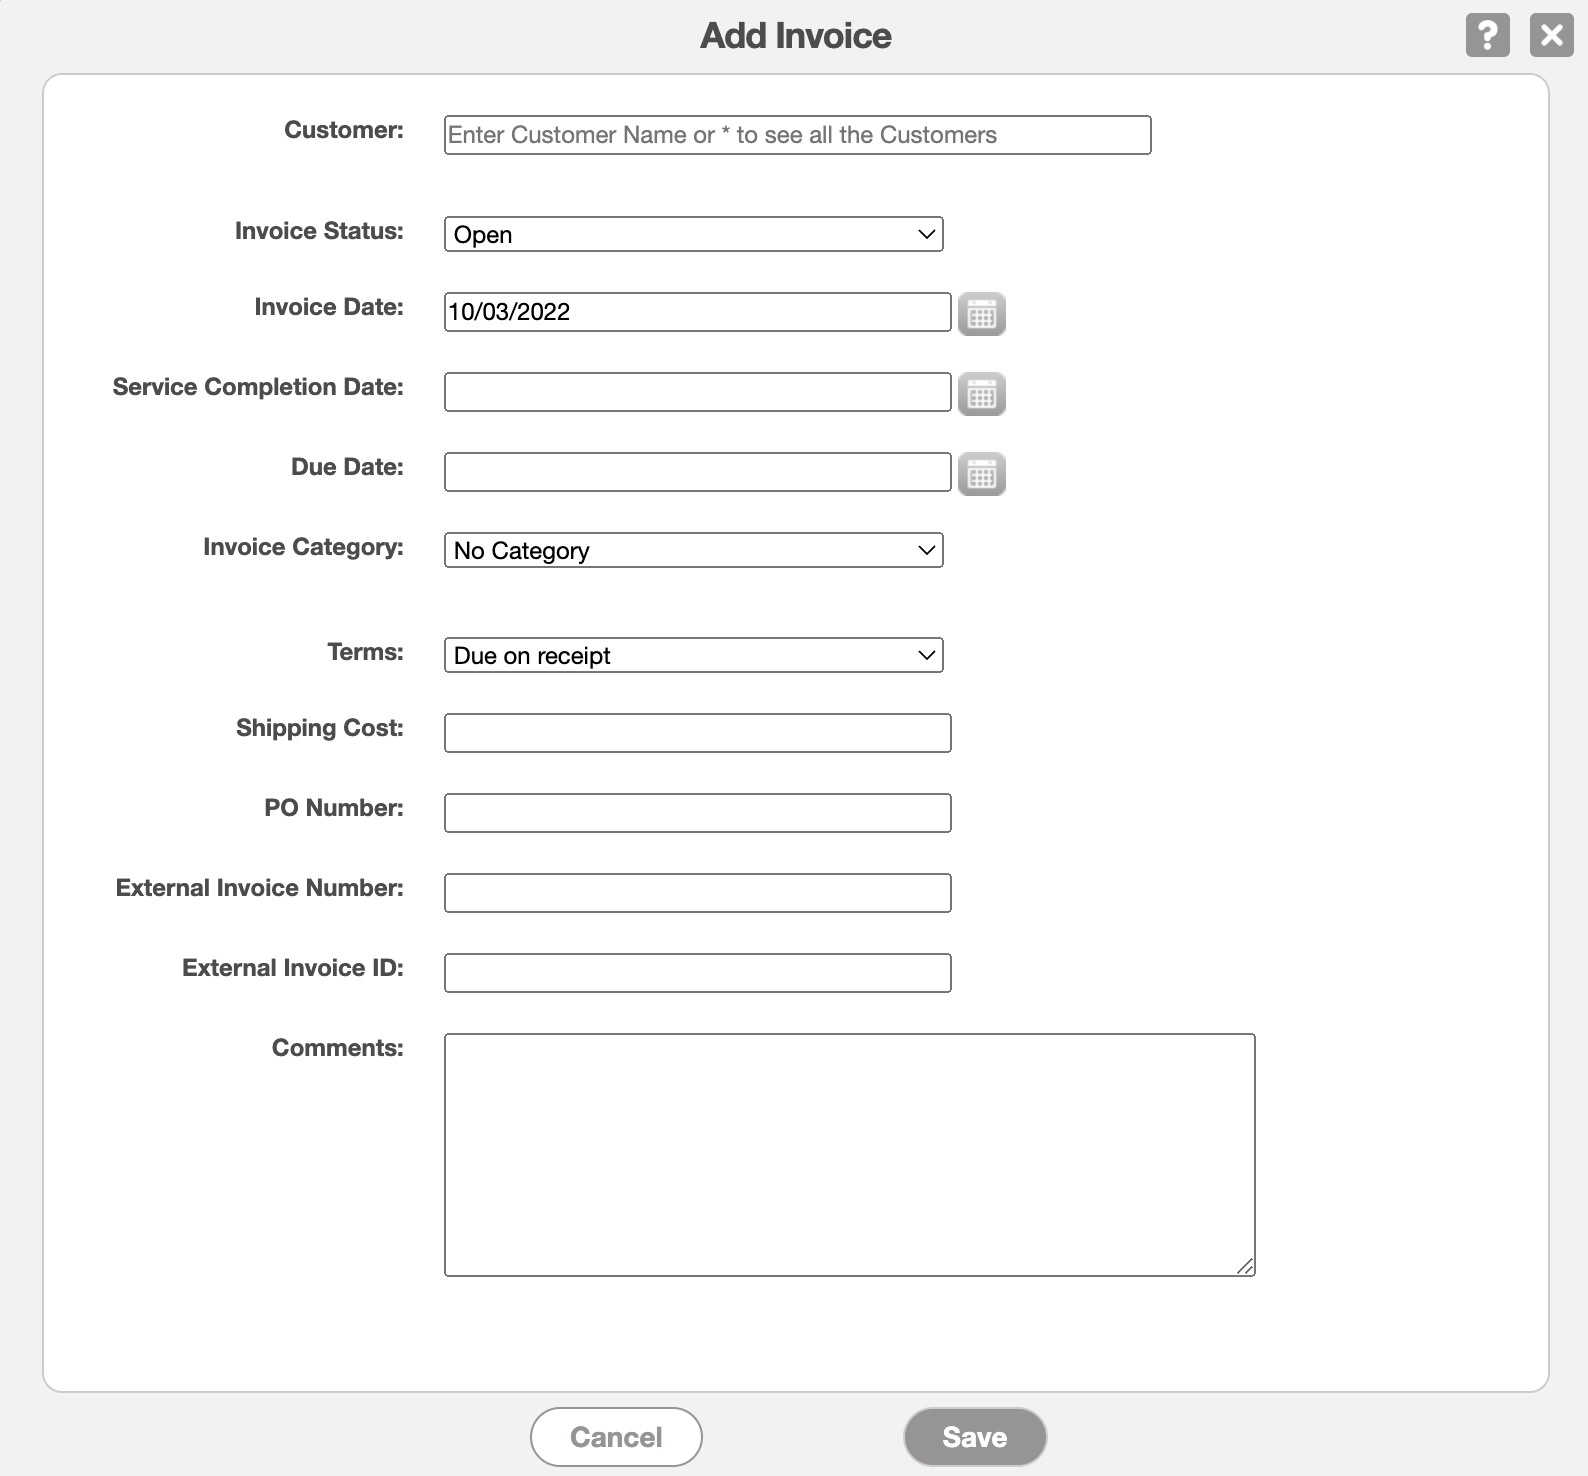
In this pop-up window, enter the appropriate information in the specified fields. Once all the information is completed to your satisfaction click the Save button:
Please note that if you would like to easily close this pop-up window, you can click on the esc button from your keyboard.
The terms listed in the Add Invoice pop-up window are defined below:
| Name: | Description: |
|---|---|
| "Customer" | Input your customer's name. You can use the asterisk symbol (*) to view all customers in your records. |
| "Invoice Status" | Select the invoice status (i.e. "Open," "Checked Out," "Service Completed," "Customer Invoiced," "Paid," and "Cancelled") For more information about the Invoice Status please see the View an Invoice page. |
| "Invoice Date" | The date the invoice is generated will automatically be generated. The calendar icon to the right of this field can be clicked on to choose a different date. |
| "Service Completion Date" | Enter the expected completion date of the service or appointment. The calendar icon to the right of this field can be clicked on to select a specific date. |
| "Due Date" | Enter the payment due date for the invoice. The calendar icon to the right of this field can be clicked on to select a specific date. |
| "Invoice Category" | How the invoice will be categorized in your system (e.g., repair invoice, service invoice, etc.). |
| "Terms" | Select the Terms of your invoice. The terms and conditions of how the invoice should be paid, (e.g. due on receipt, net 15, net 20, etc.). If there are "net" terms and no due date MobiWork will automatically be able to calculate the due date based on the "net" selected. |
| "Shipping Cost" | Enter the shipping cost of the product. |
| "PO Number" | Enter the purchase number for the invoice. |
| "External Invoice Number" | Input the external number (outside of MobiWork) of the invoice; this number can be from QuickBooks or another third-party accounting software. |
| "External Invoice ID" | Input the external ID (outside of MobiWork) of the invoice; this number can be from QuickBooks or another third-party accounting software. |
| "Comments" | Input any comments related to the invoice that you would like displayed on the invoice. This field has a limit of 255 characters. |
Once you have created a new invoice, it is time to populate it with the required parts and services. You can also add discounts and markups as well as sections to help separate the invoice items for clearer organization.
Add Part
In the "Line Items" panel click on the Individual Actions in the top-right. From the drop-down menu that appears, select the "Add Part" option:

After selecting a part from the Select Part pop-up window, the Add Part to Invoice pop-up window will appear, allowing you to adjust the quantity, section, and other details:

In this pop-up window enter the following details:
Product- The name of the part or product. By clicking the Pencil icon you can reselect the desired product.
Description- The description of the part or product. This field is optional.
Price and Cost- These fields will be automatically filled based on the saved data you have in your parts catalog; however, you can directly edit the price and cost when adding it to the invoice. For more information about your parts catalog, please see the Parts List (Catalog) page.
Quantity- Specify the quantity of the part or product needed for the invoice.
Discount- If applicable, you can enter an individual discount for the selected part.
Section- You can also directly add the part to a specific section for better organization of the invoice line items.
Add Service
In the "Line Items" panel click on the Individual Actions in the top-right. From the drop-down menu that appears, select the "Add Service" option:

After selecting a service from the Select Service pop-up window, the Add Service to Invoice pop-up window will appear, allowing you to adjust the quantity, section, and other details:

In this pop-up window enter the following details:
Service- The name and type of service.
Description- The description of the service. This field is optional.
Price and Cost- These fields will be automatically filled based on the saved data you have in your services catalog; however, you can directly edit the price and cost when adding it to the invoice. For more information about your services catalog, please see the Service Catalog (list) page.
Quantity- Specify the hours worked by the user for the service.
Discount- If applicable, you can enter an individual discount for the selected service.
Section- You can also directly add the part to a specific section for better organization of the invoice line items.
Add Discount
In the "Line Items" panel click on the Individual Actions in the top-right. From the drop-down menu that appears, select the "Add Discount" option. This discount option will allow you to add a discount to the entire invoice.
You will be able to add additional general discounts to choose from, from the Invoice Settings page. For more information on how to add or edit a general discount, please see the Invoice Settings page:

Once you click on the "Add Discount" option, the Apply Discount pop-up window will appear:

In this pop-up window select the type of discount you would like to apply. If the selected discount has predefined values for the fixed amount and percentage, these values will be automatically applied. If there are no predefined values for the selected discount, you can manually input the fixed amount and percentage.
After applying this discount, you will be able to see it in the "Total & Balance" panel of your invoice:

If you decide to no longer apply the discount, you can select the Trash Can icon next to the discounted amount.
Add Markup
In the "Line Items" panel click on the Individual Actions in the top-right. From the drop-down menu that appears, select the "Add Markup" option.
You will be able to add additional markups to choose from, from the Invoice Settings page. For more information on how to add or edit a markup, please see the Invoice Settings page:

Once you click on the "Add Markup" option, the Add Markup pop-up window will appear:

In this pop-up window select the type of markup you would like to apply. If the selected markup has predefined values for the fixed amount and percentage, these values will be automatically applied. If there are no predefined values for the selected markup, you can manually input the fixed amount and percentage.
After applying this markup, you will be able to see it in the "Total & Balance" panel of your invoice:

If you decide to no longer apply the markup, you can select the Trash Can icon next to the marked-up amount.
Add Section
In the "Line Items" panel click on the Individual Actions in the top-right. From the drop-down menu that appears, select the "Add Section" option:

Once you click on the "Add Section" option, the Add Section pop-up window will appear:

In this pop-up window enter the following details:
Header- The name of the section.
Description- The description of the section.
Lump Sum View- By clicking on the lump sum view for the Add Section pop-up window, you will be able to hide the individual line items for the items listed in the specified section. This option is different from the "Lump Sum View" checkbox in the Add Invoice pop-up window and the Edit Invoice pop-up window; this lump sum view will apply to the entire invoice.
The section will then appear in the "Line Items" panel; the parts and services listed under it will be contained in the respective section:

You can add parts or services to a specified section through the Add Part to Invoice or Add Service to Invoice pop-up window and selecting the desired section from the "Section" drop-down.
If you have any questions or need further assistance, please let us know. We'd be happy to help!
