To add the Stripe connector to your MobiWork account, please follow the steps below:
In your MobiWork account, navigate to the User icon, and from the drop-down menu choose the "Settings" option:
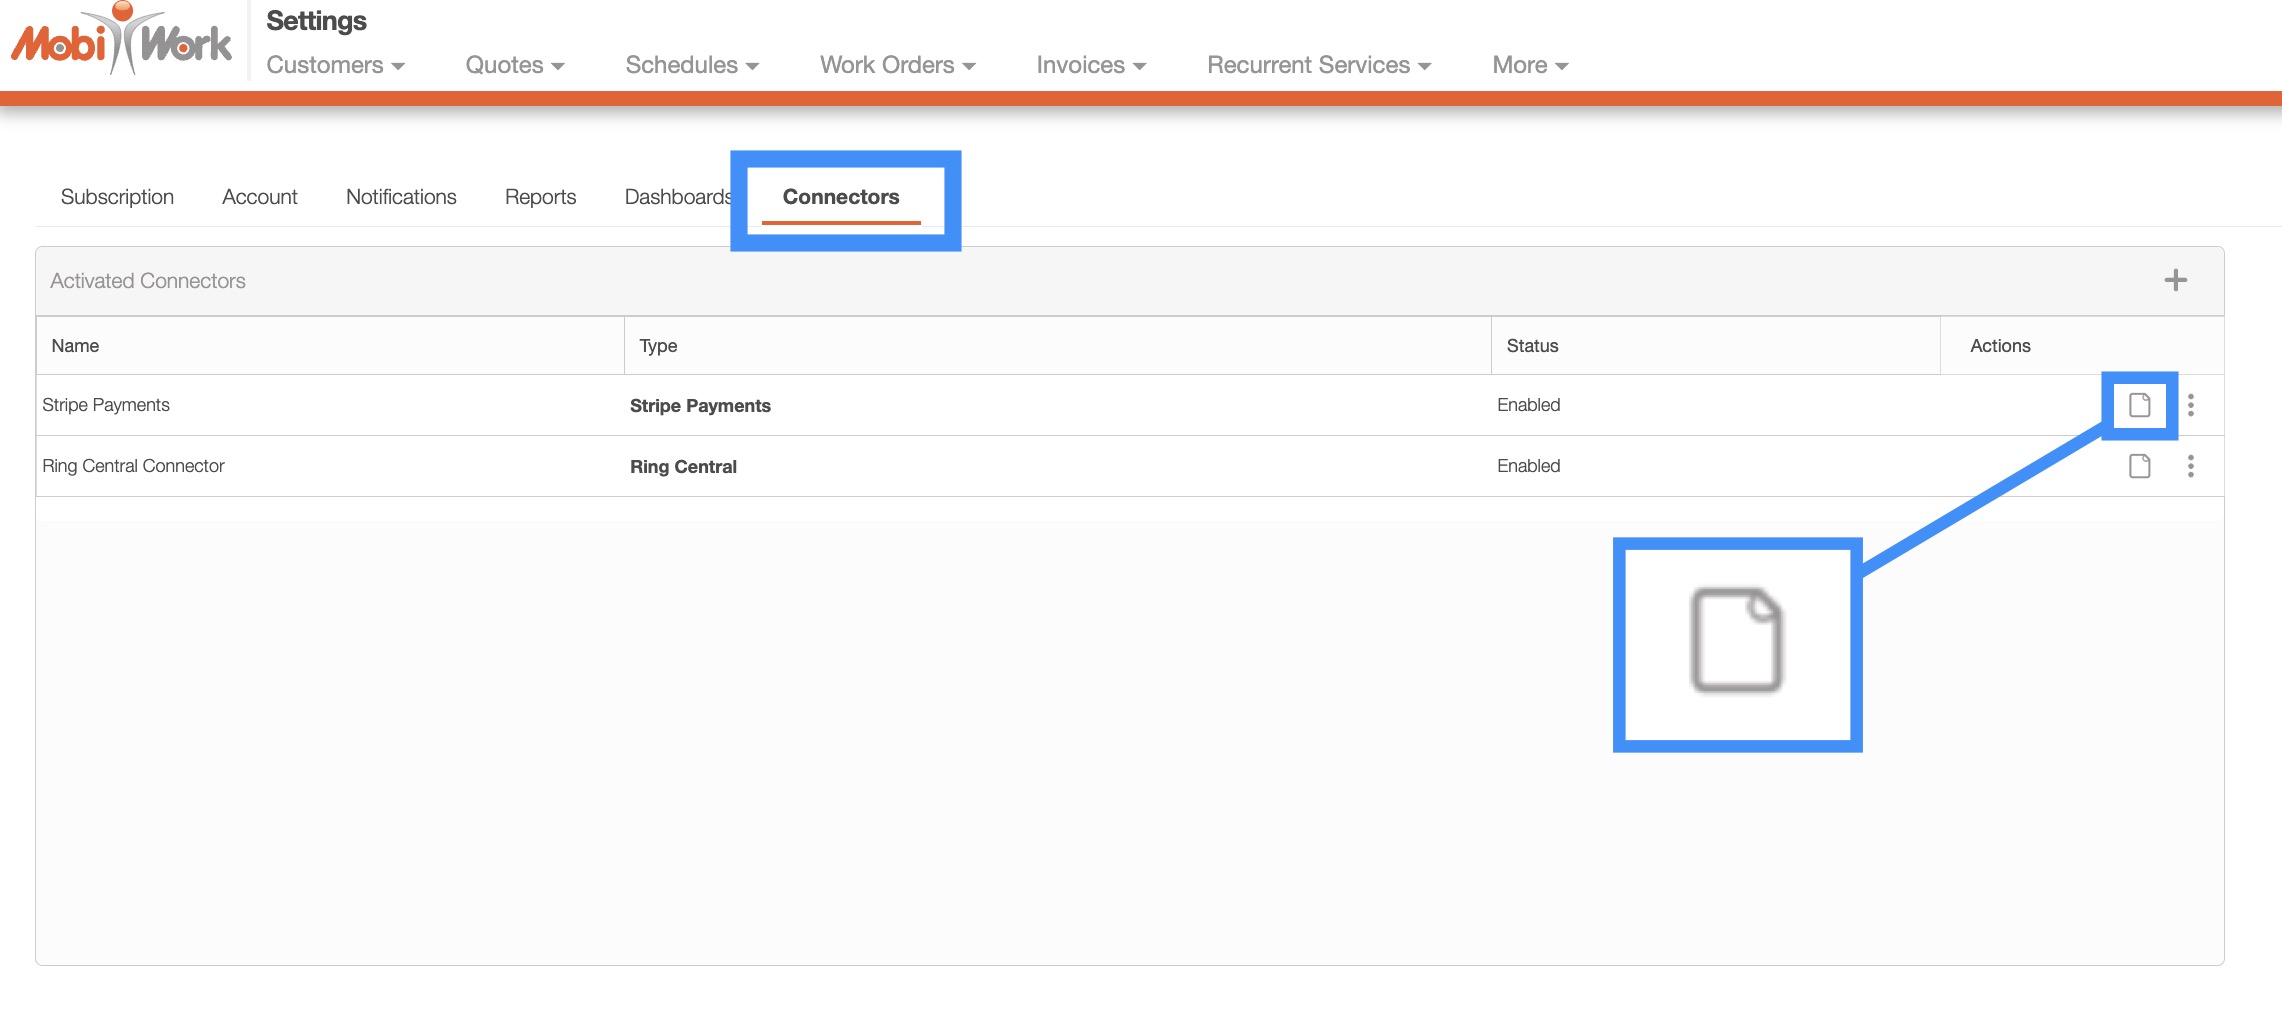
Access the "Connectors" tab, then click on the Plus Sign button:
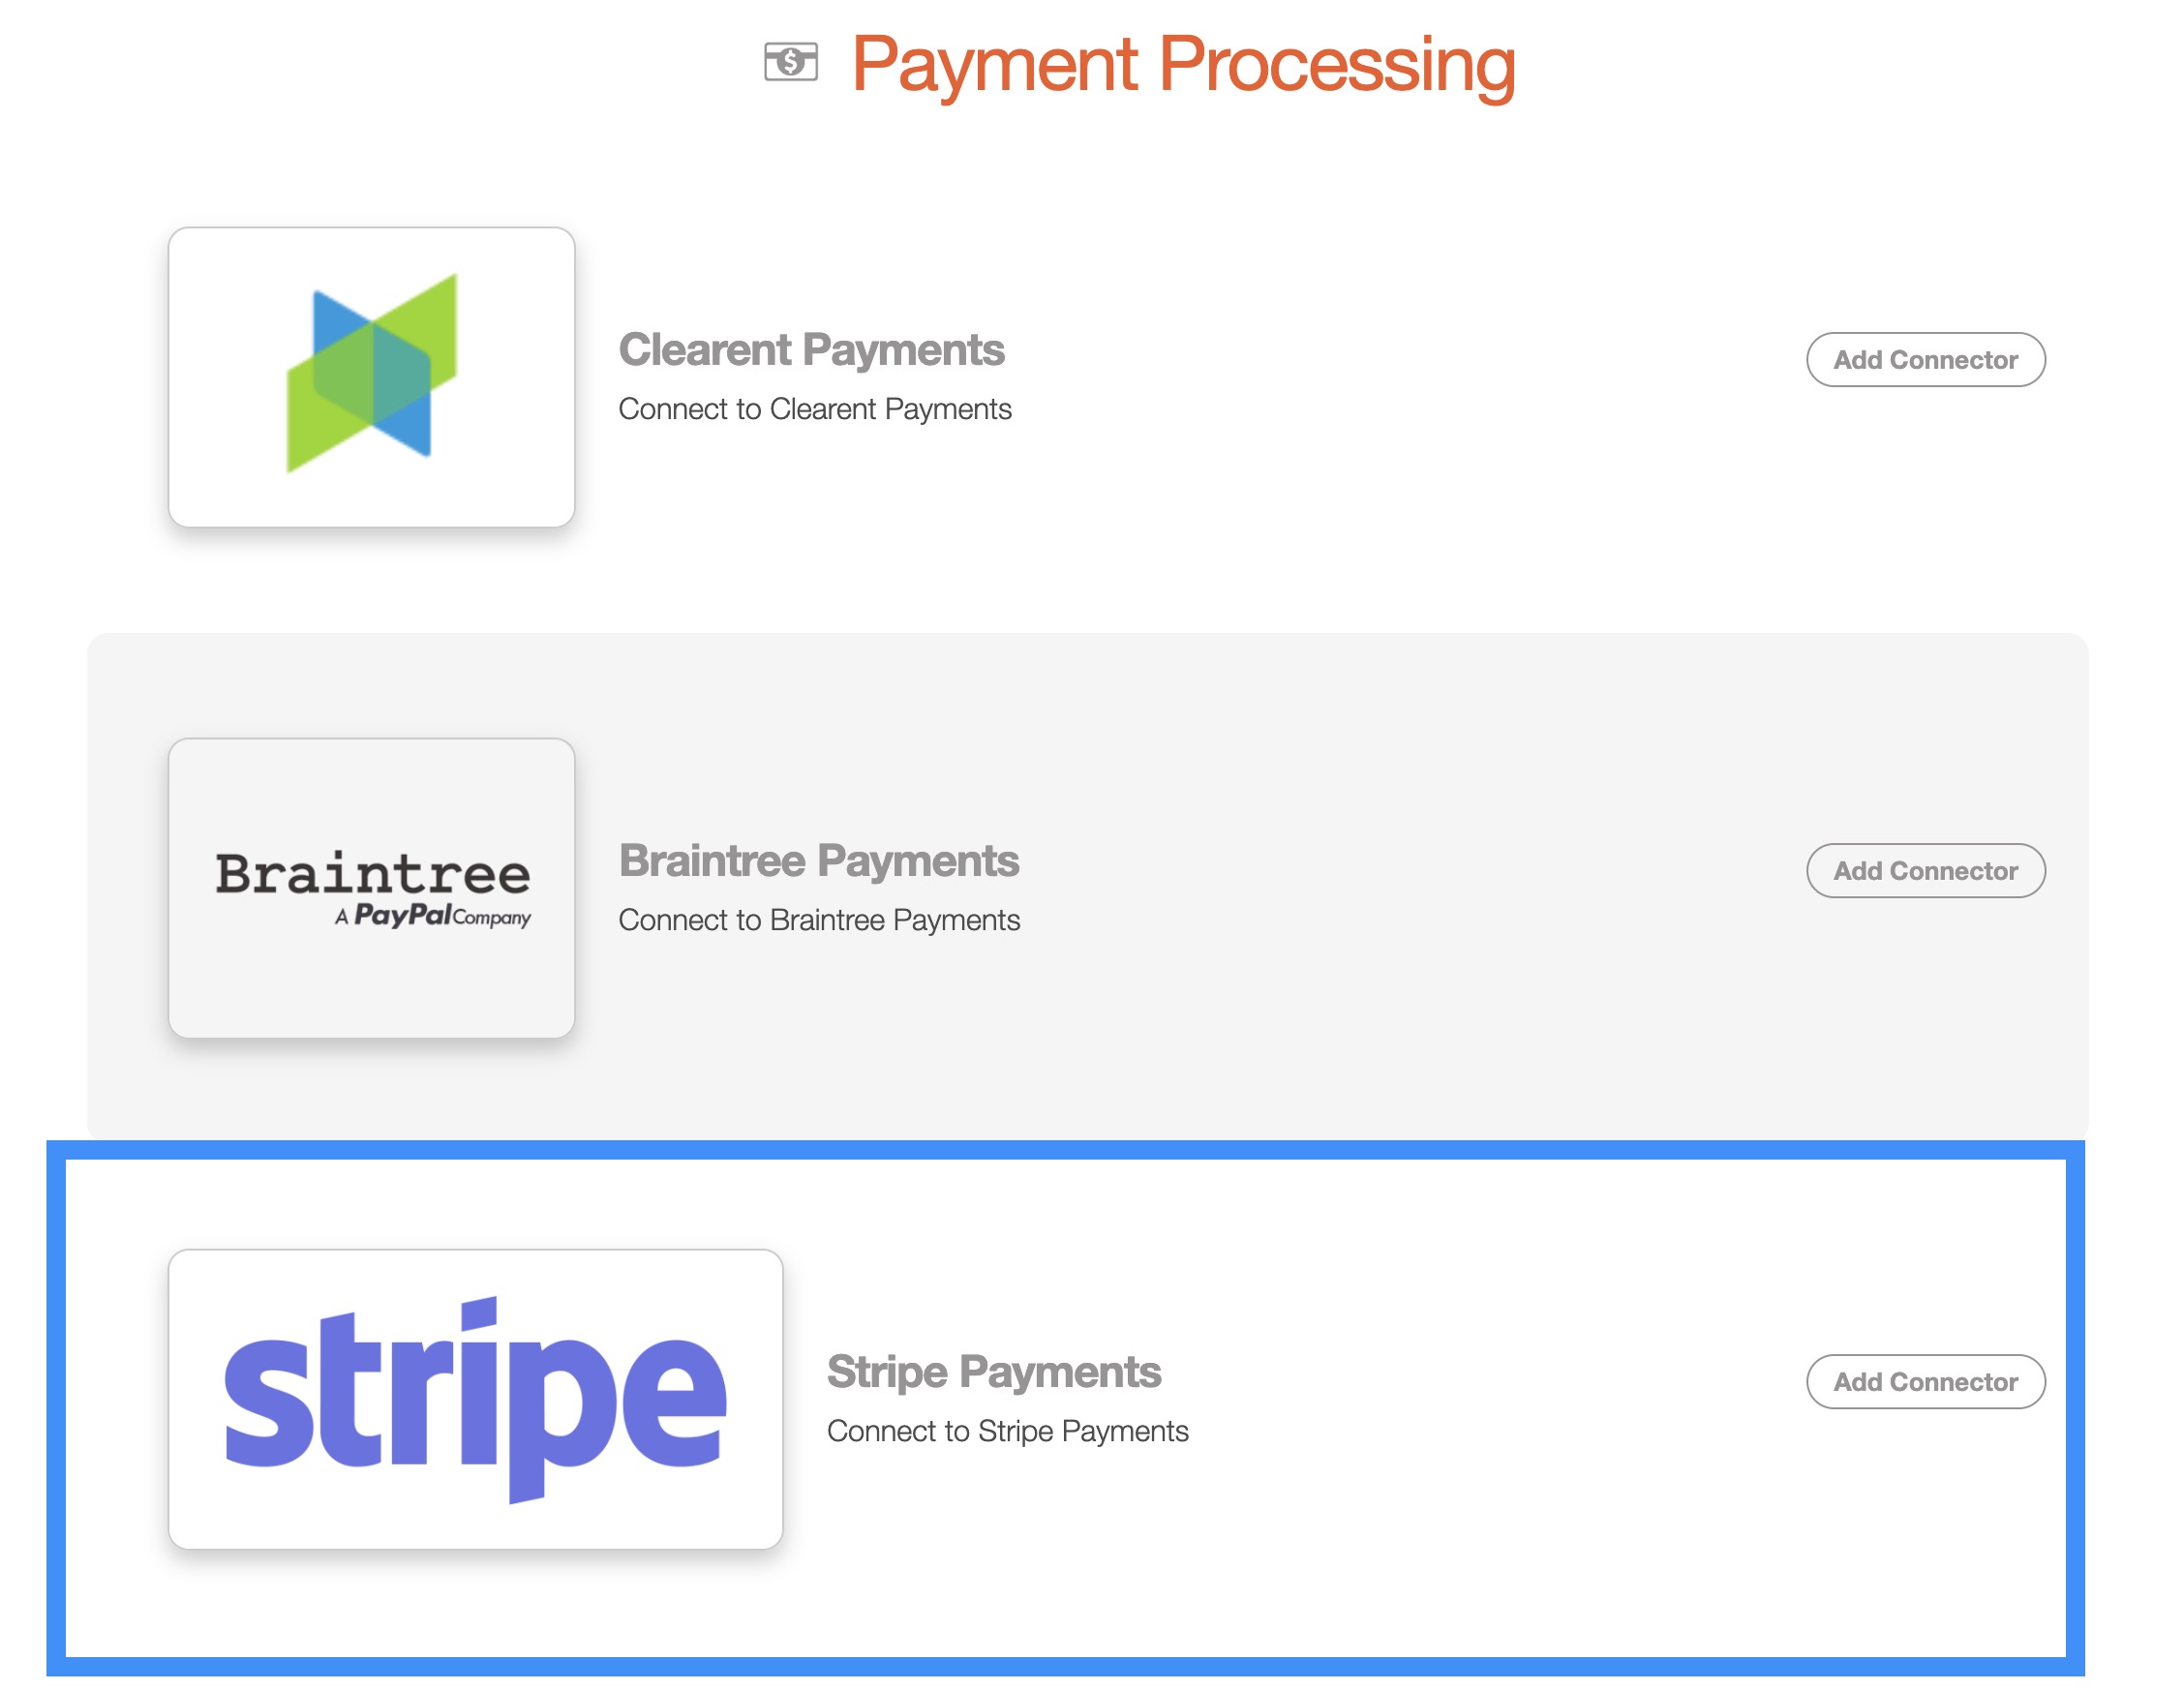
Next, scroll down to the "Payment Processing" section, find Stripe Payments and click the Add Connector button:
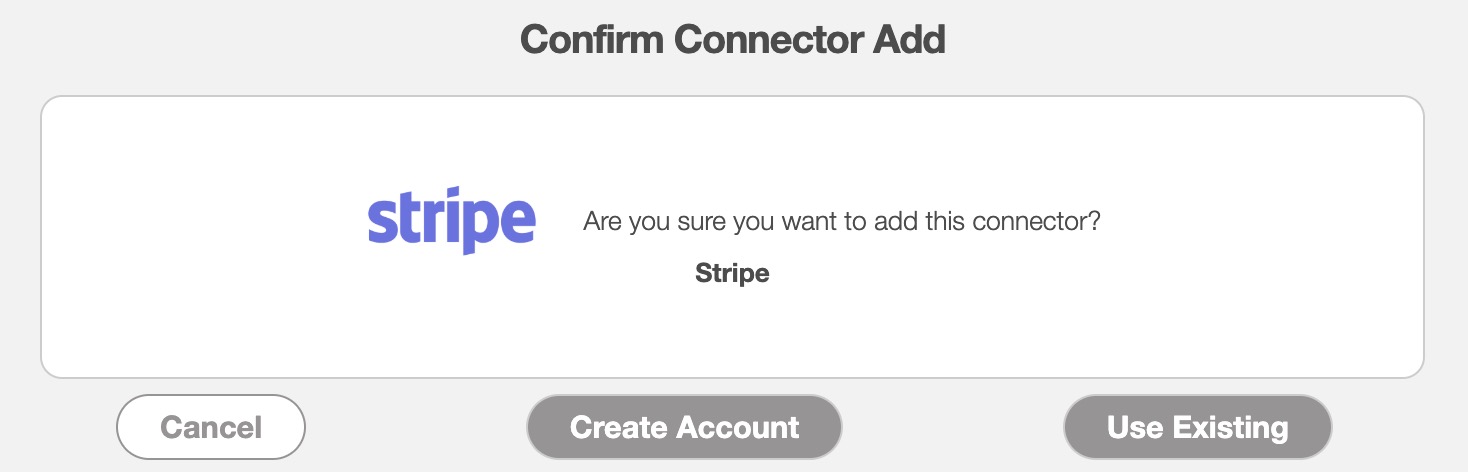
Once you add the connector, the Confirm Connector Add pop-up window will appear. Click either the Create Account or the Use Existing button. If you have an existing account, select the Use Existing button, otherwise, use the Create Account button:
The following subsections will guide you on how to set up an existing Stripe account to MobiWork or create a new Stripe account:
![]()
![]()
Add the Stripe Connector for an Already Existing Account
If you already have a Stripe account, select the Use Existing button in the Confirm Connector Add pop-up window, to register your preexisting Stripe account to MobiWork.
After clicking on the Use Existing button, the Stripe Payment Settings pop-up window will then appear:
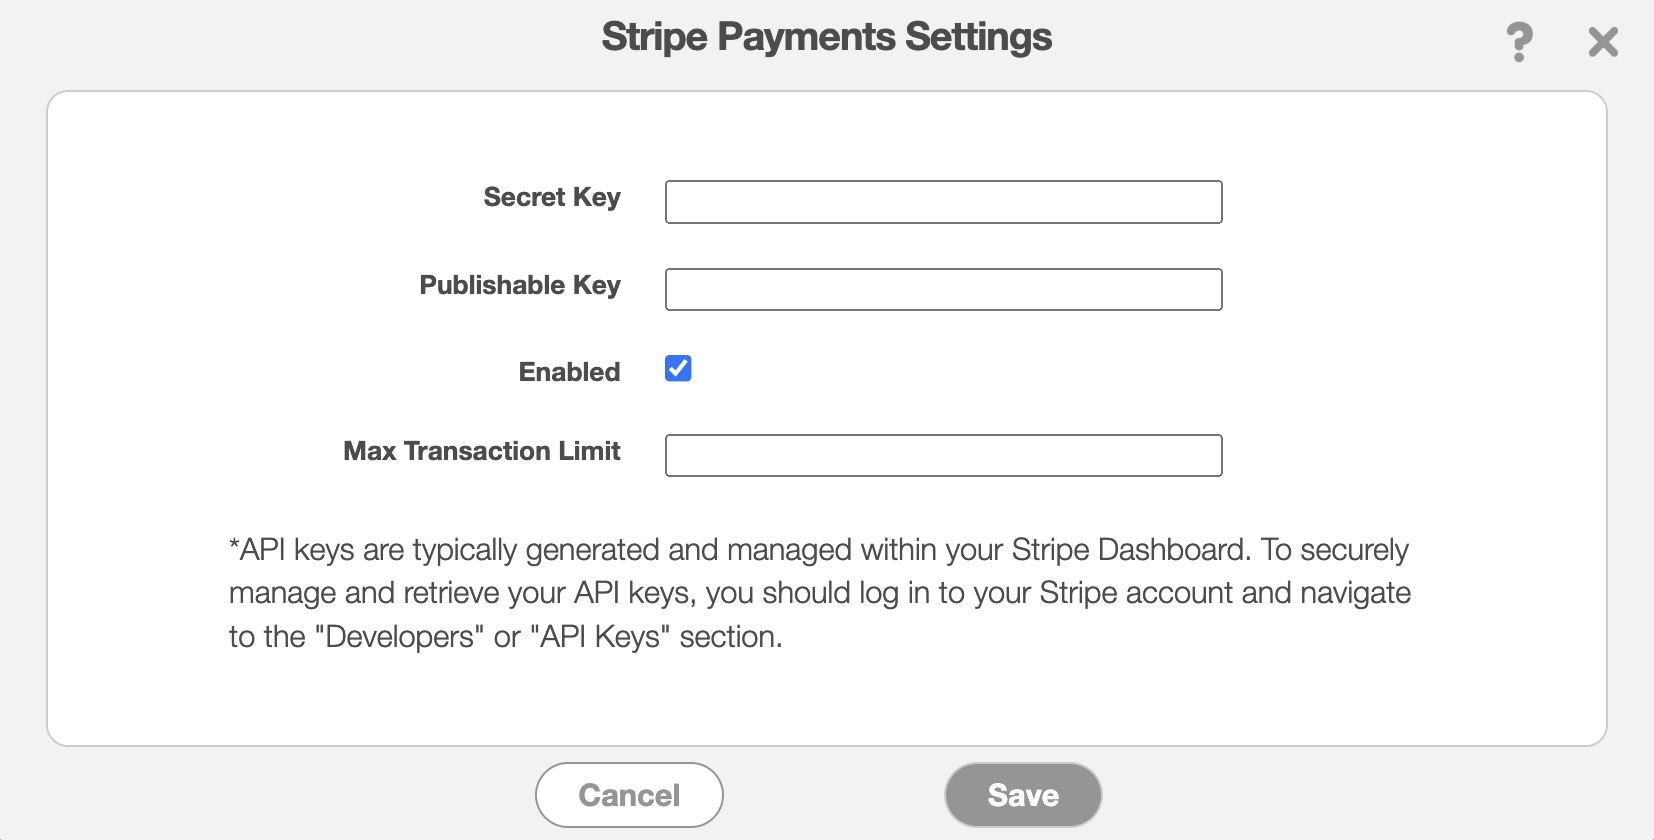
In this pop-up window, enter the following information:
Secret Key (can be found on your Stripe account)
Publishable Key (can be found on your Stripe account)
Ensure that the "Enabled" checkbox is filled so that the connector is active.
And the maximum transaction limit. Leave this field blank to allow unlimited transactions for credit cards and ACH payments.
Once the required information is entered, click the Save button to register your Stripe details.
New Stripe Account
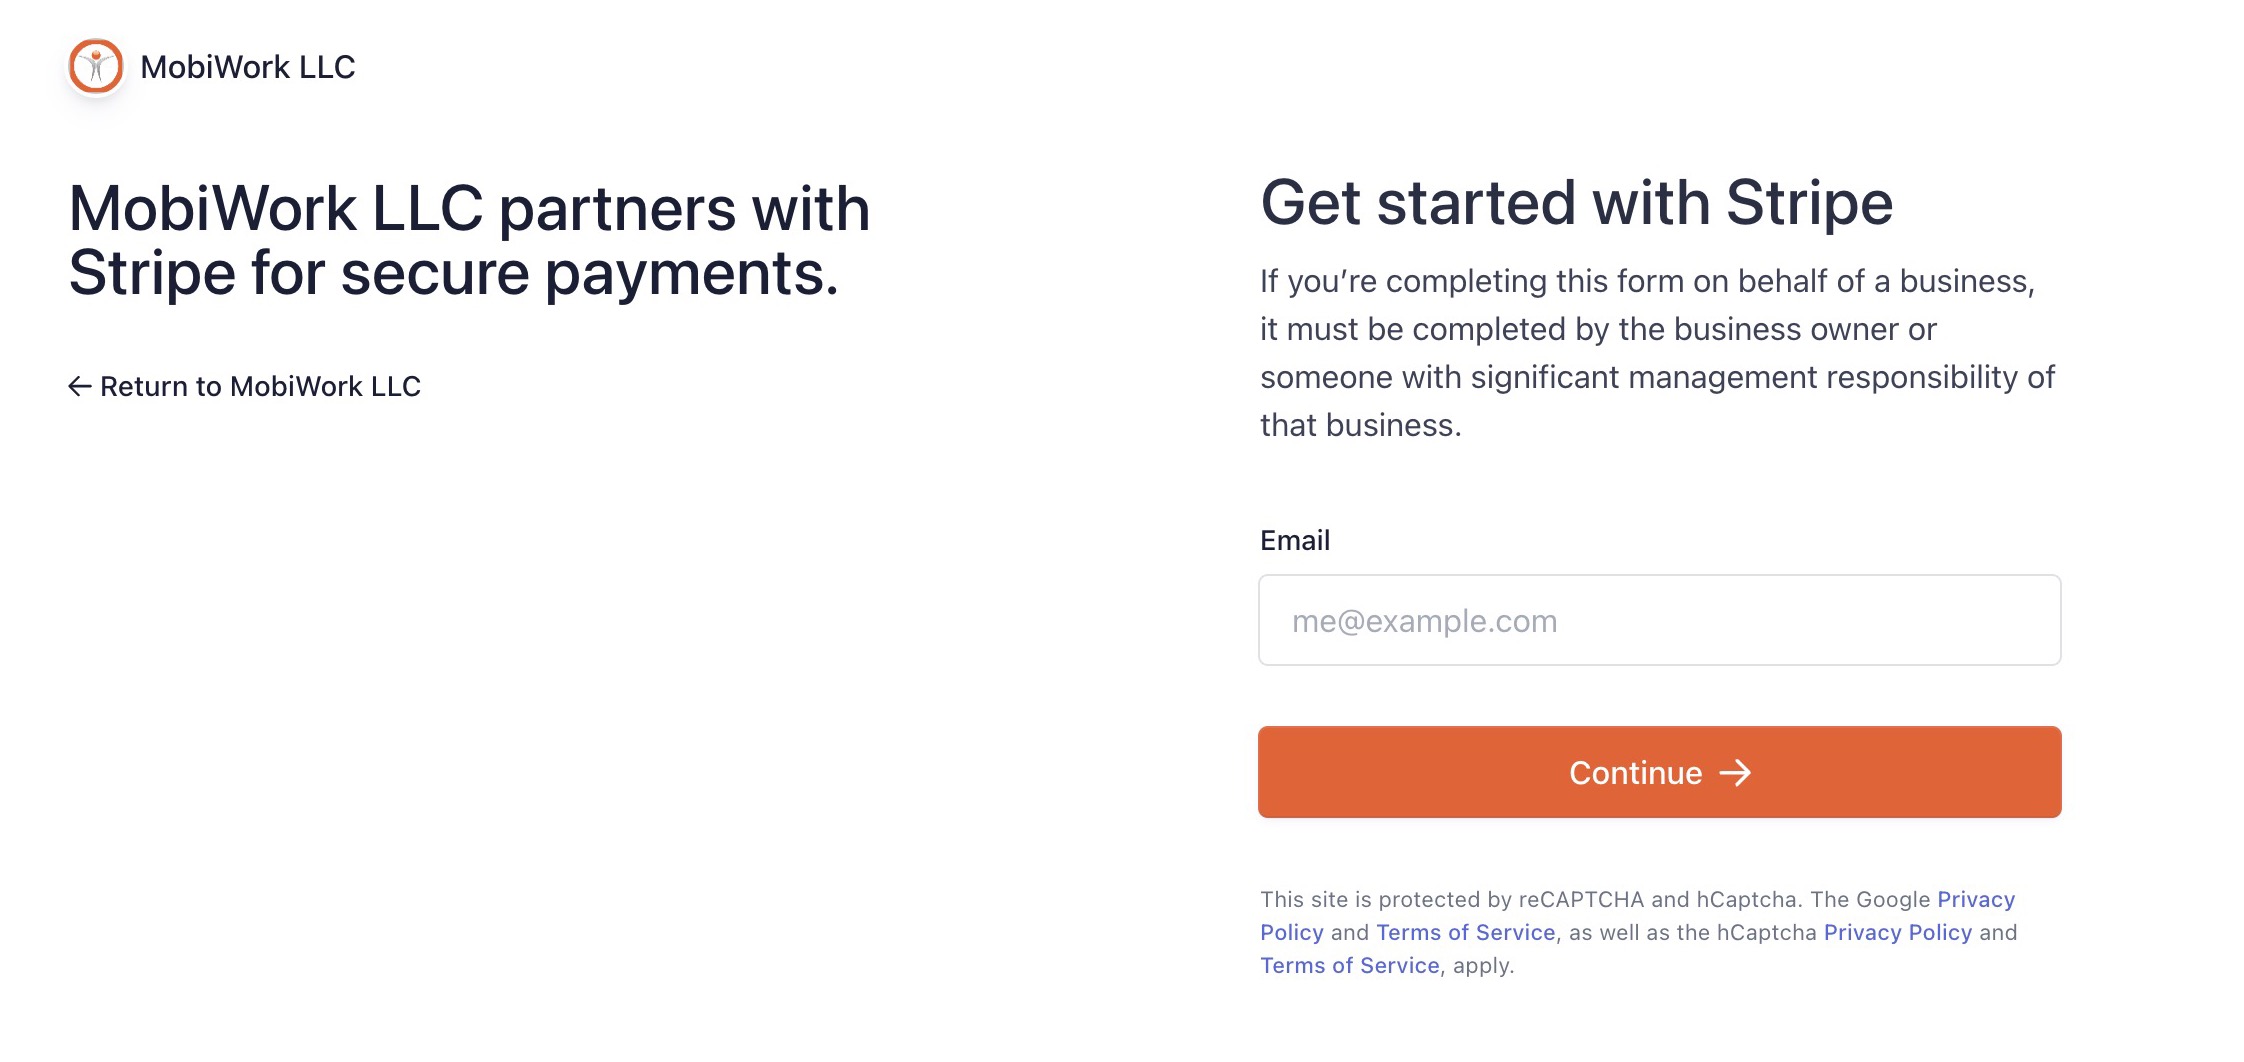
If you do not already have a Stripe account, click on the Create Account button. You will then be prompted to fill in your account, banking, and contact information. The following steps will highlight the information you need to complete when creating your Stripe account.
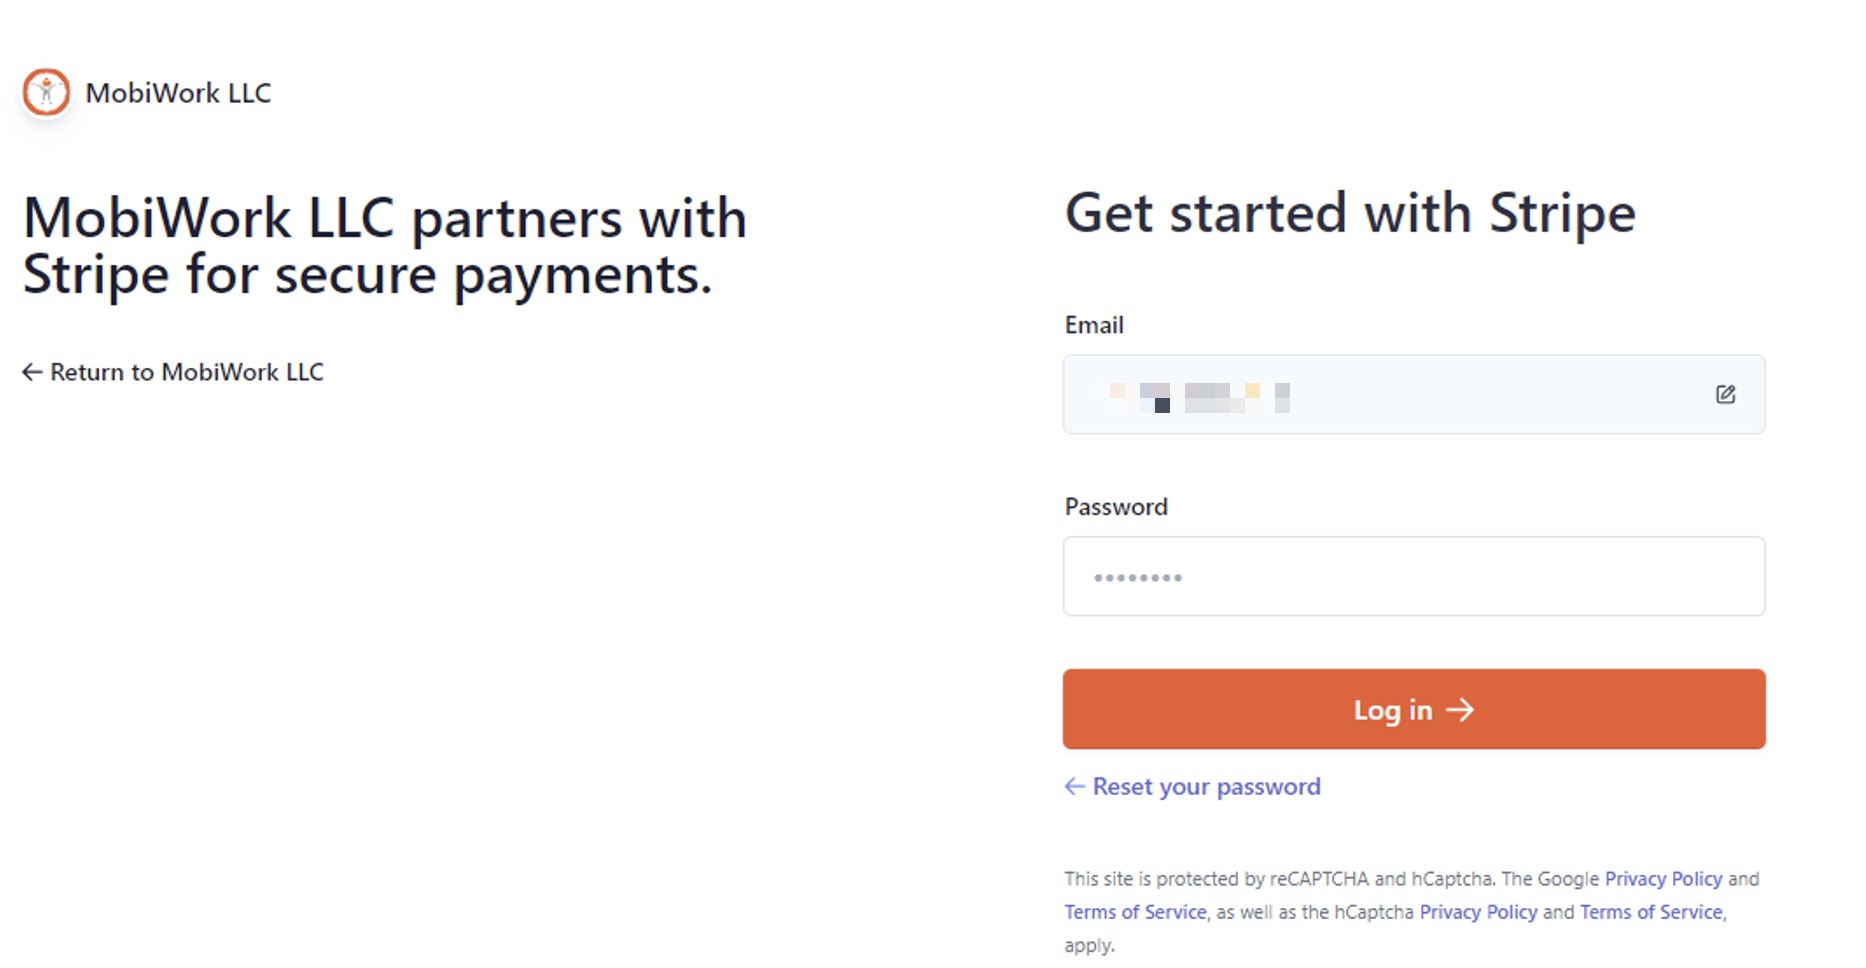
Input your email address and click on the Continue button:
Input the password you would like to use for Stripe:
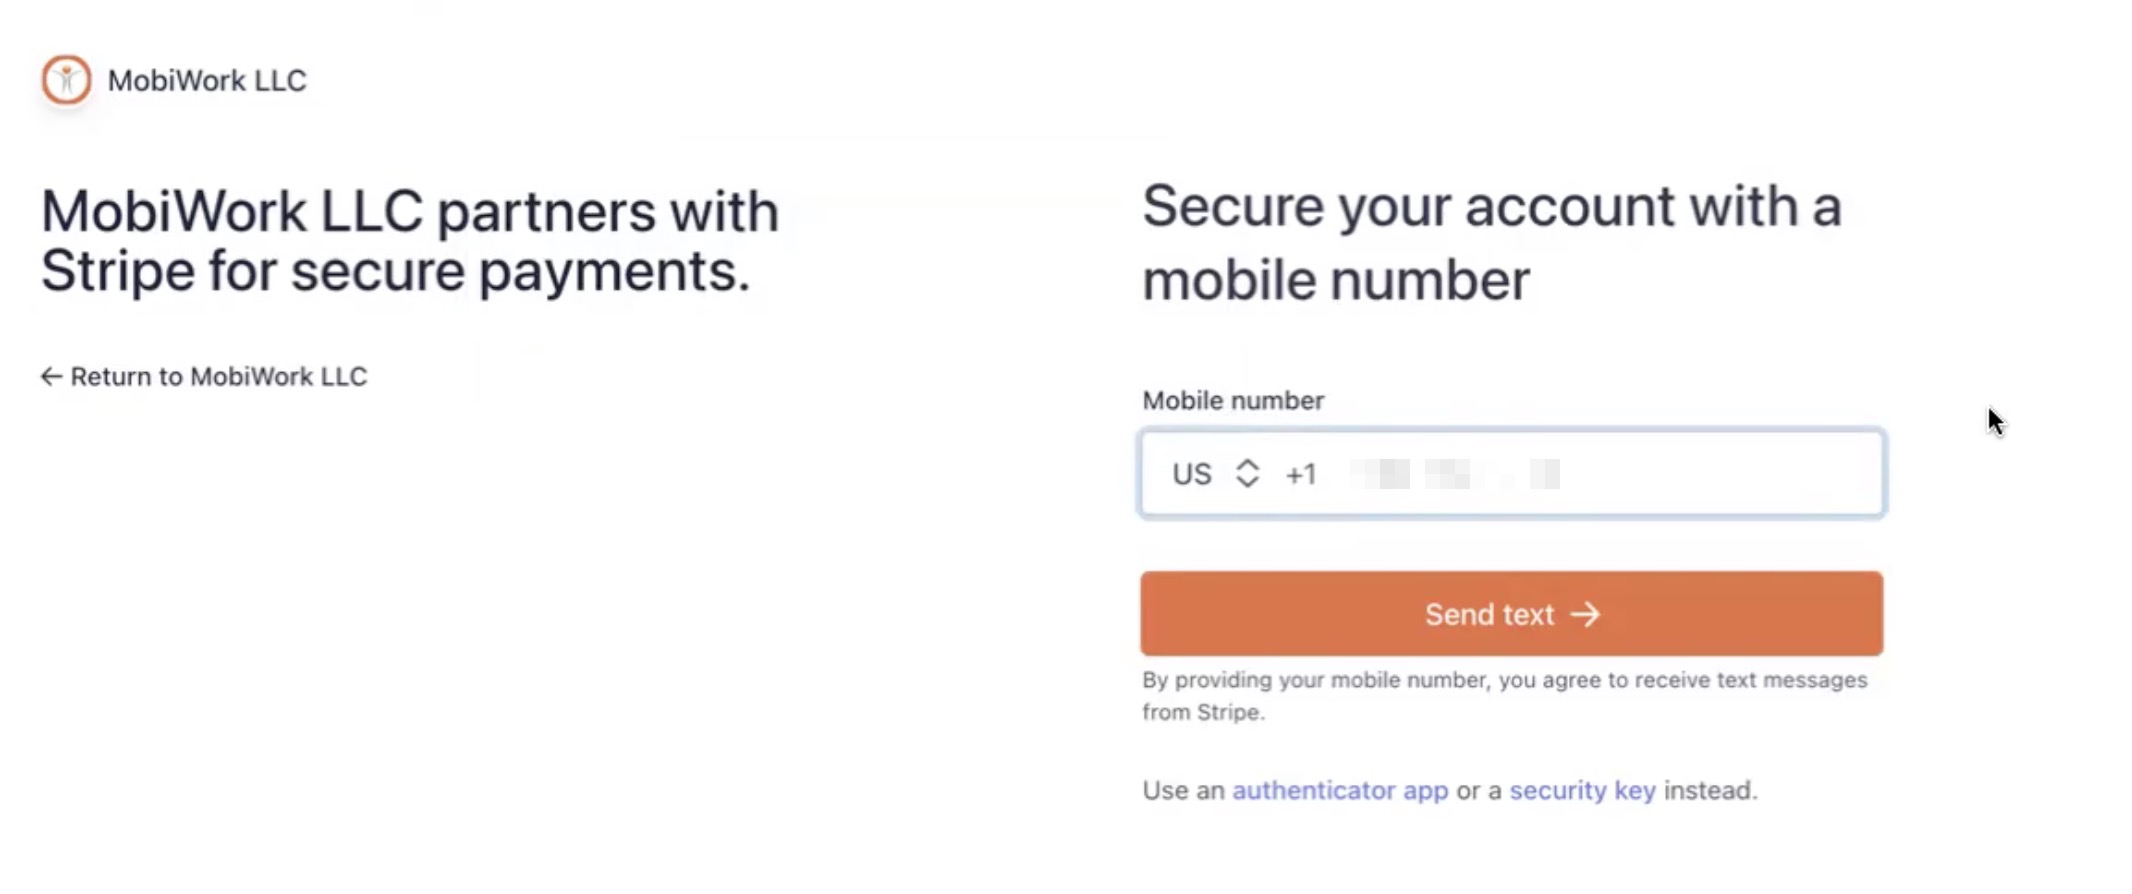
Enter the phone number you would like to associate with your Stripe account. Please note this number will be used for 2-factor authentication:
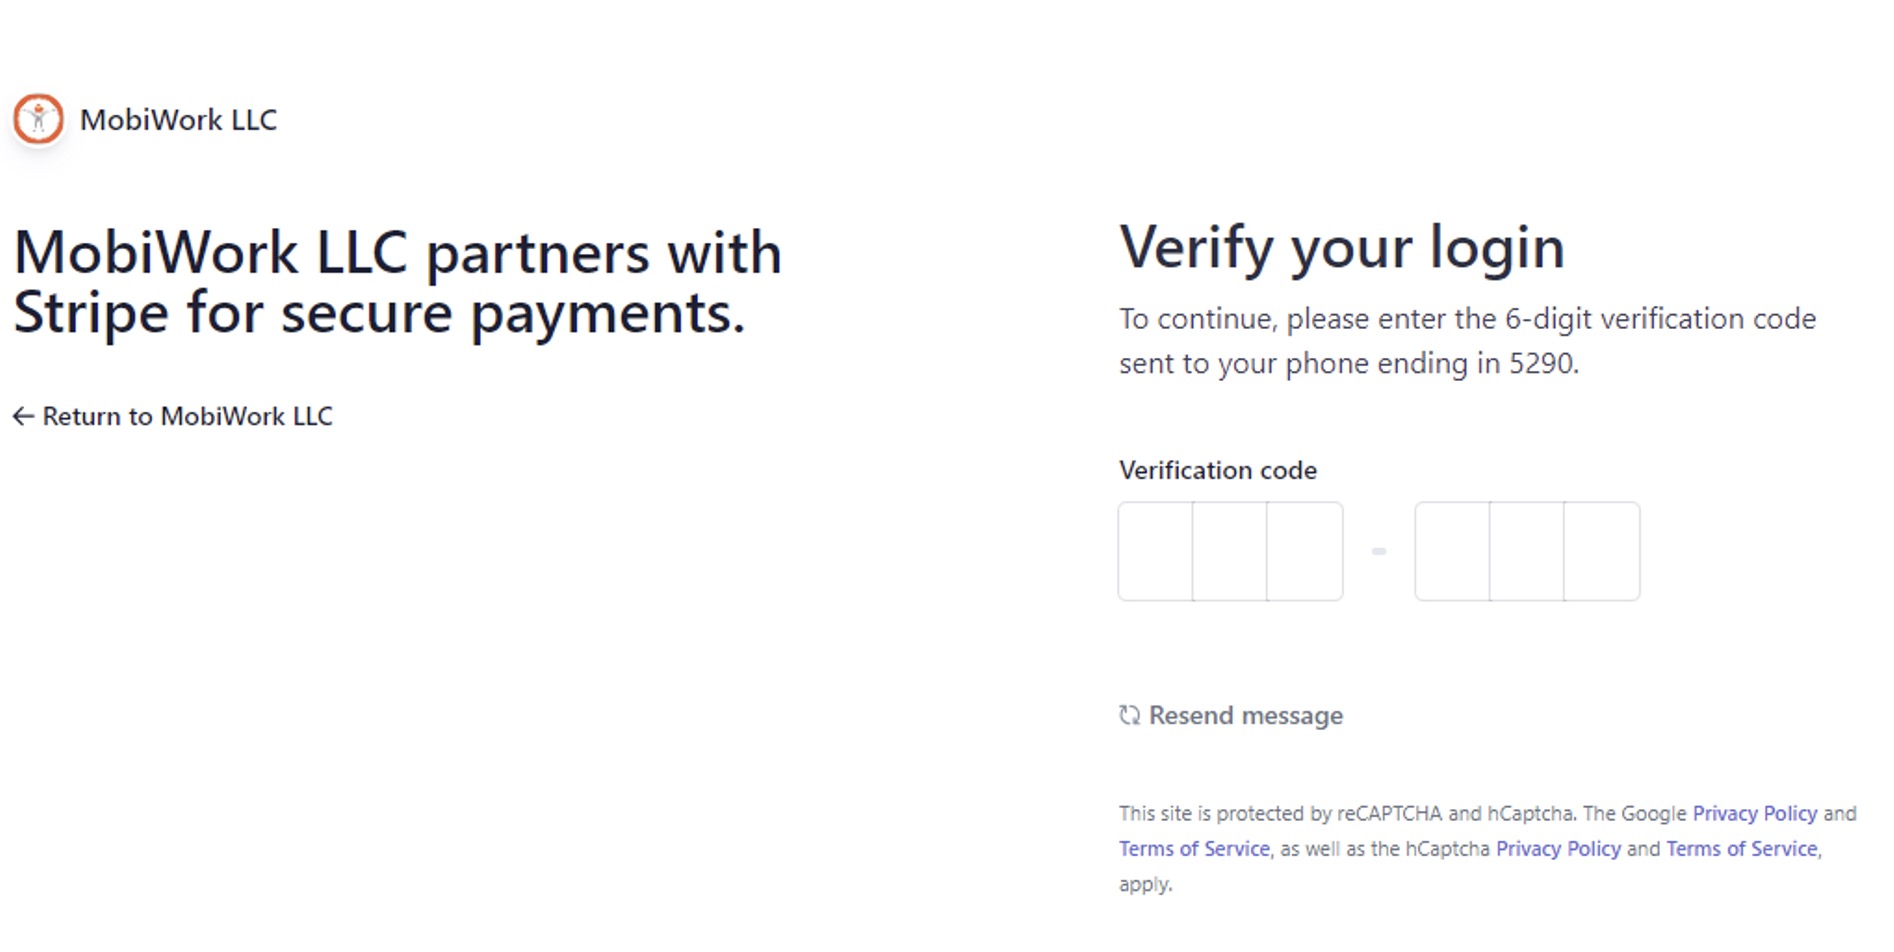
Enter the authentication code that you will receive from your phone:
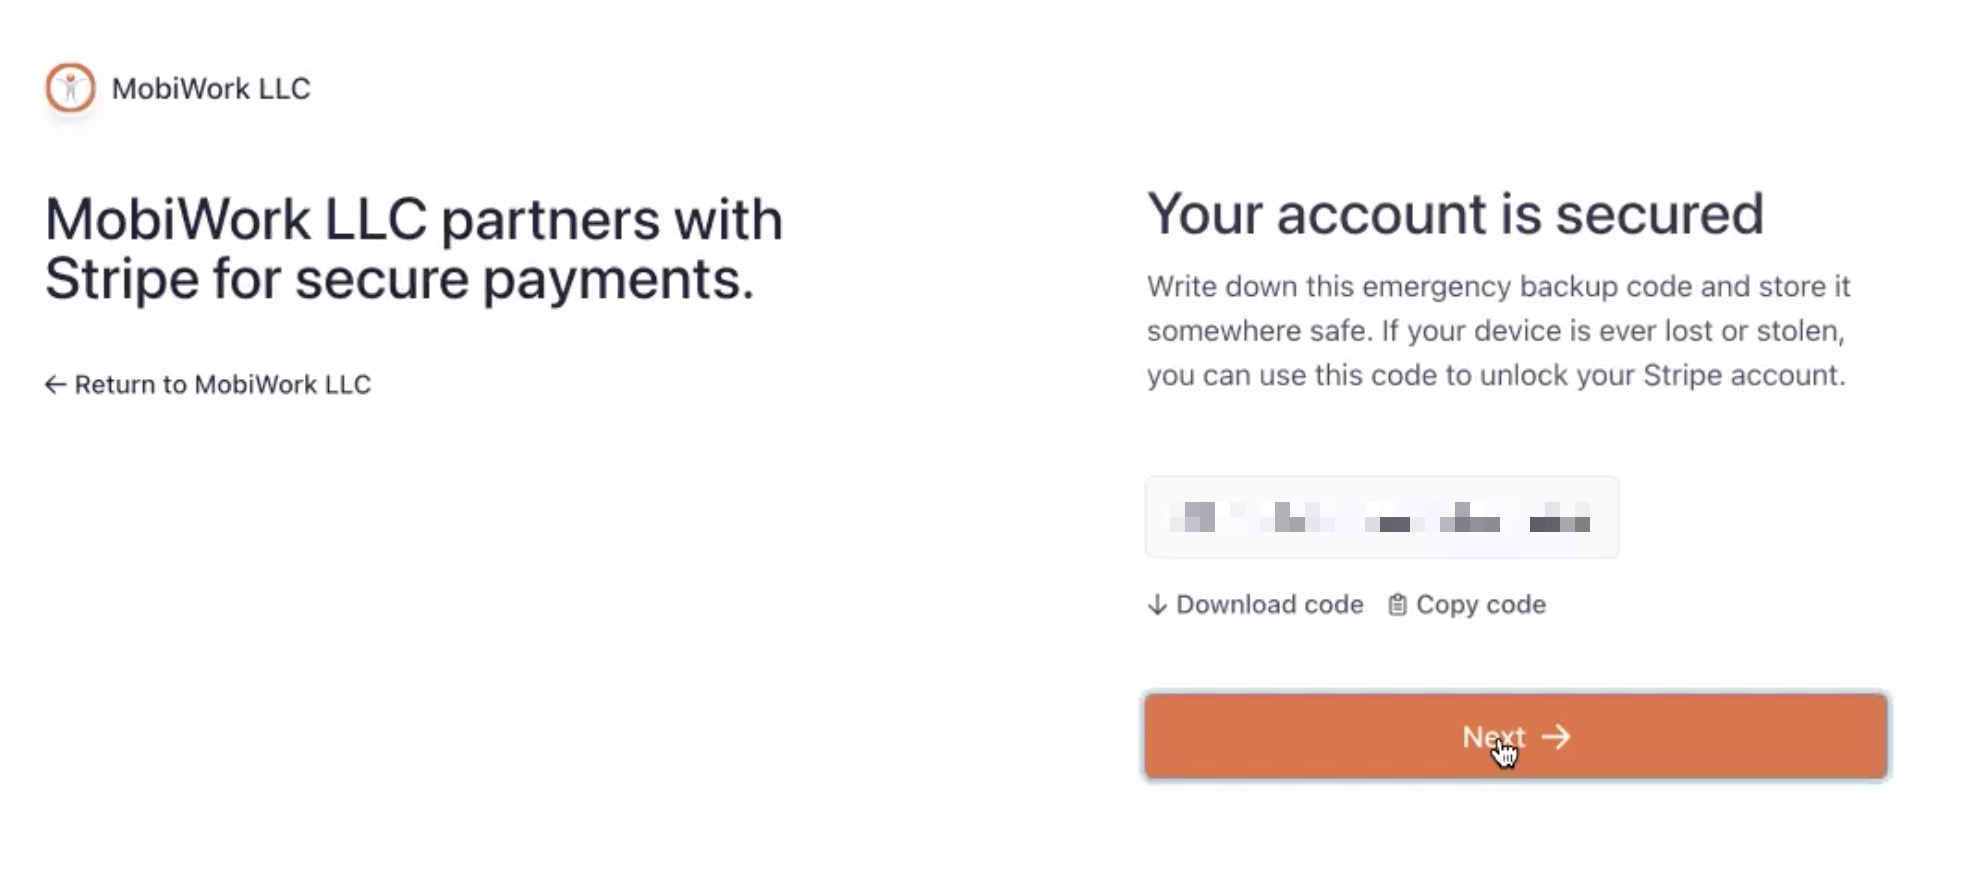
You will receive an emergency backup code. This code is used if your device is ever lost or stolen, you can still access your Stripe account; please keep this code secure in your personal documents or notes.
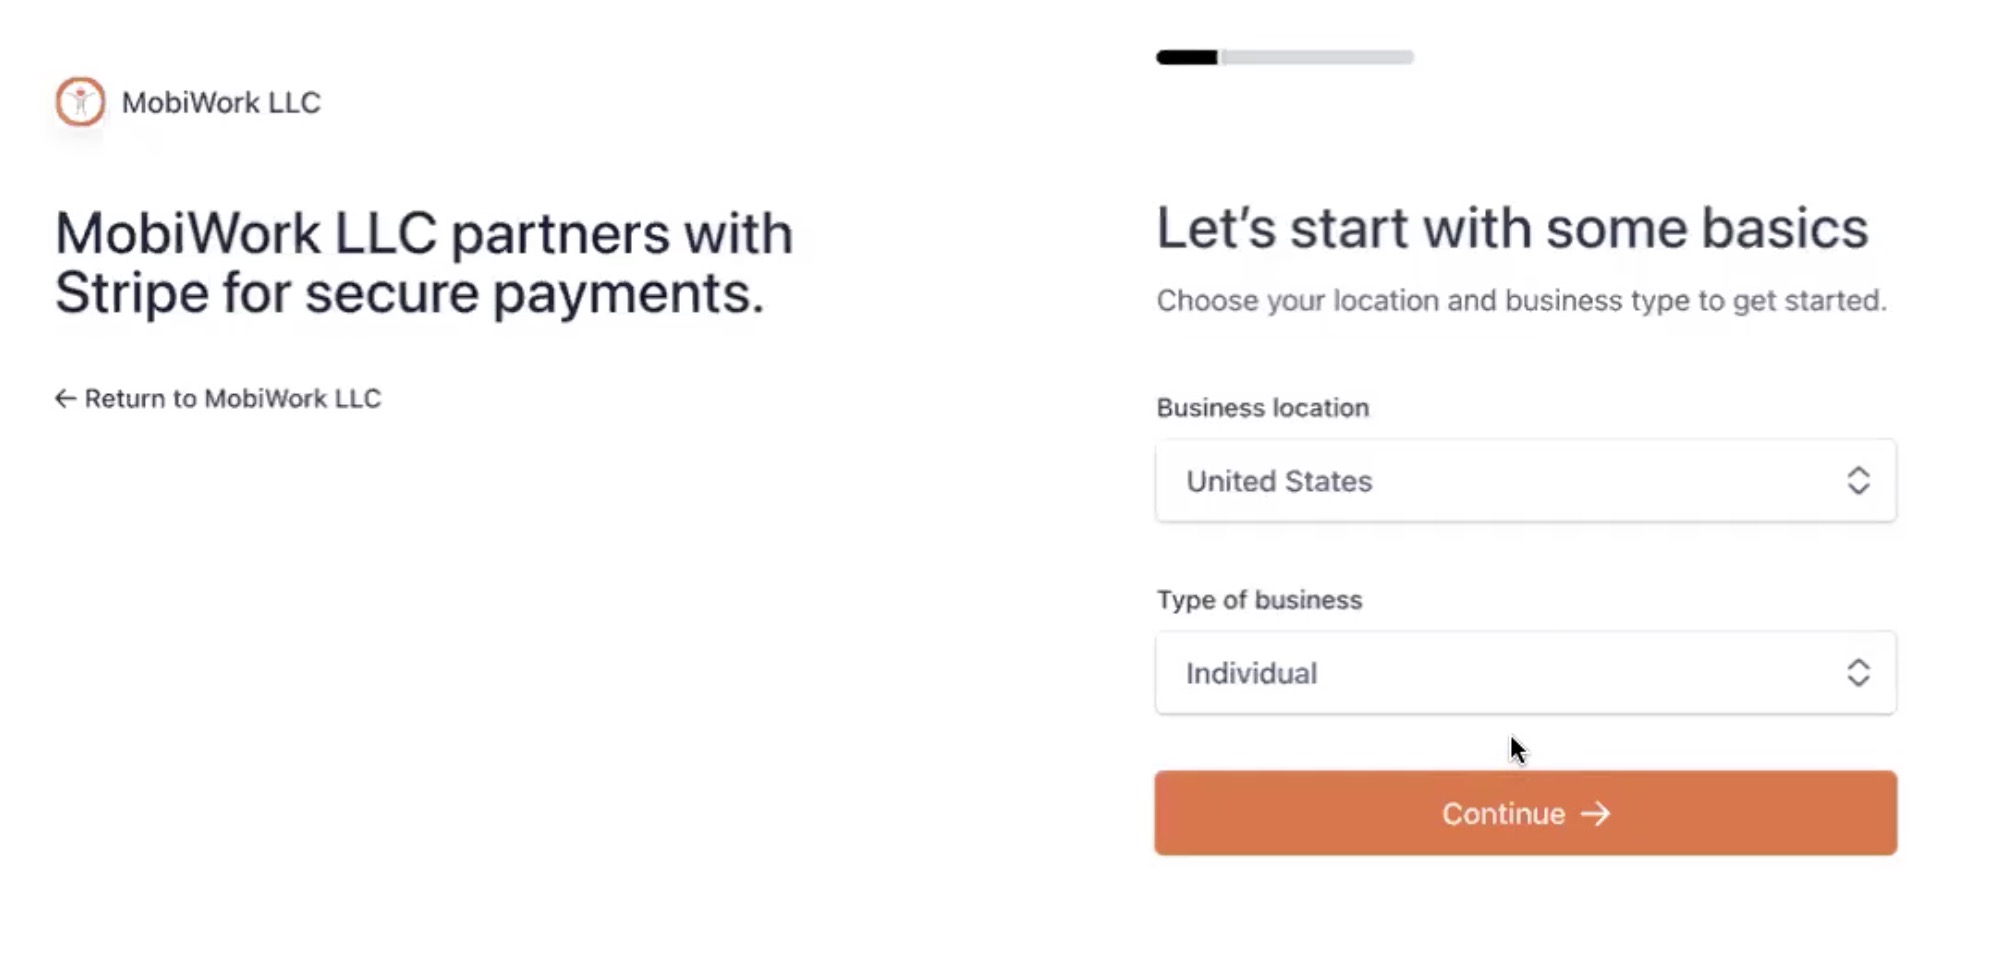
Input your business location and the type of business that your company falls under (i.e., individual, company, nonprofit organization):
On the Tell Us More About Your Business page complete the form:
This page will ask you to input the following information about your company:
Your legal business name.
Employer identification number (EIN).
The registered business address.
The name under which you are doing business as (this is optional).
The industry or business sector where your company falls under.
Your company's website.
And a description about your company.
Once you have completed filling out the details on the page, press the Continue button.
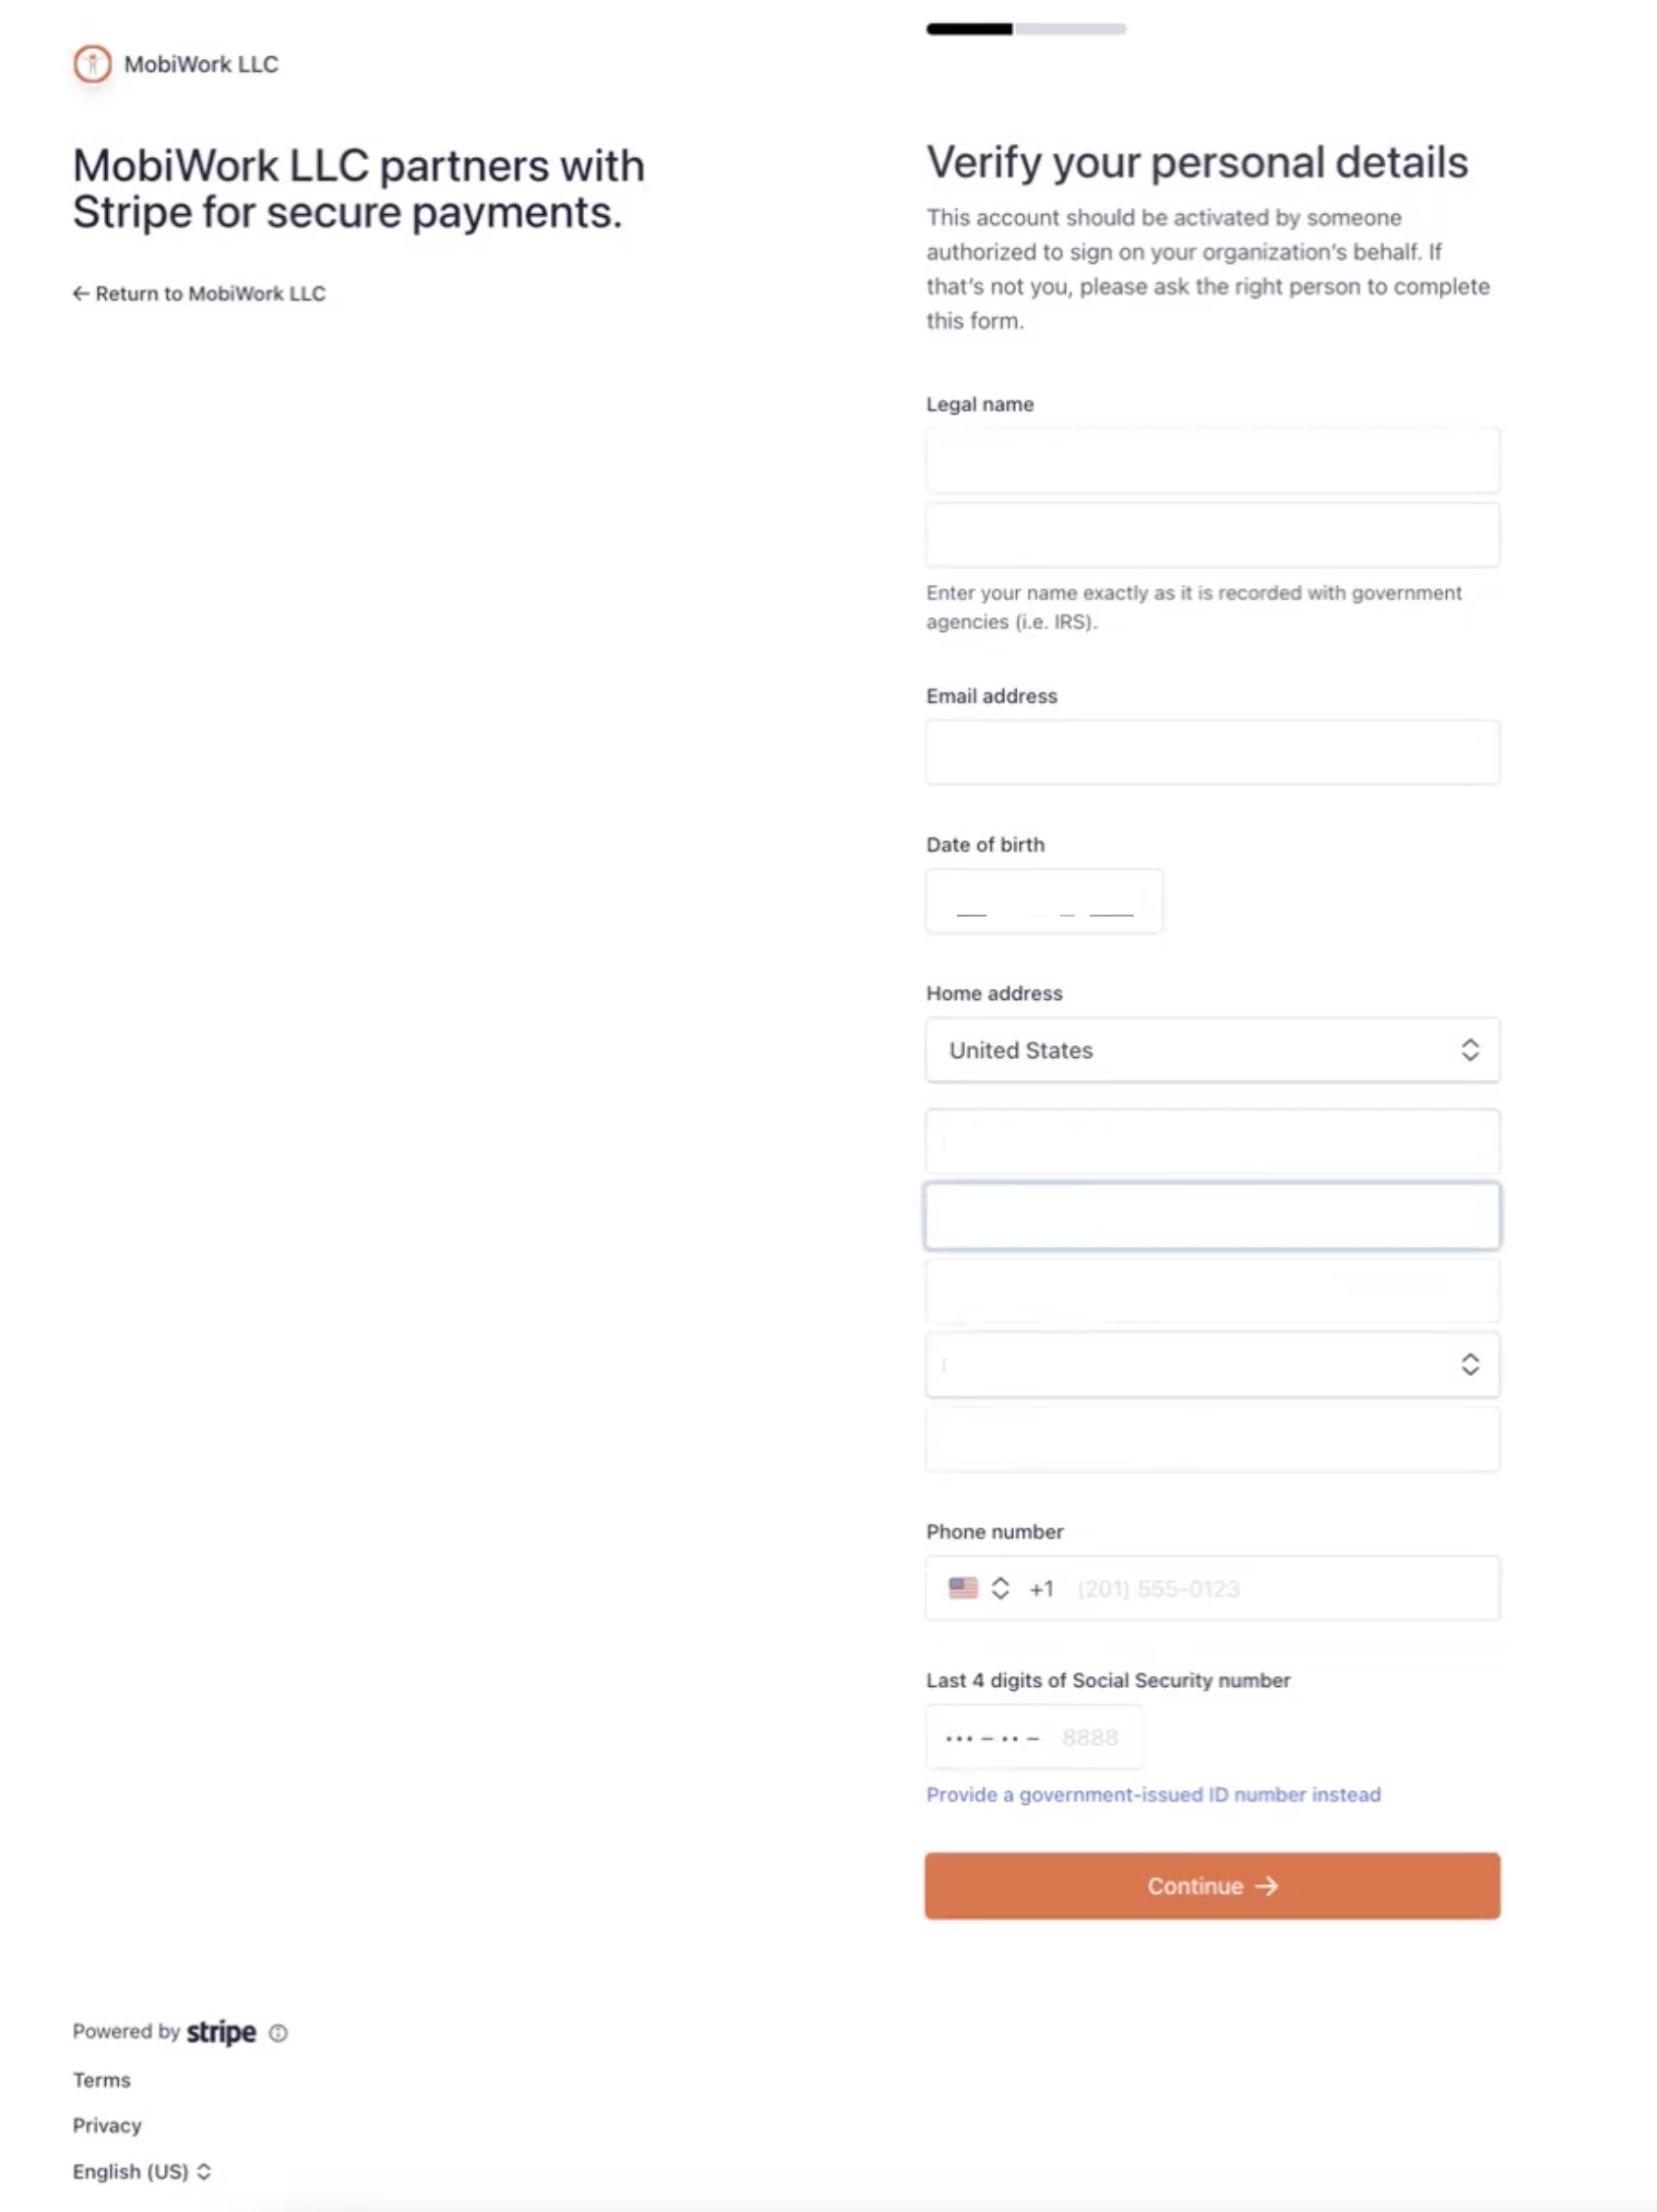
After completing the Tell Us More About Your Business page, you will be redirected to the Verify Your Personal Details page:
On this page enter your name, address, and contact information. The following details will also be requested on this page:
Your legal first and last name.
Your email address.
Your date of birth.
Your home address.
Your phone number.
And the last four digits of your social security number.
Once you have completed filling out the details on the page, press the Continue button.
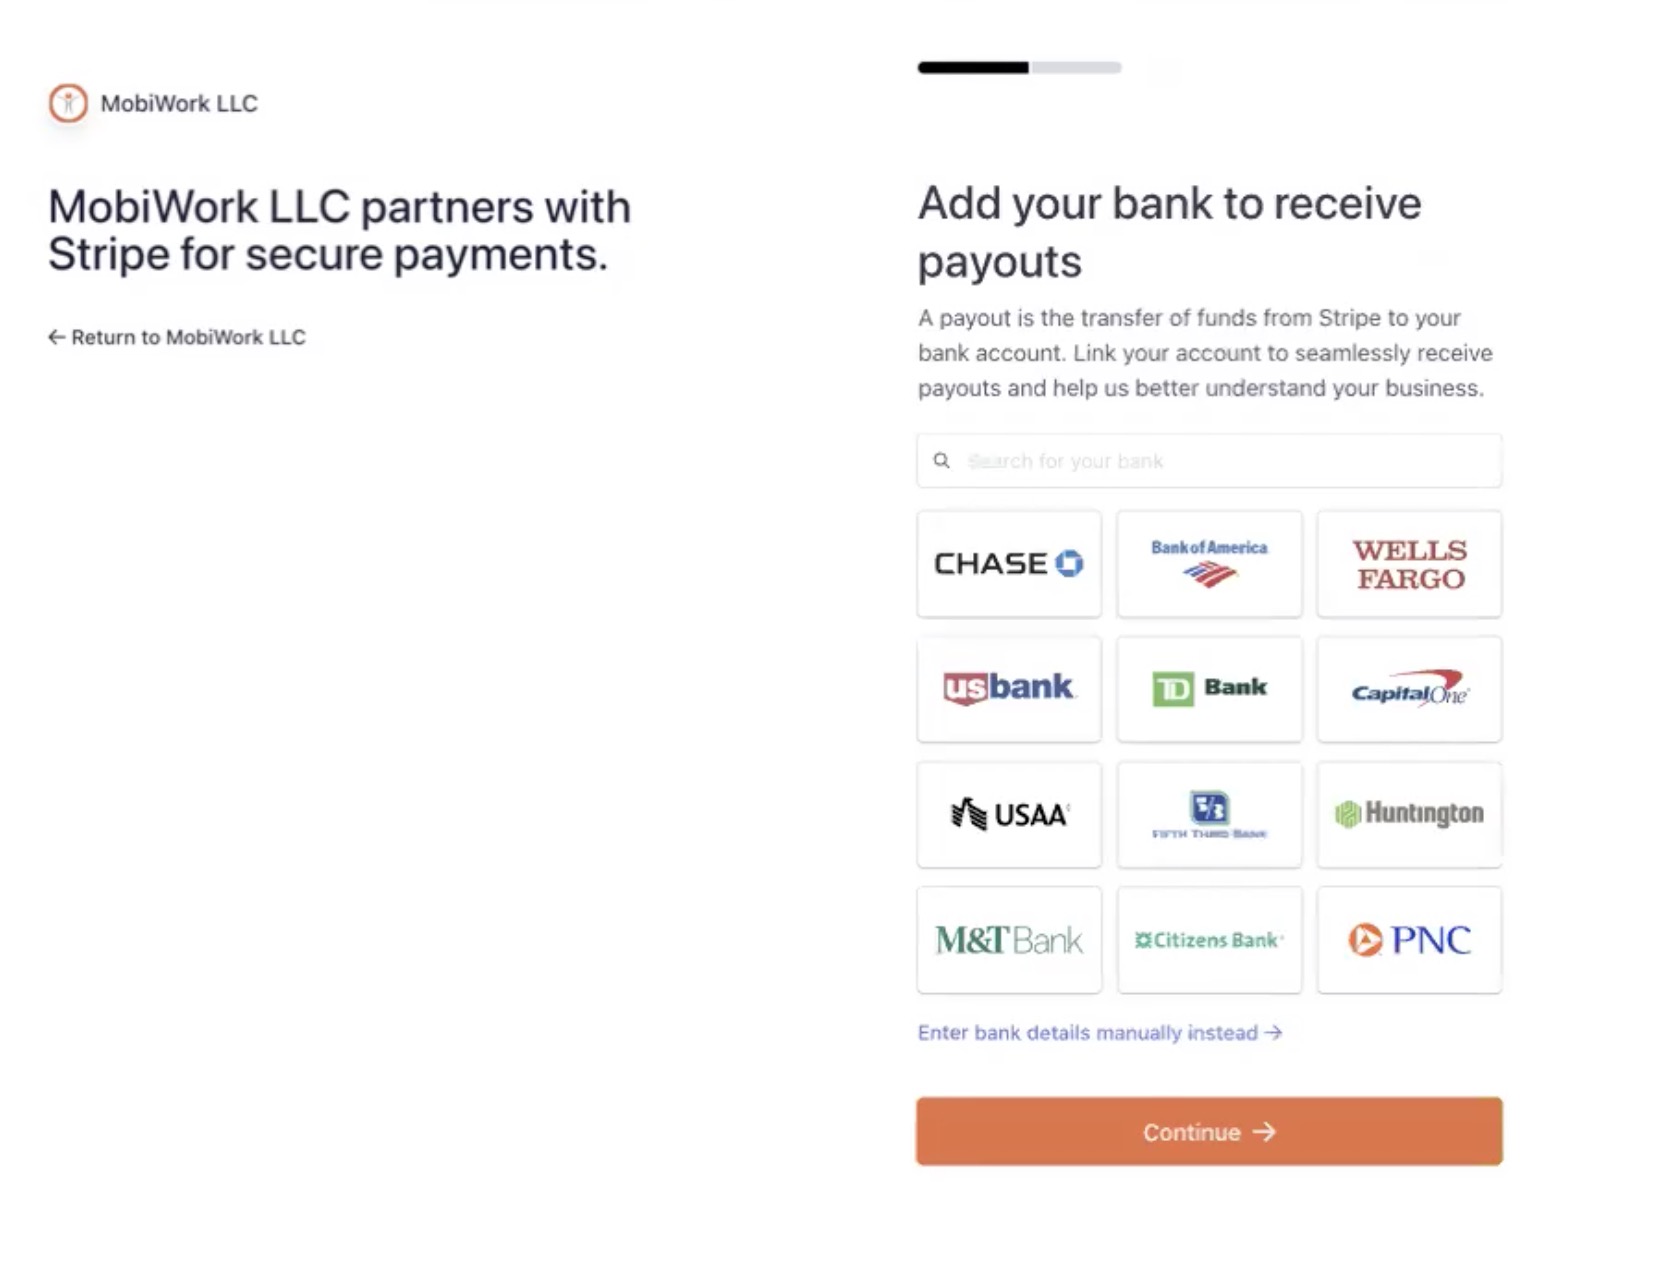
After completing the Verify Your Personal Details page, you will be redirected to the Add Your Bank to Receive Payouts page:
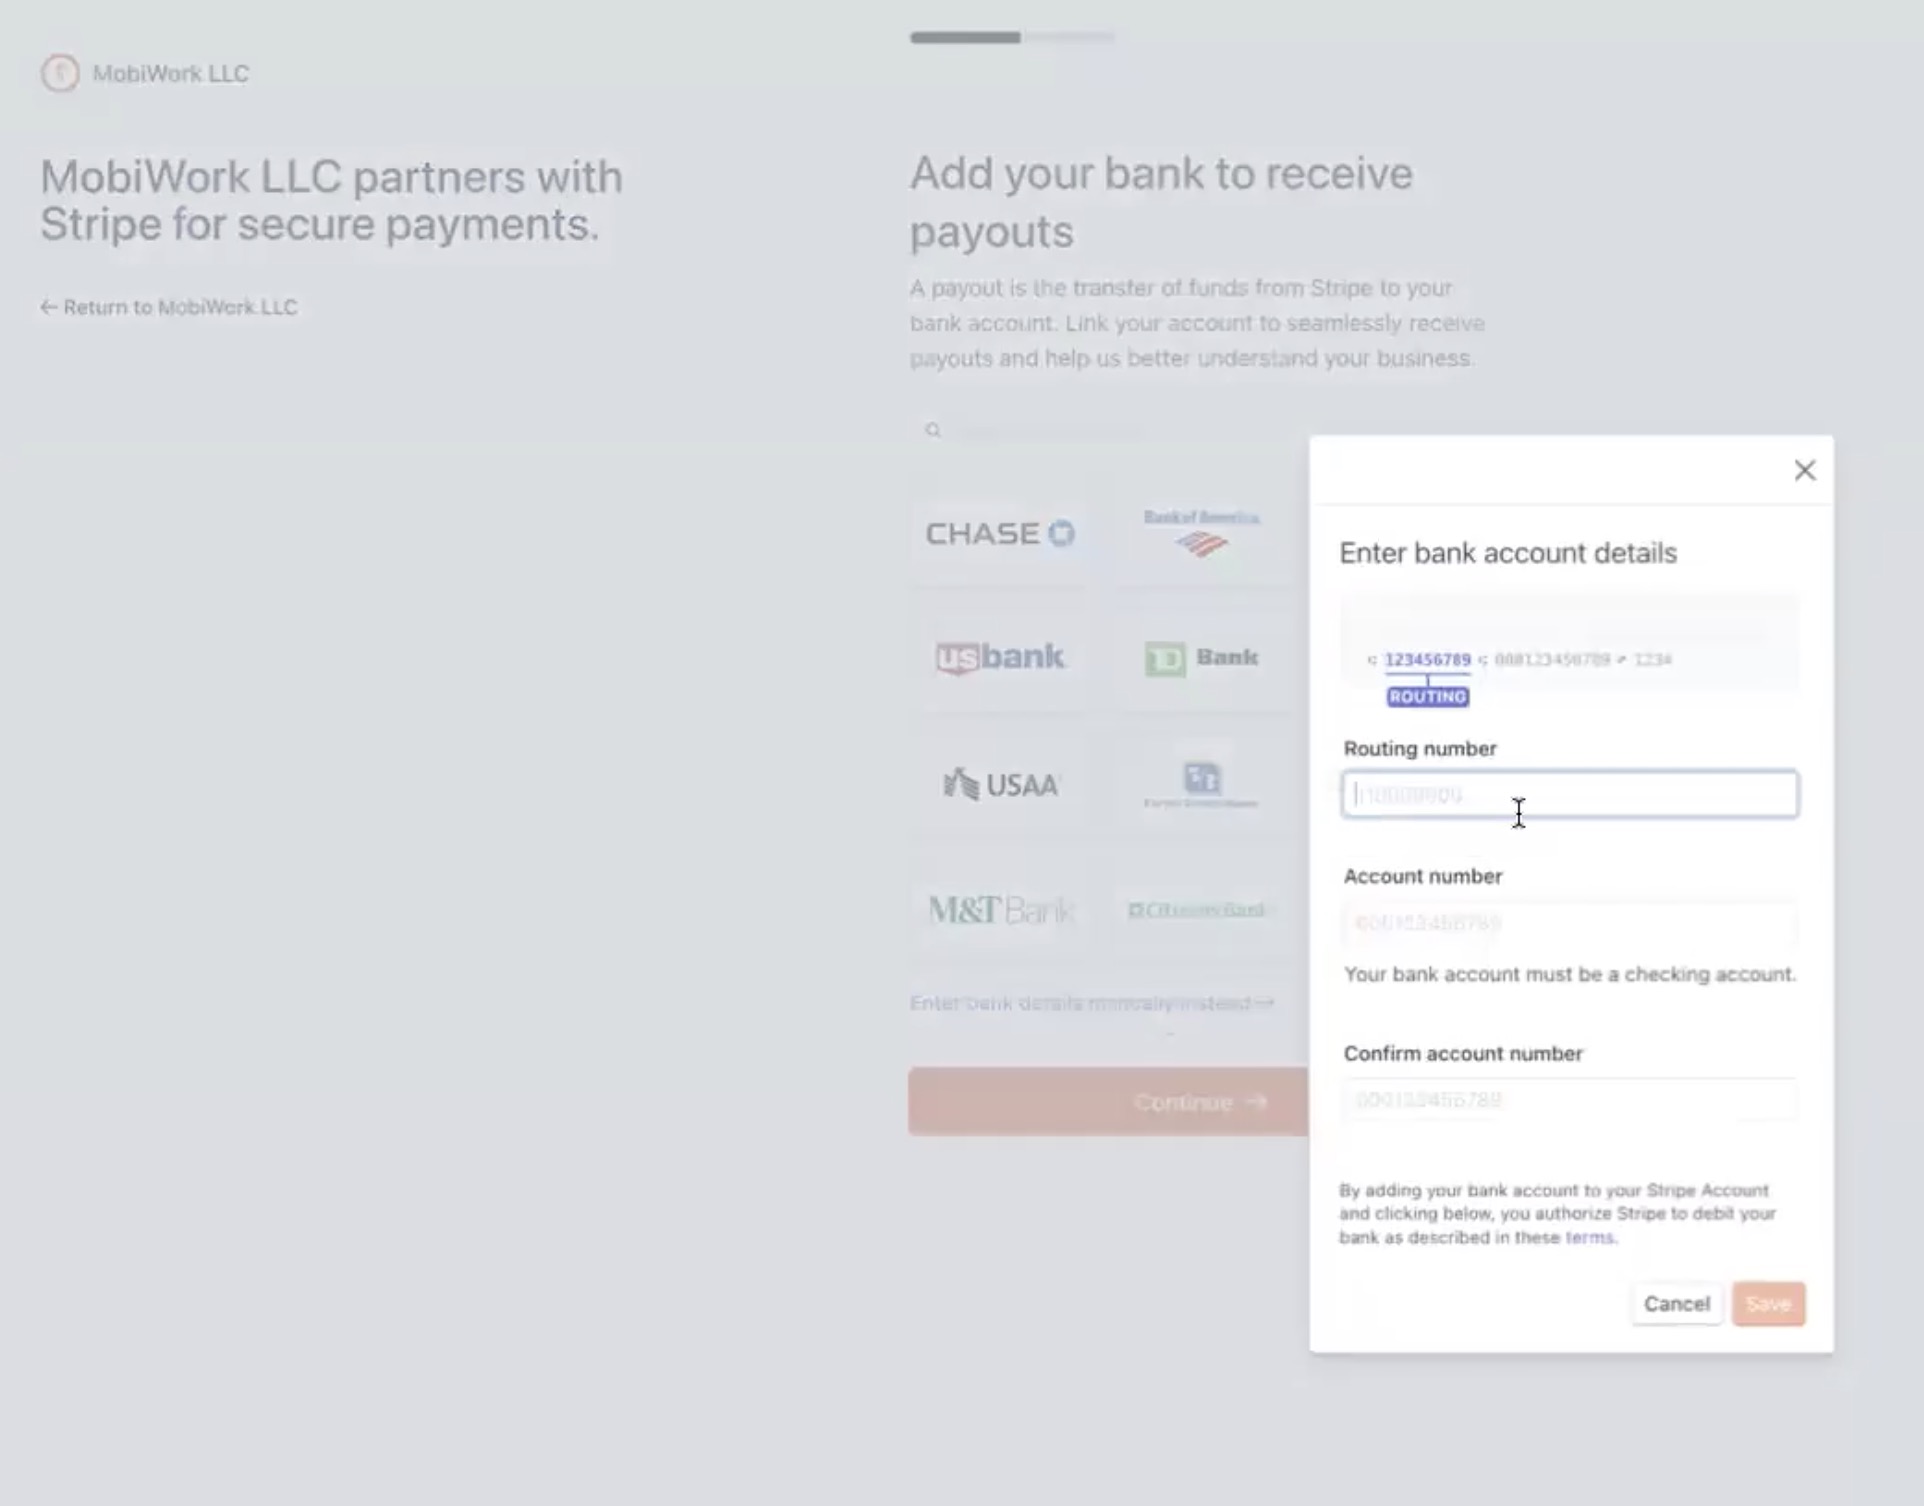
If you select the "Enter Bank Details Manually Instead" option, the Enter Bank Account Details pop-up window will appear. On this pop-up window, enter the routing number and account number. Once you have entered this information, click on the Continue button:
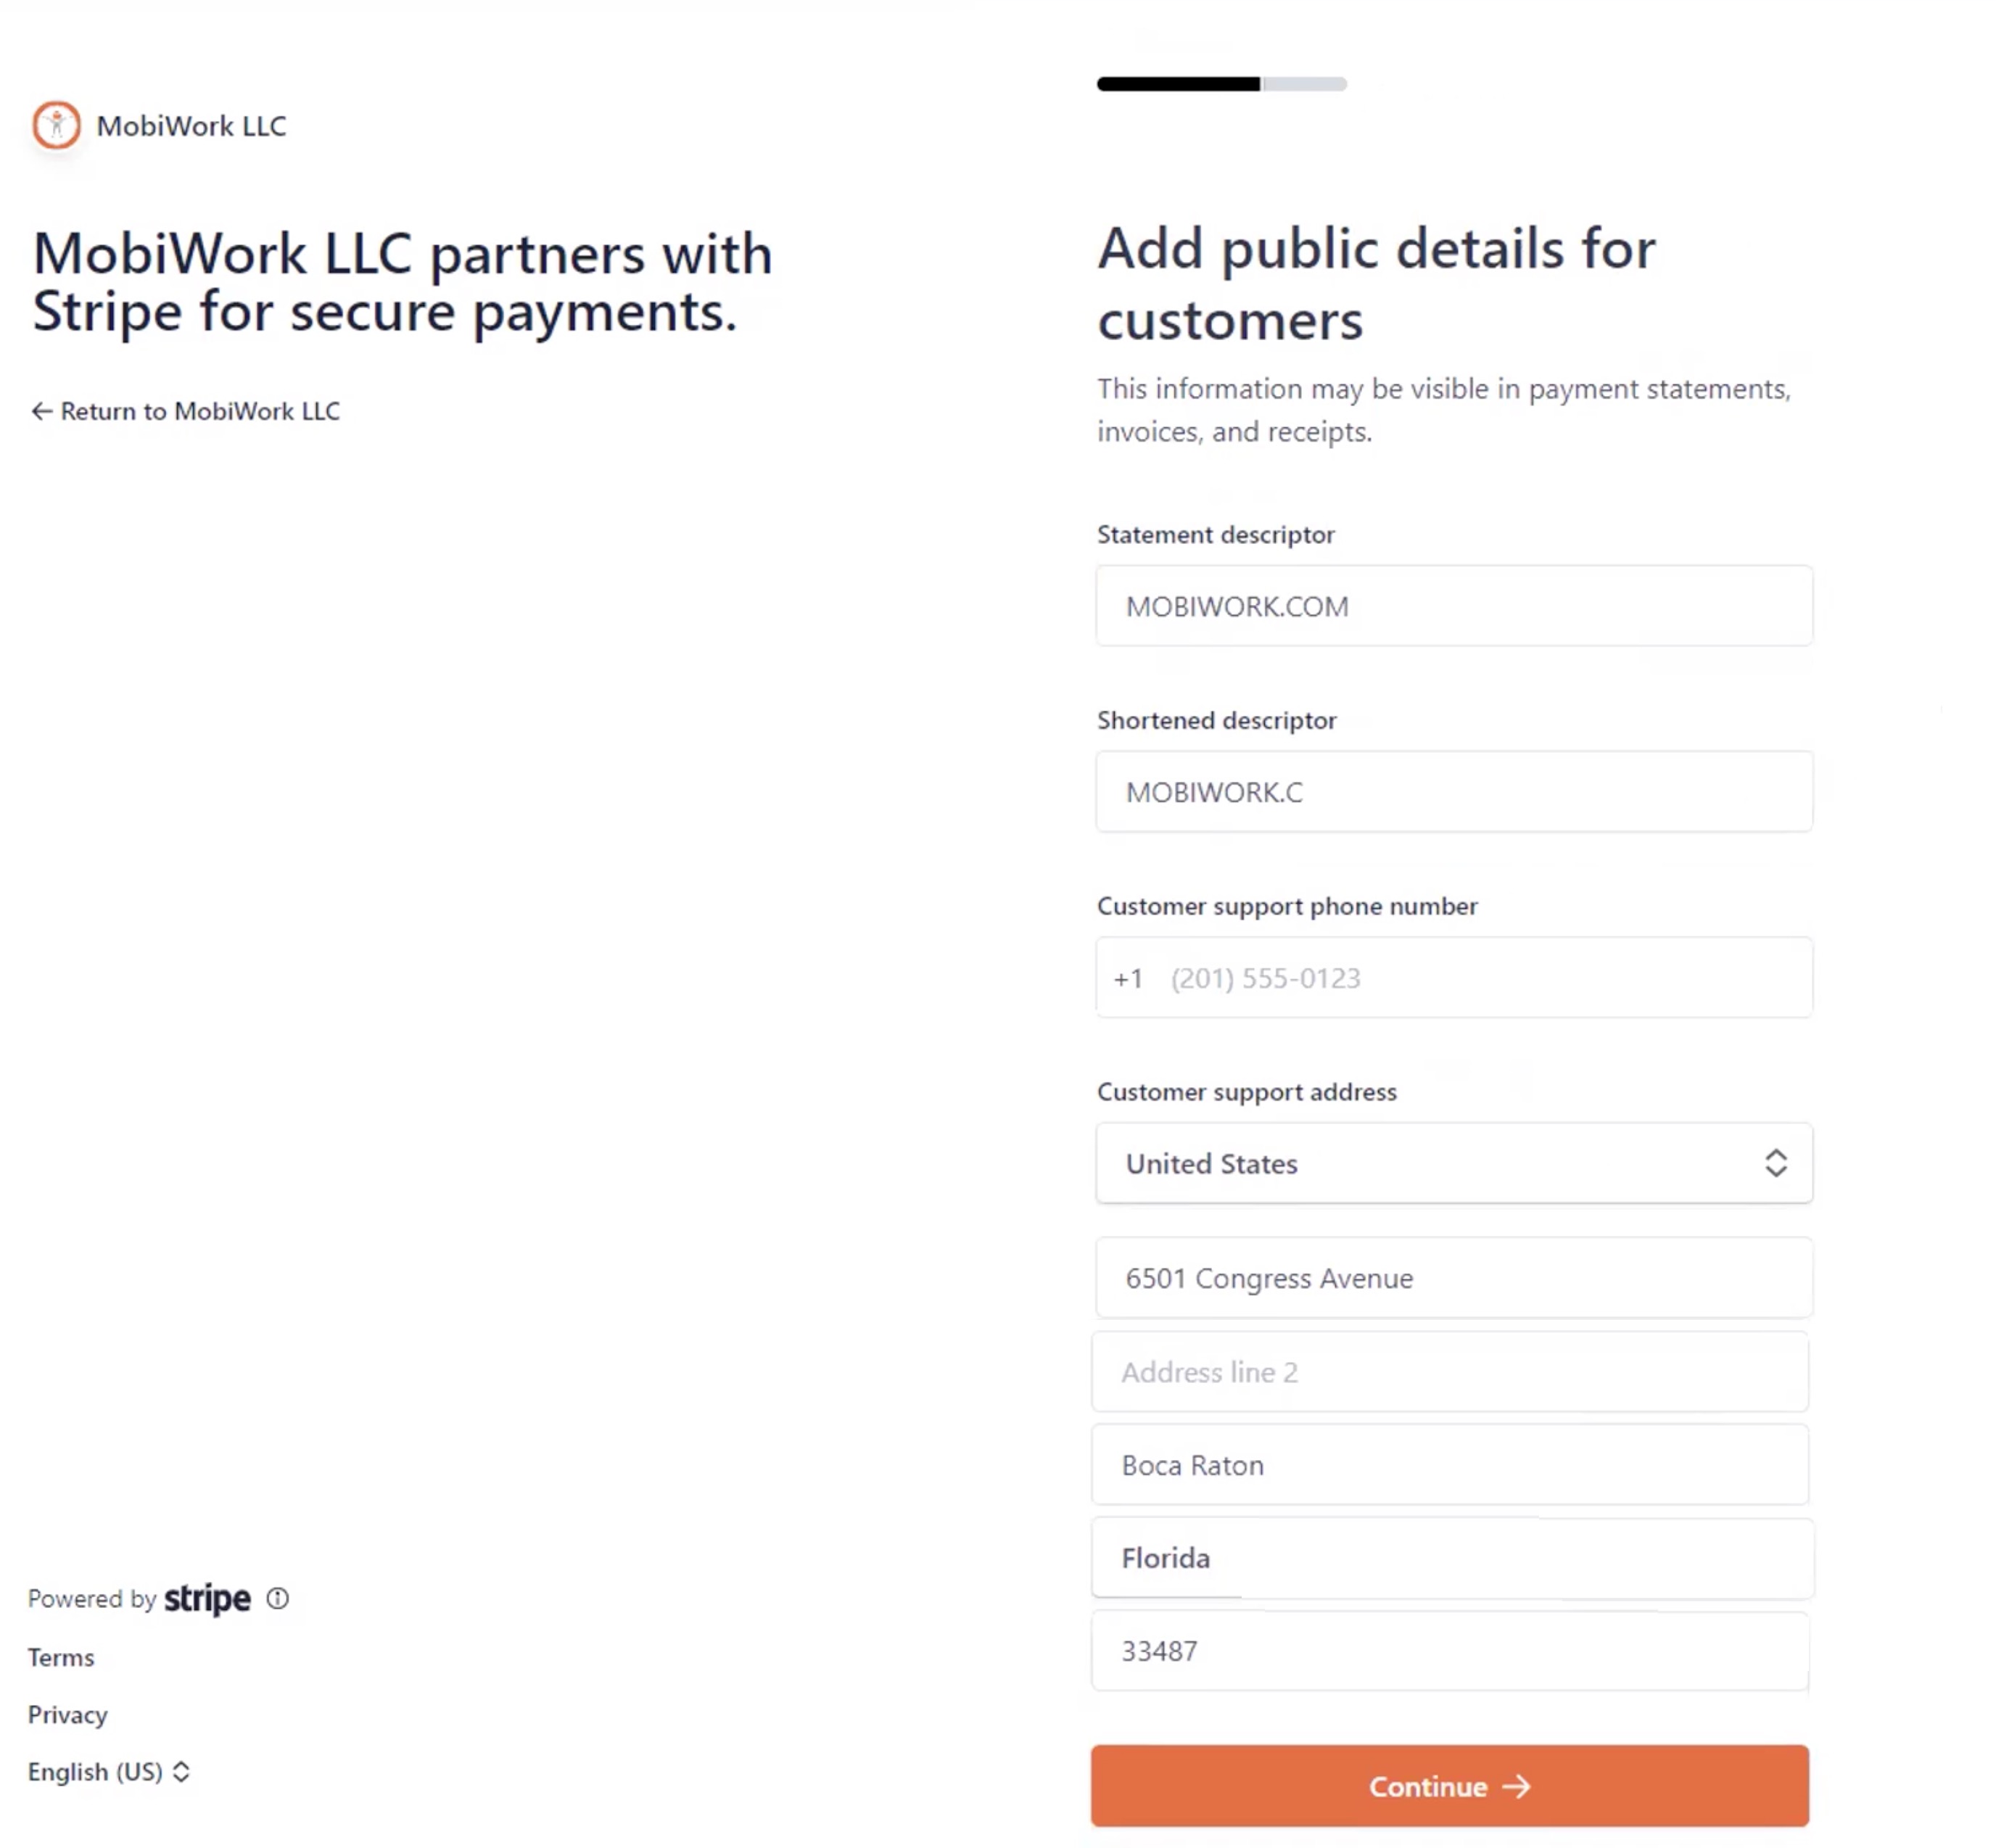
After completing the Add Your Bank to Receive Payouts page, you will be redirected to the Add Public Details for Customers page; please note this page appears during your initial Stripe account creation:
On this page you will enter the customer-facing information that your customers will see once their payment processes. The following details will also be requested on this page:
Statement descriptor.
Shortened descriptor.
Customer support number.
And the customer support address.
Once you have entered this information, click on the Continue button.
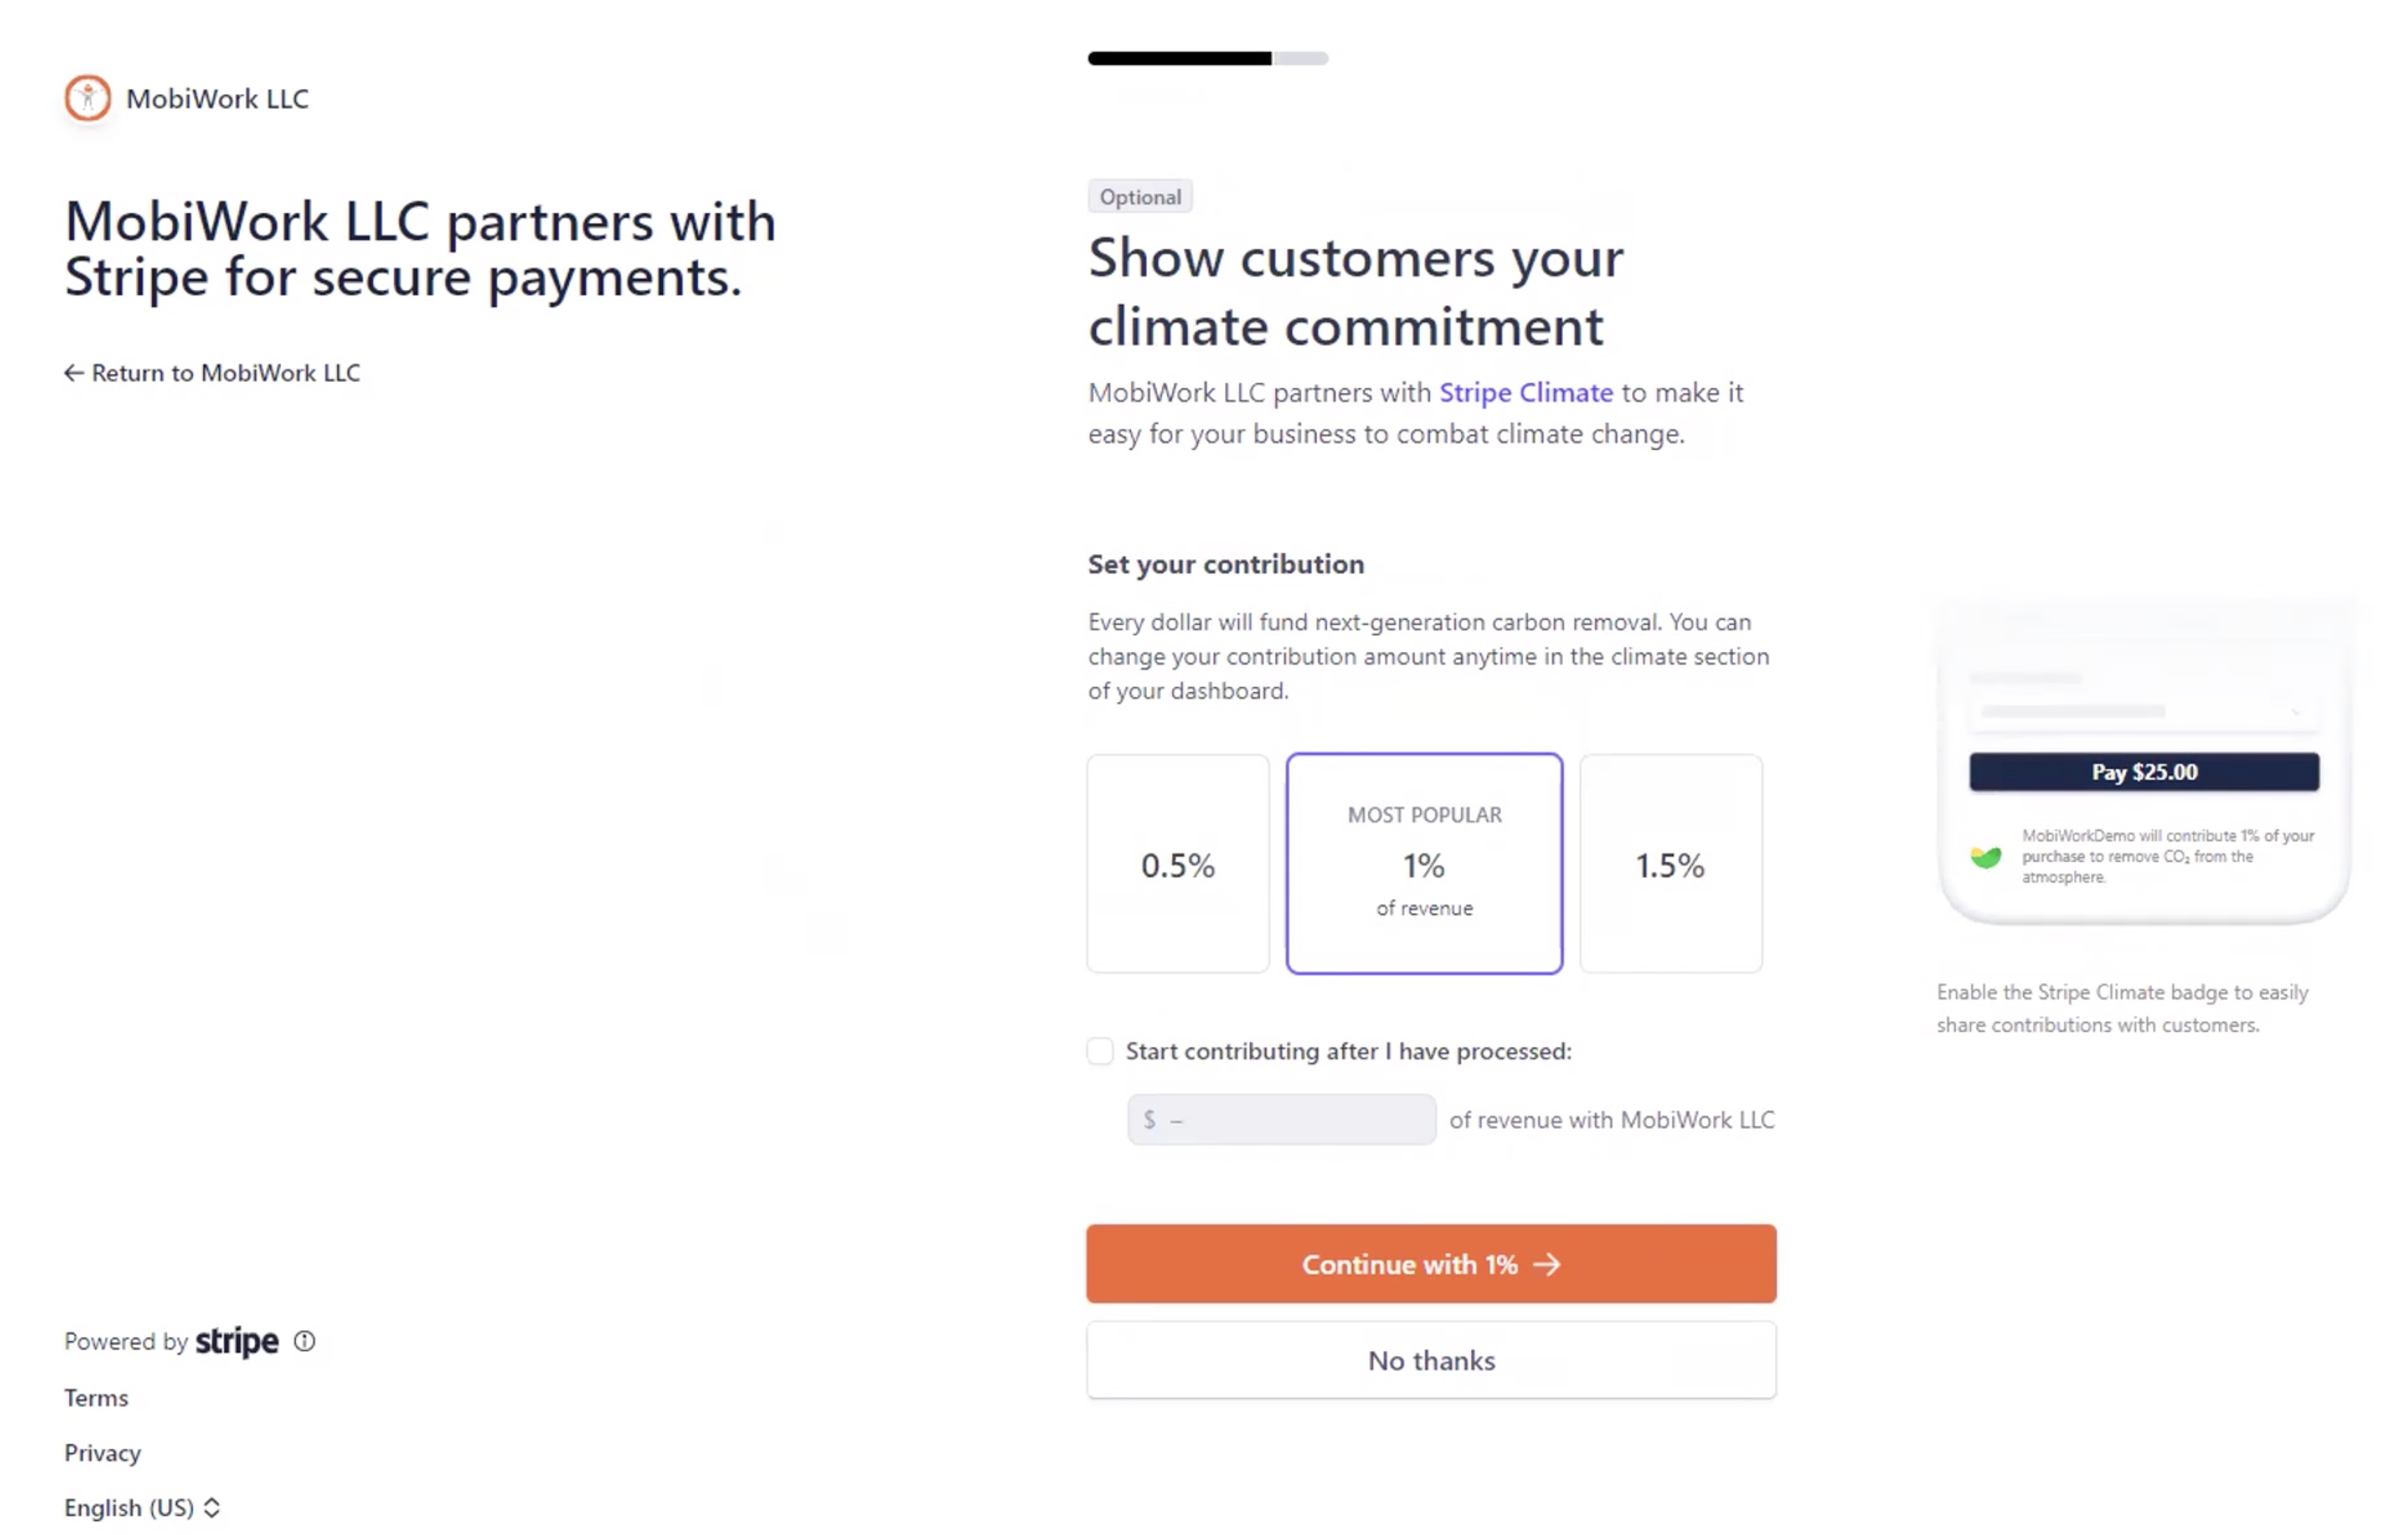
Once you finish adding your company's public details, you will be redirected to the Show Customers Your Climate Commitment page. On this page you can input a contribution percentage to help with carbon removal; please note that this contribution is optional. Depending on your choice, you can click on either the Continue with 1% button or the No Thanks button:
Regardless, of your decision you will be redirected to the Review and Finish Up page. On this page, look over the information entered to ensure its accuracy. If the information needs to be updated, click on the Pencil icon in the top right-corner of the respective box:
If the information is correct, click on the Agree and Submit button:
Once you click on the Agree and Submit button, you will then be redirected back to the MobiWork page. When you add a payment in the Add Payment pop-up window, you will now see the "Type" drop-down include the "Credit Card" option, thus signifying that the connector was properly added.
Step 1: Registering First-Time Login Information
Step 2: Enter Your Business Information

Step 3: Enter Your Personal Data
Step 4: Input Your Financial Information
Step 5: Add Company Public Details
Step 6: Climate Pledge and Review Saved Data

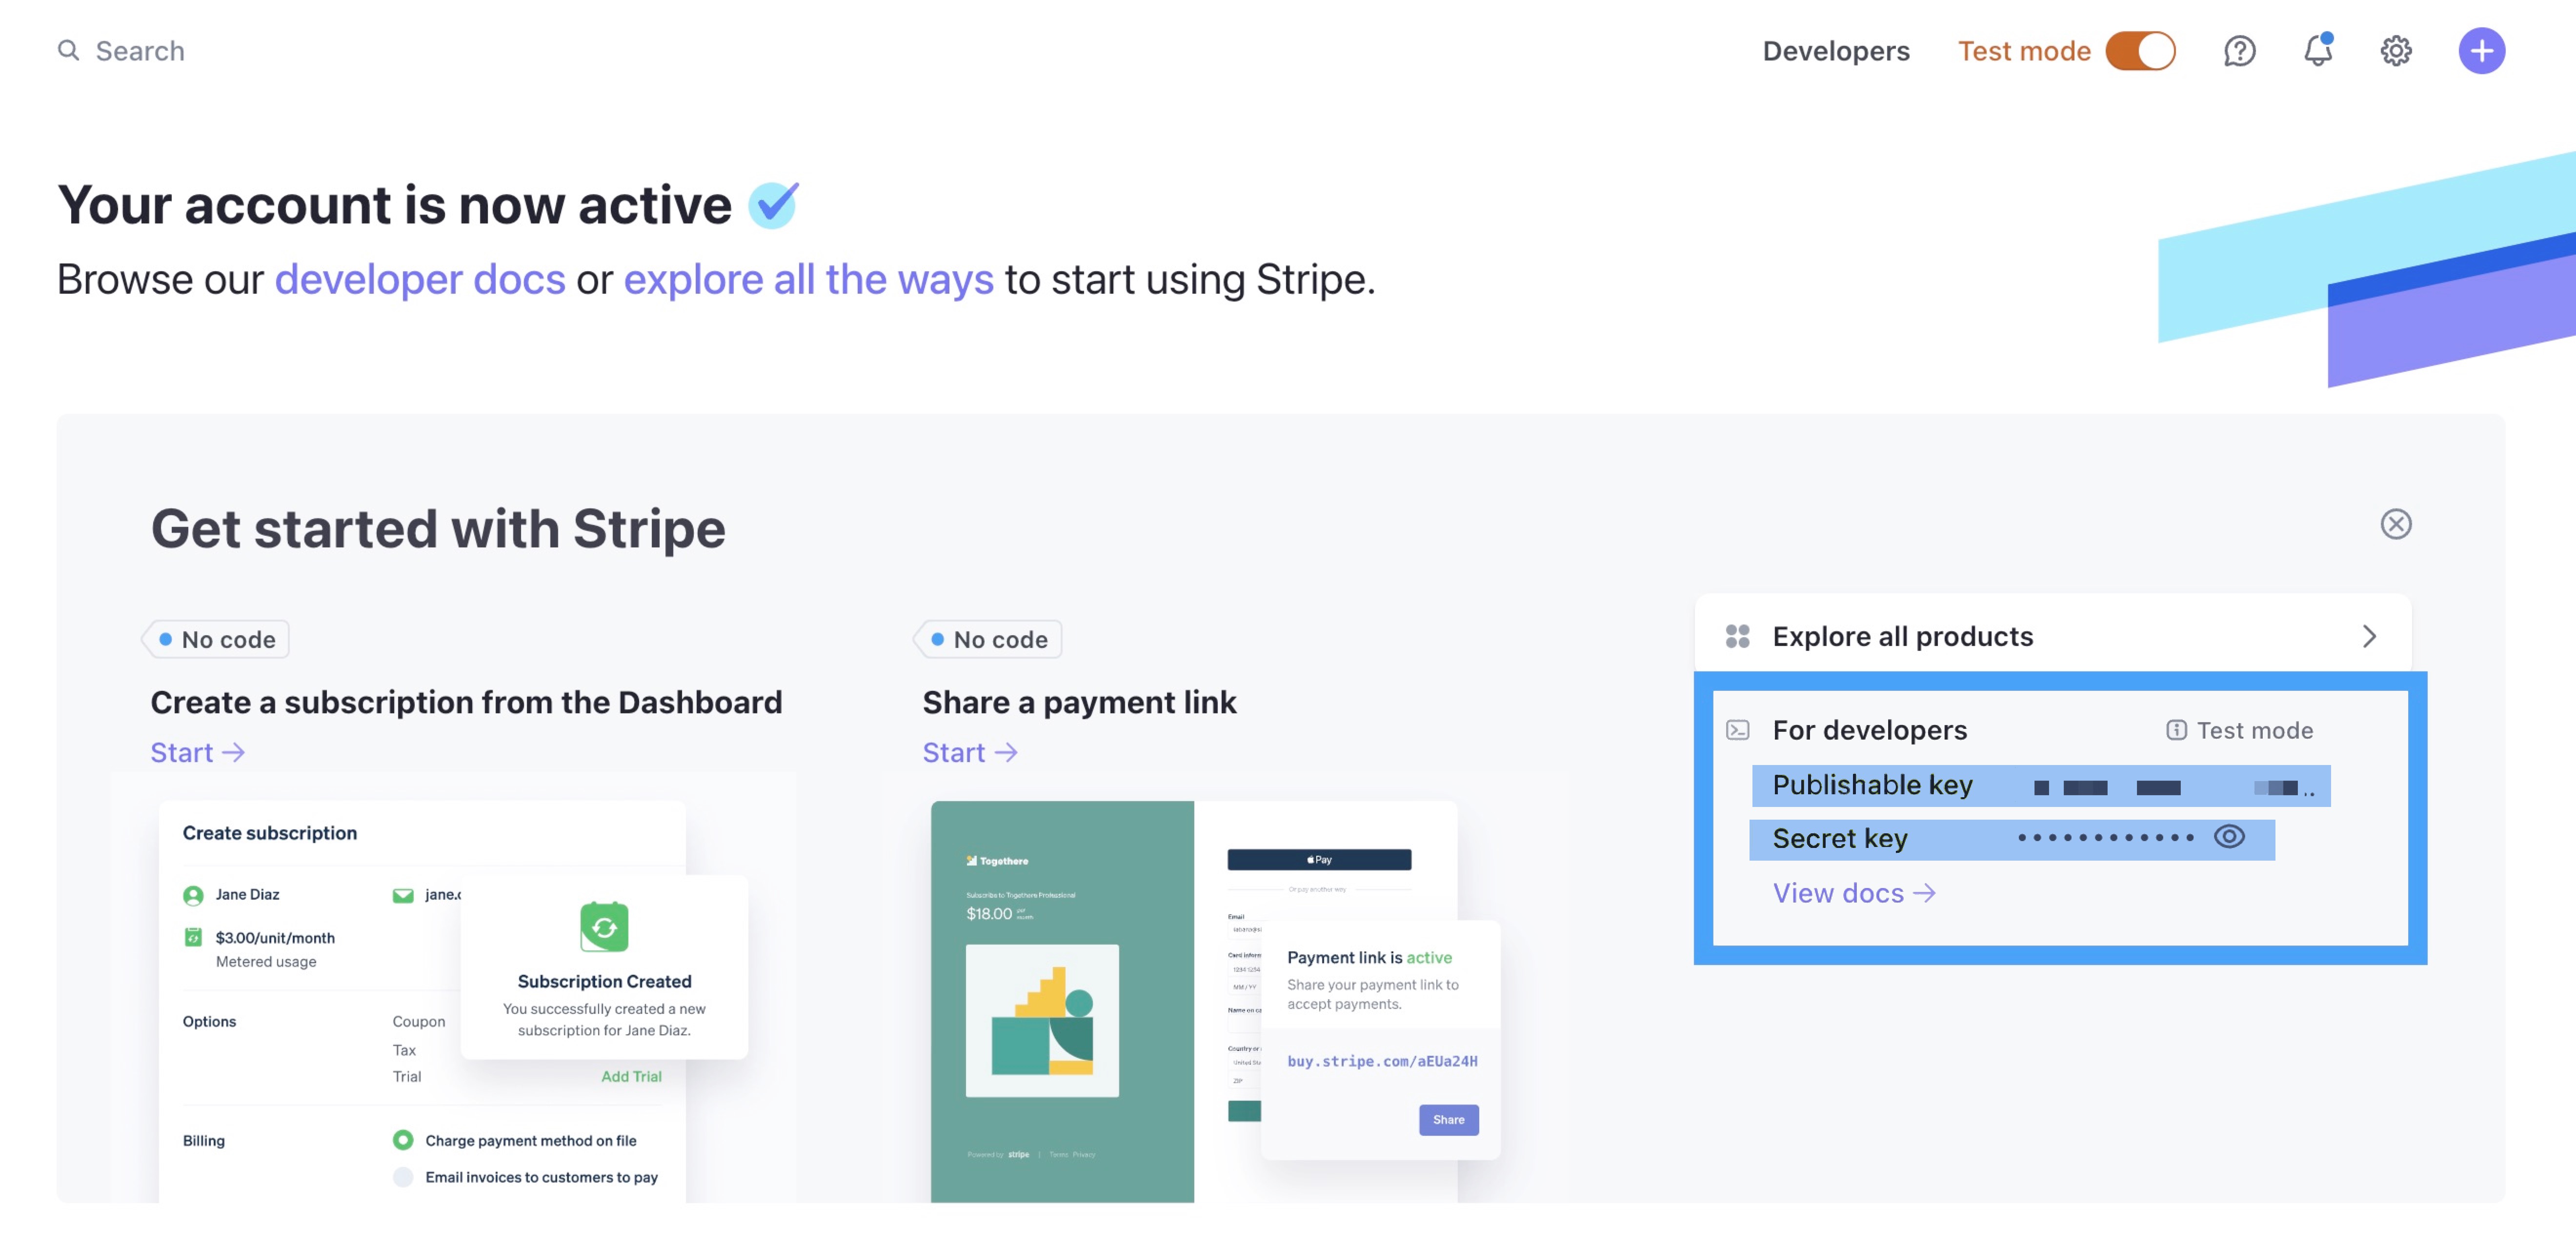
Step 7: Input the Stripe Keys into MobiWork
While you are on the "Connectors" tab and click on the View icon to view the Stripe Settings page:
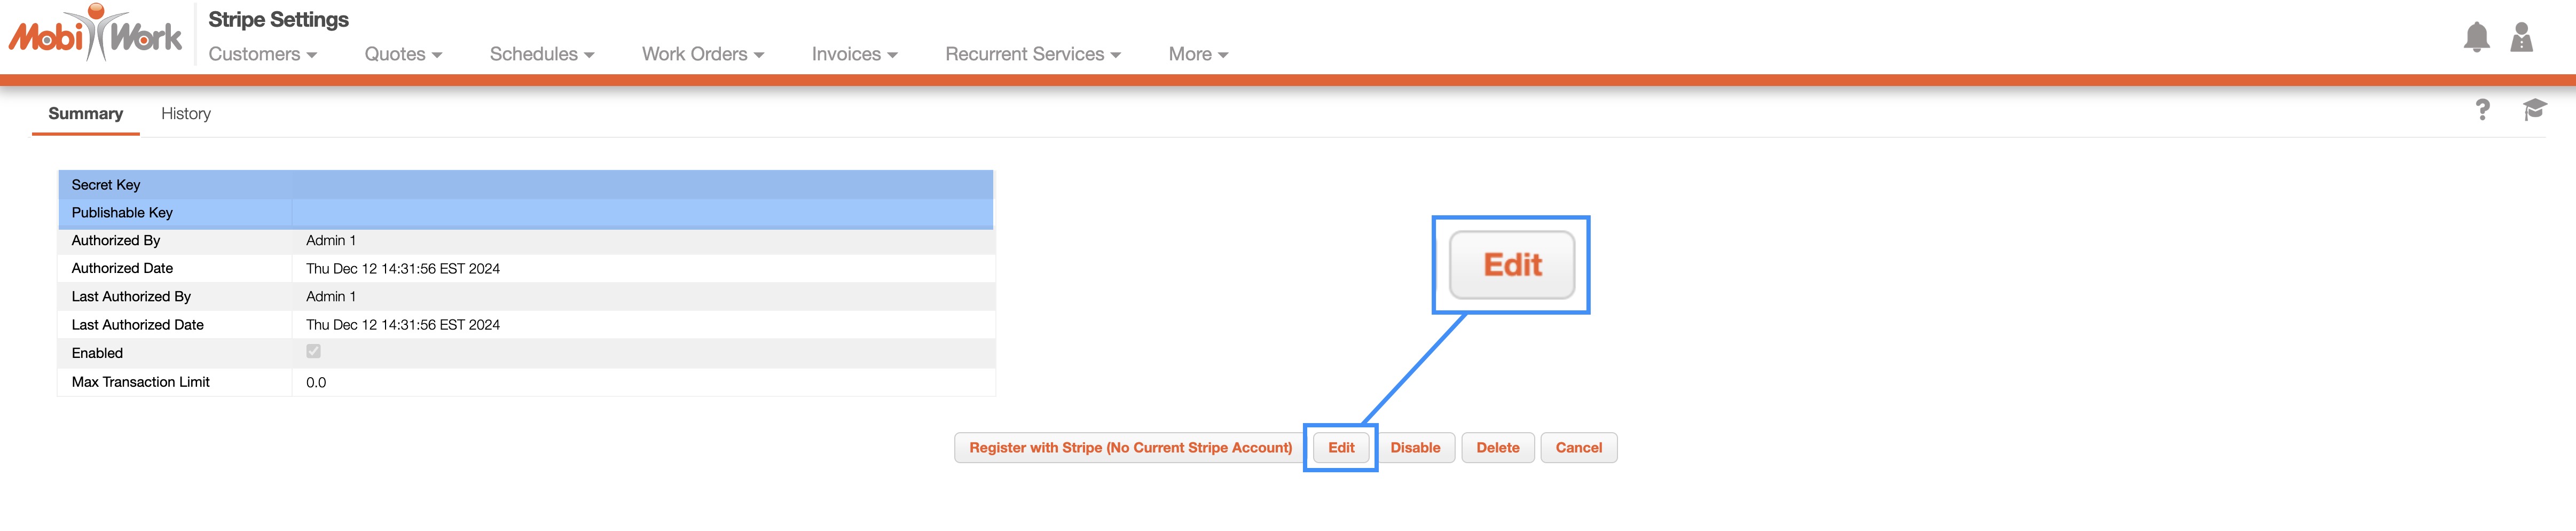
If the "Secret Key" and "Publishable Key" fields display asterisks (*), it indicates that your keys have already been entered. If these fields are without asterisks, you will need to input the keys. In the case of the latter, click the Edit button to access the Stripe Payments Settings pop-up window:
Once you are on the Stripe Payments Settings pop-up window appears, input the secret key and publishable key into the corresponding fields:
You can find your keys directly from your Stripe account under the "For Developers" section. Please note that the secret key is one-time use only. If you require another secret key, then Stripe will need to give you another secret key:
Once you have added the Stripe Connector, you will be able to choose the "Credit Card" option from the "Type" drop-down when adding a payment.
By selecting this option in the Add Payment pop-up window, you will either see:
Blank fields for the credit card number, zip code, etc., where you can input the information associated with the credit card:
If you have previously used a credit card for the customer's account, you can opt to select from the list of previously used cards, each displaying the card type, last four digits, and expiration date. Alternatively, you can choose to use a new credit card by selecting the "Use Another Payment Method" option:
After you have indicated which credit card you would like to use, input the payment amount. Once you are satisfied with the data entered, click the Add button to complete the transaction. By default, once the payment is processed your customer will receive a receipt. You can navigate to this page for more information, Receipts and paid invoices. Please note that this is third-party page, and MobiWork is not responsible for the content that appears on this page.
Note: Please ensure that your customer has an email associated with their profile. If there is no email address connected with the customer, then you will be unable to process the credit card. If your customer lacks an email, please enter a dummy email address into their profile (e.g., noreply@business.com).
Please be aware that selecting the credit card option when adding a payment, even without processing the payment, registers as an "intent" in Stripe and is recorded in Stripe's logs. We recommend using the Stripe dashboard to verify that payments have successfully processed. While MobiWork may display a "Paid" status, only the Stripe dashboard provides a complete record of all transactions, including successful and failed payments.
Note: Please note that the processed credit card information will automatically be stored in Stripe's secure vault, and not on MobiWork's servers.
ACH Payments
Once you have set up ACH payments in Stripe, you simply need to input the customer's bank account details.
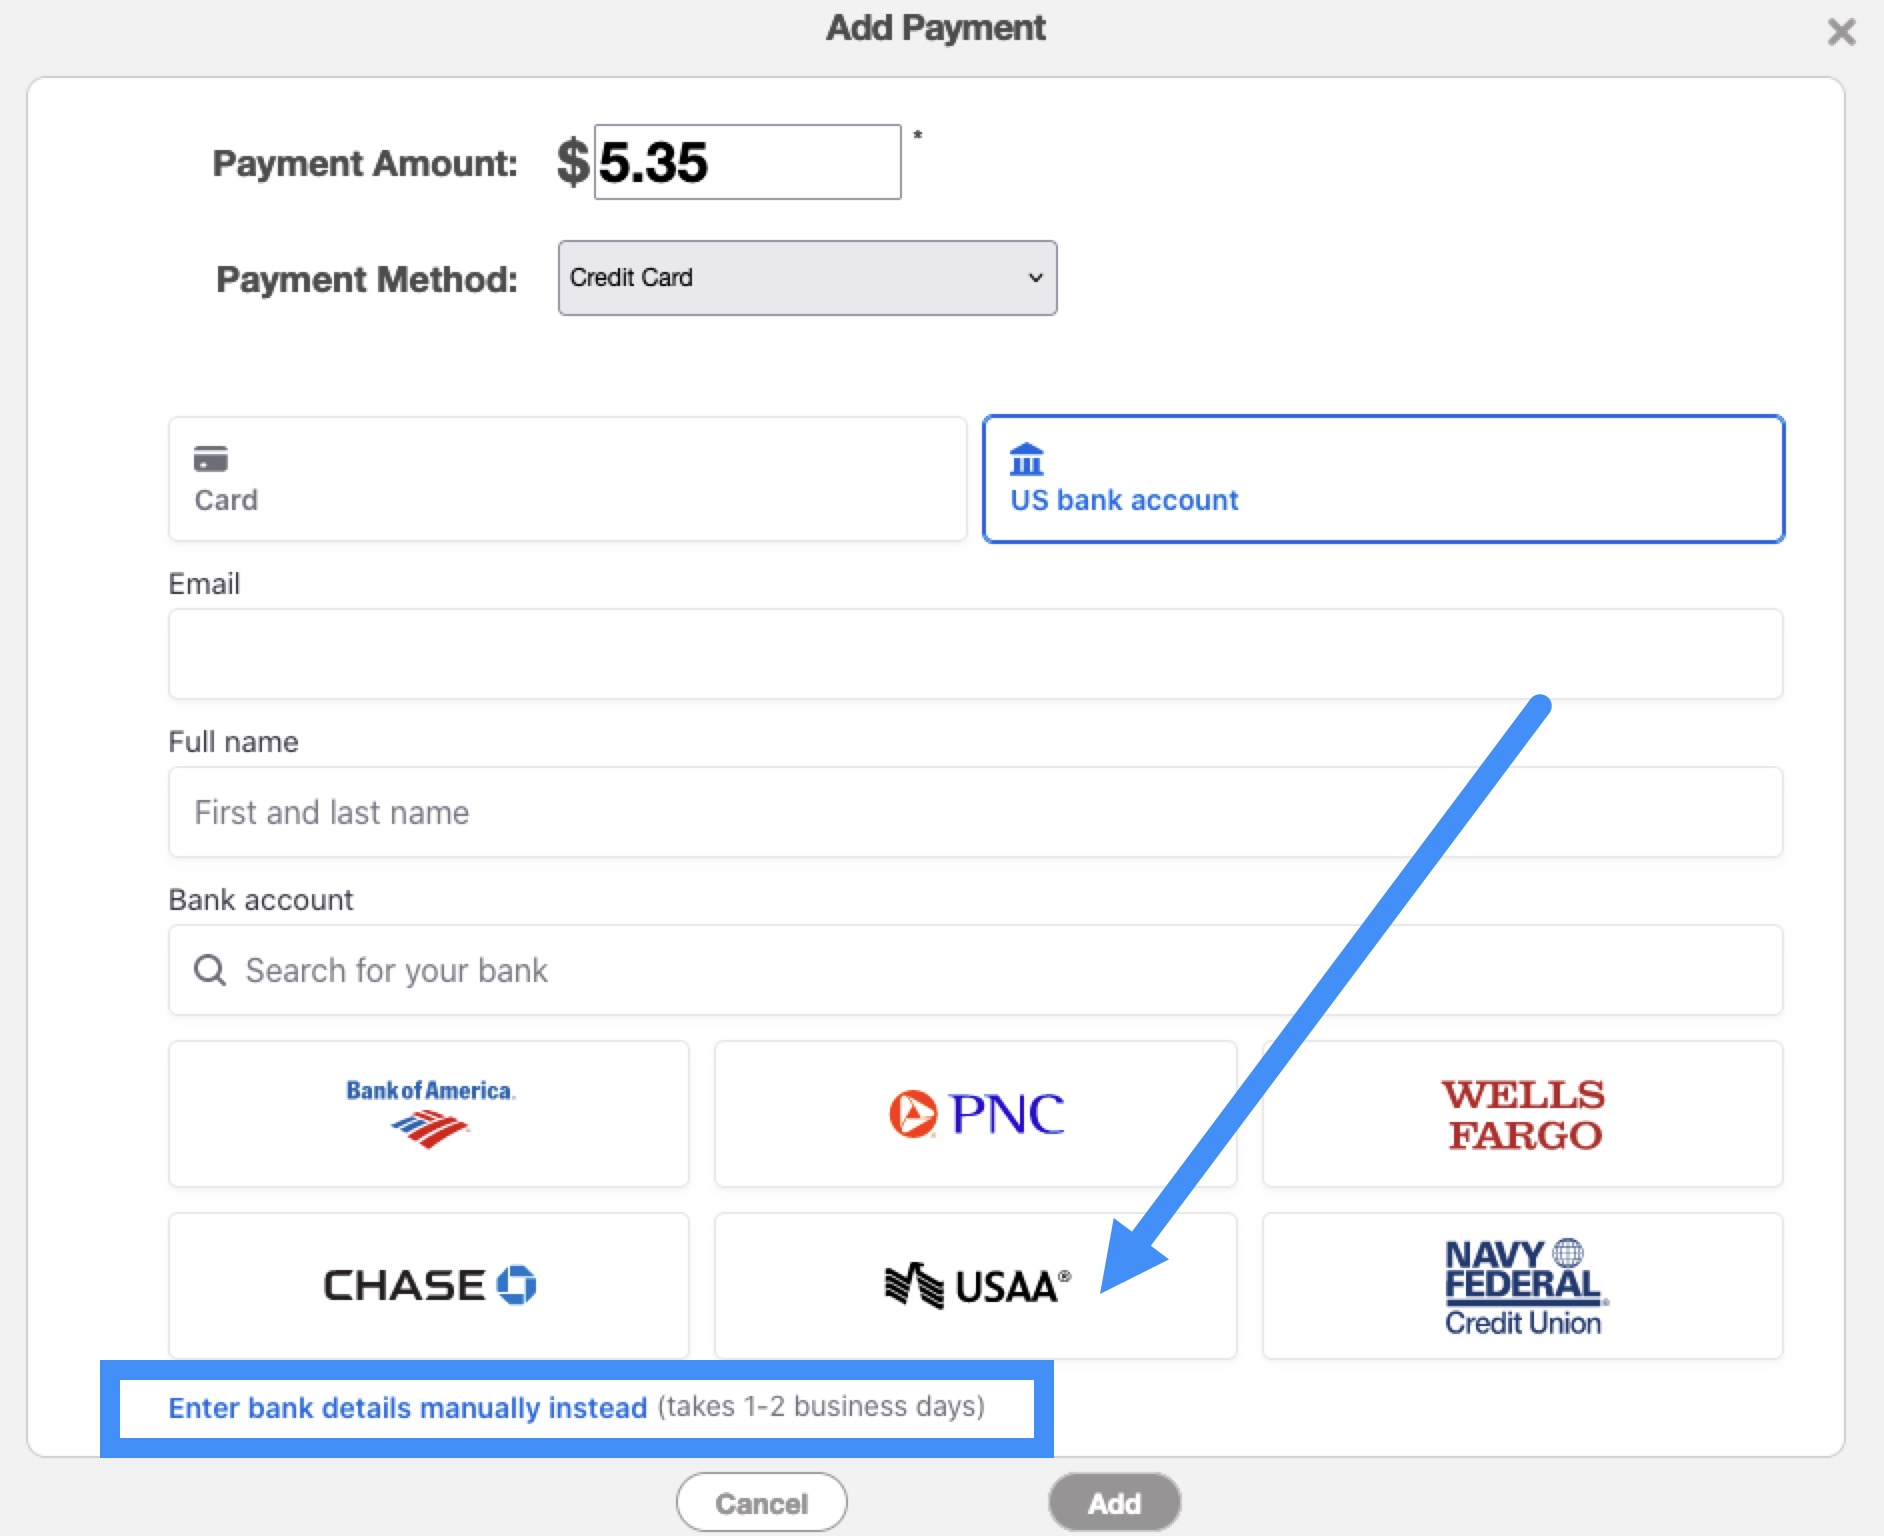
To add the ACH information for the customer, begin by accessing the Add Payment pop-up window:
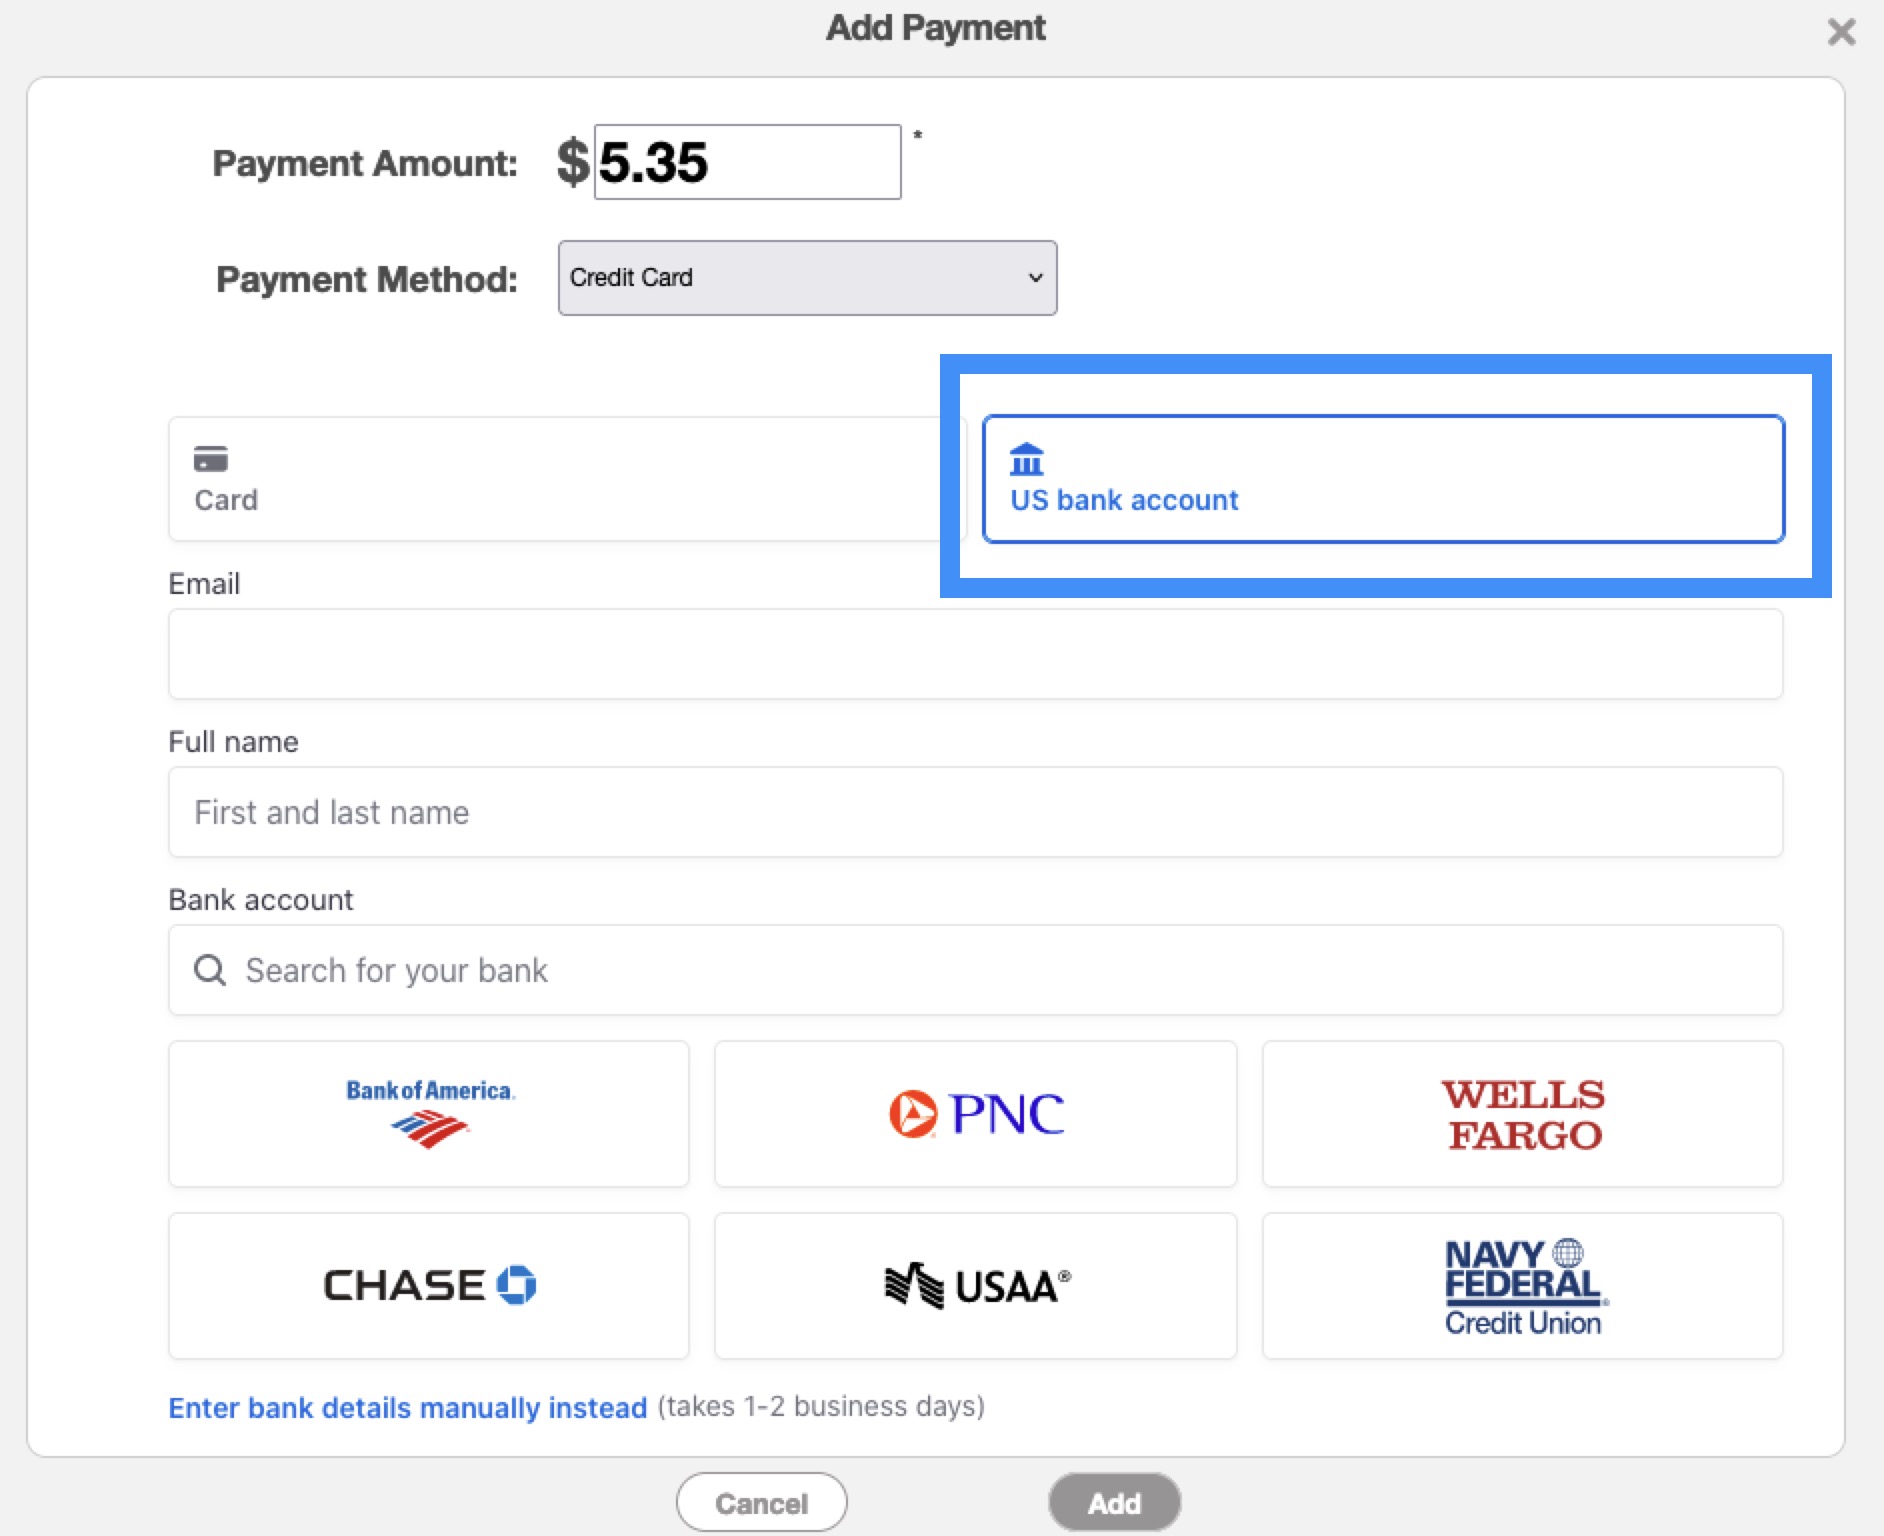
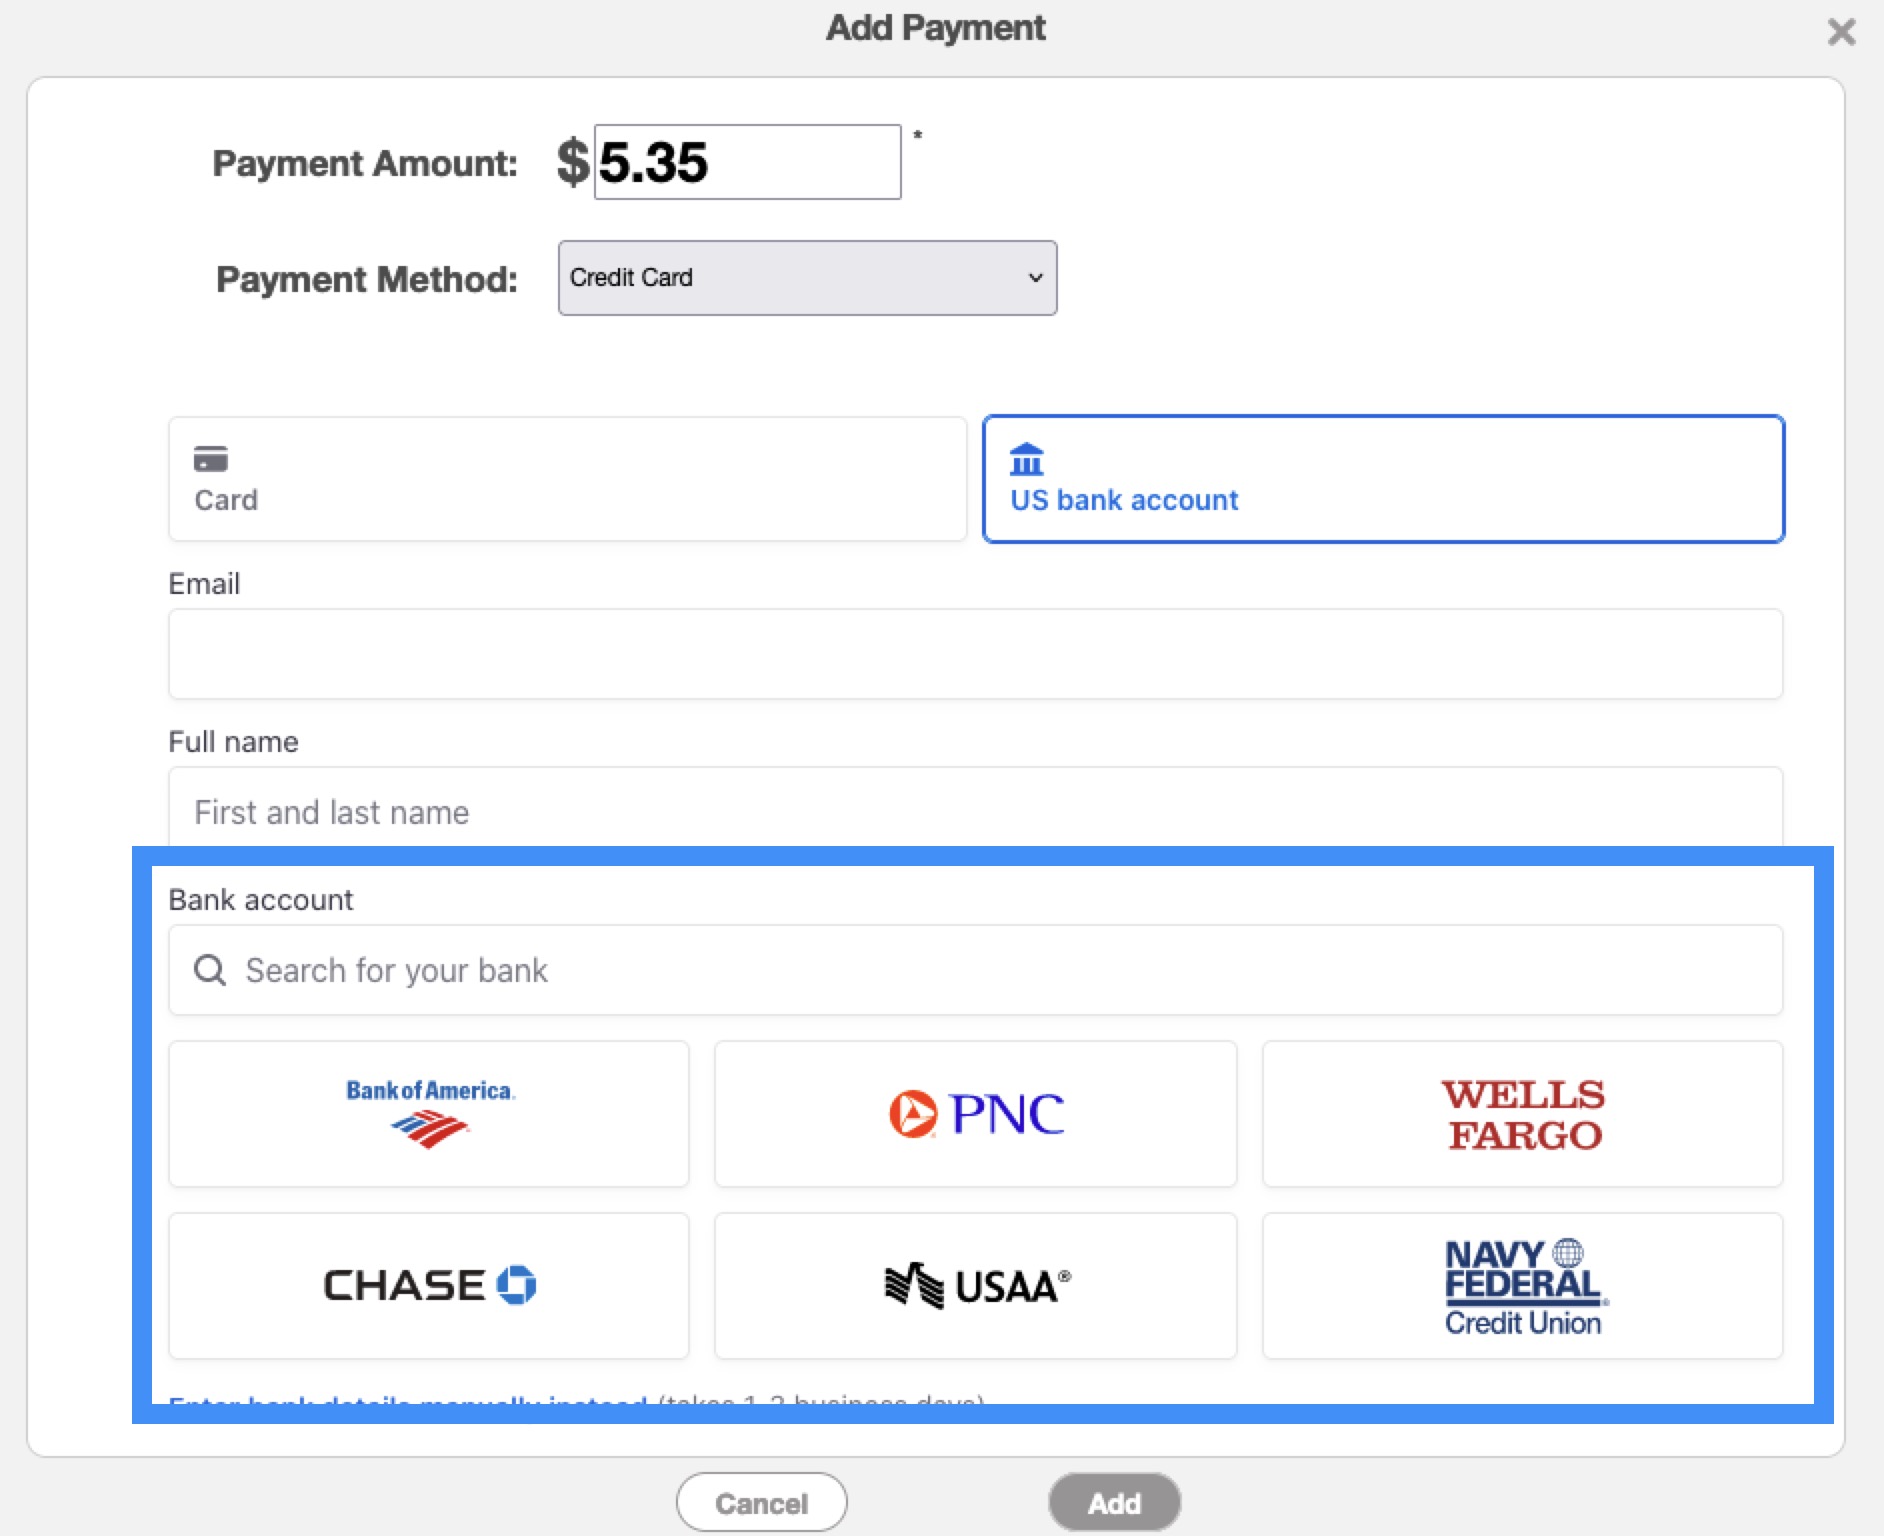
From there, select the US Bank Account icon and proceed to enter the following information:
Input the customer's email address.
Enter the customer's first and last name.
Once this contact information is provided, you have two options for registering the bank information:
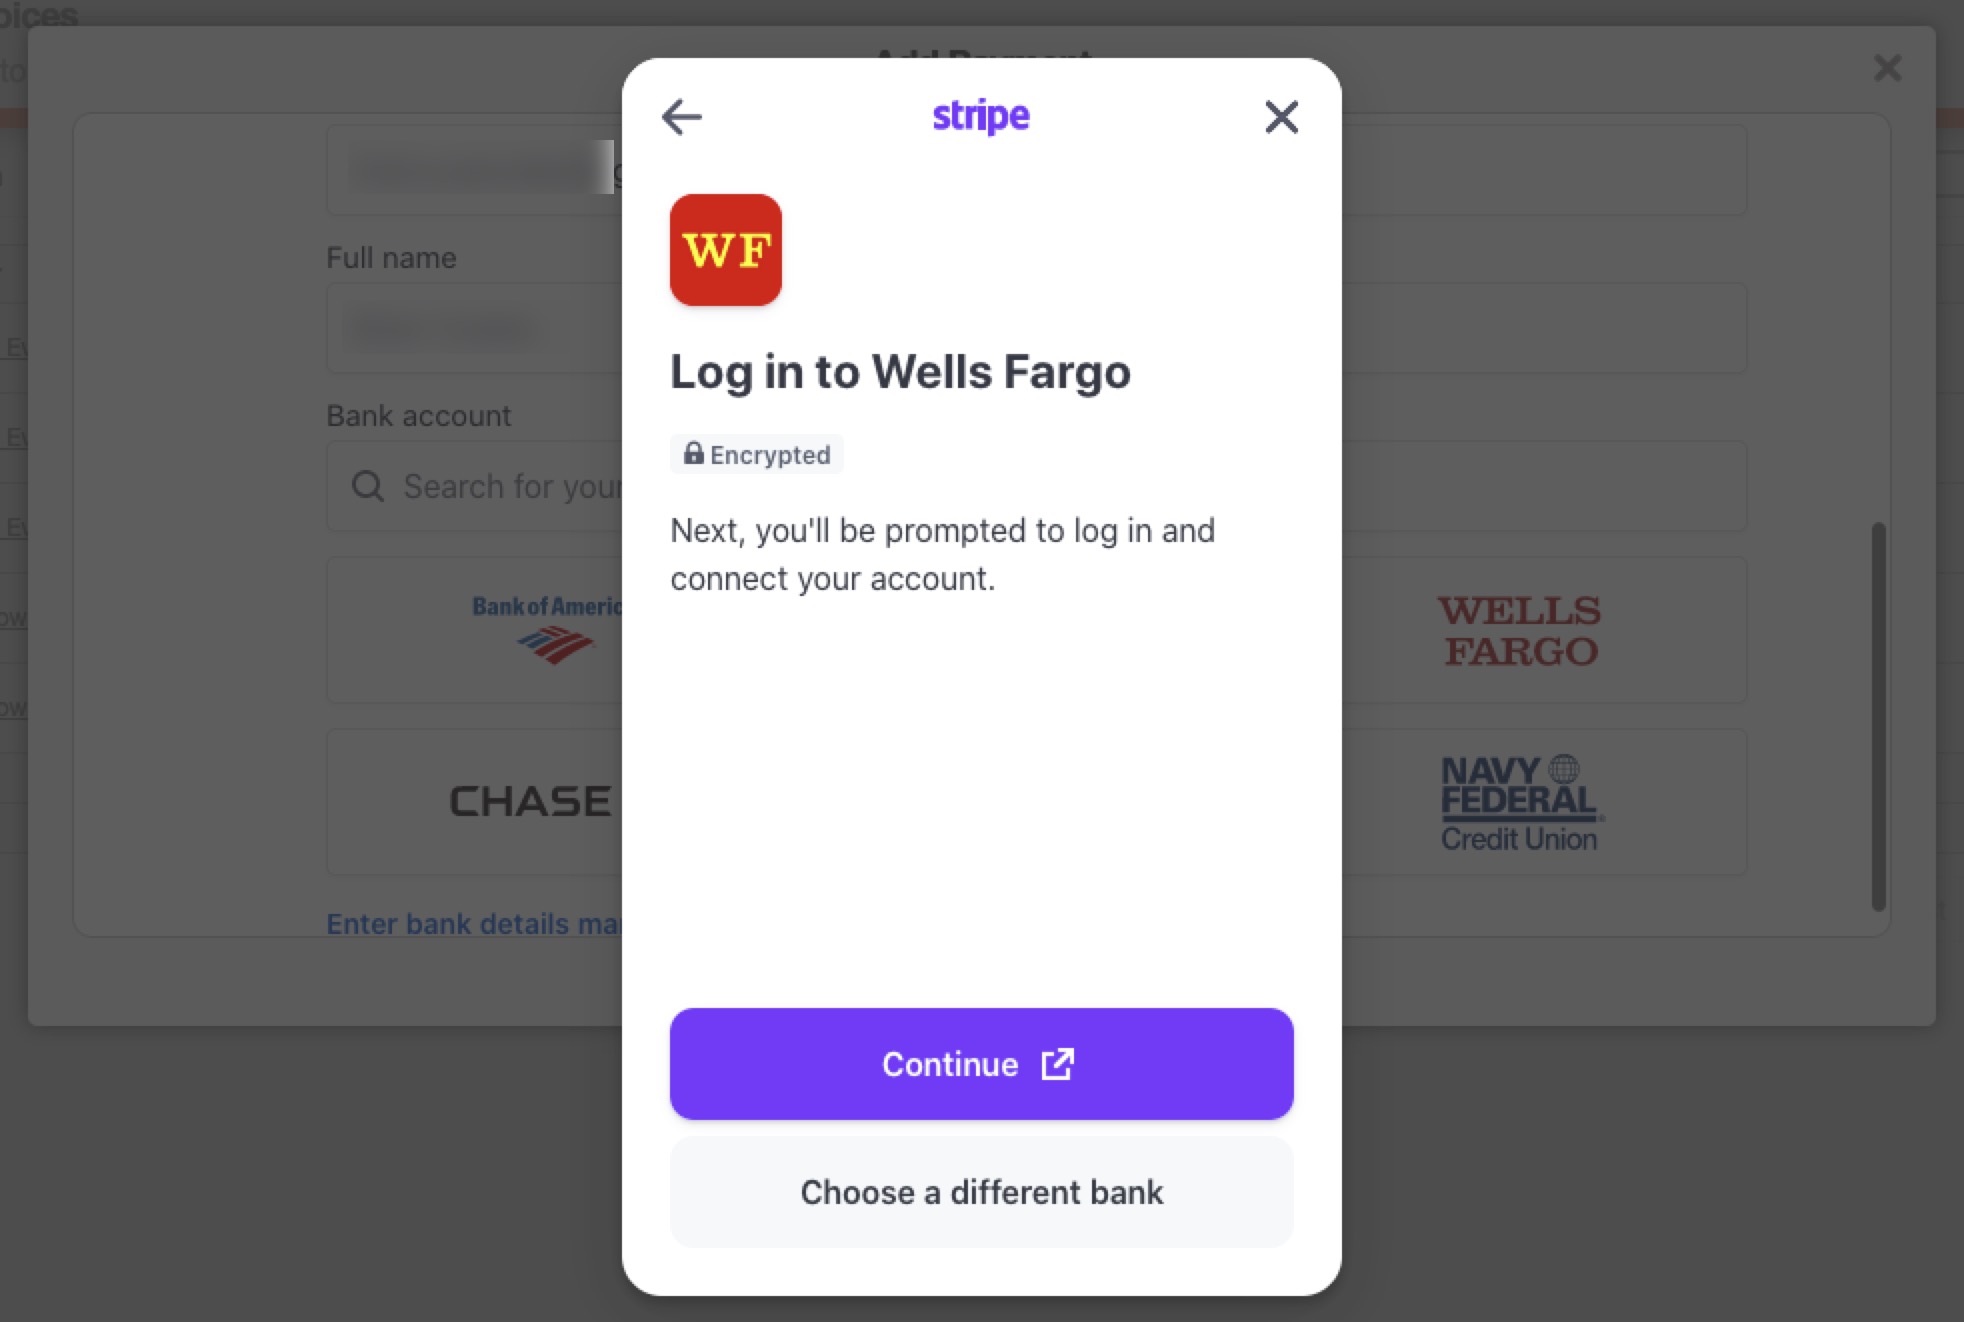
You can search for the required bank, either by using the search bar or selecting the bank from the provided list. This method will require you to log in with the customer's bank username and password:
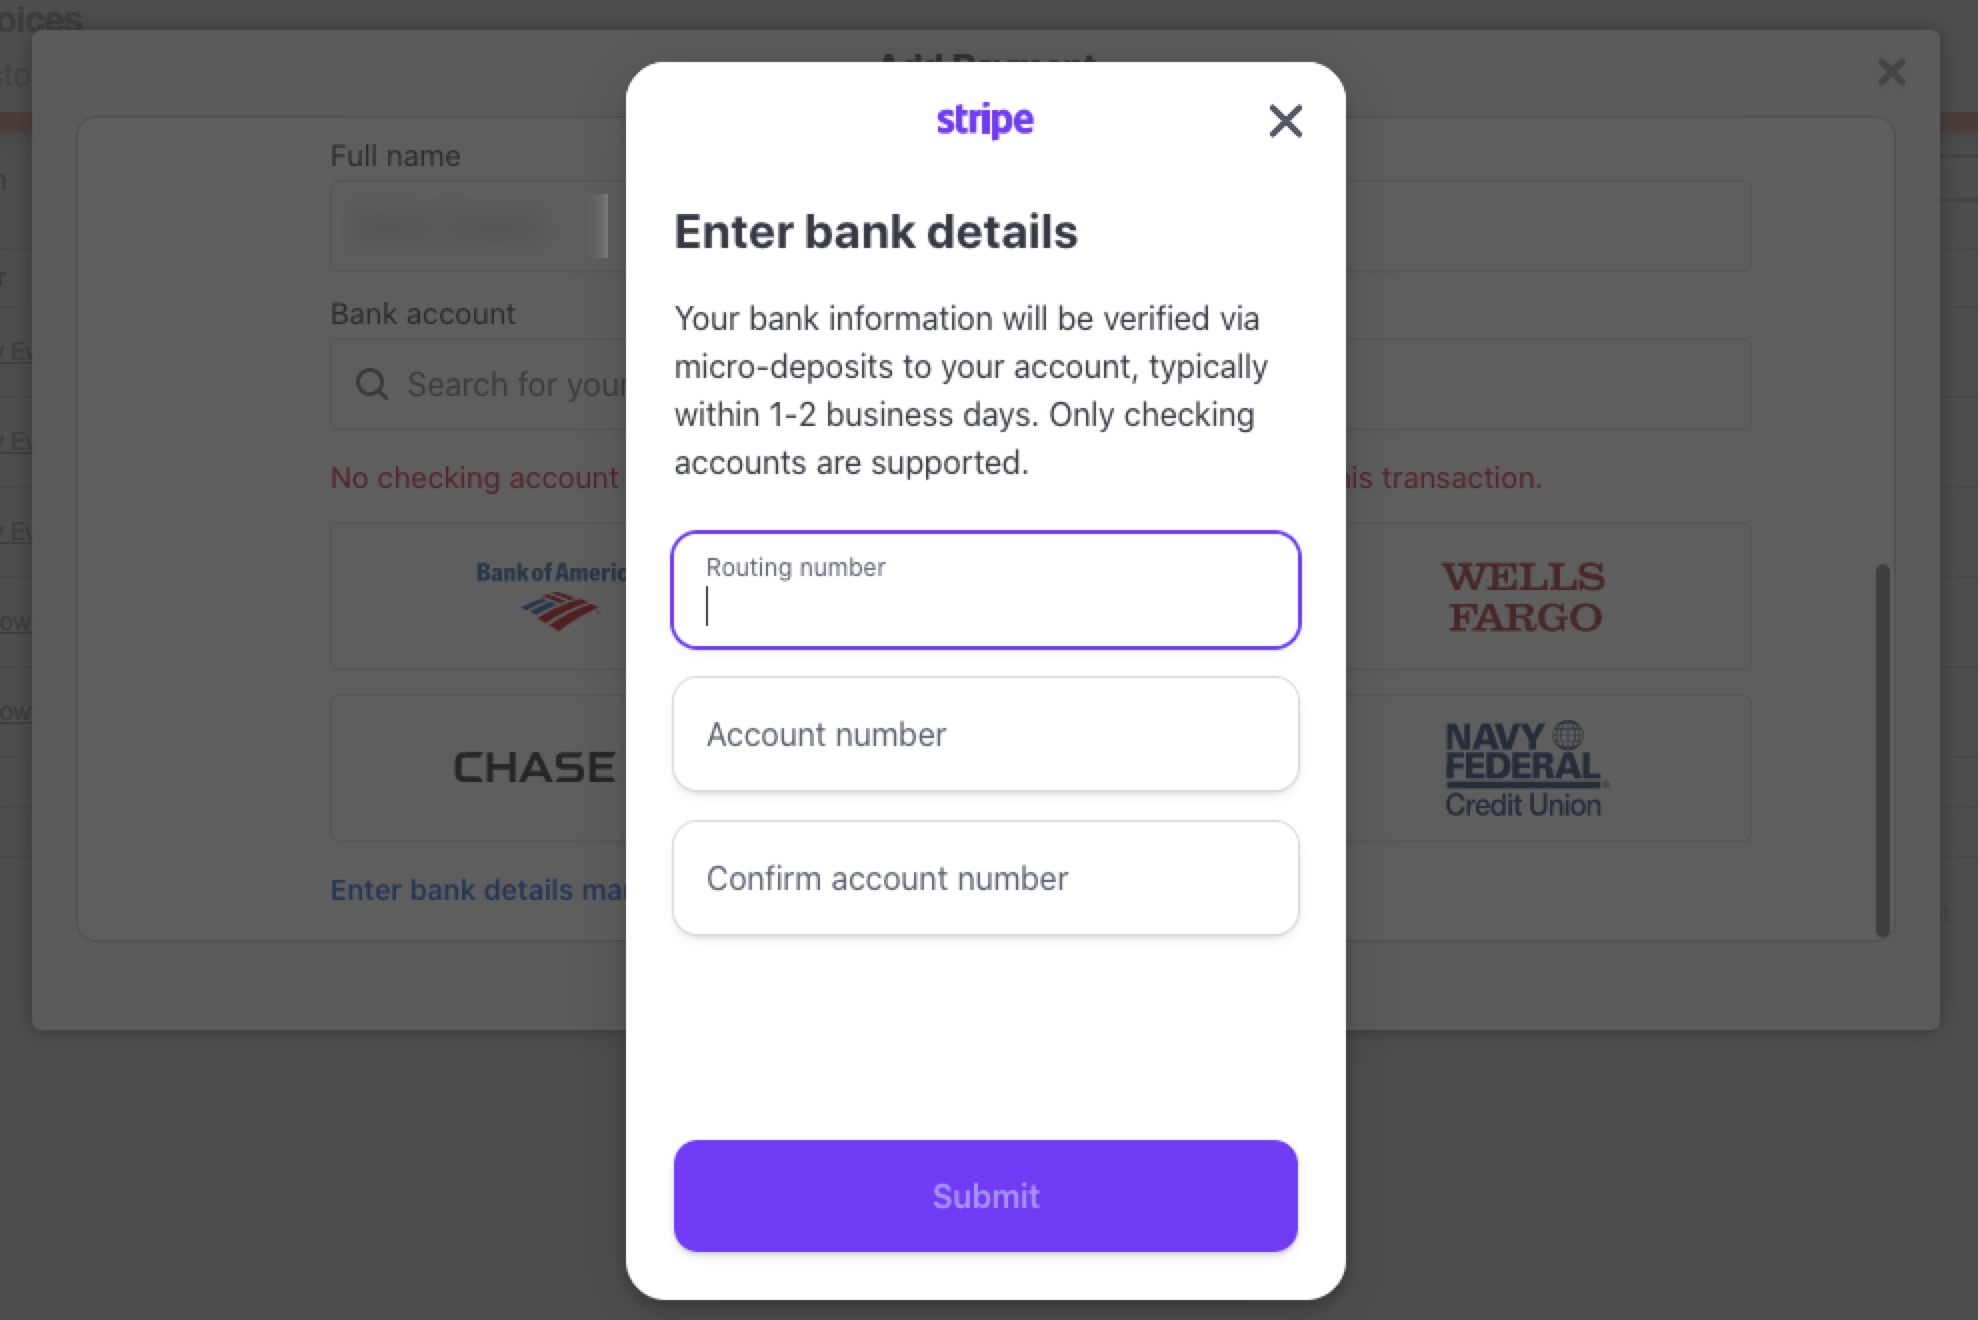
Alternatively, you can manually enter the routing and account numbers. Please note that this option may take a couple of business days to process:
If you prefer your customer to input their bank account information themselves, you can send them the payment link directly, allowing them to enter their data.
If you would like to process an ACH payment through Stripe, please ensure that the ACH payment option is enabled on the Stripe portal.
ACH Payment Status
ACH payments take time to process. In Stripe these payments are are labeled with the, "Requires Action" status; thus, signifying that the payment is still in progress and is not yet finalized.
Similarly, MobiWork also tracks the status. By keeping you informed of the status, you will be able to see if the payment is still processing, successfully completed, or have failed.
By accessing the payment's "History" tab you will be able to see if the ACH payment is still processing, if the payment went through, or if the payment was unsuccessful.
You have the flexibility to set a maximum transaction limit for credit card payments processed through Stripe. Transactions exceeding this set limit will automatically be processed via ACH payment. For instance, if you set the limit at $50, any payment of $51 or more will be processed as an ACH payment:
![]()
By default, the "Max Transaction Limit" field is blank, meaning there is no maximum limit imposed on either credit card transactions or ACH payments.
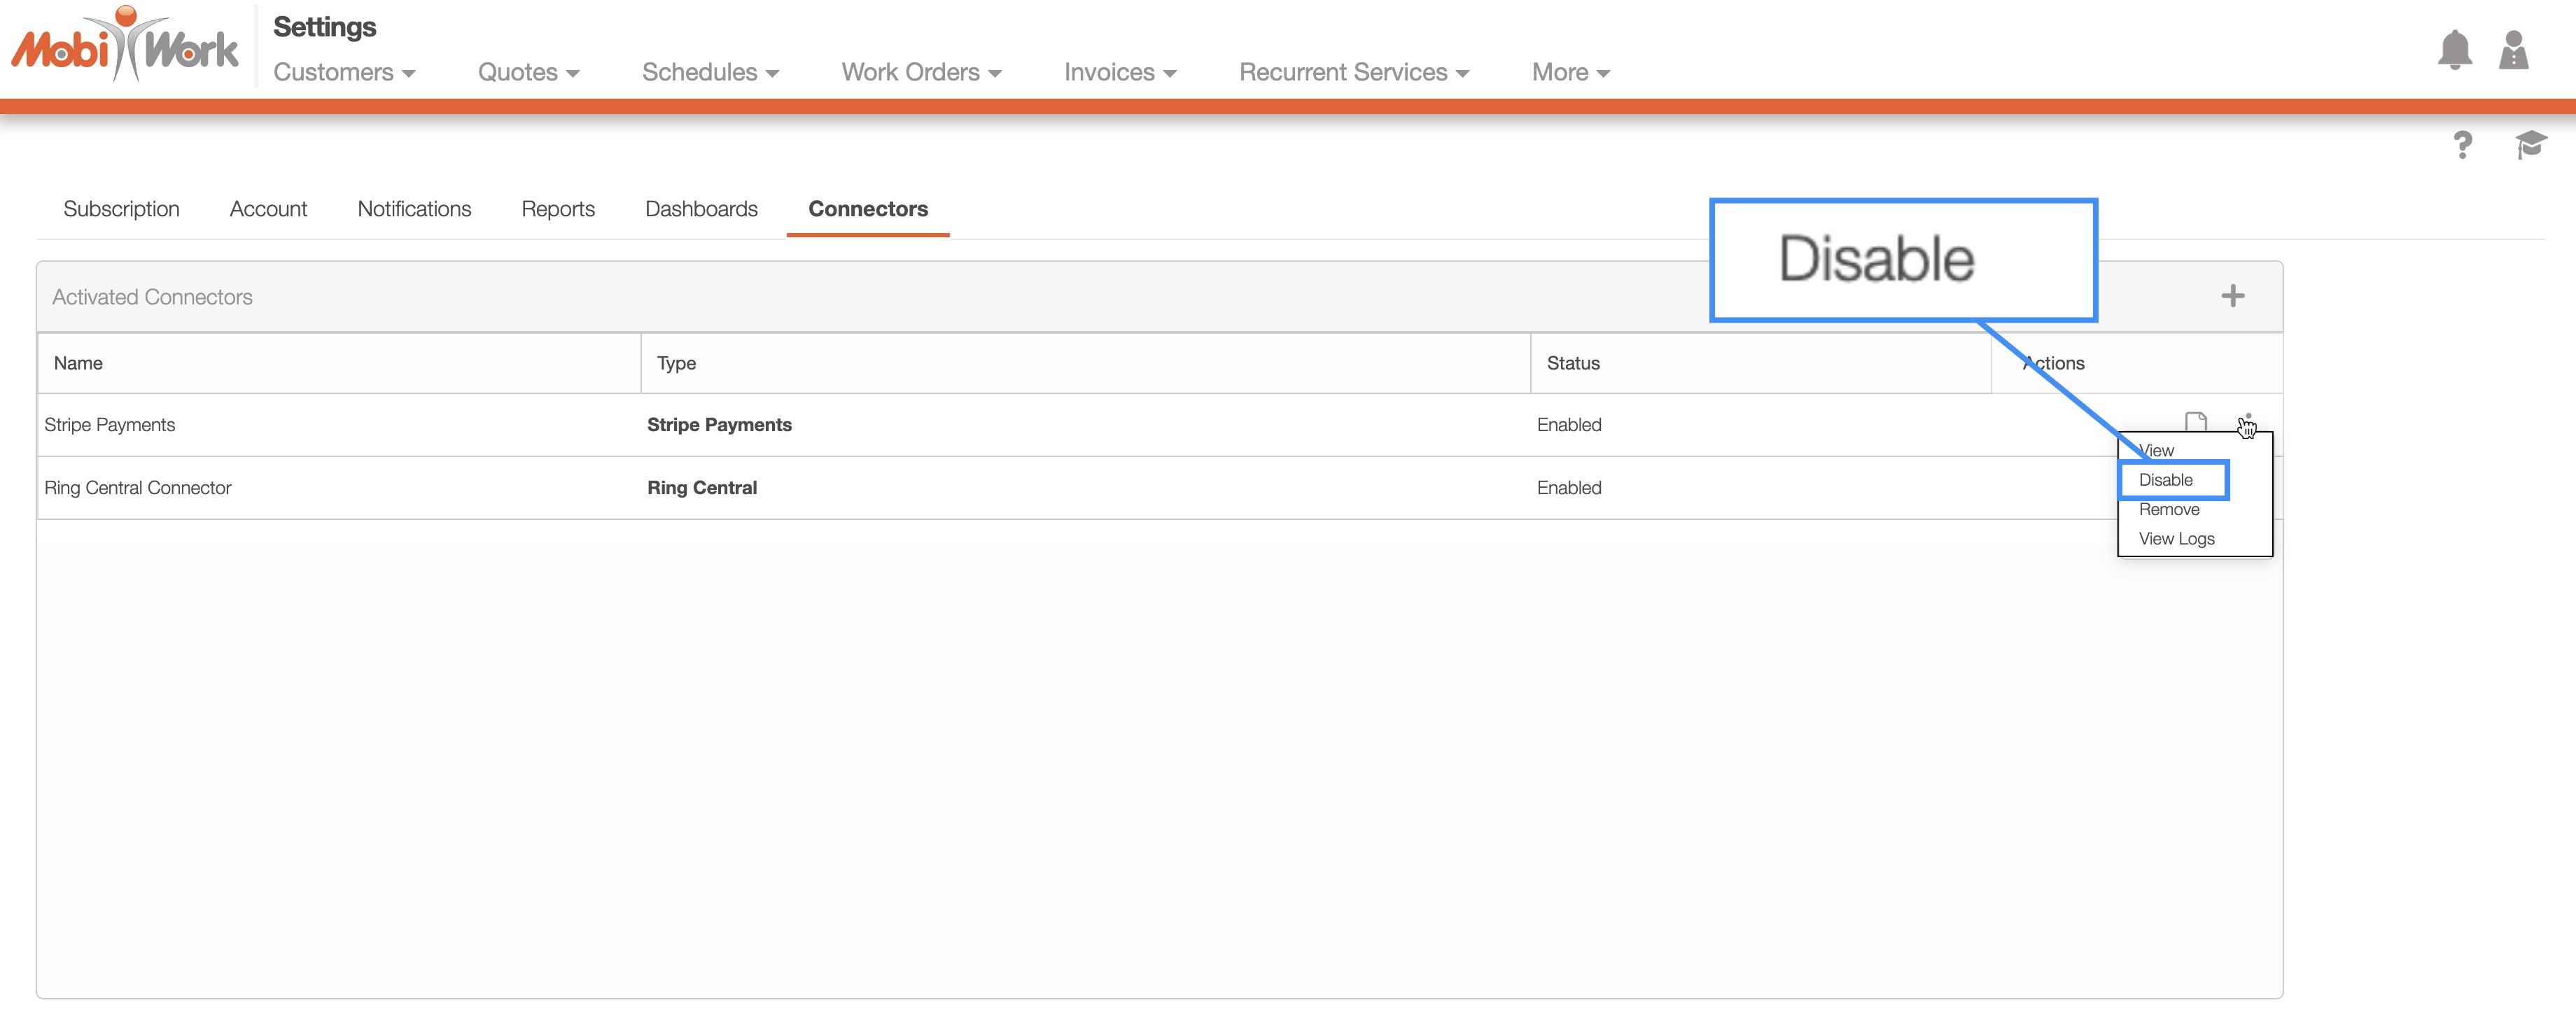
To disable the Stripe Connector, you will first need to access the "Connectors" tab from your "Account Settings." For more information on how to access this page, please see the Add the Stripe Connector subsection.
Once you are on this tab, click on the Individual Actions button for the Stripe Payments connector. From the drop-down that appears, select the "Disable" option:
This option will disable the Stripe Connector for your MobiWork account.