
The easiest way to access the View Task pop-up window is through the "List" tab. For more information on how to access the "List" tab, please see the Task List page.
Once you are on the "List" tab, there are four different ways to access the View Task pop-up window:
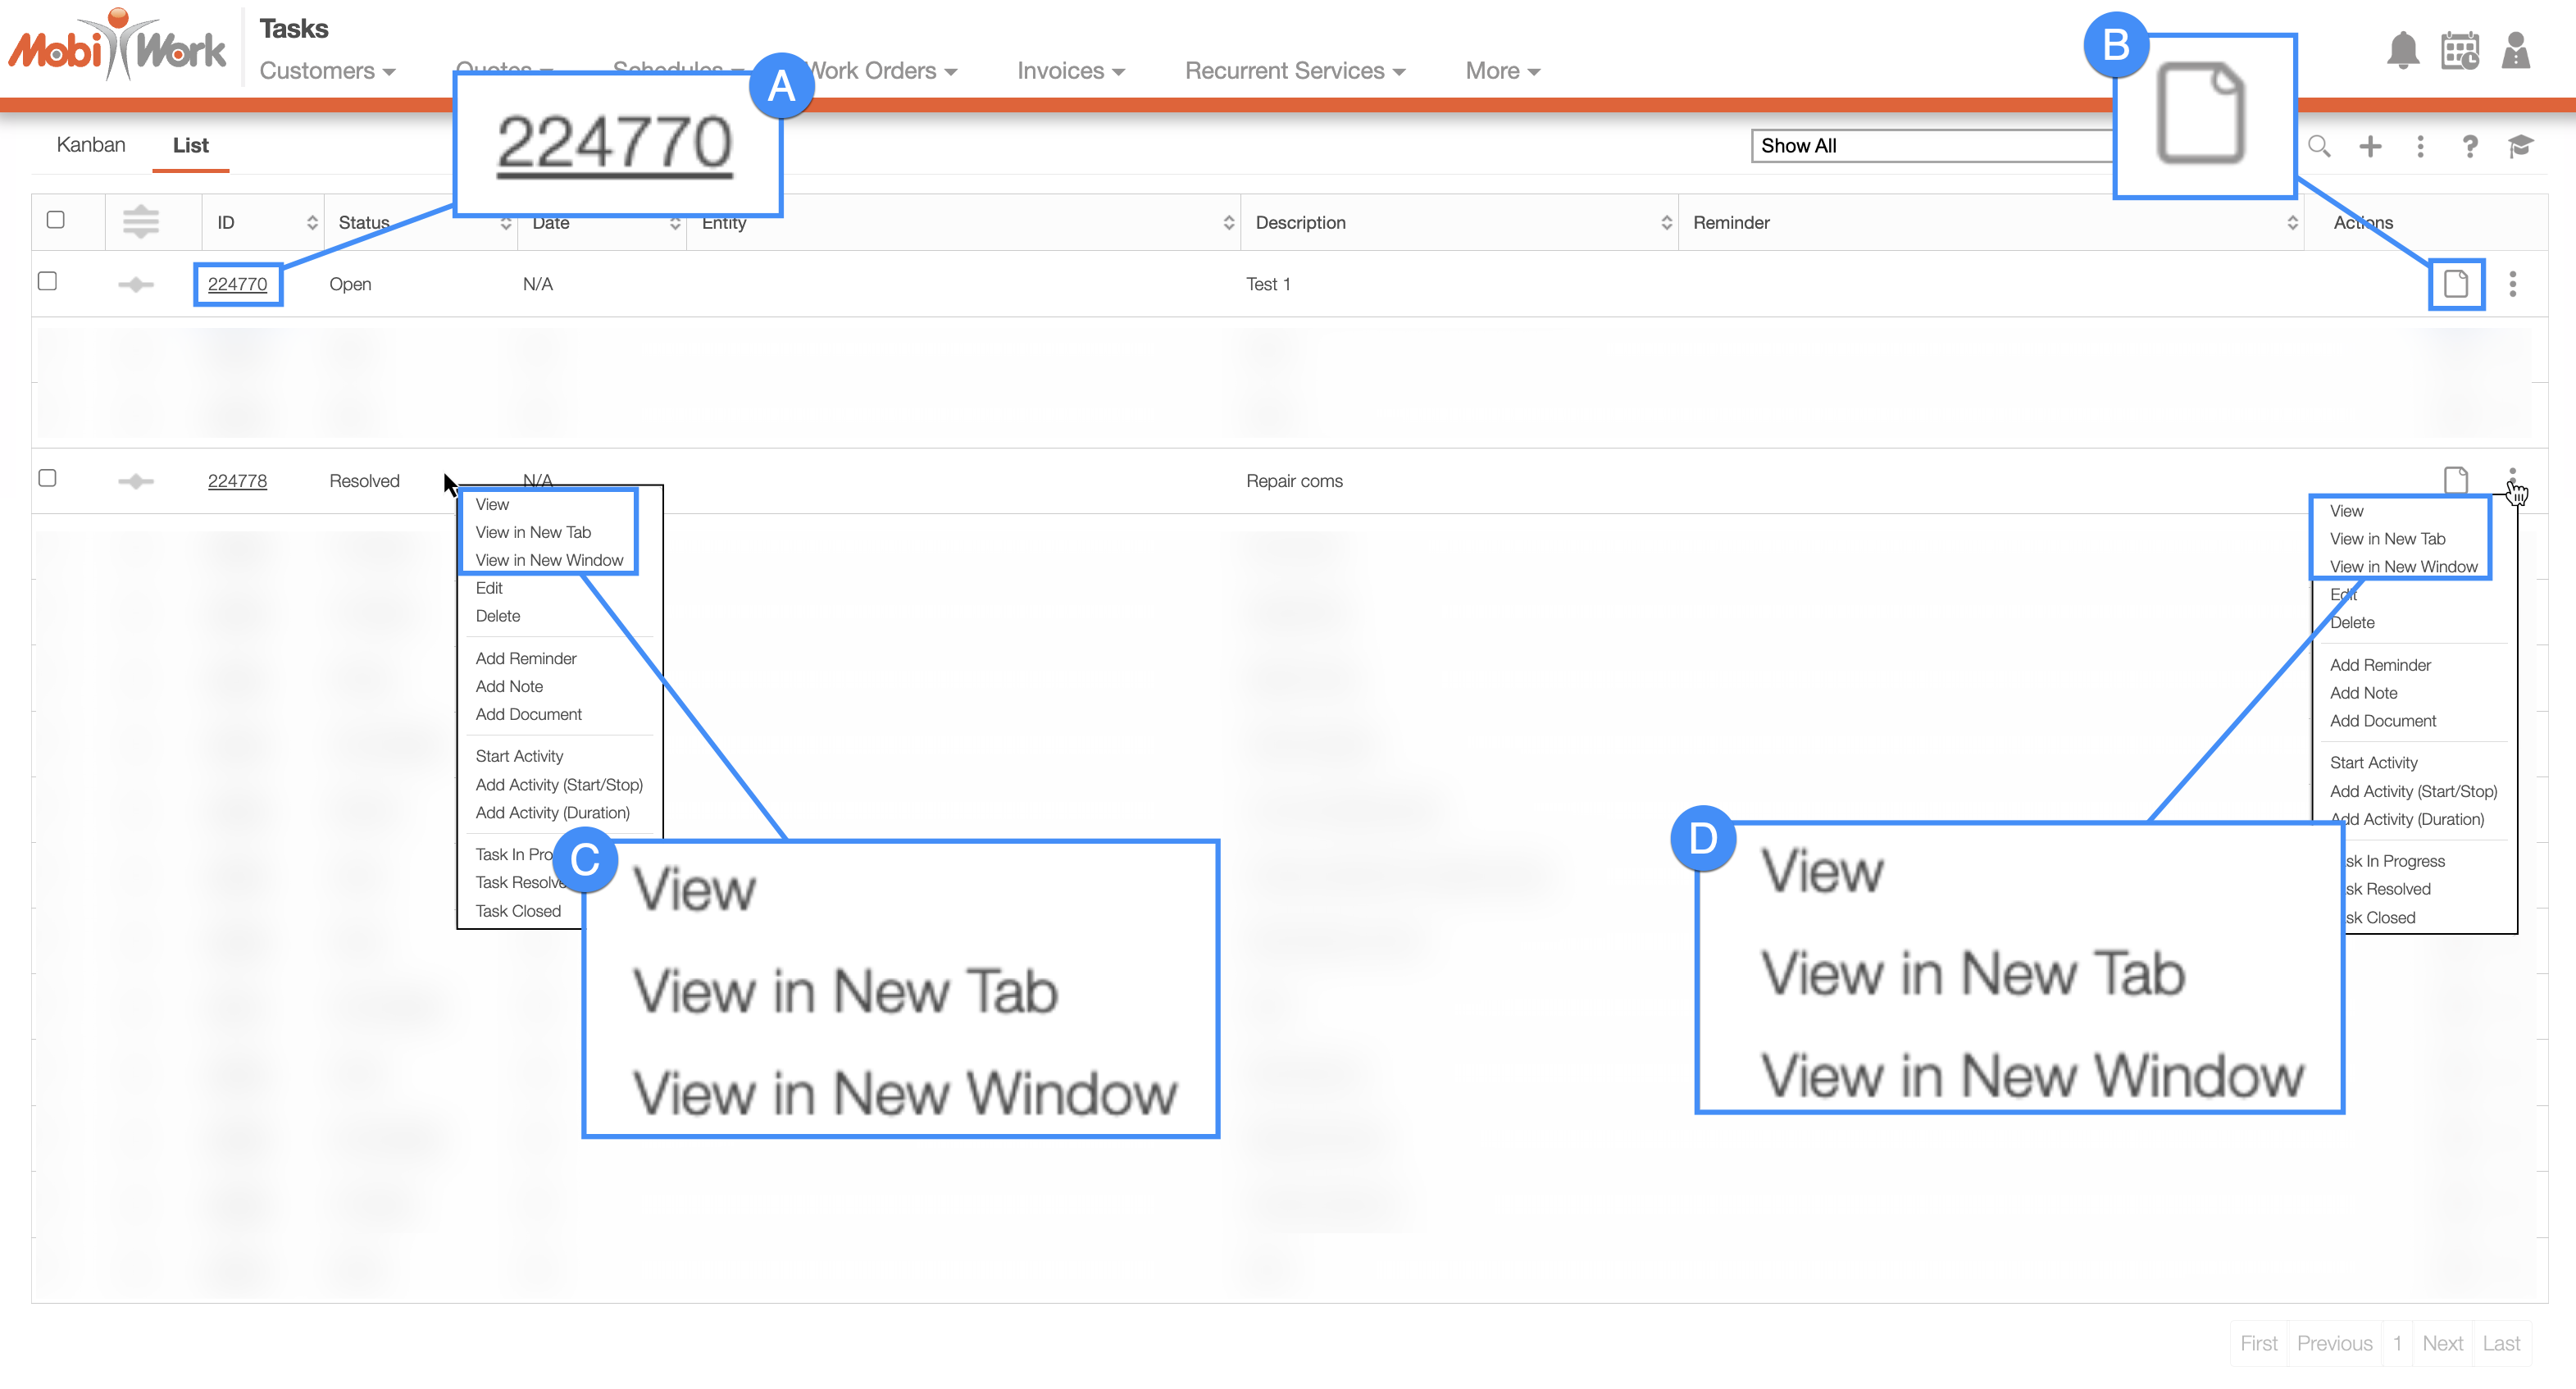
Select the desired task ID.
Select the View icon under the "Actions" column.
Right-click on the selected task and click on the "View" option from the drop-down. When you select the "View in New Tab" or the "View in New Window" options the task will open in a new tab or new window respectively.
Click on the "View" option from the Individual Actions drop-down. When you select the "View in New Tab" or the "View in New Window" options the task will open in a new tab or new window respectively.
Note: You can also access the View Task pop-up window from the "Kanban" tab on the Tasks page by clicking the desired task.
Once you open the View Task pop-up window, you will be automatically directed to the "Summary" tab:

These features are available in all four tabs and in both, the pop-up window, and the full-size view:
Please note that if you would like to easily close this pop-up window, you can click on the esc button from your keyboard.
Task Full-Size View
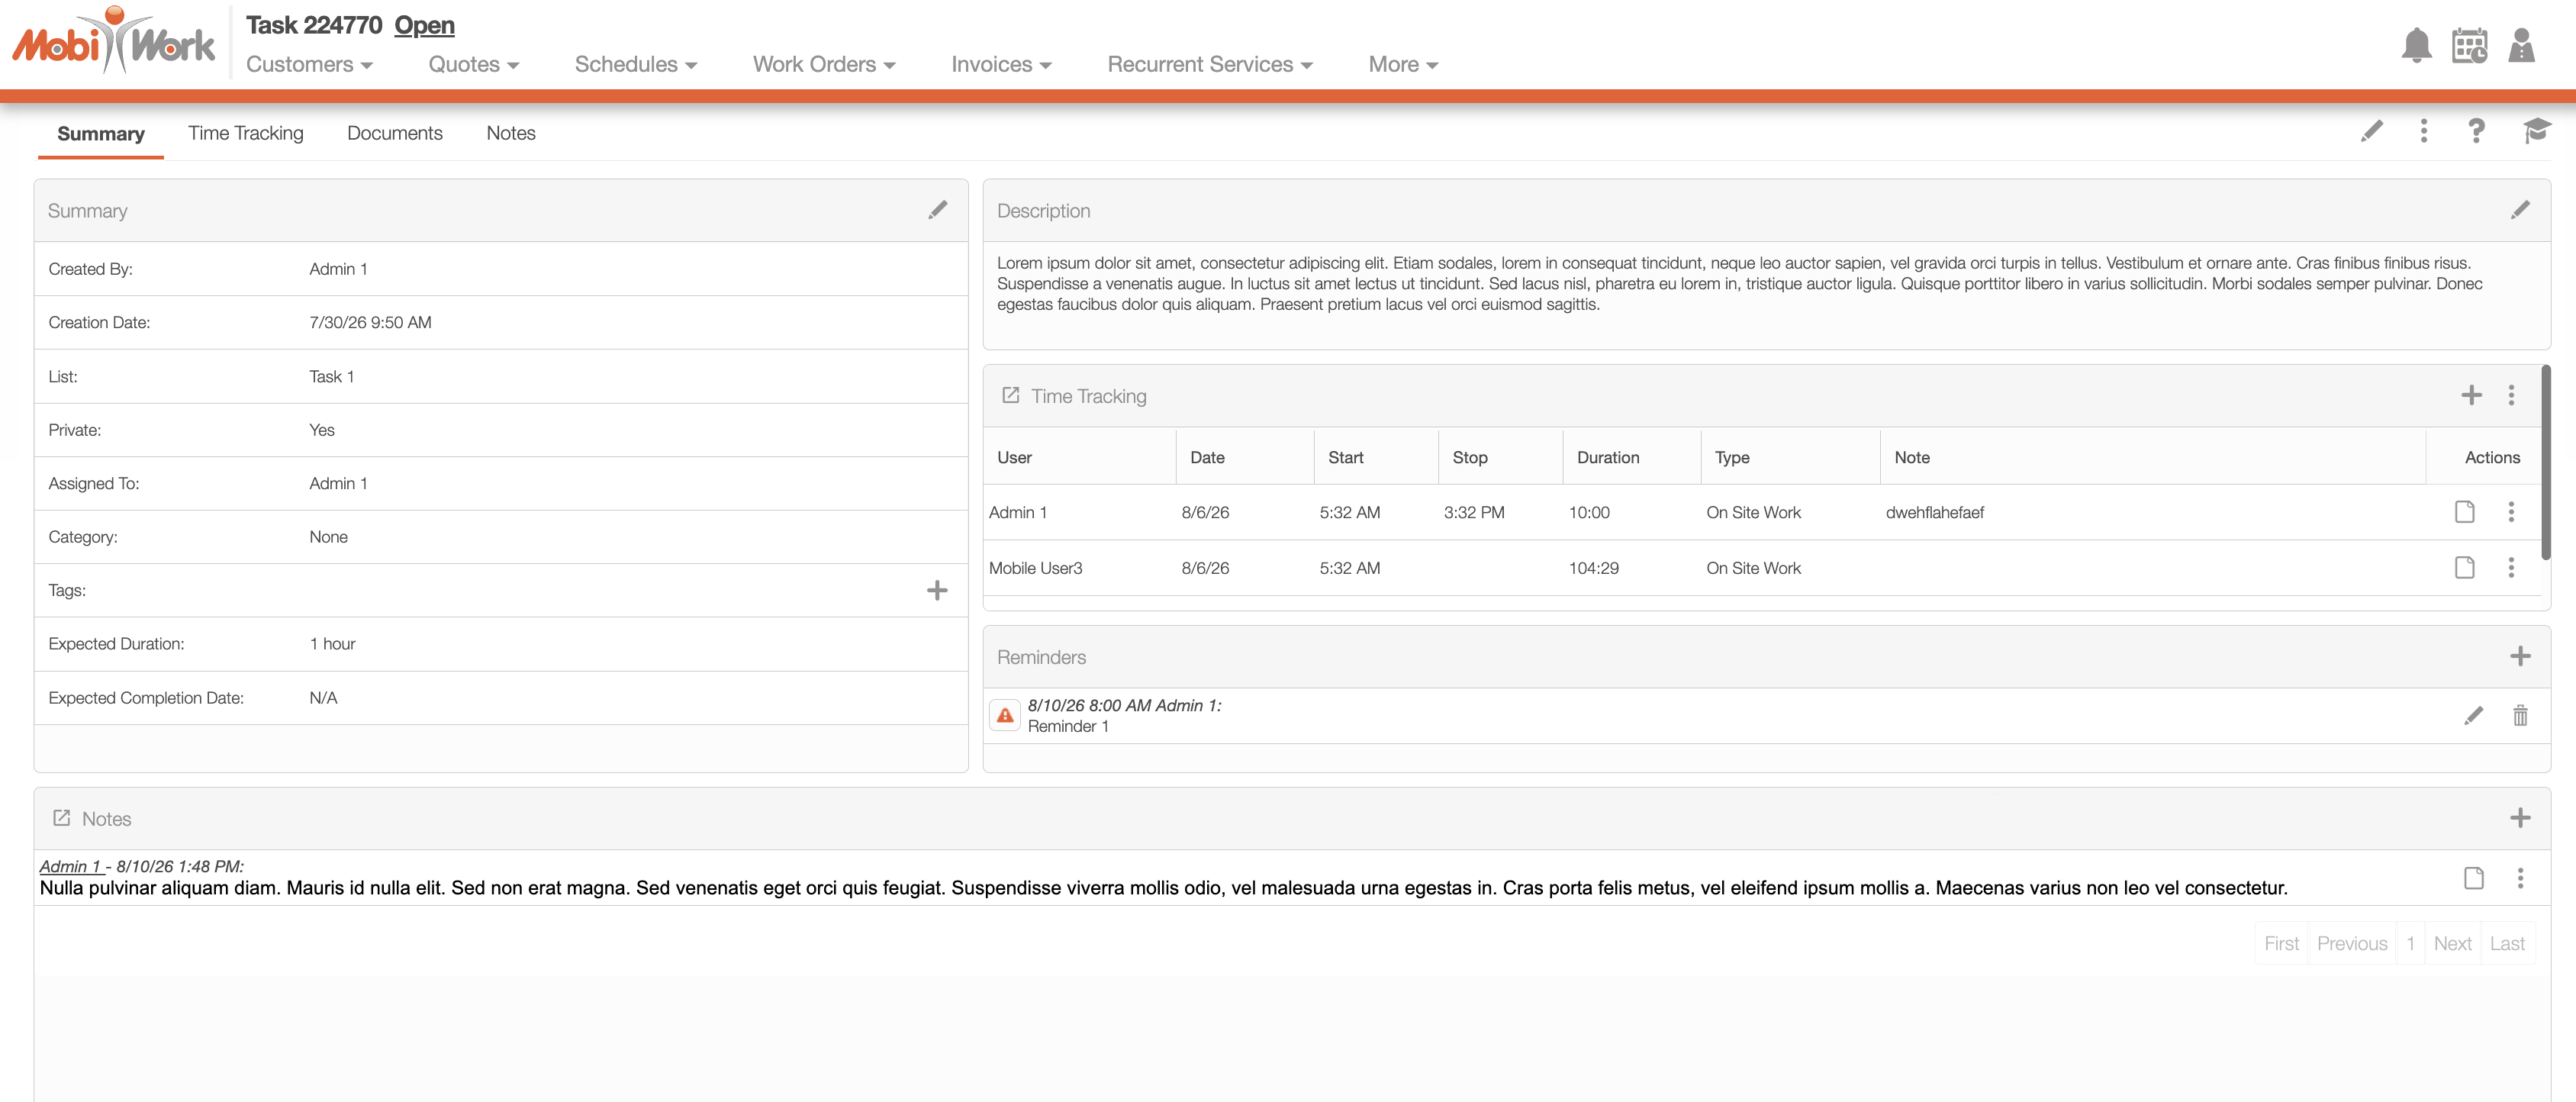
By clicking on the upwards arrow in the left-hand corner, you can expand the View Task pop-up window so that it is full-size:

The full-size View Task pop-up window can be seen below. All the tabs, buttons, and features are identical to how they would appear in the pop-up window:
Task Tabs
There are four tabs in all for the View Task pop-up window; each tab displays different information regarding the task:
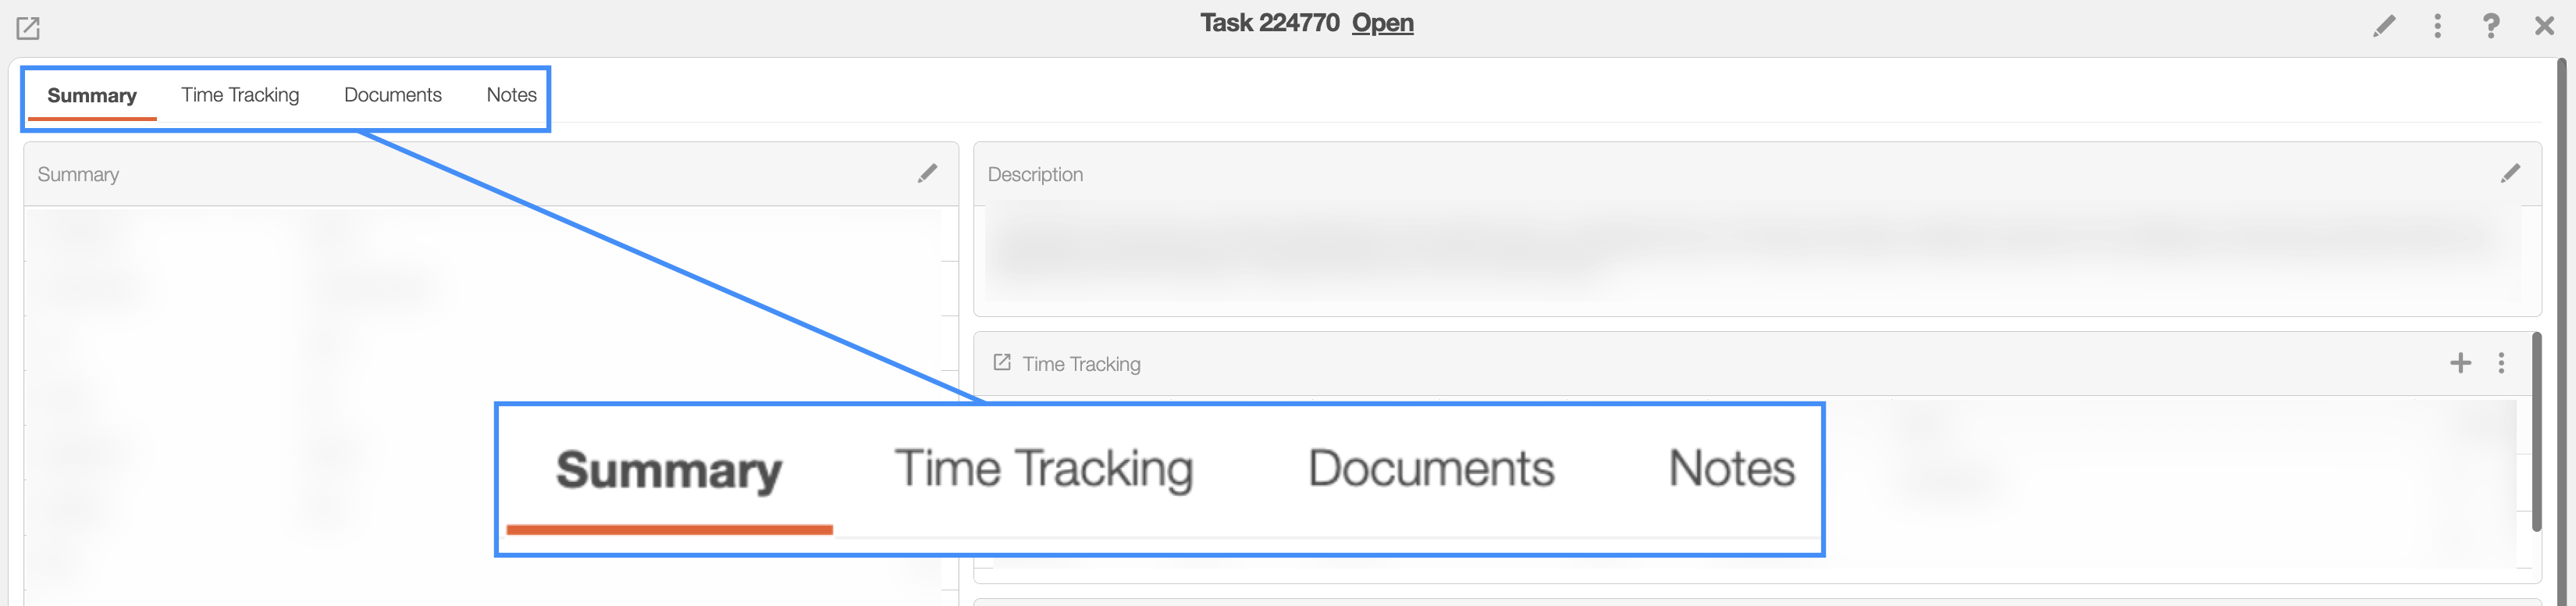
You can navigate to other tabs by clicking on the desired tab.
Task ID and Status
The task ID and the status will be displayed towards the top of the View Task pop-up window:
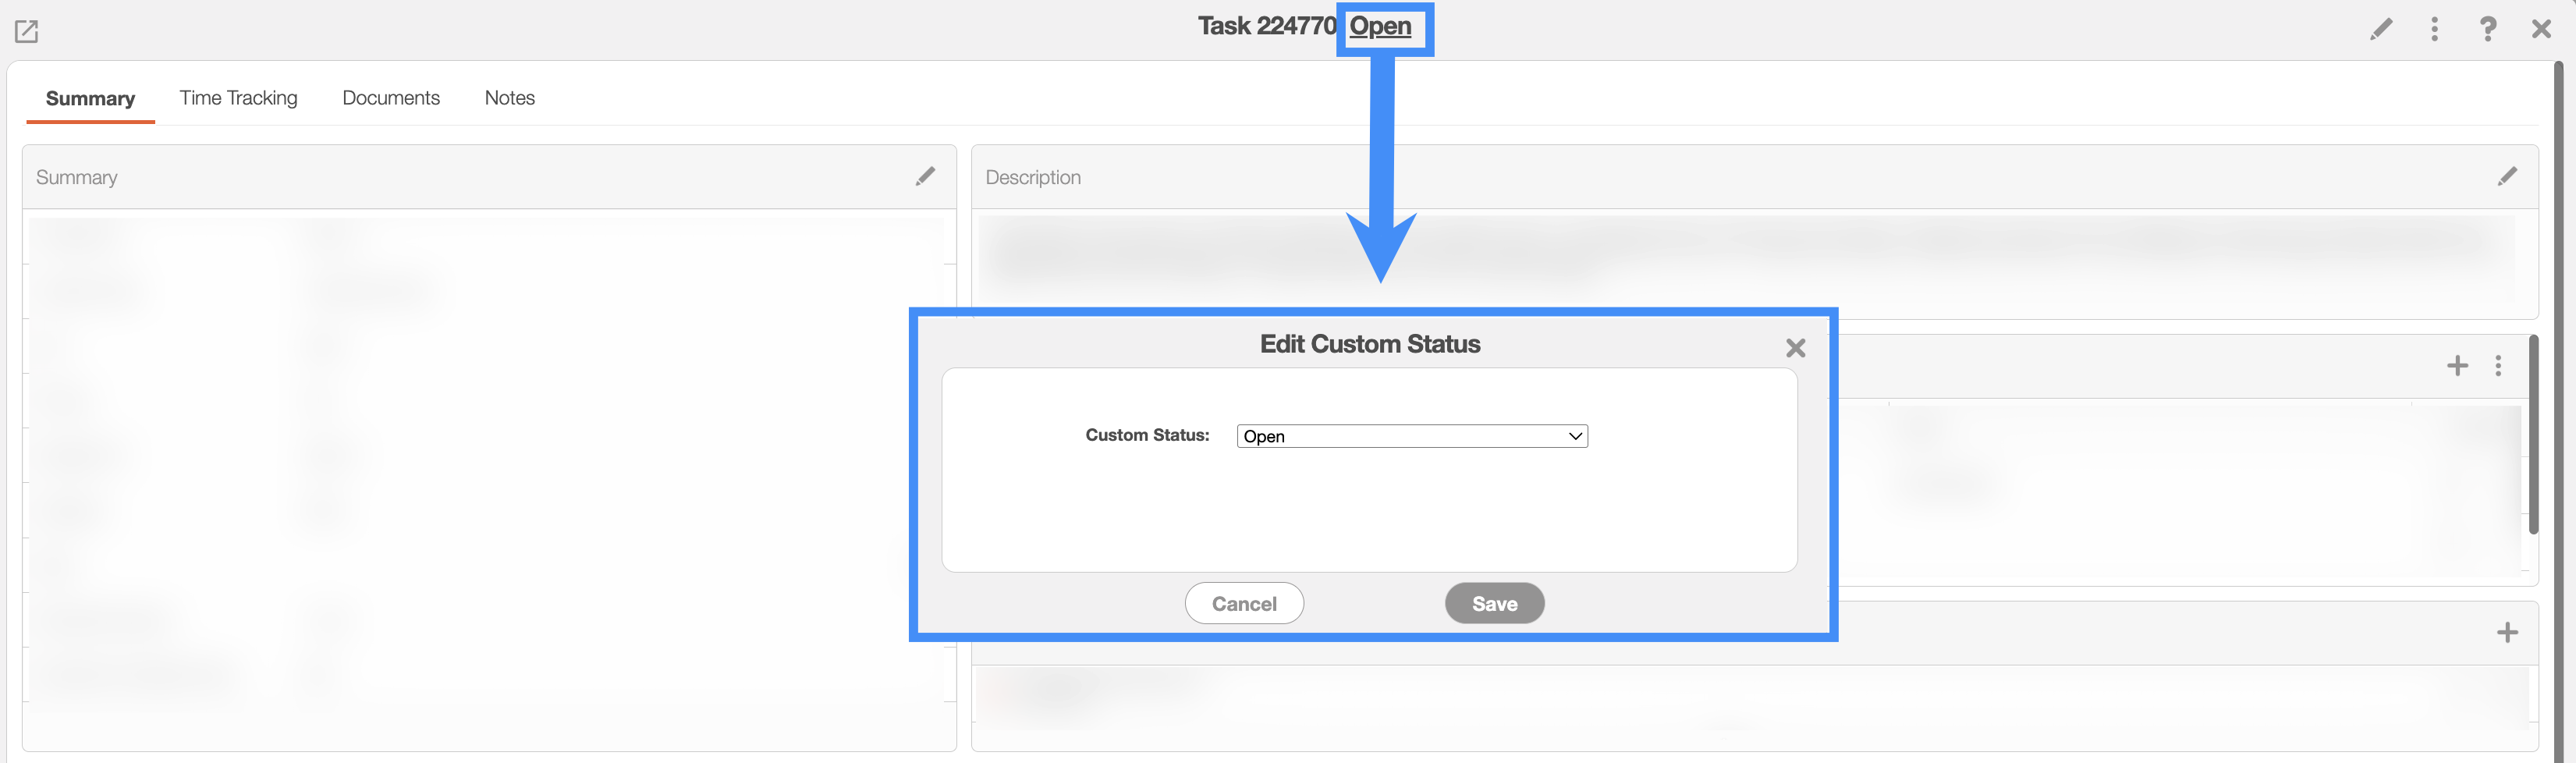
You can quickly change task's status by clicking on the status and selecting the desired new status.
The statuses that are available are:
"Open"- If the task has been generated but it has not been assigned to a user.
"Acknowledged"- The user has reviewed and accepted the task.
"In Progress"- The user is in the process of completing the assigned task.
"Pending"- The task has been completed and is pending review from the user's manager.
"Resolved"- The task has been completed and is pending review from the user's manager.
"Closed" - The task has been successfully completed by the user and reviewed by the user's manager.
Upper Right Corner Actions
The Task's Upper Right Corner Actions can be found in the top-right corner of the View Task pop-up window. These actions are located in this section, regardless of the tab you are on:
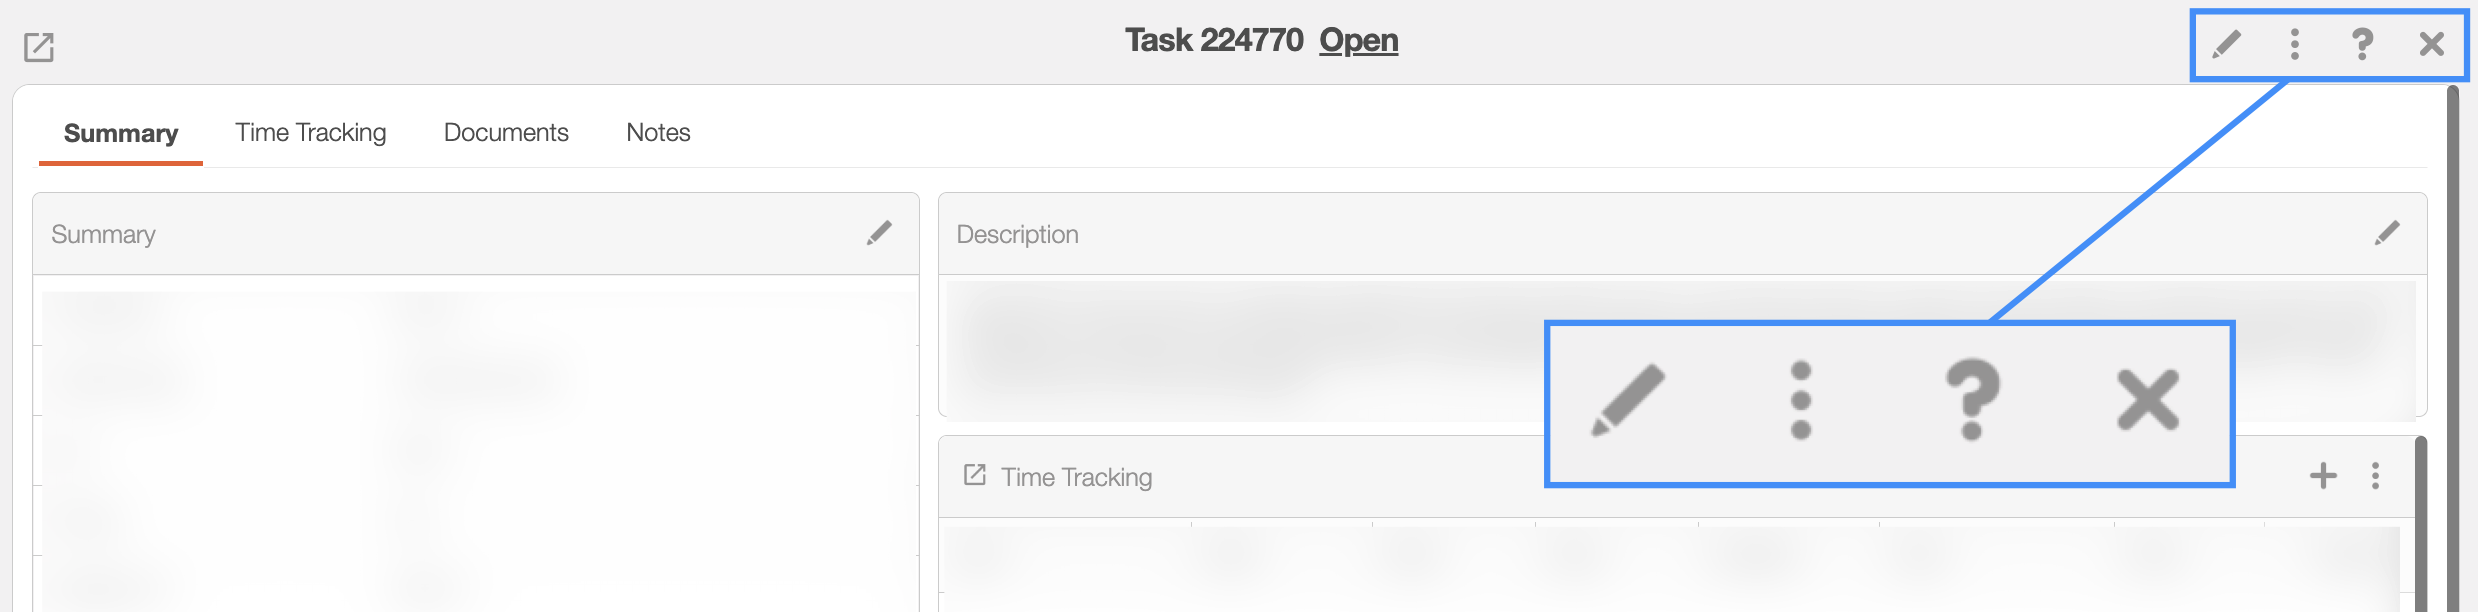
The Upper Right Corner Actions section includes:
The Pencil button will allow you to edit the task.
The Individual Actions button will allow you to perform various actions.
The Question Mark button which will direct you to the respective MobiWork Features page.
The X button will close out of the View Task pop-up window.
After clicking on the vertical three dots in the top-right corner, the Individual Actions drop-down menu will appear:
From the Individual Actions drop-down menu, you can select various actions that will help manage the specified task.
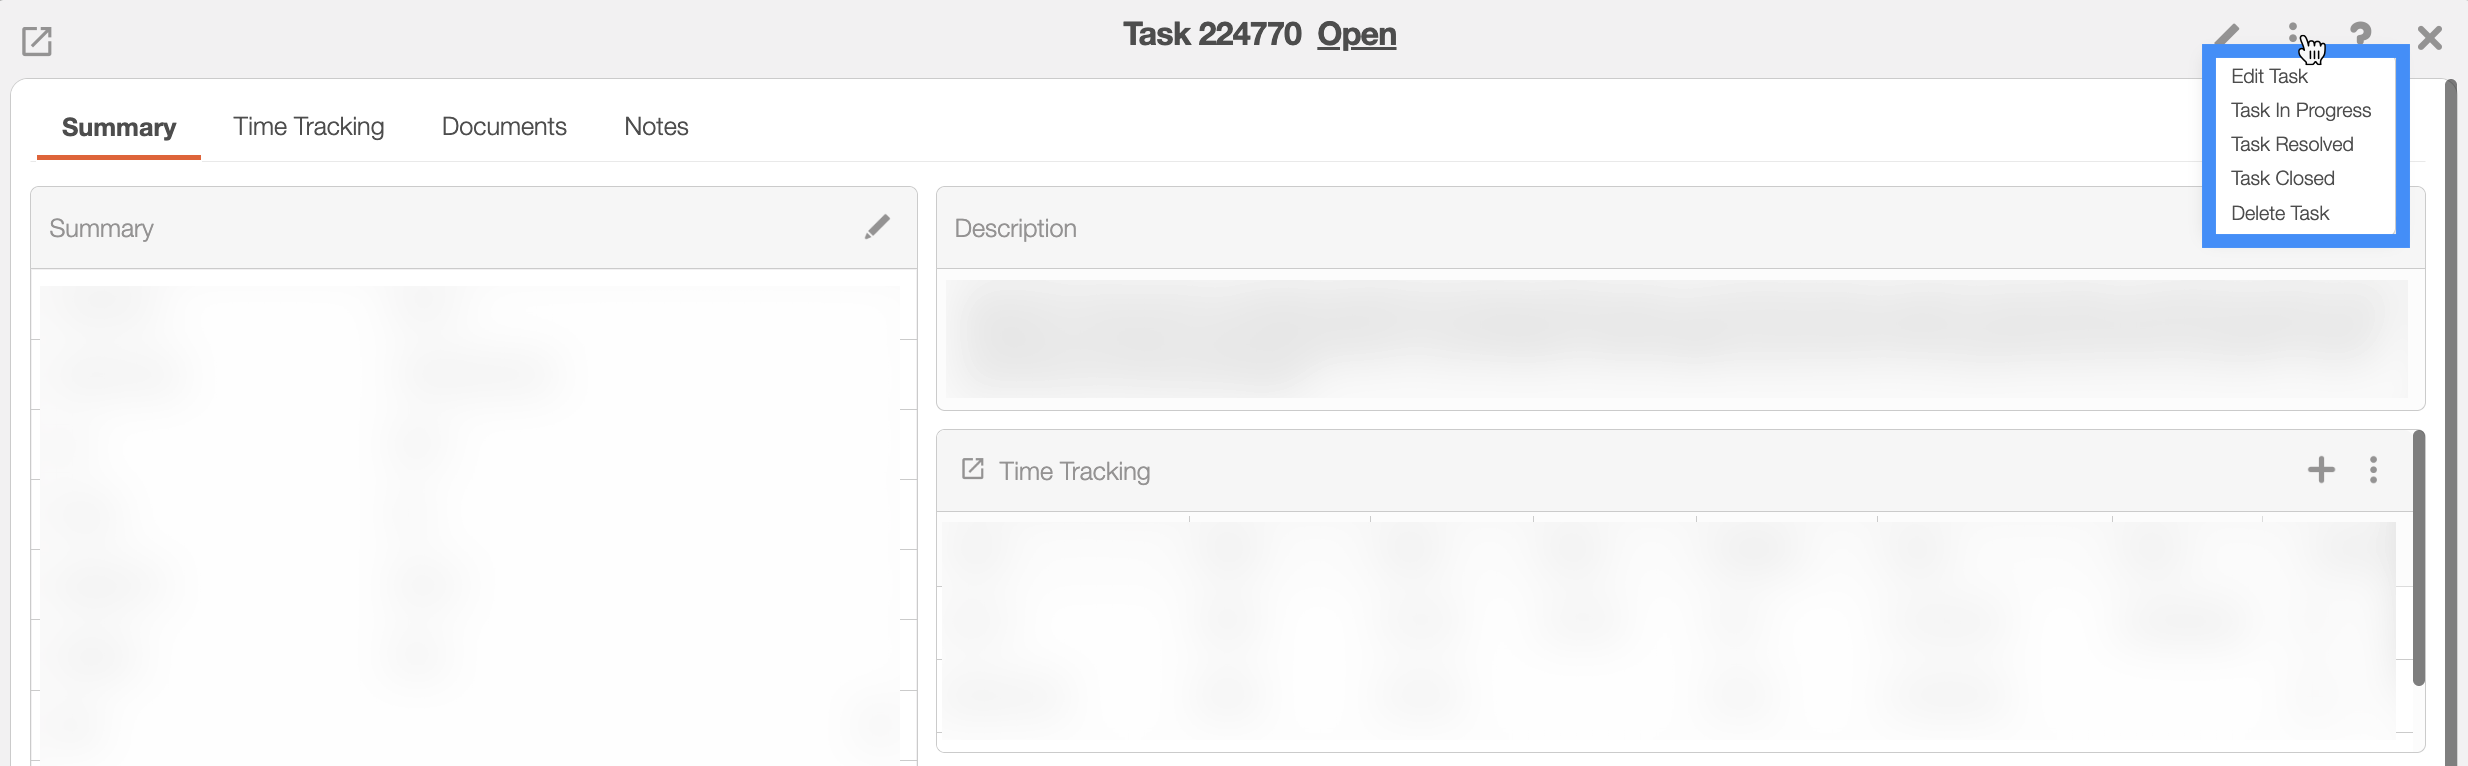
The complete list of actions found in the Individual Actions drop-down menu are defined below:
| Name: | Description: |
|---|---|
| "Edit Task" | Allows you to edit the task. |
| "Task in Progress" | Immediately sets the task's status to In Progress. |
| "Task Resolved" | Immediately sets the task's status to Resolved. |
| "Task Closed" | Immediately sets the task's status to Completed. |
| "Delete Task" | Deletes the selected task. |
The "Summary" tab is the default tab that will appear once you open the View Task pop-up window. This tab will display all the requisite information regarding a task; the information is also displayed in an accessible and practical manner.
The panels found on the "Summary" tab will summarize the data from the other tabs found in the View Task pop-up window:
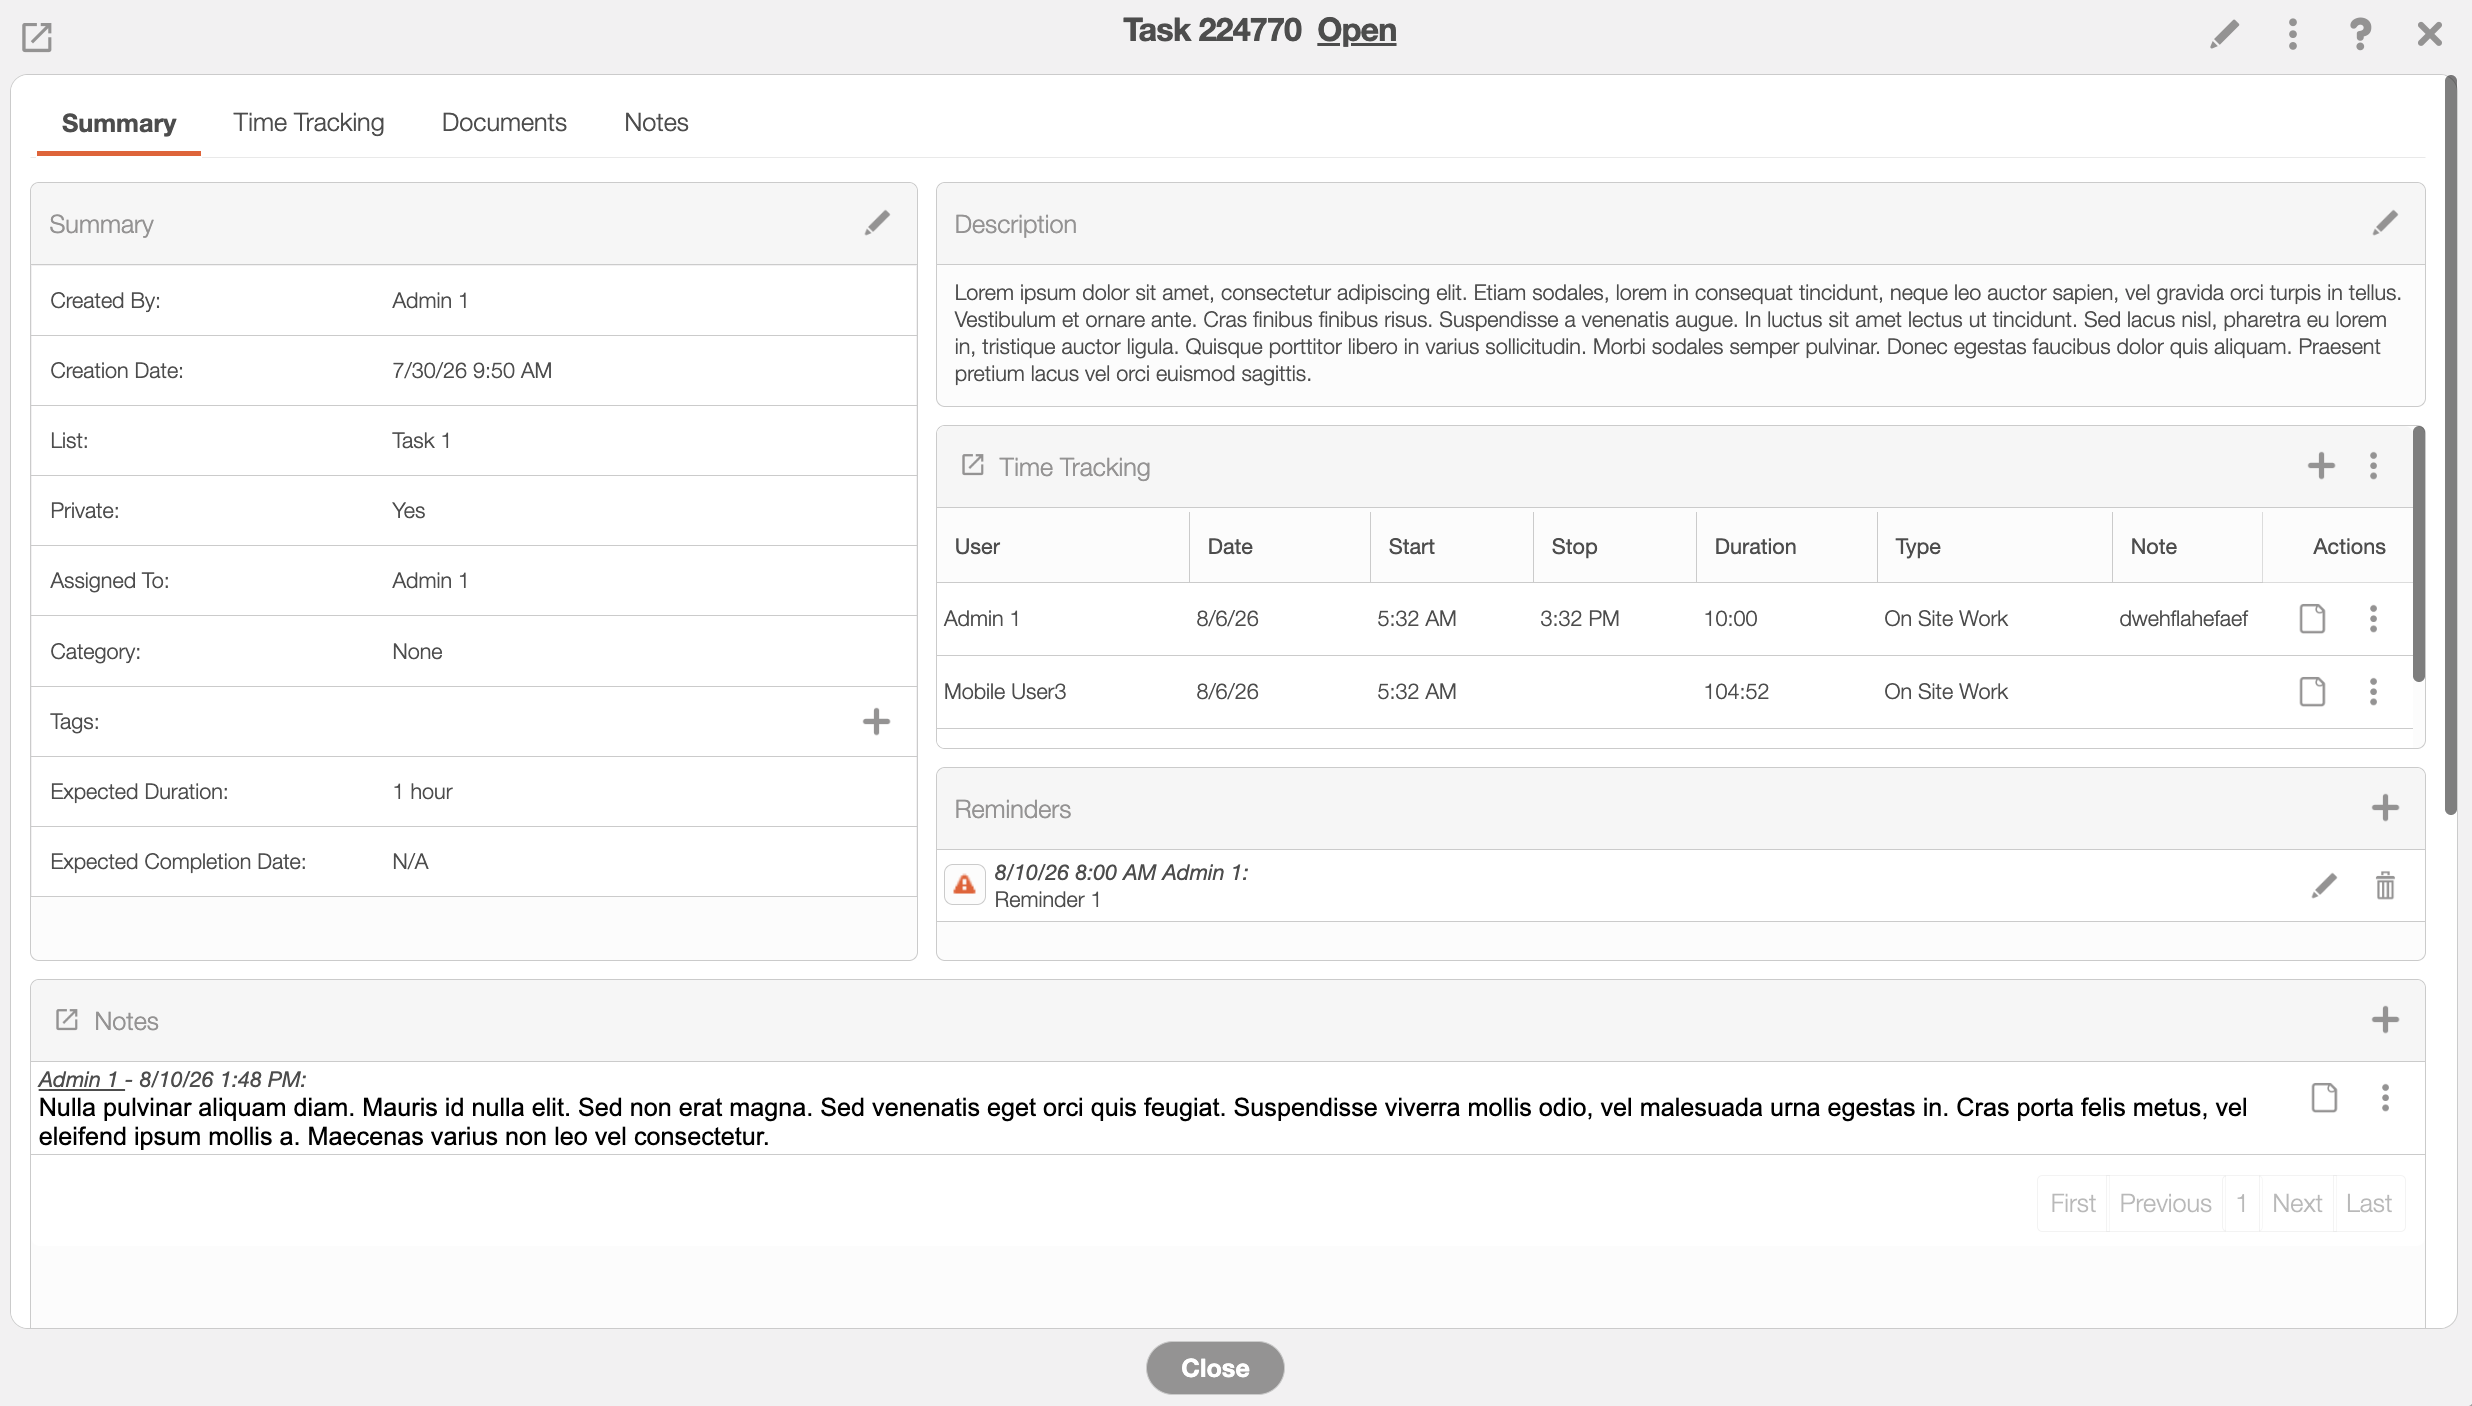
Where applicable, you can edit or add additional information directly in the "Summary" tab:
The Pencil icon will allow you to edit the selected data or field.
The PDF button enables you to download the selected data as a PDF document.
The Plus Sign icon will allow you to add additional data or notes.
The Trash Can icon will allow you to delete the selected data.
The View icon will allow you to view the selected data in a separate window.
The PDF button enables you to download the selected data as a PDF document.
Summary Panel
The "Summary" panel will contain general task information, including the task creation date, which list the task belongs to, and who the task is assigned to.
The other information found in the "Summary" panel are described below:
| Name: | Description: |
|---|---|
| "Created By" | The user who created the task in MobiWork. |
| "Creation Date" | The date that the task was initially created in MobiWork. |
| "List" | Allows you to view the group list that the task is a part of; this group bands relevant tasks together. For example, all tasks related to payroll operations can be grouped together, while tasks associated with specific work orders or customers can be grouped together. |
| "Private" | Indicates if the group list is restricted only for your access or if anyone can access the group list. |
| "Assigned To" | The user that the task is assigned to. |
| "Category" | The category that the task is classified under. |
| "Tags" | Tags act as a visual indicator of a custom status or category, thus improving organizational clarity with the ability to identify specified tagged tasks at a glance. With the saved search feature, you can locate a specific tag. |
| "Expected Duration" | The planned duration (from Start to Stop) that the task is expected to last. |
| "Expected Completion Date" | The planned date that the task is expected to be completed on. |
Description Panel
The "Description" panel contains a blurb detailing an explanation of the task.
Time Tracking Panel
Within the "Time Tracking" panel, you will be able to keep track of the time that the users have spent on the taskr; this panel not only allows you to track user hours but also enables you to start/stop their worked hours, specify the nature of the work, view time duration, and more for enhanced visibility and control.
Time Tracking (Ongoing)
You can see that the time tracking for a user is ongoing when it has the Clock icon. As demonstrated below, the actions in this ongoing stage vary slightly from the stopped time tracking:
The View icon will allow you to view the hours in a read-only format.
The Individual Actions will allow you to stop the clock, view the hours in a read-only format, edit the time edit the time with either the Edit Time Tracking: Duration pop-up window or with the Add Time Tracking: Start & End pop-up window, or delete the time.
The Plus Sign will add a new time tracking for a user and the topmost Individual Actions will allow you to start the time tracking, add a new time tracking for a user (either with the Add Time Tracking: Duration pop-up window or with the Add Time Tracking: Start & End pop-up window, or refresh the tab.
Time Tracking (Stopped)
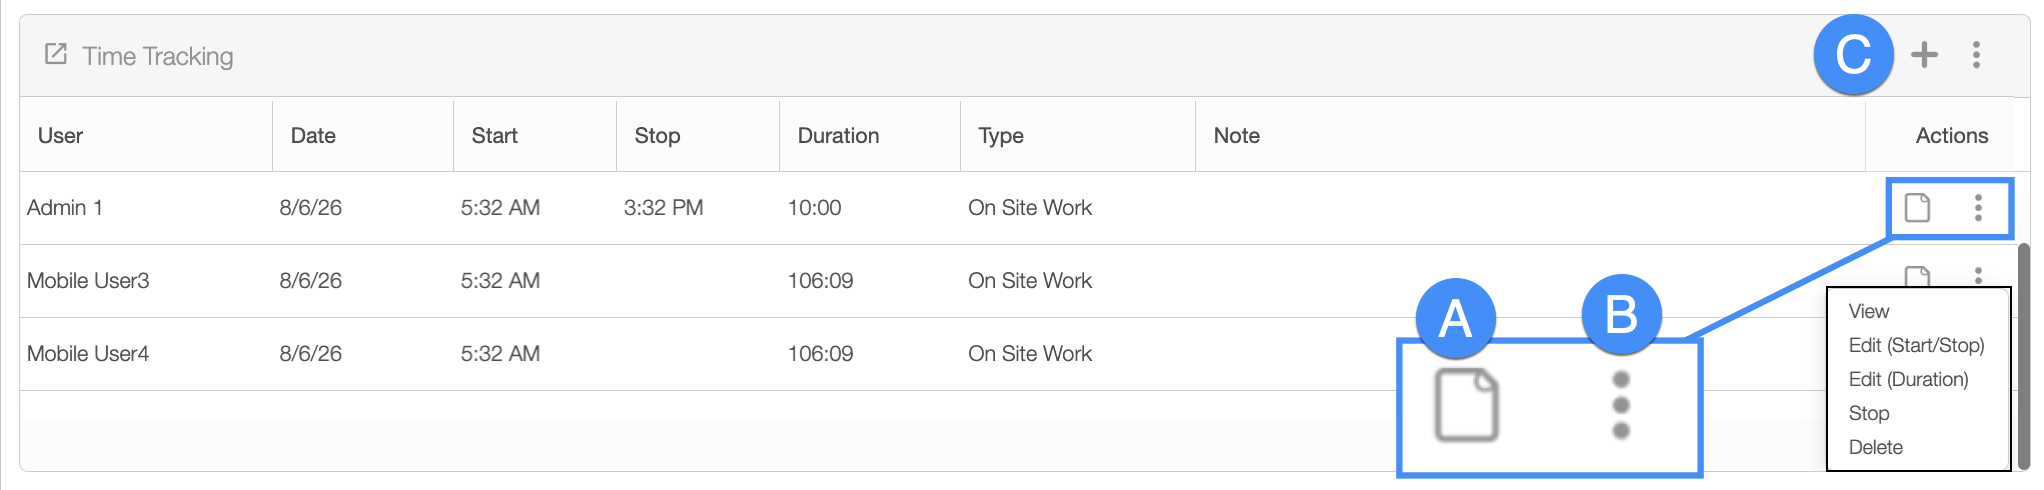
You can see that the time tracking for a user is stopped when it has the Checkmark icon. As shown below, the actions in this stopped stage vary slightly from the ongoing time tracking:

By right-clicking on a stopped time interval, you will bring up the right-click actions. These actions are identical to the Individual Actions for a stopped time interval and will allow you to view the hours in a read-only format, edit the time, or delete the time.
The View icon will allow you to view the hours in a read-only format.
The Individual Actions for a stopped time interval (the three dots next to the View icon) are identical to the right-click actions for a stopped time interval and will allow you to view the hours in a read-only format, edit the time, or delete the time.
The terms found in the "Time Tracking" section are defined below:
| Name: | Description: |
|---|---|
| "User" | The user associated with the respective time tracking. |
| "Start" | The start time and date of the activity or task. |
| "Stop" | The stop time and date of the activity or task. |
| "Duration" | How long (from Start to Stop) the activity or task lasts. |
| "Type" | The type of activity or task that is being measured by the time tracking. |
| "Note" | A brief note regarding the time tracking activity or task. |
| "Exception" | If any error occurs between time tracking events (e.g., an exception) the error icon will be visible here. |
| "Actions" | For an ongoing time interval, the Actions drop-down will allow you to stop the clock, view the hours in a read-only format, edit the time, or delete the time. For a stopped time interval, the Actions drop-down will allow you to view the hours in a read-only format, edit the time, or delete the time. |
Notes Panel
The "Notes" panel will allow you to add and manage notes related to the task. To add a note, click the Plus Sign in the upper right corner.
The Add Note pop-up window will then appear:
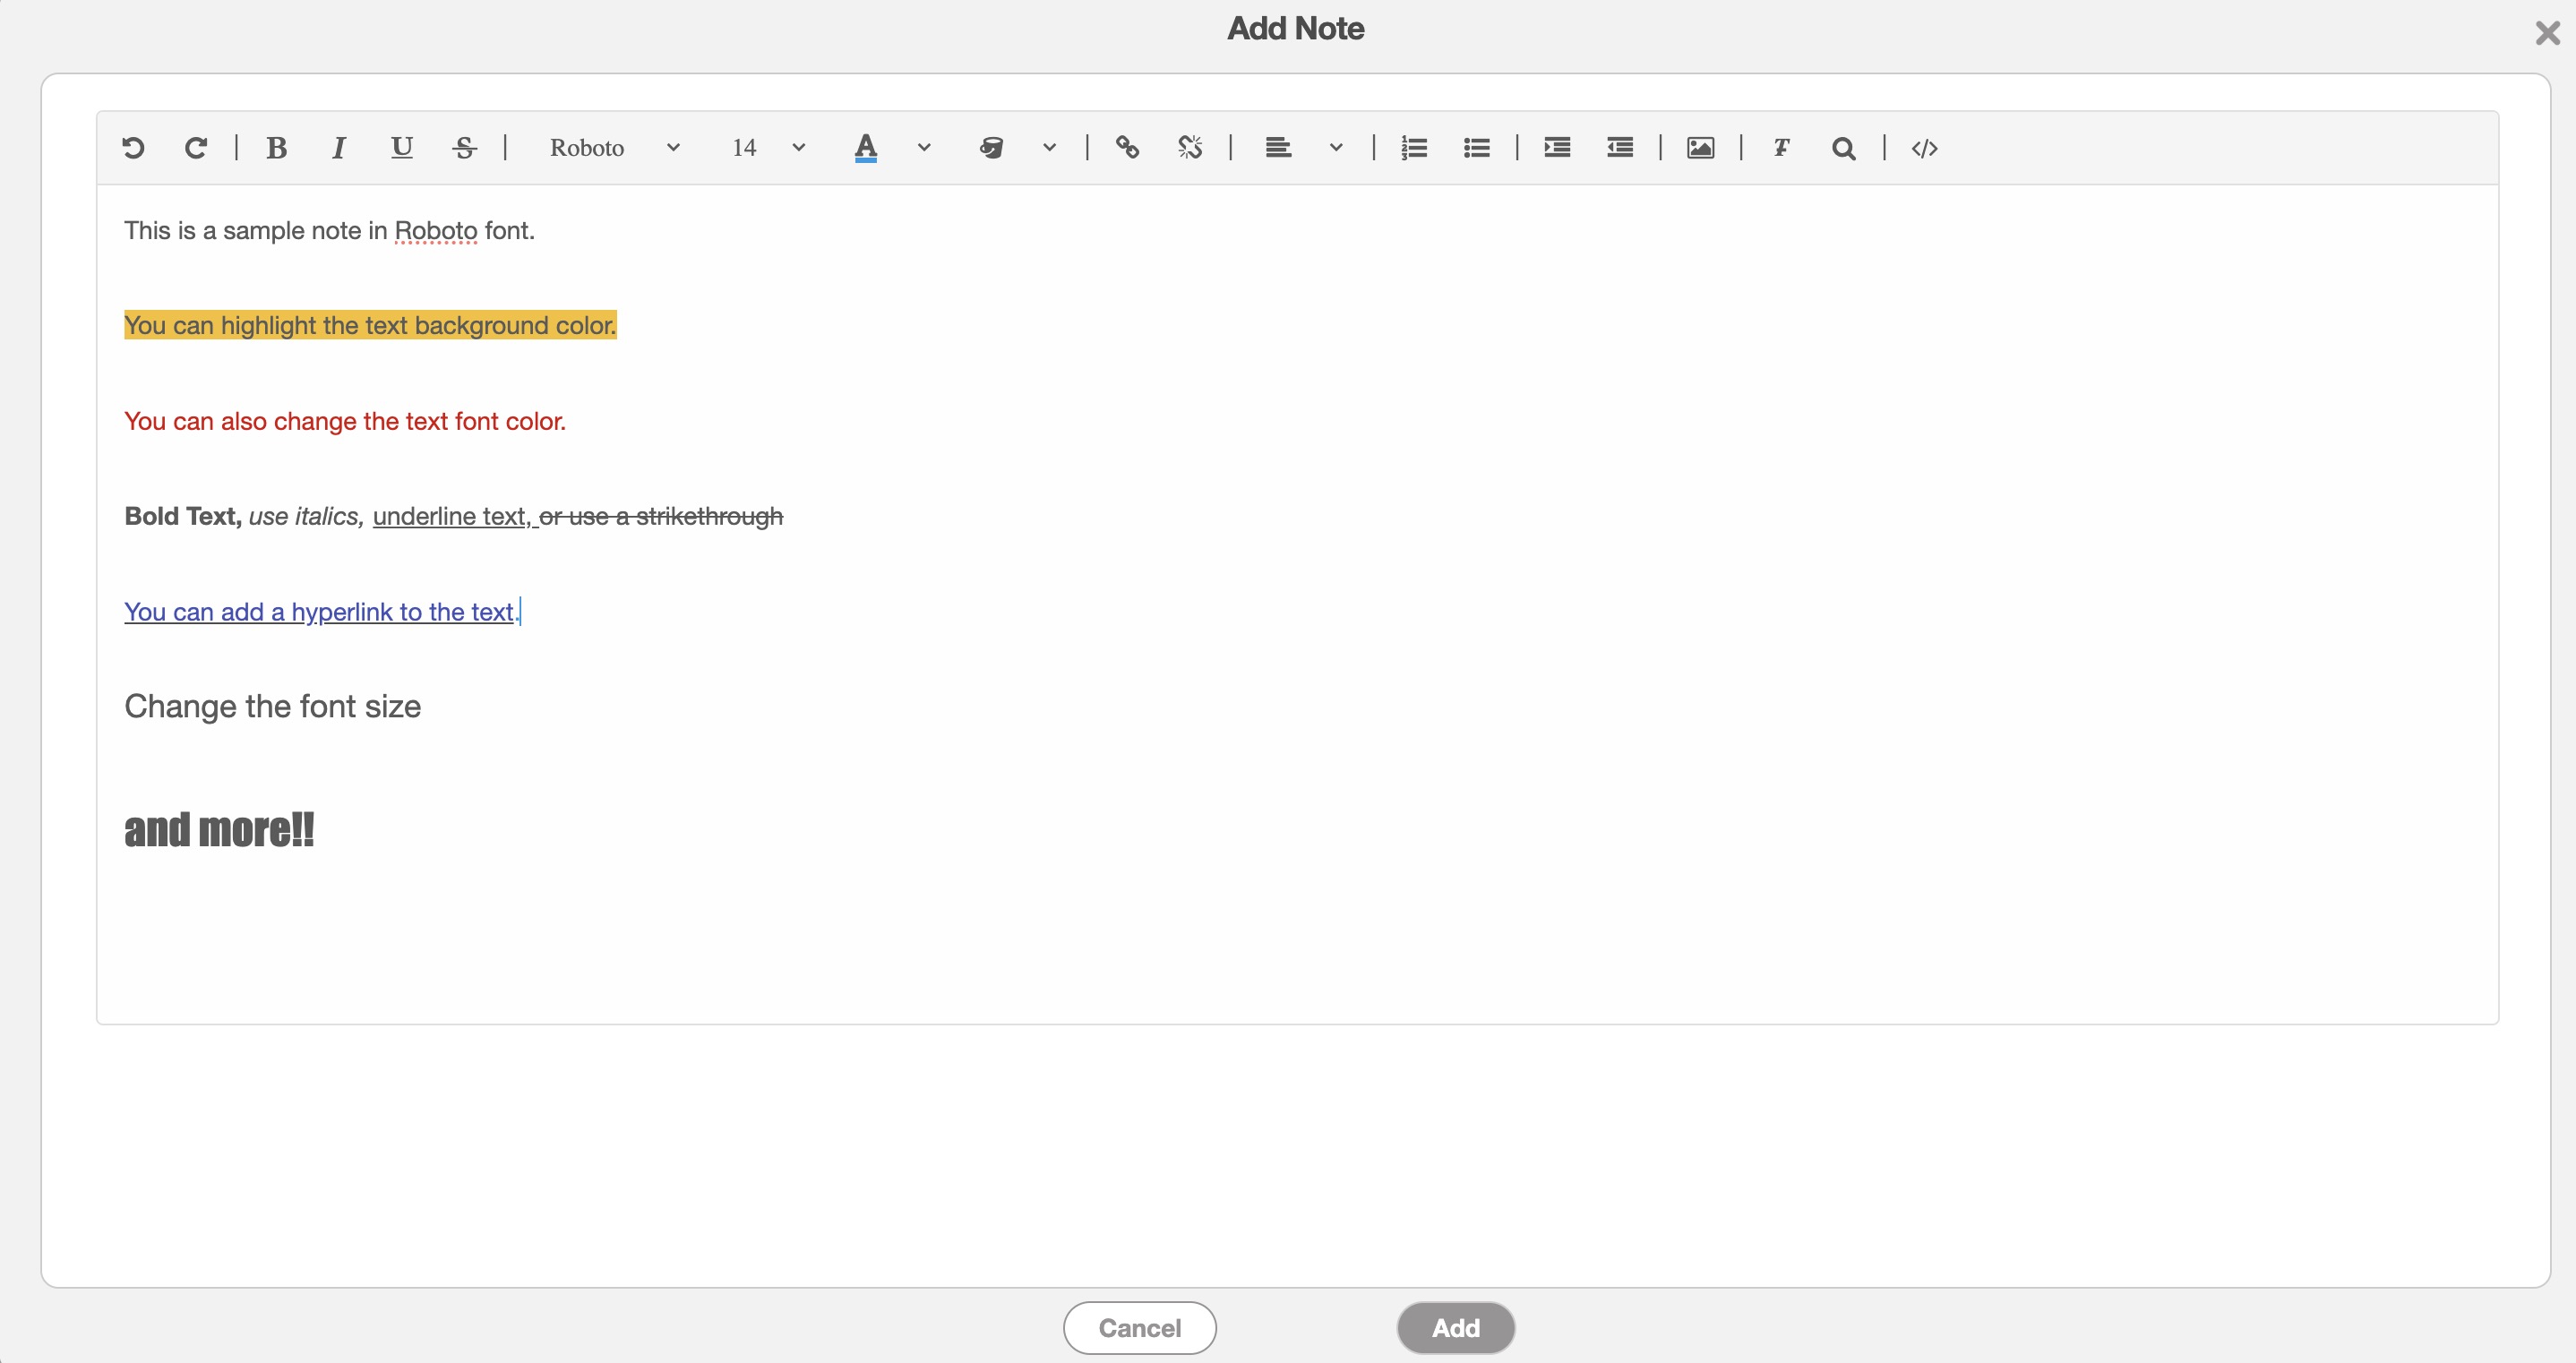
In this pop-up window, you will be able to format your text, insert hyperlinks, and more.
To edit or delete a note, return to the "Notes" panel and click the Individual Actions button. From the drop-down, you can then select the "Edit" or "Delete" option to either update or remove the note.
Within the "Time Tracking" panel, you will be able to keep track of the time that the users have spent on the taskr; this panel not only allows you to track user hours but also enables you to start/stop their worked hours, specify the nature of the work, view time duration, and more for enhanced visibility and control.
Time Tracking (Ongoing)
You can see that the time tracking for a user is ongoing when it has the Clock icon. As demonstrated below, the actions in this ongoing stage vary slightly from the stopped time tracking:
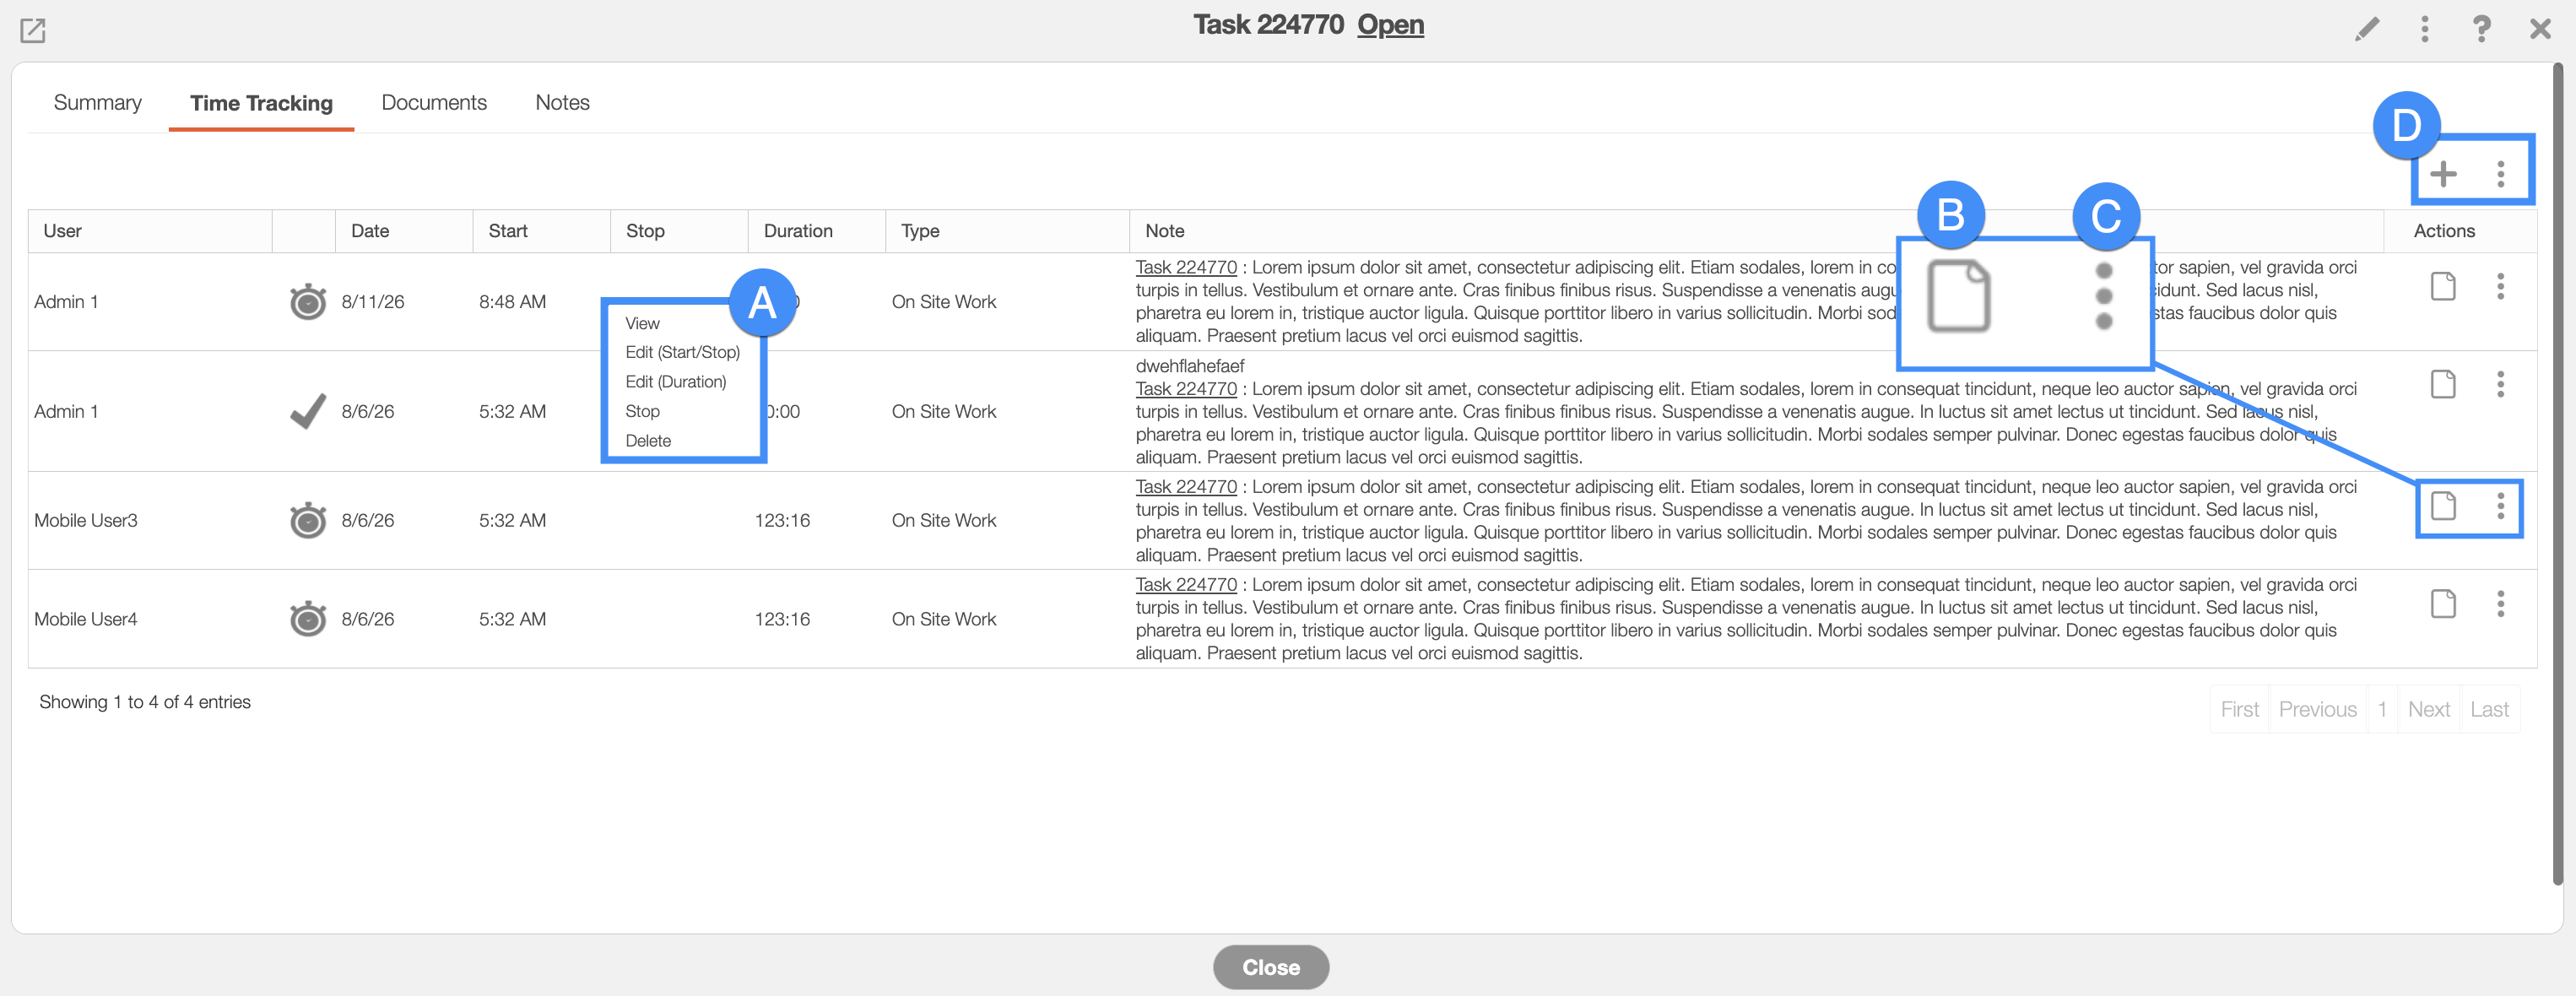
By right-clicking on an ongoing time interval, you will bring up the right-click actions. These actions are identical to the Individual Actions for an ongoing time interval, and will allow you to stop the clock, view the hours in a read-only format, edit the time with either the Edit Time Tracking: Duration pop-up window or with the Add Time Tracking: Start & End pop-up window, or delete the time.
The View icon will allow you to view the hours in a read-only format.
The Individual Actions will allow you to stop the clock, view the hours in a read-only format, edit the time edit the time with either the Edit Time Tracking: Duration pop-up window or with the Add Time Tracking: Start & End pop-up window, or delete the time.
The Plus Sign will add a new time tracking for a user and the topmost Individual Actions will allow you to start the time tracking, add a new time tracking for a user (either with the Add Time Tracking: Duration pop-up window or with the Add Time Tracking: Start & End pop-up window, or refresh the tab.
Time Tracking (Stopped)
You can see that the time tracking for a user is stopped when it has the Checkmark icon. As shown below, the actions in this stopped stage vary slightly from the ongoing time tracking:
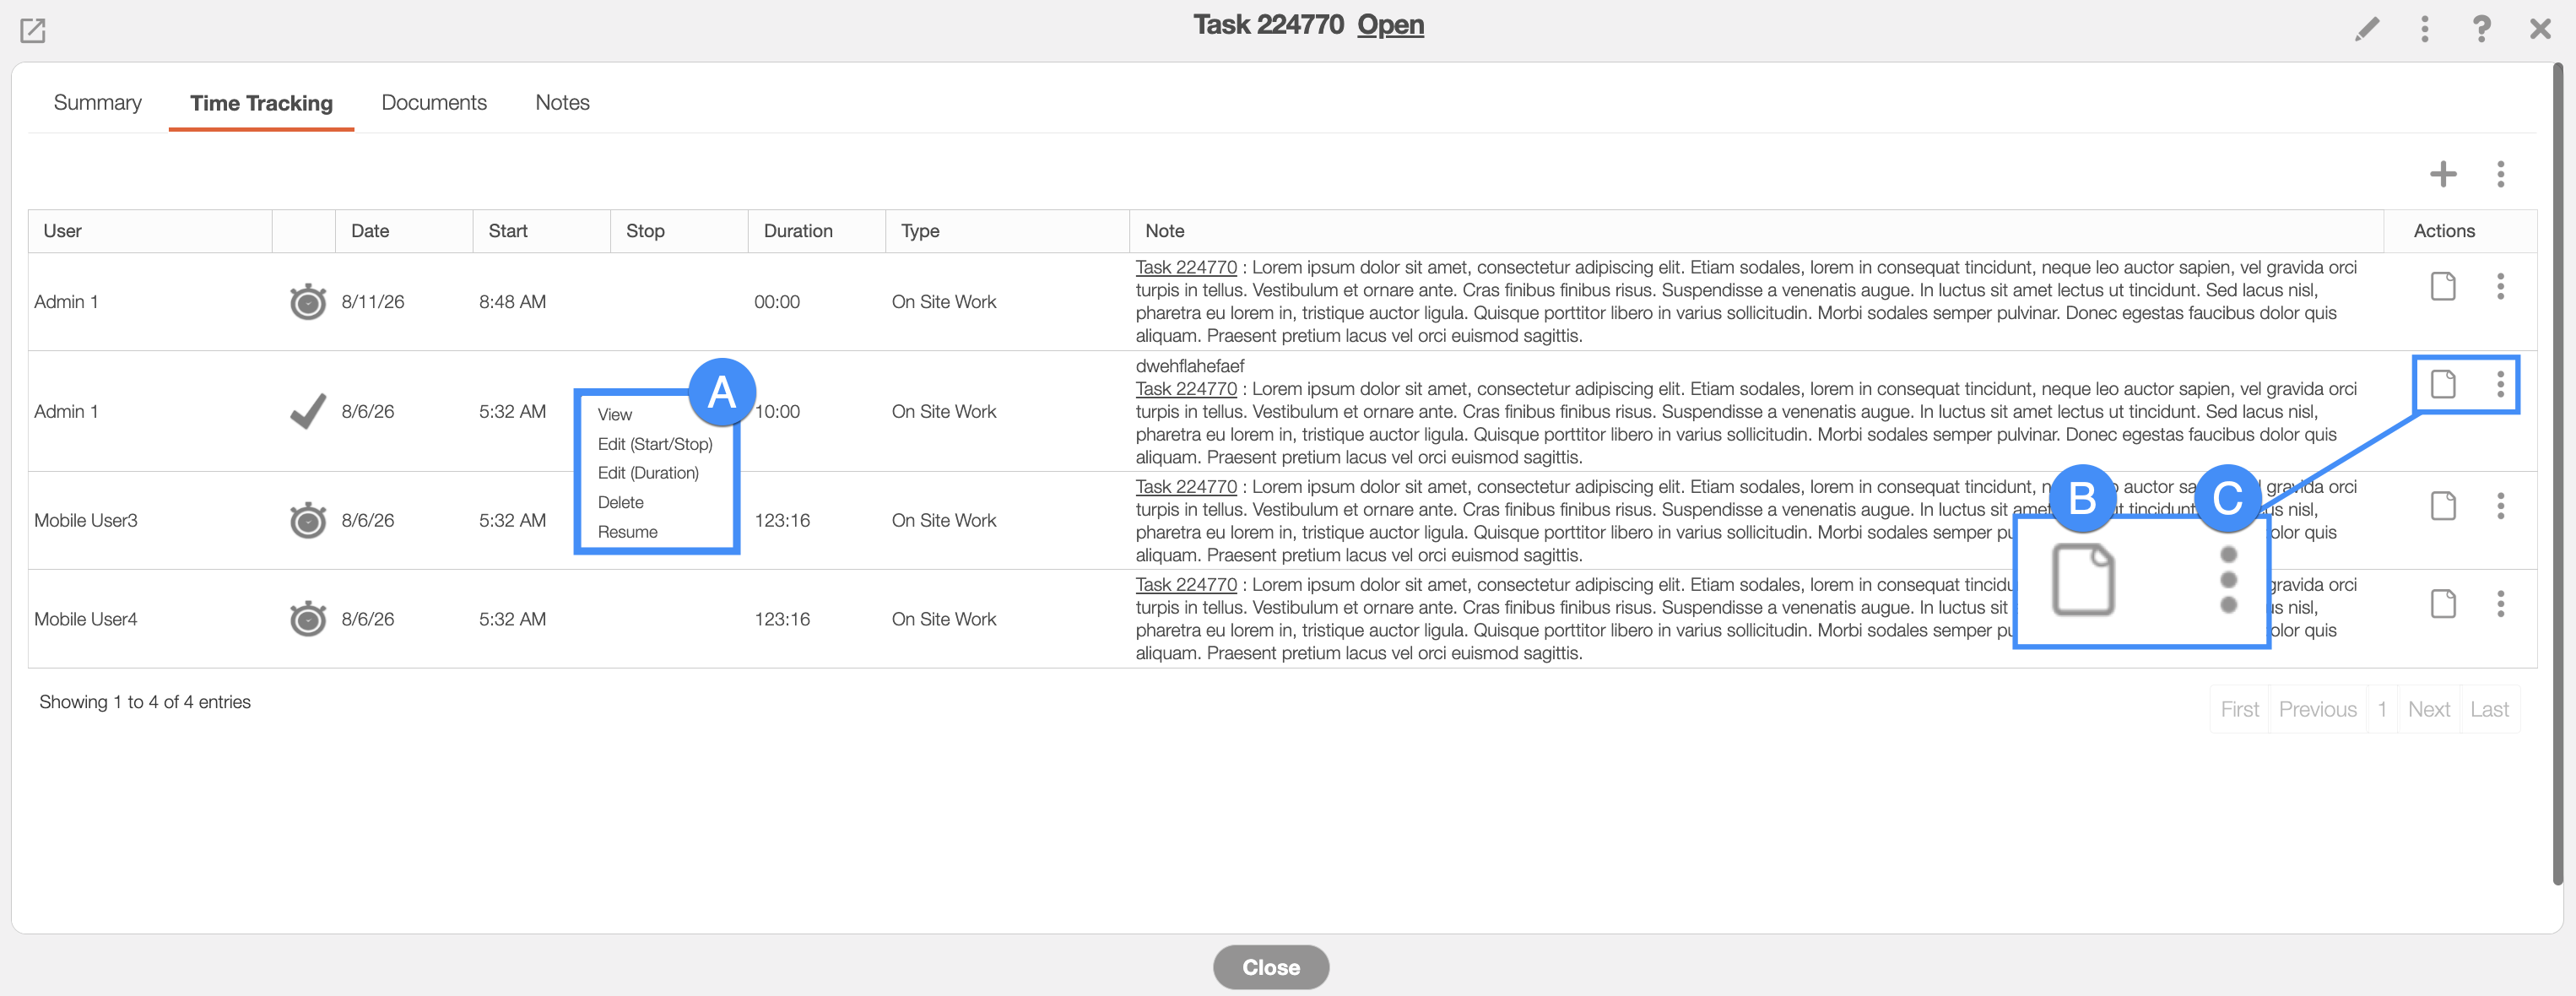
By right-clicking on a stopped time interval, you will bring up the right-click actions. These actions are identical to the Individual Actions for a stopped time interval and will allow you to view the hours in a read-only format, edit the time, or delete the time.
The View icon will allow you to view the hours in a read-only format.
The Individual Actions for a stopped time interval (the three dots next to the View icon) are identical to the right-click actions for a stopped time interval and will allow you to view the hours in a read-only format, edit the time, or delete the time.
The terms found in the "Time Tracking" section are defined below:
| Name: | Description: |
|---|---|
| "User" | The user associated with the respective time tracking. |
| "Start" | The start time and date of the activity or task. |
| "Stop" | The stop time and date of the activity or task. |
| "Duration" | How long (from Start to Stop) the activity or task lasts. |
| "Type" | The type of activity or task that is being measured by the time tracking. |
| "Note" | A brief note regarding the time tracking activity or task. |
| "Exception" | If any error occurs between time tracking events (e.g., an exception) the error icon will be visible here. |
| "Actions" | For an ongoing time interval, the Actions drop-down will allow you to stop the clock, view the hours in a read-only format, edit the time, or delete the time. For a stopped time interval, the Actions drop-down will allow you to view the hours in a read-only format, edit the time, or delete the time. |
The "Documents" tab will allow you to store task-specific documentation (e.g., contracts, photos, etc.) for future use. This tab will also list the type of document file, the date it was uploaded, the user who uploaded it, and more.
To add a new document or file, you must click on the Plus Sign button and then drag & drop or choose a file to upload.
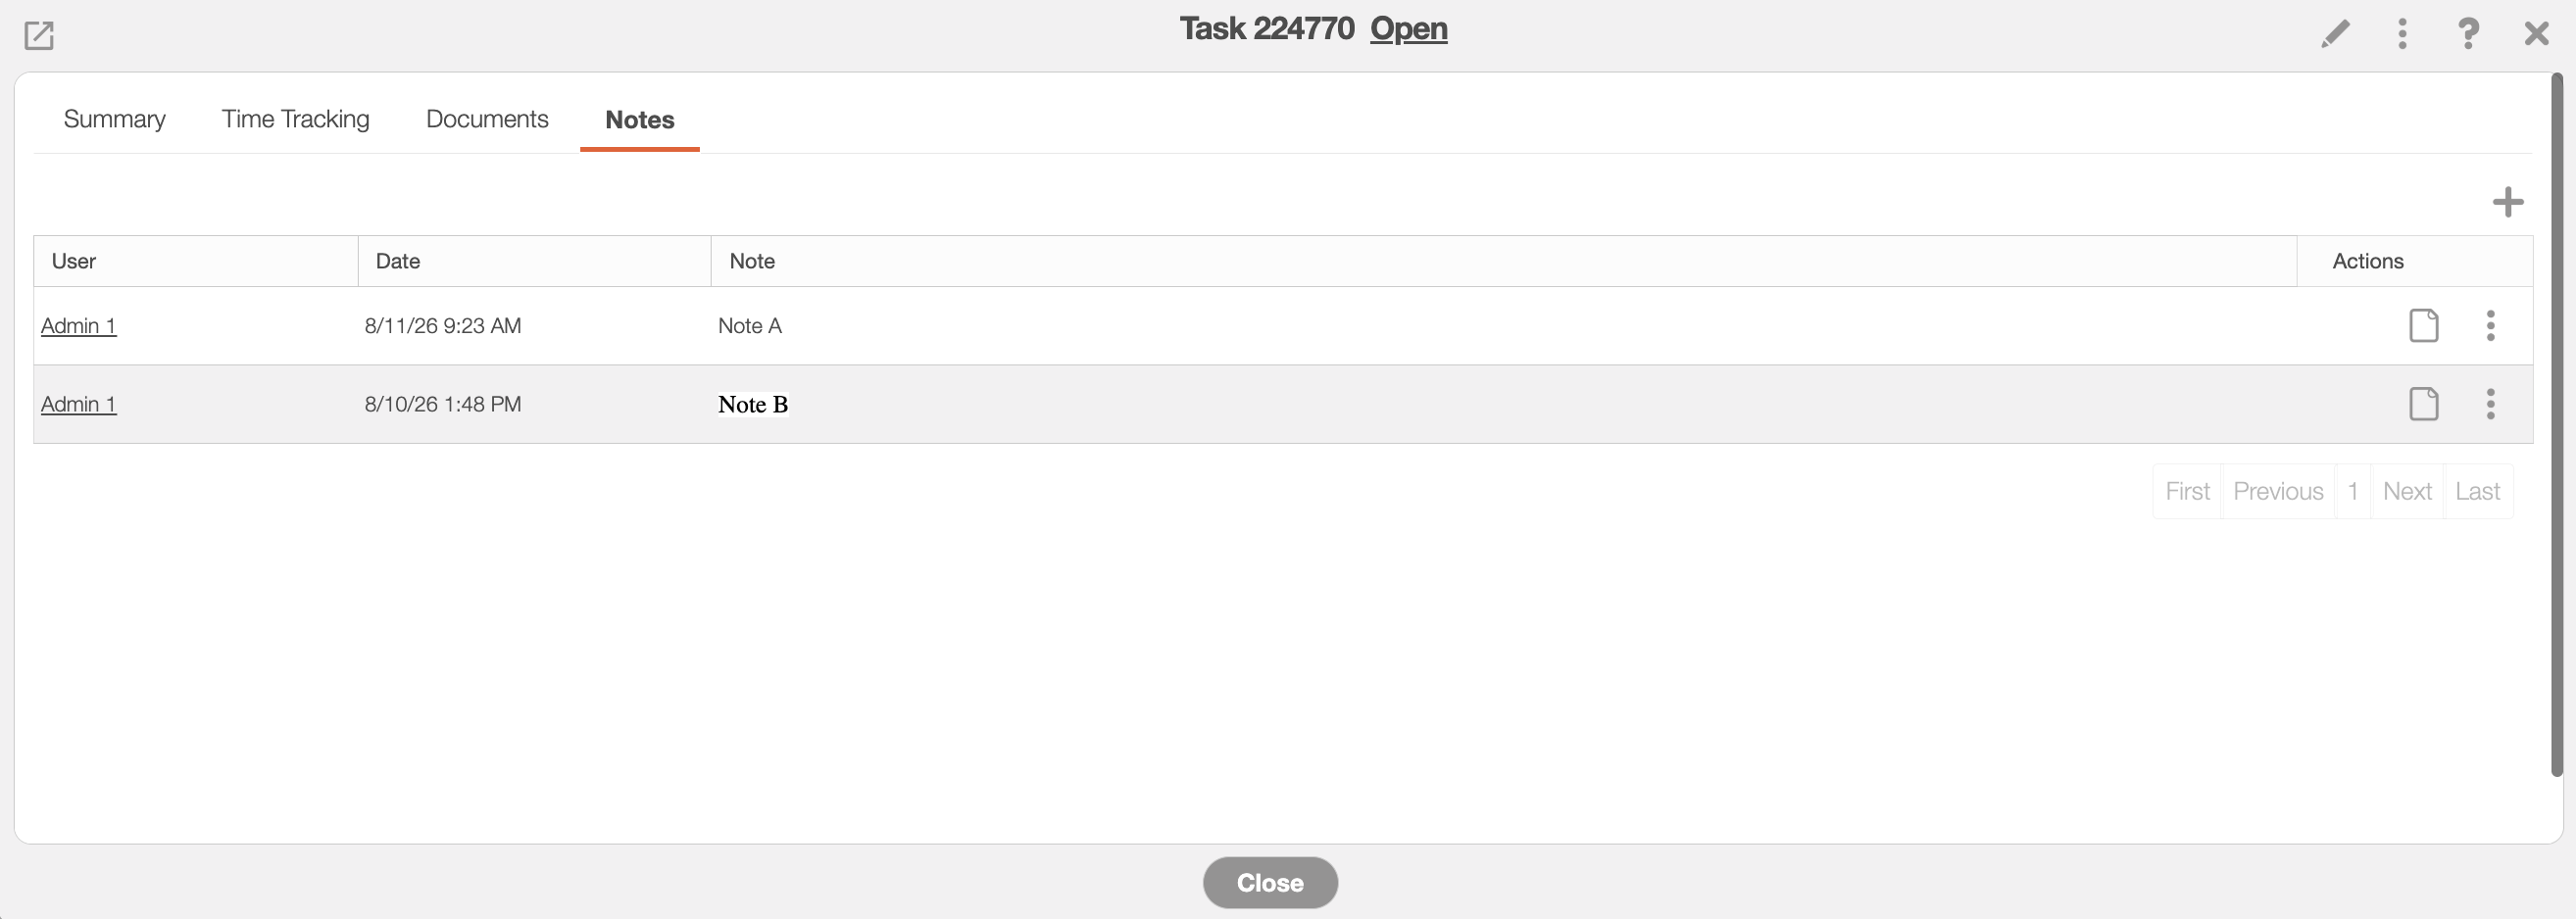
By right-clicking you will bring up the right-click actions. These actions are identical to the Individual Actions and will allow you to view, edit, download, or delete the document.
The Plus Sign will add a new document or file.
The topmost Individual Actions will allow you to add a new document, a new folder, or refresh the tab. To add a document to any created folder, first edit the selected document and use the "Select Folder" drop-down to choose the desired folder. Then click the Edit button to save the new destination.
The View icon will allow you to view the image file in a new tab, window, or allow you to download the document.
The Individual Actions (the three dots next to the View icon) are identical to the right-click actions and will allow you to view, edit, download, or delete the document.
| Name: | Description: |
|---|---|
| "User" | The user who uploaded the document or file. |
| "Date" | The date the document or file was uploaded. |
| "Type" | The type of document (e.g., PDF, Word, image, Excel, etc.). |
| "Name" | The name of the document. |
| "Comment" | Any comments or notes associated with the document. |
| "Actions" | Allows you to view, edit, download, or delete the document. |
The "Notes" panel will allow you to add and manage notes related to the task. To add a note, click the Plus Sign in the upper right corner.
The Add Note pop-up window will then appear:
In this pop-up window, you will be able to format your text, insert hyperlinks, and more.
To edit or delete a note, return to the "Notes" panel and click the Individual Actions button. From the drop-down, you can then select the "Edit" or "Delete" option to either update or remove the note.