
There are several different ways you can access the Delivery Items Settings page:
You can directly access the Delivery Items Settings page by selecting the Delivery Items feature from MobiWork, and clicking on the "Settings" option:
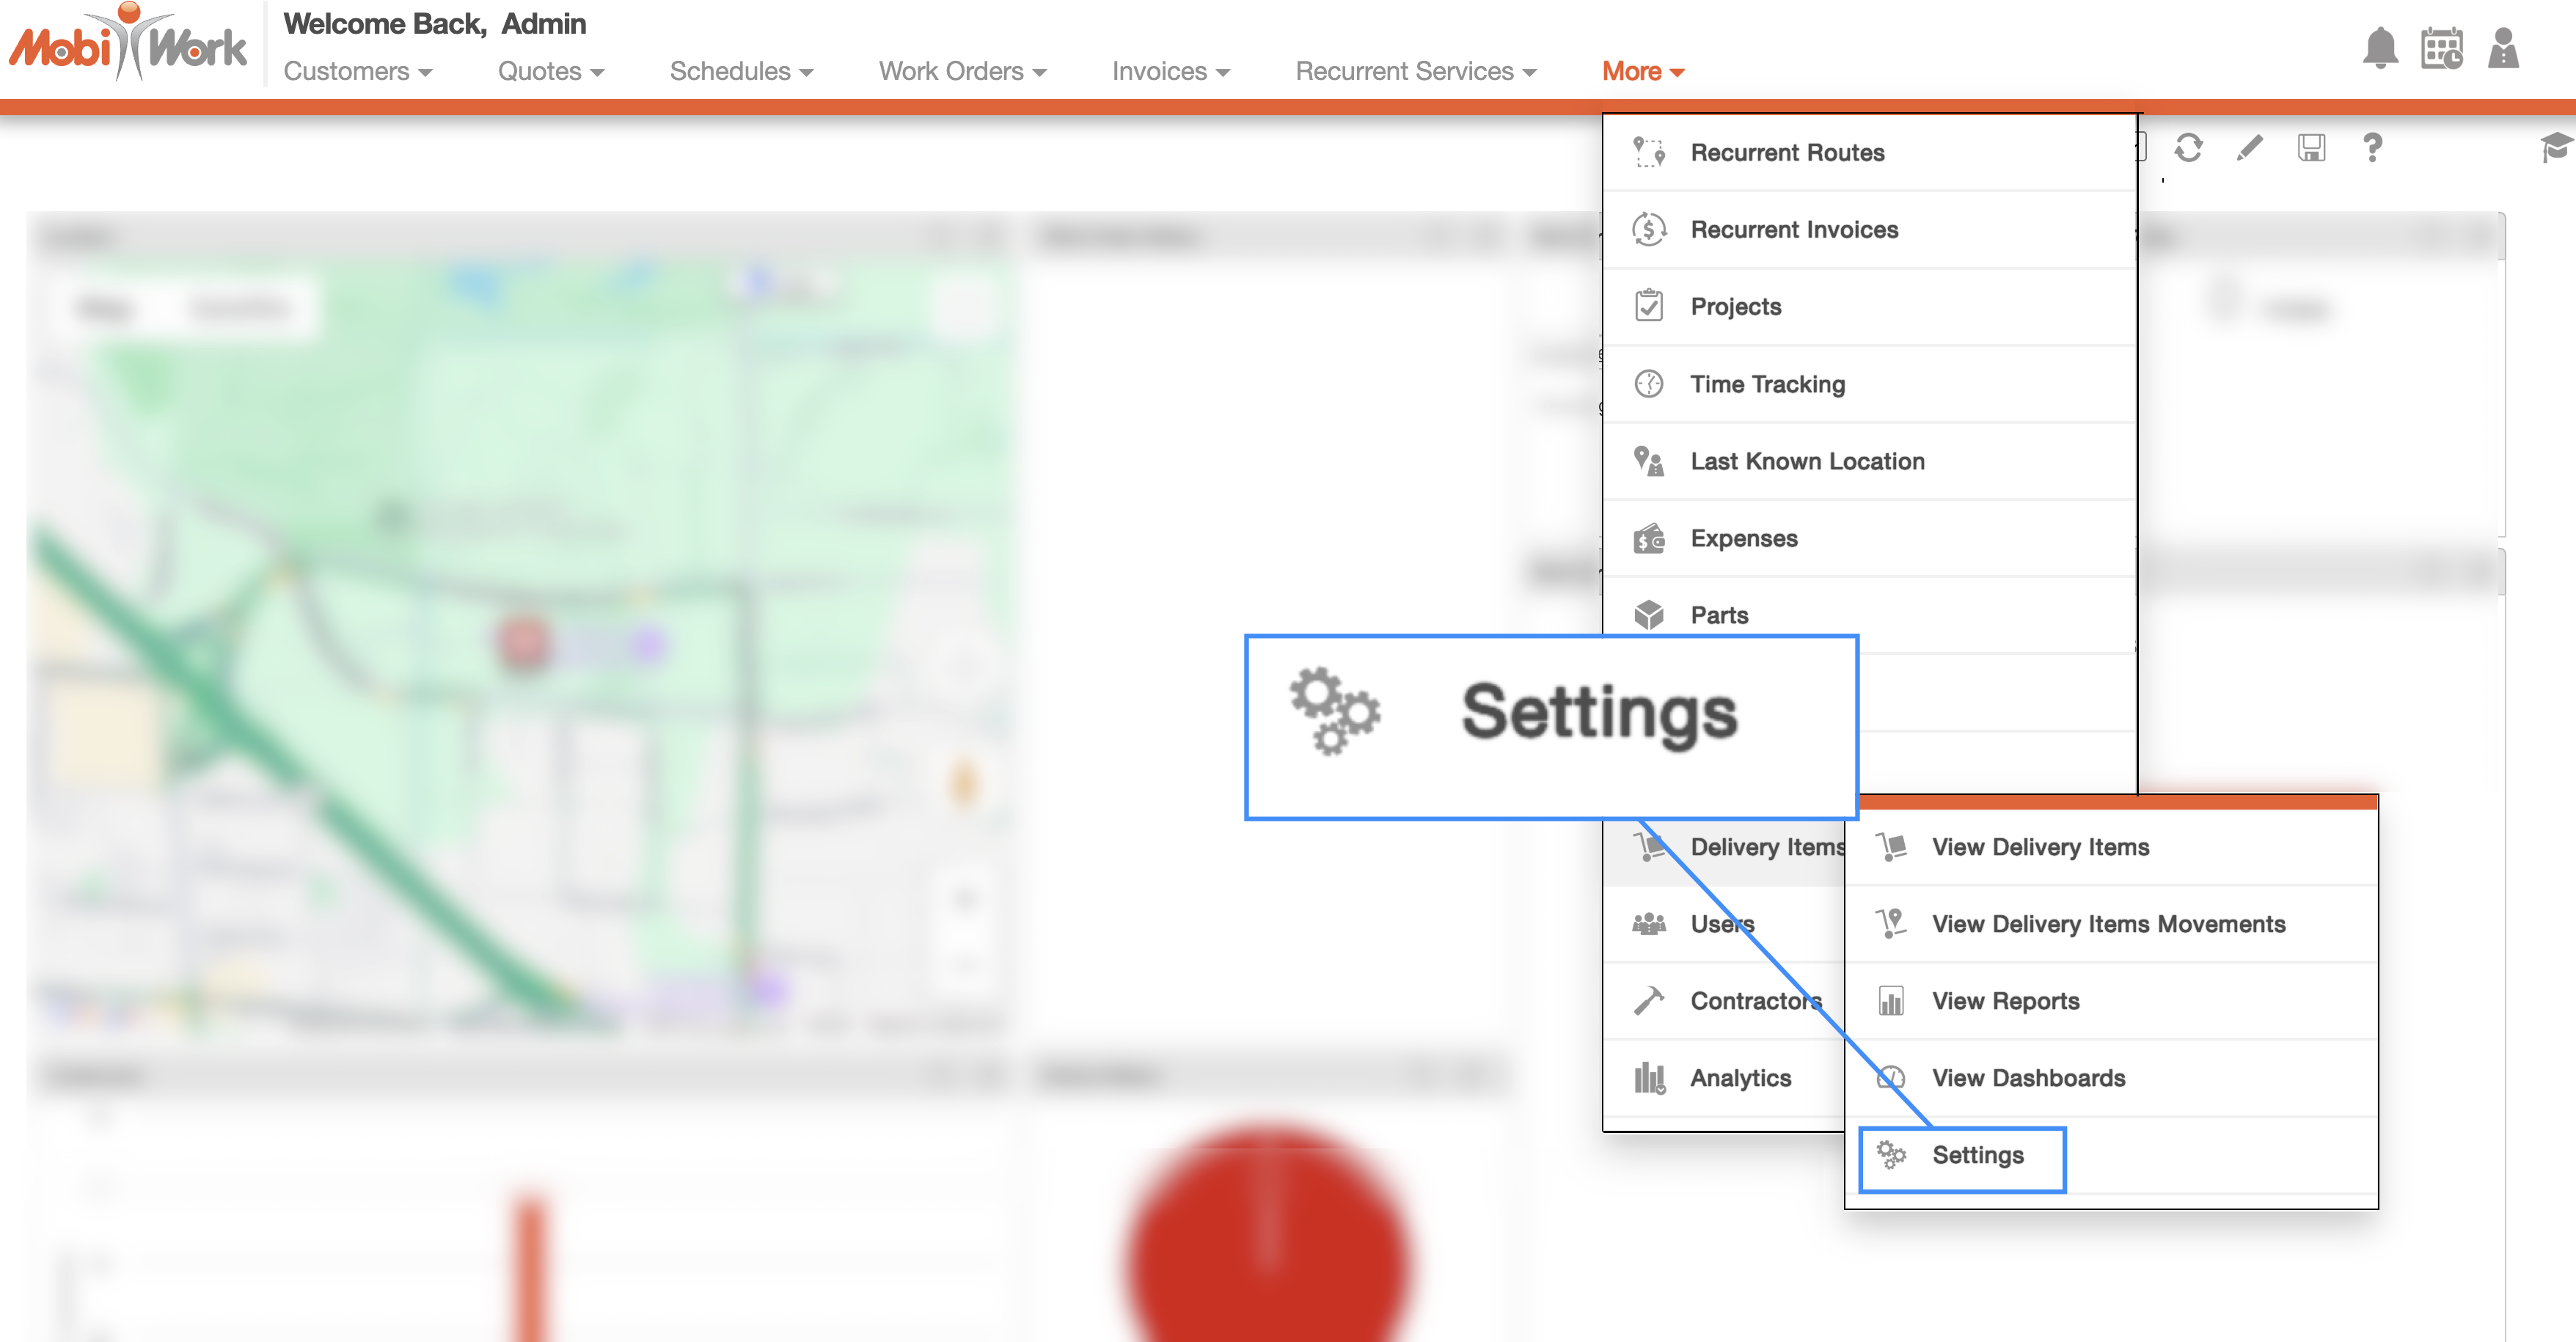
From the Delivery Items feature page, click on the More Actions button located at the top-right of the Delivery Items List page, and from the drop-down select the "Settings" option:

For more information on how to access the Delivery Items List please see the Delivery Items List page.
Once you are on the Delivery Items Settings page there will be a number of different sections:
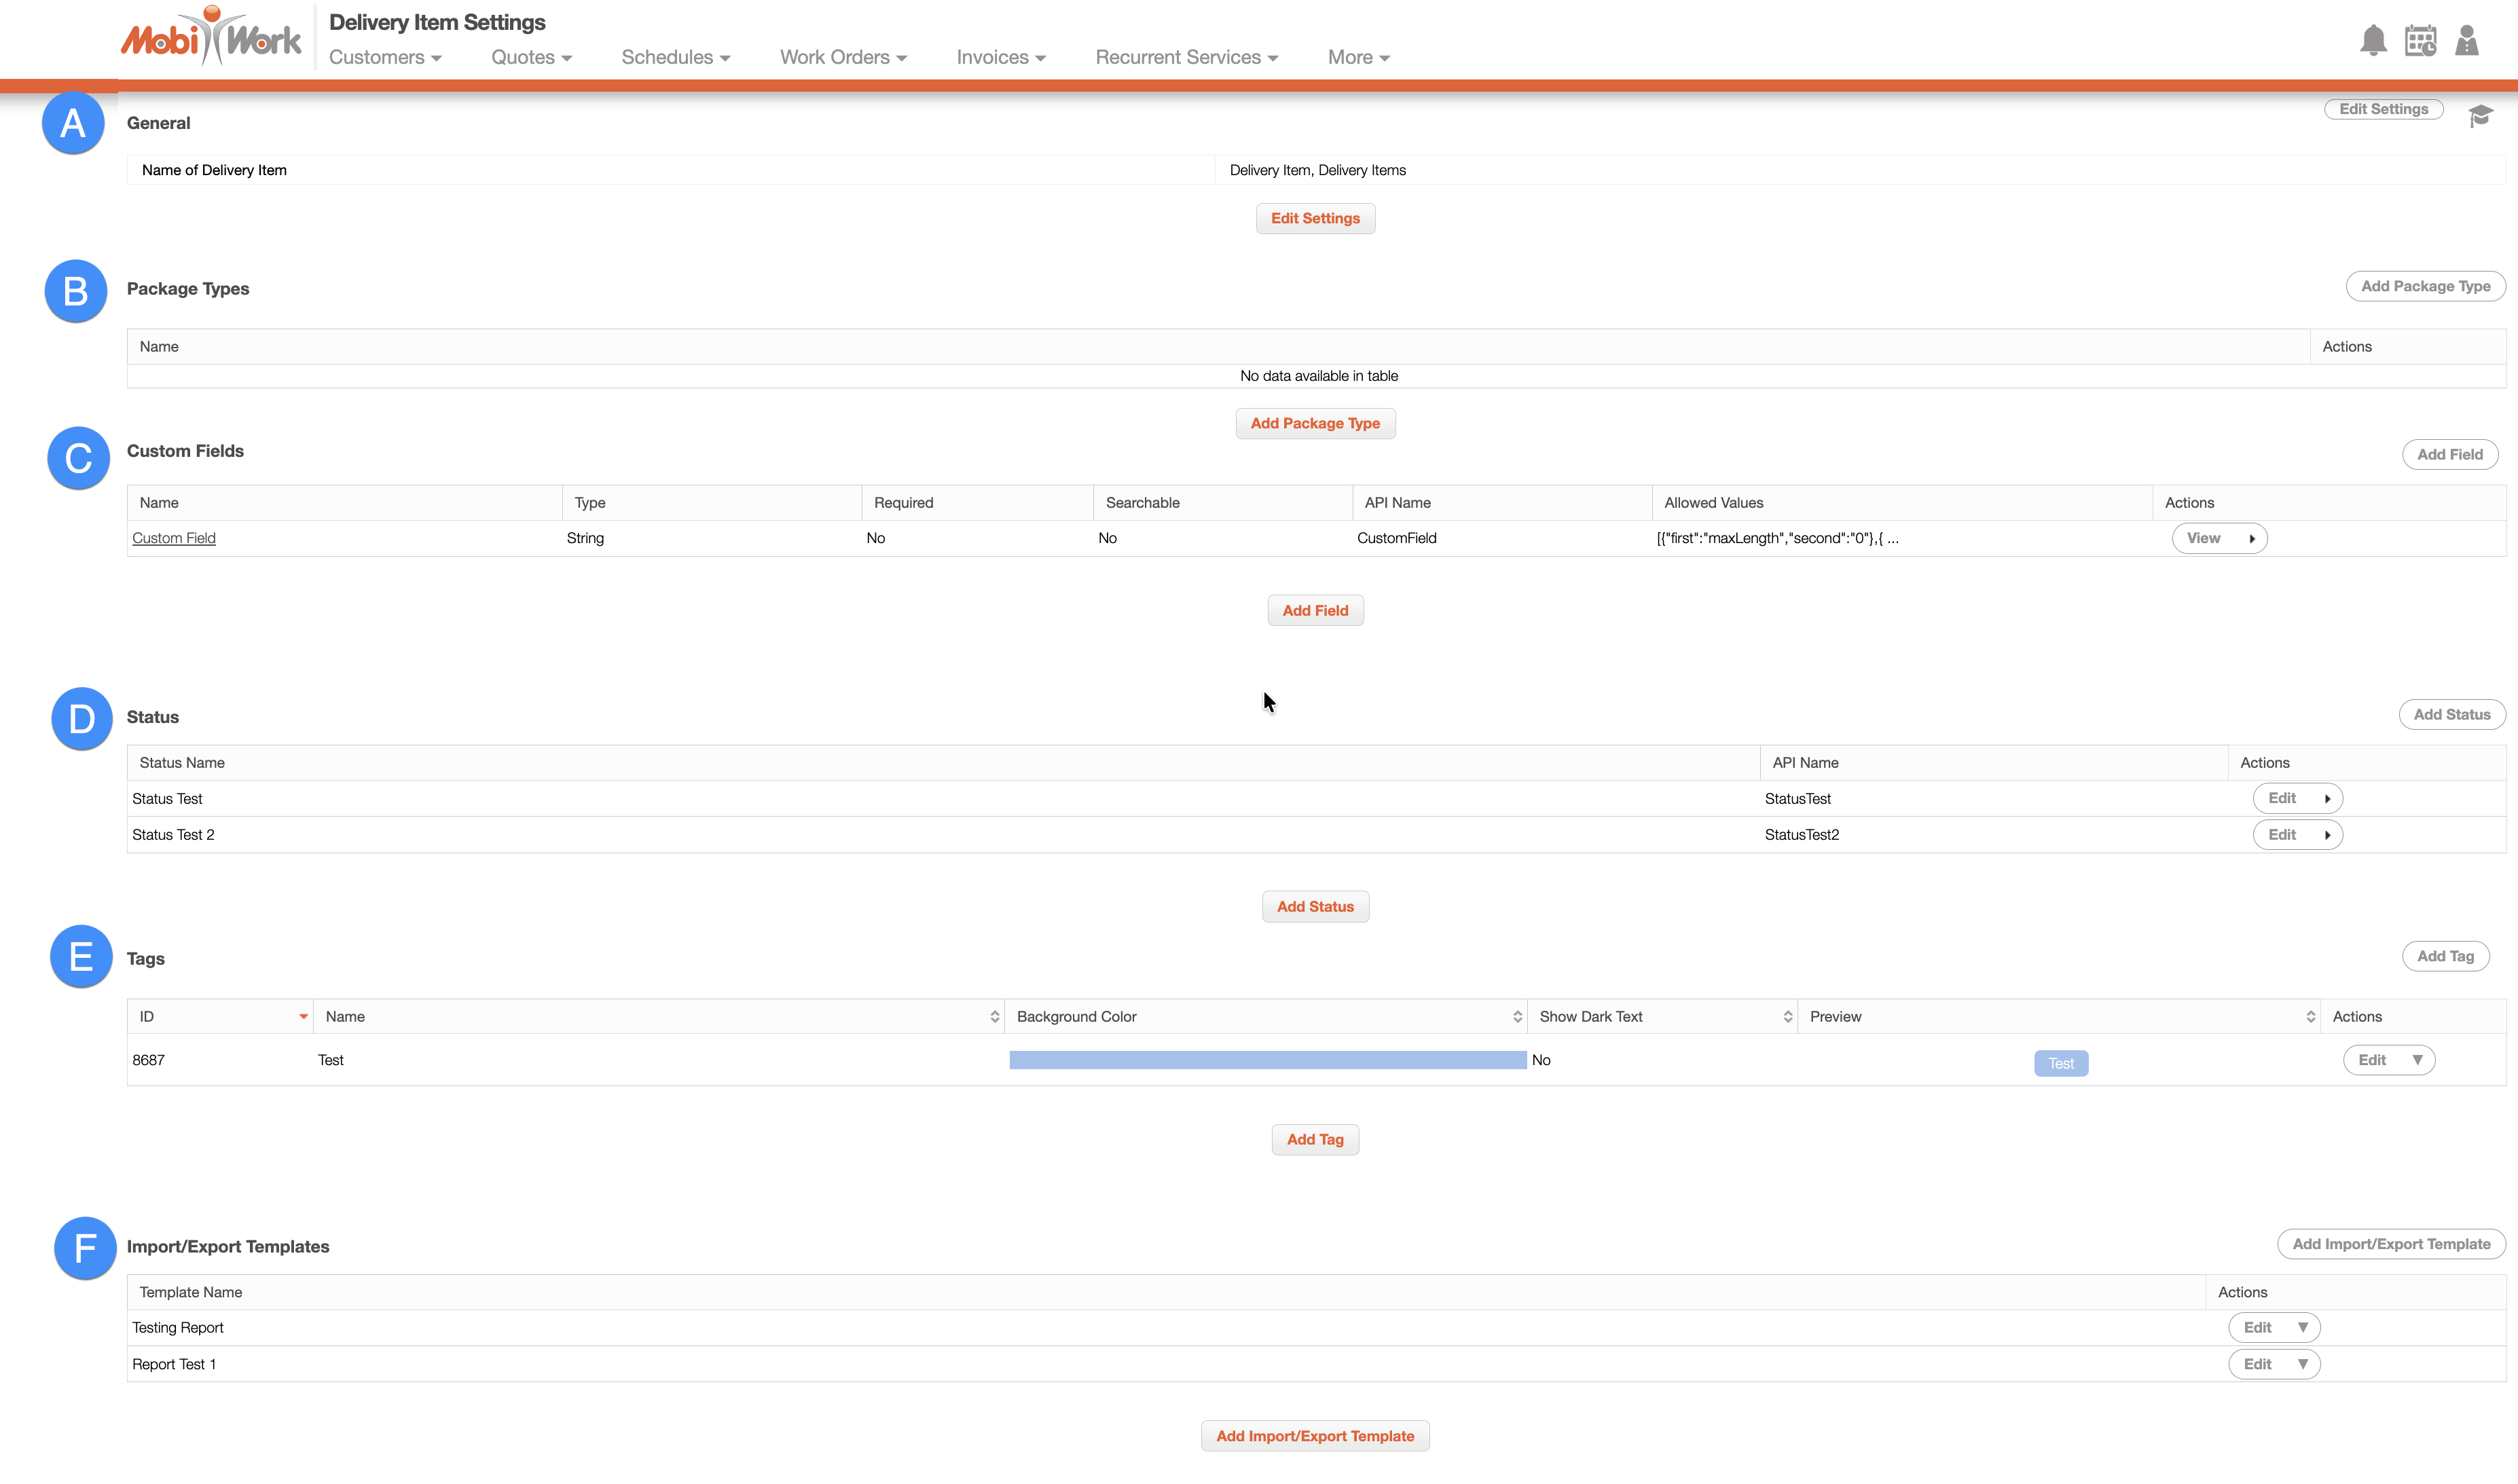
The "General" section will display both the singular and plural versions of how you refer to your MobiWork delivery items (e.g., shipment / shipments, parcel / parcels, etc.):

You can update the term by clicking on the Edit Settings button; you will then be redirected to the Edit Delivery Item Settings page where you can enter the the desired terms:
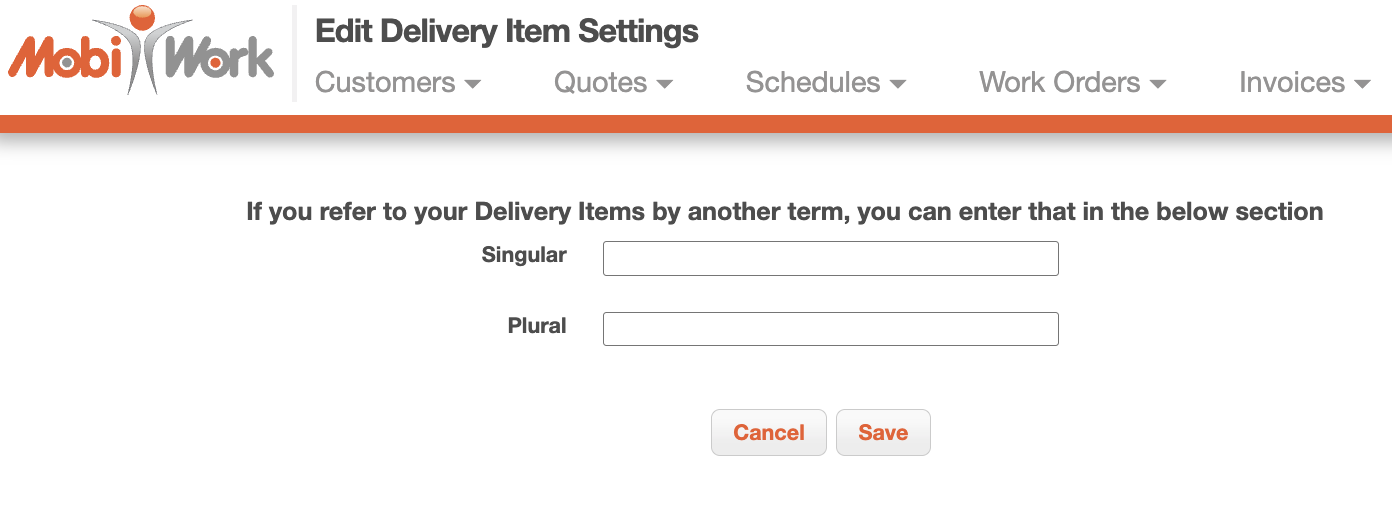
Once you are satisfied with the new term, click the Save button.
The "Package Types" section allows you to define the different package classifications used for your delivery items. Creating package types helps standardize your delivery records, making it easier to organize, identify, and manage items based on their packaging.
To create a new package type, click the Add Package Type button:

The Add Package Type pop-up window will then appear. Enter a descriptive name for the package type, and when you are satisfied with your entry, click the Add button to save it. The new package type will then be available for selection when creating or editing delivery items:

The "Custom Fields" section will allow you to add additional fields for your delivery items. These fields will appear when you add, edit, view, or import/export your delivery items.
The custom fields that you add can be searchable, appear once, be open ended, be required or optional, or can be visible or hidden to the customer:

The list of terms found in the "Custom Fields" section are defined below:
| Name: | Description: |
|---|---|
| "Name" | The designated name or title of the delivery item for easy identification. |
| "Type" | The type of custom field which includes string, number, decimal, date, yes/no, multiple choice, QR code, signature, header, image capture, notes, phone number, phone number plus extension, SSN, time field, text area, vertical separator, vertical spacing, multiple QR code, customer field, product field, user field, project field, asset field, store field, dynamic header, and multiple option drop-down. |
| "Required" | Indicates if the custom field is required to fill or not. |
| "Searchable" | If checked, the custom field will become searchable within the New Search pop-up window. (It will not be searchable in the Free Text Search bar). |
| "API Name" | The API name of the status. After the status is created this name cannot be changed or altered |
| "Allowed Values" | Shows the configuration information; only provides value during troubleshooting. |
| "Actions" | Allows you to view, edit, and delete the selected custom field. |
When you click the Add Field button, the Add Field pop-up window will automatically appear. Input the desired name, type, etc. into the fields provided and then click Add to save the new delivery item custom field:
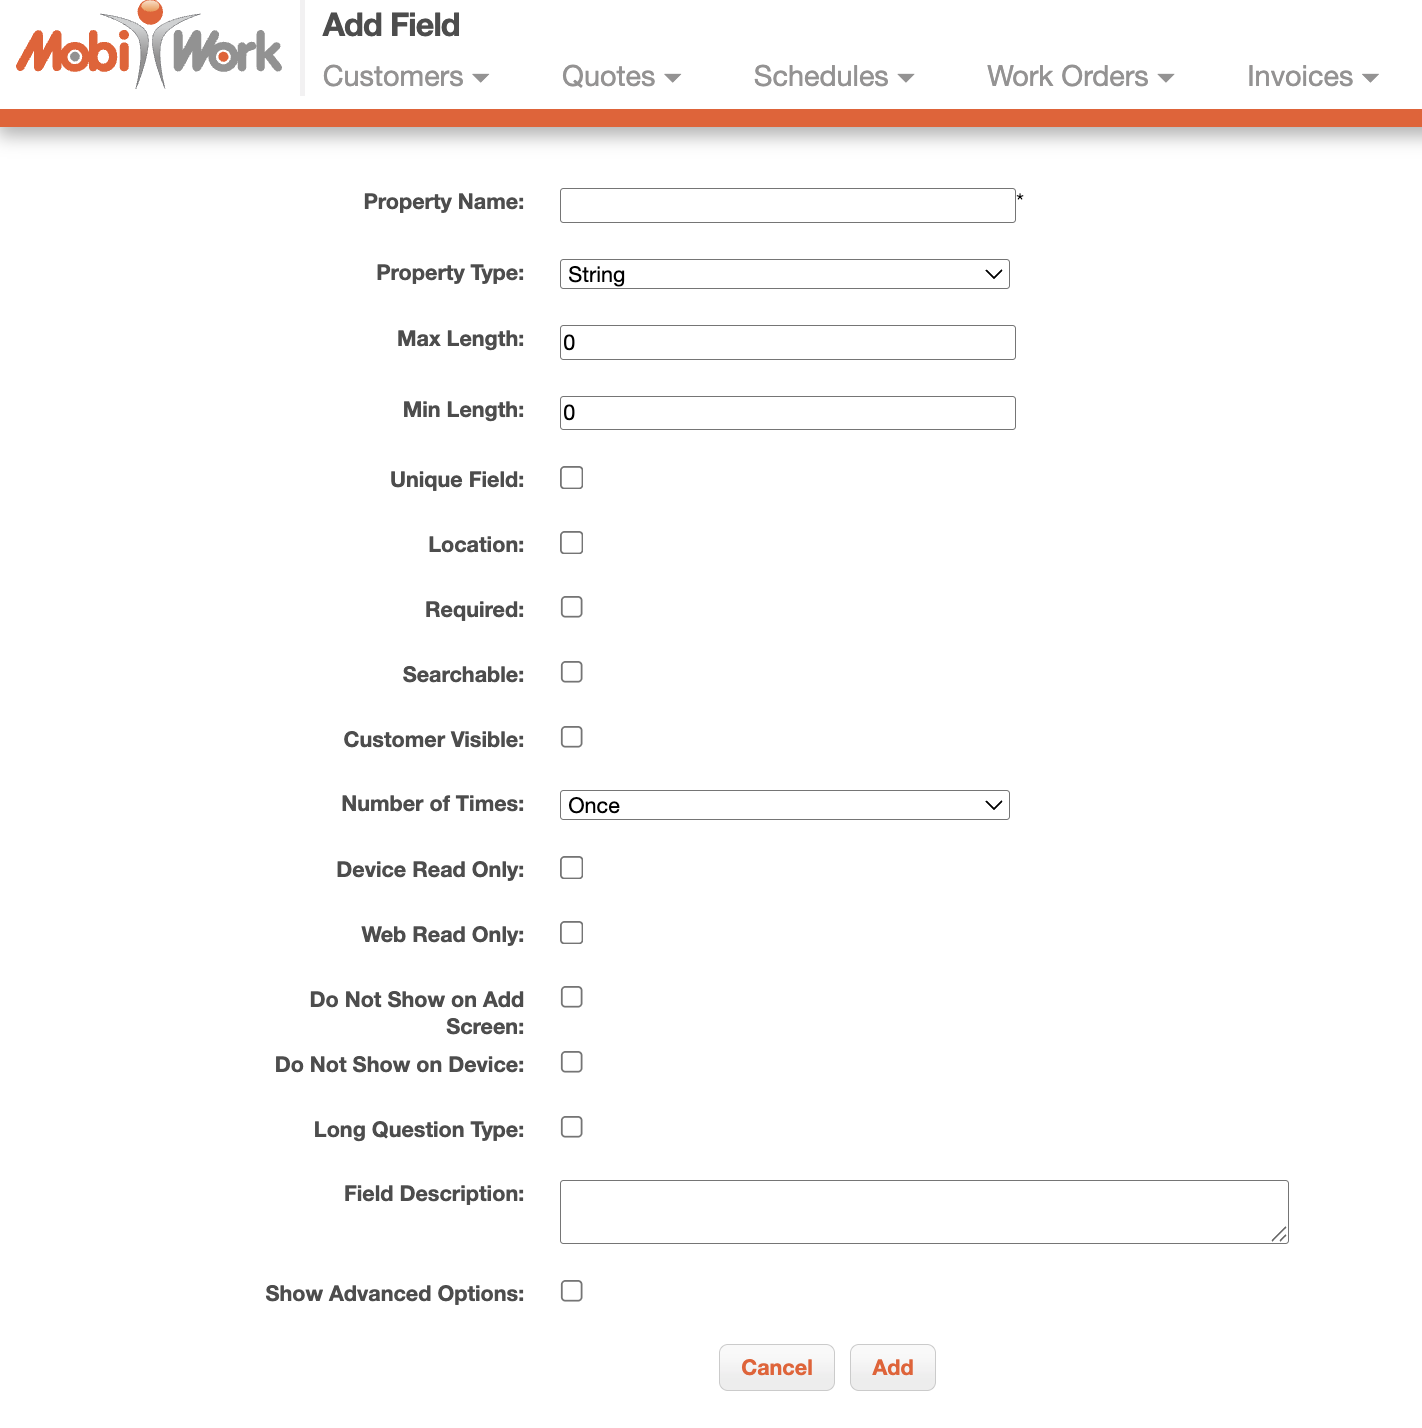
The terms for the adding a custom field are defined below:
| Name: | Description: |
|---|---|
| "Property Name" | The name of the custom field. |
| "Property Type" | is the type of custom field which include string, number, decimal, date, yes/no, multiple choice, QR code, signature, header, image capture, notes, phone number, phone number plus extension, SSN, time field, text area, vertical separator, vertical spacing, multiple QR code, customer field, product field, user field, project field, asset field, store field, dynamic header, and multiple option dropdown. |
| "String" | is a field where the user can enter text. The field supports limiting the number of characters that can be entered. |
| "Number" | is a number field that does not accept decimals. The maximum and minimum number for the field can be defined. |
| "Decimal" | is a number field that accepts decimals. The maximum and minimum number for the field can be defined. |
| "Date" | is a field that allows the selection of the date from a pop-up calendar or a 3-field layout. It can be specified whether the current date will automatically appear and cannot be edited. |
| "Yes/No" | is a yes/no field indicated by a checkbox. |
| "Multiple Choice" | is a multiple-choice field where the values within it can be specified within "Select Values" by placing a comma between each value. You can indicate if the first value is invalid. For instance, if in the first value you want to give instructions for the multiple choice such as, "Please select from the following:" |
| "QR Code" | is a field that captures barcode/QR code data (only for the device). |
| "Signature" | is a signature capture field to capture signatures (only for the device). |
| "Header" | is a bold label that does not allow input. |
| "Image Capture" | is an image capturing field that displays in the mobile device that allows photos to be taken to upload into the field or uploads existing images from the mobile device's gallery into the field. It can be specified to not allow images from the device gallery. |
| "Notes" | adds notes to the notes list for the entity. For example, if a form is filled for a work order, then the note field content will be added to the work order notes list. |
| "Phone Number" | is a phone number field that can be indicated if the phone number will appear in one or three fields. |
| "Phone Number Plus Extension" | is a phone number field that allows for an extension to be entered. It can be indicated if the phone number plus extension will appear in one or four fields. |
| "SSN" | allows the inputting of the social security number within 3 fields (###-##-#### format). |
| "Time Field" | Allows you to specify a 12- or 24-hour time format |
| "Text Area" | is a larger text field for multiple sentences, notes, etc. |
| "Vertical Separator" | is a vertical line separator for the web only. |
| "Vertical Spacing" | places spacing between rows for the web only. |
| "Multiple QR Code" | allows the scanning and inputting of multiple QR codes continuously in this field. |
| "Customer Field" | allows the selection of the customers available in the Permissions to appear in the field. |
| "Product Field" | allows the selection of the products available in the Permissions to appear in the field. |
| "User Field" | allows the selection of the users available in the Permissions to appear in this field. Default to device user, if selected, will display the user who is logged in on the device within the field. |
| "Project Field" | allows the selection of the projects available in the Permissions to appear in the field. |
| "Asset Field" | allows the selection of the assets available in the Permissions to appear in the field. Associate asset with work order, if selected, and if a custom field or form is associated to a work order then it will associate the asset with the work order. |
| "Store Field" | allows the selection of the stores available in the Permissions to appear in the field. |
| "Dynamic Header" | allows you to show data from the associated work order or customer (such as work order description, customer's name, etc.). |
| "Multiple Option Dropdown" | is a drop down where you can select multiple options. |
| "Required" | Indicates if the custom field is required to fill or not. |
| "Searchable" | If checked, the custom field will become searchable within the New Search pop-up window. (It will not be searchable in the Free Text Search bar) |
| "Customer Visible" | will allow customers to view the form field on the Customer Portal. |
| "Number of Times" | include once which will show the form field one time or multiple open-ended which will add the form field multiple times. |
| "Device Read Only" | means the field cannot be edited on the device. |
| "Web Read Only" | means the field cannot be edited on the web. |
| "Long Question Type" | is for the label of the field. It is a user interface setting which gives more space for the label on the device. |
| "Field Description" | are any comments that describe the field. |
| "Show Advanced Options" | include QuickBooks Field Name, Label CSS, and Initial Value for this Field. |
| "QuickBooks Field Name" | only applies to customer forms/custom fields. This refers to the name of the corresponding field in QuickBooks which is used during the import/sync. |
| "Label CSS" | is a web only feature which allows the entered HTML CSS attributes to be applied to the field label (for example, showing the label of the field in red with a font size of 20 px). |
| "Initial Value for this Field" | sets the initial value of this field when the form is added/opened on the device. At present, this needs to be configured by MobiWork's Professional Services team. |
The "Status" section allows you to create and manage the different statuses used to track the progress and availability of your delivery items. Custom statuses provide greater visibility into where each delivery item is within its lifecycle, helping your team quickly identify its current state.

To create a new status, click the Add Status button:
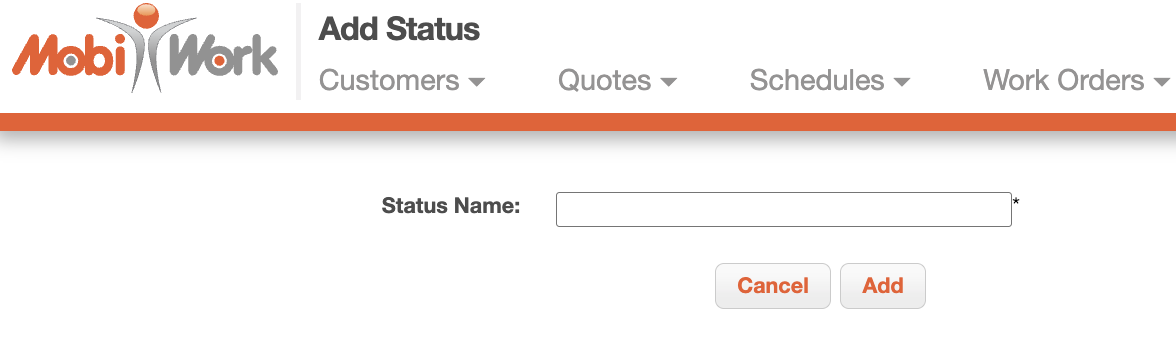
You will then be redirected to the Add Status page. Input the name of the status, and when you are satisfied with your entry, click the Add button to save it. The new status will then be available for selection when creating or editing delivery items, allowing you to consistently track and manage your delivery inventory.
Tags serve as a visual indicator of custom statuses or categories, greatly enhancing organizational clarity by enabling you to identify designated delivery items at a glance. These labels are highly adaptable, making it possible to tailor them to your business's unique requirements; this flexibility means that tags can represent a wide spectrum of information.
When you attach tags to delivery items, you establish an efficient method for sorting and locating delivery items based on specific criteria. This streamlined approach proves invaluable when handling a substantial volume of delivery items.
To add a new tag in your MobiWork Delivery Items settings, click on the Add Tag button:

Once you click on the Add Tag button, the Add Tag pop-up window will then appear:

In this pop-up window, you can enter the following information:
- Enter the name of the tag.
- Instead of using a white font, you can choose to use a dark font. This is helpful when using a light-colored background for the tag to help the text stand out.
- Select the background color of the tag.
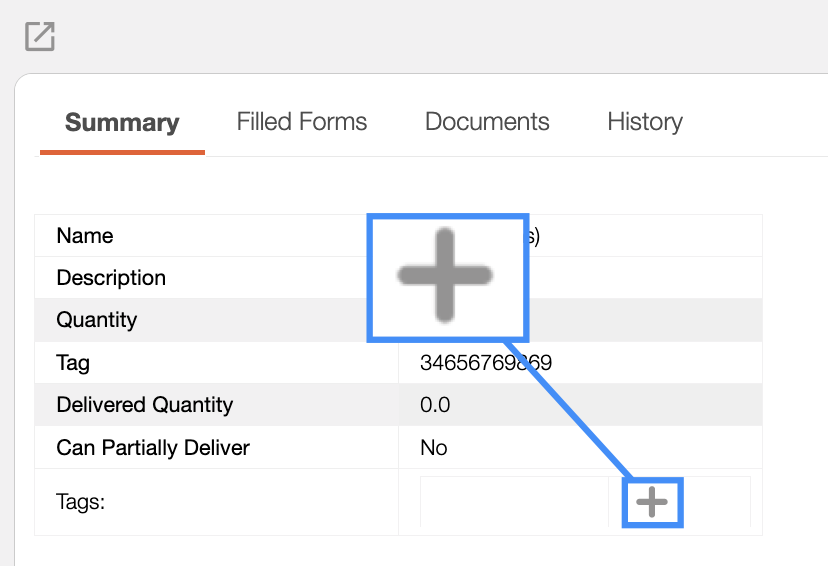
To add a new tag to your delivery item, open the View Delivery Item pop-up window and in the "Summary" panel click on the Plus Sign for the "Tags" column; if you have already added tags to your customer, this icon will turn into a Pencil icon:
If you would like to remove any tags from a delivery item, click on the Pencil icon again. The Add Tag pop-up window will appear again; from this window you will then be given the option to remove the tags by unchecking the specified tags:
Once you are satisfied that the selected tags have been removed, press the Add button to save your changes.
The "Import/Export Templates" section allows you to customize the information displayed in your "Delivery Items" reports, ensuring that the report contains the data most relevant to your organization's needs.
You can add, remove, and arrange report columns and fields to determine exactly which delivery item information is included. This flexibility enables you to create reports tailored to your inventory management, tracking, and operational requirements.
To create a new report, click on the Add Import/Export Template button:

You will then be brought to the Add Report page:

From this page, you can add, remove, and arrange report columns and fields. To add a new column, simply click the Add Column button:
Select the desired data field from the right panel and then enter the corresponding column name. Once you are satisfied with the information entered, click on the Save button to confirm the new field.

Repeat the steps as necessary until you have all the desired fields for your report. Once your report has been configured, you can easily export the results to Microsoft Excel for further analysis, record-keeping, or sharing with your team. Likewise, report configurations can be imported when needed, helping you maintain consistent reporting across your organization.
You will then be able to import or export this report from the Delivery Items' More Actions button:
