The most straightforward and convenient way to view your contractor is by accessing the "List" tab. For further details on how to access this page, please refer to the Contractor List section.
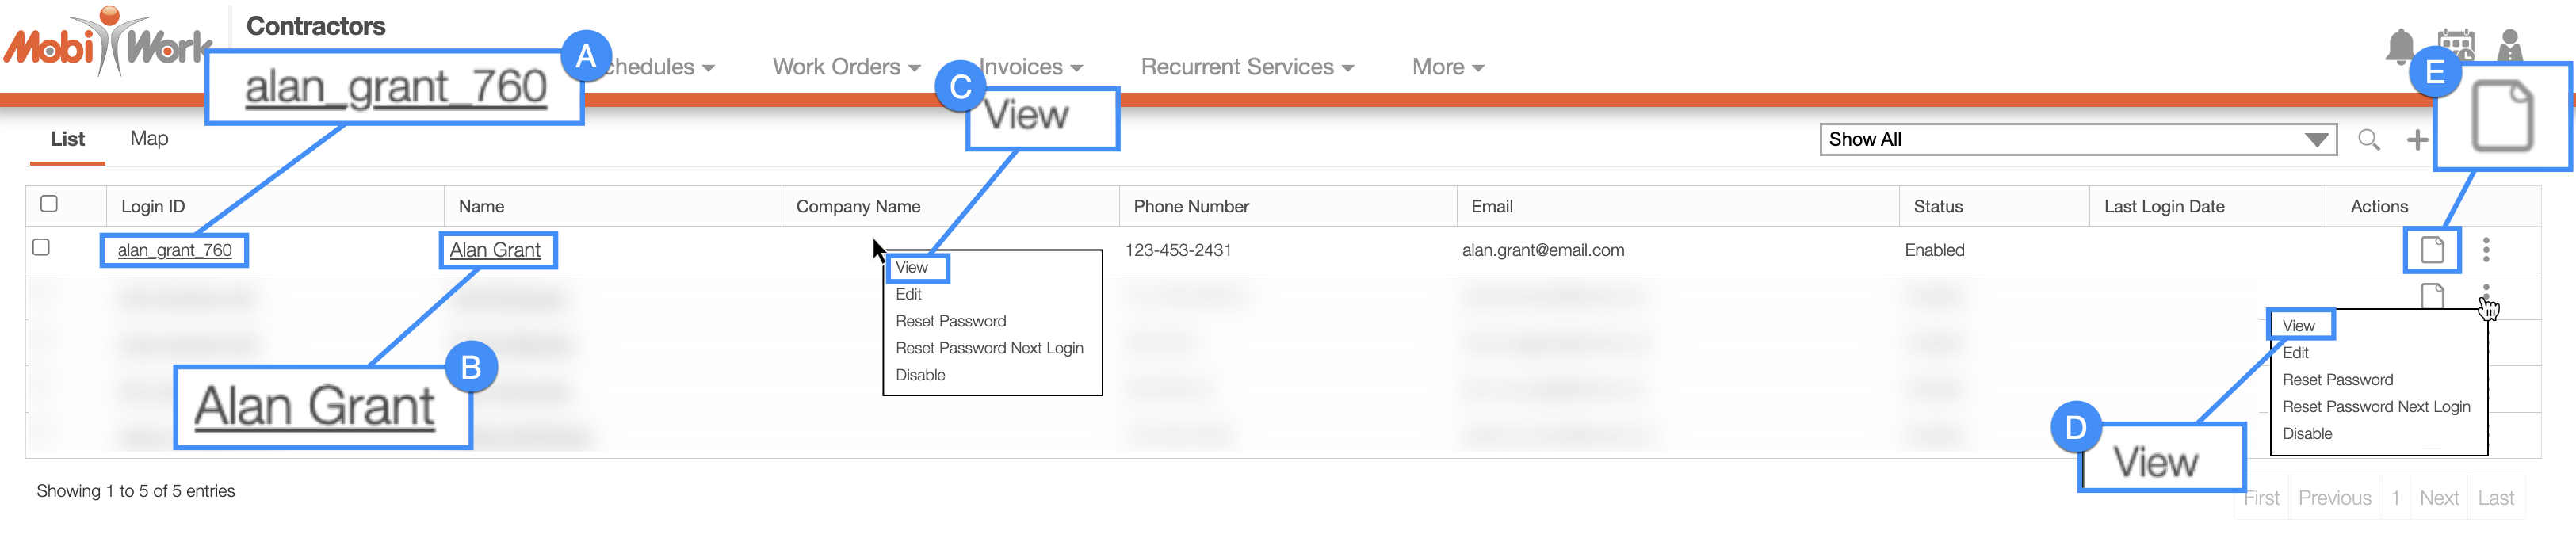
Once you are on the "List" tab, there are four different ways to access the View Contractor pop-up window from this screen:
Select the desired contractor ID.
Click on the contractor's name.
Right-click on the selected contractor and click on the "View" option from the drop-down.
Click on the "View" option from the Individual Actions drop-down.
Select the View icon under the "Actions" column.
Once you open the View Contractor pop-up window, you will be automatically directed to the "Summary" tab:

The View Contractor pop-up window has similar tabs as the View User pop-up window. The following features are available in all twelve tabs and in both, the pop-up window, and the full-size view:
Please note that if you would like to easily close this pop-up window, you can click on the esc button from your keyboard.
Contractor Full-Size View
The full-size View Contractor pop-up window can be seen below. All the tabs, buttons, and features are identical to how they would appear in the pop-up window:

The full-size View Contractor pop-up window can be seen below. All the tabs, buttons, and features are identical to how they would appear in the pop-up window:

Contractor Tabs
There are twelve tabs in all for the View Contractor pop-up window; each tab displays different information regarding the contractor:

You can navigate to other tabs by clicking on the desired tab.
Contractor Name
The contractor name will be displayed towards the top of the View Contractor pop-up window:

Upper Right Corner Actions
The contractor's Upper Right Corner Actions can be found in the top-right corner of the View Contractor pop-up window. These actions are located in this section, regardless of the tab you are on:
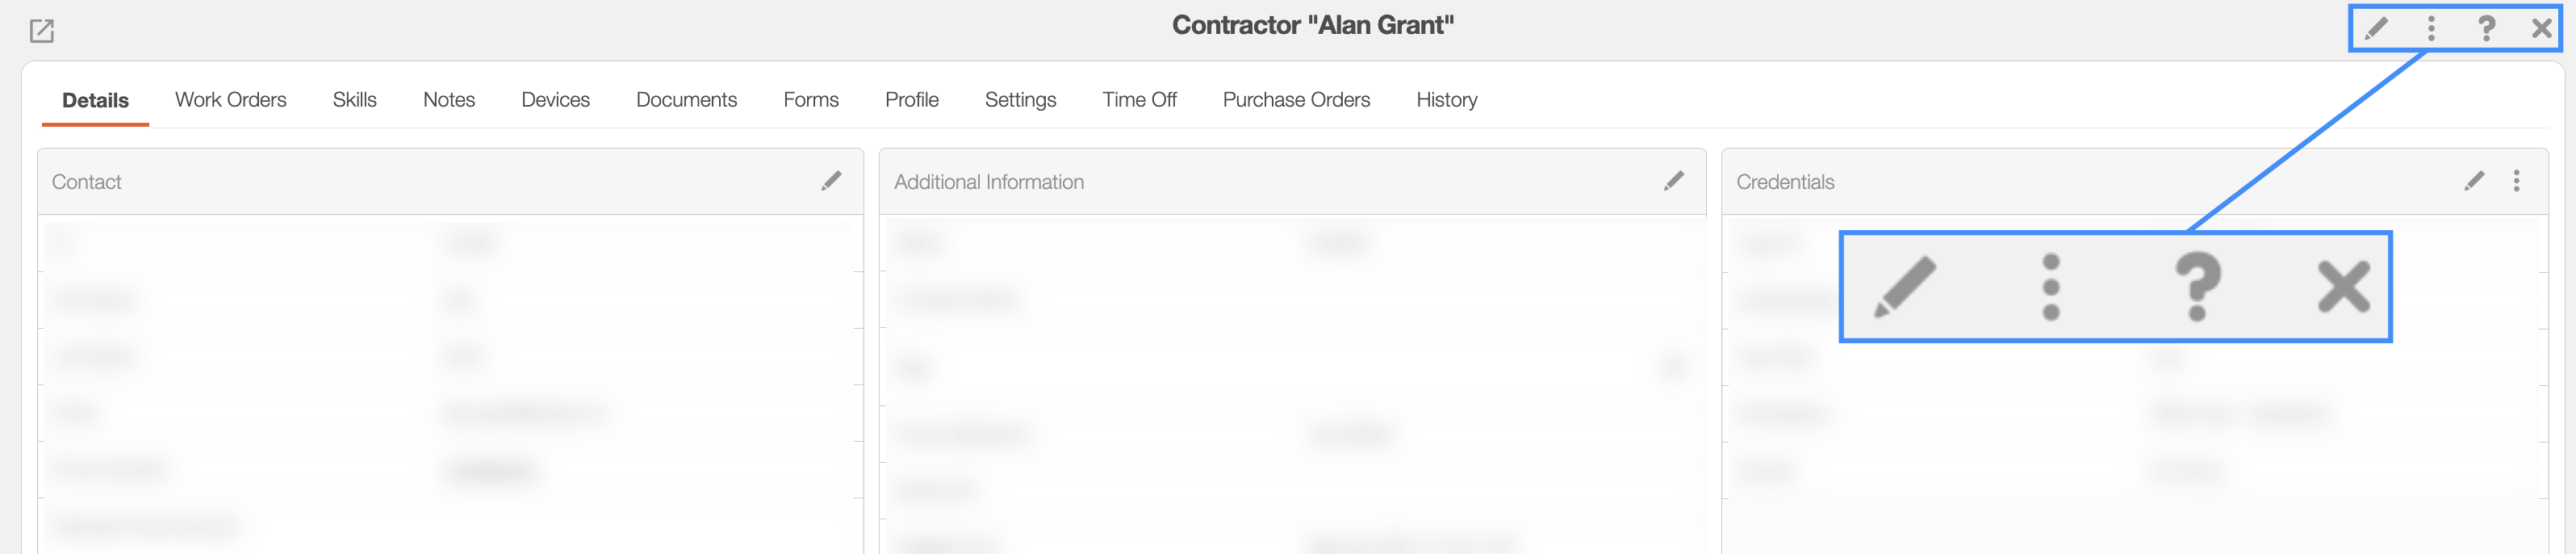
The Upper Right Corner Actions section includes:
The Pencil icon will allow you to edit the contractor's data.
The Individual Actions button will allow you to perform various actions.
The Question Mark button which will direct you to the respective MobiWork Features page.
The X button will close out of the View Contractor pop-up window.
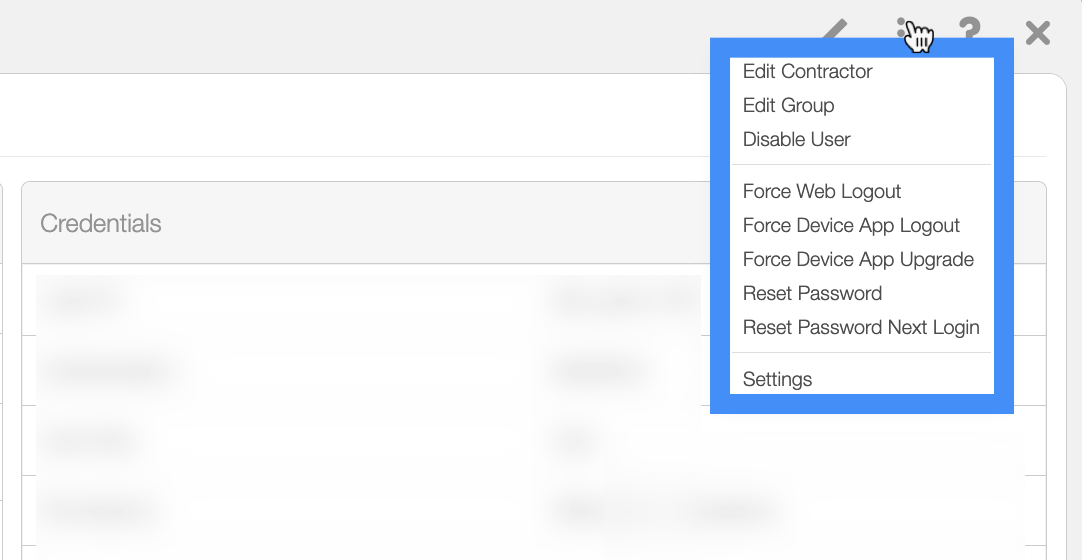
After clicking on the vertical three dots in the top-right corner, the Individual Actions drop-down menu will appear:
From the Individual Actions drop-down menu, you can select various actions that will help manage the specified contractor.
The complete list of actions found in the Individual Actions drop-down menu are defined below:
| Name: | Description: |
|---|---|
| "Edit User" | Allows the user to edit the specified contractor. |
| "Edit Group" | Edits the group that the contractor is associated with. |
| "Disable User" | Disables the contractor so they are no longer active on MobiWork. if you disable your contractors they will remain in the system and their historical data will still be available to you. |
| "Force Web Logout" | Remote forces the contractor to log out of their session on the MobiWork web application. |
| "Force Device Logout" | Forces the selected contractor to be logged out from their device. |
| "Force Device App Upgrade" | Forces the contractor's device to upgrade to the newest MobiWork app version. |
| "Reset Password" | Resets the password for the specified contractor. |
| "Reset Password Next Login" | Forces the contractor to update their password upon their next login session. |
| "Settings" | Directs the user to the Contractor Settings page. |
The "Details" tab is the default tab that will appear once you open the View Contractor pop-up window. It will display the profile information and credential data associated with the contractor:
Where applicable, you can edit or add additional information directly in the "Details" tab:
The Arrow icon (found in the top left of designated boxes) will open the corresponding tab in the View Contractor pop-up window.
The Individual Actions button (the three dots) will display different options (e.g., view, edit, delete, etc.) depending on the corresponding panel.
The View icon will allow you to view the selected data in a separate window.
The Pencil icon will allow you to edit the selected data or field.
The Plus Sign icon will allow you to add additional special notes, notes, reminders, assets, work orders, etc.
The Trash Can icon will allow you to delete the selected data.
Contact
The "Contact" panel will contain general contractor contact information, including their first and last name, contractor ID, email, job title, and more. This information is populated when a contractor is added or can be updated in the Edit Contractor pop-up window.
The other information found in the "Contact" panel are described below:
| Name: | Description: |
|---|---|
| "ID" | The ID number of the contractor |
| "First Name" | The contractor's first name. |
| "Last Name" | The contractor's last name. |
| "Email" | The email address associated with the contractor. |
| "Phone Number" | The contractor's main phone number. |
| "Alternate Phone Number" | The contractor's alternate phone number. |
| "Job Title" | The job title of the contractor. |
| "Supervisor" | The supervisor of the contractor; the supervisor can access and take action on the contractor. |
| "Fax Number" | The fax number associated with the contractor. |
| "Address" | The address associated with the contractor. |
Reminders
The "Reminders" panel will contain the scheduled reminders for the selected contractor(s). To add a reminder, click the Plus Sign in the upper right corner. To edit a reminder, click on the Pencil icon or if you would like to delete a reminder, click on the Trash Can icon.
When adding or editing a reminder, you can specify both the date for sending the reminder and the priority level of the task that the contractor(s) is being reminded of.
Additional Information
The "Additional Information" panel will contain supplemental contractor information regarding their account and device access. This information inlcudes date and time the contractor's account was created, the last time the contractor was logged onto their account, and more.
The other information found in the "Additional Information" panel are described below:
| Name: | Description: |
|---|---|
| "Status" | Lists the status of the contractor. Can be enabled (can login to the system), disabled (cannot login to the system), registration incomplete, or awaiting confirmation. |
| "Company Name" | The company that the contractor associated with. |
| "Tags" | Tags act as a visual indicator of a custom status or category, thus improving organizational clarity with the ability to identify specified tagged contractors at a glance. |
| "Home Dashboard" | Indicates the type of dashboard that the contractor uses in MobiWork. |
| "External ID" | The external ID (outside of MobiWork) associated with the contractor. |
| "Created Time" | The date and time that the contractor was created. |
| "Last Login Time" | The last time the contractor logged in to MobiWork. |
| "User Device Version" | The version that the contractor's mobile device utilizes. |
| "Pay Rate" | The pay rate that the contractor earns. |
| "Billable Rate" | The billable rate that the contractor's company charges you over time. |
| "Vendor" | The vendor associated with the contractor. |
Credentials
The "Credentials" panel will contain the contractor's login information, including their login ID, how the user can access their MobiWork account (i.e., MobiWork user ID and password, or their Google account, or their Microsoft account), any groups that the user is associated with, and more.
From the Individual Actions in the top right corner of the "Credentials" panel, you will be able to reset the contractor's password.
The other information found in the "Credentials" panel are described below:
| Name: | Description: |
|---|---|
| "Login ID" | The MobiWork login ID of the contractor. |
| "Authentication" | Displays how the contractor can acccess their MobiWork account (i.e., MobiWork user ID and password, or their Google account, or their Microsoft account). |
| "User Role" | The contractor's role. Can either be a user or global admin role. User's permissions can be edited whereas global admins have access to all actions within MobiWork. |
| "Permissions" | Displays the permission template that the contractor is utilizing. The permission templates dictate what actions, features, etc. that the contractor can access. |
| "User Group" | Lists the groups associated with the contractor. |
Notes
The "Notes" panel will allow you to add and manage notes related to the contractor. To add a note, click the Plus Sign in the upper right corner.
The Add Note pop-up window will then appear:
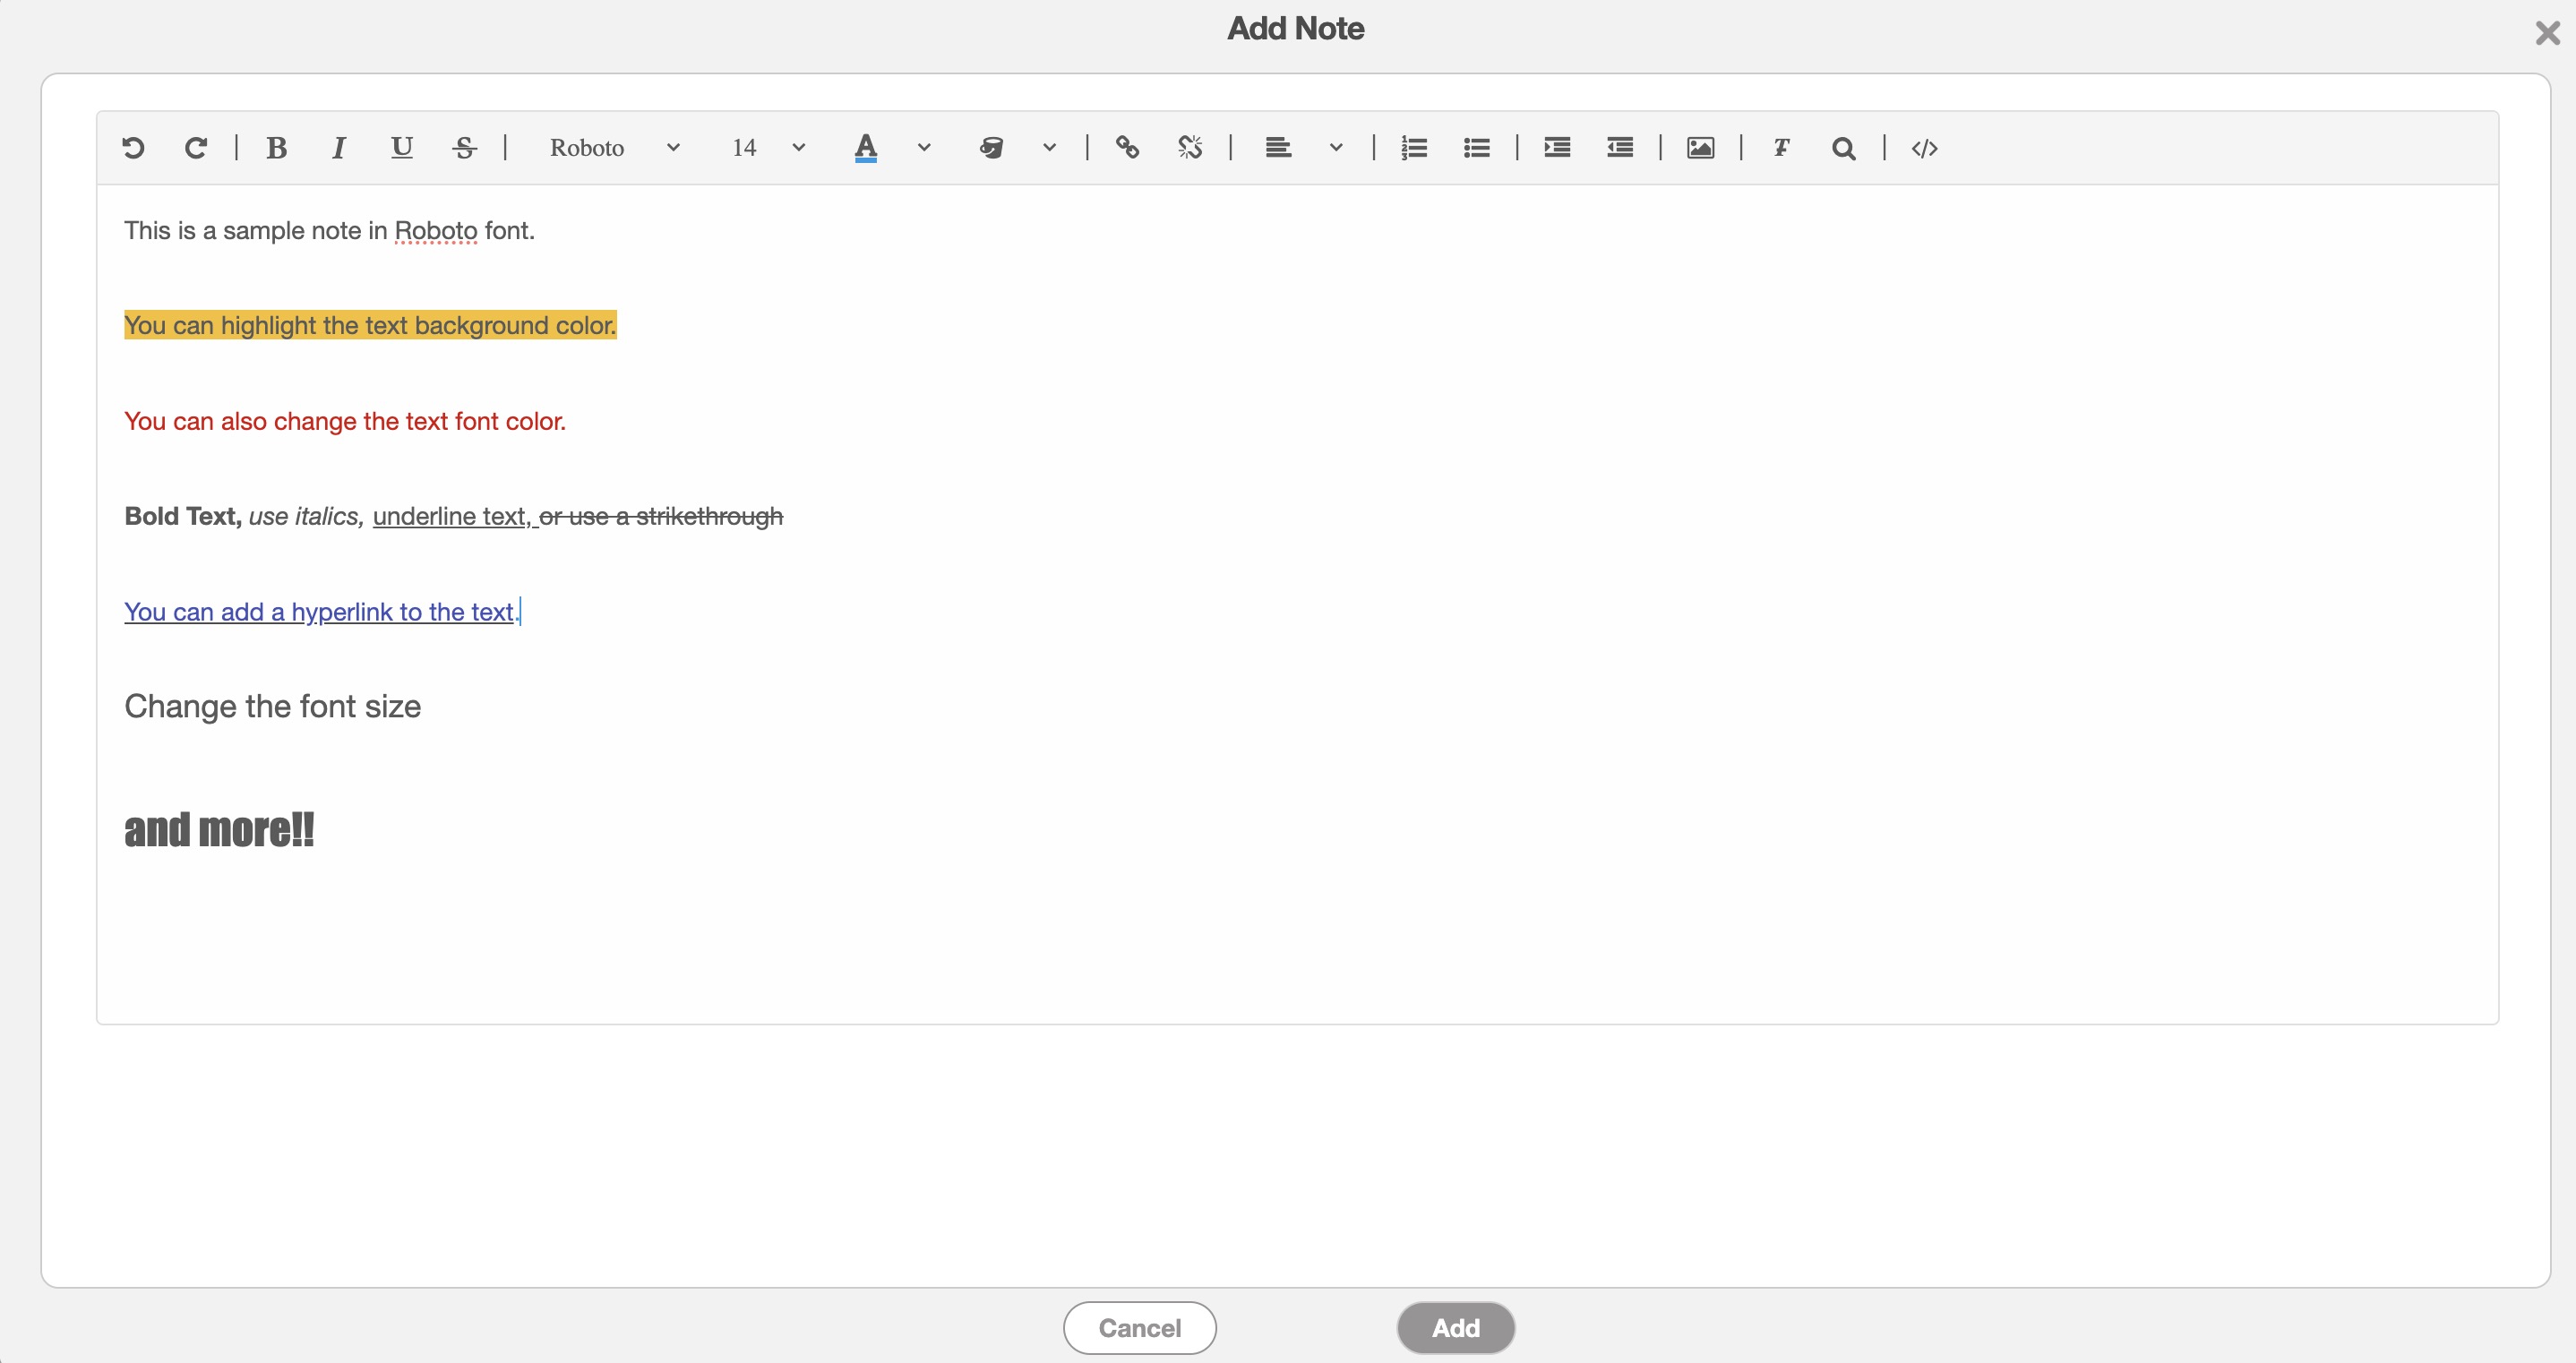
In this pop-up window, you will be able to format your text, insert hyperlinks, and more.
To edit or delete a note, return to the "Notes" panel and click the Individual Actions button. From the drop-down, you can then select the "Edit" or "Delete" option to either update or remove the note.
The "Work Orders" tab is the second tab located in the View Contractor pop-up window. This tab will display all the work orders that are assigned to the contractor:
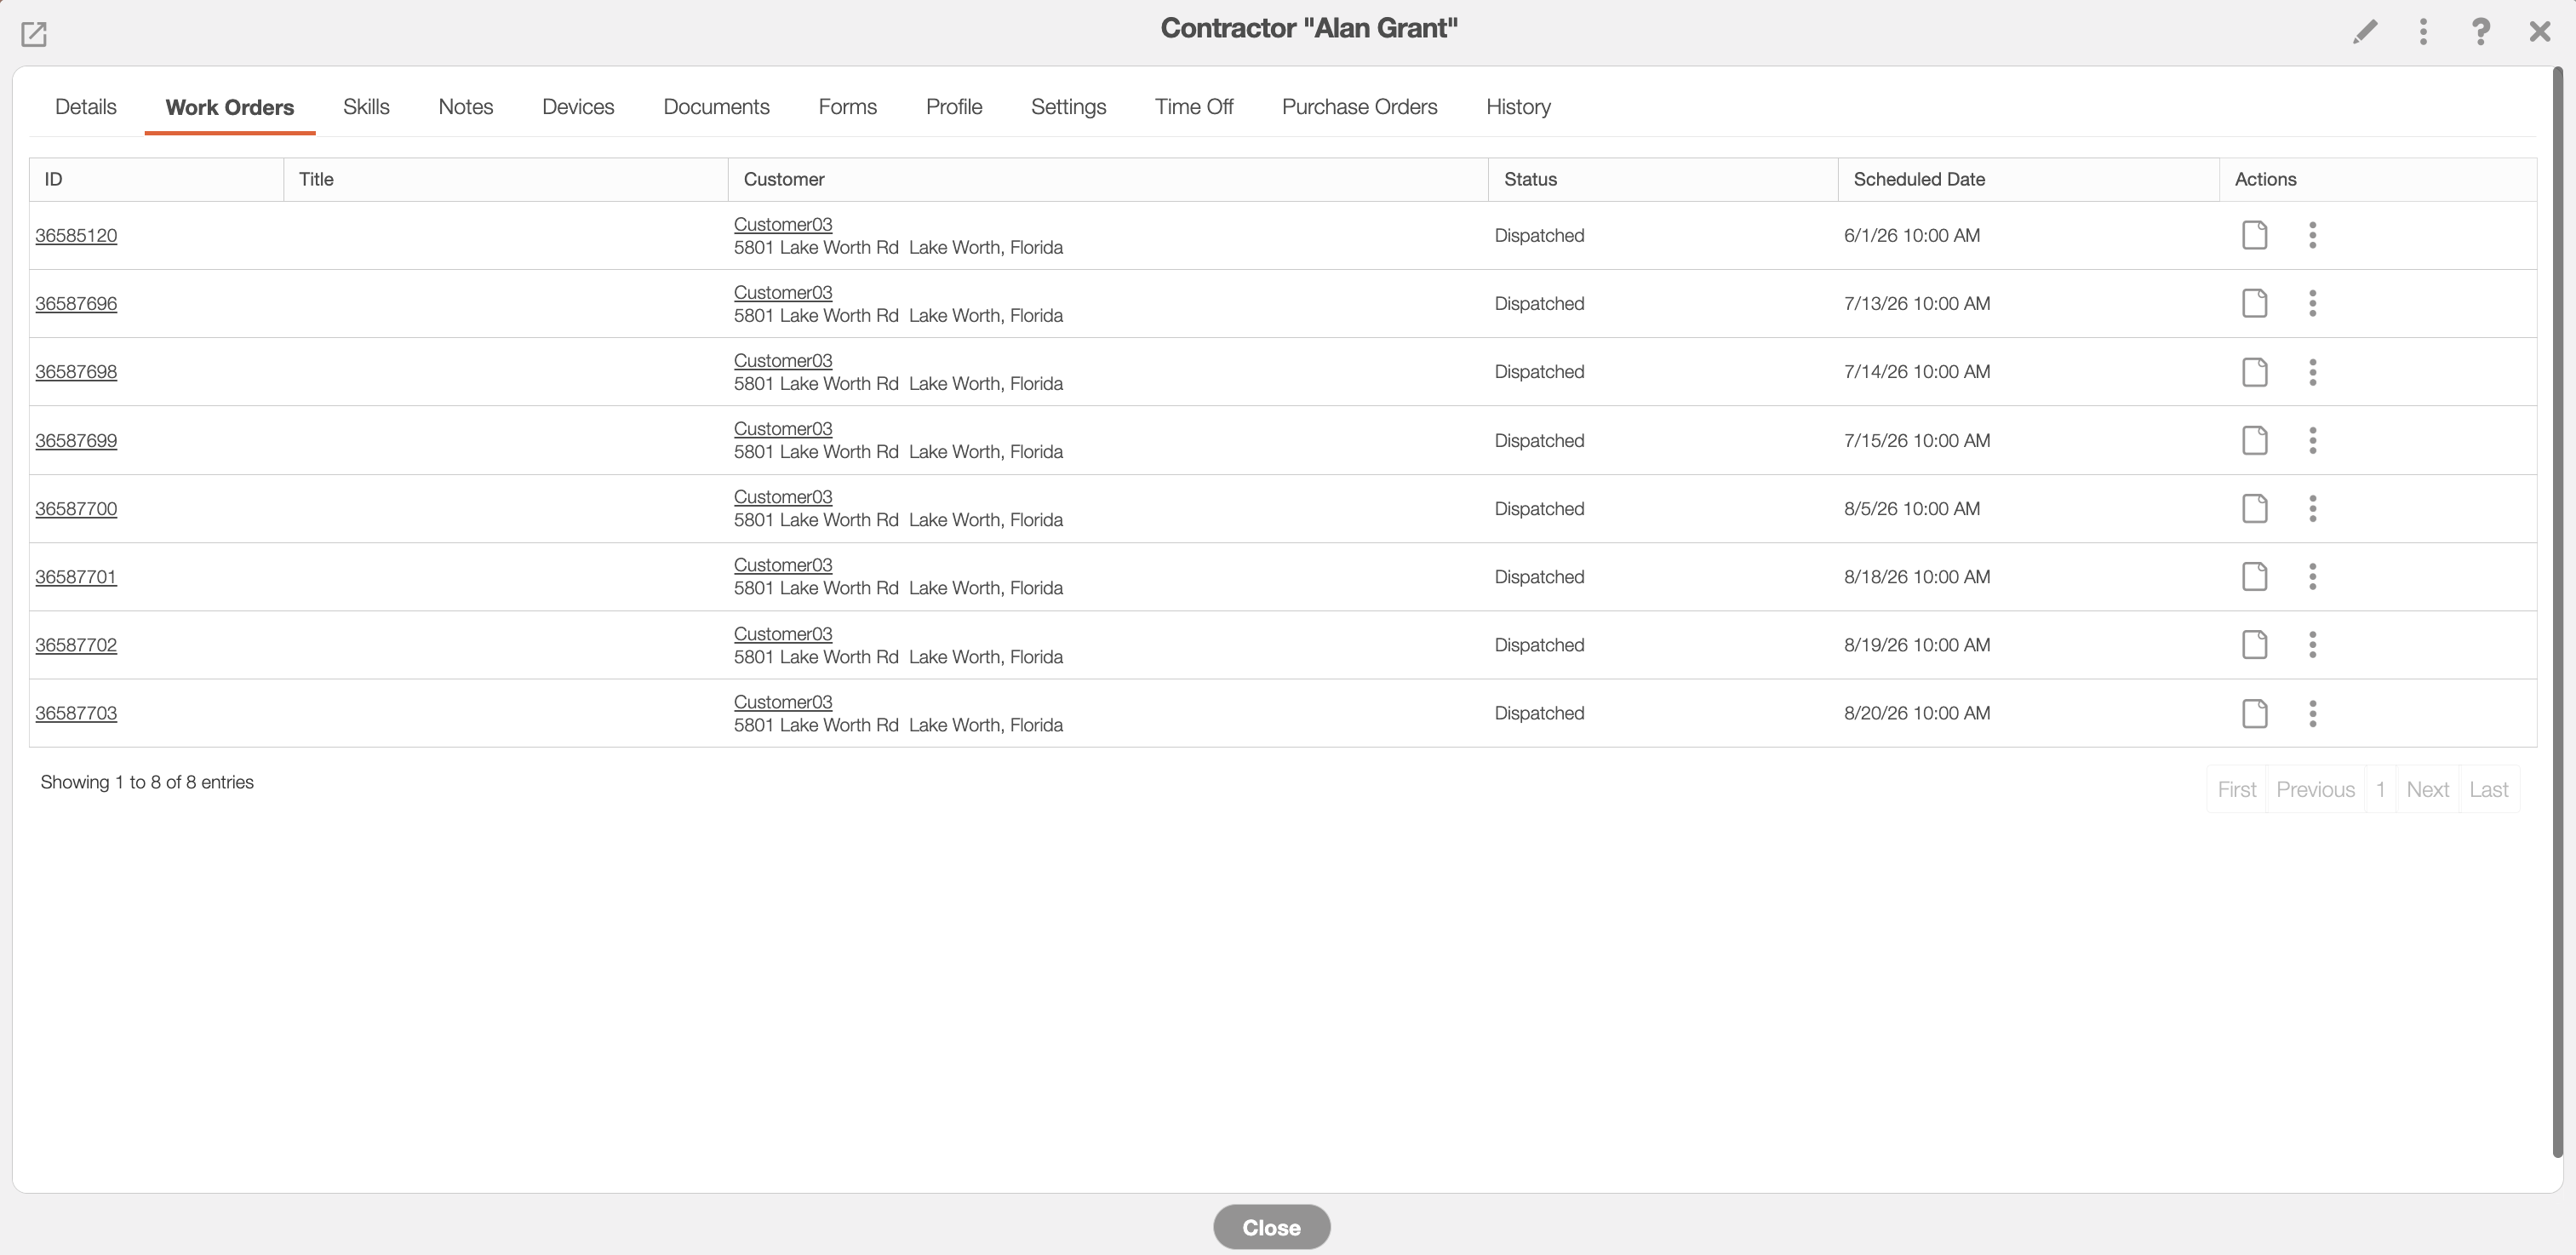
You can click on the Work ID to directly open the corresponding work order or on the customer's name to open the View Customer pop-up window.
You will also be able to view type of work order, the status of the work order, when it is scheduled, etc.
The columns for the "Work Orders" tab are defined below:
| Name: | Description: |
|---|---|
| "ID" | The ID of the work order. |
| "Title" | The type of work order that is being performed (e.g., repair, installation, etc.). |
| "Customer" | The customer that the work order is being performed for. |
| "Status" | The status of the work order associated with the contractor. |
| "Scheduled Date" | The scheduled date and time of the work order associated with the contractor. |
| "Actions" | By clicking on the View icon or the Individual Actions button you will be able to access the "View" or "Duplicate" option. The "Duplicate" option allows you to repeat a work order; please see the Add Work Order section for more information about repeating work orders. |
The "Skills" tab will list any specialized skills or certifications that the contractor possesses:
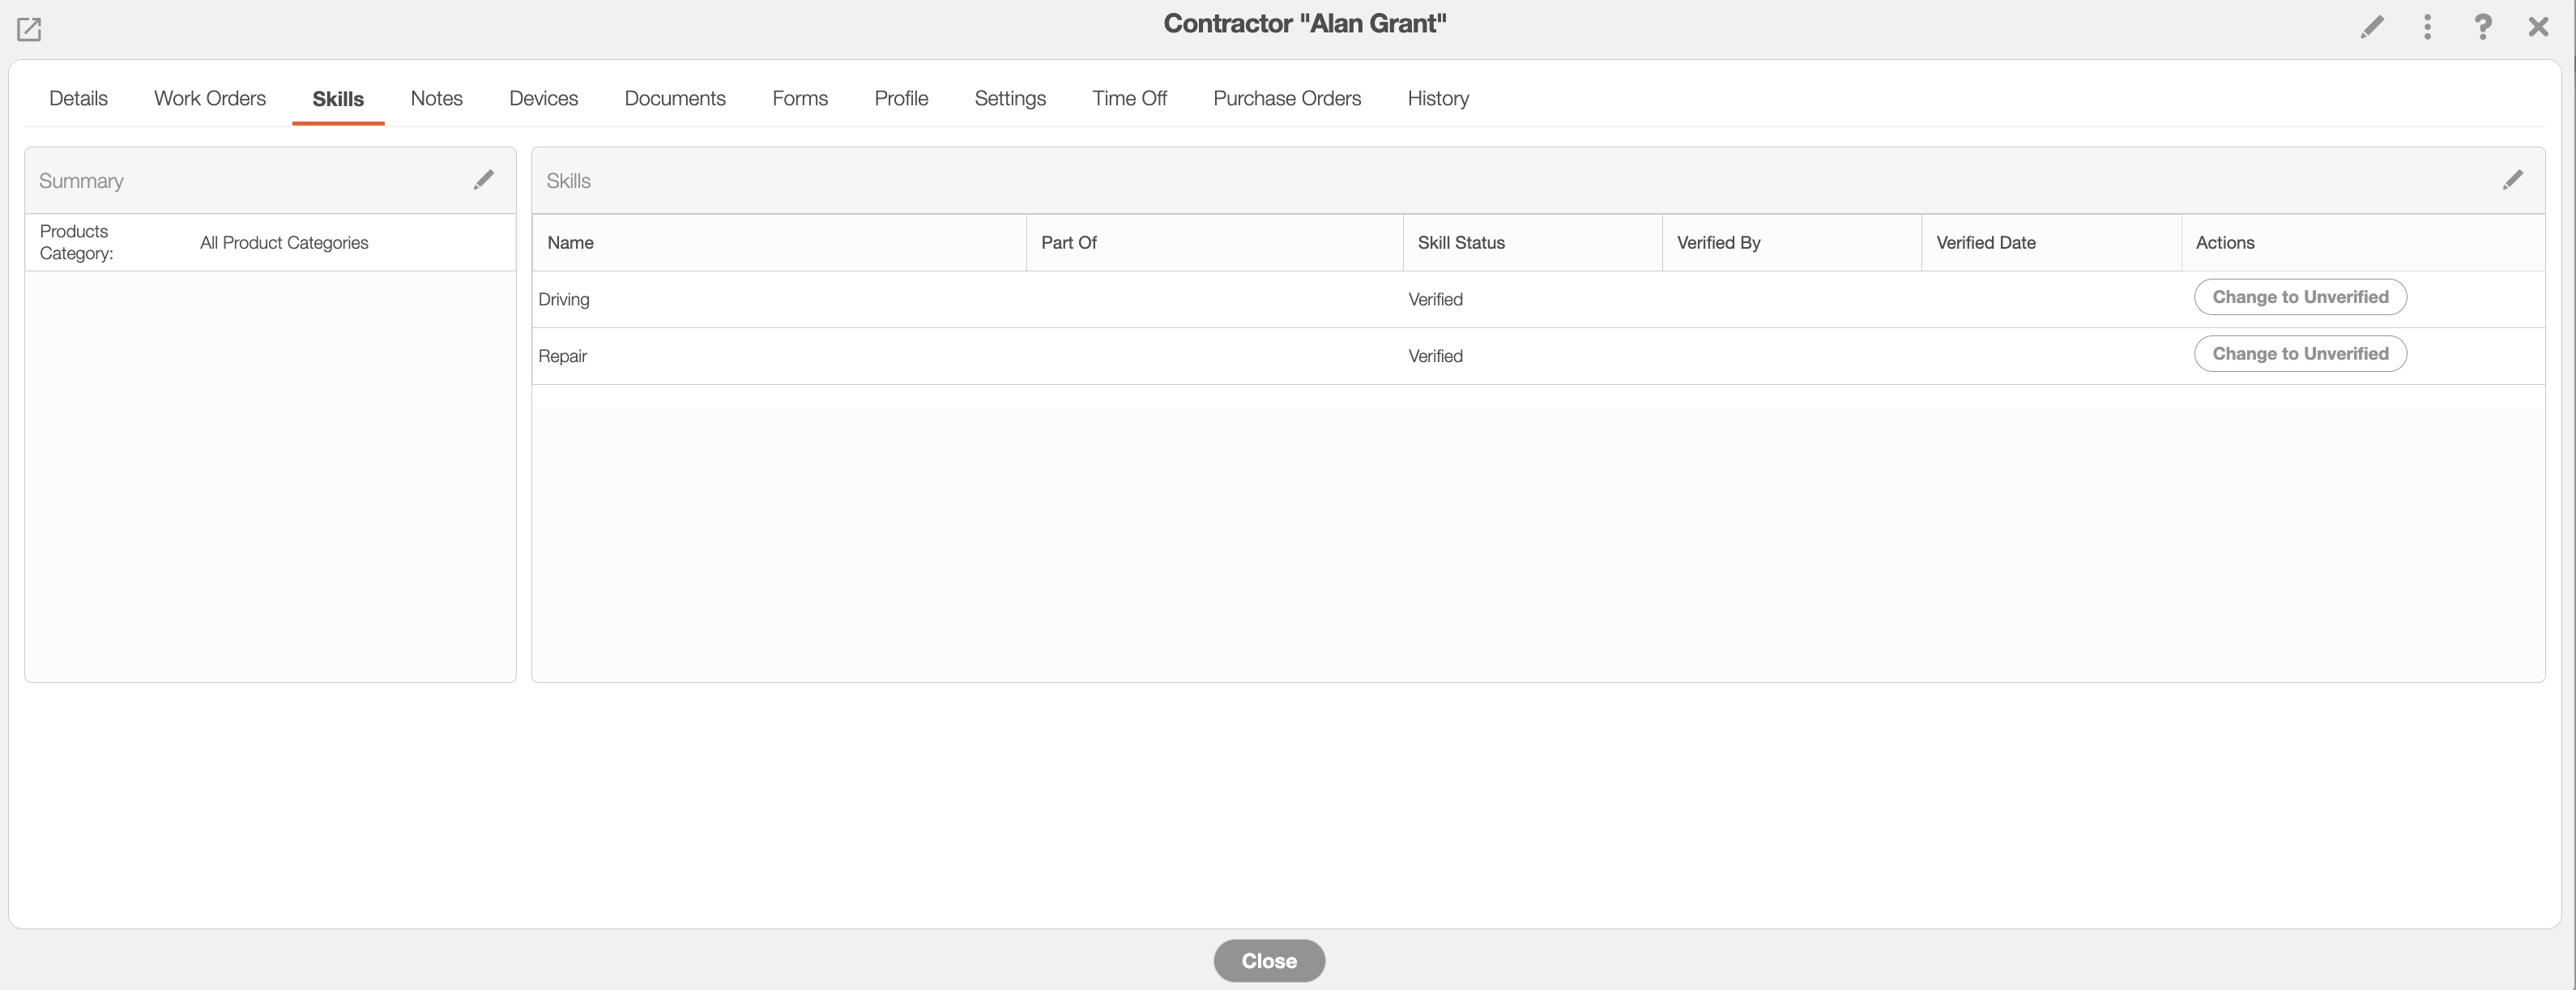
Please note that the first time you access the "Skills" tab, it will be blank. You will need to create the necessary skills from the Settings page; for more information on how to create skills, please see the User Settings page.
After you have added the skills into MobiWork, you can associate them with a contractor. Click on the Edit Skills button to associate the skills with the contractor.
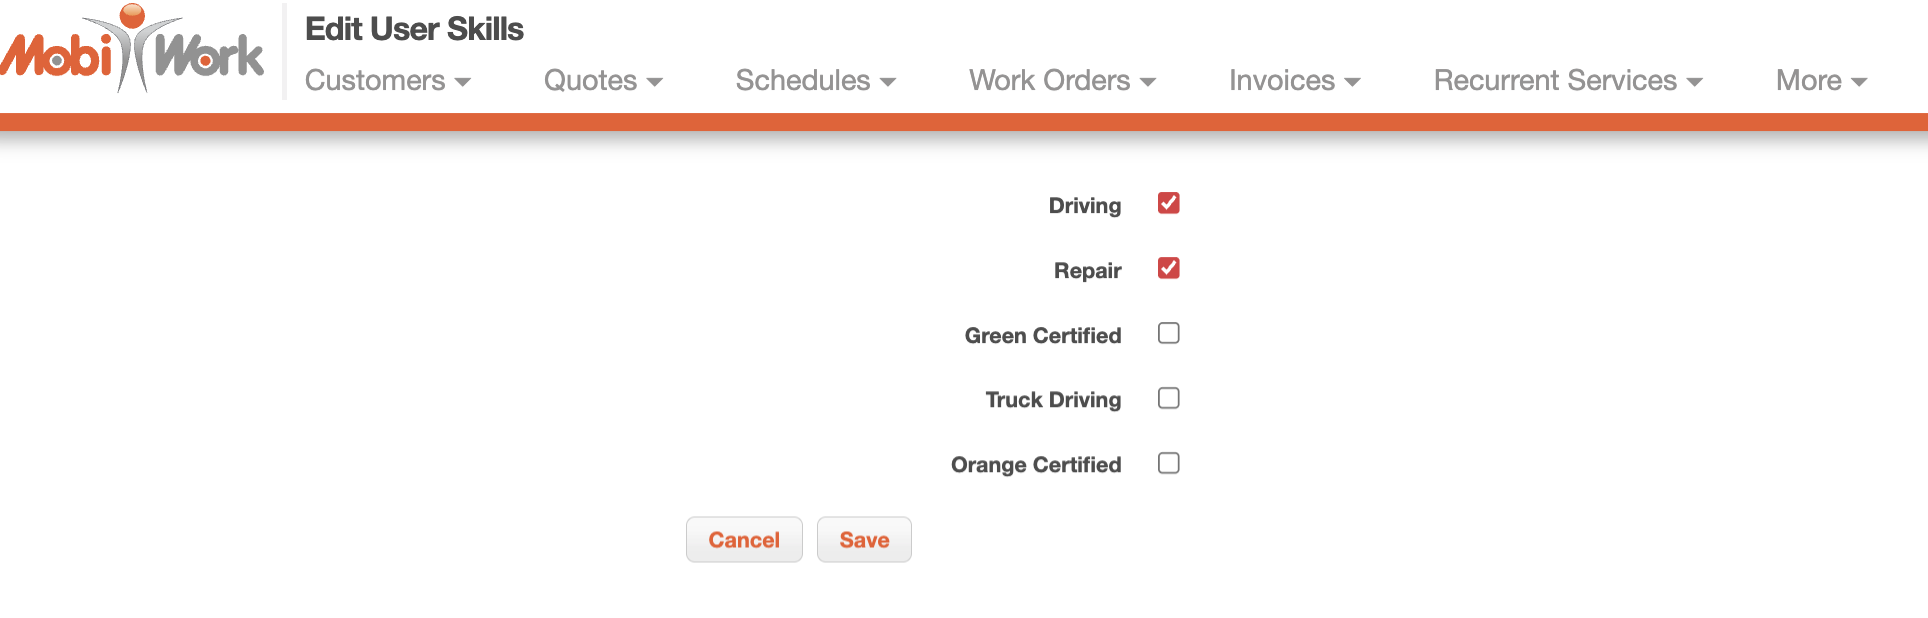
You will be redirected to the Edit User Skills page; use the checkmarks to indicate which skills you would like to associate with the contractor:
When you are ready to finalize, click the Save button:
The columns for the "Skills" tab are defined below:
| Name: | Description: |
|---|---|
| "Name" | The name of the skill. |
| "Part Of" | The skill represents a specialized area within a broader skill category. For example, Leak Detection may be a skill within Pool Service, while Drain Cleaning may be a skill within Plumbing. |
| Status" | Displays if the contractor is verified or unverified for the selected skill. |
| "Verified By" | The individual who verified the contractor's skill. |
| "Verified Date" | The date and time that the skill was verified. |
| "Actions" | Will allow you to update the contractor's skill to verified or unverified. |
The "Notes" tab will list any notes associated with the contractor:
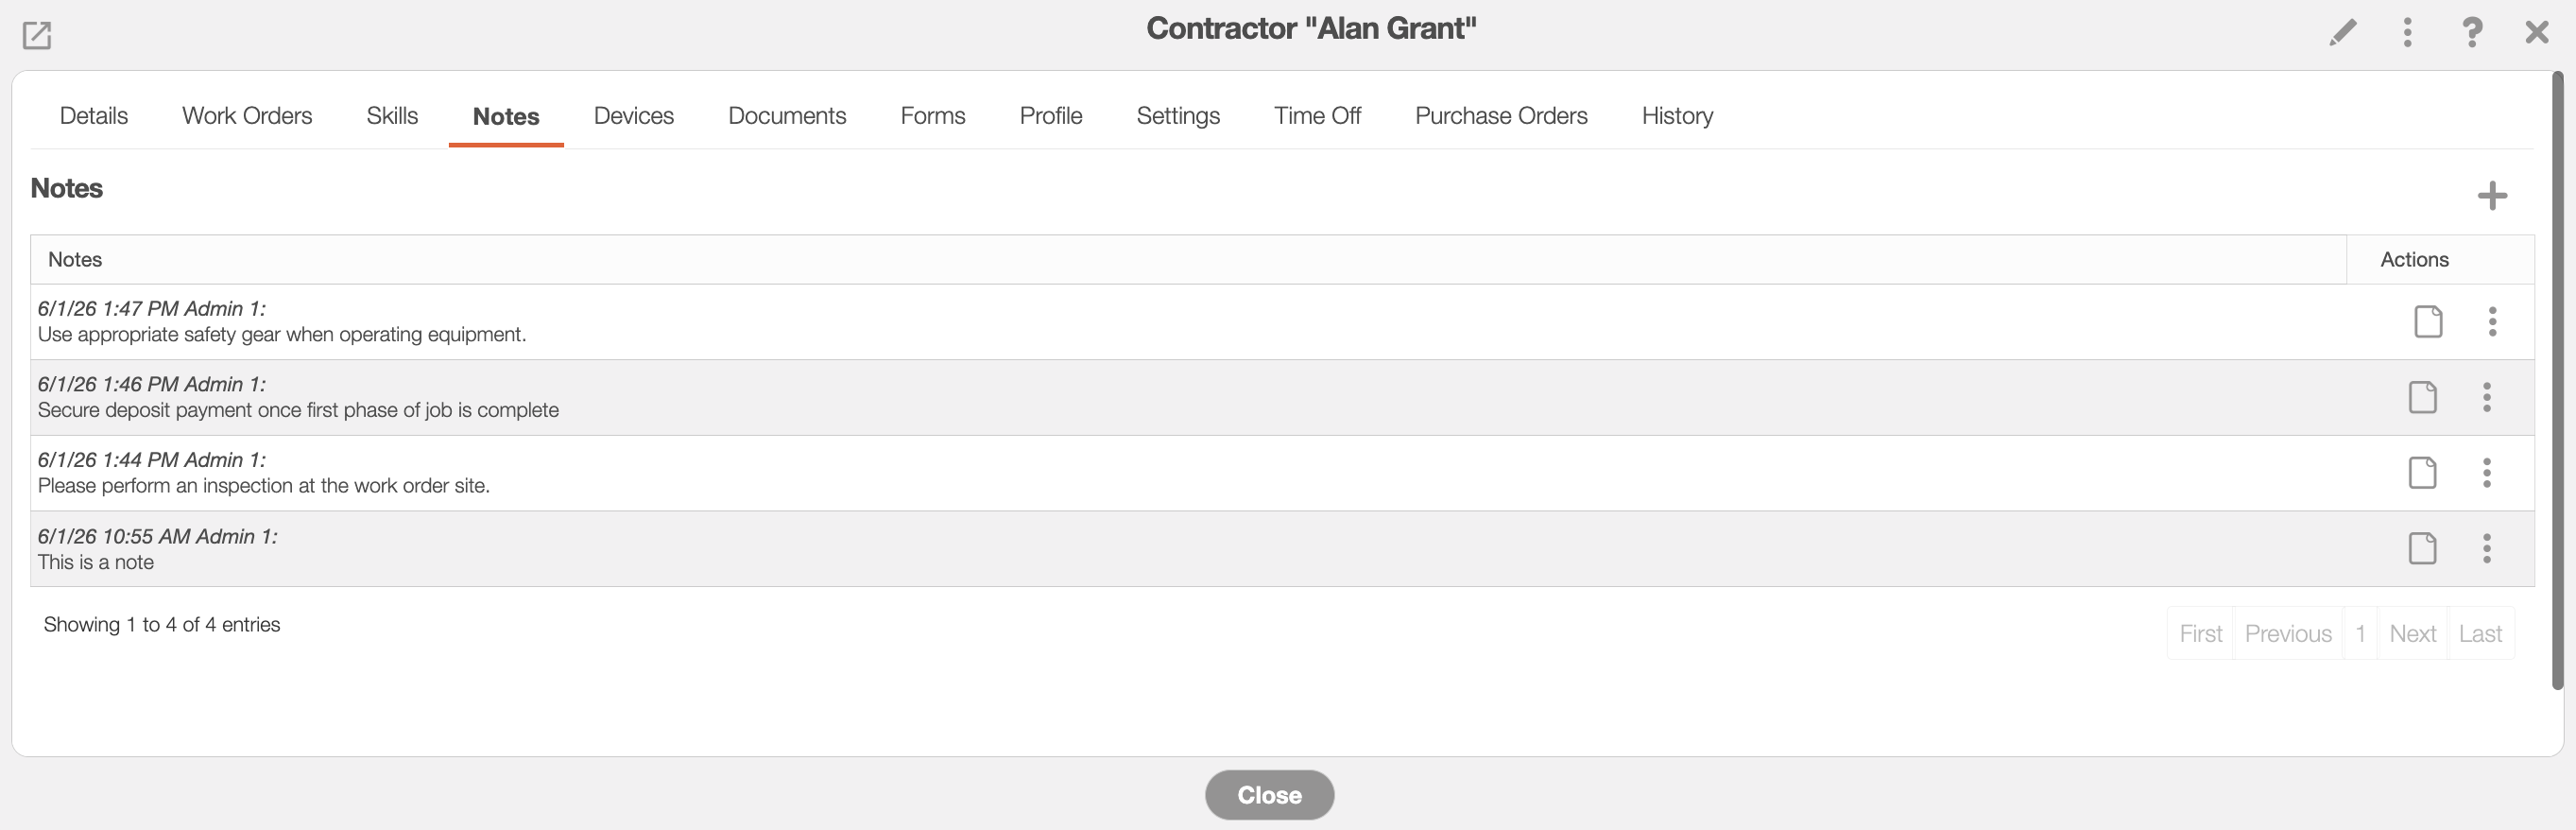
To add a new note, simply press the Plus Sign button in the top right-corner.
If you would like to view the note in a read-only window, you can click on the View icon or select the "View" option from the Individual Actions button.
The Individual Actions button will also allow you to edit or delete the specified note.
The list of devices that the contractor has access to will be displayed here. You will be able to view the last time that the contractor logged on to the specified device, as well as, see a more in-depth analysis once you click on the device:
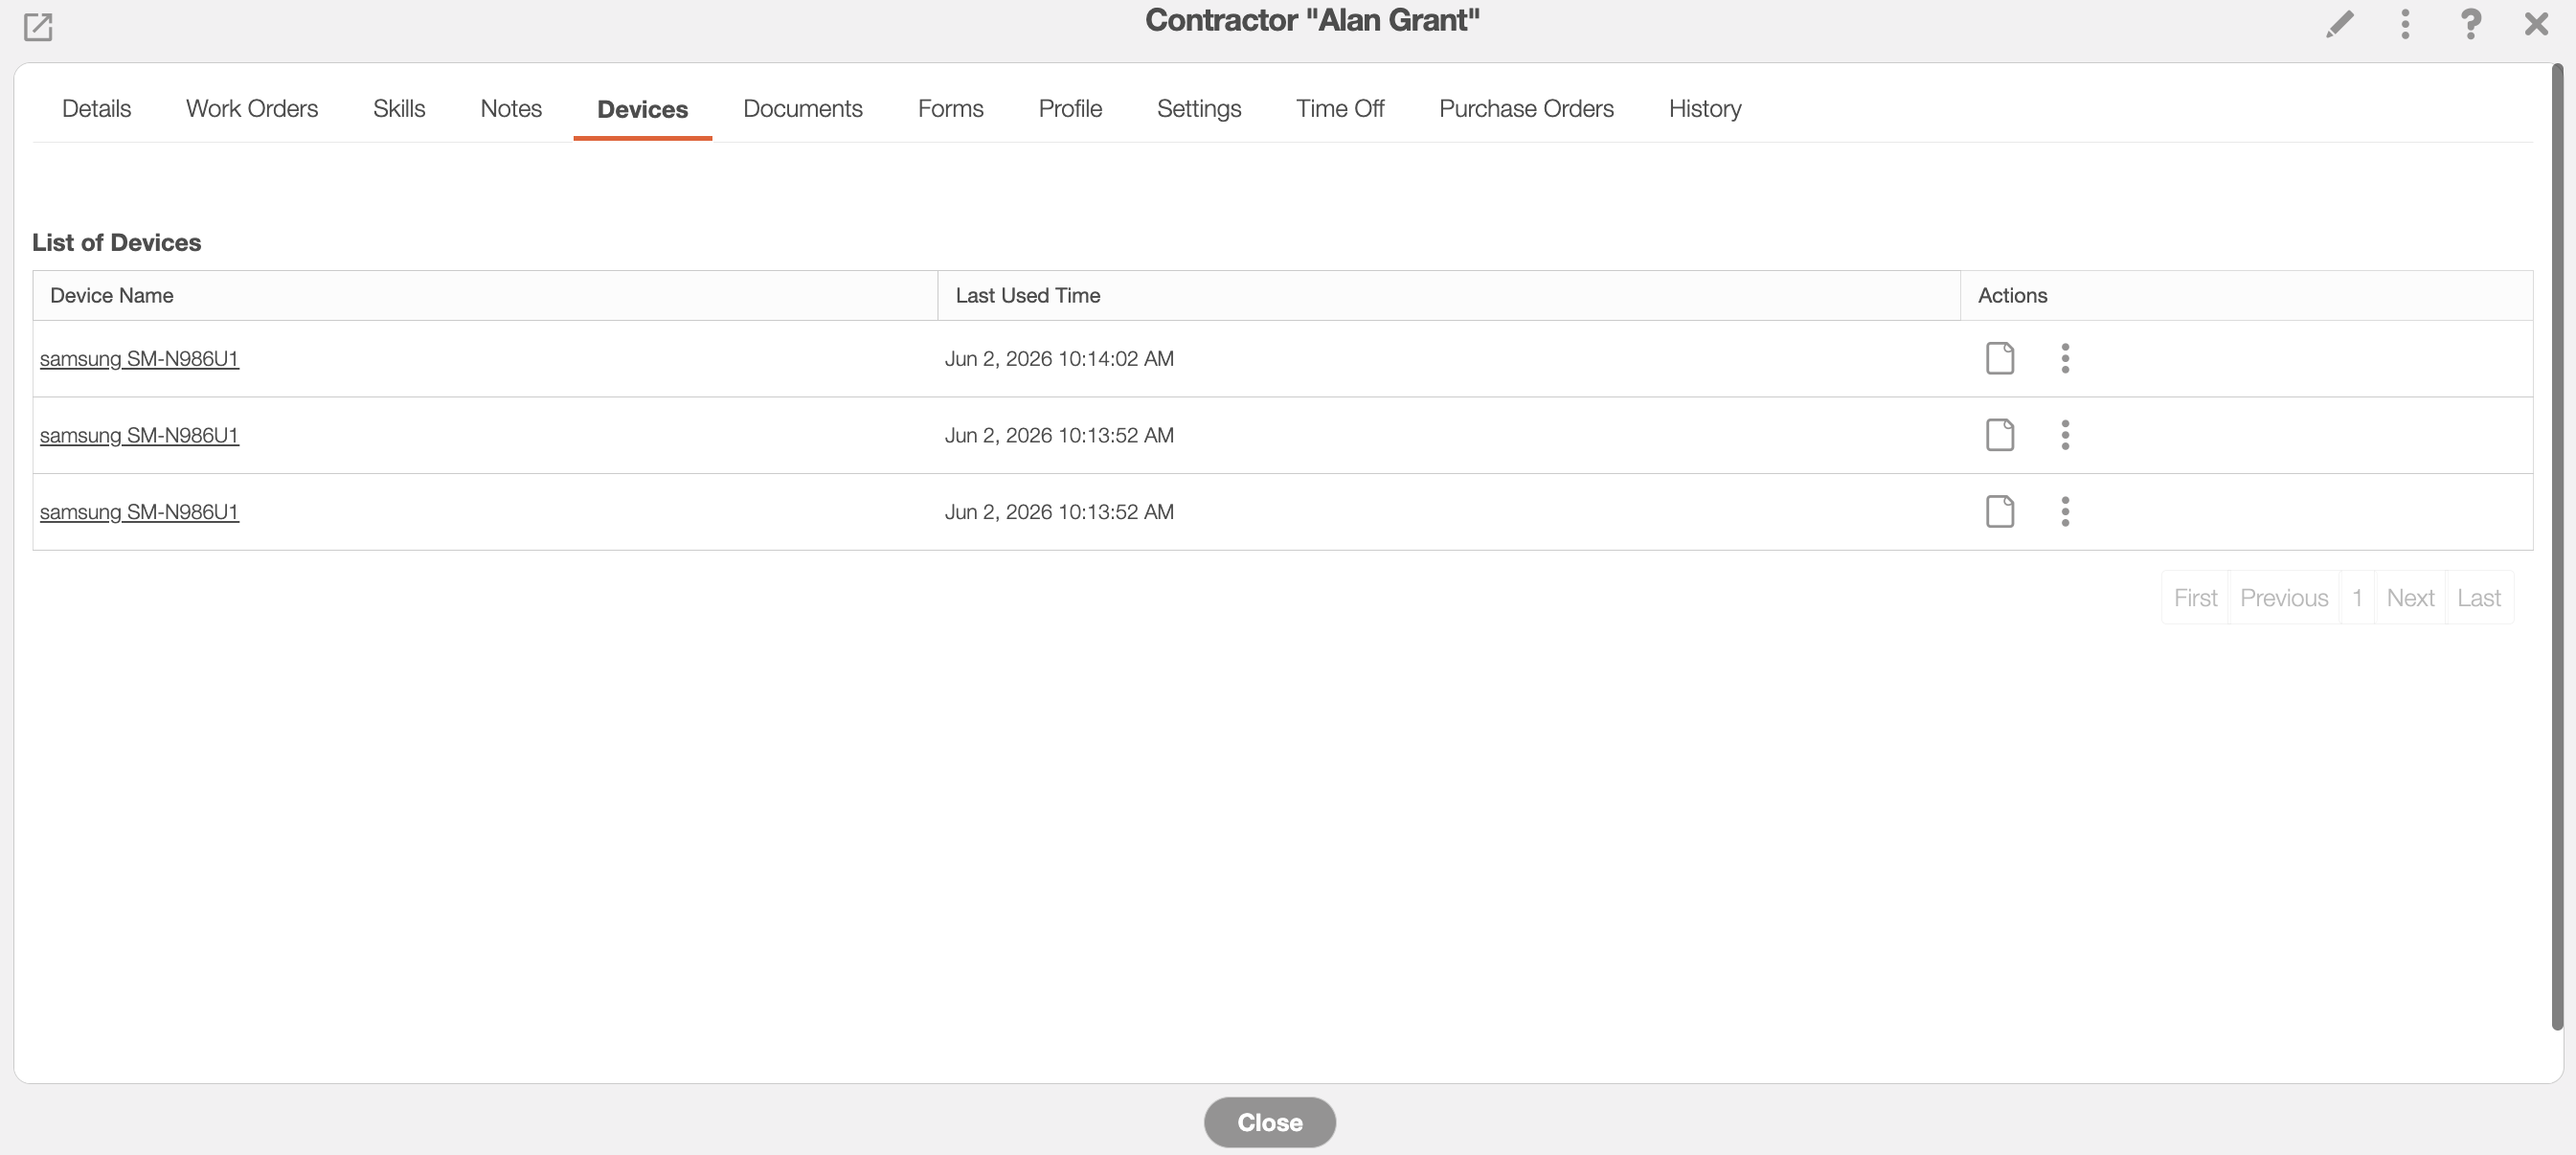
The "Devices" tab will list all the devices that are associated with the contractor (i.e., the devices that the contractors log into).
With the Individual Actions button, you will be able to perform the following actions on the device:
View the selected device.
Edit the selected device.
Sync data with the device.
Send a test push notification to the device.
Request a heartbeat ping from the device.
Or re-register the Google Cloud Messaging (GCM).
Once you click on the selected device, you will be redirected to the Device page. This page will display the data associated with the selected device:
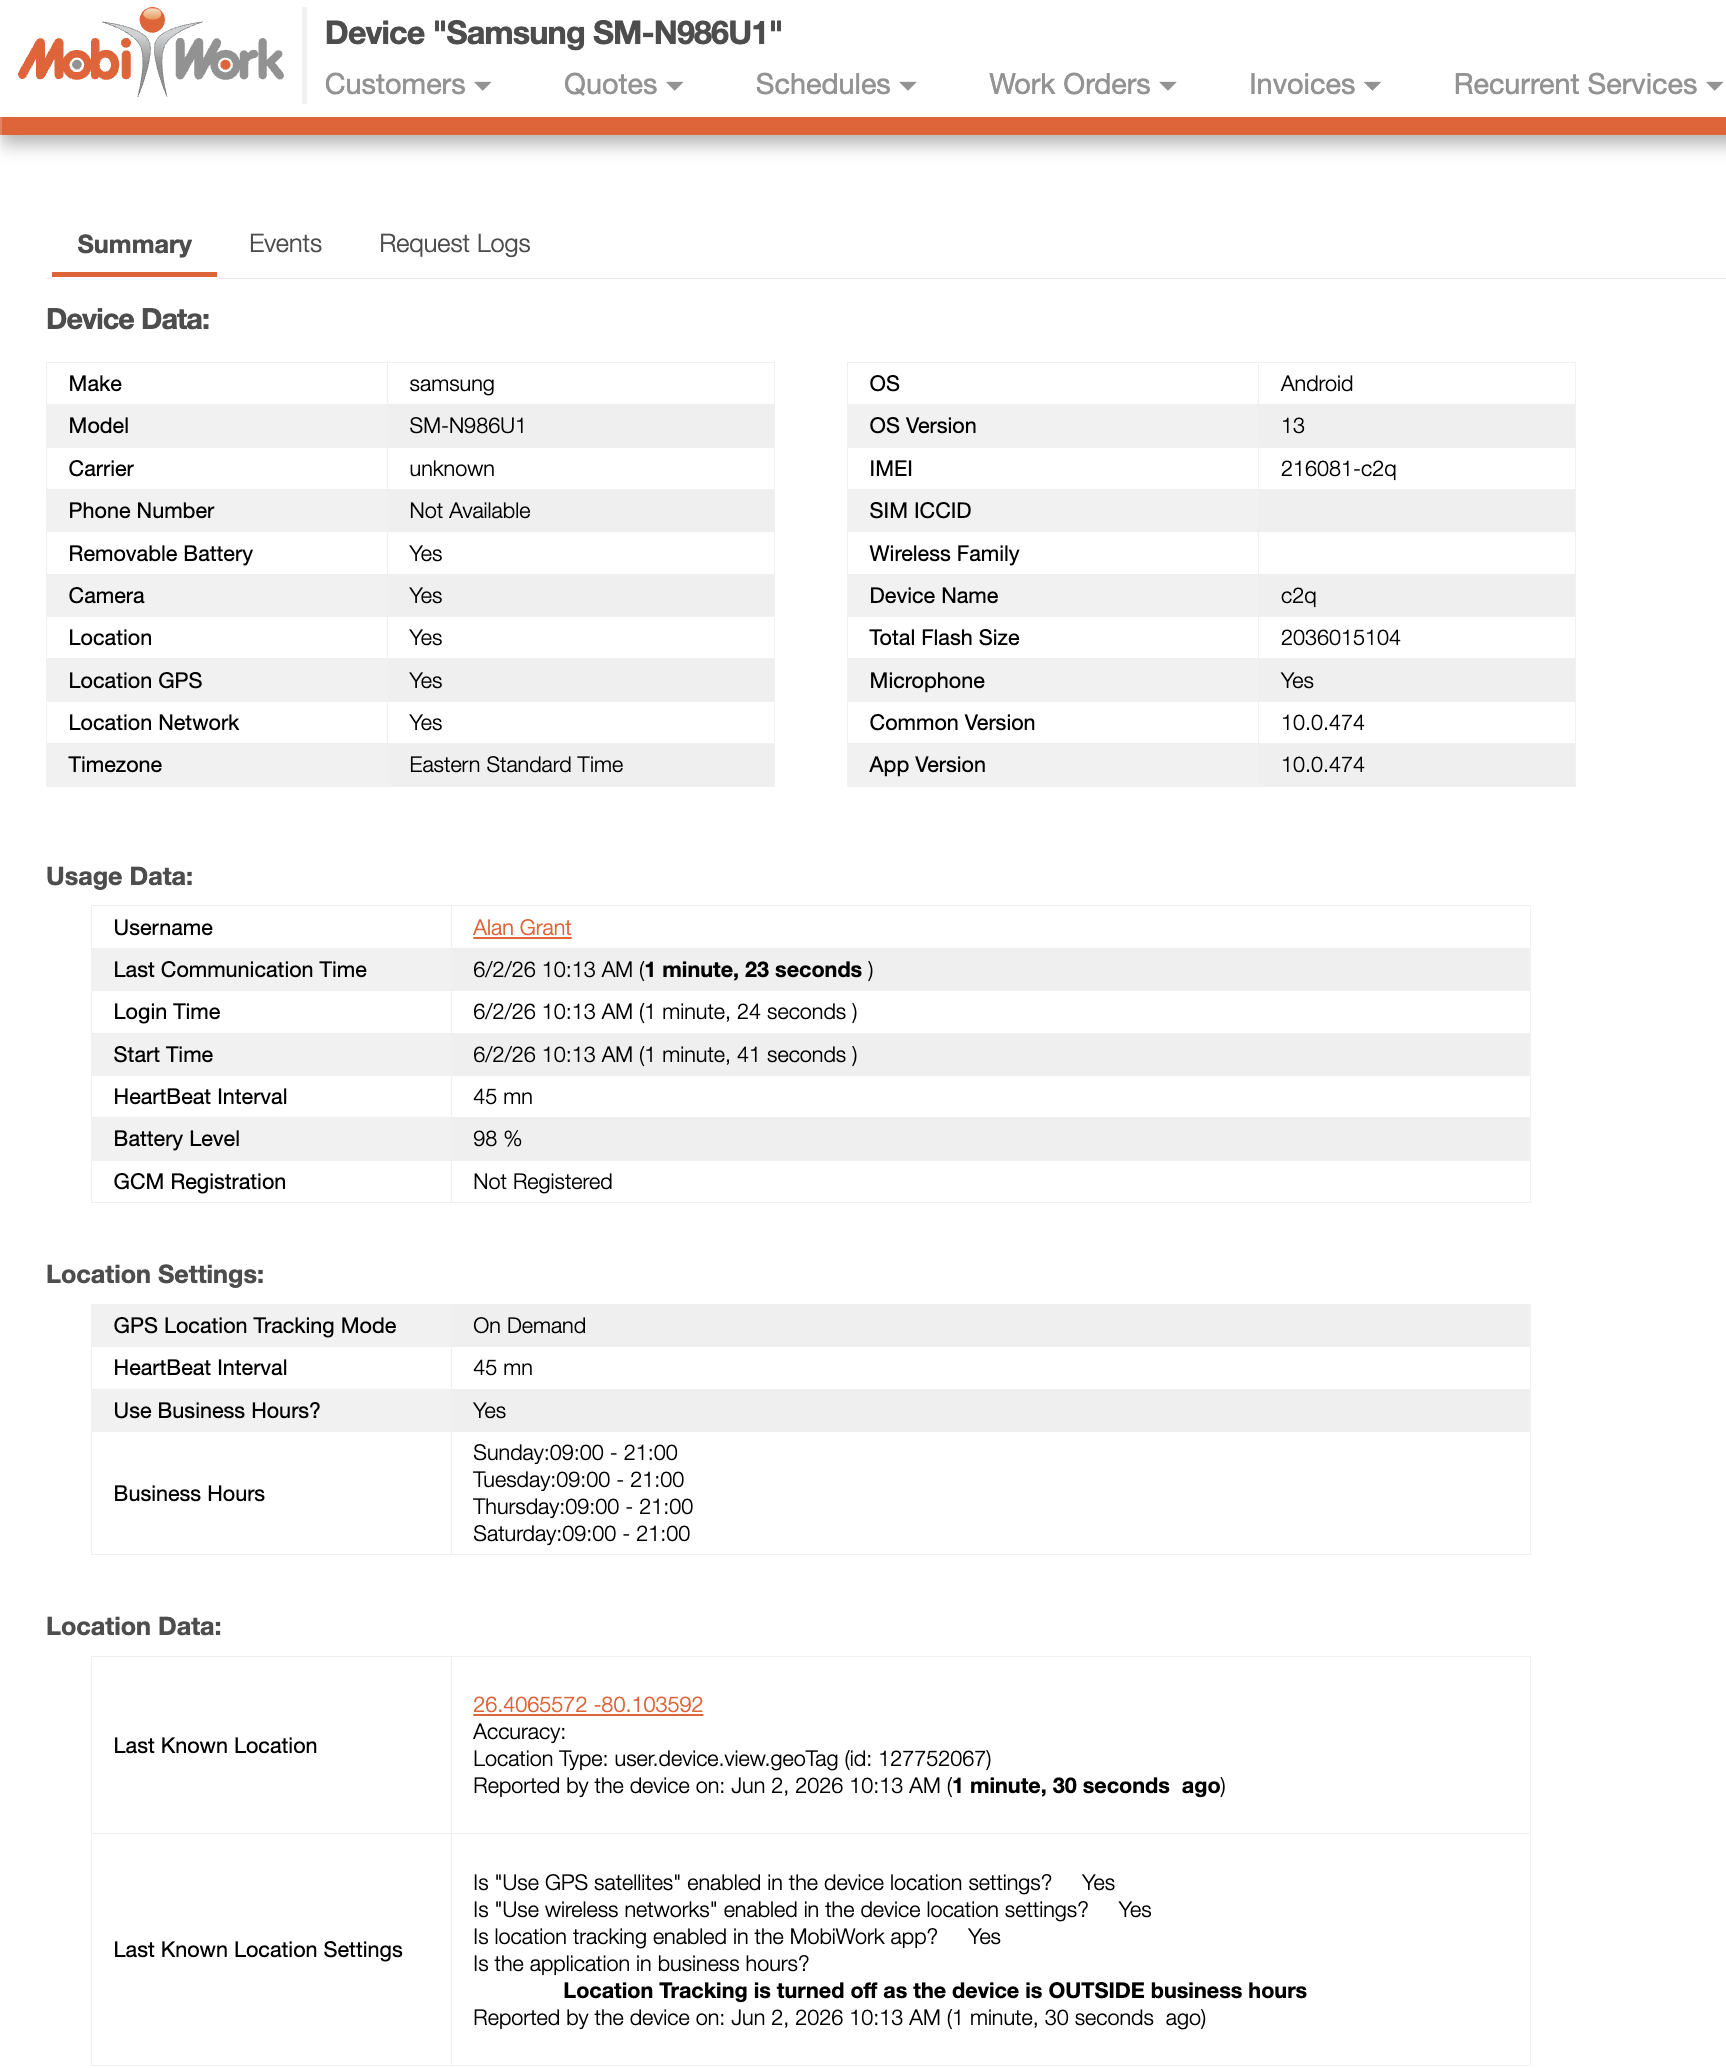
For more information about the Device page, please see the Device Overview section.
The "Documents" tab will contain any documentation associated with the contractor. This tab will display the type of document listed, the contractor who posted the document, and more:
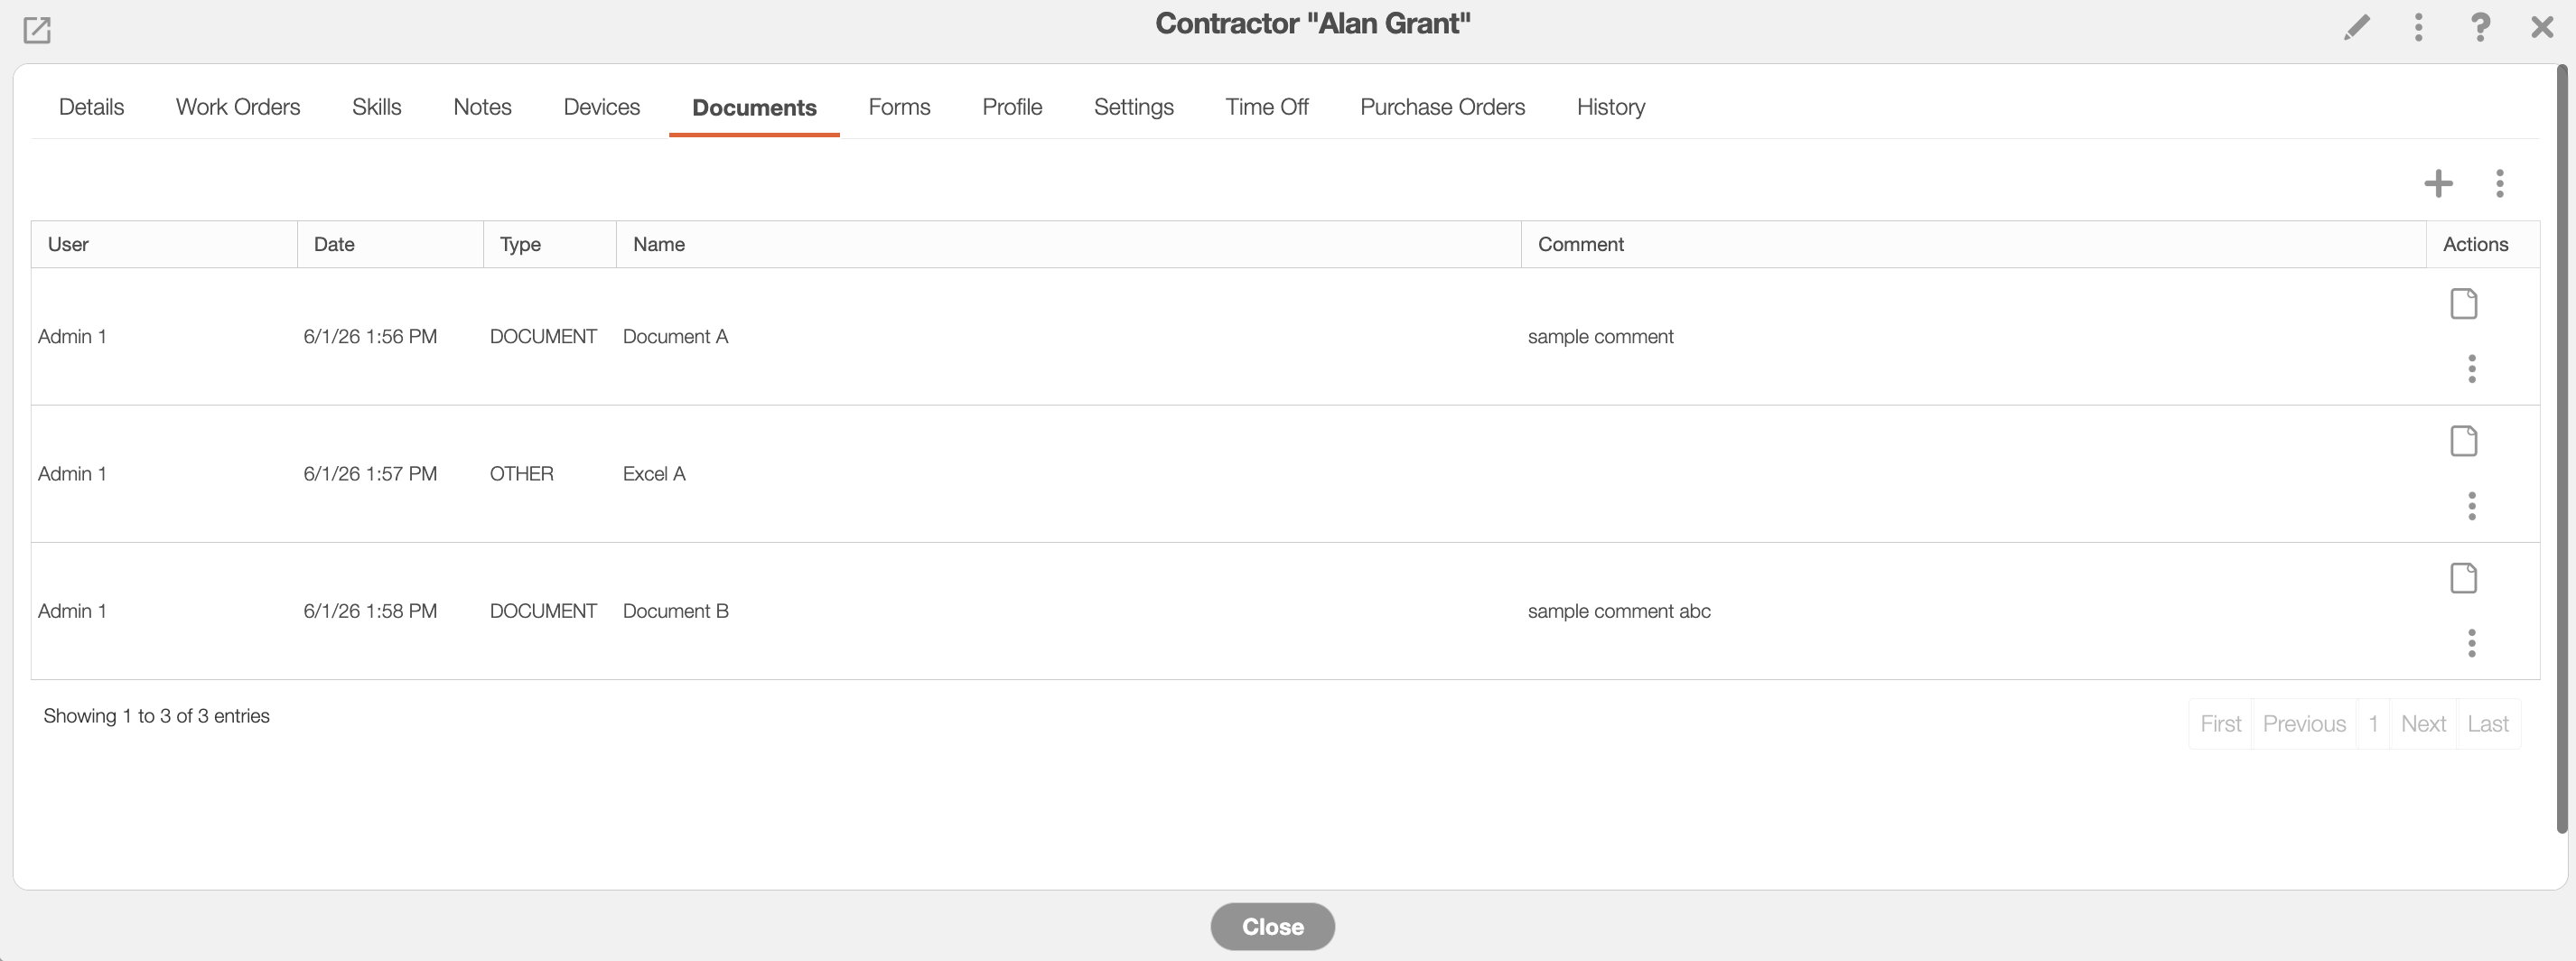
You can use the Plus Sign button or the More Actions button to add a new document for the contractor.
The columns for the "Documents" tab are defined below:
| Name: | Description: |
|---|---|
| "User" | The contractor who posted the document. |
| "Date" | The date and time that the document was posted. |
| "Type" | The type of file that the document is in. |
| "Name" | The name of the file. |
| "Comment" | Any comments associated with the document. |
| "Actions" | Will allow you to view, edit, download, or delete the specified document. |
The "Forms" tab will display all the forms associated with the contractor and any form where the contractor is referenced:

The columns for the "Forms" tab are defined below:
| Name: | Description: |
|---|---|
| "Name" | The name of the form associated with the contractor. |
| "User" | The contractor who uploaded the form. |
| "Created Date" | The date the form was created |
| "Geotags" | The geographical locations of where the form was created |
| "Actions" | Will allow you to view, edit, or export MobiForm to PDF |
| "Actions" | Will allow you to refresh, show all images, or export all forms |
The "Profile" tab will display the contractor's profile image and personal biography:
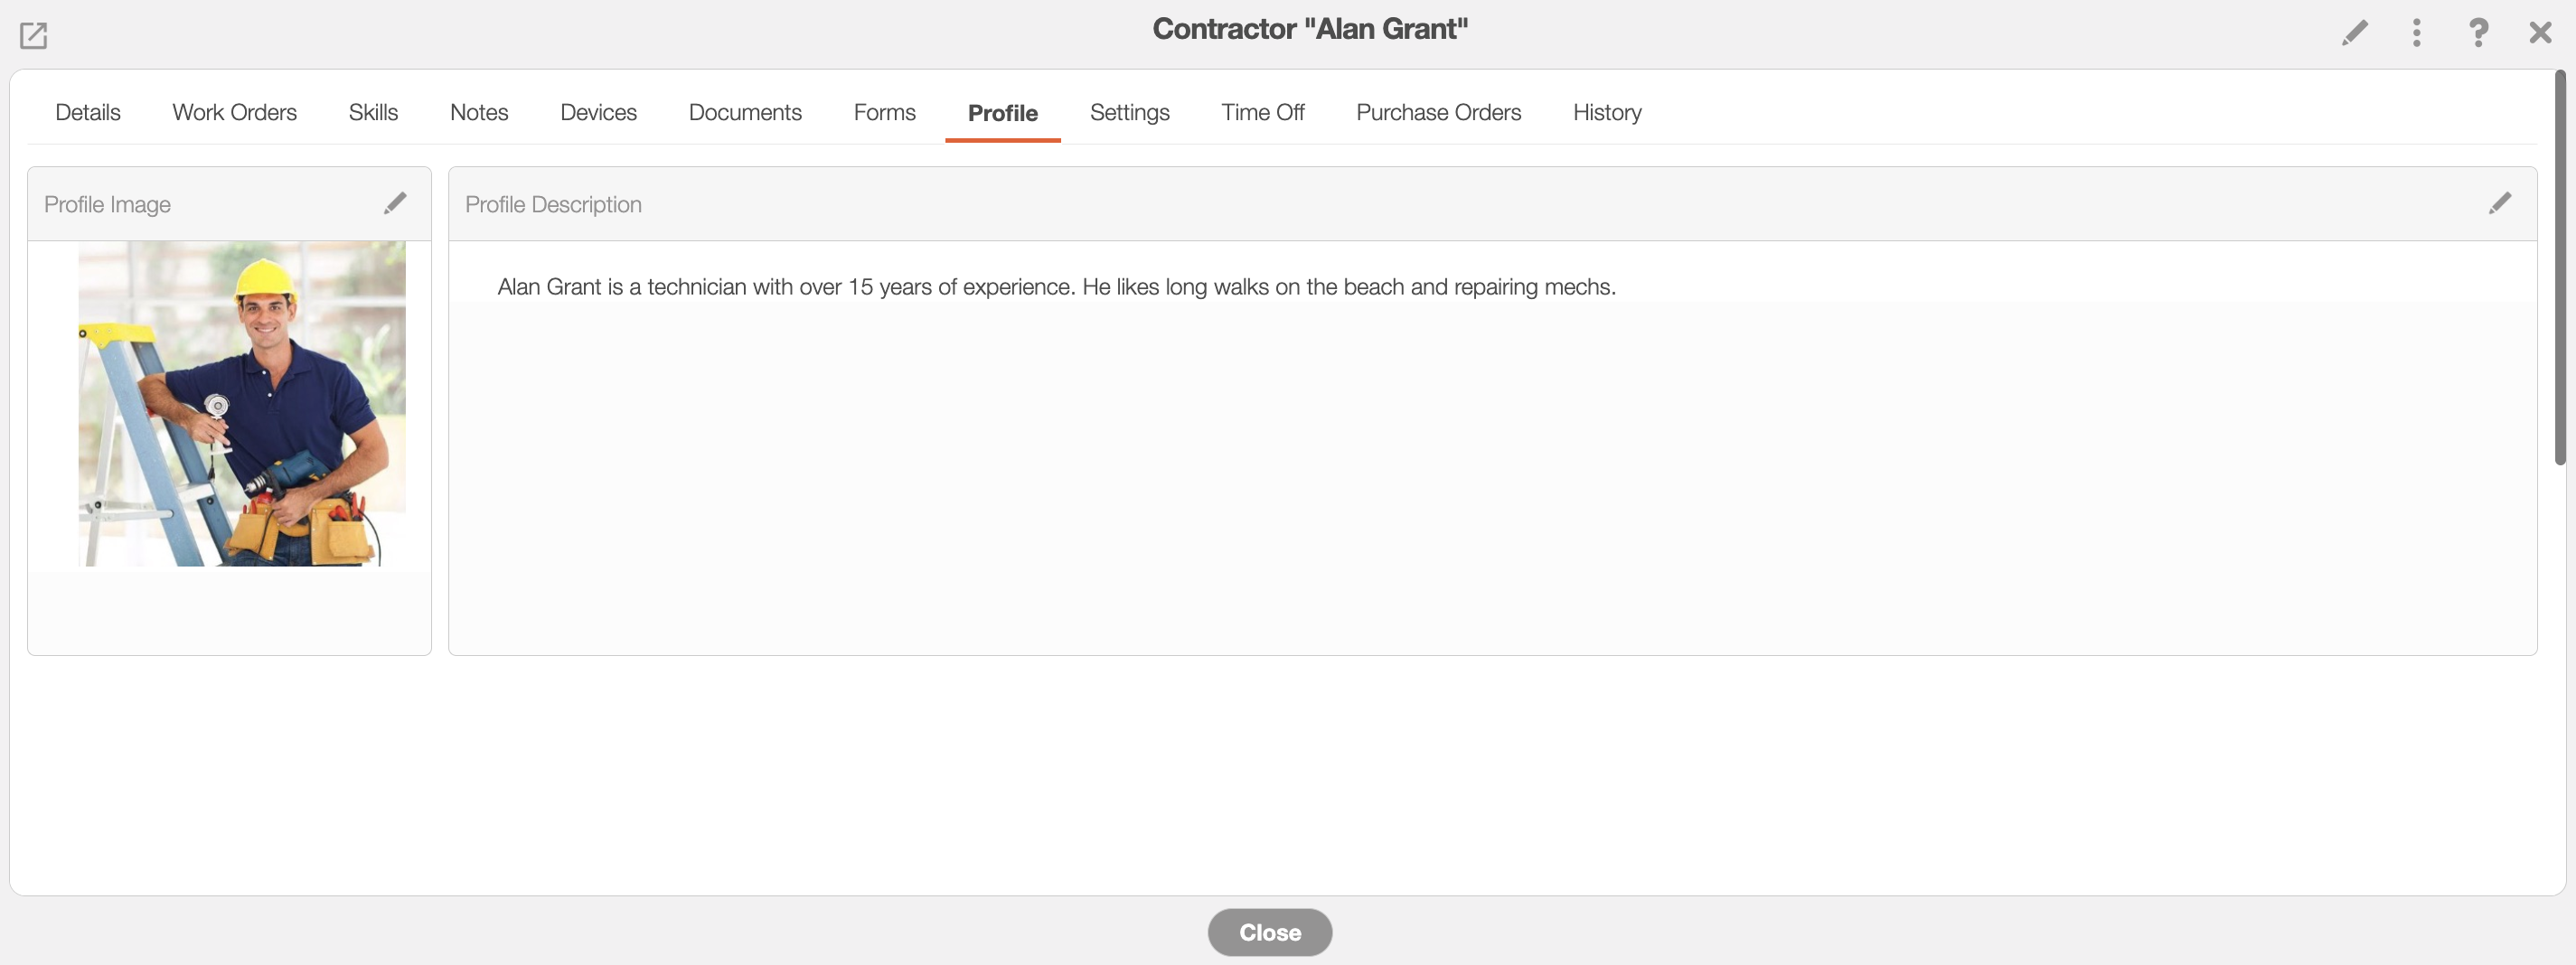
You can add or update the contractor's profile image by clicking on the Pencil icon from the top right of the "Profile Image" panel:

Once you click on the Pencil icon, the Profile Image pop-up window will appear. Upload the desired file and then once you are satisfied with the image, click the Add button to save the image.
Likewise, to update or add the contractor's personal biography, click on the Pencil icon in the top right corner of the "Profile Description" panel:

Once you click on the Pencil icon, the Edit Profile Description pop-up window will appear. In this pop-up window, input the contractor's bio and once you are satisfied with the text, click the Save button to save the content.
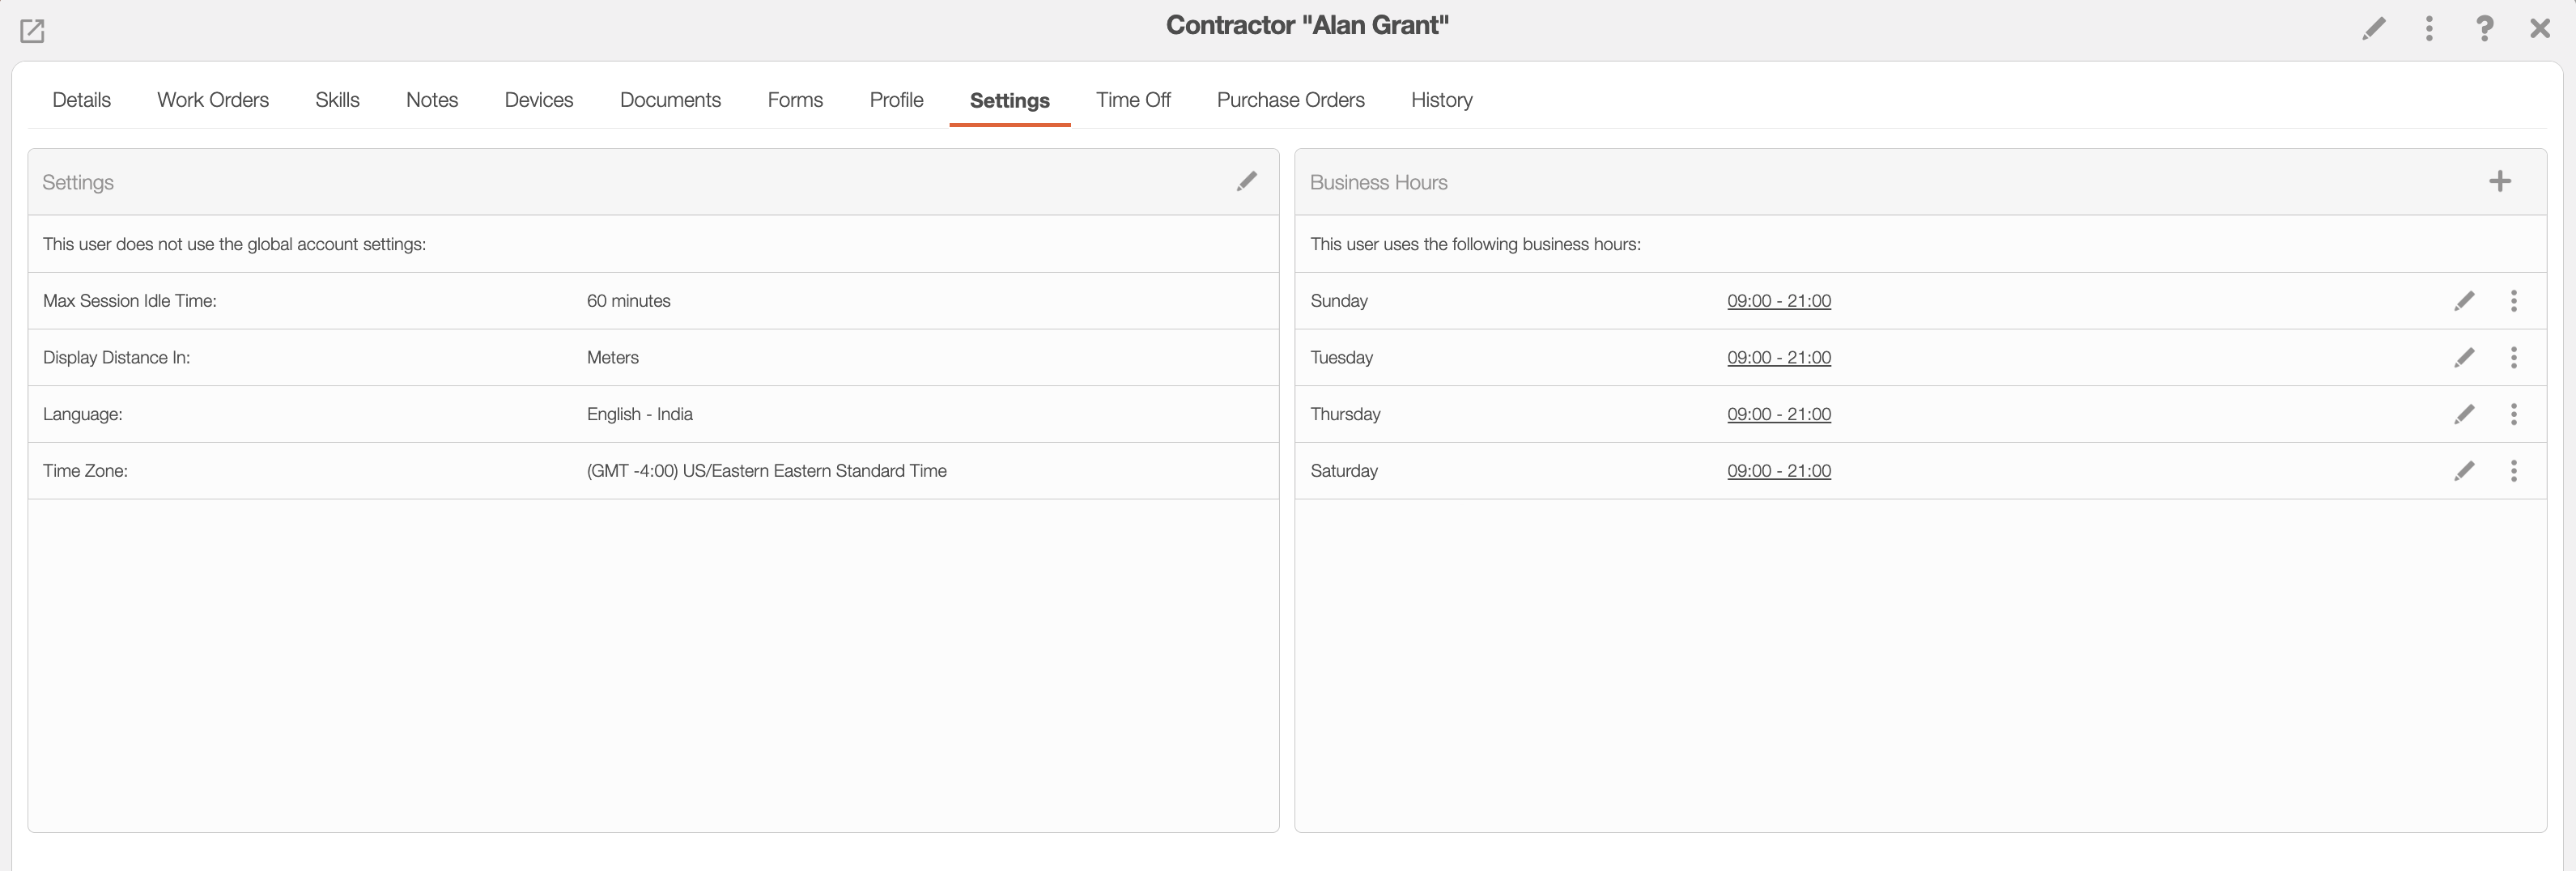
The "Settings" tab will allow you to view the specified settings for the contractor; you can utilize the global settings for the contractor, or you can customize the settings accordingly. Additionally, you also will be able to update the contractor's business hours.
The default settings and business hours are set to the ones specified in your global account settings. To update the "Settings" tab simply click on the Pencil icon; if you would like to update the business hours information, click on the Plus Sign icon:
Once you click on the Pencil icon for the "Settings" tab, you will be redirected to the Settings page. On this page you can adjust the session idle time, the heartbeat inerval, GPS location tracking mode, and more.
To input settings that differ from the Global Settings for the specific contractor, uncheck the "User Global Settings" option:
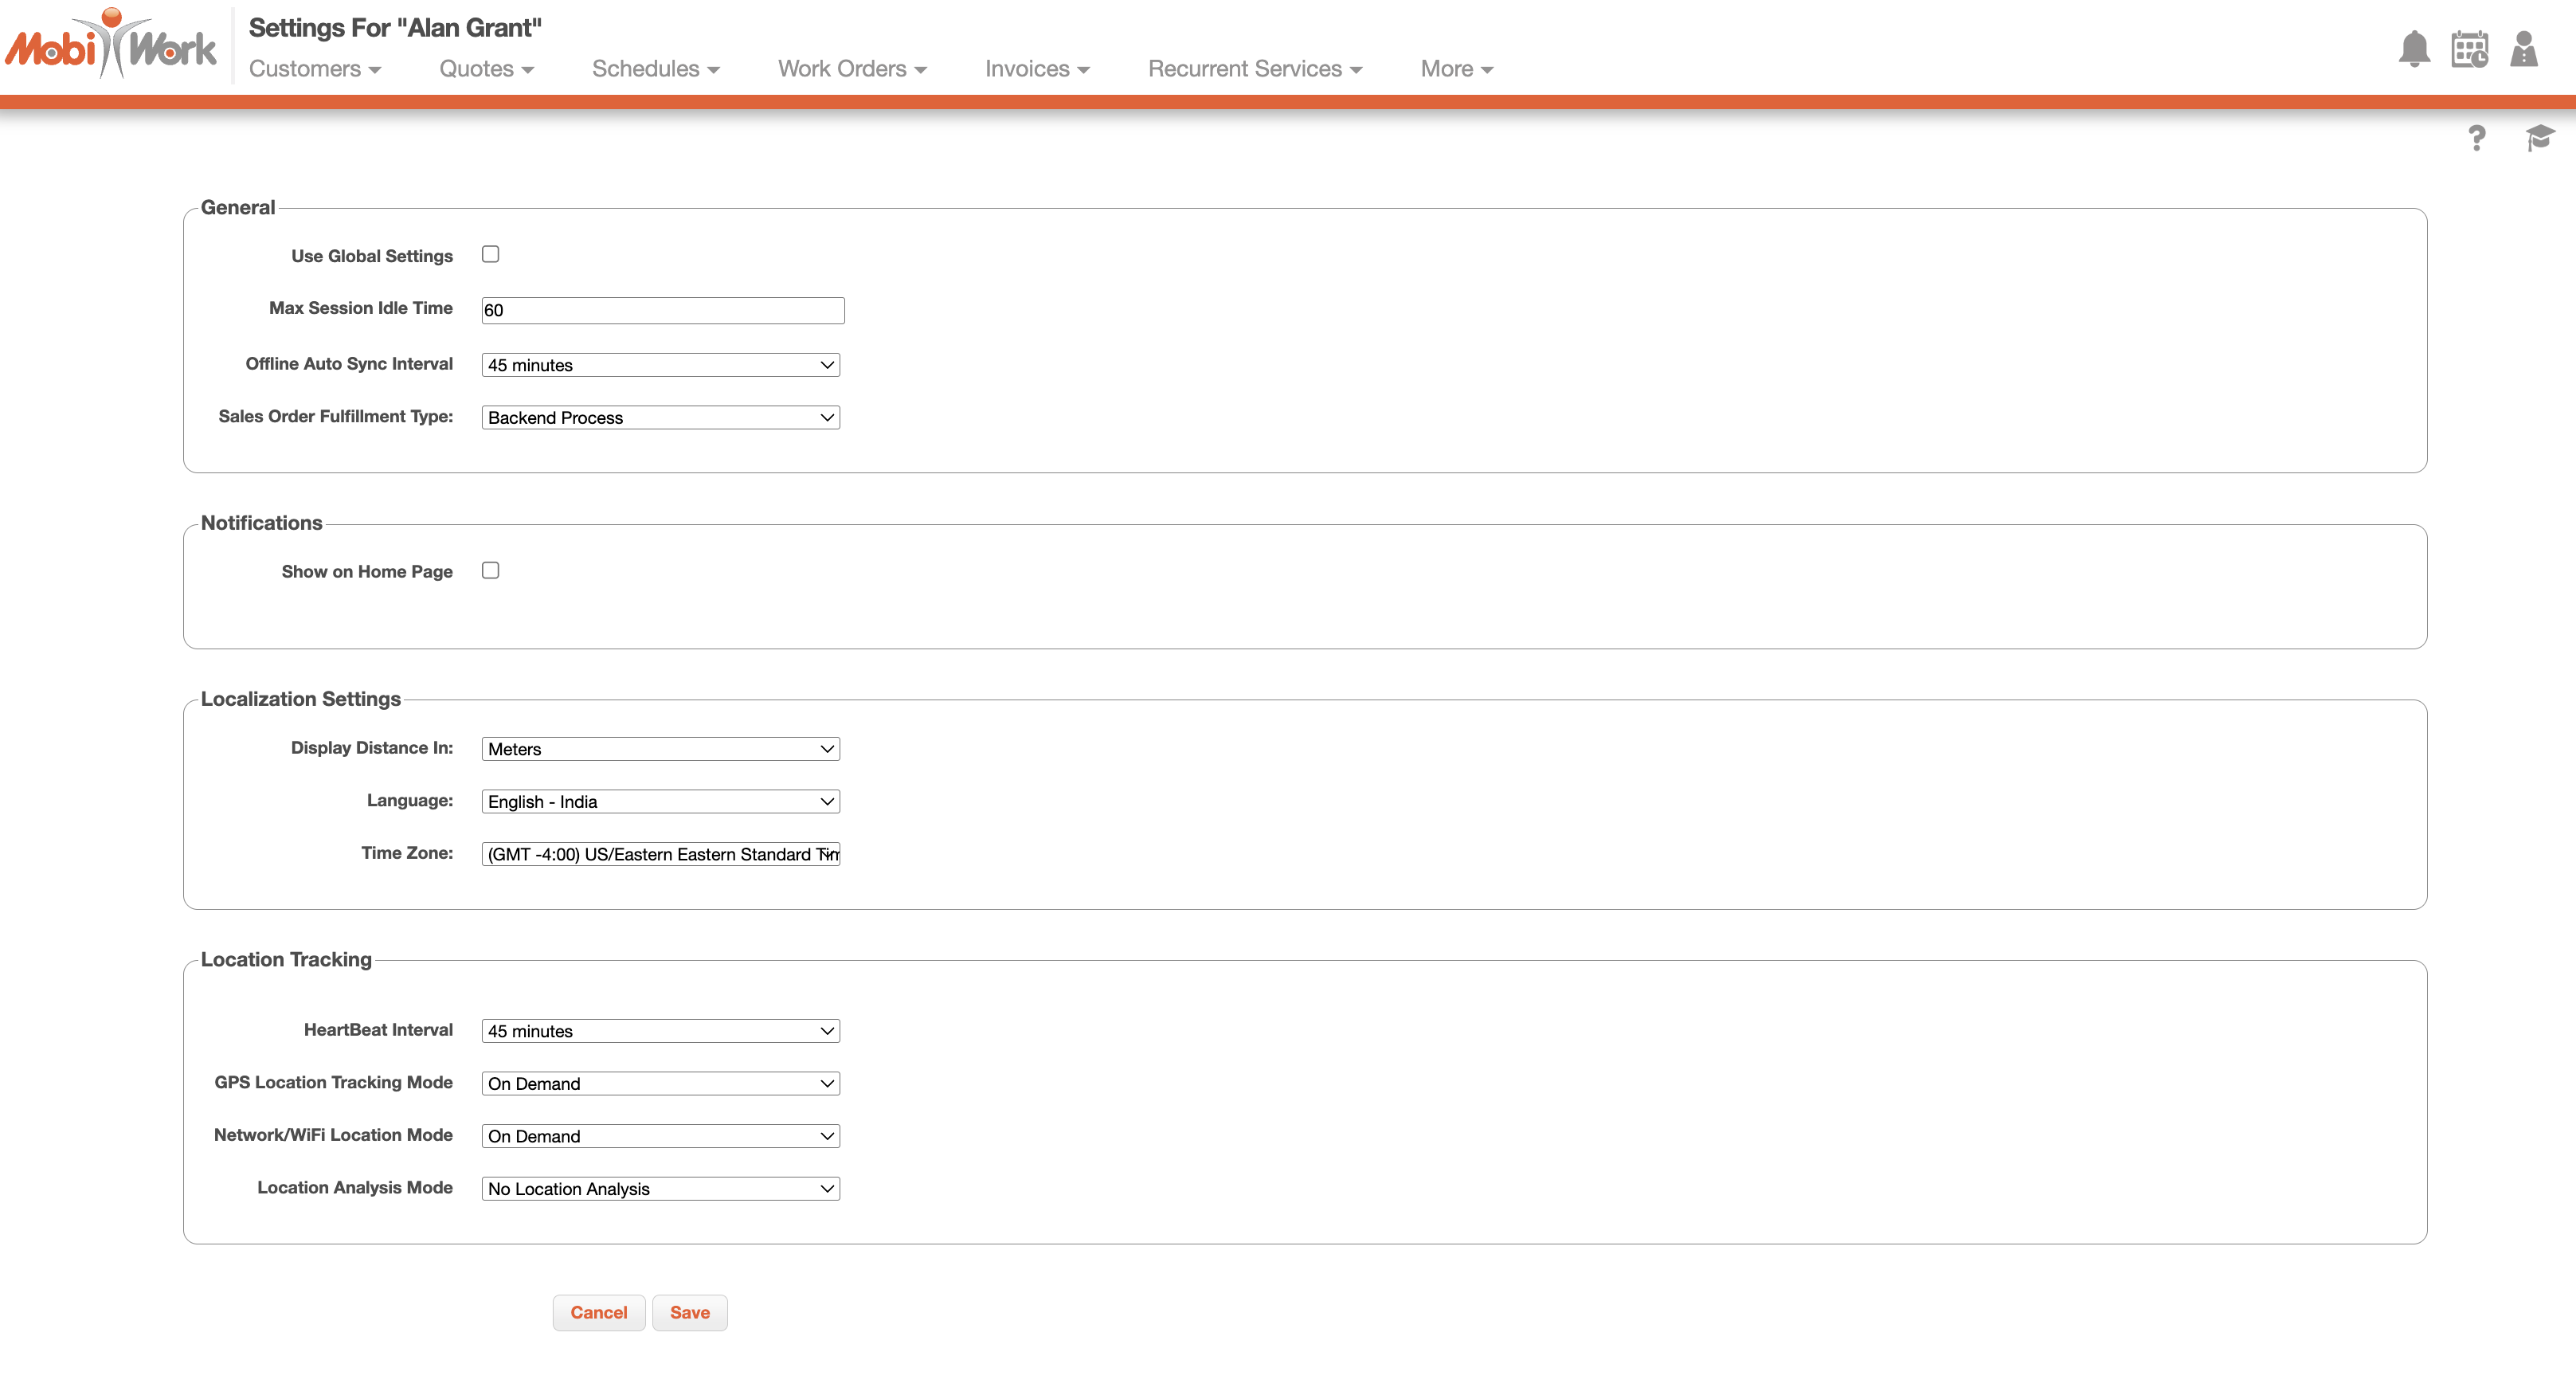
The columns for the "Settings" tab are defined below:
| Name: | Description: |
|---|---|
| "Use Global Settings" | Uses the settings configured at the company level. If unchecked the settings will be tuned for the specified contractor. |
| "Max Session Idle Time" | The max session idle time before MobiWork automatically logs out. |
| "Offline Auto Sync Interval" | How often the device will try to communicate with the server when it is in offline mode. |
| "Sales Order Fulfillment Type" | Indicates how the contractor can fulfill a sales order (i.e., from their personal inventory or the backend process). |
| "Show on Home Page" | Shows the notification panel on the home Page. |
| "Display Distance In" | The measurement of distance that will display for the user in MobiPath, MobiTimesheet, and work order assignments by location. |
| "Language" | The language that the text within MobiWork will be displayed in. |
| "Time Zone" | The time zone the contractor is in. |
| "HeartBeat Interval" | How often location information from the contractor's device will be sent to MobiWork |
| "GPS Location Tracking Mode" | The continuous, no location tracking, frequency mode (at defined intervals), or on demand (on the device, the user can specify when they want to be tracked) |
| "Use Business Hours" | The contractor will be tracked during business hours. If unchecked, the user will be tracked 24/7 |
| "Global Business Hours" | The business hours for the contractor. |
| "Network/WIFI Location Tracking Mode" | Determines how often the contractor can be tracked. (i.e., continuous, no location tracking, a set number of minutes, or on demand). For "On Demand" the user can specify when they want to be tracked. |
| "Location Analysis Mode" | Allows you to analyze all locations, analyze POI locations only, or no location analysis. |
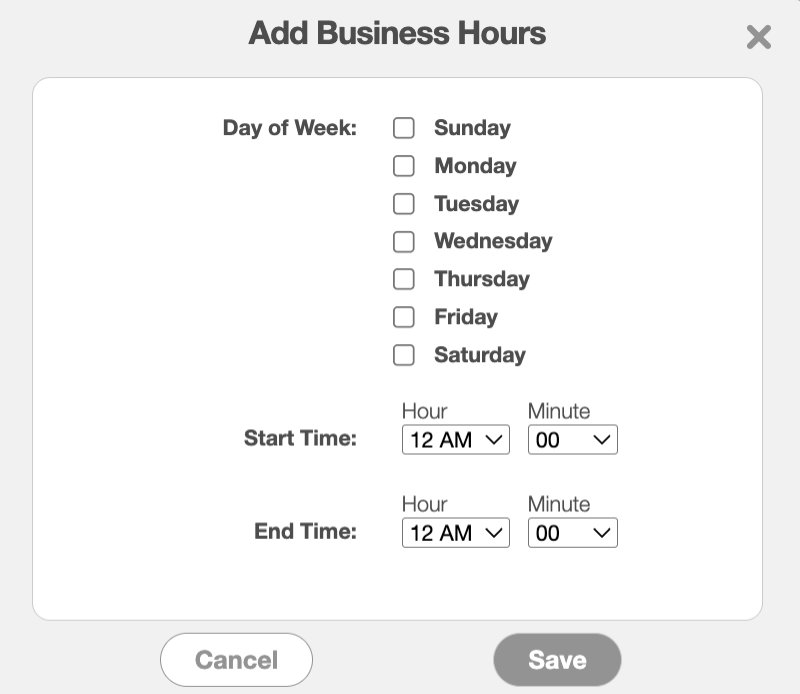
To update the business hours information for the contractor, click on the Plus Sign icon. Once you click on this Plus Sign the Add Business Hours pop-up window will appear.
In this pop-up window, highlight the days of the week, start time, and end time for the selected contractor. Once you are satisfied with the information entered, click the Save button:
The "Time Off" tab will allow you to view or add time off notifications for the specified contractor:

To add a new time off notification, click on the Plus Sign button. Once you click on this button, the Add Time Off pop-up window will appear:

Input the time frame and date of the notification, if it will be recurring, and a note. Once you are satisfied with the information you have entered, click the Add button.
The columns for the "Time Off" tab are defined below:
| Name: | Description: |
|---|---|
| "Date" | The date the contractor requested to take off. |
| "Start" | The start time when the time off duration begins. |
| "End" | The end time when the time off duration begins. |
| "Hours" | The cumulative number of hours the time off entry is designated for. |
| "Notes" | Any notes associated with the time of entry. |
| "Actions" | Will allow you to view, edit, download, or delete the time off entry. |
When the time off entry is viewed in the Schedule feature, a work order cannot be added or overlap the specified time off duration:

The "Purchase Orders" tab will highlight the purchase orders associated with the contractor:

By right-clicking or selecting on the Individual Actions button, users will be able to view, edit, or delete the purchase order.
Users can also use the "Shipment Received" action to indicate that the requisite parts for the purchase order have arrived.
For more information about how to create a purchase order, please see the Add Purchase Order page. Or for details on how fulfill a purchase order, please see the Purchase Order Fulfillment page.
The columns for the "Purchase Orders" tab are defined below:
| Name: | Description: |
|---|---|
| "ID" | The unique identification number assigned to the purchase order. |
| "Description" | The title or description associated with the purchase order. |
| "Vendor" | The vendor responsible for fulfilling the purchase order. |
| "Status" | The status of the purchase order. The status can be "Open," "Sent to Vendor," "Shipment Received," or "Cancelled." |
| "Total" | The overall expense for the selected part or product, calculated based on its quantity and unit price. |
| "Actions" | Allows you to view, edit, delete or confirm that the shipment has been received. |
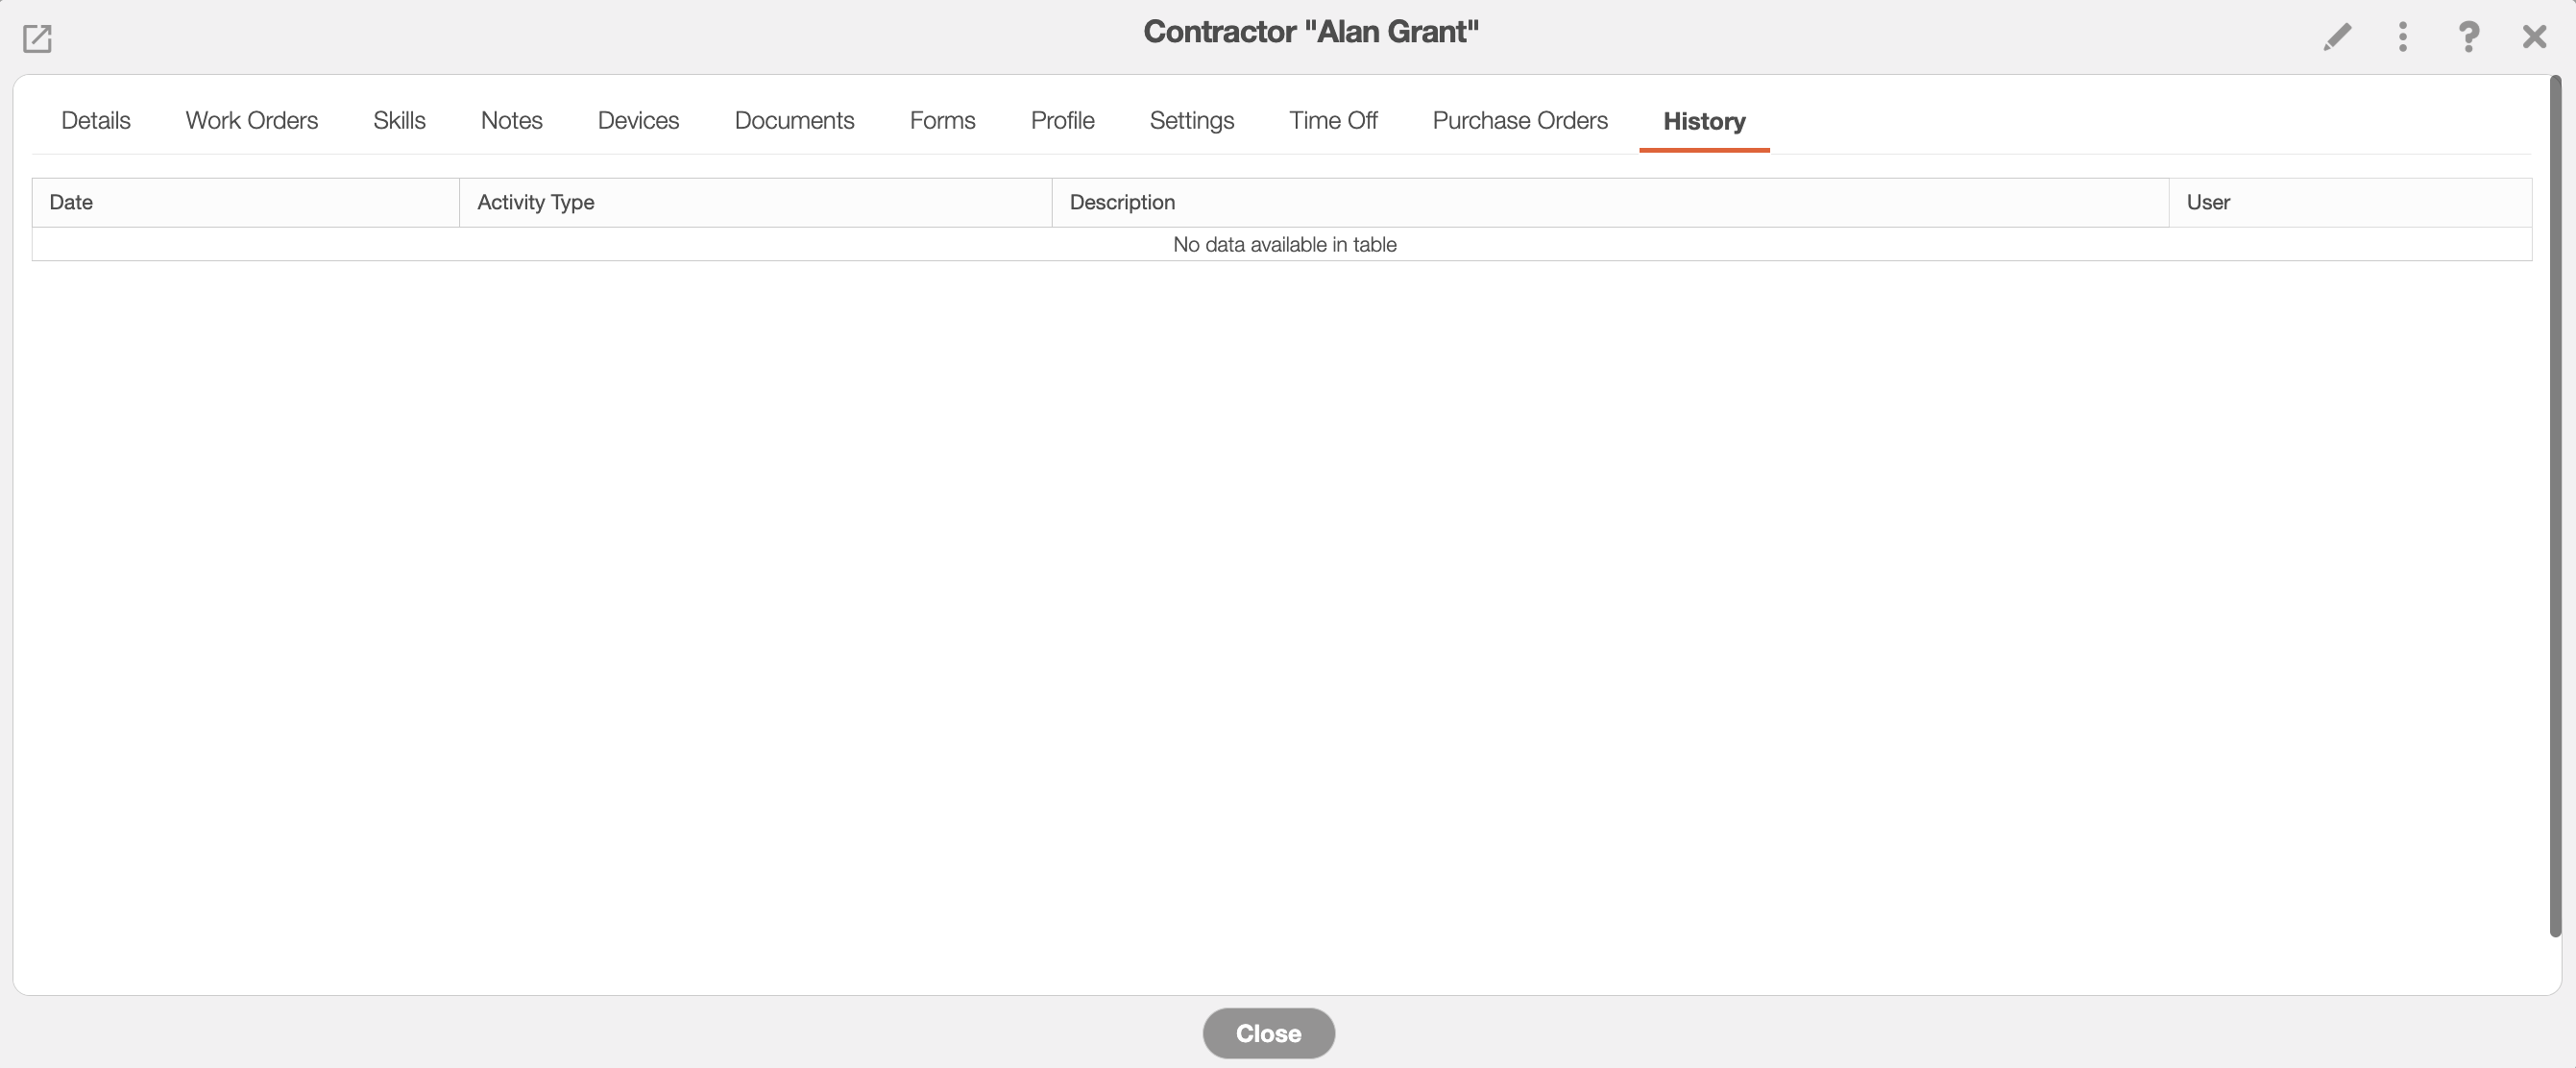
The "History" tab lists the historically recorded details of the contractor including date, activity type, work order, and description: