
There are two ways to access the Invoice feature from your mobile device; the following sections explain each method for accessing and viewing invoices.
Work Order
You can access the Invoices feature directly from the View Work Order page on your mobile device. For more information about accessing this page, see the View Work Order on Device section.
Once you are on the View Work Order page, you can access the Invoices feature through the "Invoice & Payment" action.

Note: For some work orders, you must complete the preceding red Action Items before you can access the invoice. For more information about completing a work order, please see the Complete a Work Order page.
If parts or services have already been added to the work order, the invoice will then be populated with the corresponding line items. If you have not added the parts or services previously, you can add them directly to the invoice, once you access the "Invoice & Payment" action.
Customer
You can access a customer's invoices directly from the Customer feature, providing a convenient way to review invoices associated with the customer's profile. For more information about accessing the Customer feature, see the Mobile Customer Layout page.
Once you are on the Customer feature page, select the Invoices tile to view the list of invoices associated with the selected customer:

All invoices displayed on this page are associated with the corresponding customer profile.
When an invoice is first generated from the customer profile, you can select the desired status. If the invoice is generated from the work order, the status will be "Open."
An invoice with the "Open" status will have a different layout and tiles than an invoice with a "Checked Out" or "Paid" status.
The following image highlights the overall layout of an invoice with the "Open" status:

You can access and perform the following actions on an invoice with an "Open" status:
The Actions Panel tile allows you to perform additional actions on the invoice. These actions include the ability to edit the invoice, edit the terms and conditions, or print the invoice using a bluetooth printer. For more information about bluetooth printers, please see the Bluetooth Printers page.
The "Information Panel" displays the invoice status, the invoice creation date, the invoice due date and the customer's name. The invoice status can be found in the tag in the top right corner of the "Information Panel."
The "Line Items" will display the invoice items, unit price, the quantity, and the price of the listed service or product; as well as the subtotal of all the listed products and services, the added tax, any discounts/markups and the total amount due. Use the Add Part tile or the Add Service tile to populate the invoice; to add discounts, markups, etc. to the invoice use the More... tile.
The Add Part tile will allow you to add a new item to the invoice.
The Add Service tile will allow you to add a new service to the invoice.
The More... tile grants you additional actions that you can perform on your invoices. These actions include the ability to add a discount/markup, signature, note, or payment to the invoice. You can also send the invoice to the customer through email or text message, check out the invoice, access the customer preview option, or view the invoice as a PDF.
The Check Out tile completes the invoice and allows the customer to pay the outstanding balance.
If you generated the invoice from the work order and previously added the respective parts and service, then the parts and services will populate the invoice's corresponding line items. Otherwise, the invoice will be blank and need to be populated. For more information about populating the invoice, please see the Add Invoice page.
Once the invoice status is set to "Checked Out" the layout and tiles of the invoice page will change accordingly.
The layouts for invoices with a "Checked Out" status and a "Paid" status are the same. The following image highlights the overall layout of an invoice with the "Checked Out" status:

You can access and perform the following actions on an invoice with a "Checked Out" status:
The Actions Panel tile allows you to perform additional actions on the invoice. These actions include the ability to edit the invoice, edit the terms and conditions, or print the invoice using a bluetooth printer. For more information about bluetooth printers, please see the Bluetooth Printers page.
The "Information Panel" displays the invoice status, the invoice creation date, the invoice due date and the customer's name. The invoice status can be found in the tag in the top right corner of the "Information Panel."
The "Line Items" will display the invoice items, unit price, the quantity, and the price of the listed service or product; as well as the subtotal of all the listed products and services, the added tax, any discounts/markups and the total amount due. Use the Add Part tile or the Add Service tile to populate the invoice; to add discounts, markups, etc. to the invoice use the More... tile.
The More... tile grants you additional actions that you can perform on your invoices. These actions include the ability to add a signature, note, or payment to the invoice. You can also send the invoice/overdue message to the customer through email or text message, access the customer preview option, or view the invoice as a PDF.
The PDF tile will allow you to view and export your invoice into a PDF document.
The Back tile will redirect you back to the previous page.
The Pay tile will allow you to issue the customer's payment for the invoice.
By clicking the Actions Panel, you can access additional invoice functions. These functions are available regardless of the invoice's status.

Available actions include editing the invoice, updating the invoice terms and conditions, and printing the invoice using a Bluetooth printer. For more information about using Bluetooth printers, please see the Bluetooth Printers page.
These invoice functions are described in more detail below:
Edit Invoice
The Edit tile allows you to update specific information associated with the invoice. The available fields include the invoice status, invoice date, payment terms, due date, tax rate, and invoice terms and conditions.
Once you have made the necessary changes, select the Save tile to save and confirm your updates:
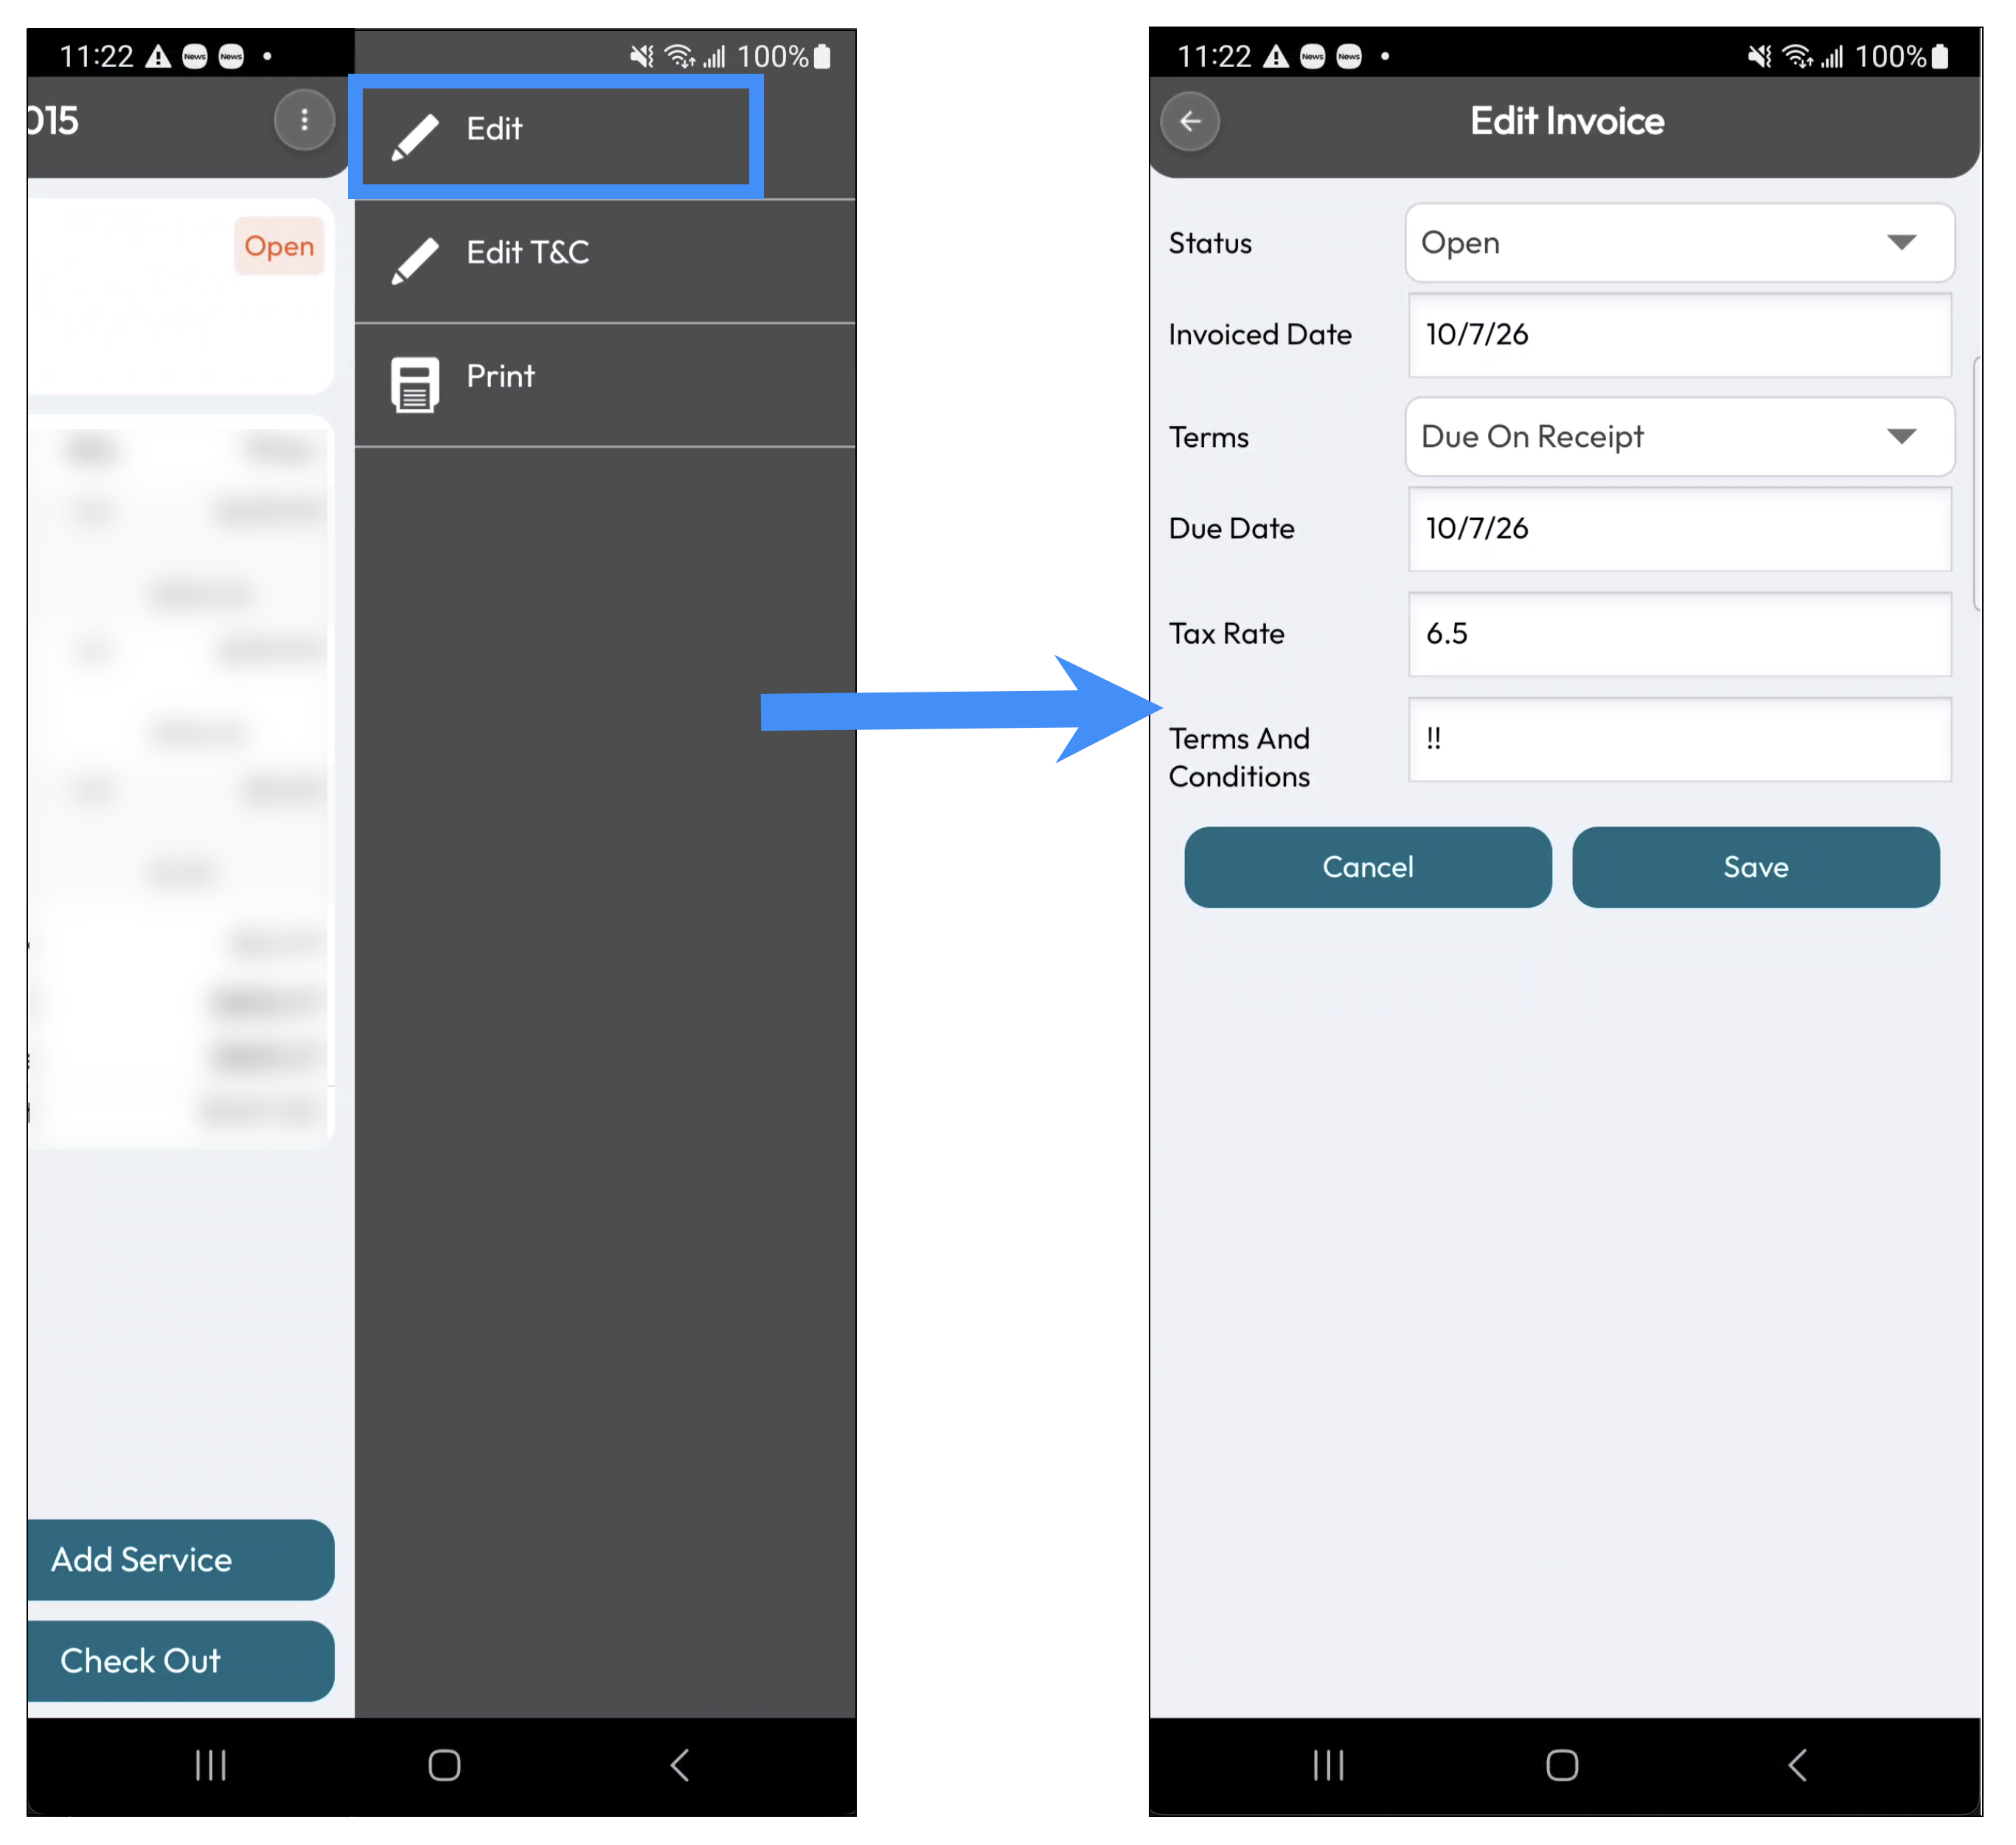
For more information about editing an invoice, please see the Edit Invoice on the Device page.
Edit T&C
By pressing the Edit T&C tile, you will be redirected to the Invoice Terms & Conditions page. On this page, you will be able to update the invoice's corresponding terms and conditions:
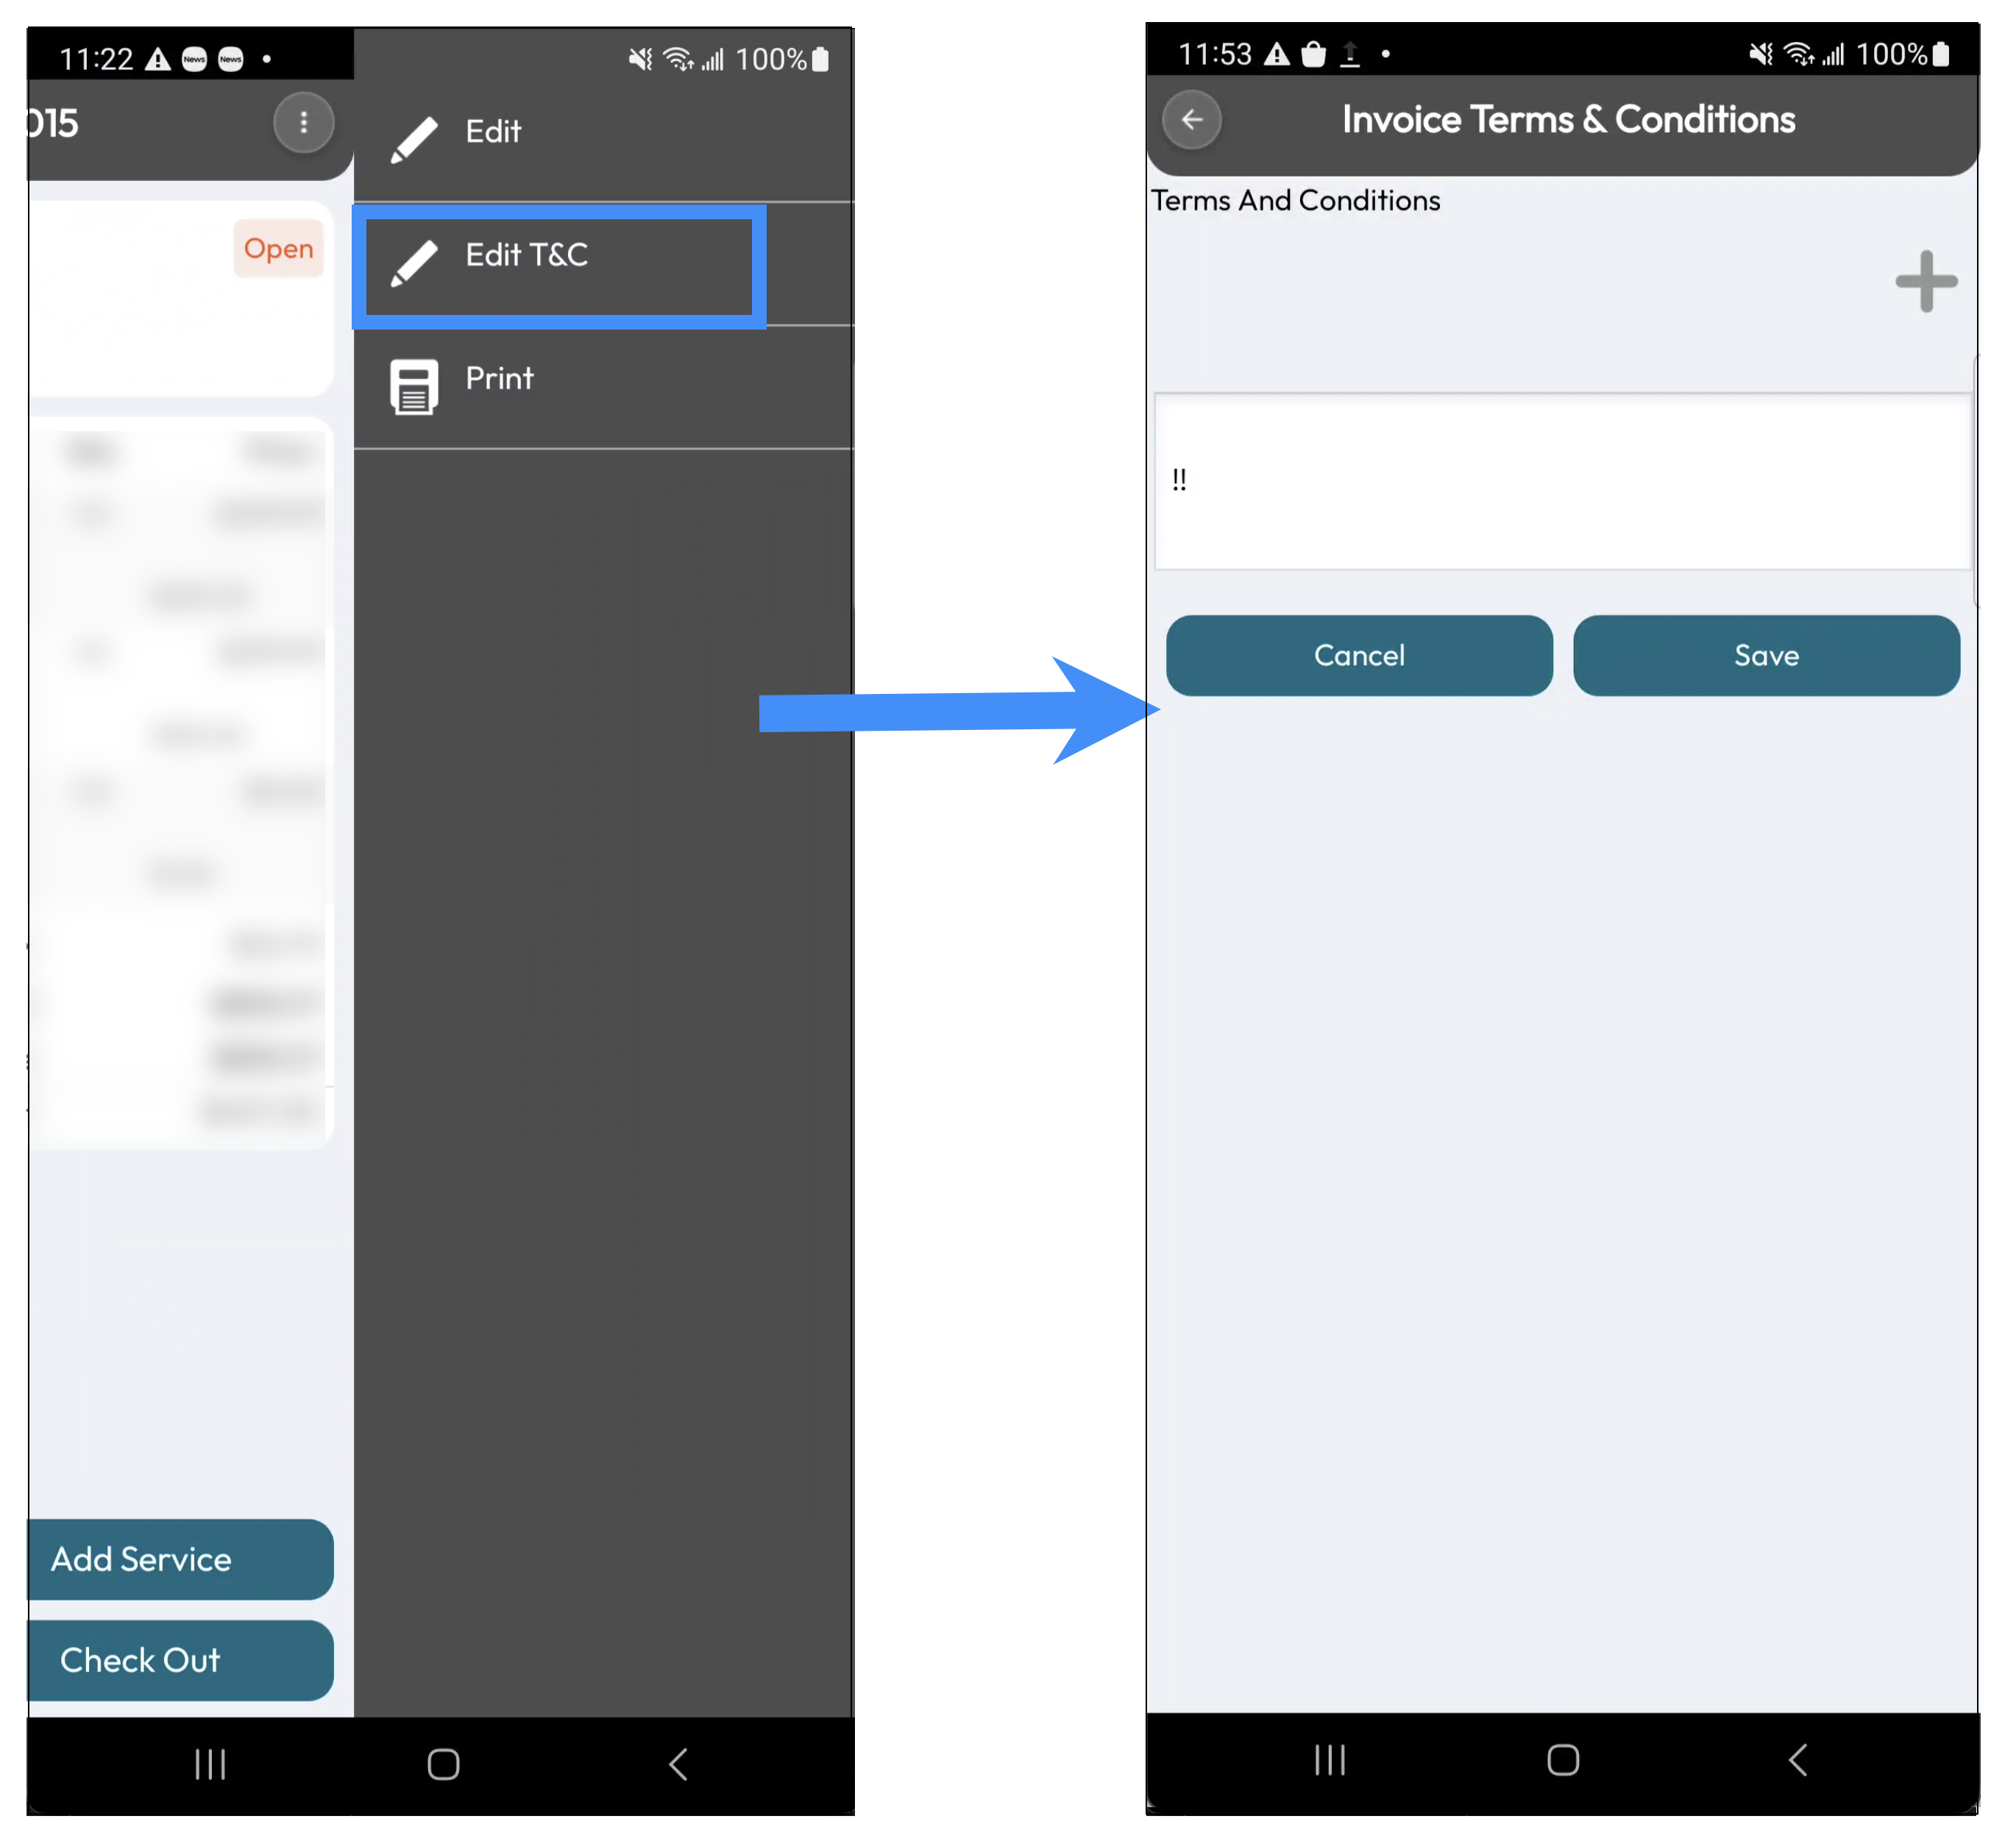
You can either use Plus Sign tile to upload the terms and conditions directly from the MobiWork web interface. or you can manually enter or update the terms and conditions in the text box.
Once you are satisfied with the information, select the Save tile to save and confirm your changes.
Selecting the Print feature allows you to print the corresponding invoice from your mobile device:
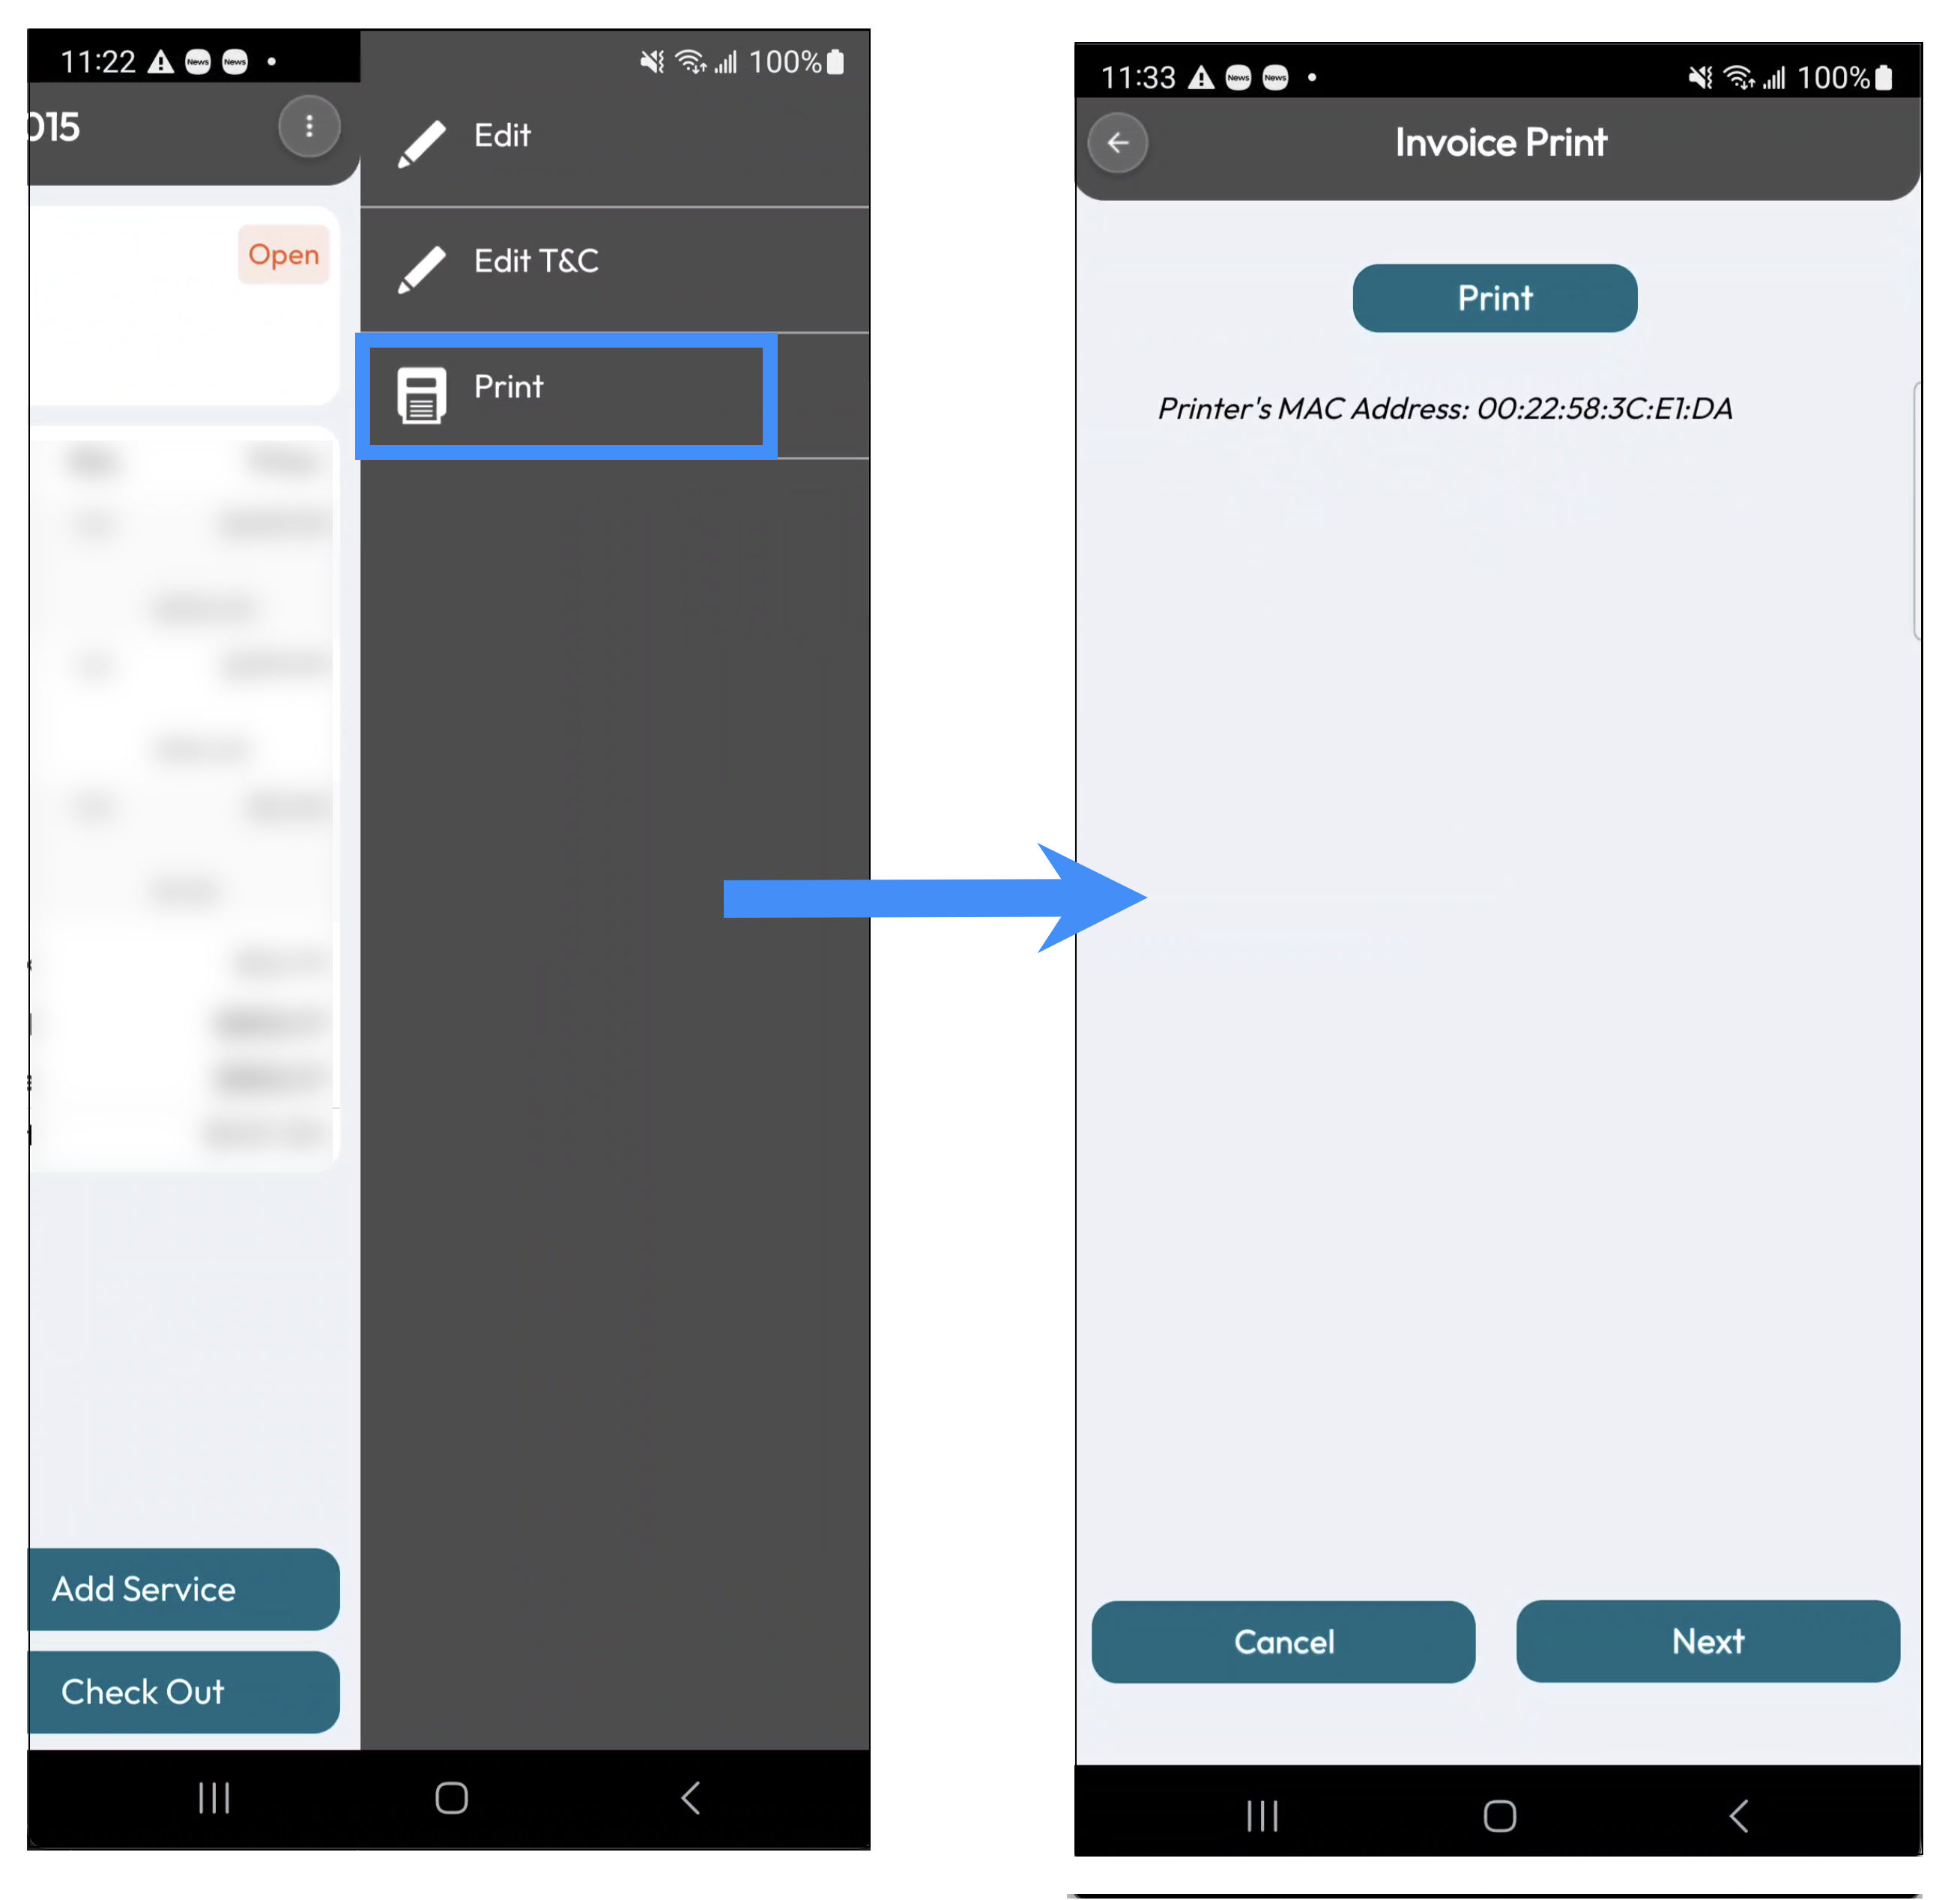
Before printing, you must connect your mobile device to a compatible Bluetooth printer. Make sure Bluetooth is enabled on your device and that the printer is powered on and in pairing mode. Then, select the printer from your device's available Bluetooth connections to establish the connection.
Once the connection has been established, select the Print tile to print the invoice.
For more information about using Bluetooth printers with MobiWork, please see the Bluetooth Printers page.
The More... tile provides additional options for finalizing and managing your invoice. The actions that are available in the More... menu will depend on the status that the invoice has and if the invoice line items are populated.
If the invoice does not yet contain any line items, the More... menu will only provide options to add a part, service, discount, or markup. Depending on the invoice status, different actions will also be available in the More... menu.
These actions allow you to complete final adjustments, review the invoice, and prepare it for the customer.
You can also use options such as View PDF or Customer Preview to review how the invoice will appear.
The image below shows the different versions of the More... menu:
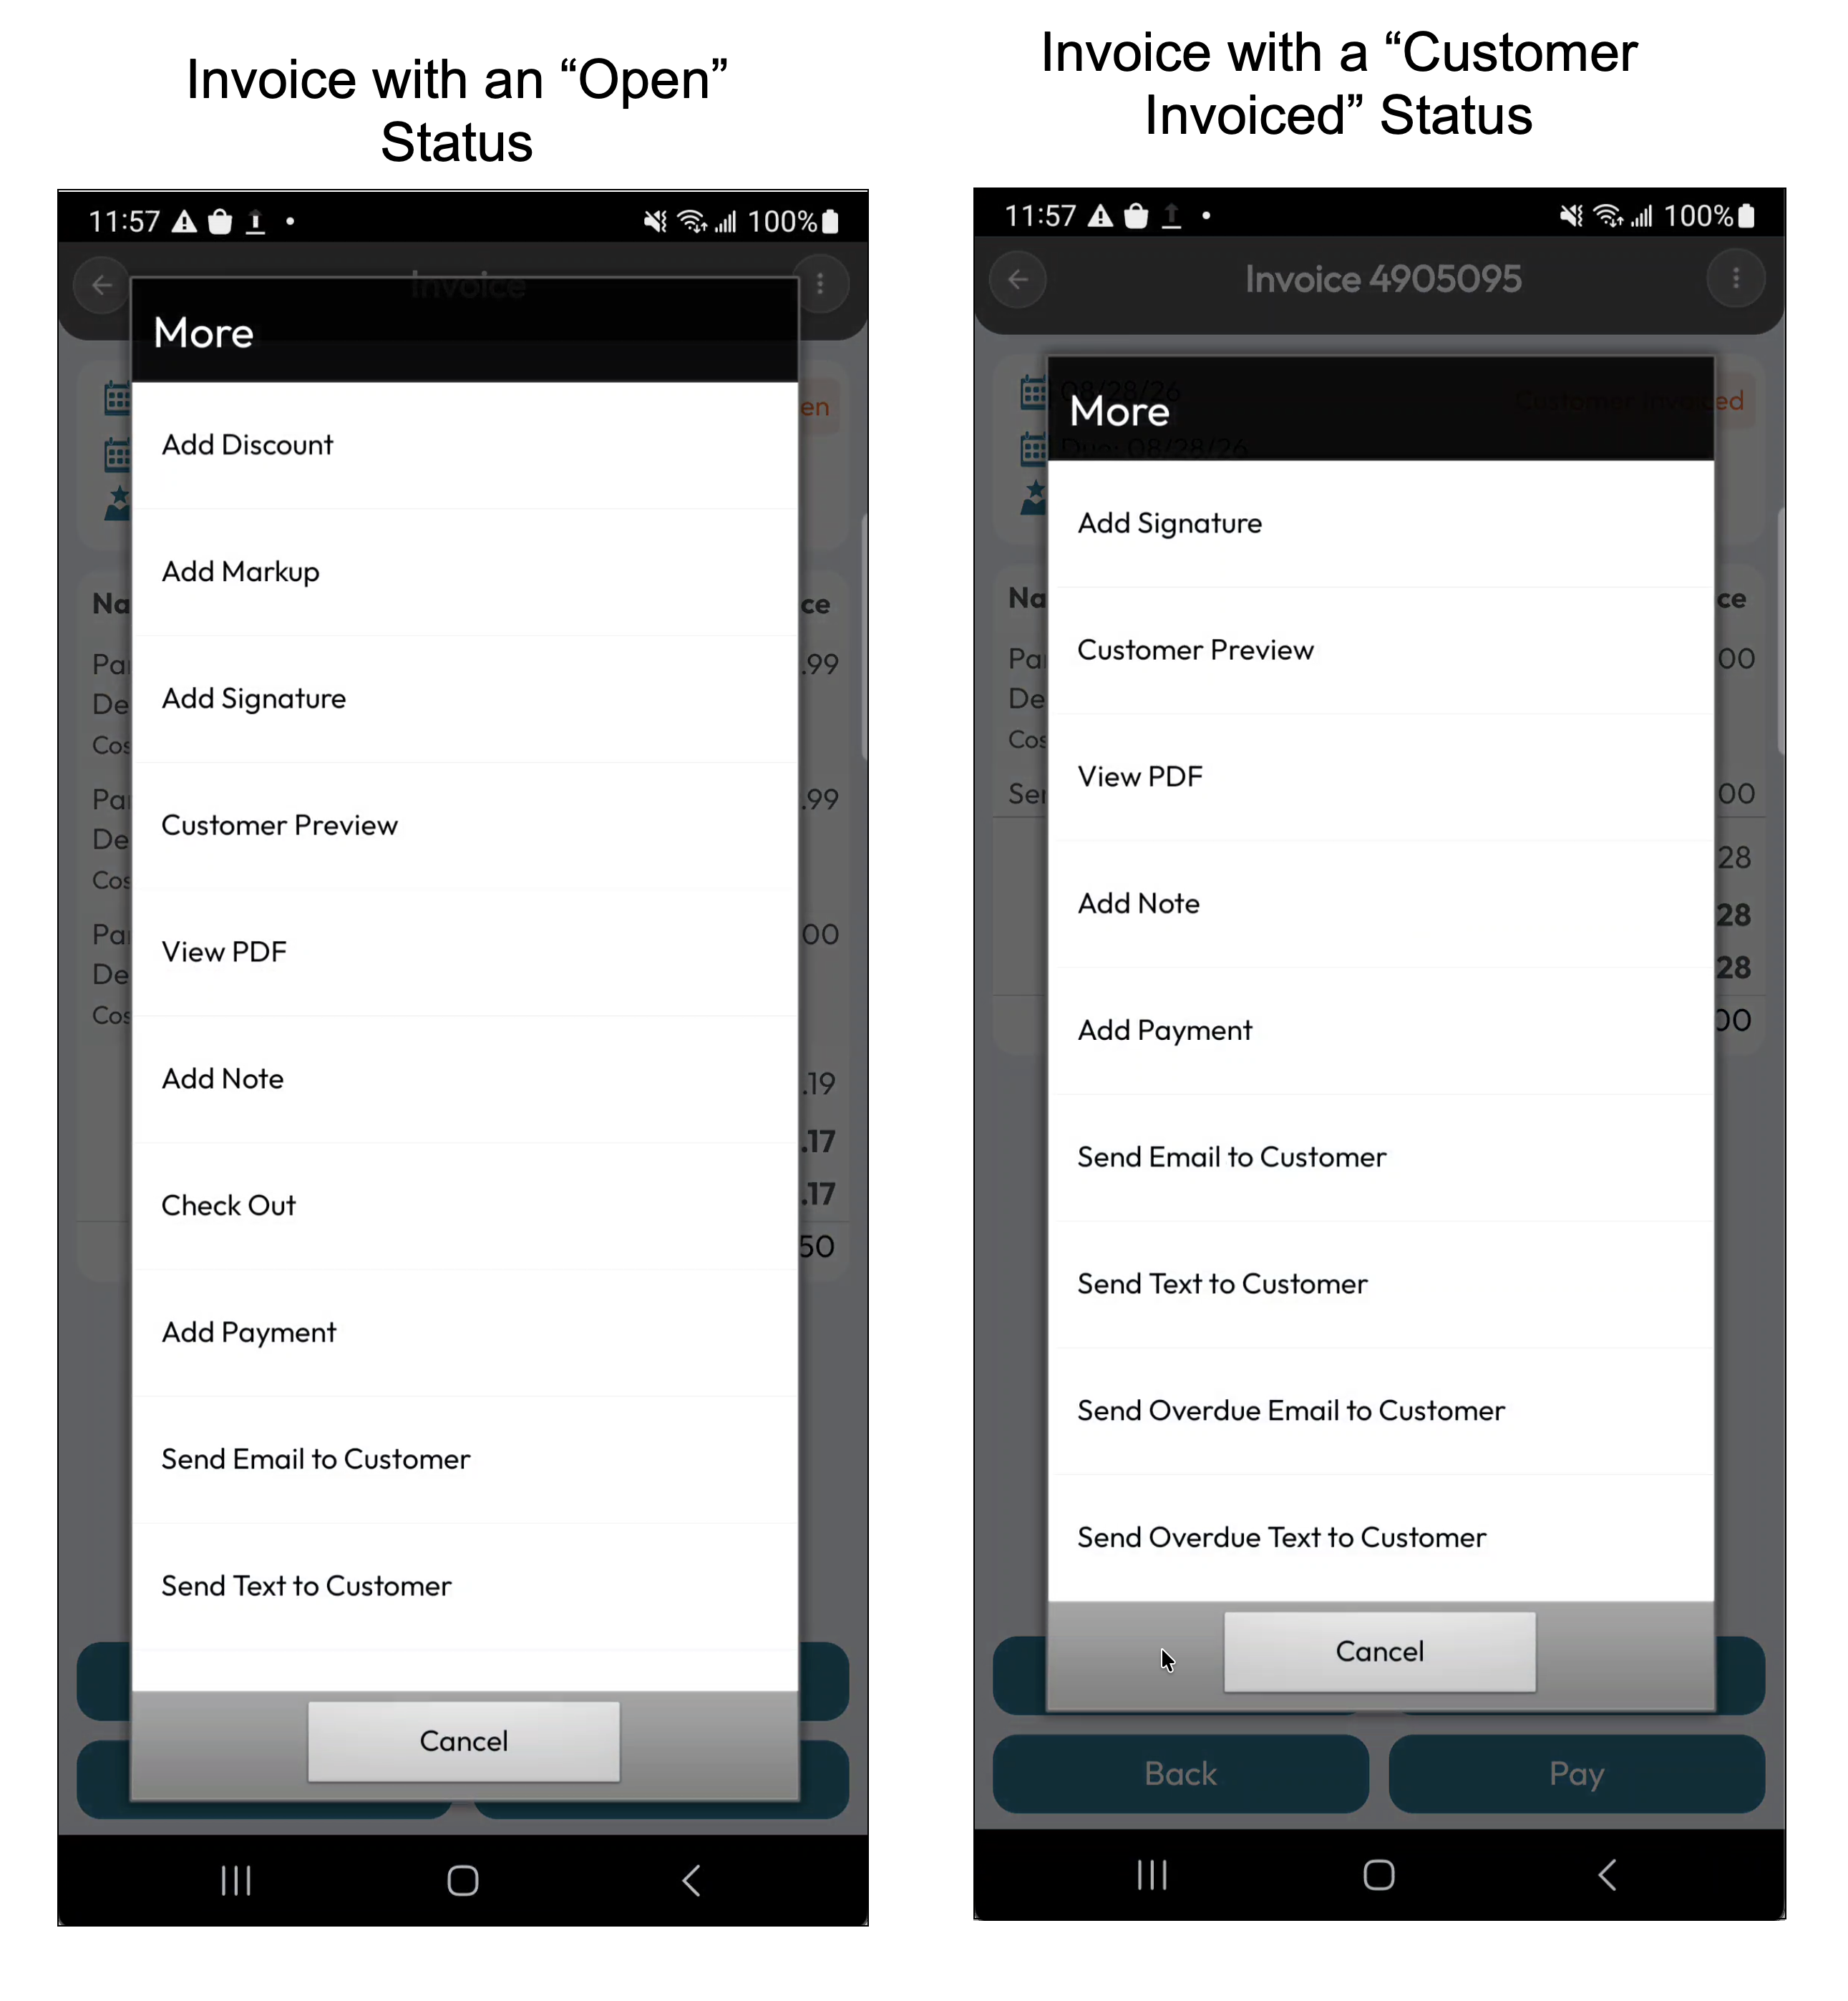
The following subsections provide more information about the different actions available from the More... menu.
Add Discount
The Add Discount tile allows you to apply an ad hoc discount to the overall invoice. Once you press on the Add Discount tile, the Ad Hoc Discount window will appear:
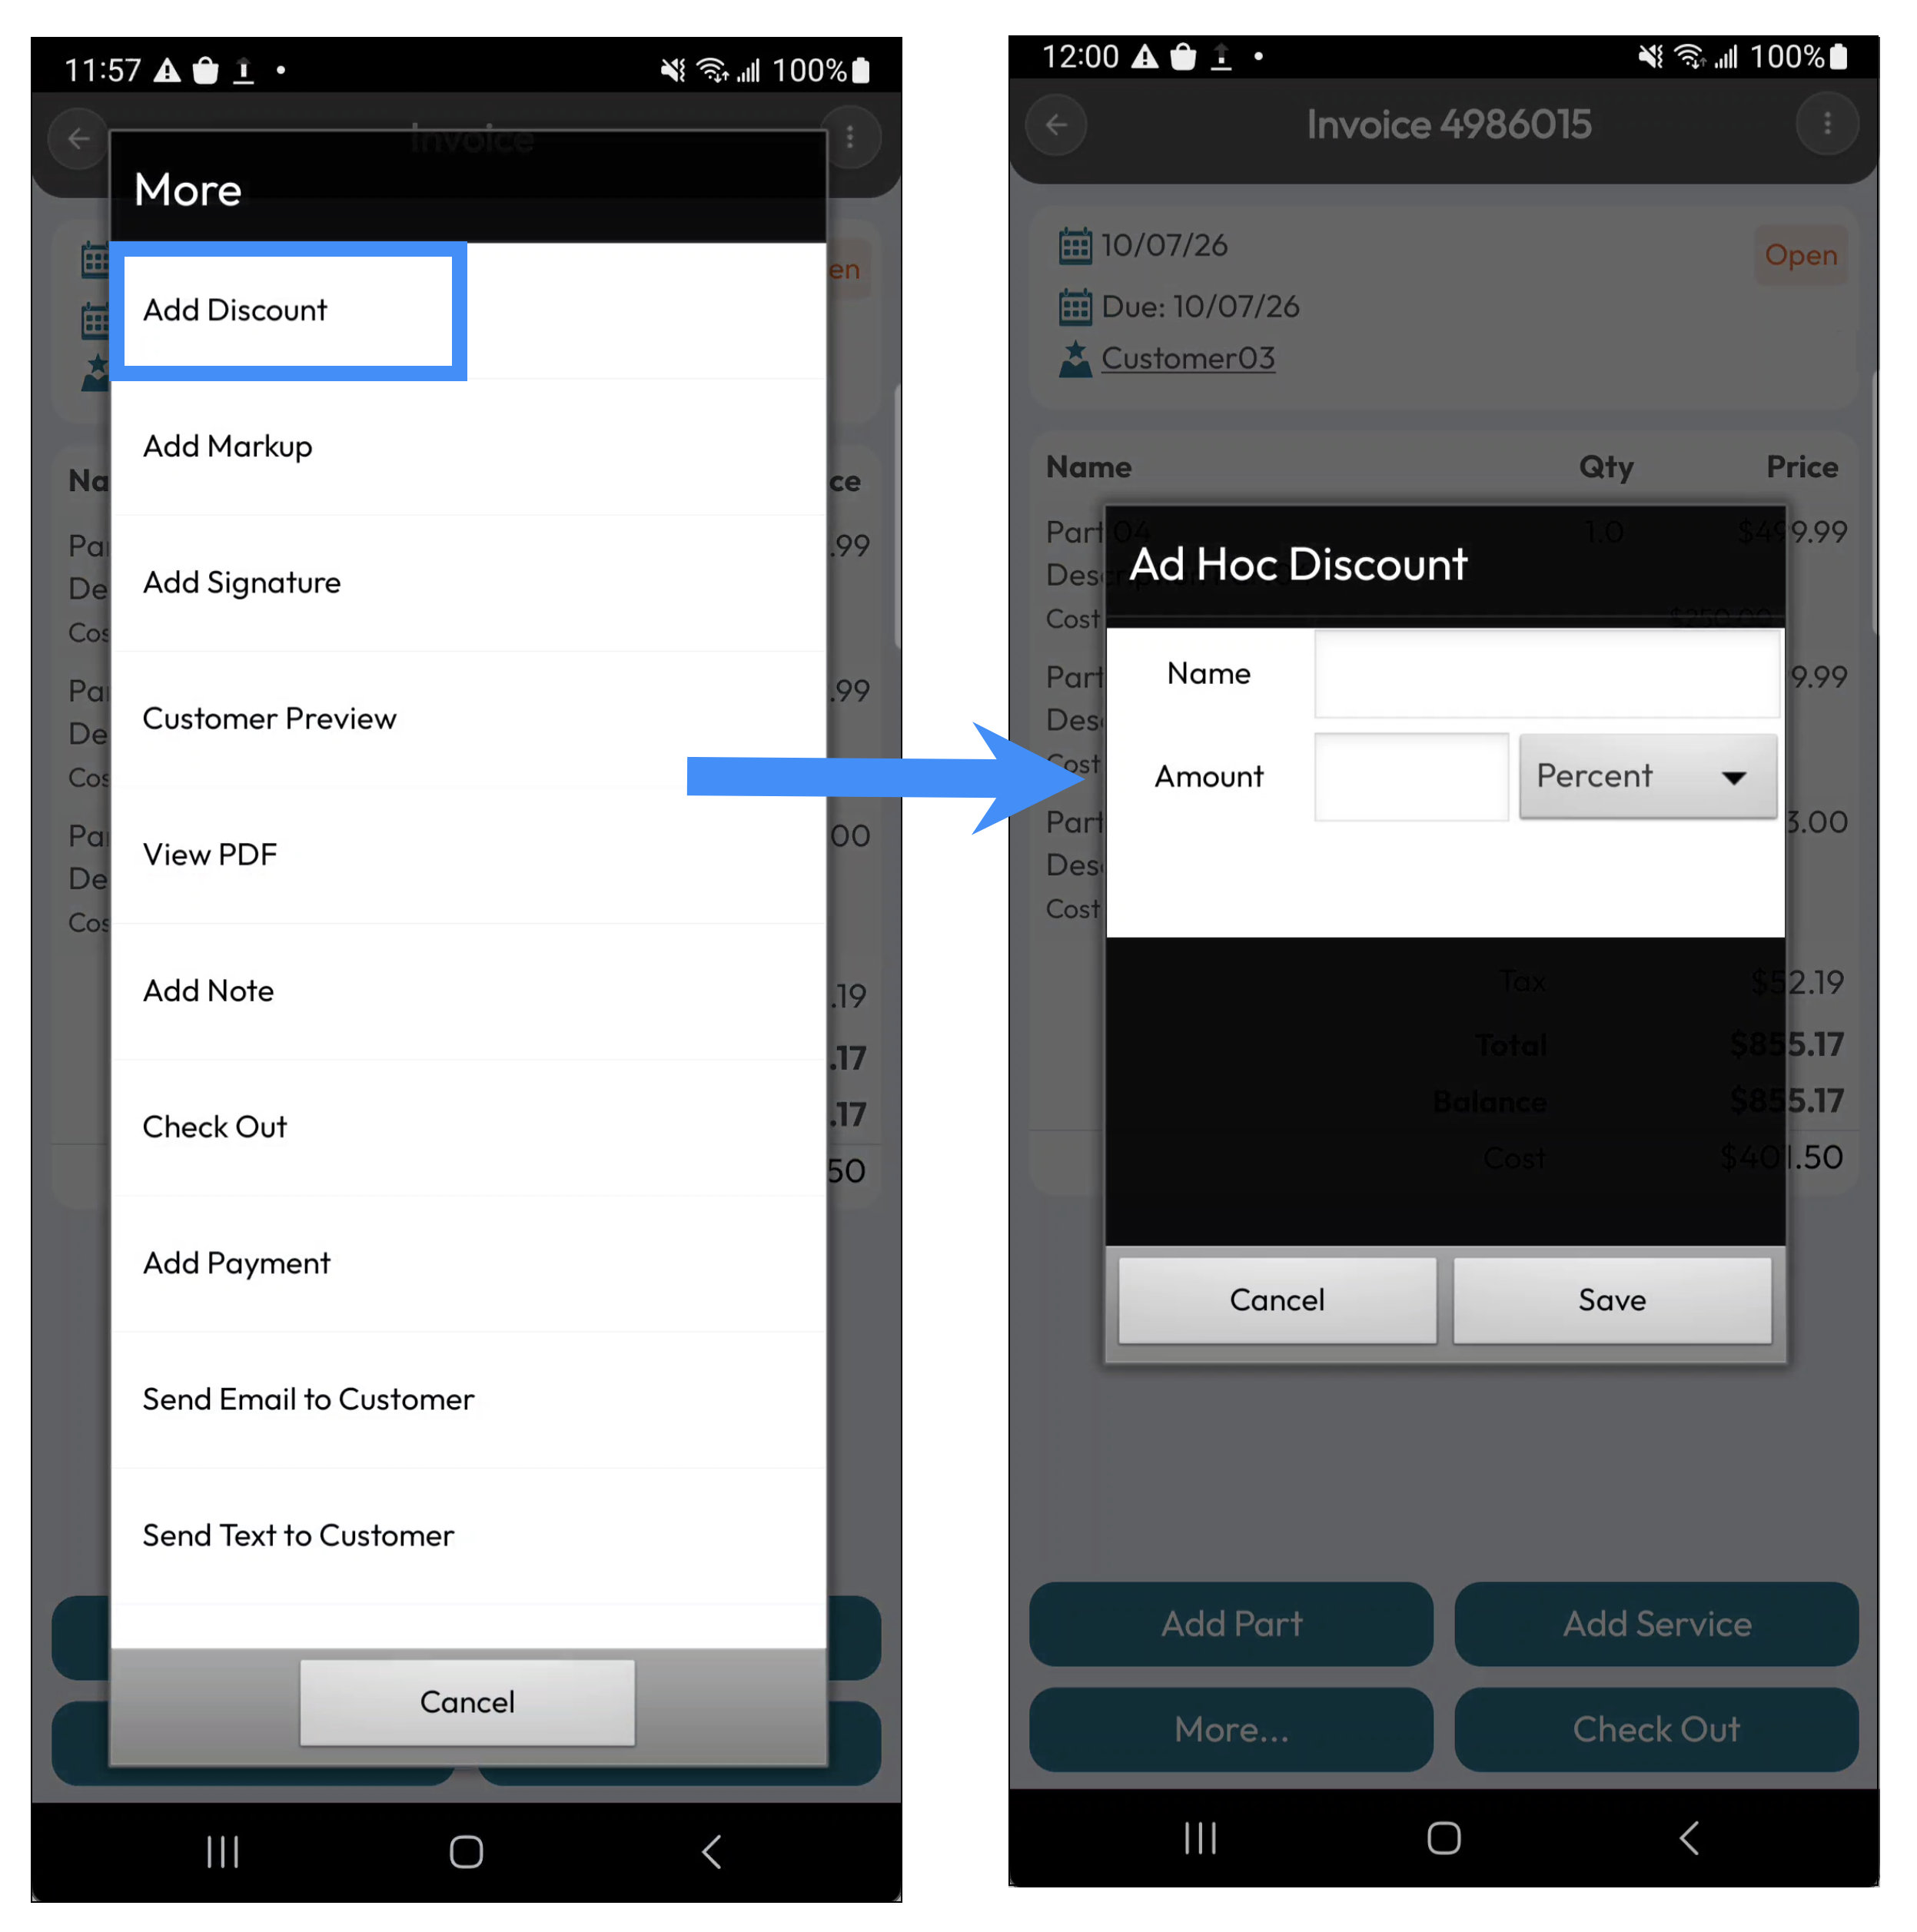
In this window, enter the desired name of the discount and the discount amount.
You can enter the discount amount as either a percentage or a specific dollar amount.
If you would like to remove the discount after it's been added to the invoice line items, simply press and hold on the discount line item until the Discount window appears. Then, select the "Remove Discount" option; the discount will be automatically removed from the invoice's line items:
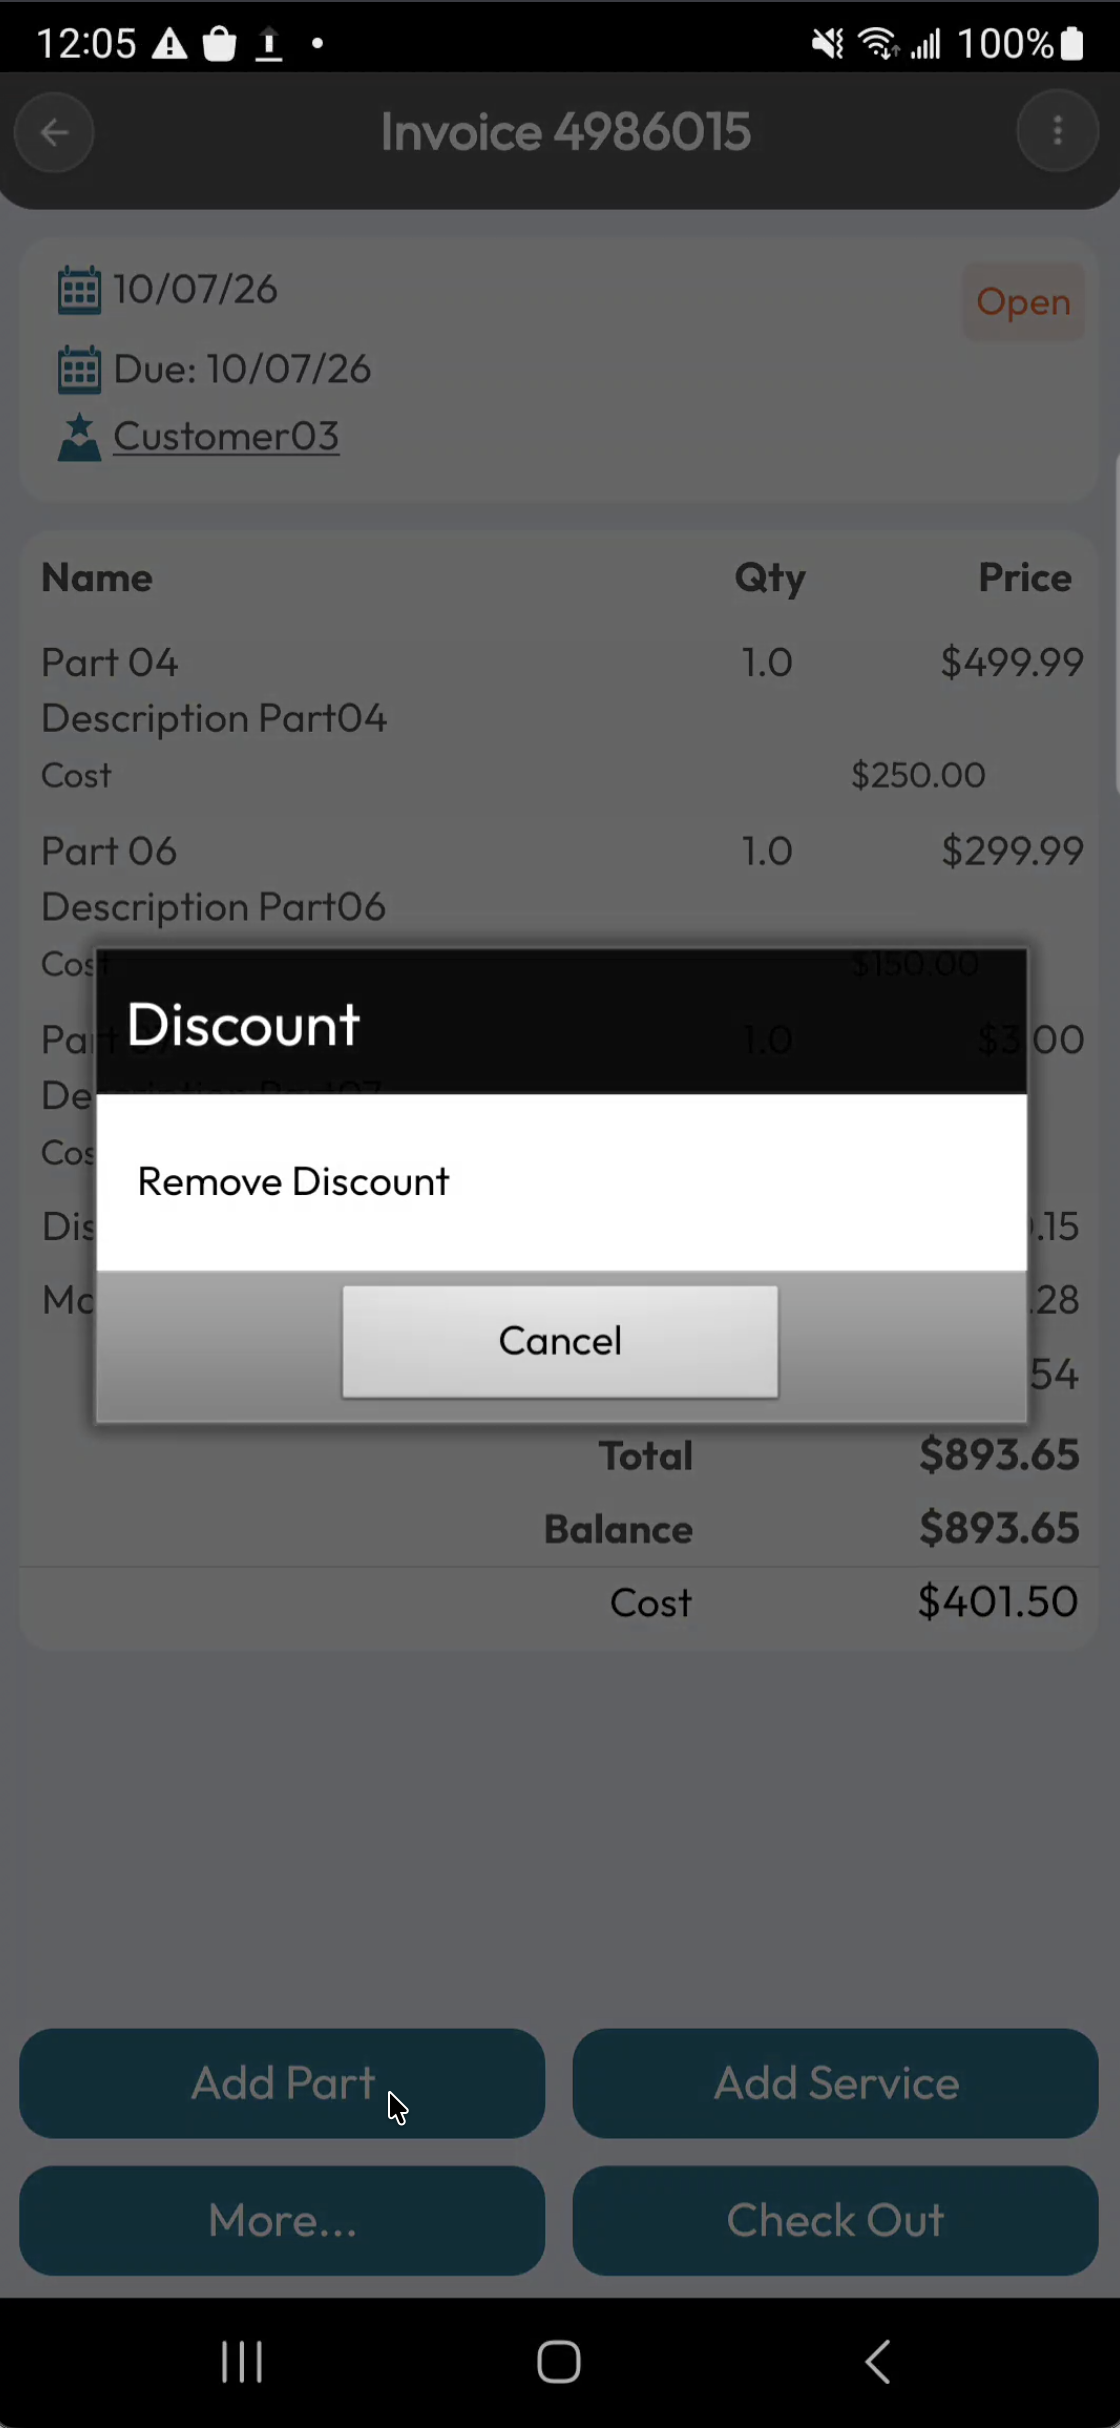
This action will only be available for invoices with the "Open" status. For more information about discounts, please see the Invoice Discounts, Markups, and Signatures page.
Add Markup
The Add Markup tile allows you to apply an ad hoc markup to the overall invoice. Once you press on the Add Markup tile, the Ad Hoc Markup window will appear:
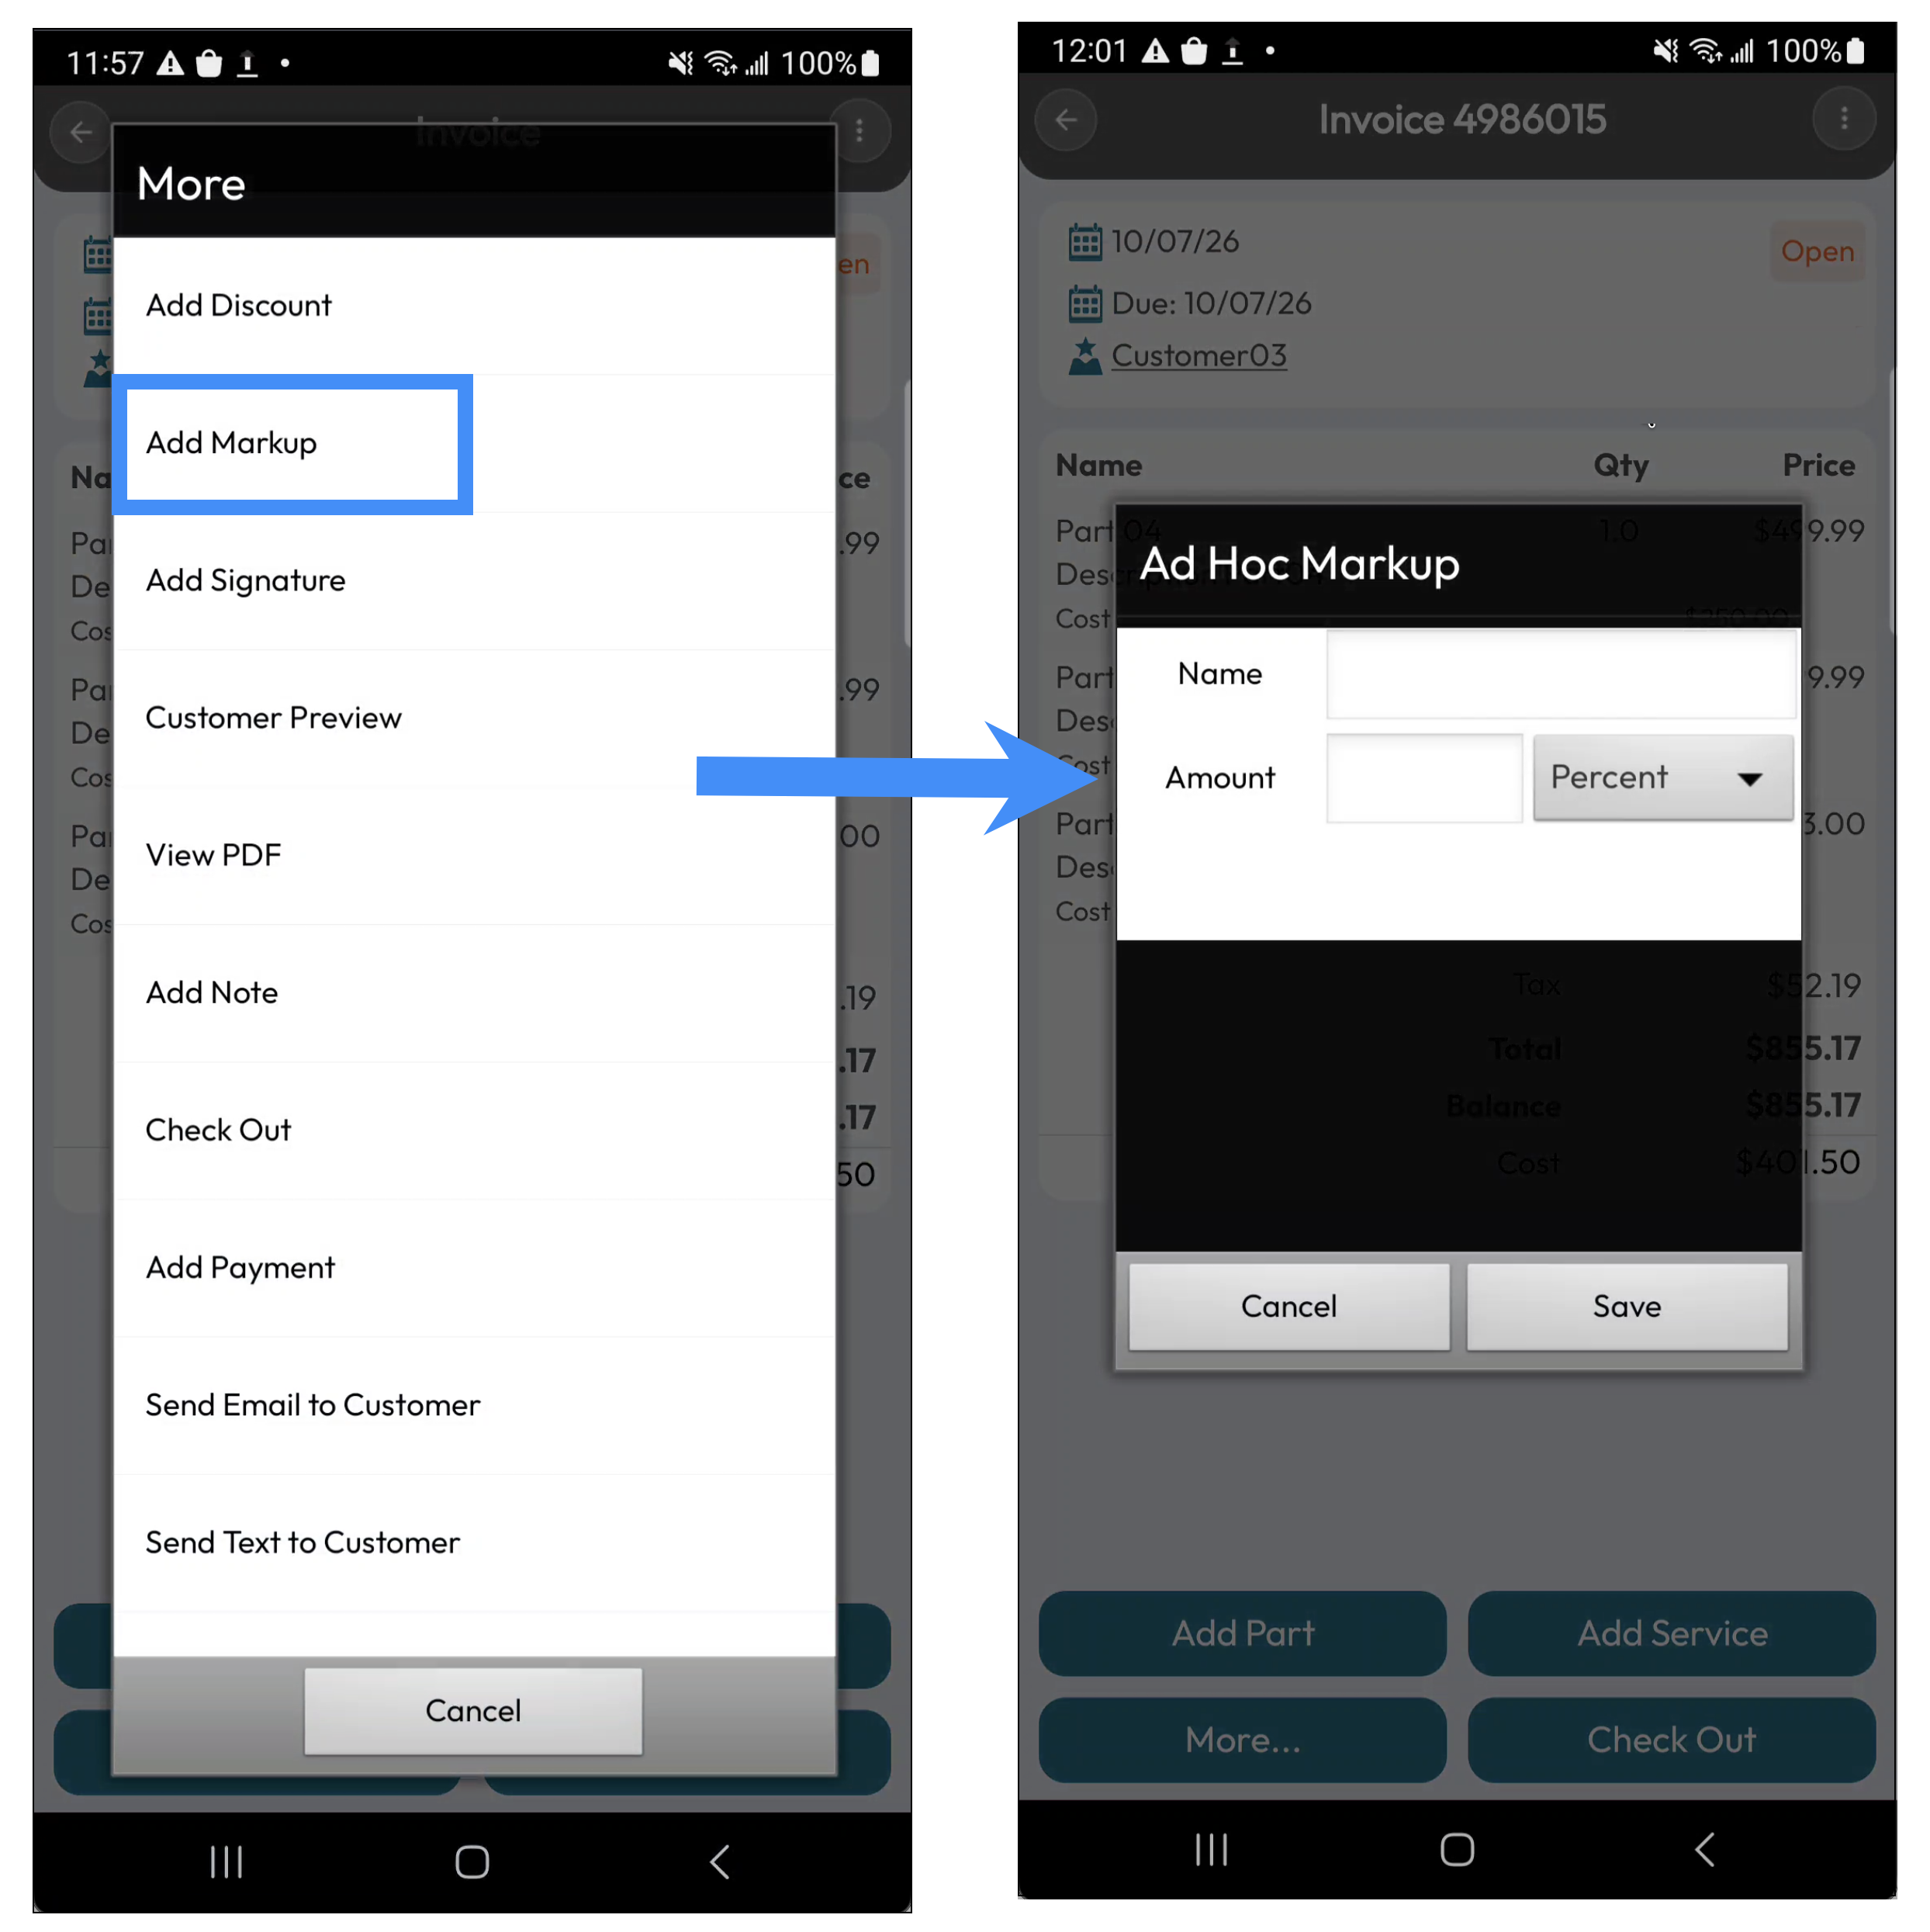
In this window, enter the desired name of the markup and the markup amount.
You can enter the markup amount as either a percentage or a specific dollar amount.
If you would like to remove the markup after it's been added to the invoice line items, simply press and hold on the markup line item until the Markup window appears. Then, select the "Remove Markup" option; the markup will be automatically removed from the invoice's line items:
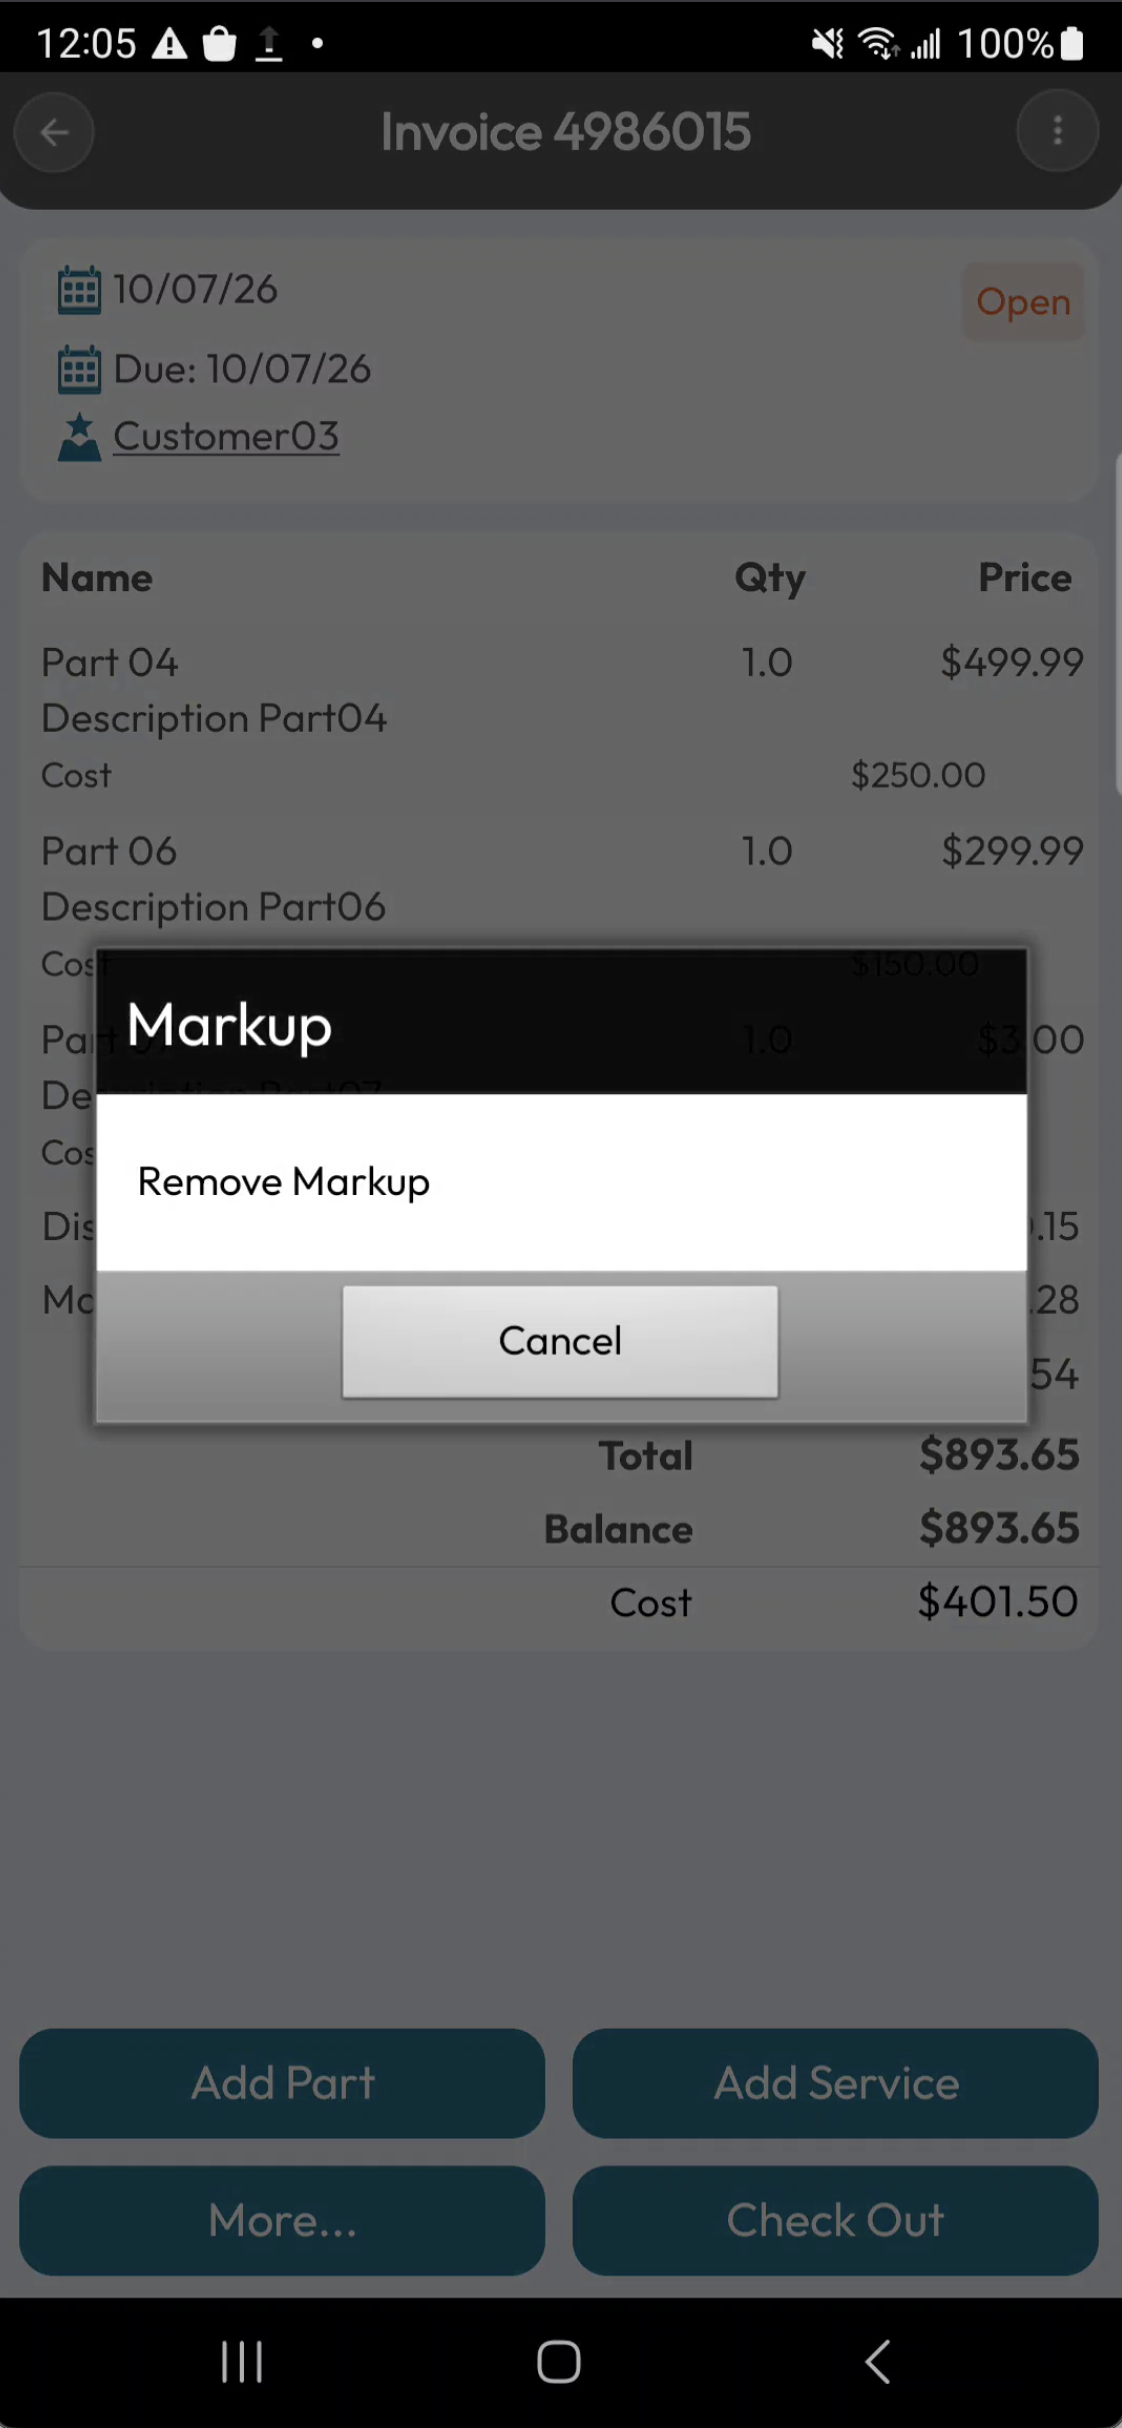
This action will only be available for invoices with the "Open" status. For more information about markups, please see the Invoice Discounts, Markups, and Signatures page.
Add Signature
The Add Signature tile allows the customer to provide their signature to approve the invoice. This action is available regardless of the status that the invoice is in. Once signed, press the Next tile:
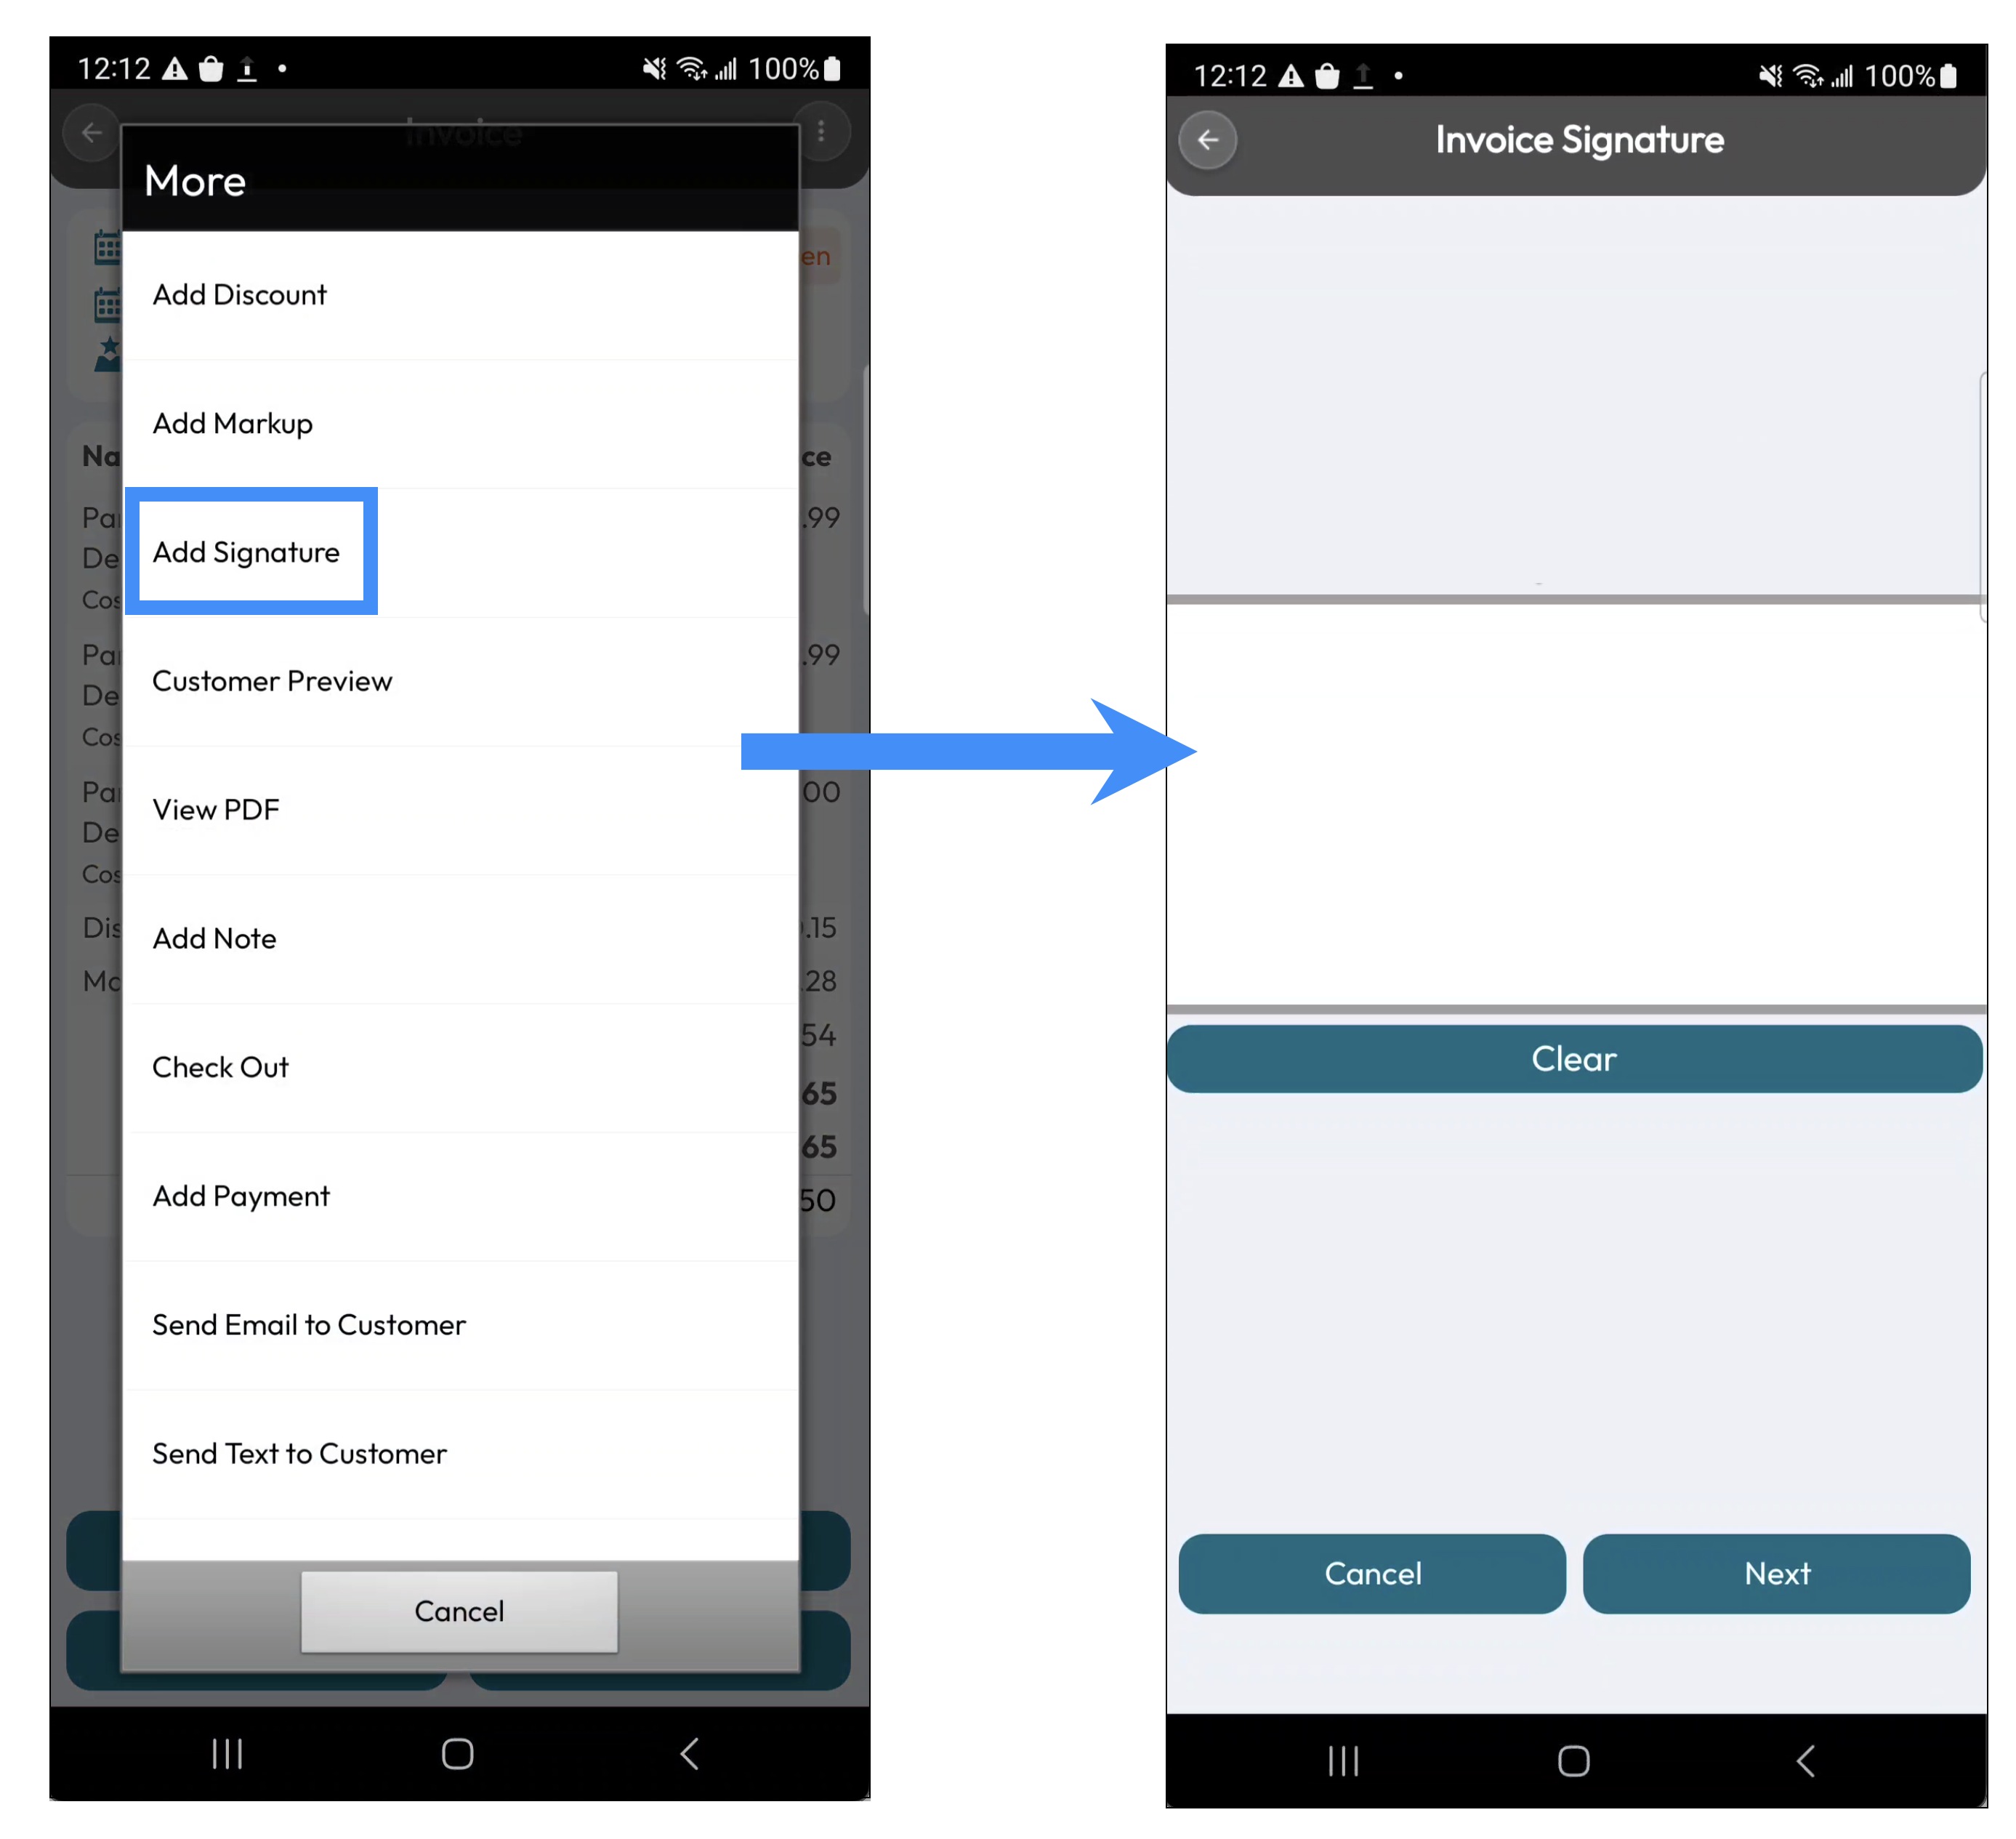
Afterwards the signature can be viewed on the invoice PDF. For more information about signatures, please see the Invoice Discounts, Markups, and Signatures page.
Customer Preview
The Customer Preview tile allows you to view the invoice in a web browser; you can then see how it will appear to the customer if you decide to text or email them the invoice.
Once you press on the Customer Preview tile, you will be redirected to the Customer Preview page:
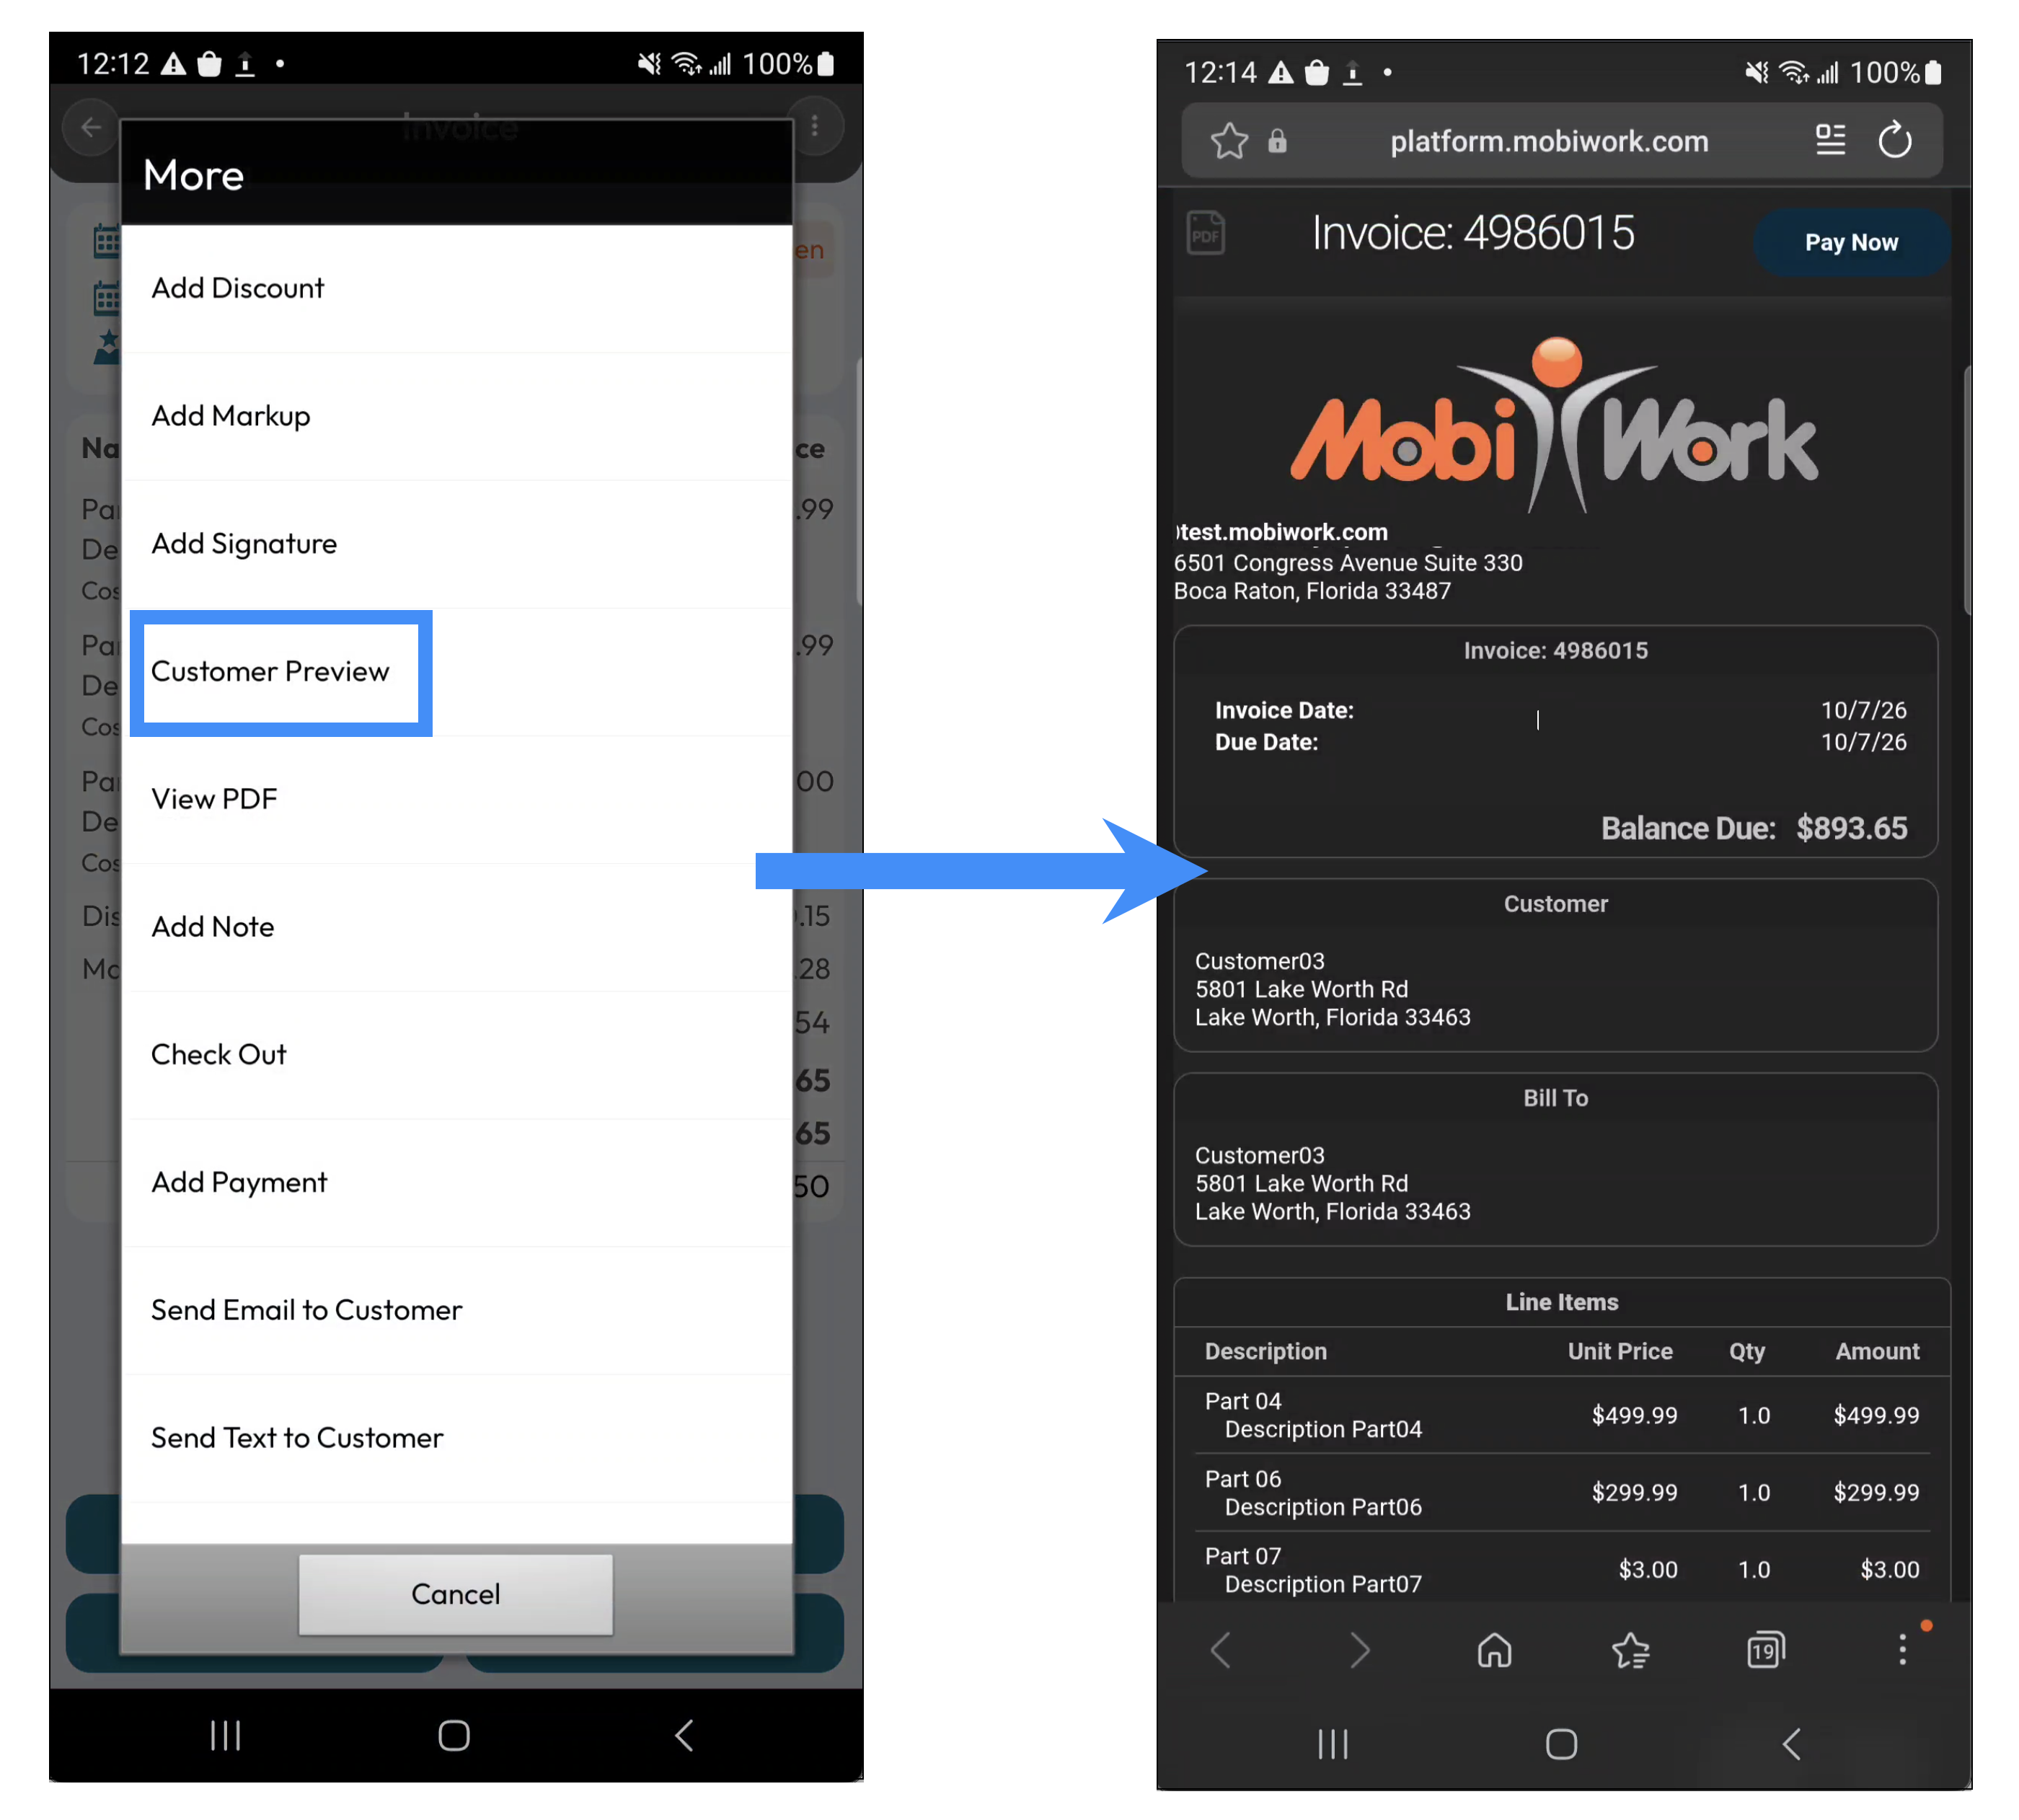
The Customer Preview page will display a wealth of information, including:
Your company logo
The invoice's terms and conditions, line items, and subtotal
Detailed customer and bill-to information
The option to make a payment
The ability to download the invoice as a PDF
and more!
All of this information is presented in a sleek, professional format, providing a convenient way to review the invoice before sending it to the customer. The customer preview is available regardless of the status that the invoice is in.
View PDF
The View PDF tile allows you to view the invoice in PDF format directly from your mobile device:
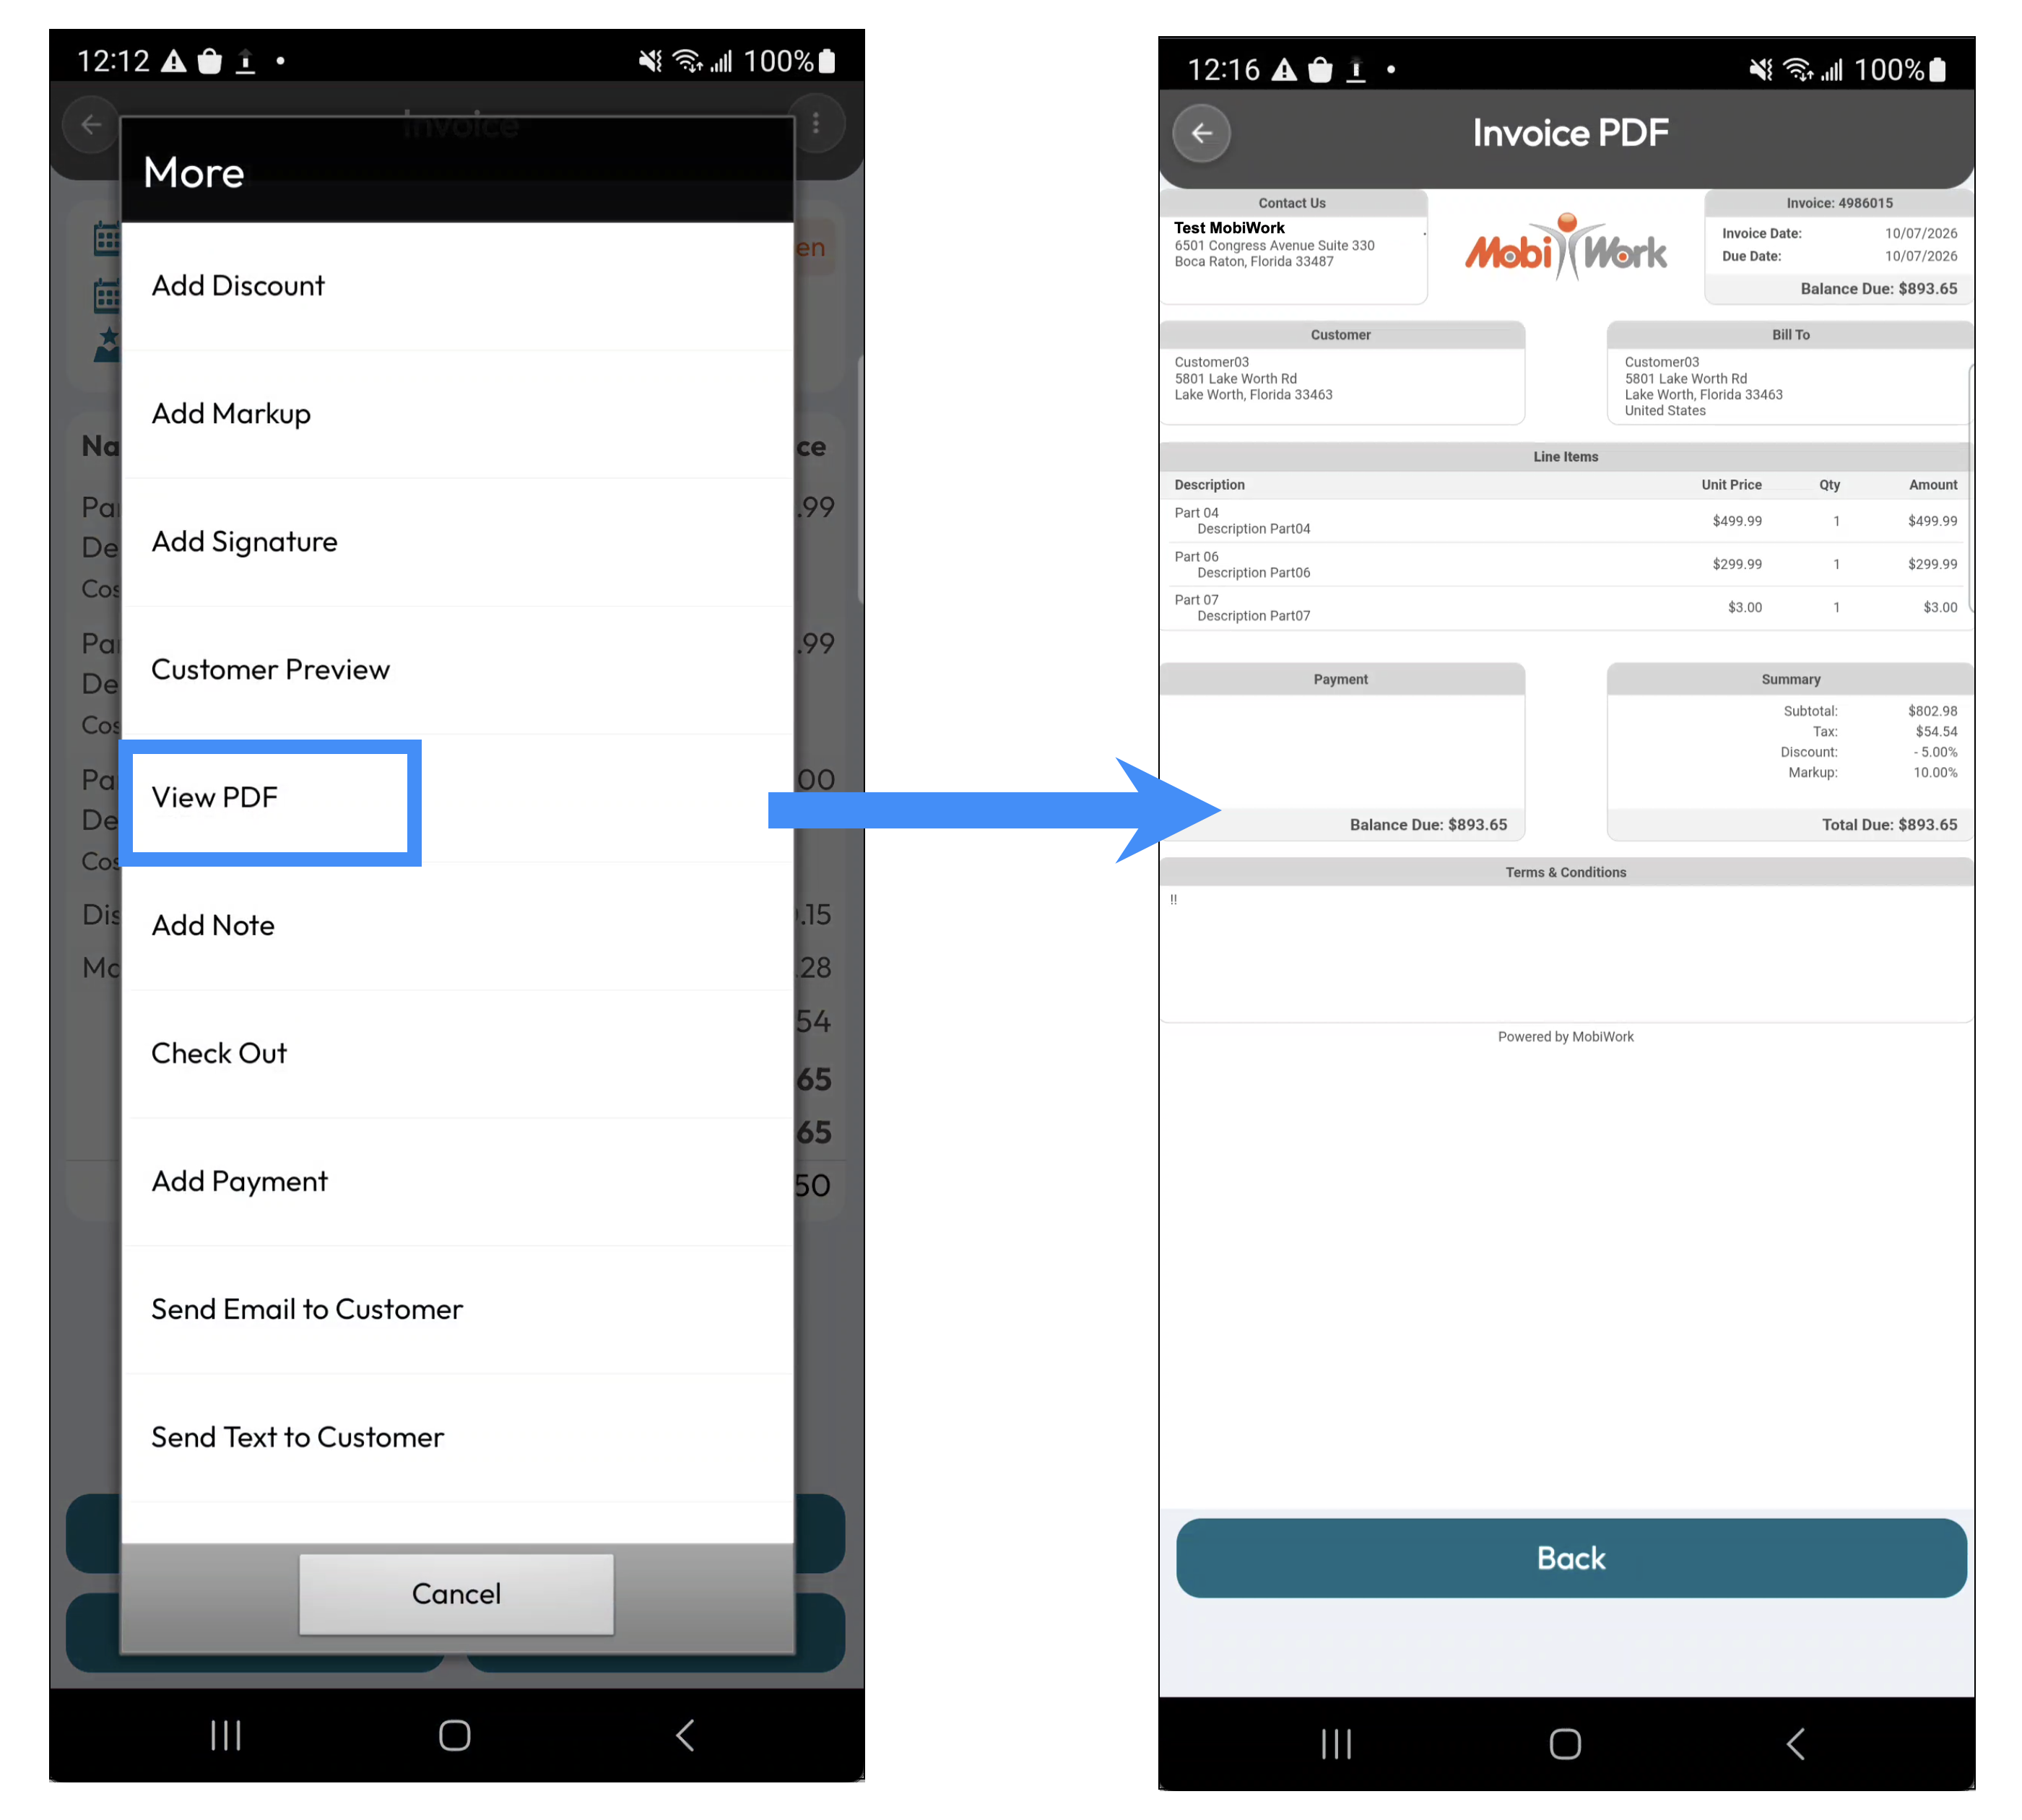
After selecting the View PDF tile, you will be redirected to the invoice PDF, where you can review the invoice details, including:
The invoice's terms and conditions, line items, and subtotal
Detailed customer and bill-to information
and more!
The View PDF action is available regardless of the current status of the invoice.
Add Note
The View Note tile allows you to add a note regarding the invoice. You can use this feature to record additional information, instructions, or comments associated with the invoice:
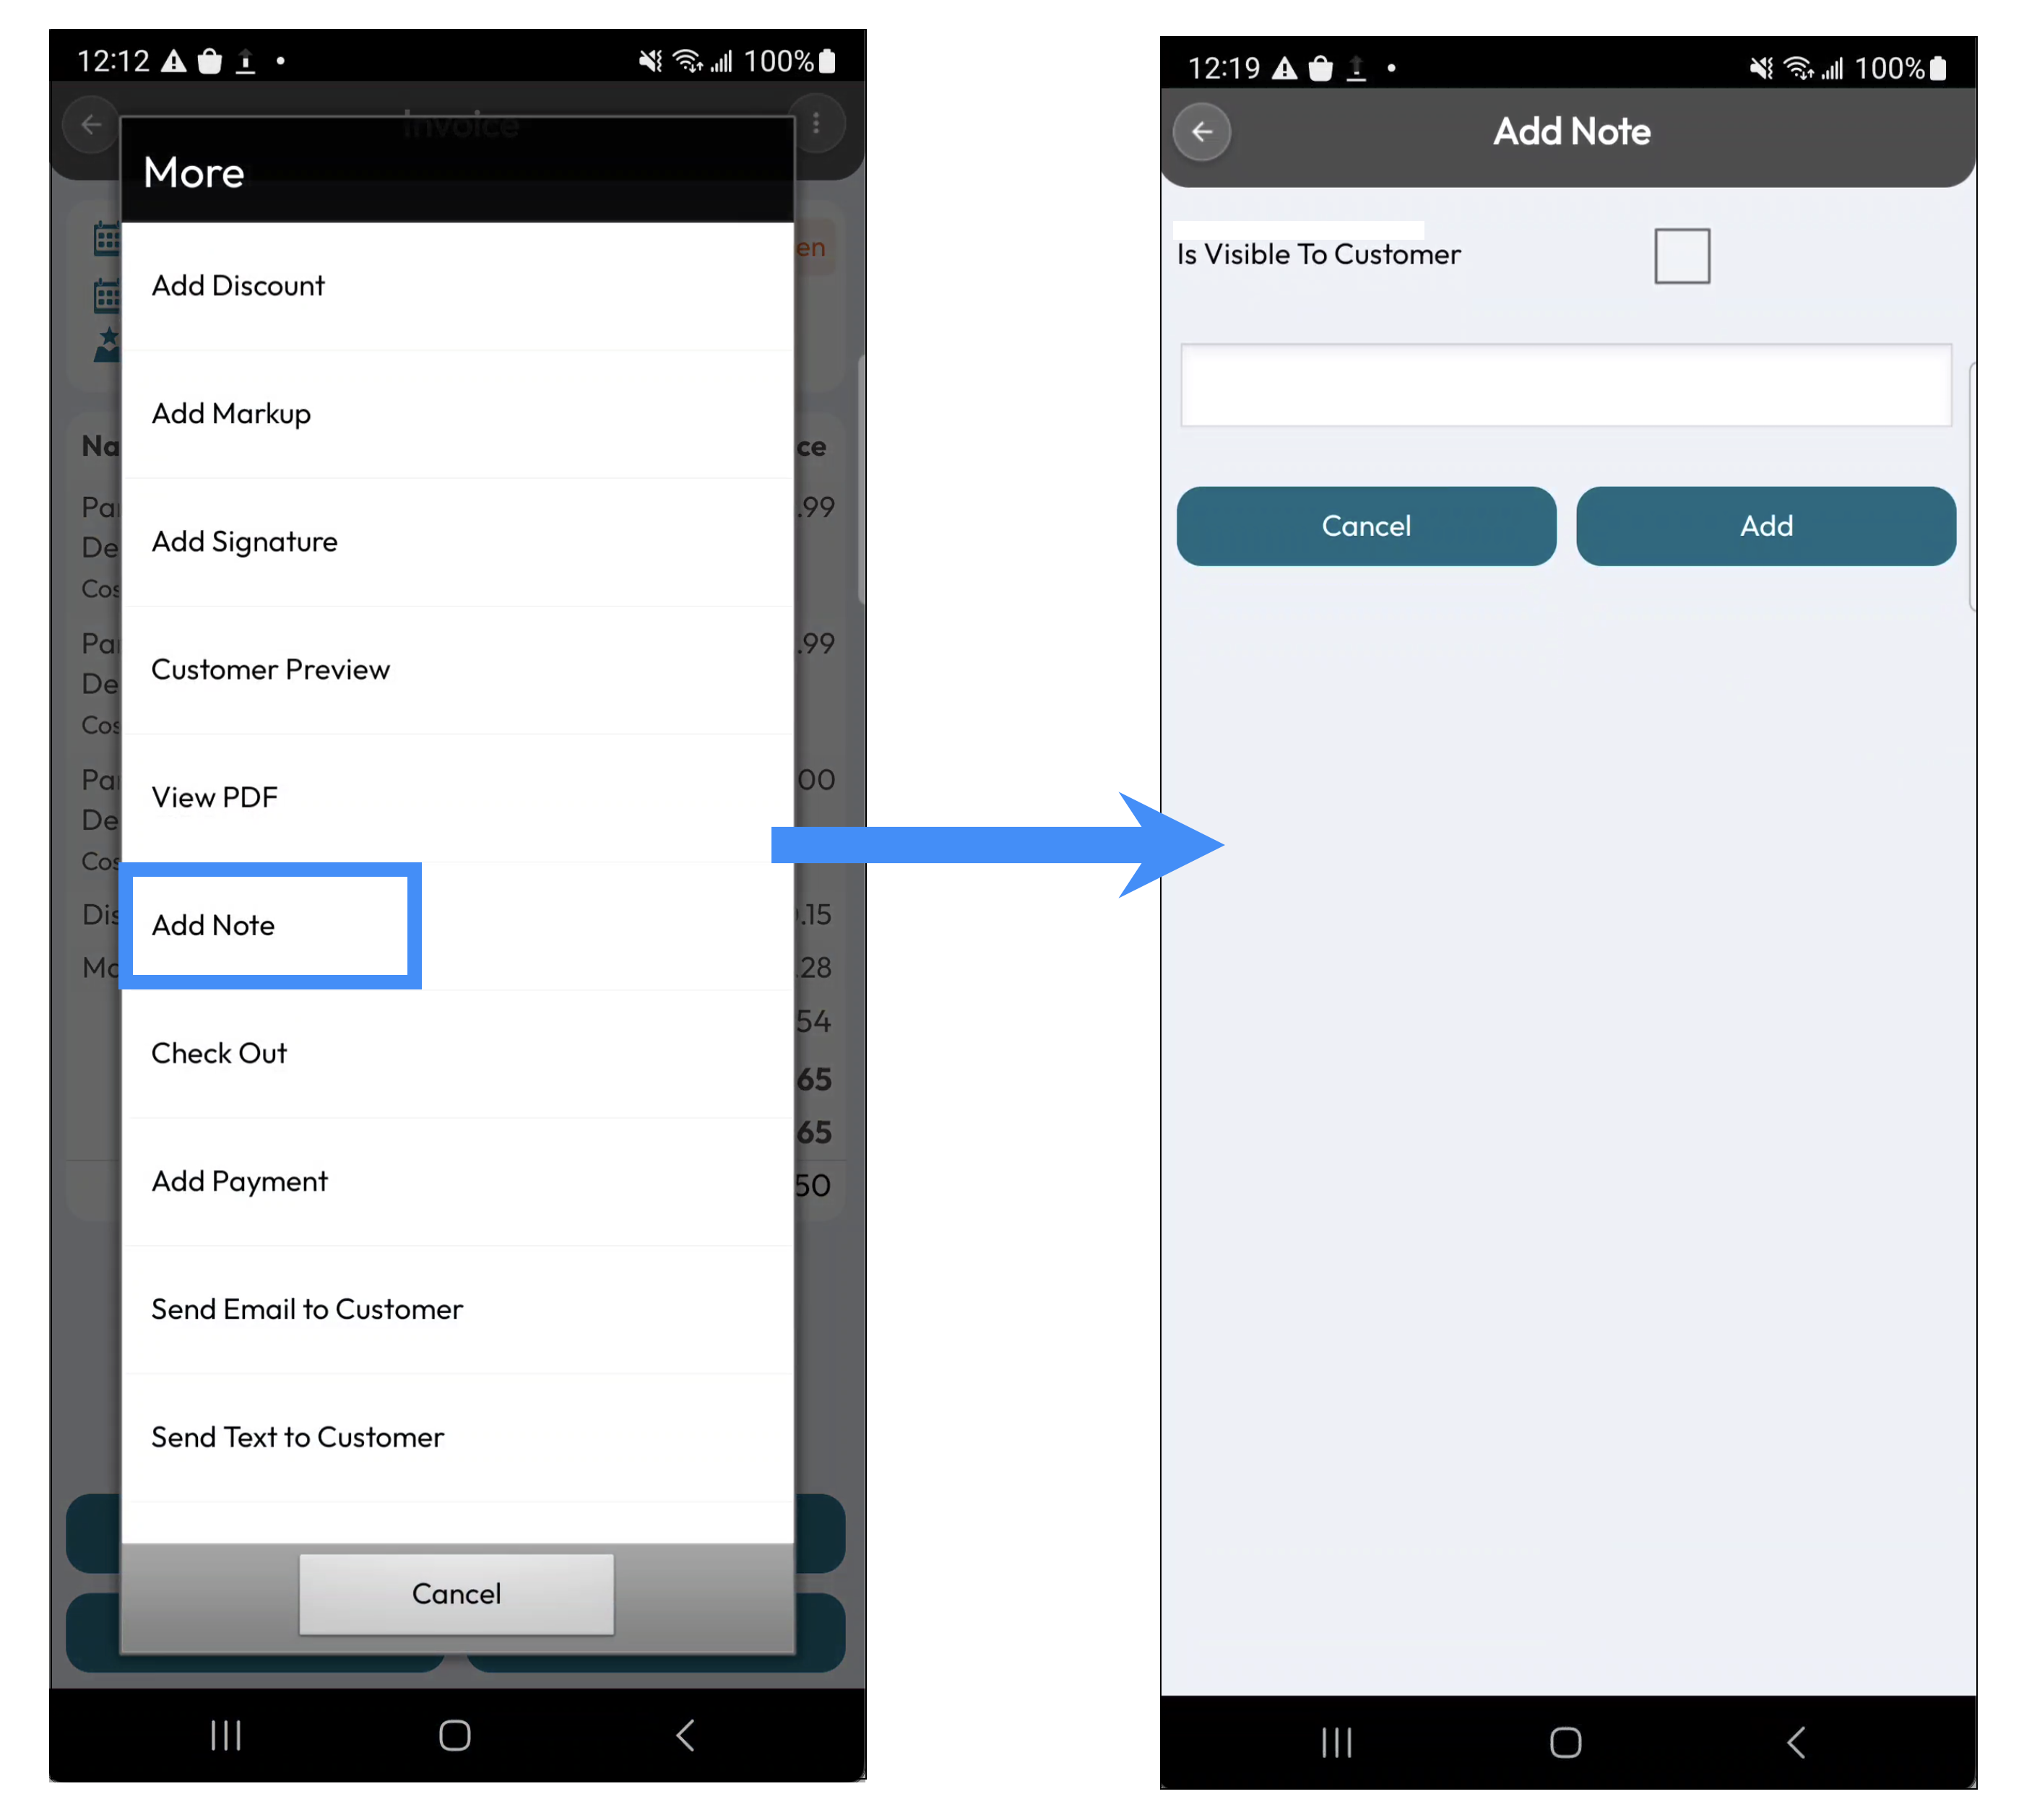
If you want the note to be visible to the customer, select the "Is Visible To Customer" checkbox. Notes that are not marked as visible to the customer remain internal.
The View Note tile is available regardless of the current status of the invoice.
Check Out
The Check Out tile allows you to check out the invoice and move it from an Open status to the next stage of the invoicing process:
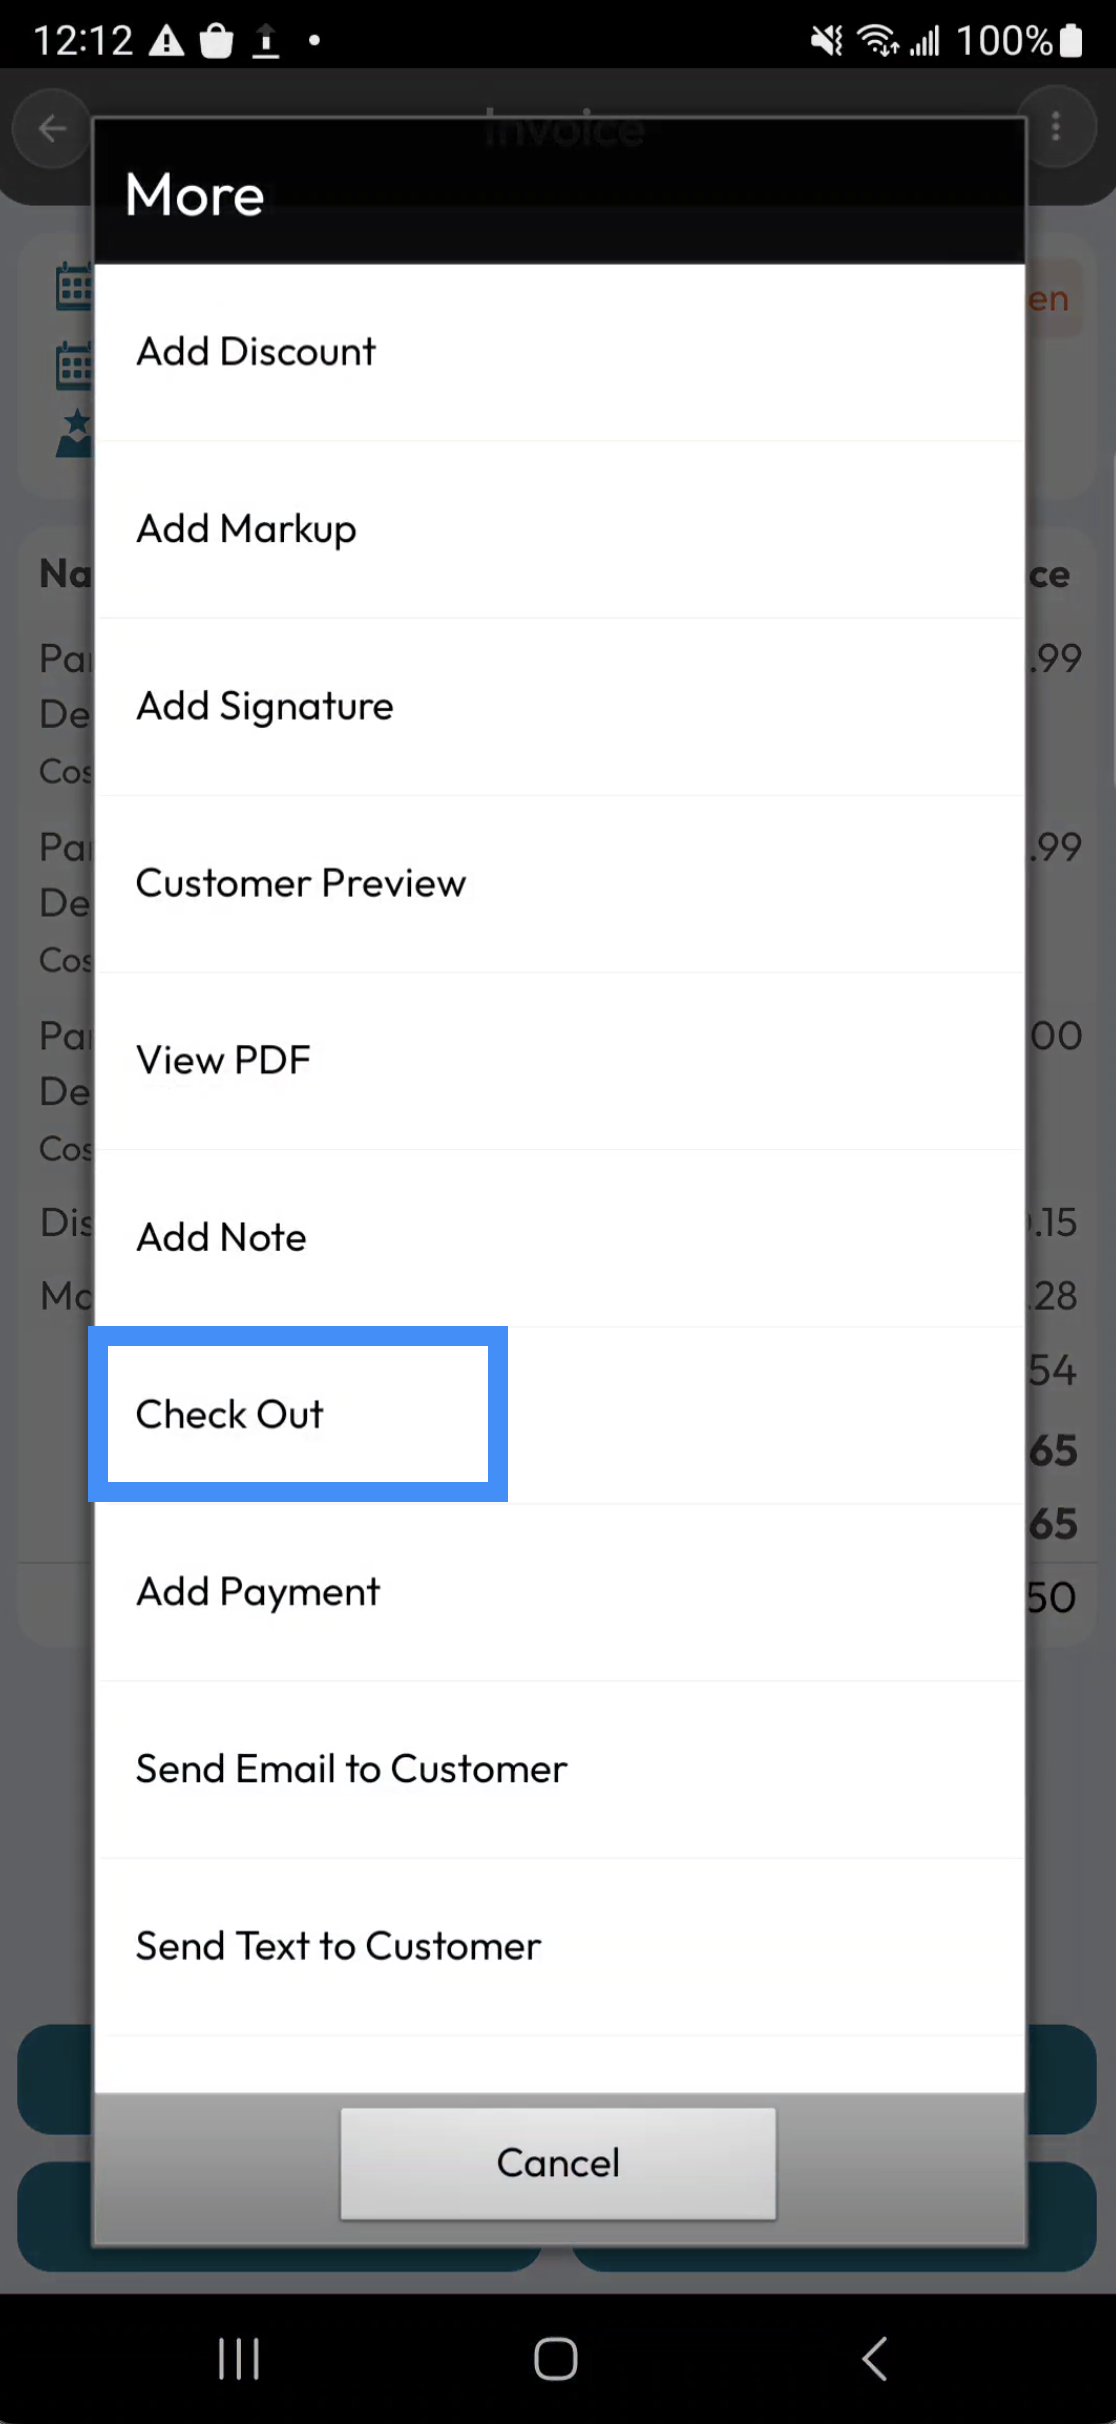
The Check Out tile is only available for invoices with an "Open" status.
Add Payment
The Add Payment tile allows you to record a payment received for the invoice:
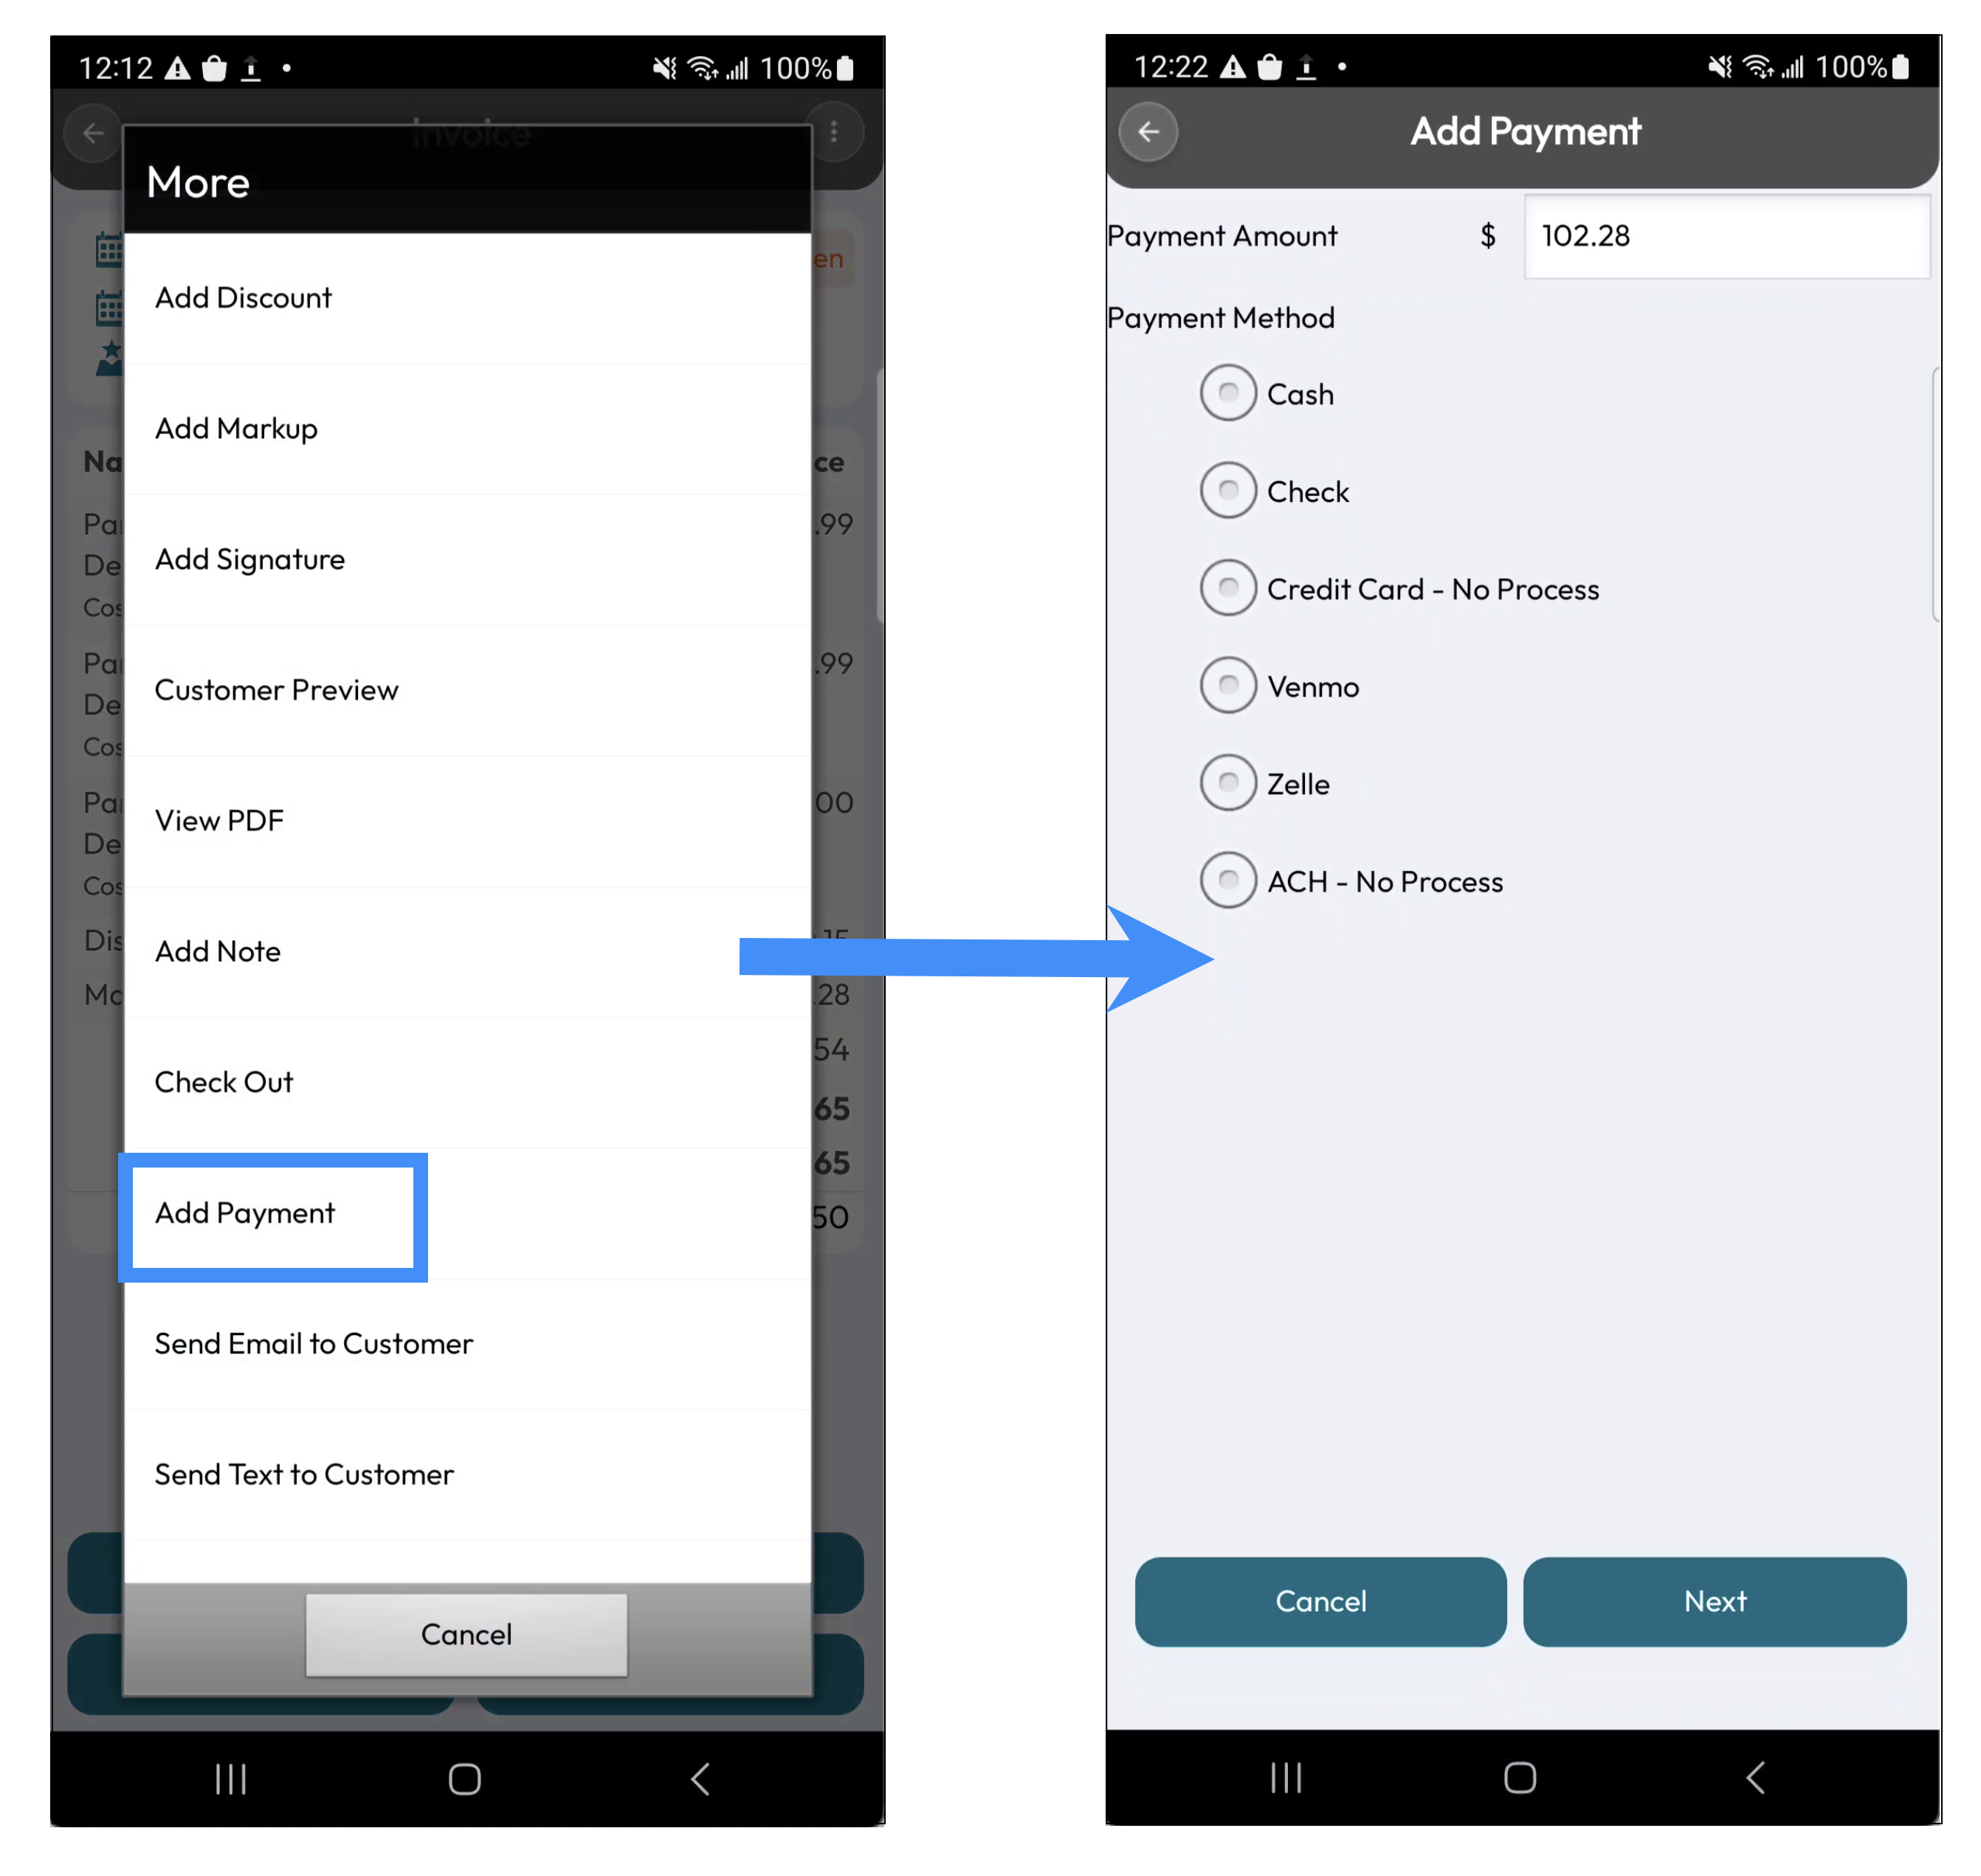
This action can be used to apply a payment to the invoice and keep the invoice's payment information up to date.
Send Email to Customer
The Send Email to Customer tile allows you to email the invoice to the customer for their review and payment:
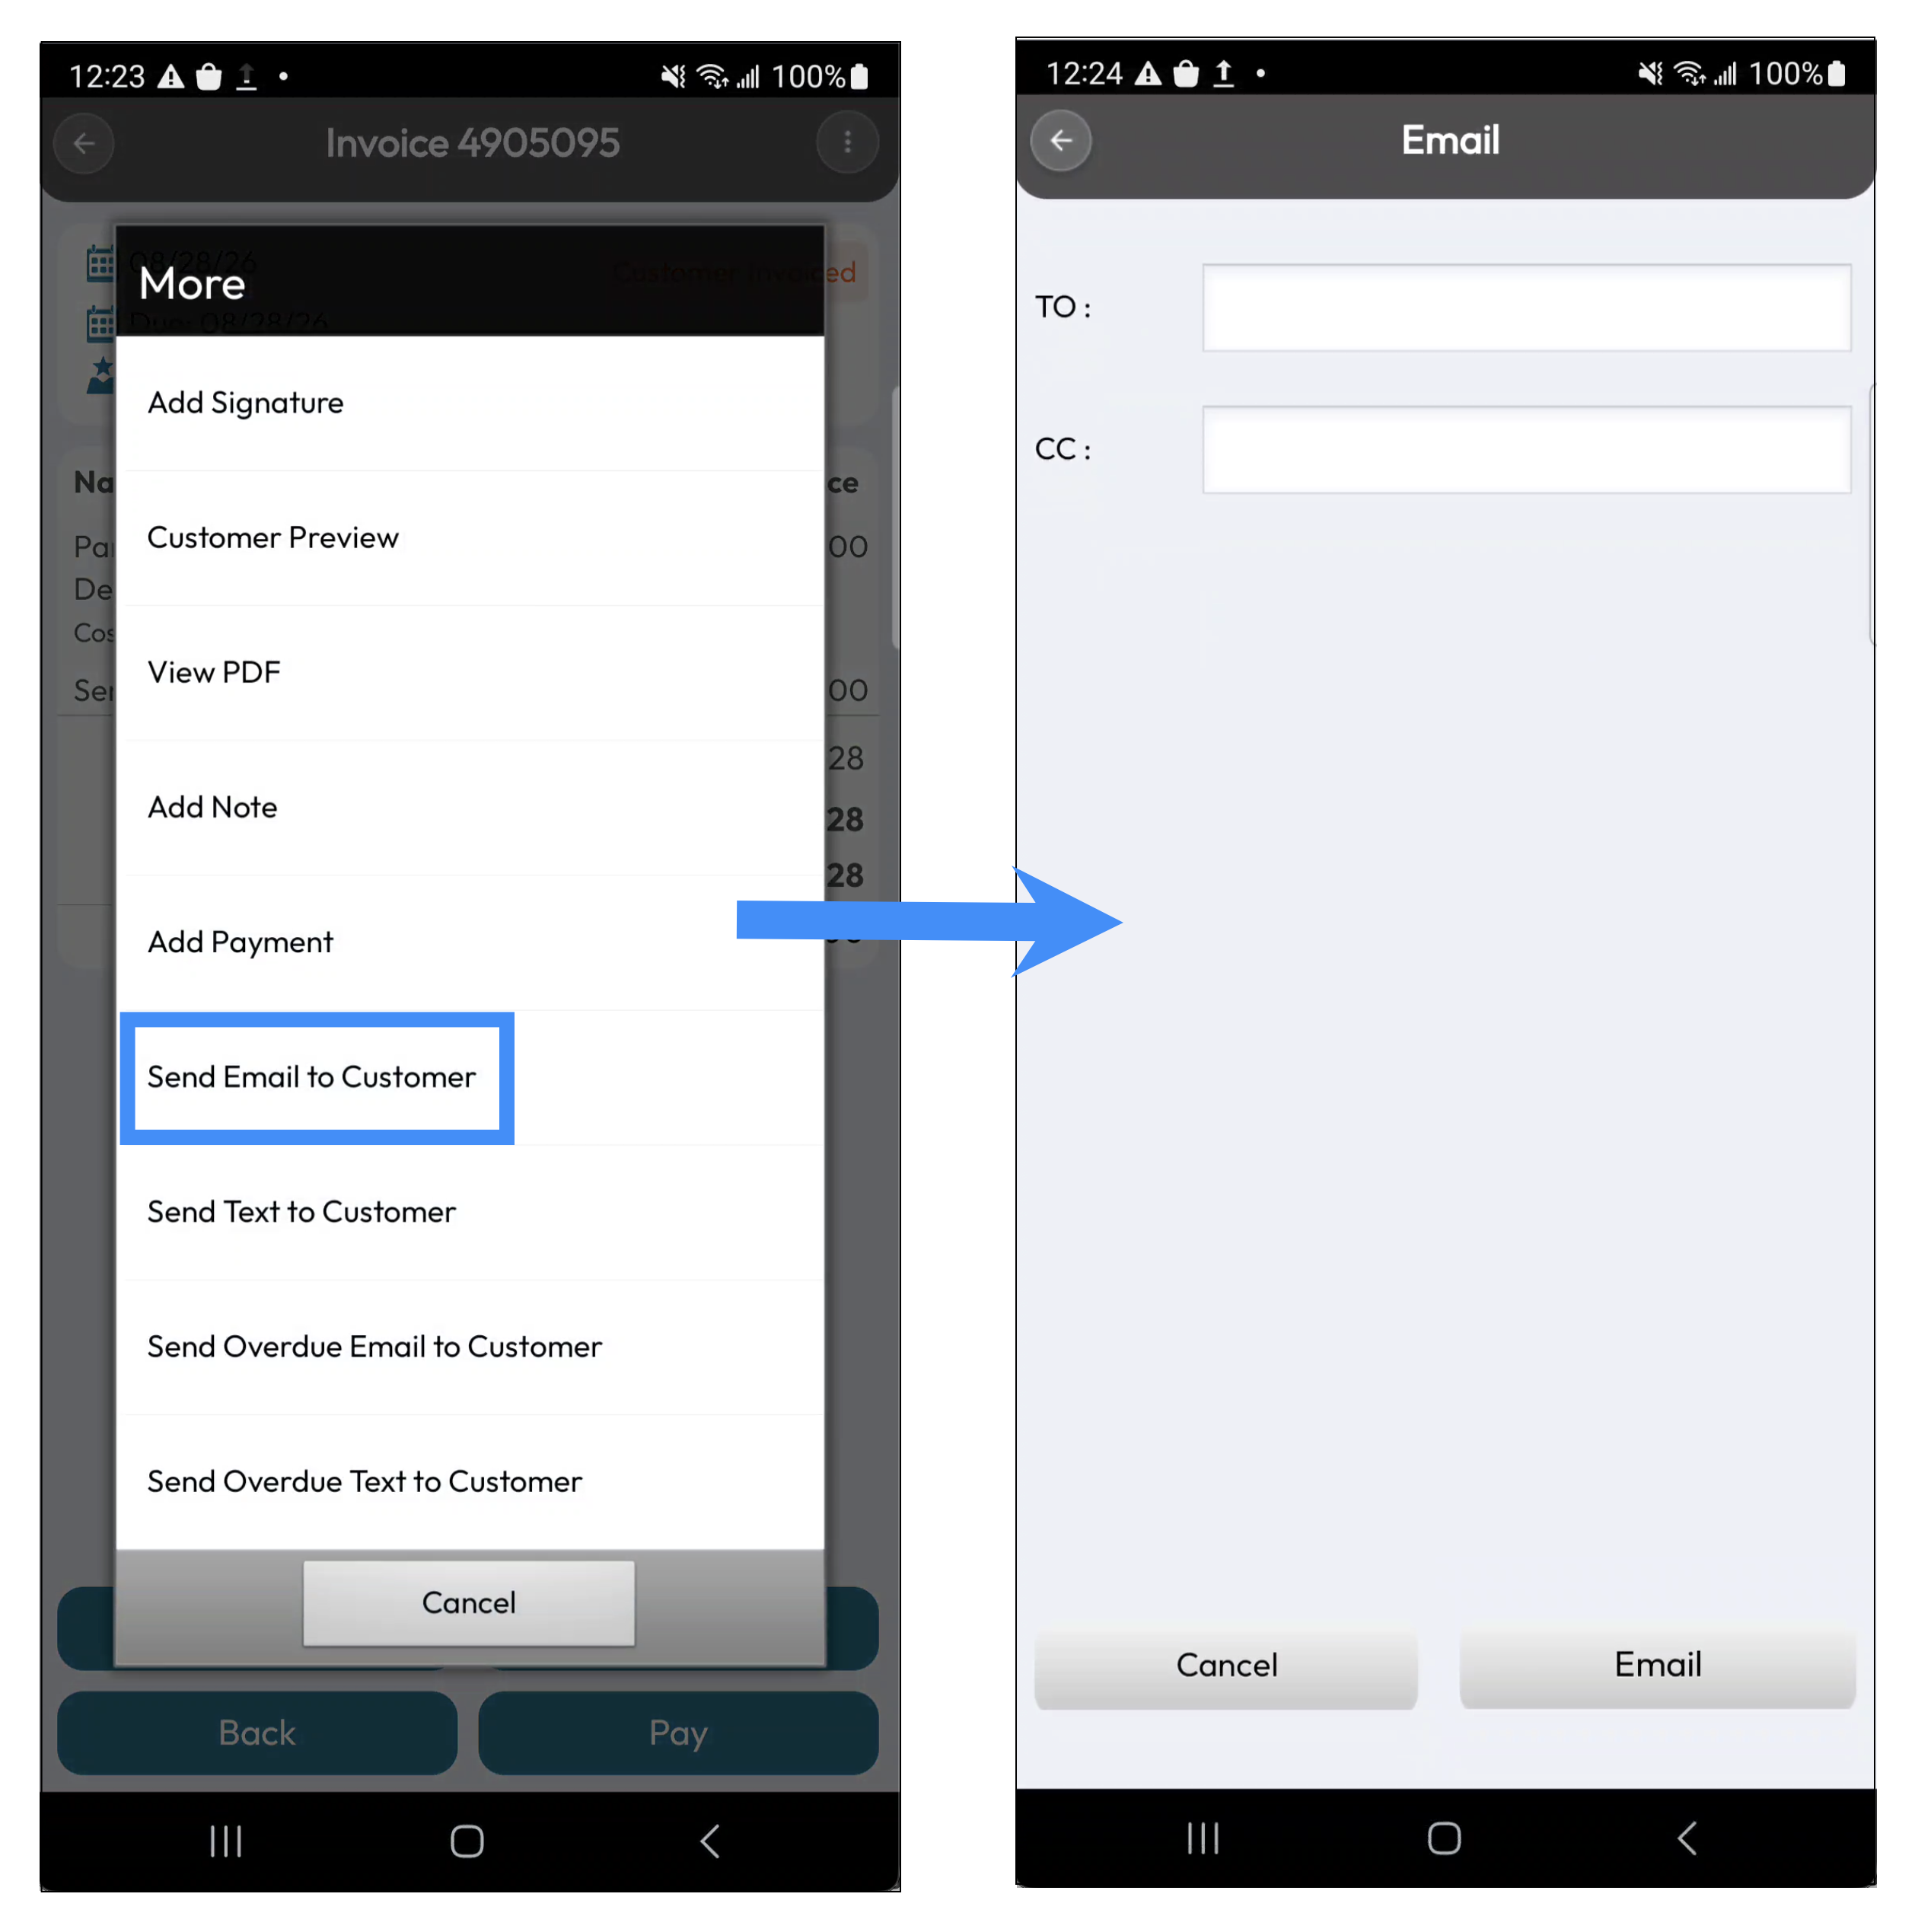
This action is available regardless of the current status of the invoice.
Send Text to Customer
The Send Text to Customer tile allows you to text the invoice to the customer for their review and payment:
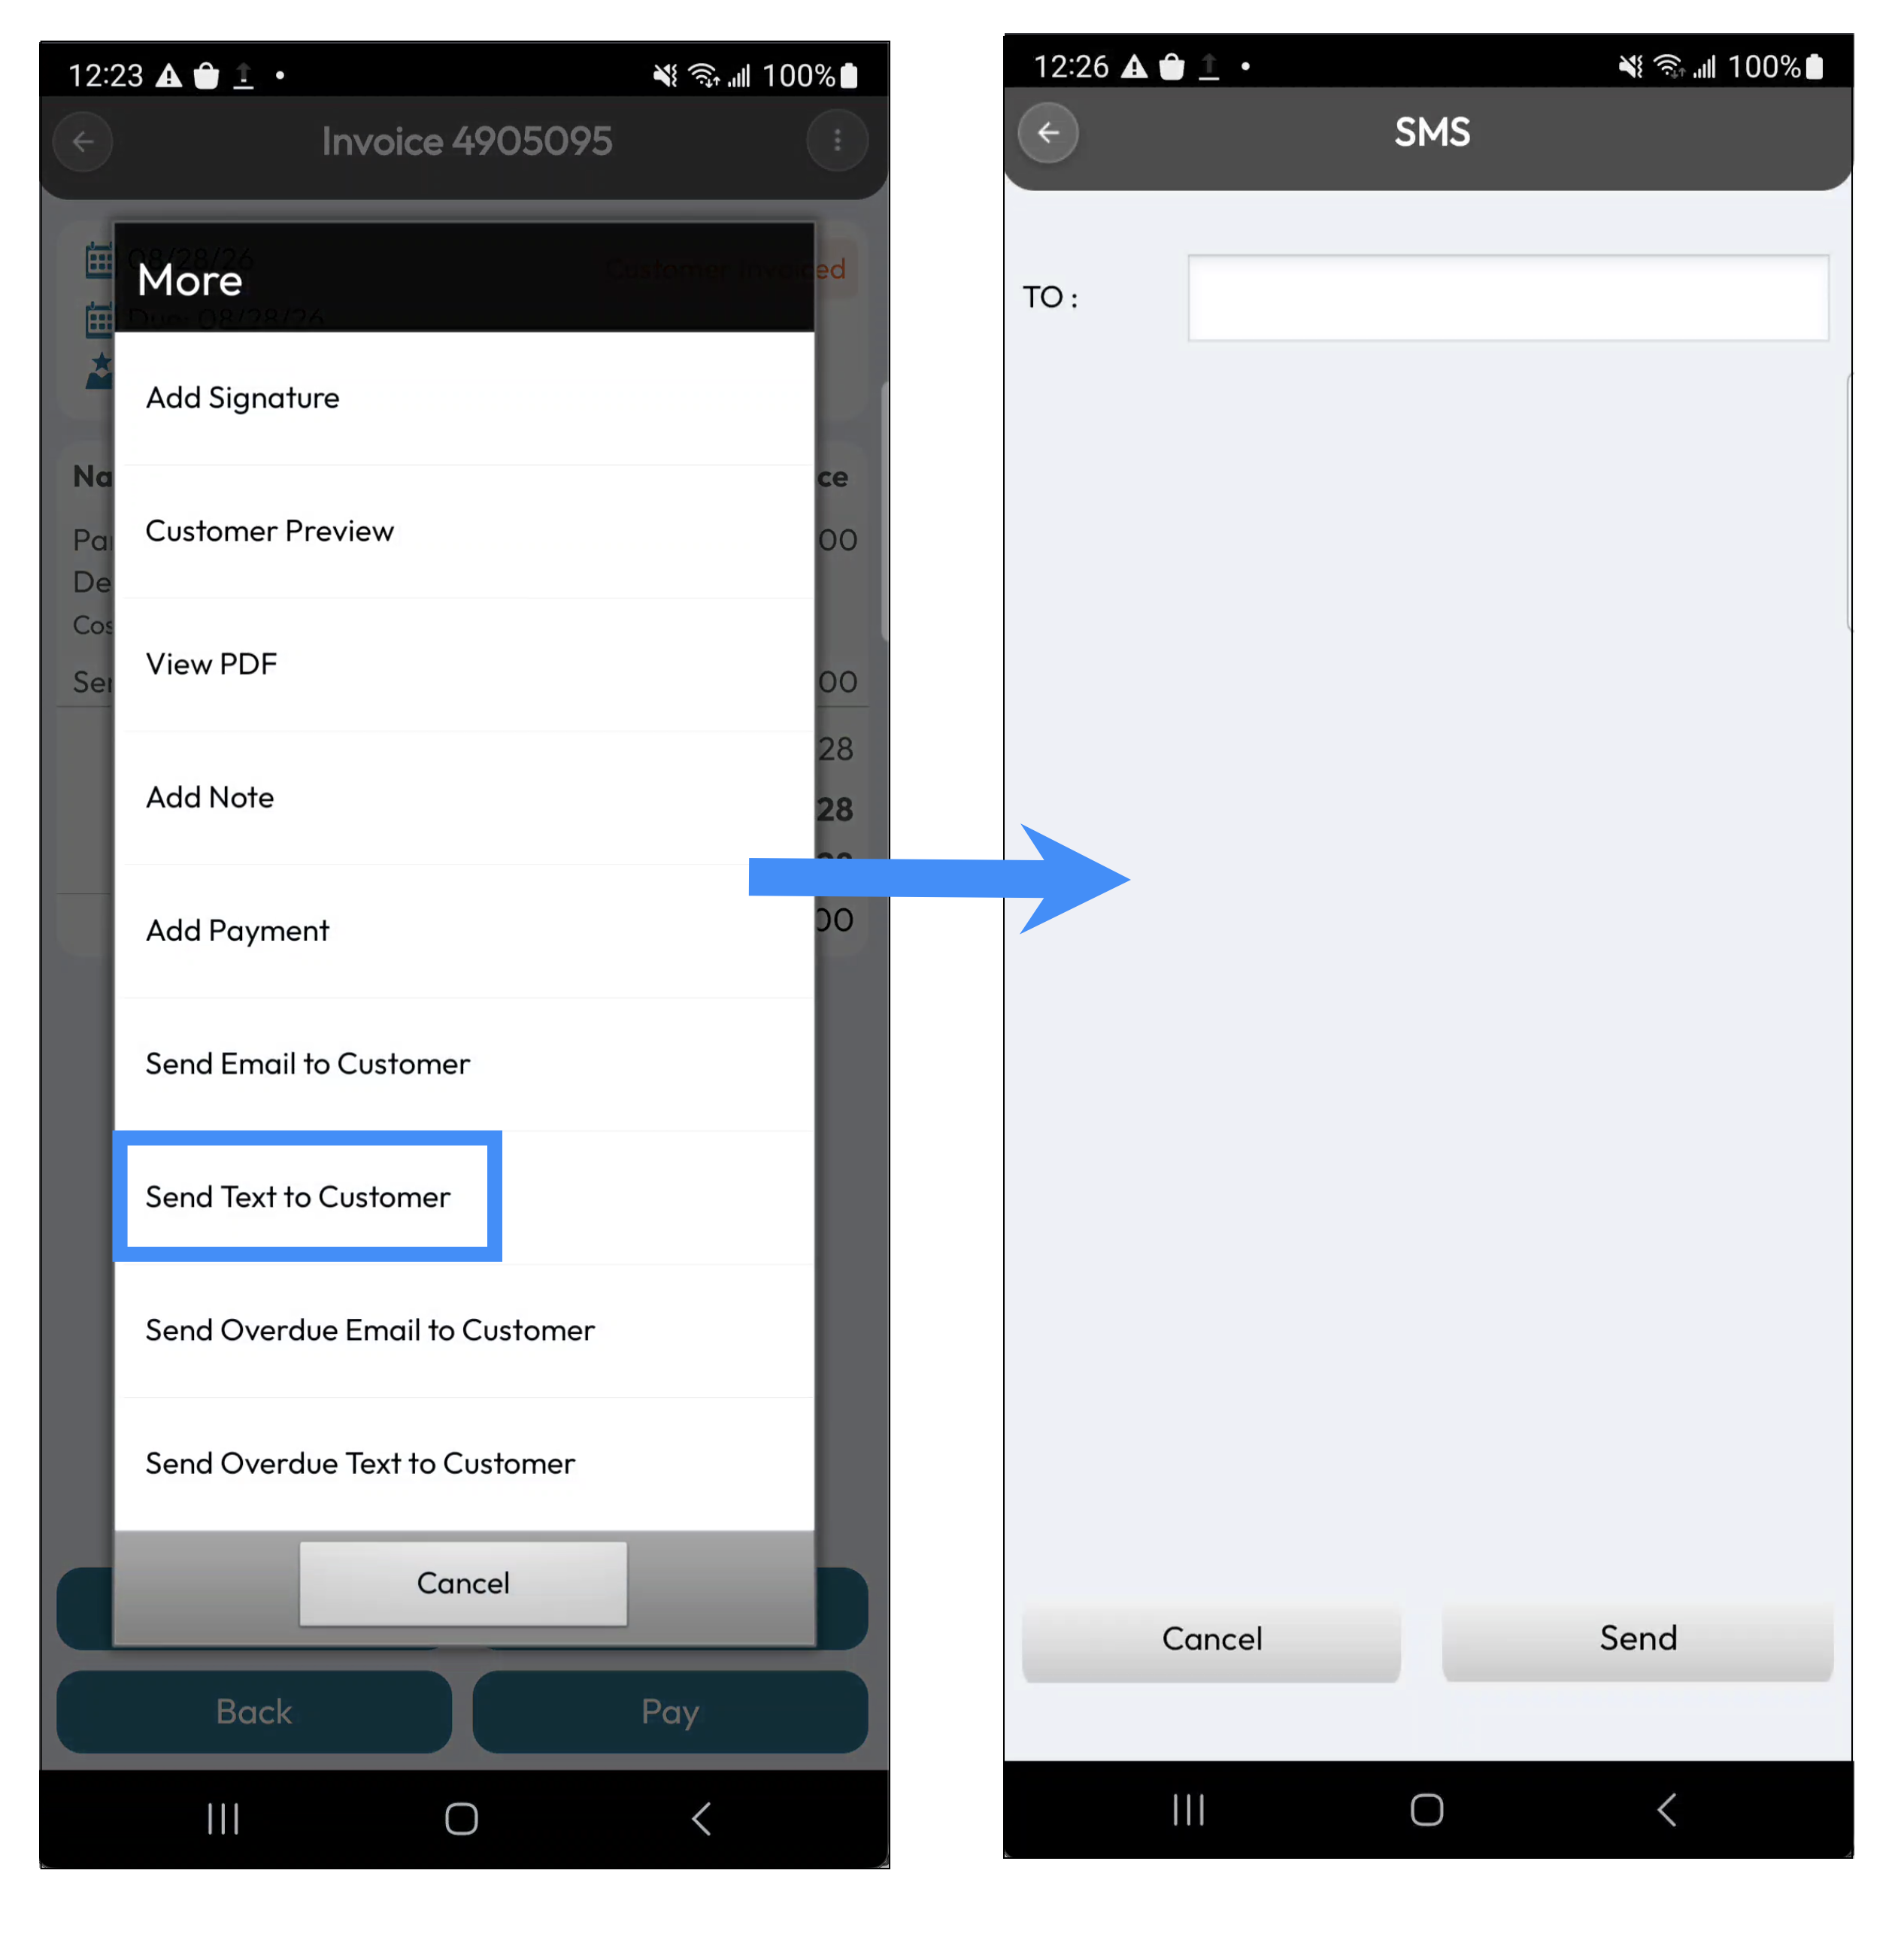
To ensure that the text message can be sent to your customer, you will first need to make sure that:
You have a Text Message Connector installed in your MobiWork Web Application.
And that the customer has a cell phone number associated with their profile.
Please see the MobiWork Features and Texting page for more information about texting. The Send Text to Customer is available regardless of the current status of the invoice.
Send Overdue Email to Customer
The Send Overdue Email to Customer tile allows you to email the invoice to the customer for their review and payment:
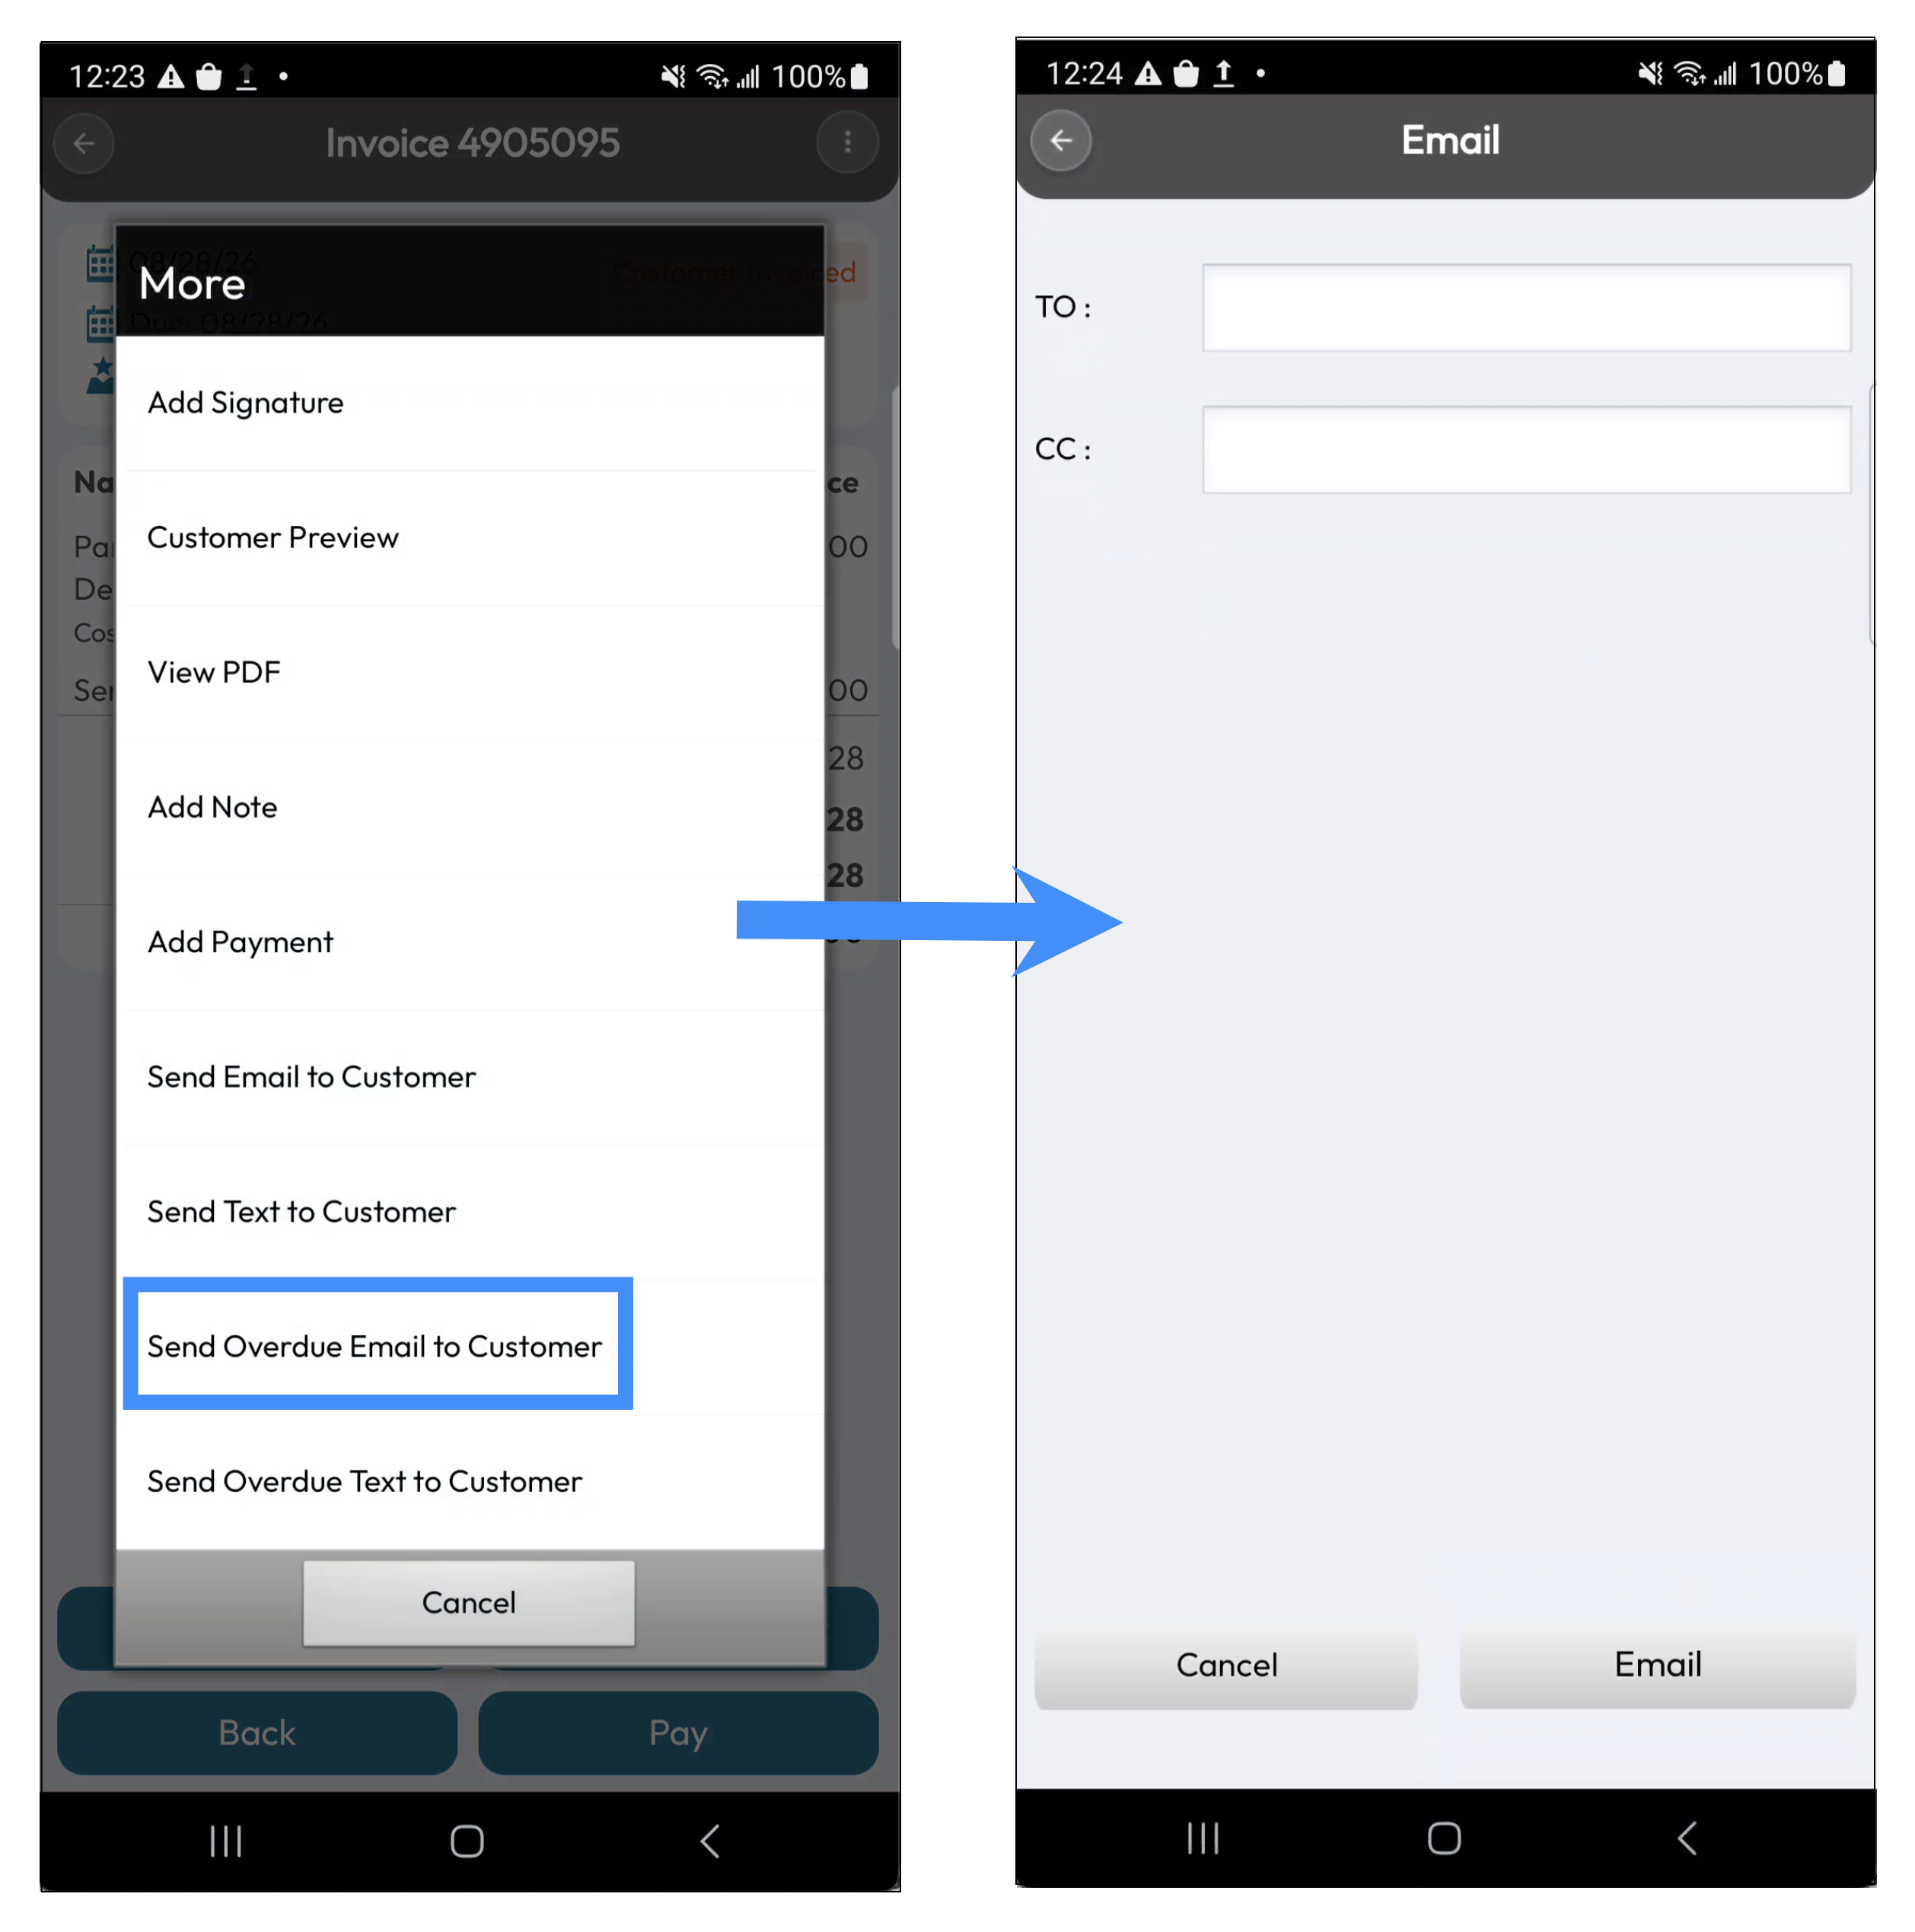
The Send Overdue Email to Customer tile is only available for invoices with a "Customer Invoiced" or with a "Checked Out" status.
Send Overdue Text to Customer
The Send Overdue Text to Customer tile allows you to text the invoice to the customer for their review and payment:
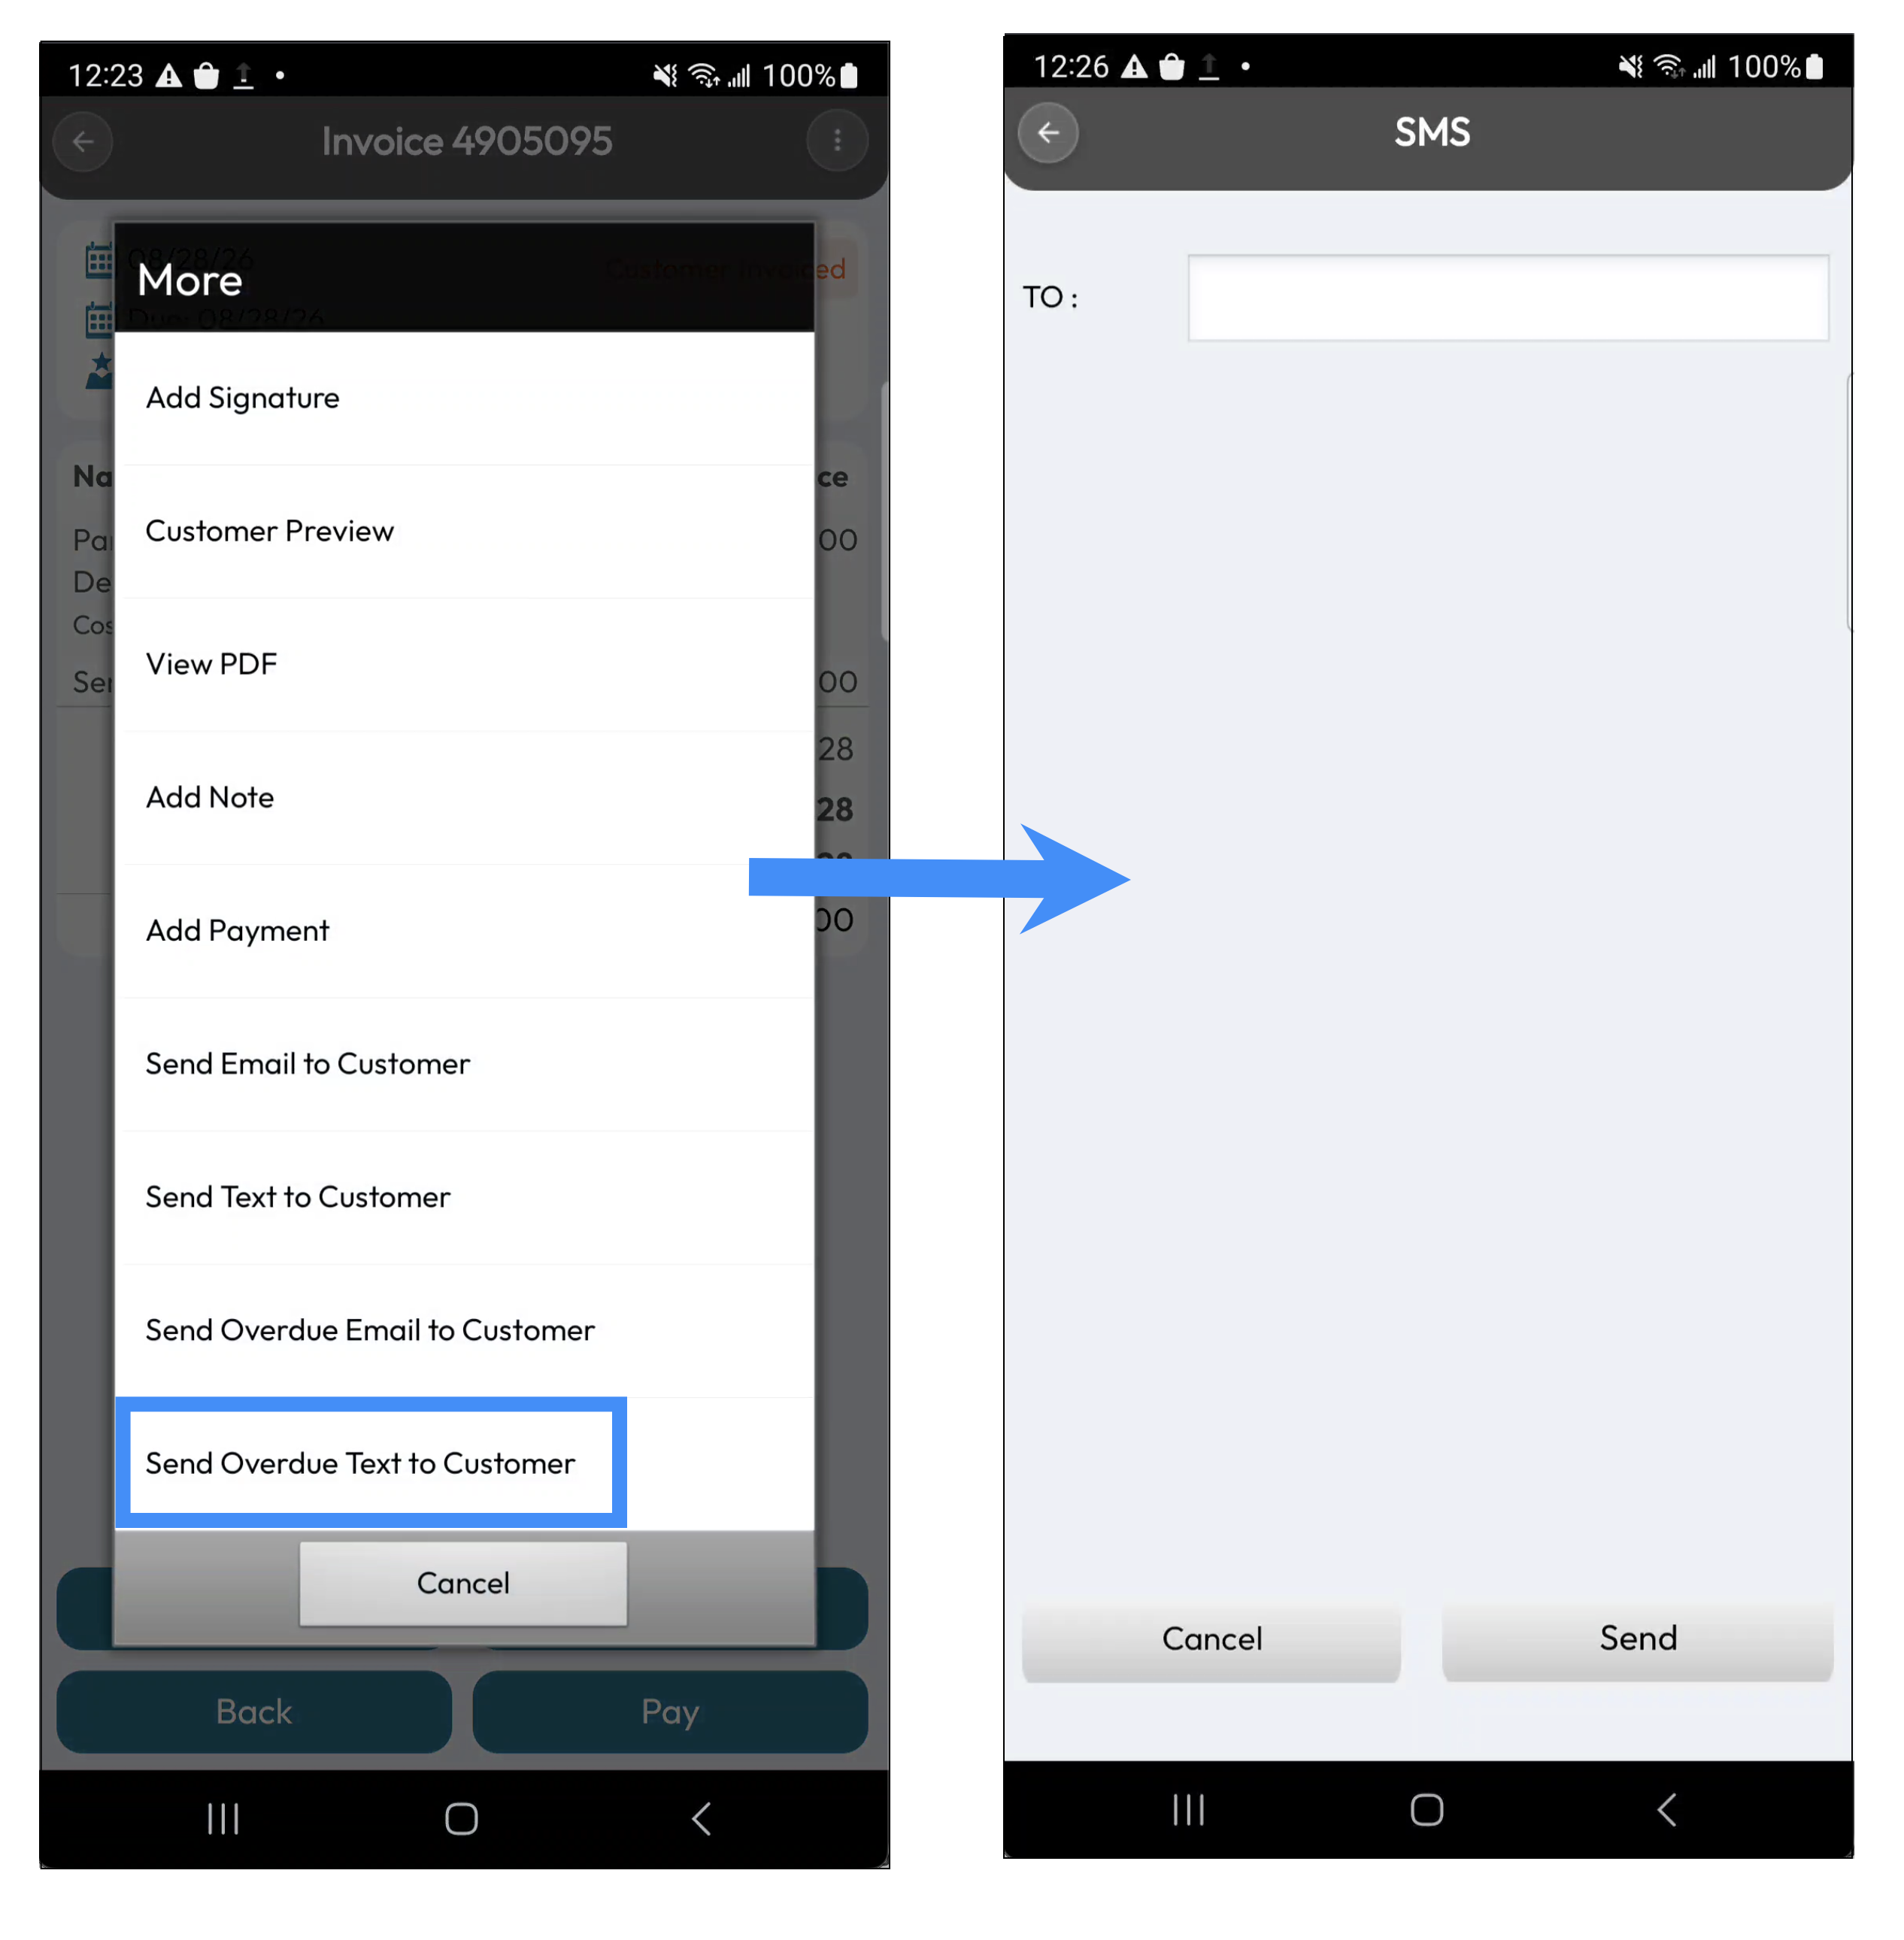
To ensure that the text message can be sent to your customer, you will first need to make sure that:
You have a Text Message Connector installed in your MobiWork Web Application.
And that the customer has a cell phone number associated with their profile.
Please see the MobiWork Features and Texting page for more information about texting. The Send Overdue Text to Customer tile is only available for invoices with a "Customer Invoiced" or with a "Checked Out" status.