- Overview
- Account Settings
- Assets
- Connectors Framework
- Overview
- QuickBooks Online
- QuickBooks Desktop Web Connector
- Azure AD
- Salesforce Integration
- FleetNet Connector
- Avalara Connector
- Inbound REST API
- Outbound REST API
- Mailchimp Connector
- Text Messaging Connector
- Clearent Connector
- Stripe Connector
- HubSpot Connector
- UKG Connector
- Paylocity Connector
- UKG Connector
- Gusto Connector
- iSolved Payroll Connector
- Customer Portal
- Customers
- Dashboards
- Devices
- Dispatching
- Forms
- Inventory
- Invoices & Billing
- Locations
- Payments
- Parts
- Projects
- Quotes
- Recurrent Routes
- Recurrent Services
- Reports
- Sales Orders
- Schedule
- Services
- Tasks
- Text Messaging
- Time Tracking
- Users
- Work Orders
Experience streamlined marketing and improved client engagement with MobiWork and Mailchimp. With the MailChimp Connector, your audiences and campaigns stay effortlessly up-to-date, helping you engage customers more effectively while enhancing overall efficiency. MobiWork is ideal for efficiently sending individual emails to your customers, while Mailchimp excels at providing detailed analytics and managing bulk email campaigns to clients.
You can create and send targeted email campaigns and manage recipients in Mailchimp. Tags applied to clients in MobiWork automatically carry over to Mailchimp, simplifying audience management and campaign targeting.
If you require additional information regarding Mailchimp itself, please see the Mailchimp Help Center page. Please note that this is a third-party page, and MobiWork is not responsible for the content that appears on this page.
We currently sync the following customer and prospect contact data from MobiWork to Mailchimp:
Email addresses.
The first and last name of the contact.
The phone number.
And the MobiWork customer and prospect tags.
The video below demonstrates how to create a new Mailchimp account:
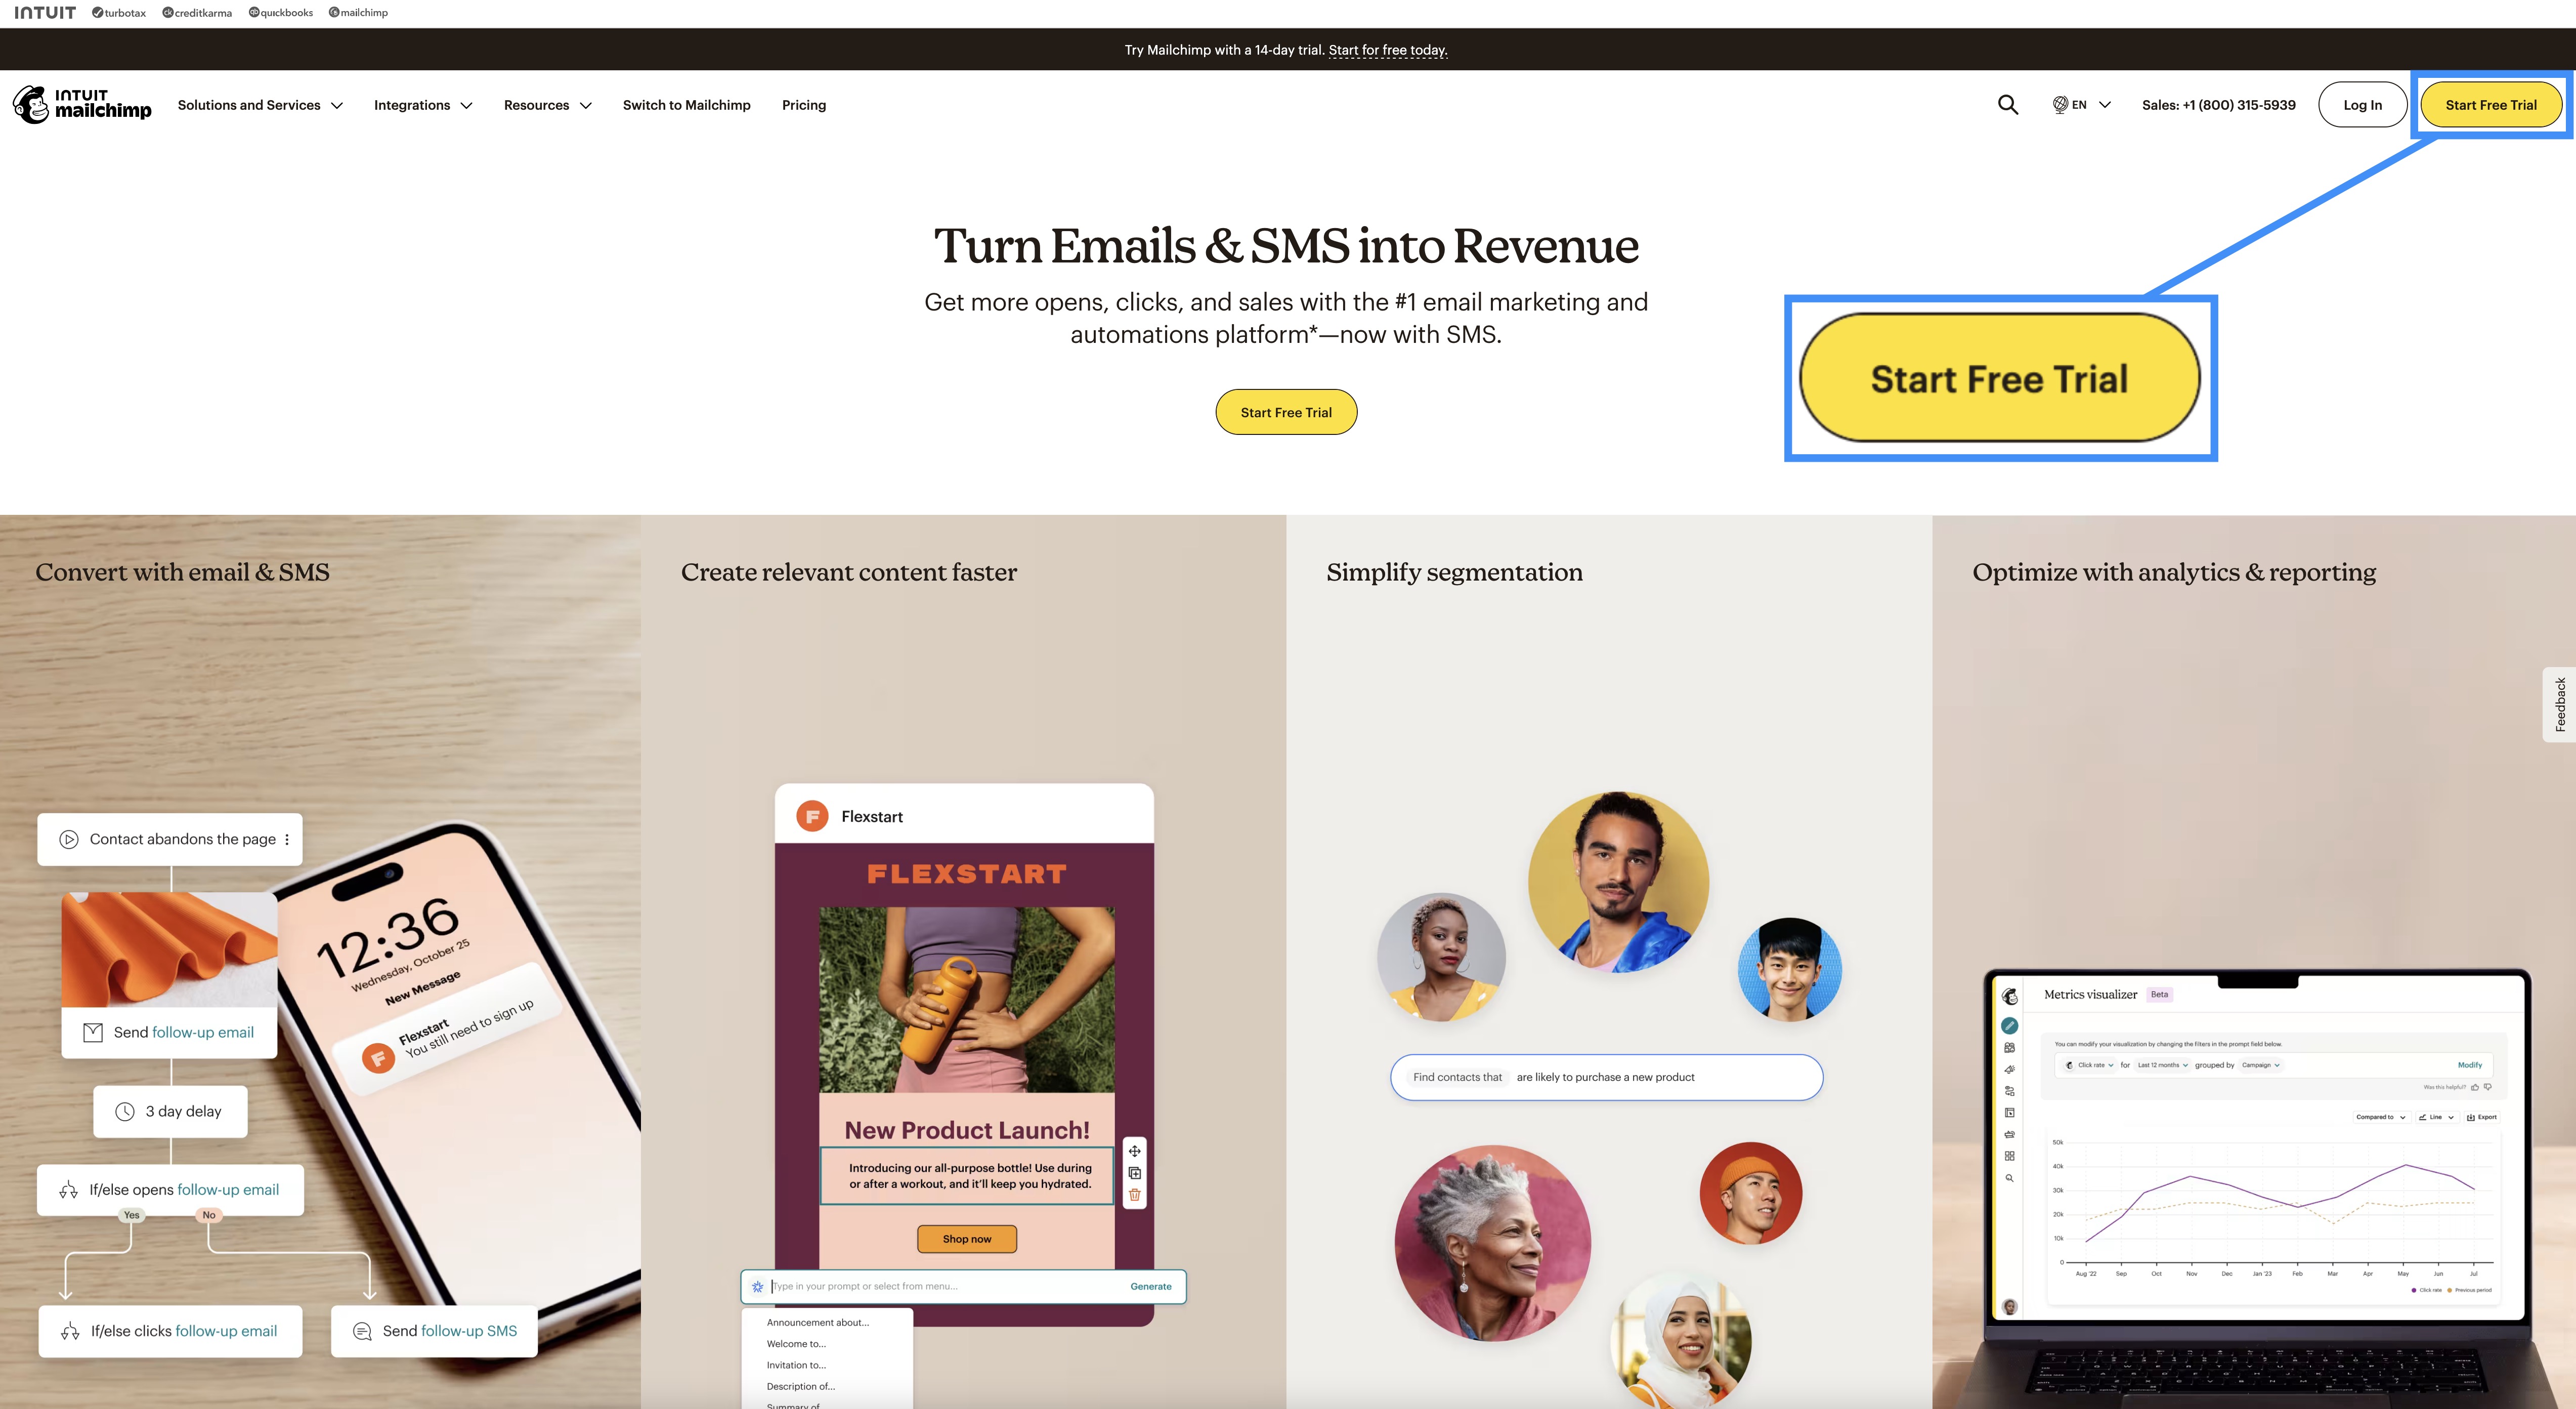
First, if you have not already done so, please create a Mailchimp acocunt. Visit mailchimp.com to sign up, and follow the guided steps to set up your Mailchimp account:
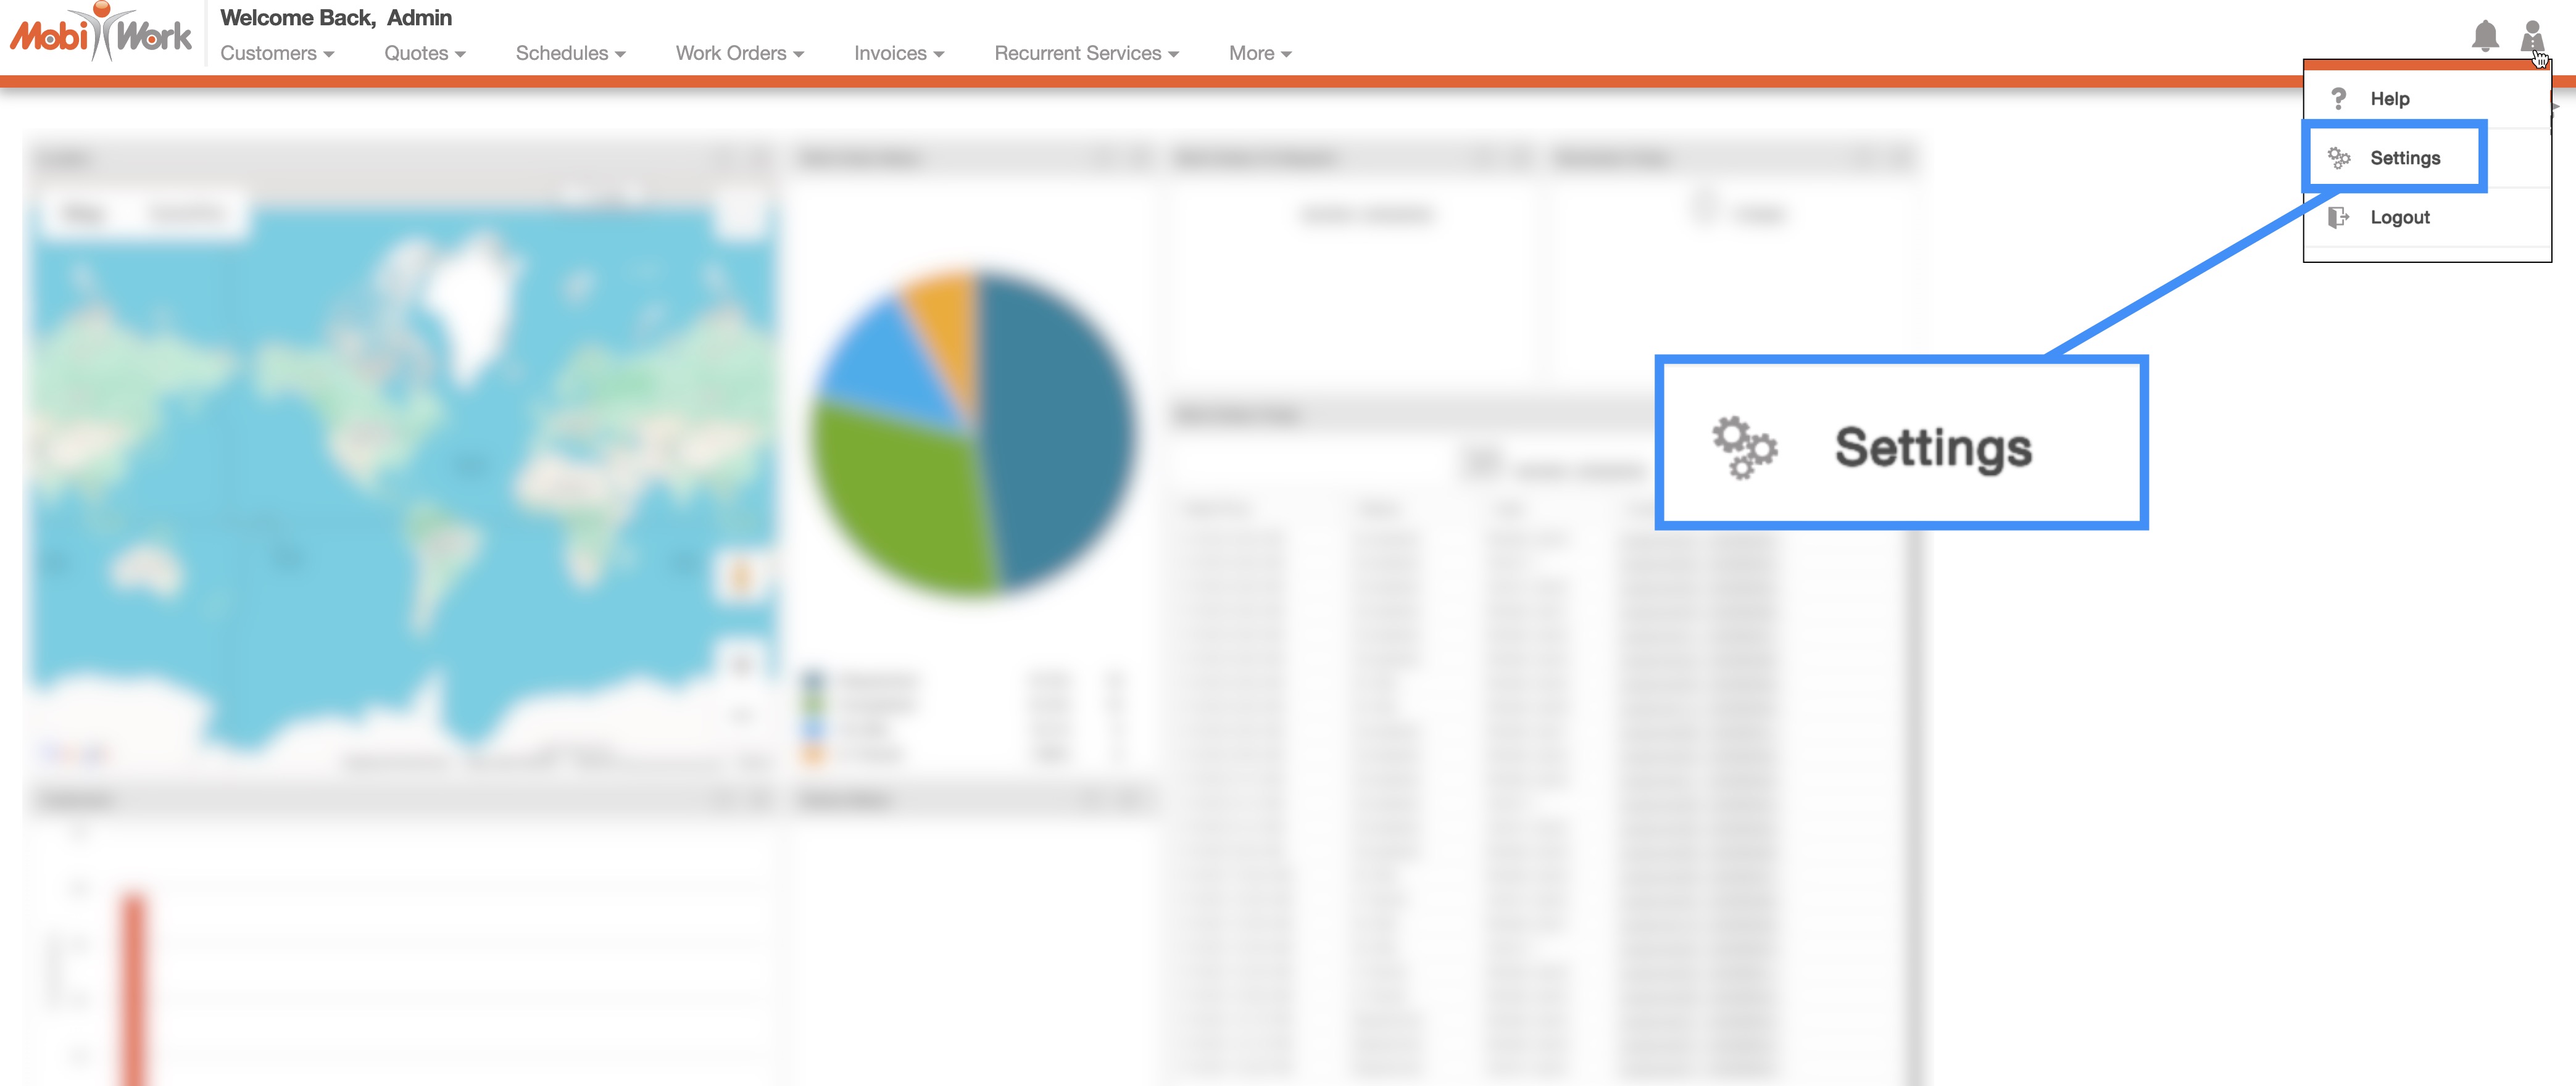
Once your Mailchimp account is created, you can add the Mailchimp connector to your MobiWork account. To add the Mailchimp connector, Navigate to the User icon, and from the drop-down menu and choose "Settings" option:
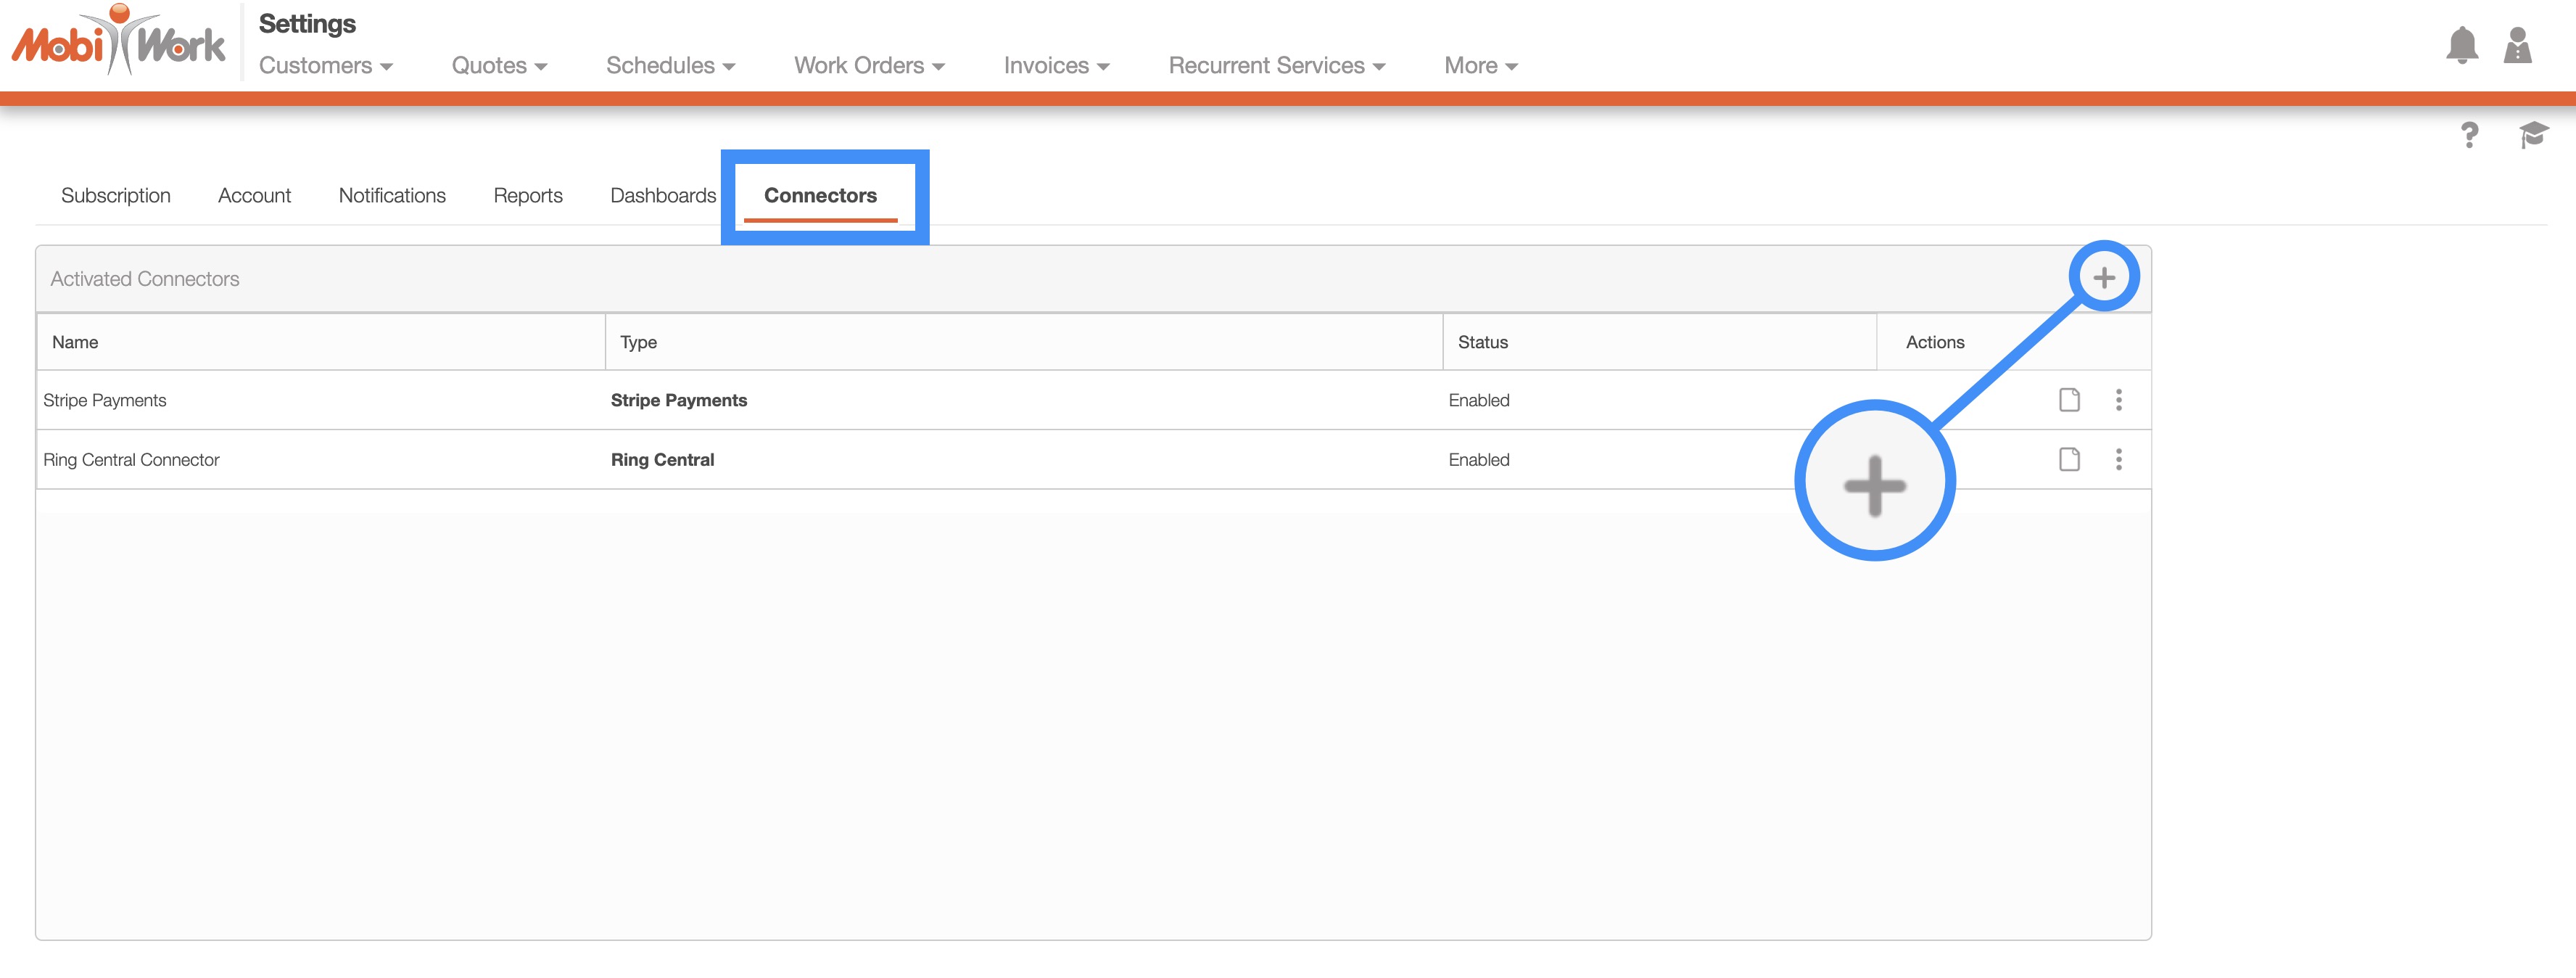
Click the "Connectors" tab, then click on the Plus Sign button to add a new connector:
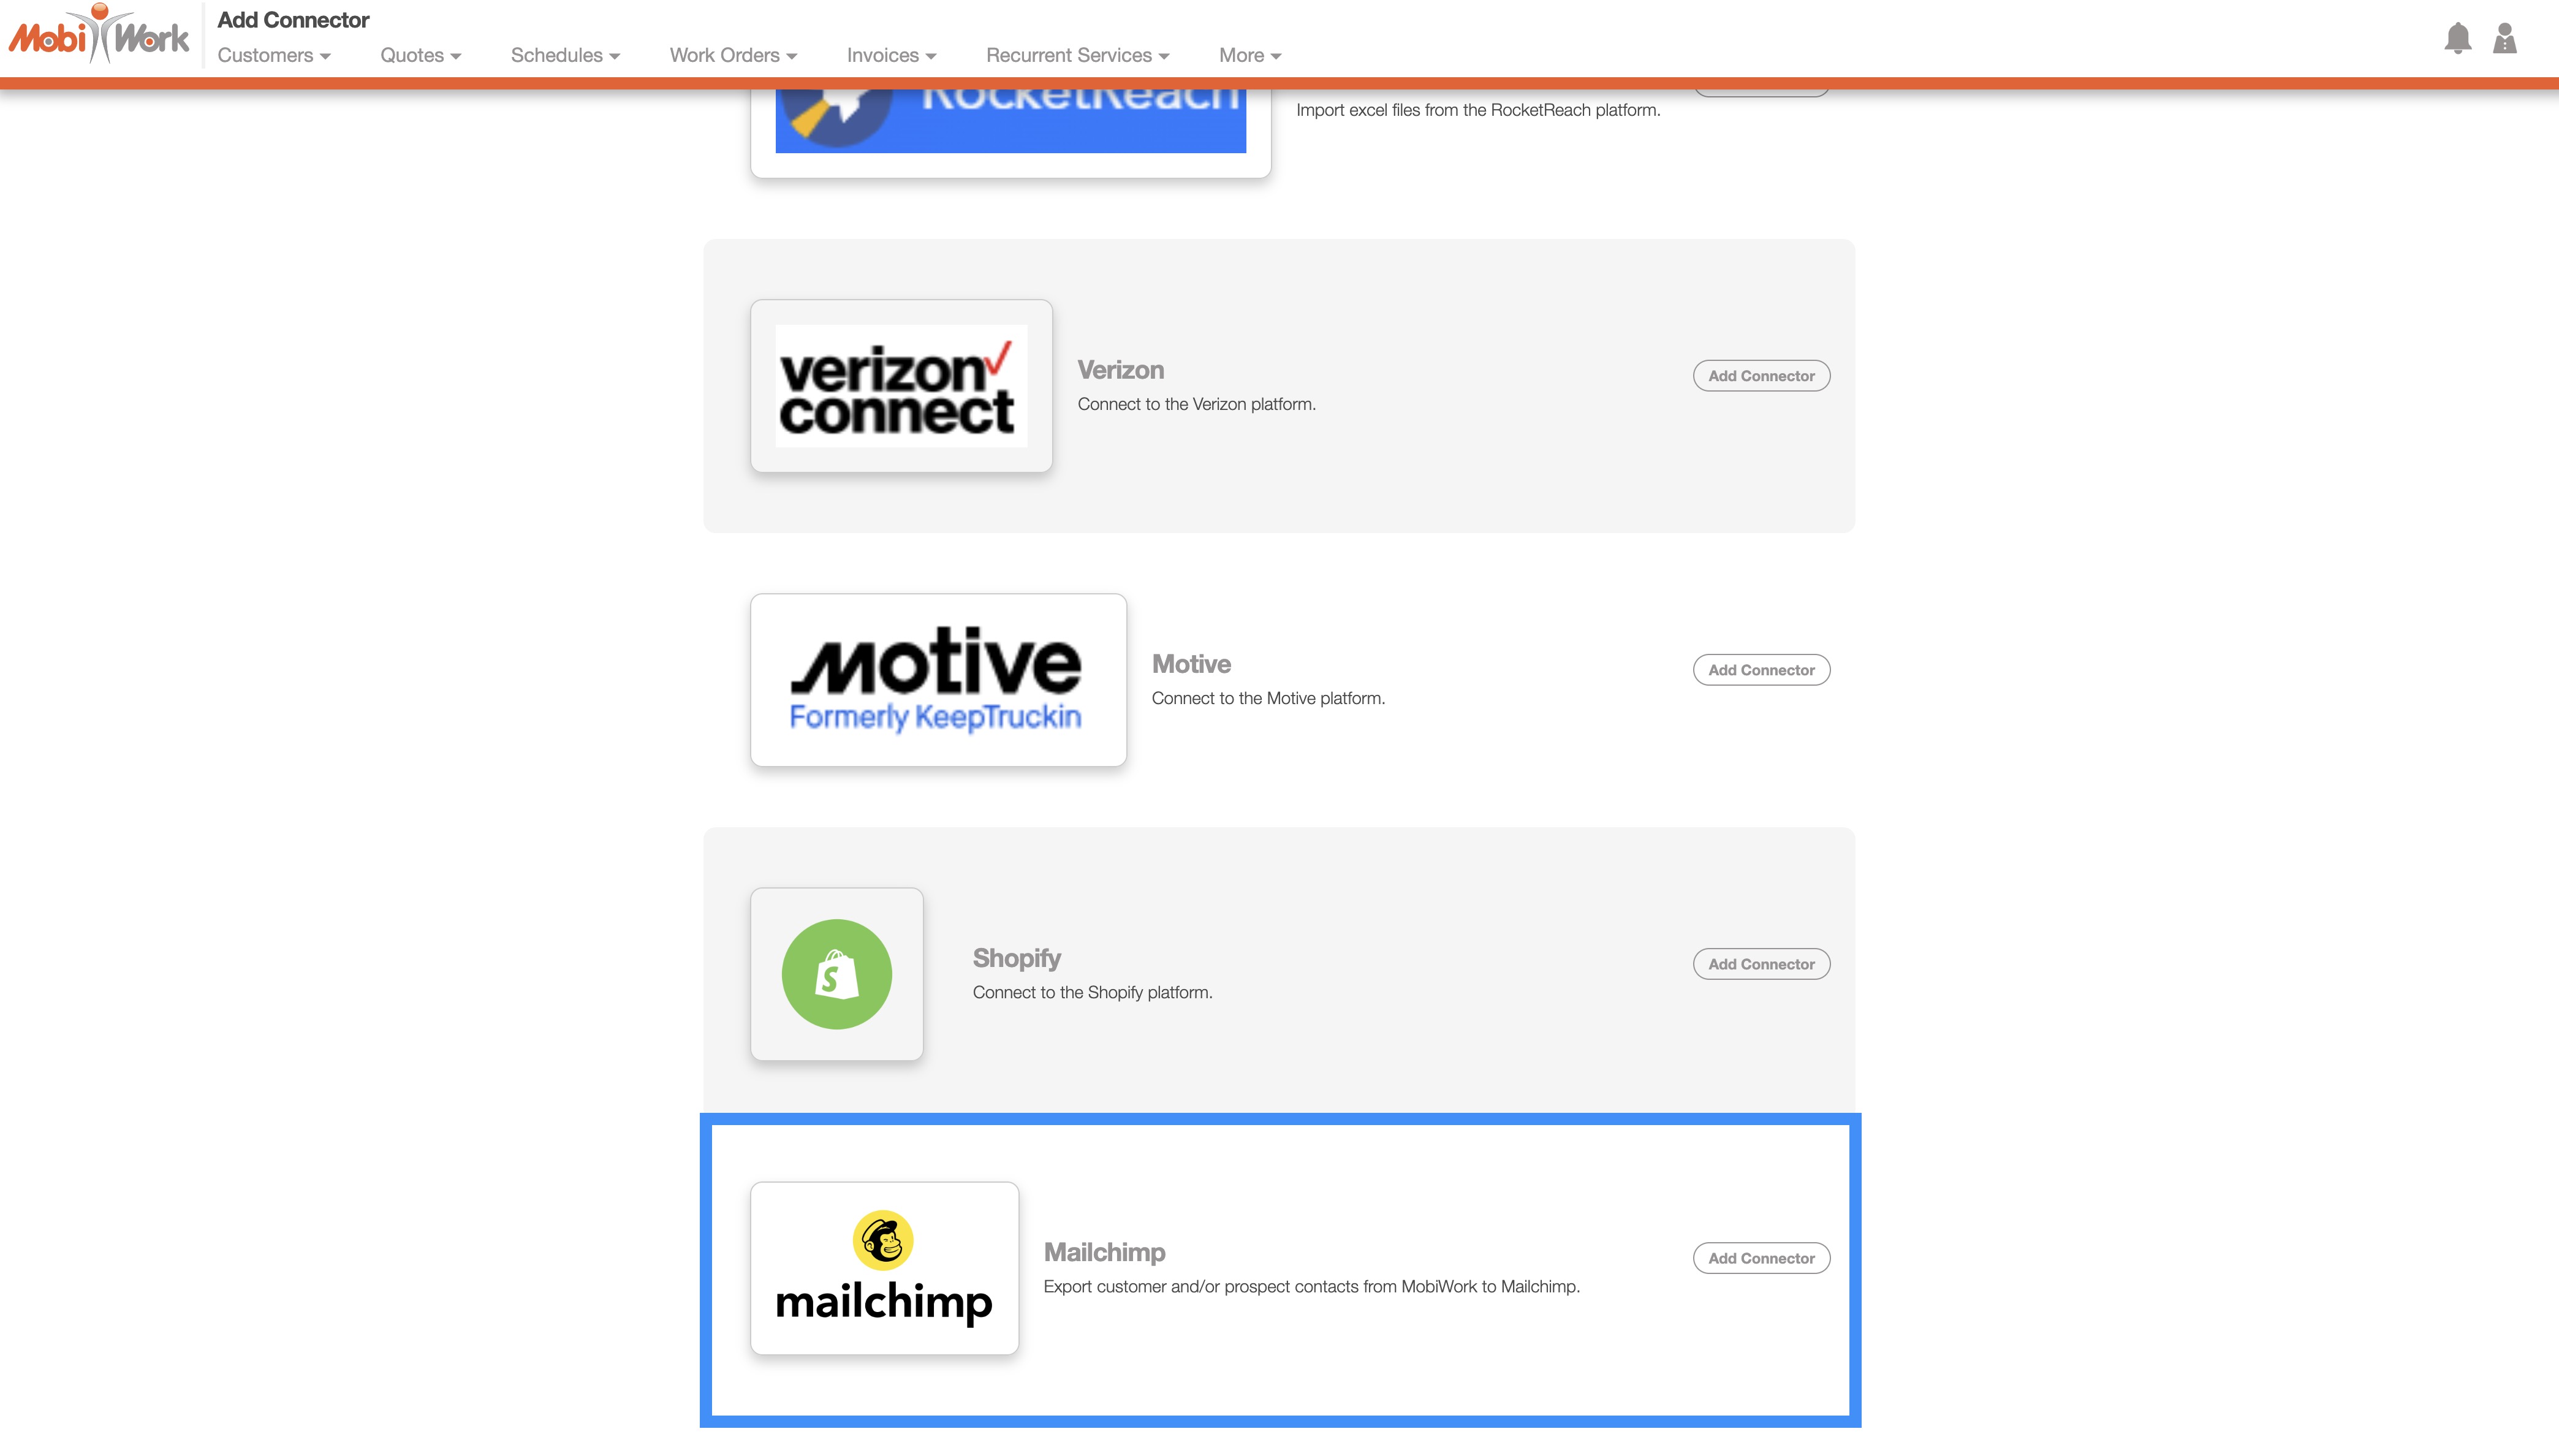
Next, scroll down to the "Others" section, find the Mailchimp connector listed and click the Add Connector:
Once the connector has been added, you will need to input the API key and Data Center into the connector settings. The subsection, Entering the API Key and Data Center (DC) will highlight how to fill in these fields.
The video below demonstrates how to add the API key and Data Center (DC) number from Mailchimp to MobiWork:
If you prefer to read through the steps, please read the following procedure.
After adding the Mailchimp connector to your MobiWork account, you can link your Mailchimp account by navigating to the Mailchimp Connector Settings page. To access this page, click on the View icon to view the connector:
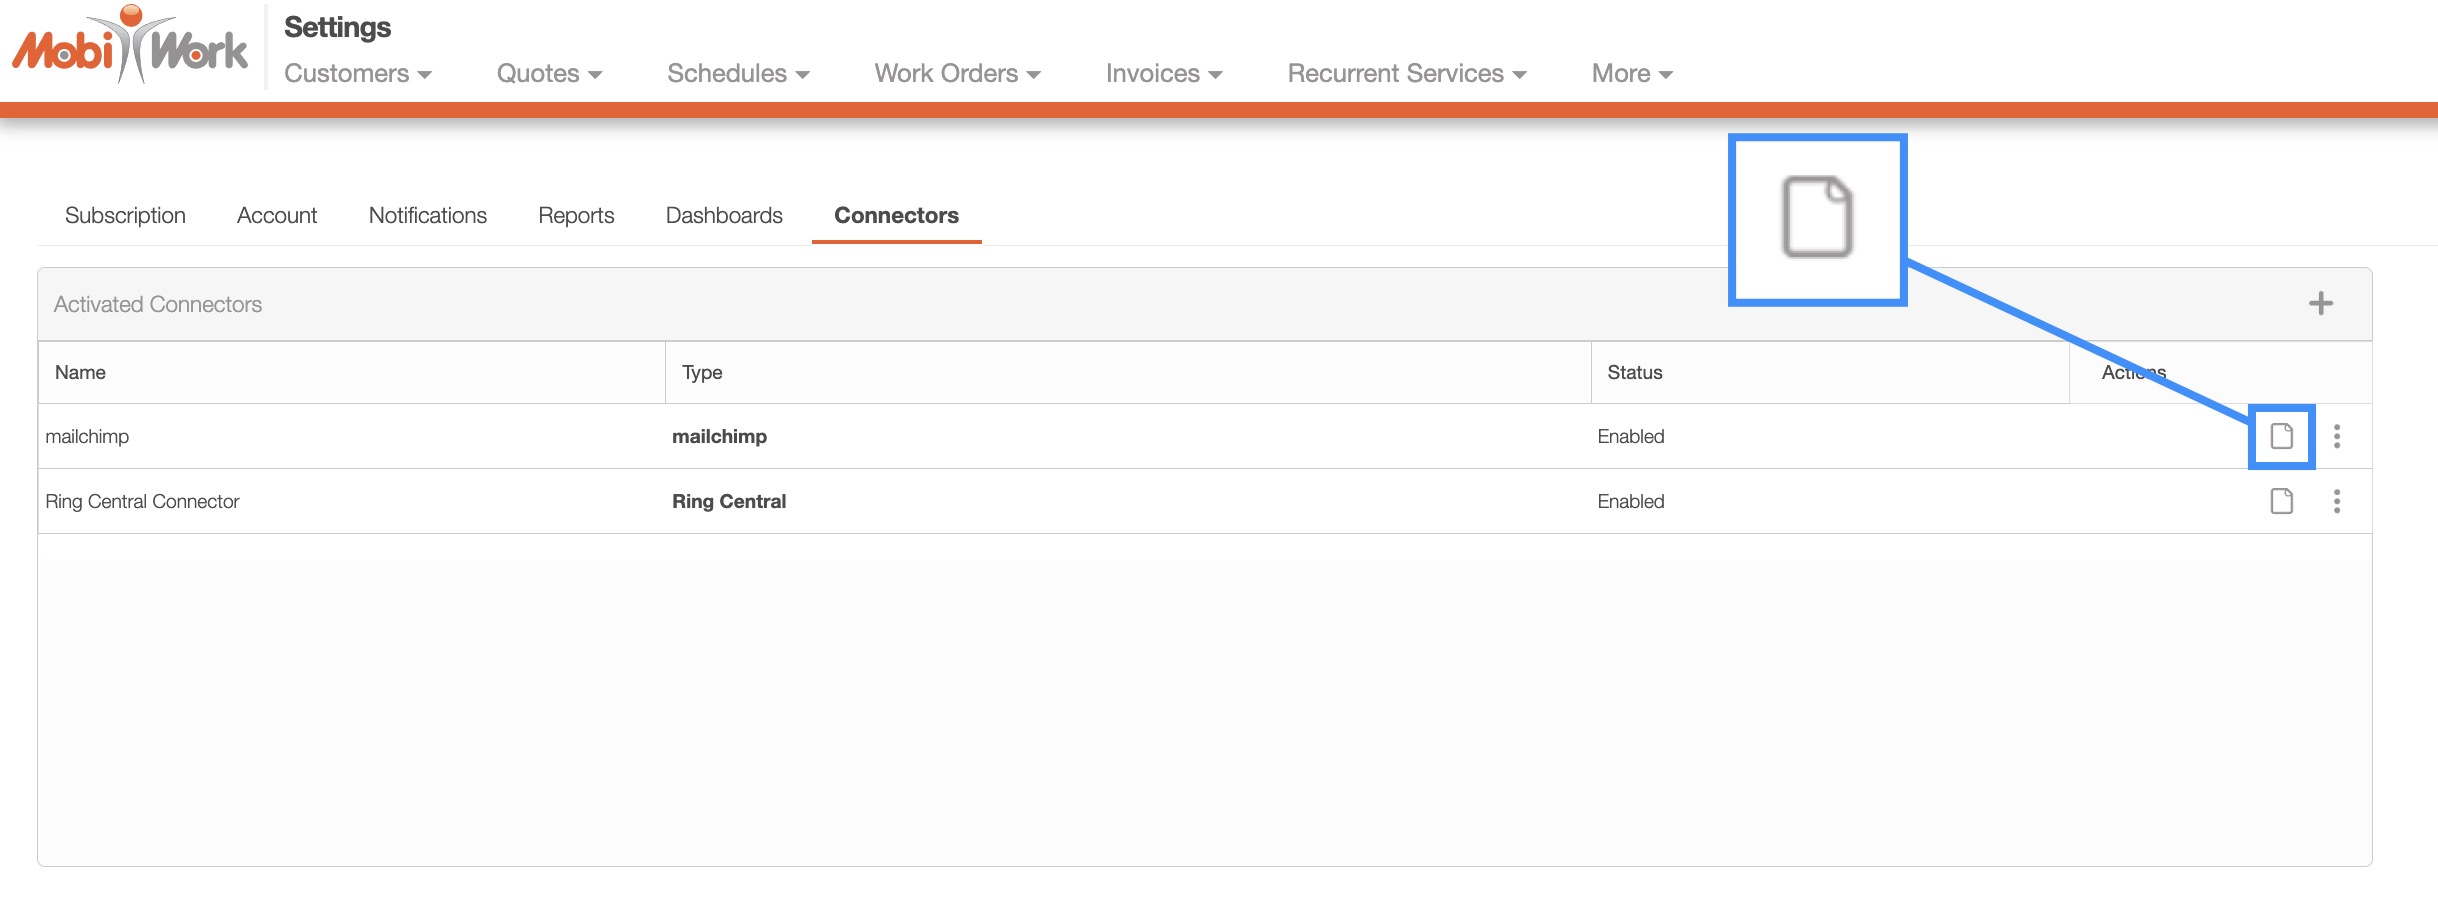
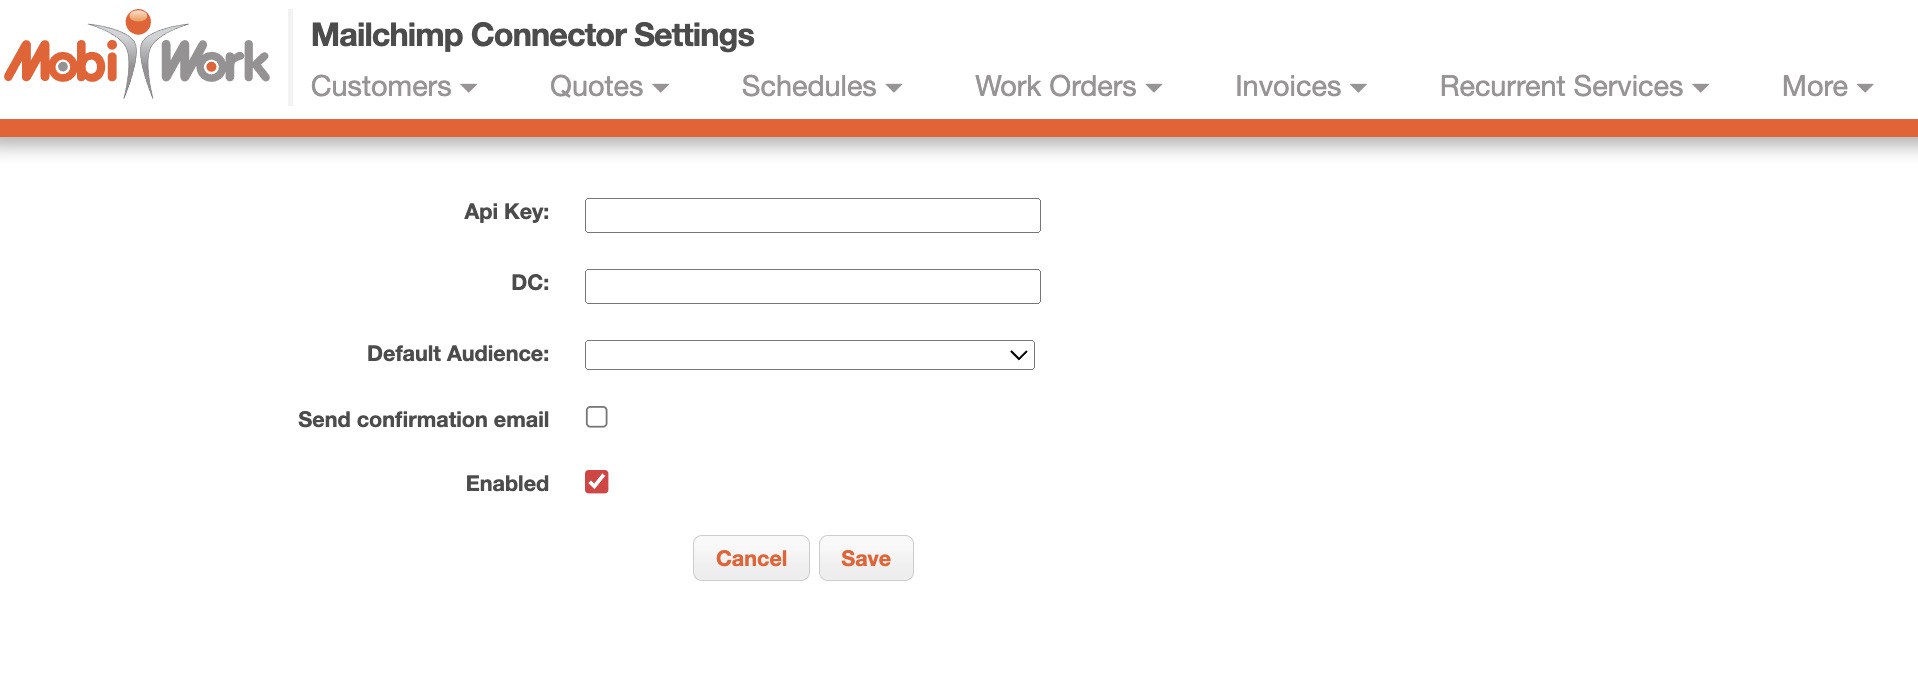
On this page, click Edit to input the API Key and DC fields required by MobiWork:

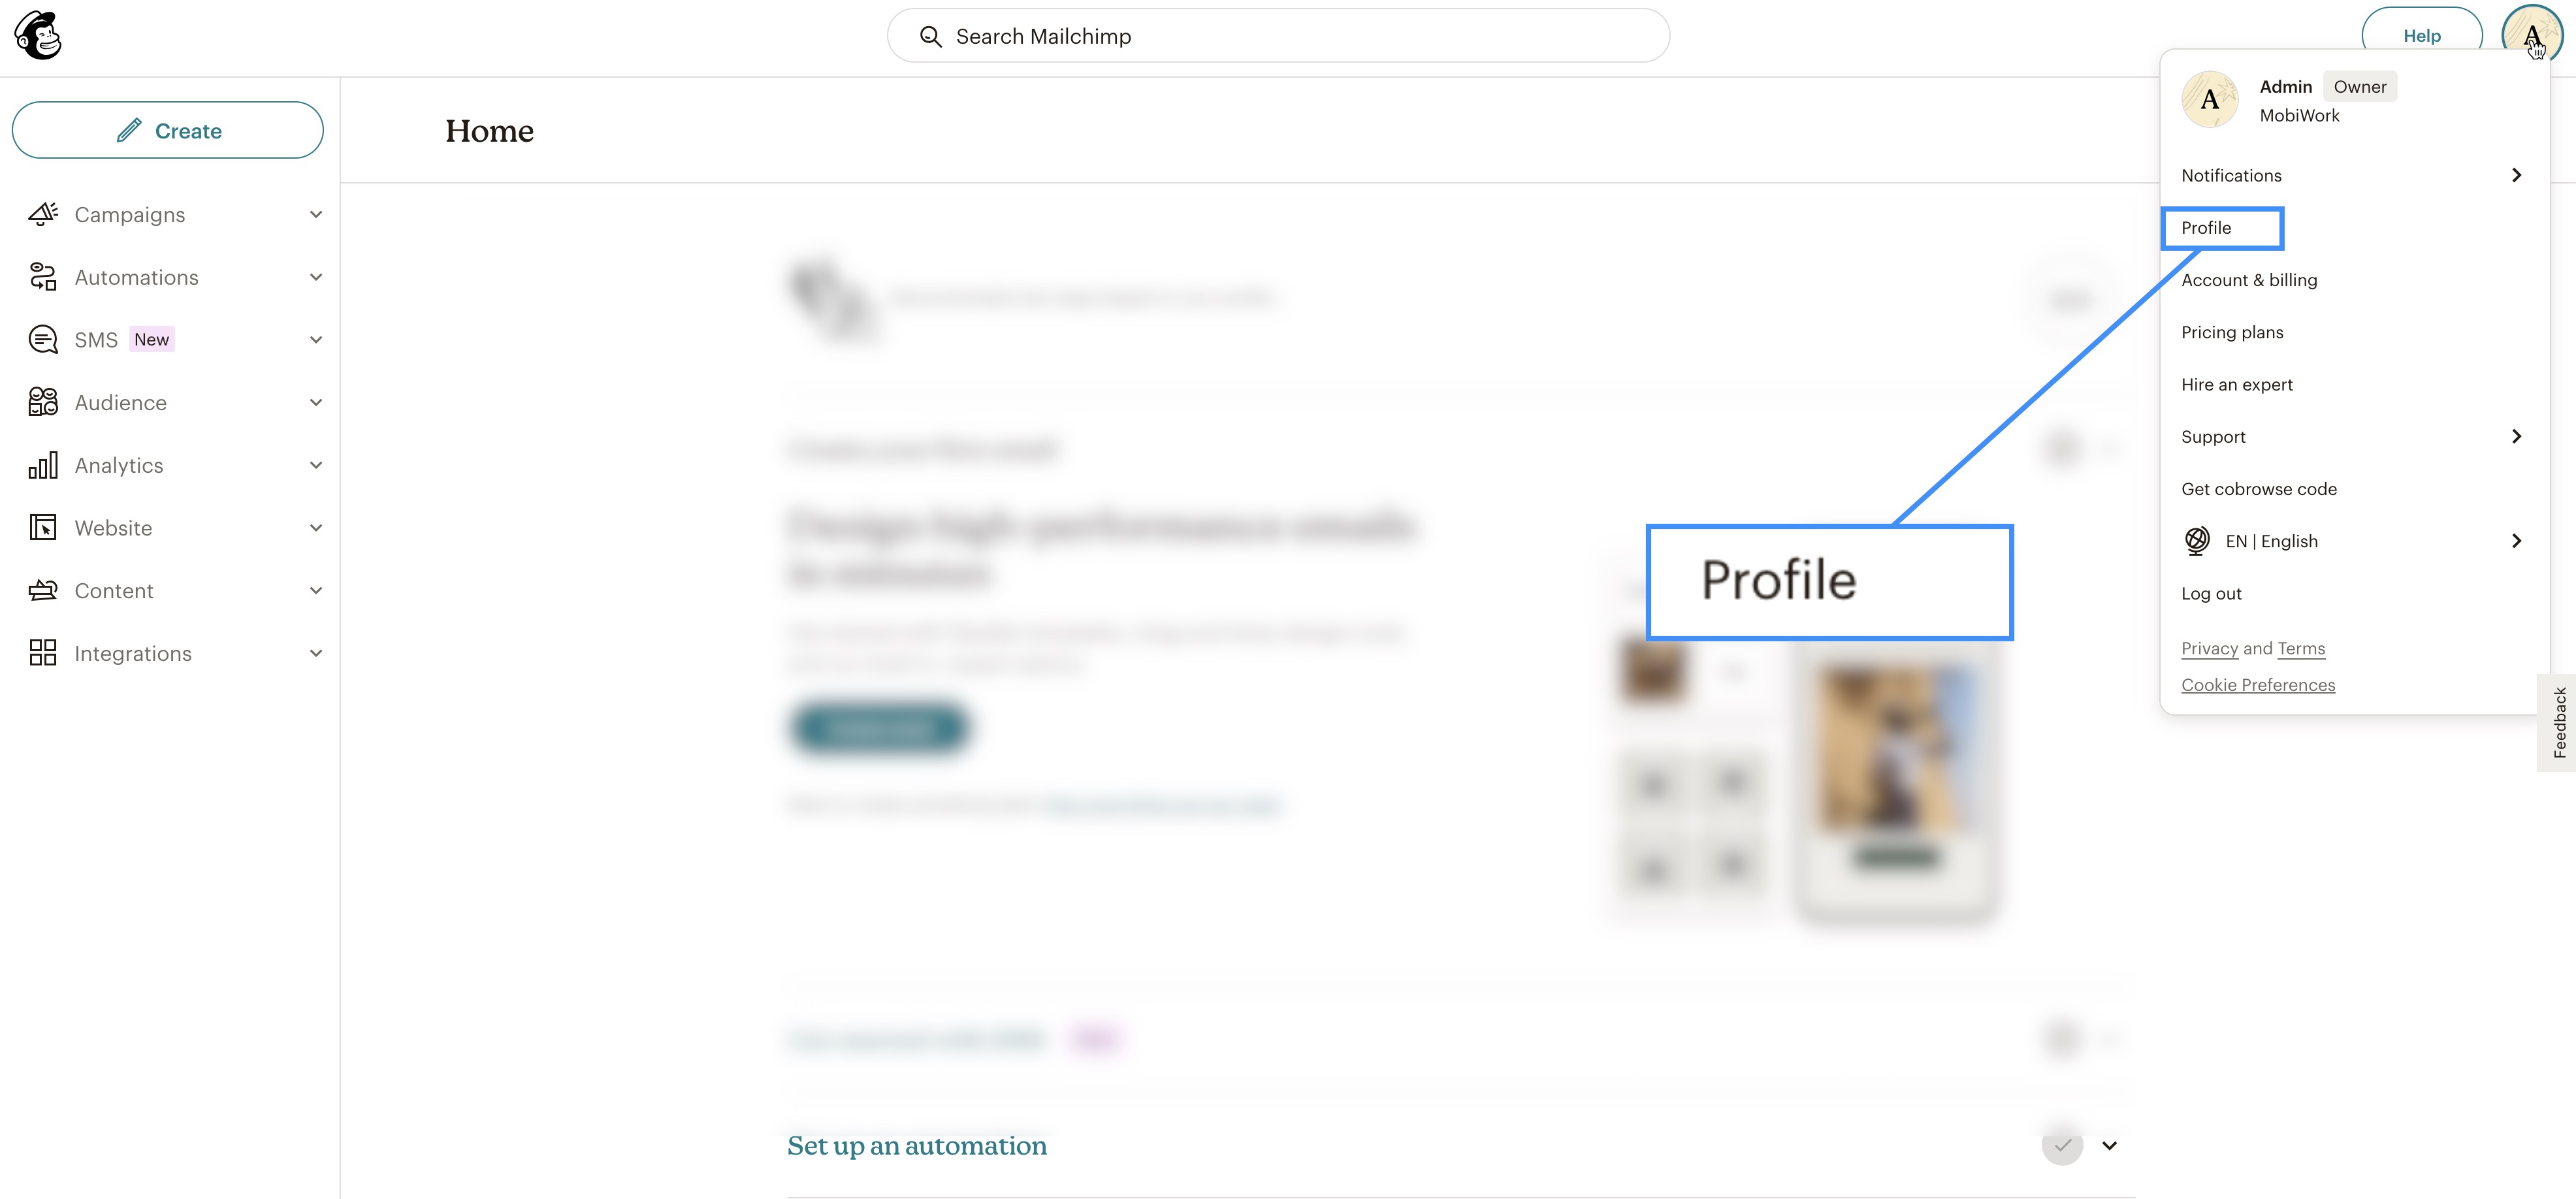
To obtain these values from Mailchimp, first access your Mailchimp's profile dashboard.
To access your profile dashboard, select the "Profile" option from your "Account" drop-down:
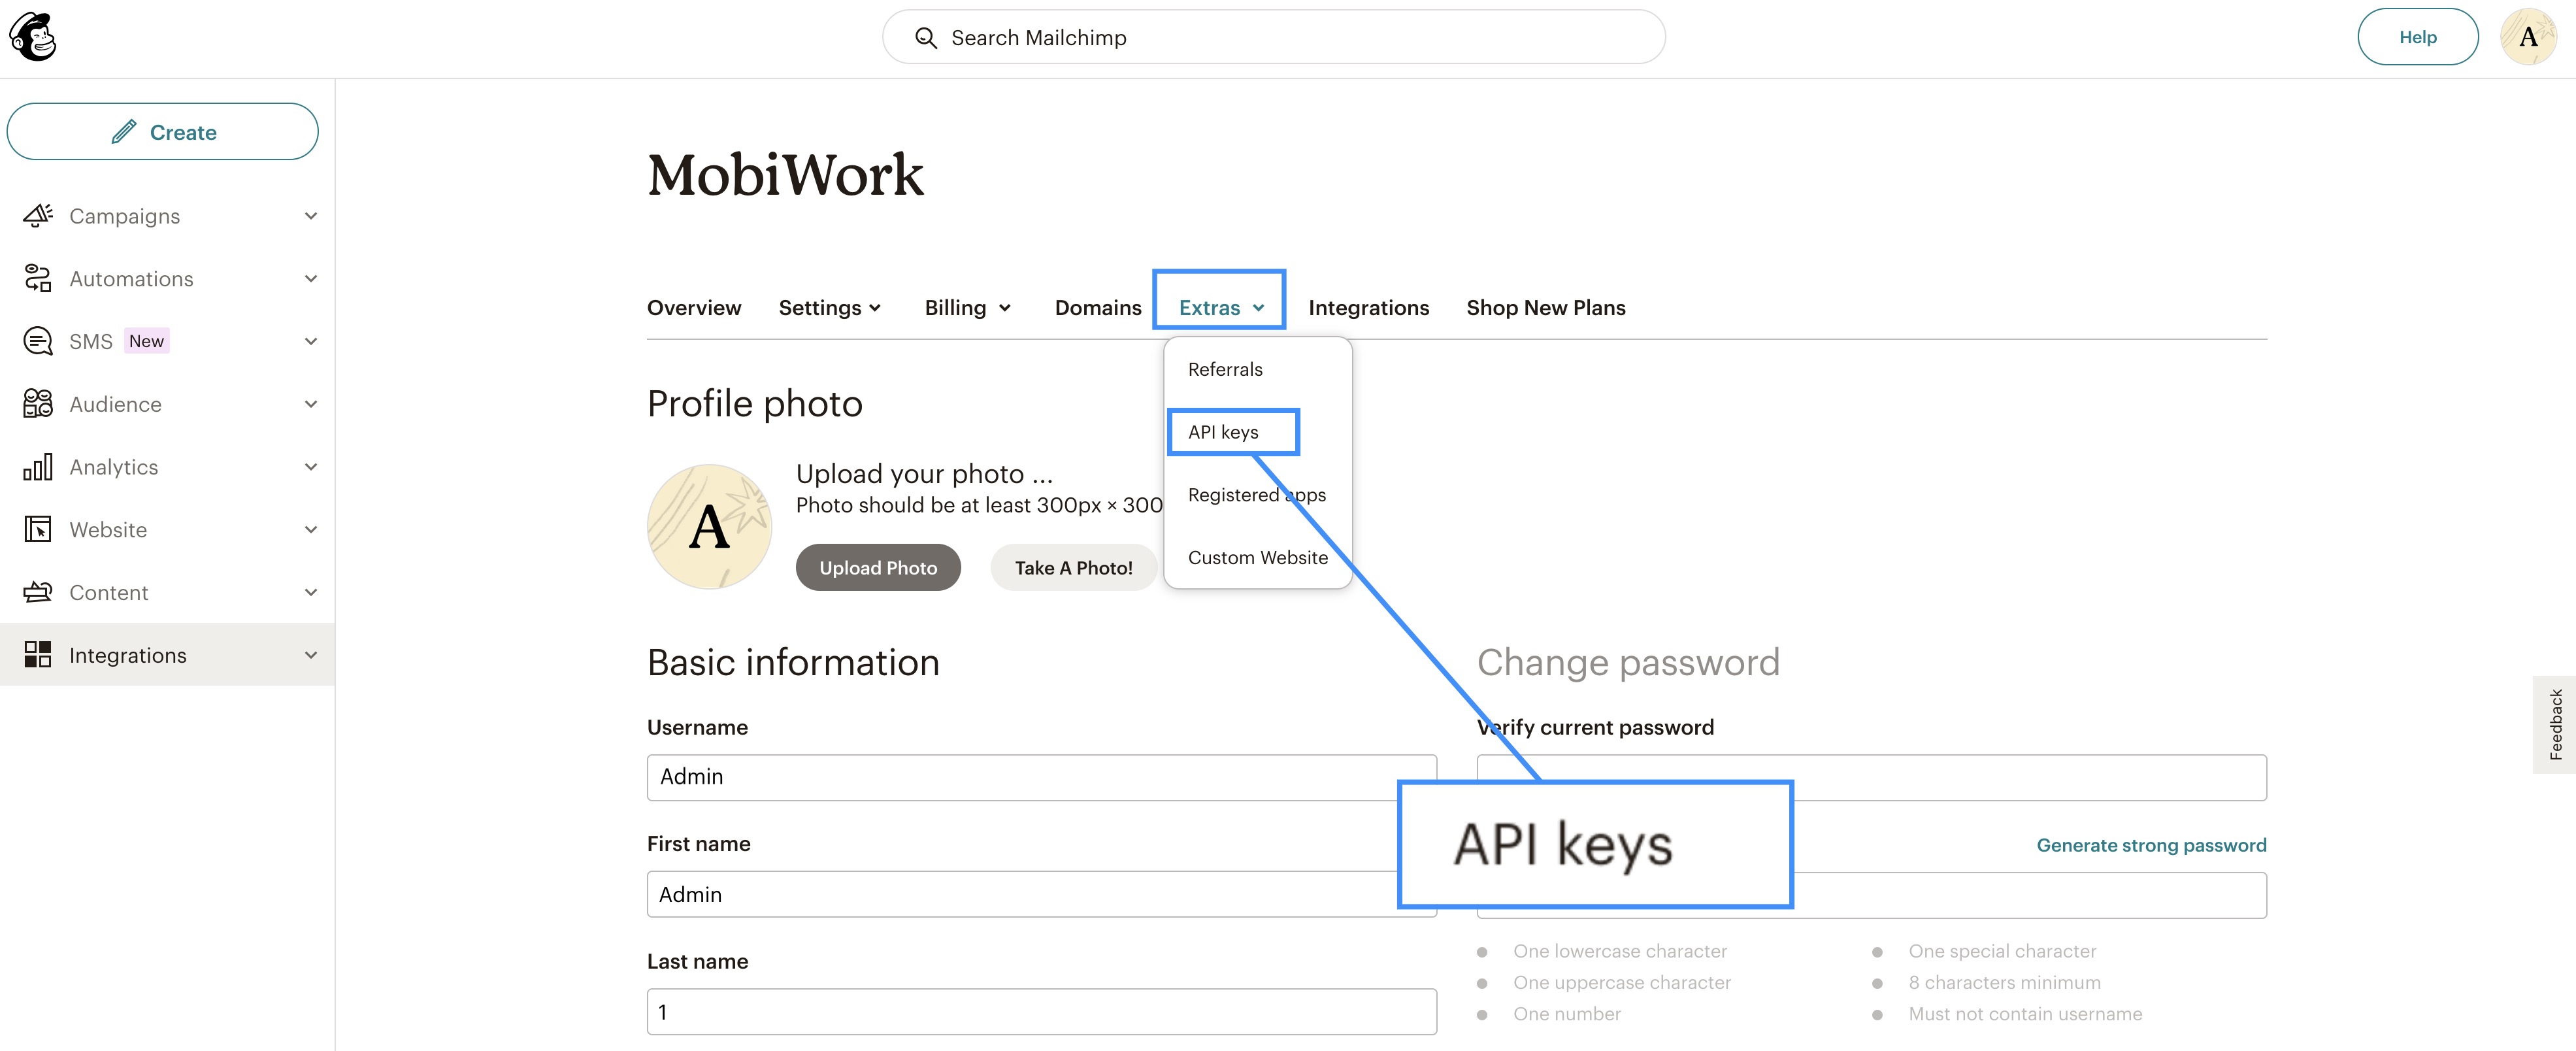
Once on the profile dashboard, select the "Extras" tab and choose "API Keys" option from the drop-down menu:
You will be redirected to the API page. On this page, click on the Create a Key button:
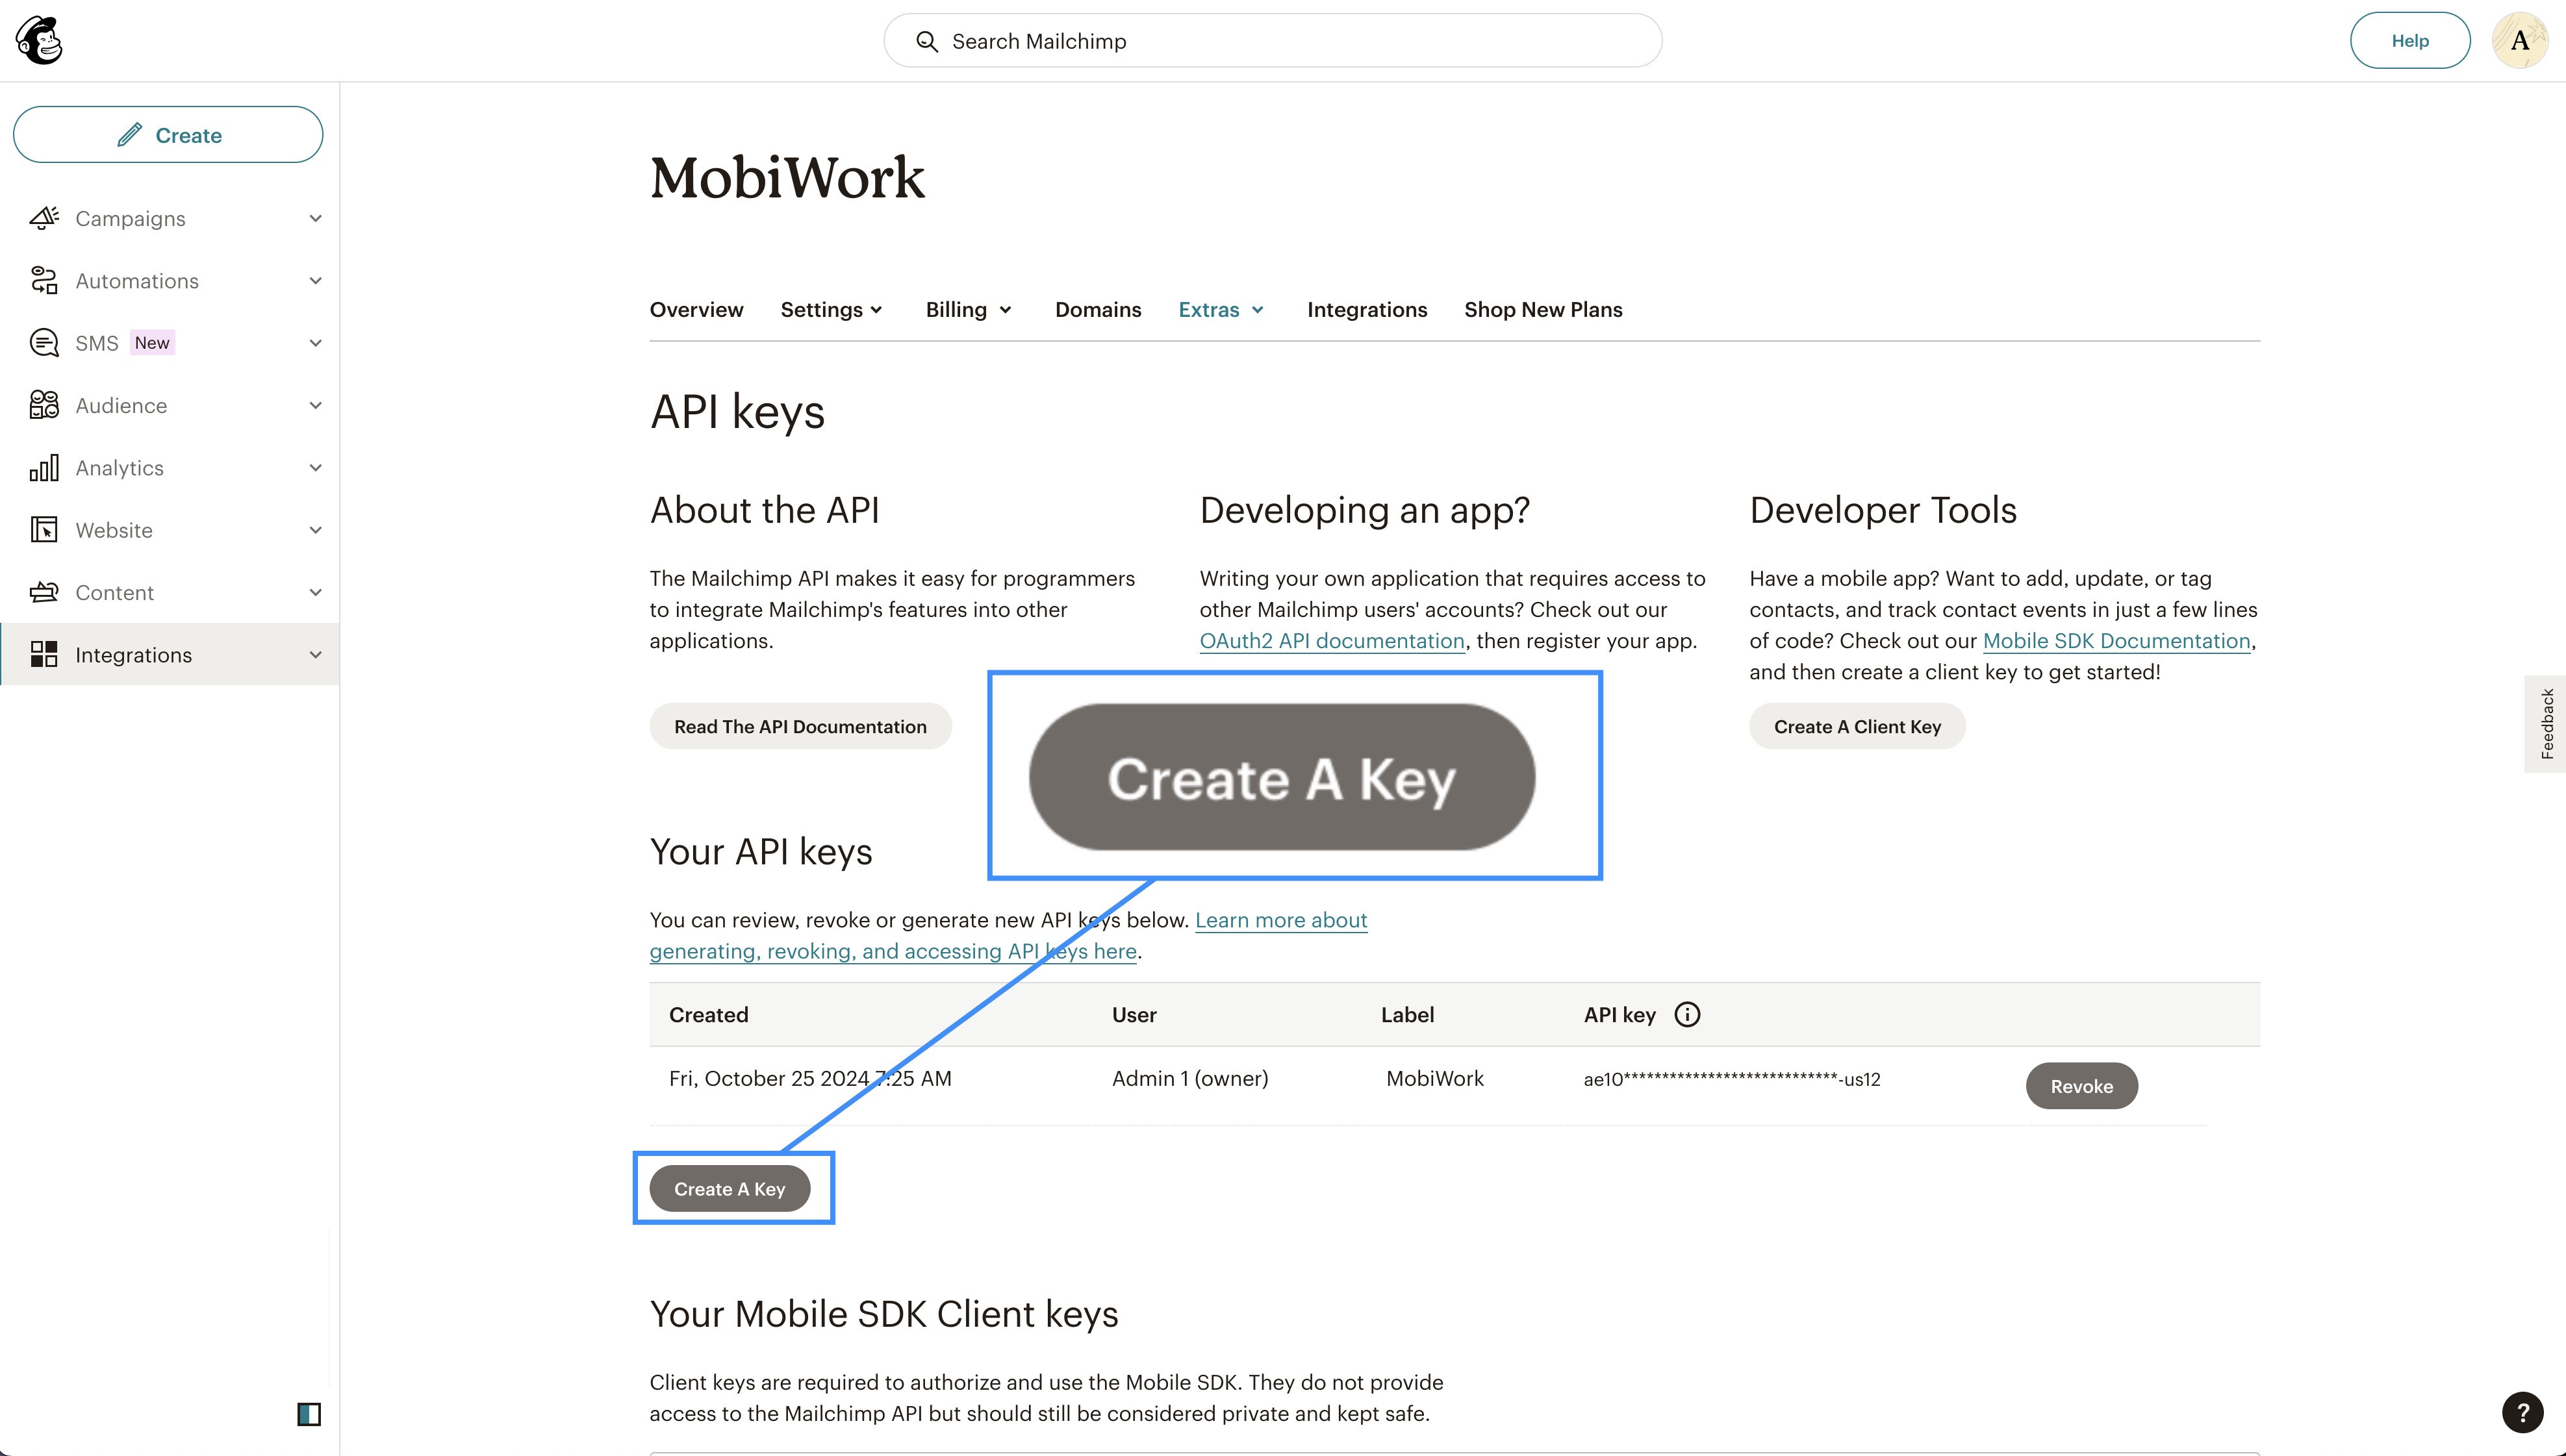
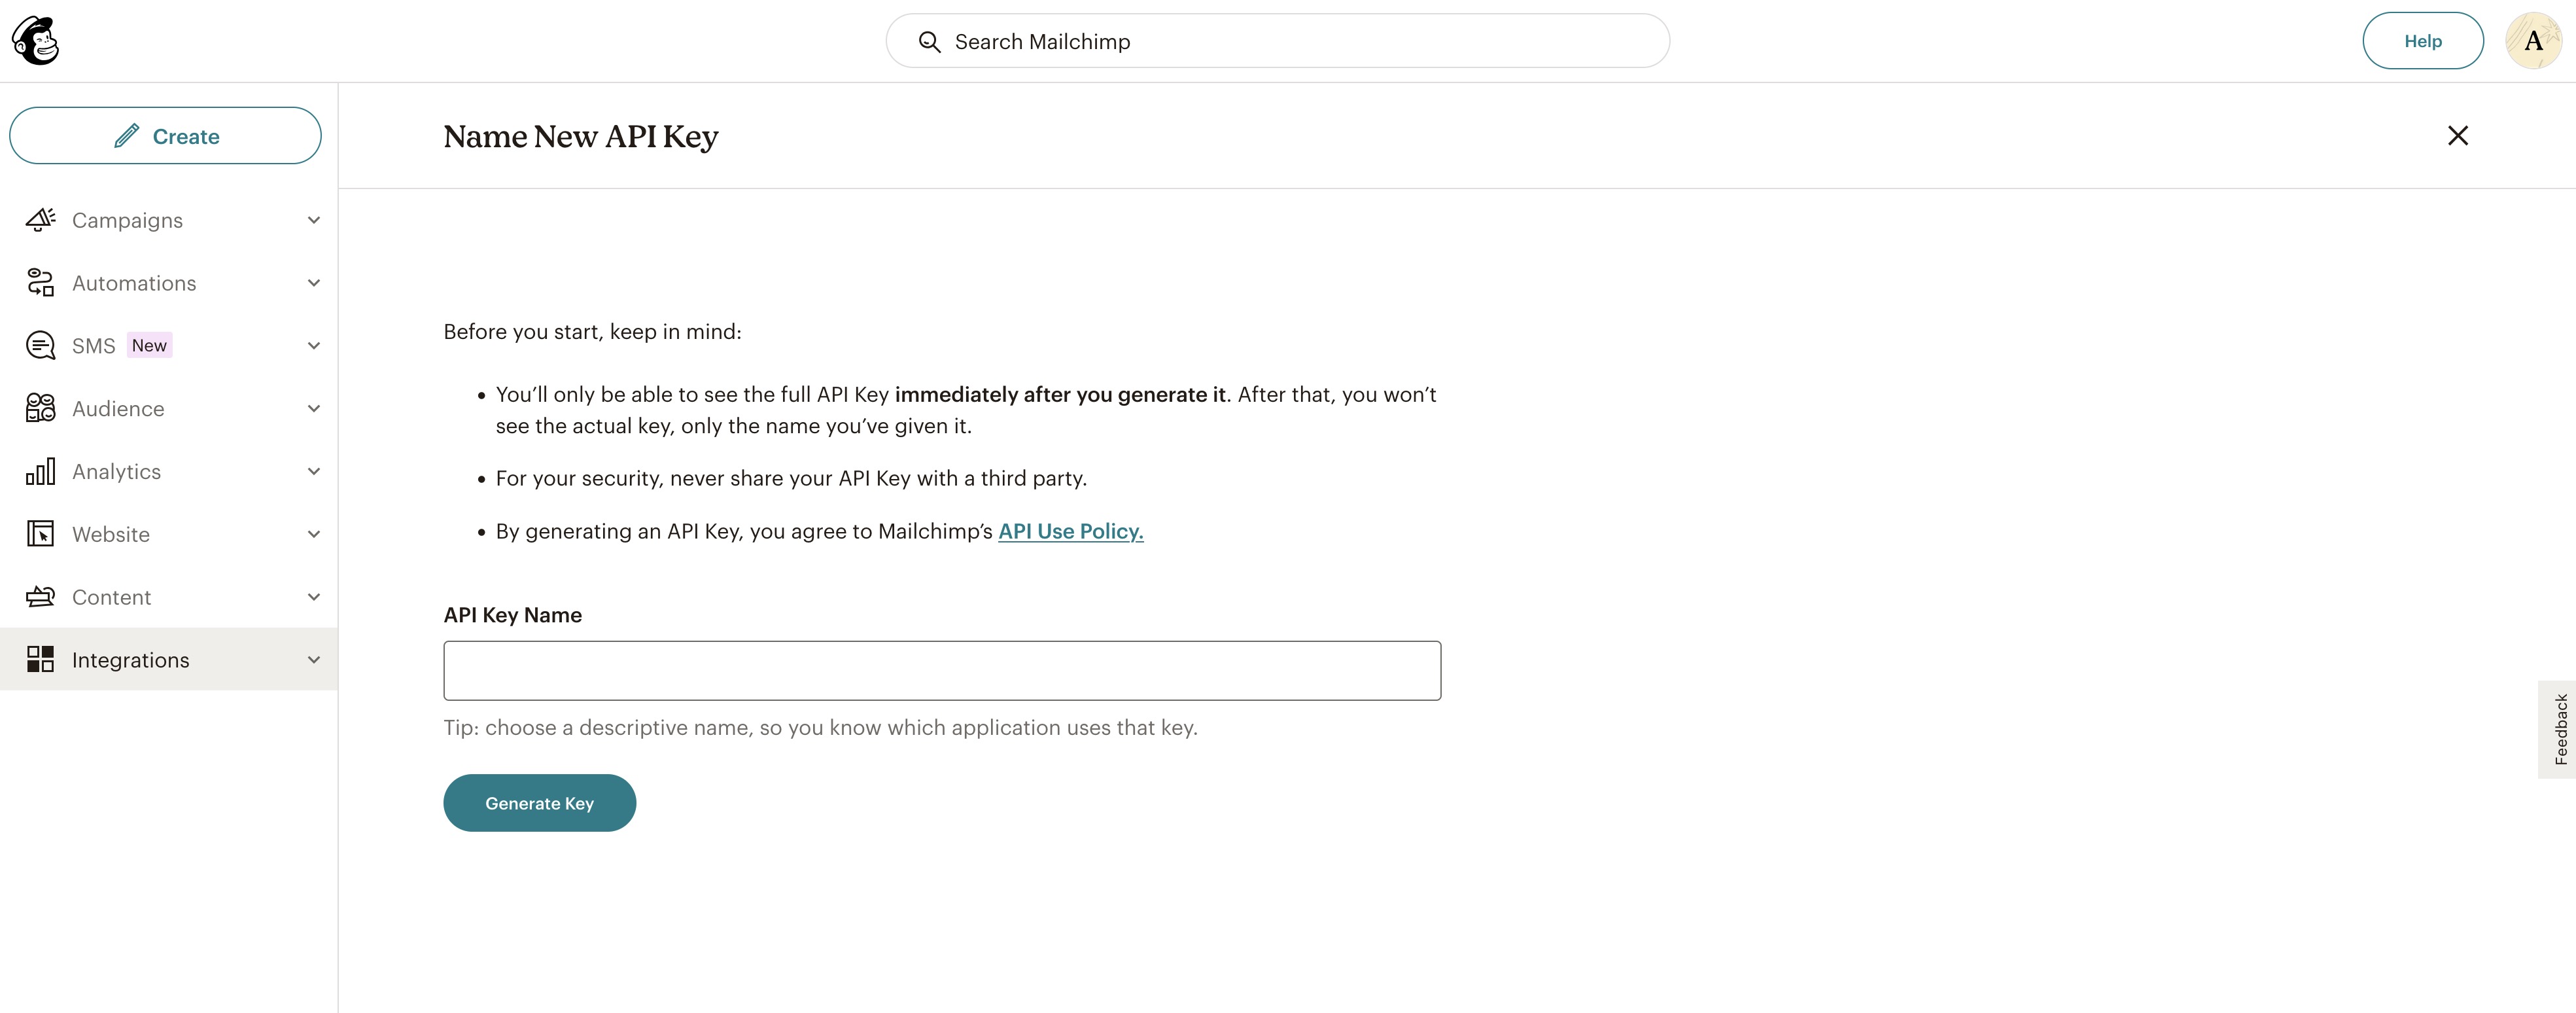
Enter a unique name for the API key, then click the Generate Key button. The API key will be automatically generated, and you can copy it into MobiWork's "API Key" field:
To find the "DC" field, check the first part of your Mailchimp URL, which indicates your data center code:

Copy the first part of the code (e.g., us12, us19, us45, etc.) and enter it in the "DC" field.
Note: Once your contacts are synced, you will be able to select your default audience from the "Default Audience" drop-down in MobiWork.
After entering all the required fields on MobiWork, click Save to complete the setup:
To integrate these entities with Mailchimp, you will need to access the Customer List page. Once you are on this page, simply select either the "Export Customers to Mailchimp Excel" or the "Export Customer Contacts to Mailchimp (Default Audience)" action from the More Actions button:
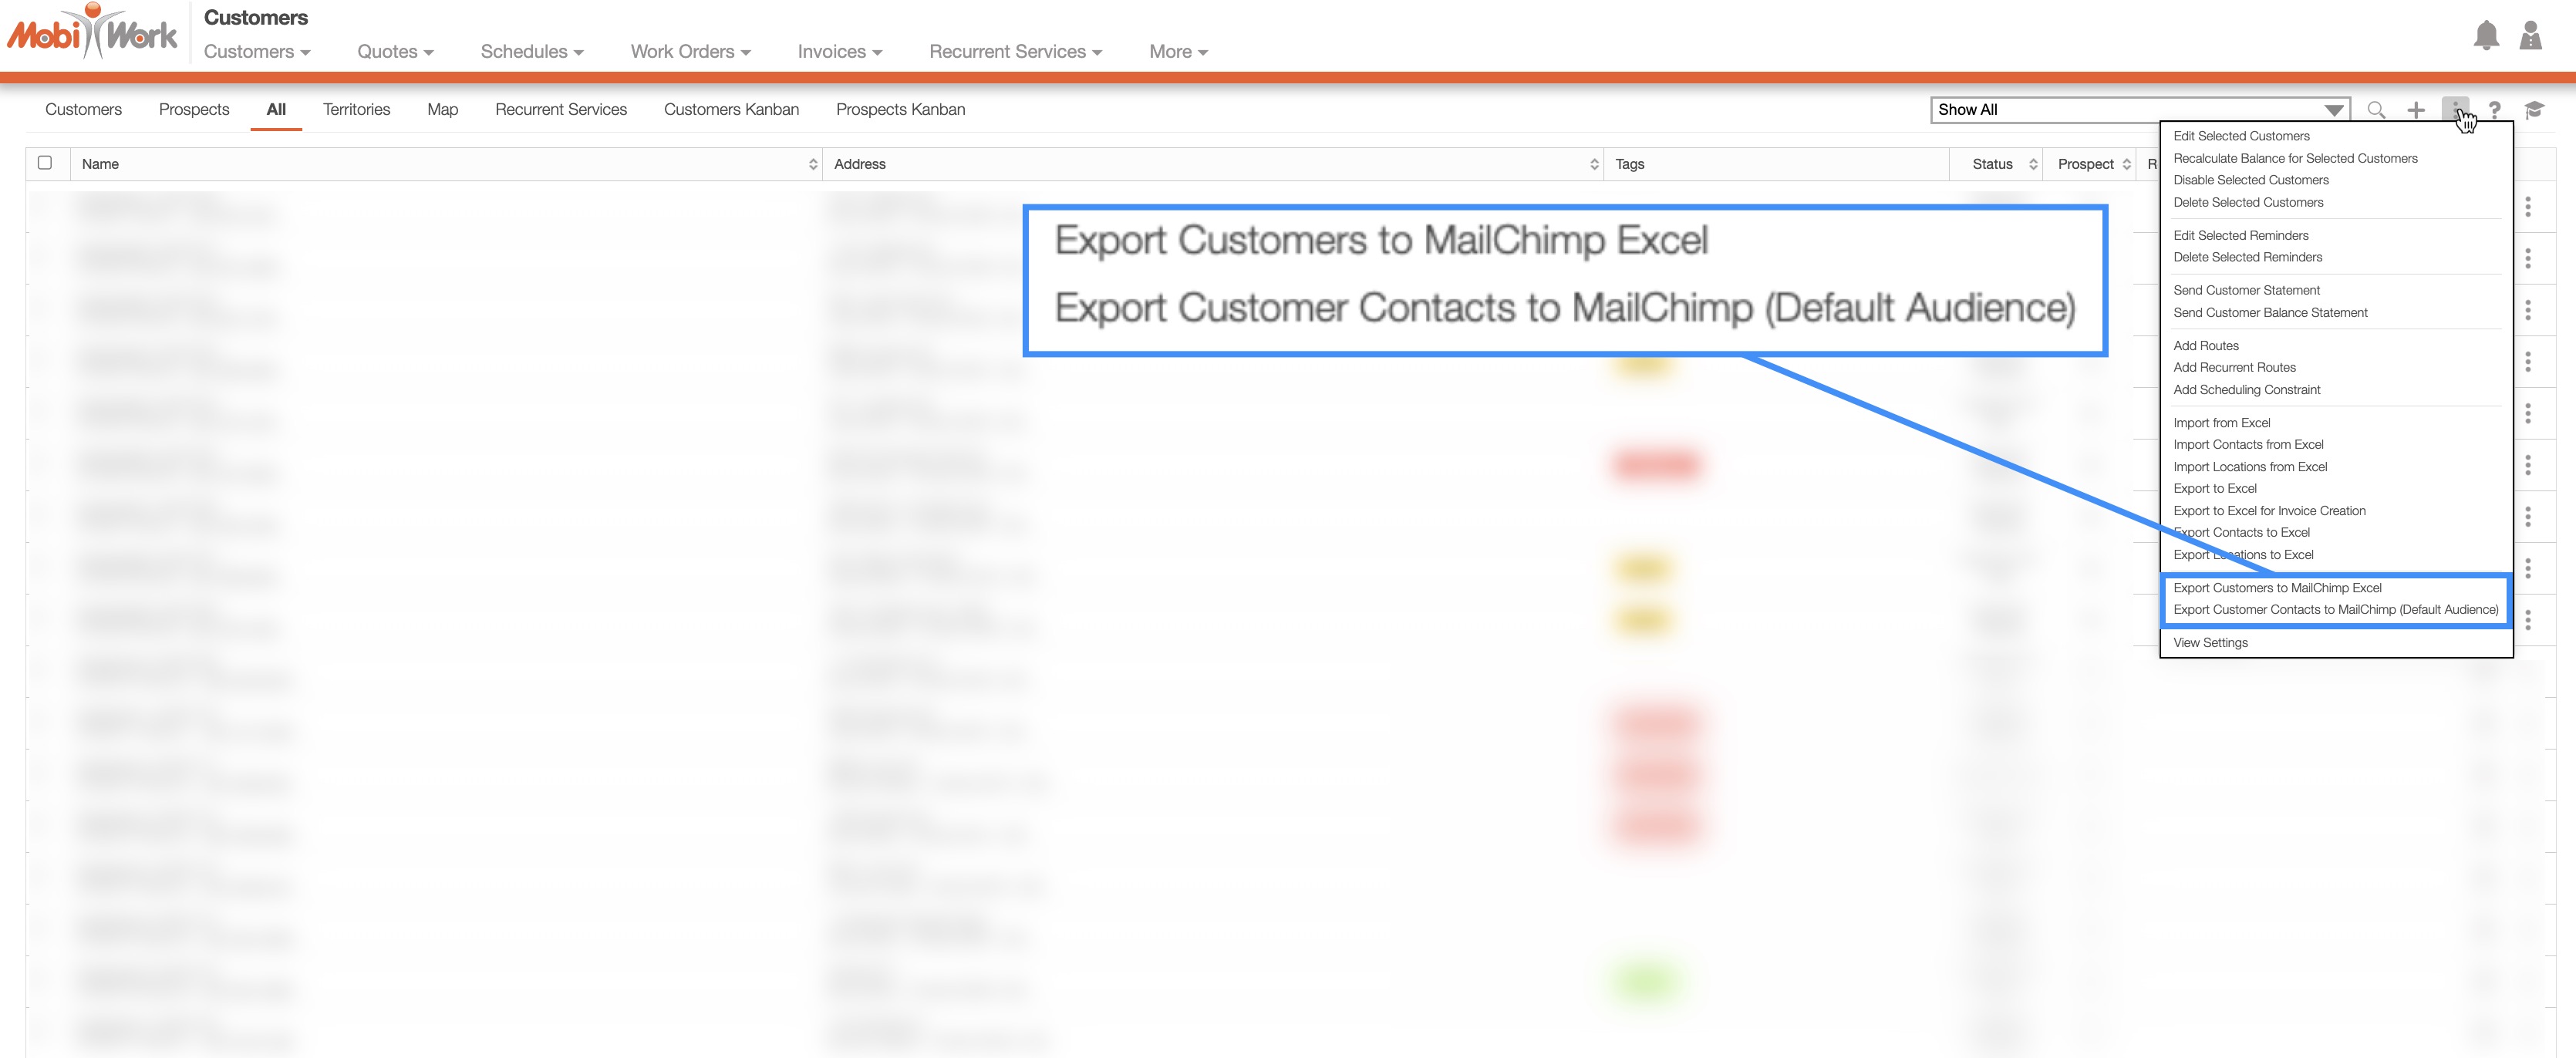
These actions will allow you to export your customer contacts from MobiWork to Mailchimp. The "Export Customers to Mailchimp Excel" option will create an Excel file that can be manually imported into Mailchimp. The "Export Customer Contacts to Mailchimp (Default Audience)" option will push the data to Mailchimp with the MobiWork API.
To confirm if your customers have successfully synced to Mailchimp, access the "History" tab in the View Customer pop-up window:
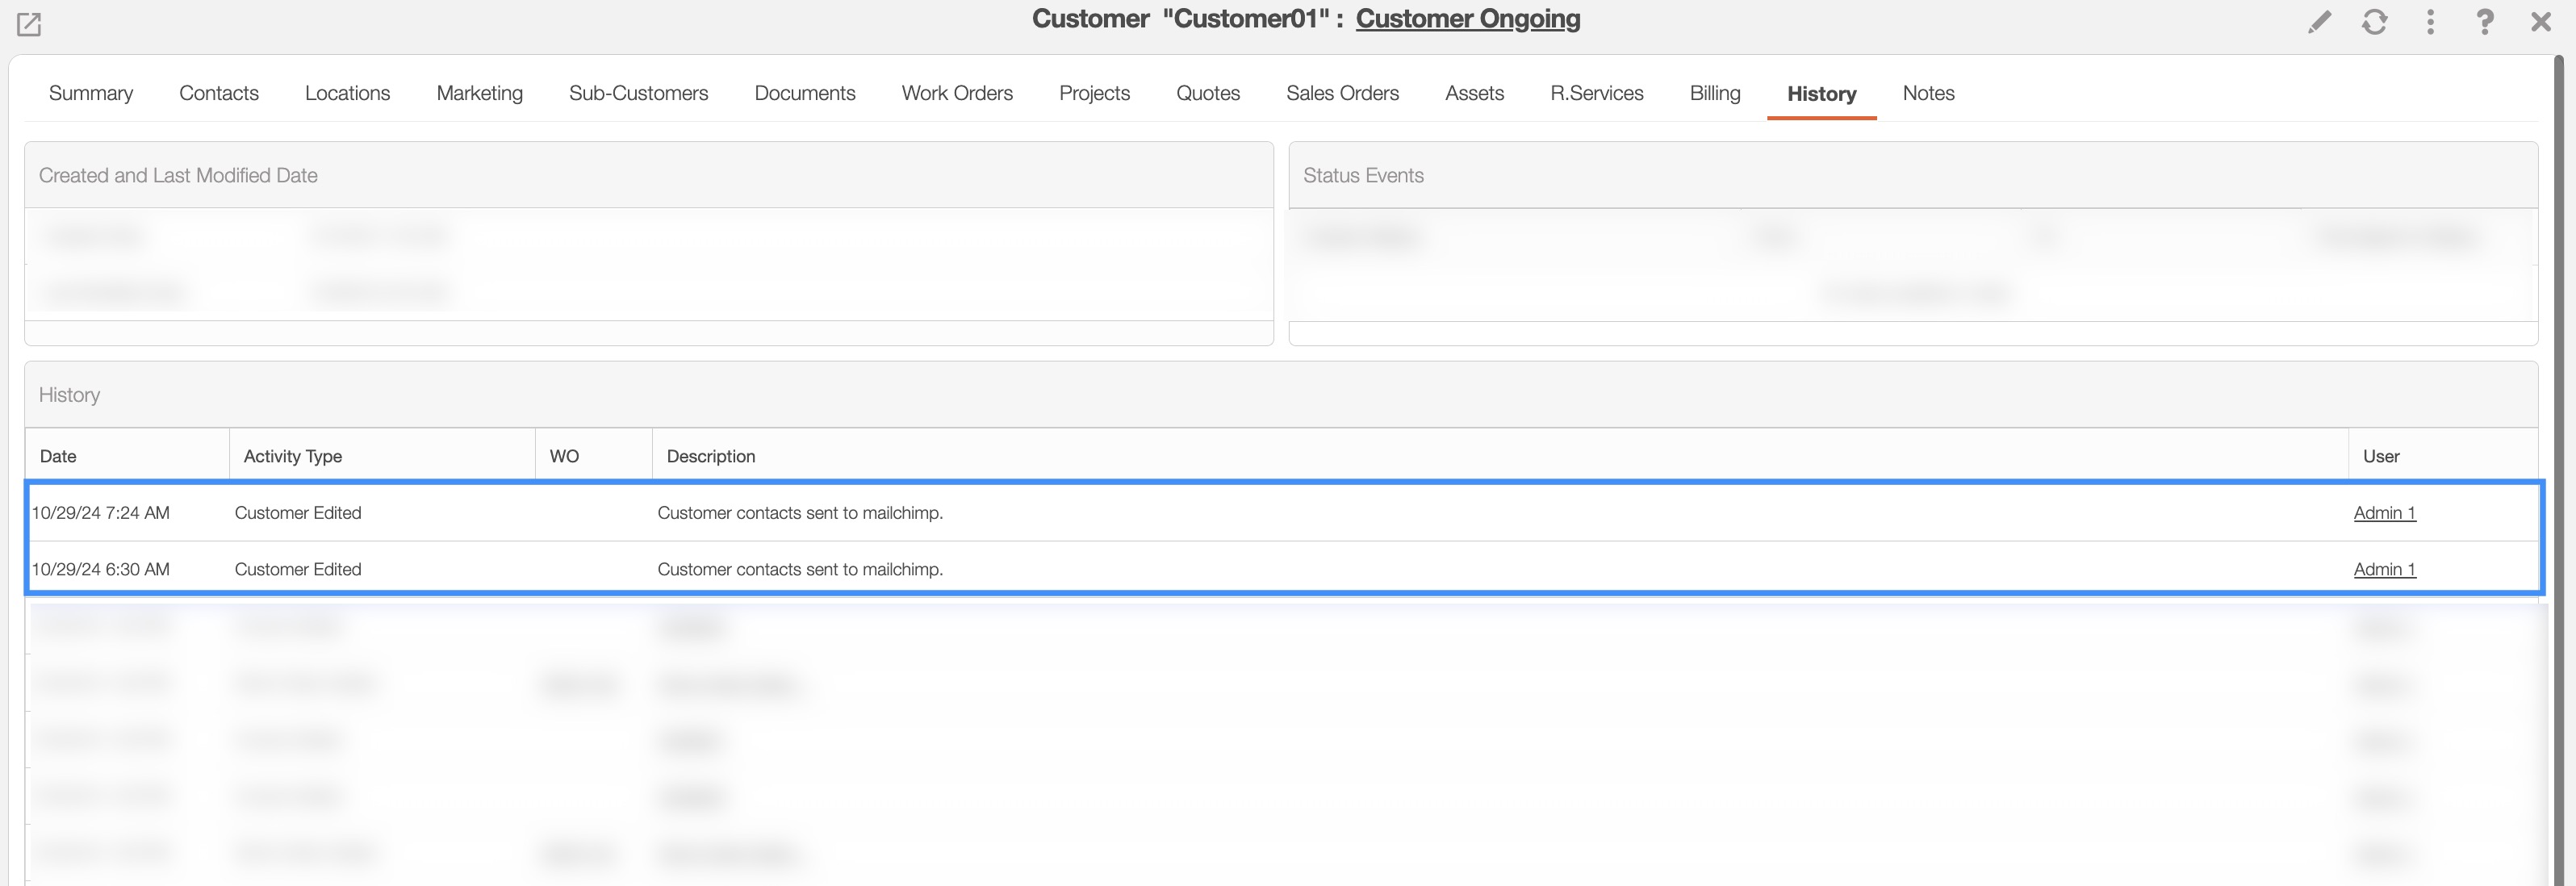
For more information on how to access the View Customer pop-up window, please see the View Customer page.
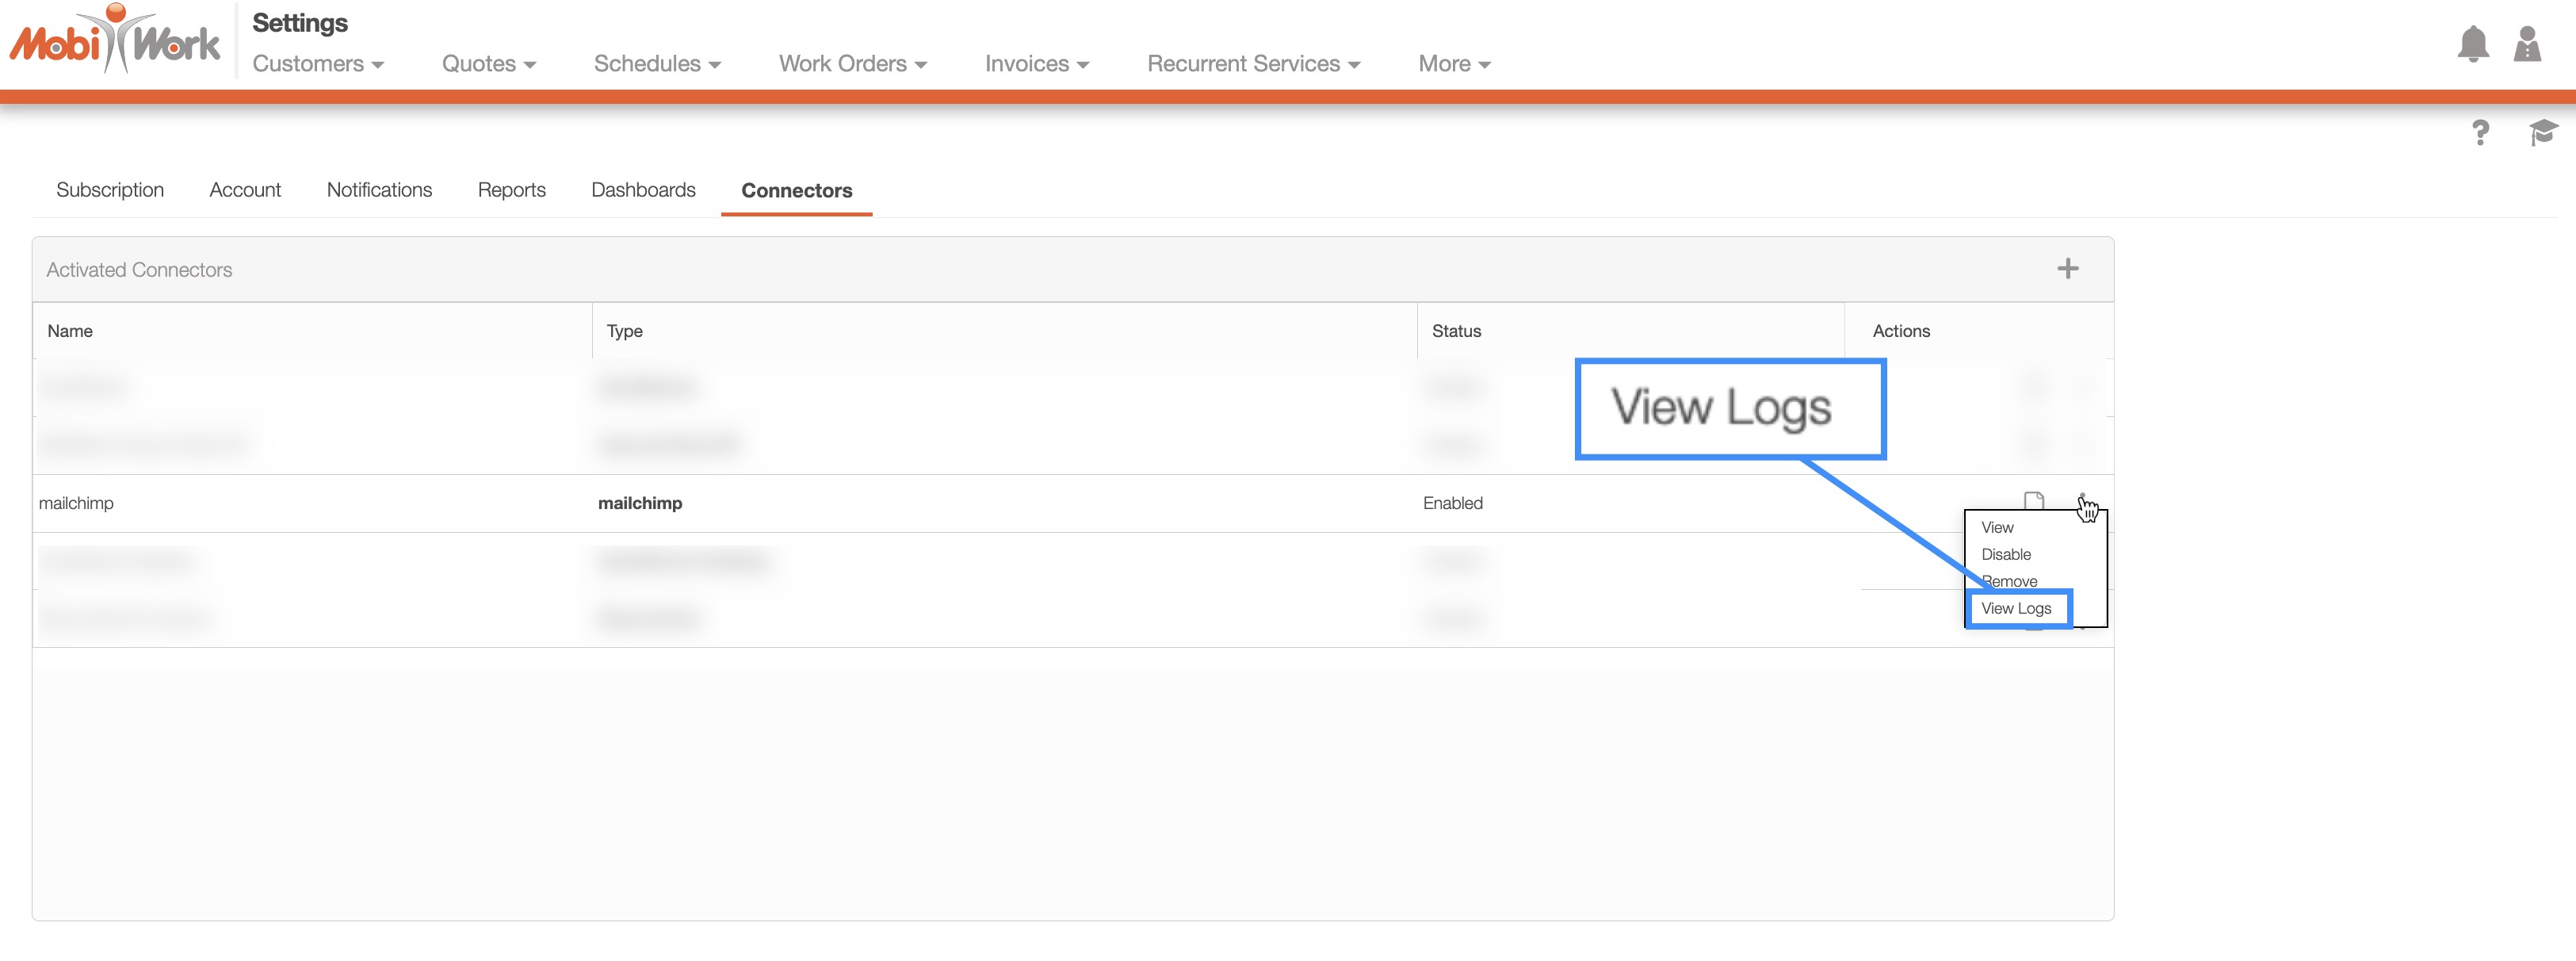
You can also see the sync status or any related errors through the View Logs page of the Mailchimp connector. To access View Logs, go to the "Connectors" tab on your Settings page. From there, click on the Mailchimp connector's Individual Actions button, then choose "View Logs" option from the drop-down menu:
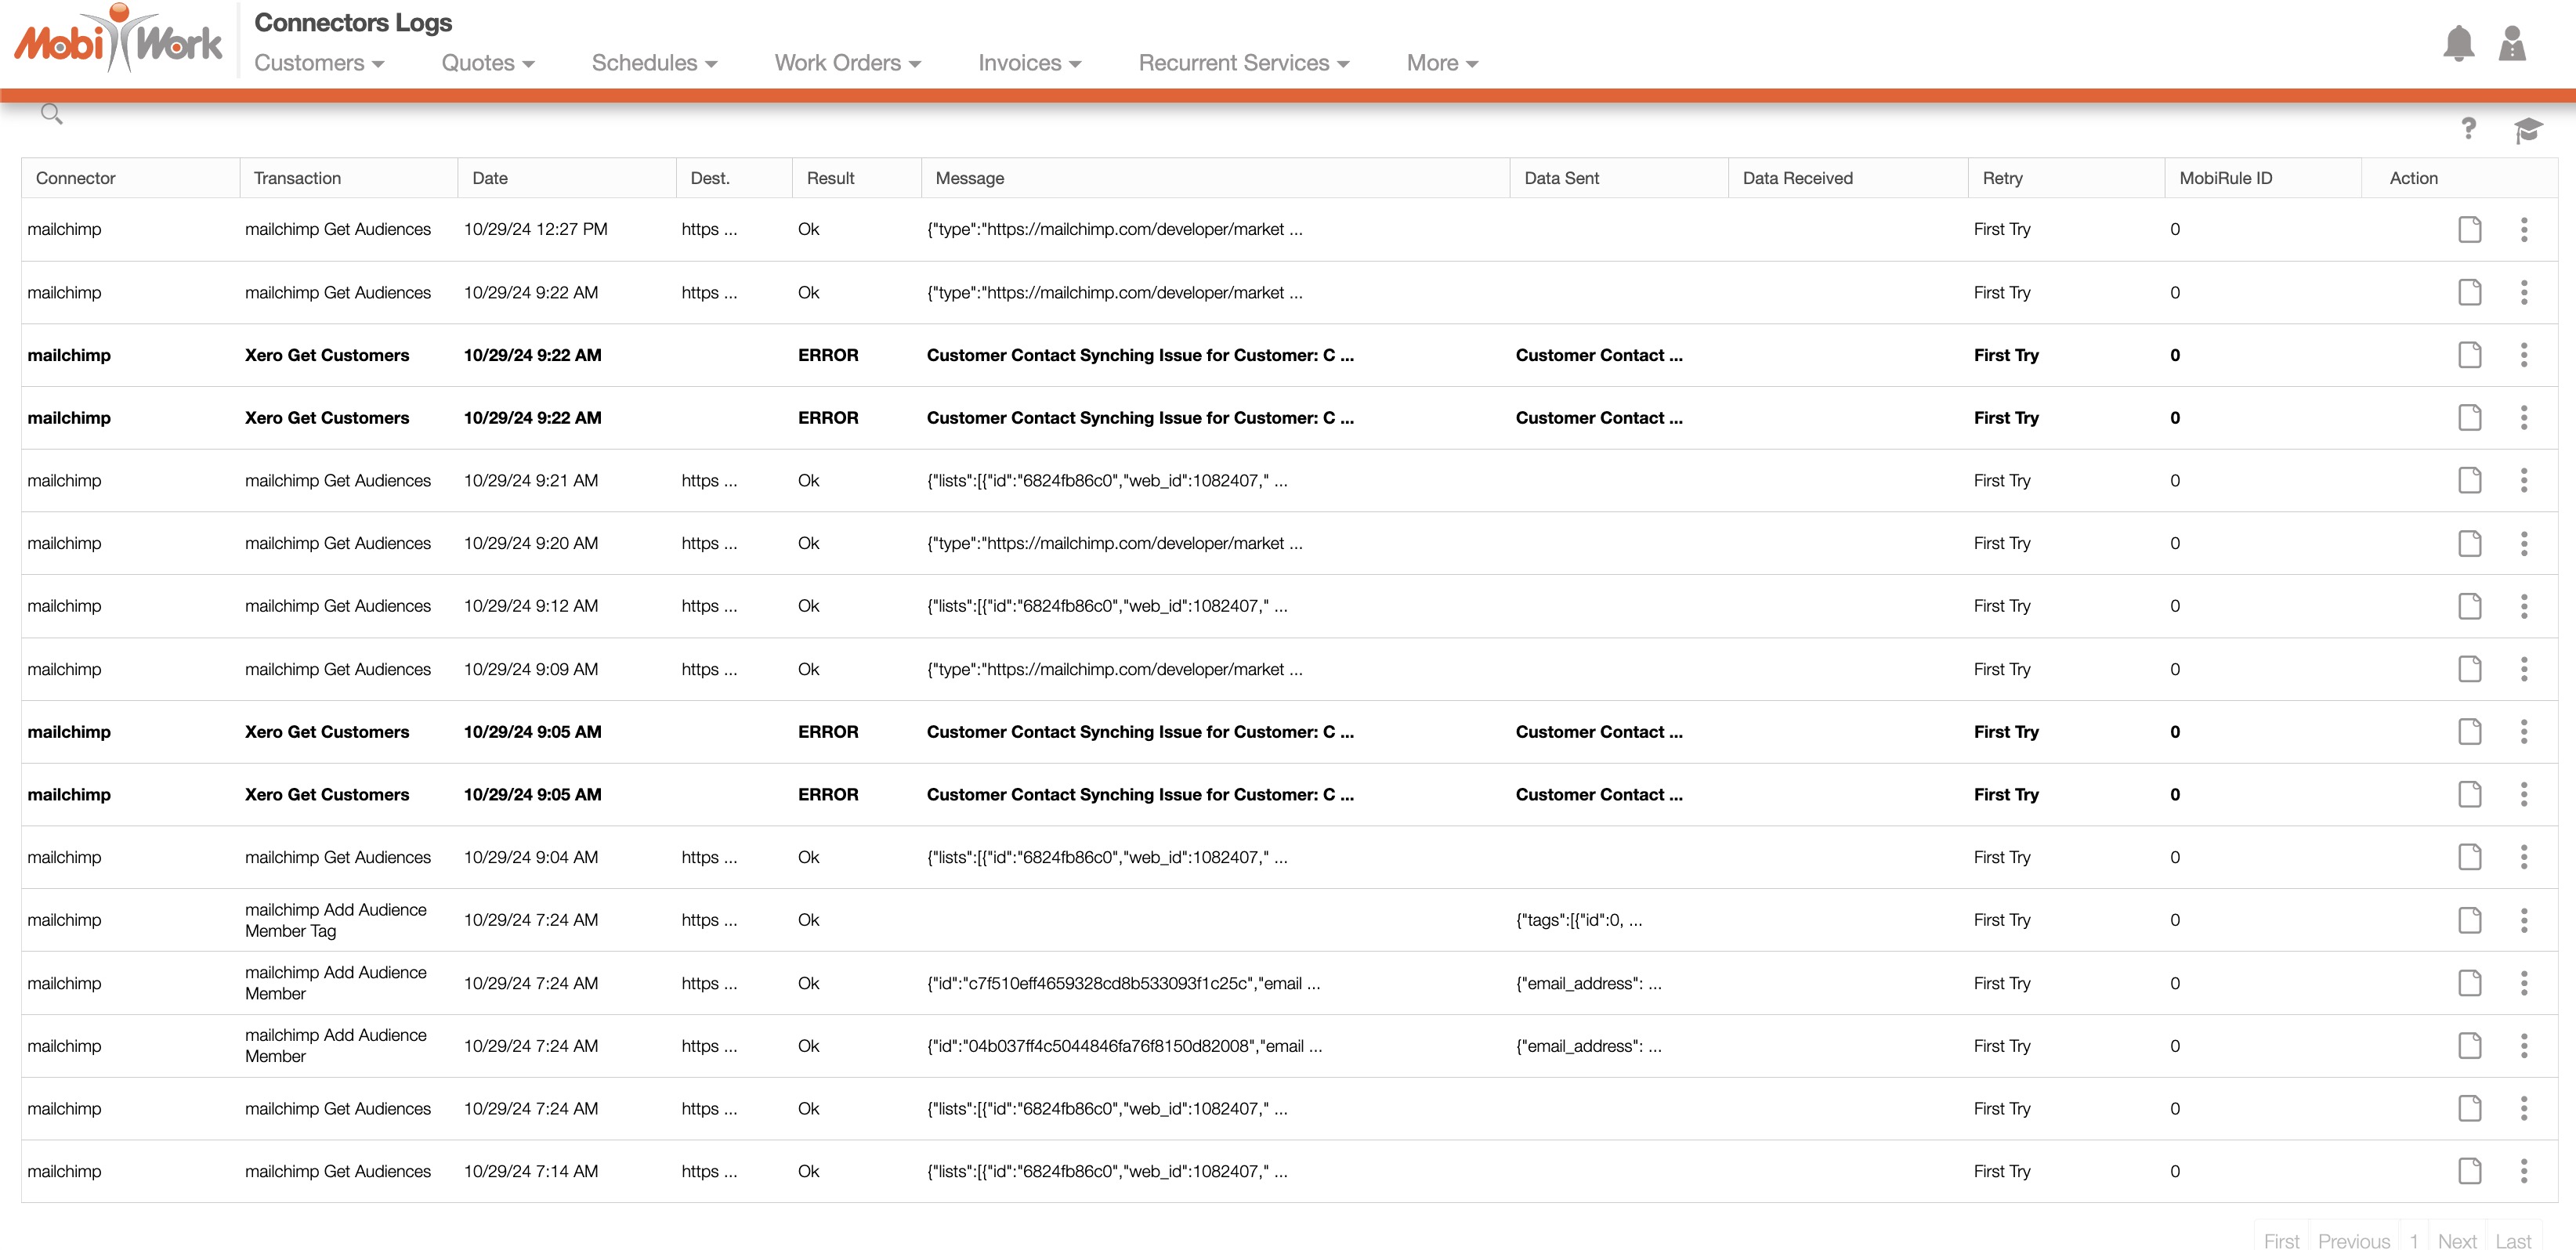
You will then be redirected to the Connector Logs page. On this page you can see if the customer was successfully synced to Mailchimp or any sync errors:
If a contact's email address already exists in Mailchimp, MobiWork will automatically update the following details:
The first and last name of the contact.
The phone number.
The email address will remain unchanged, with only the details above being updated.
Additionally, any new customer tags from MobiWork will be added to the Mailchimp contact, ensuring your data stays complete and up-to-date.
Note: When tags are removed from customers in MobiWork, the removal of the tags will not sync to Mailchimp. If you would like to remove tags from your customers in Mailchimp, you will need to remove them directly from your Mailchimp account. For detailed guidance on managing and editing tags, please refer to Mailchimp. Please note that this is a third-party page, and MobiWork is not responsible for the content that appears on this page.
The following sections provide detailed information about potential errors you may encounter when using the Mailchimp connector.
Customer Contact Syncing Issue for Customer
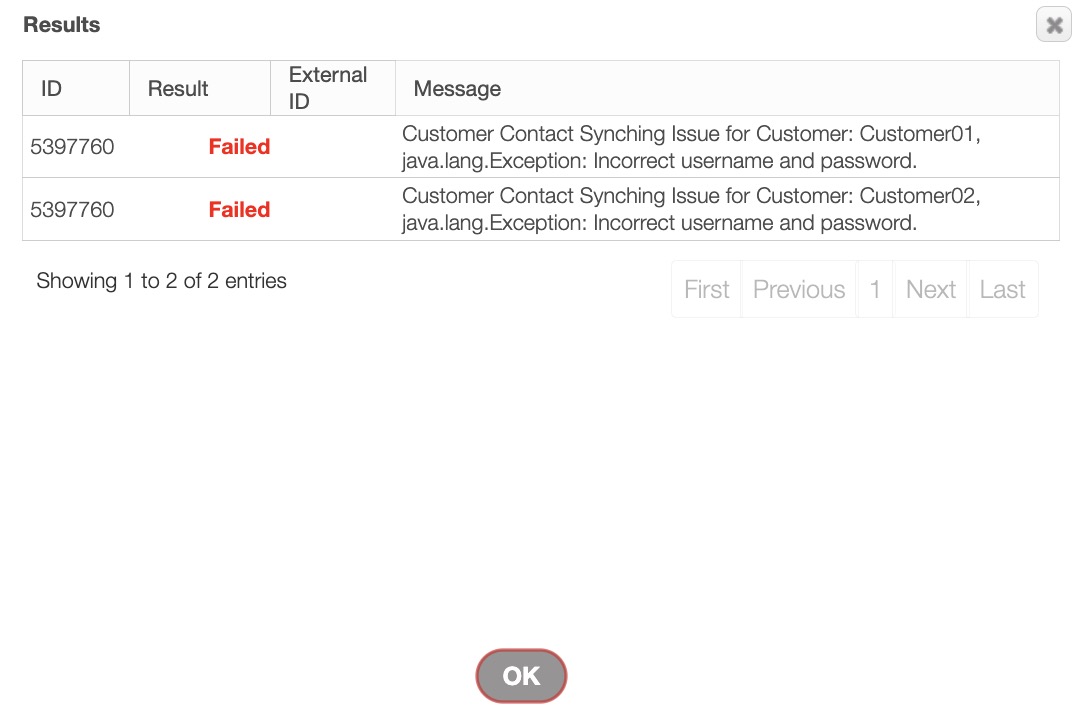
If you receive the error "Customer Contact Syncing Issue for Customer: ...java.langException: Incorrect username and password," when trying to sync your contacts into Mailchimp, then your API key is either blank or has been revoked in Mailchimp:
If the API key is blank, copy the API key from Mailchimp into the "API Key" field. For more details, refer to the Entering the API Key and Data Center (DC) section.
If your API key has been revoked in Mailchimp, you will need to obtain a new API key from Mailchimp and then enter it in the "API Key" field.
Invalid Email Address
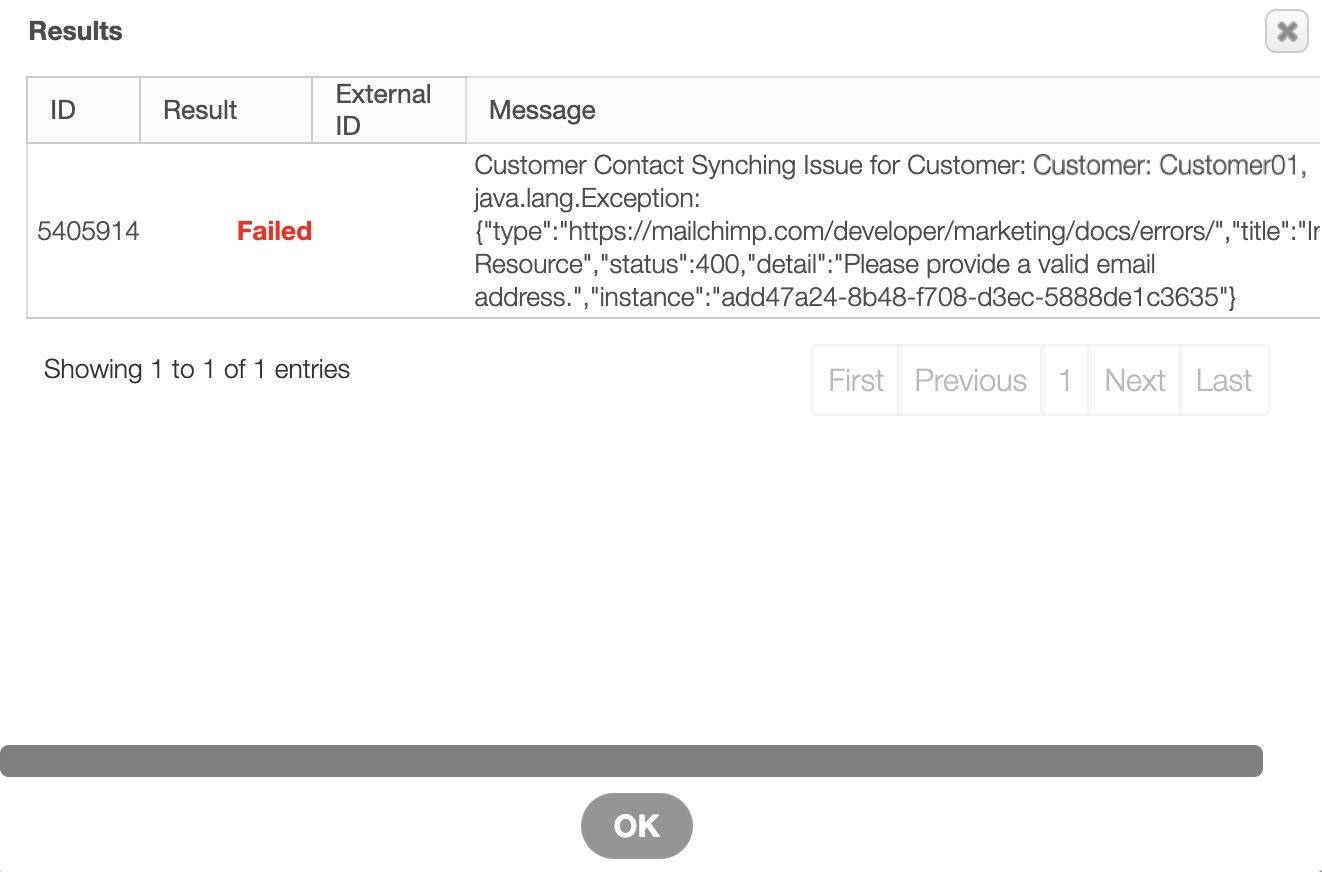
If you receive the error "Customer Contact Syncing Issue for Customer: ...'Please provide a valid email address.','instance':'add47a24-8b48-f708-d3ec-5888de1c3635')," when trying to sync your contacts into Mailchimp, then your email address may have a typo:
Please ensure that the email address is formated correctly without any errors.
The video below demonstrates how to add tags to your customers in MobiWork and how to use those tags to create effective, targeted email campaigns:
If you prefer to read through the steps, please read the following procedure.
To set up customer tags in Mailchimp, you will first need to assign tags to your customers in MobiWork.
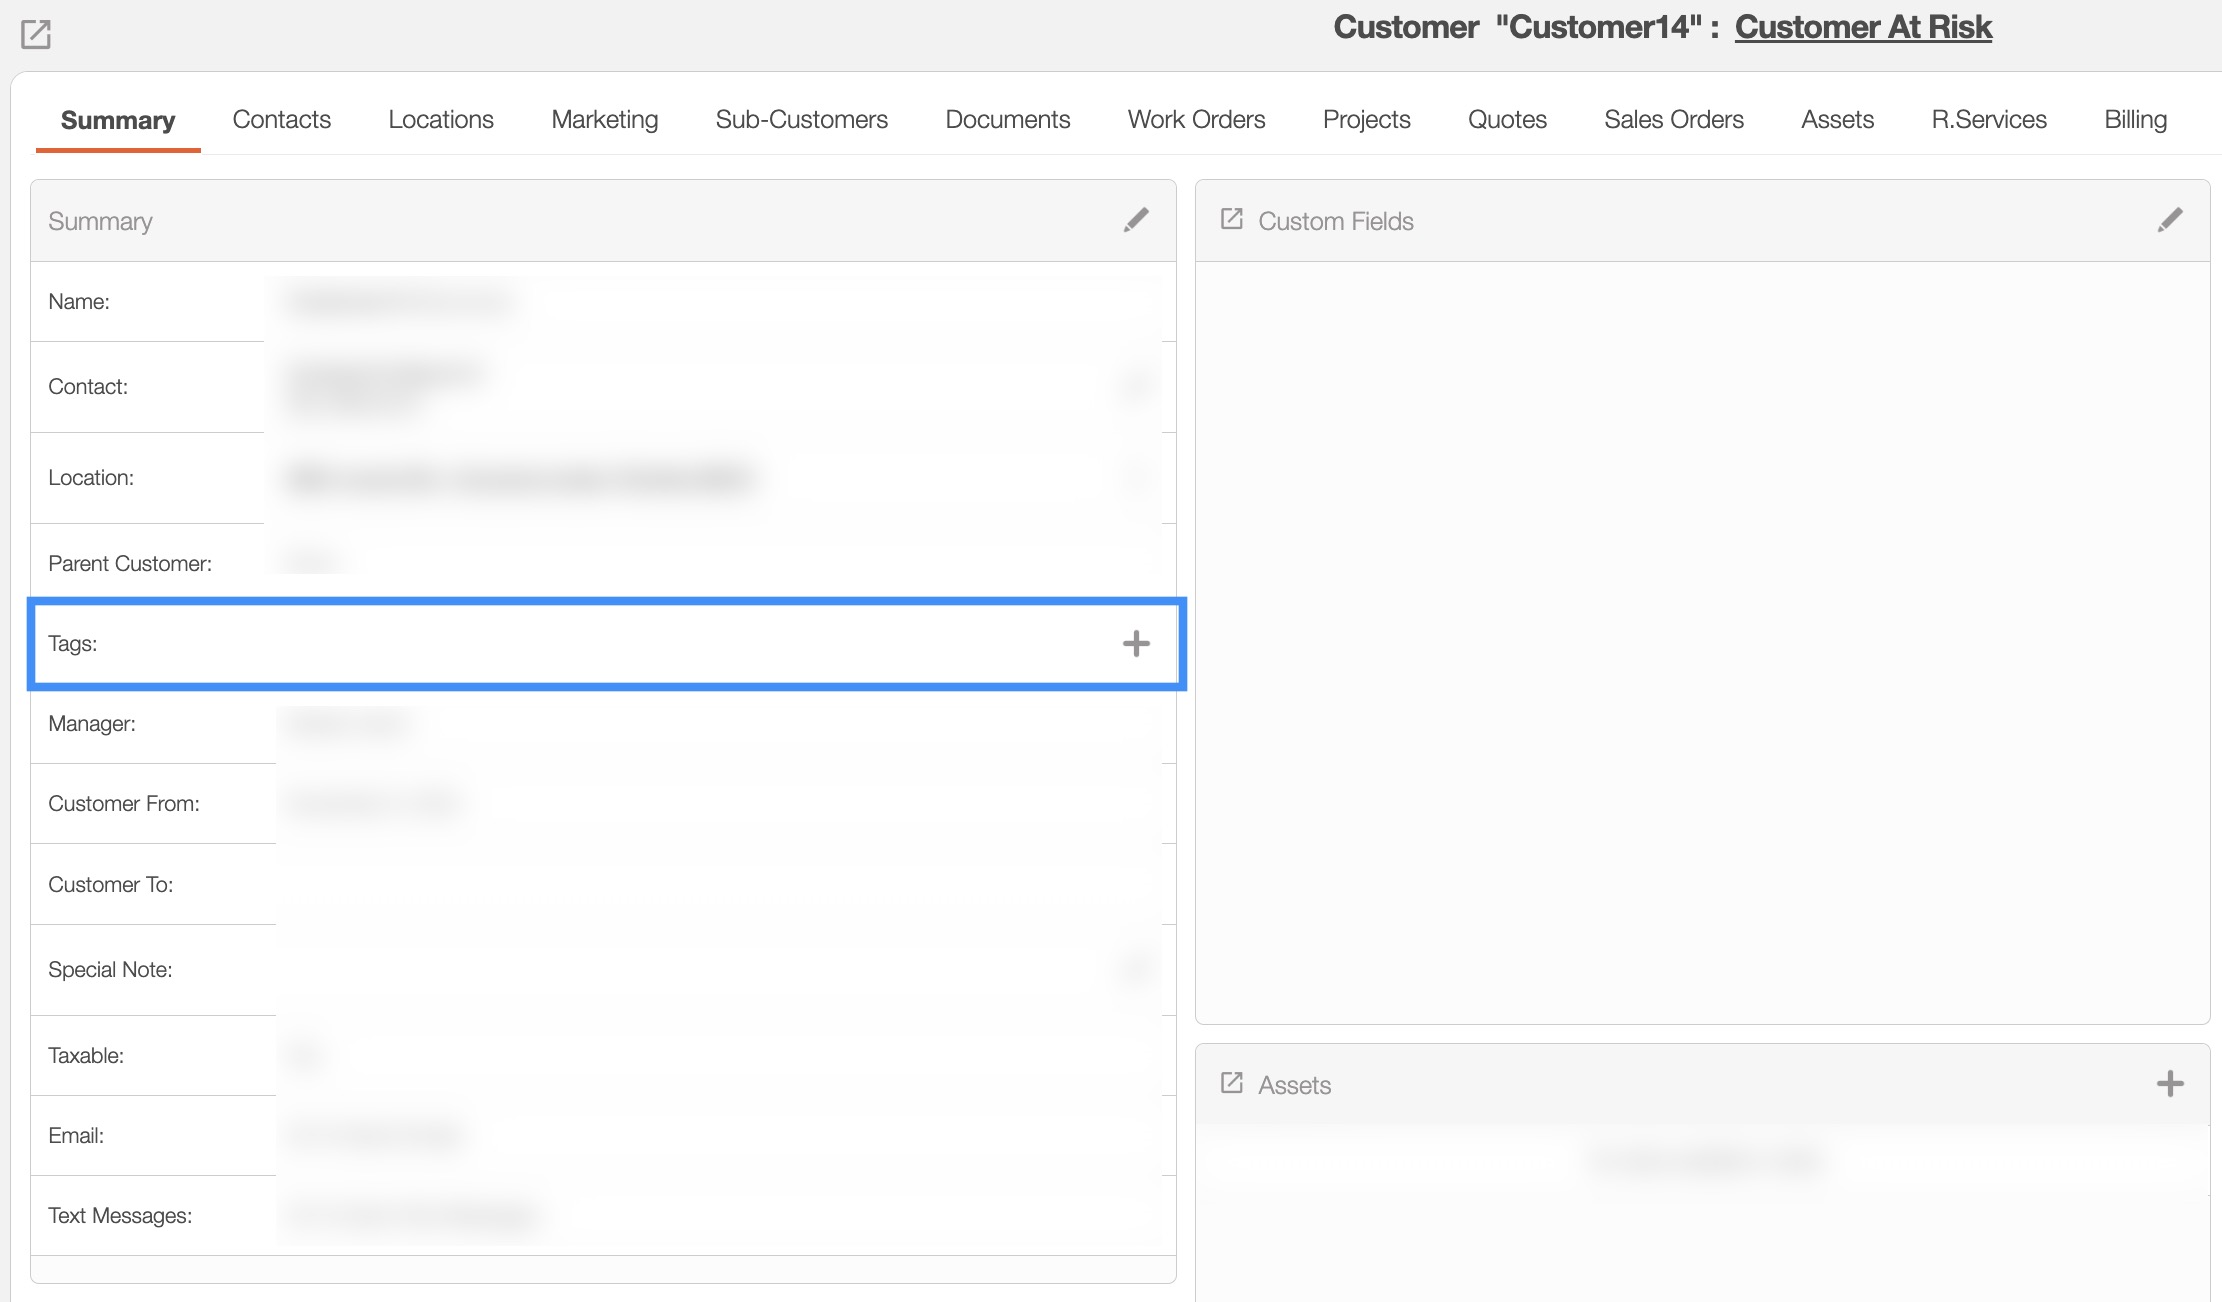
To add a tag, open the View Customer pop-up window. In the "Summary" panel, select the Pencil icon (if tags are already associated with the customer) or the Plus Sign icon (if there are no tags).
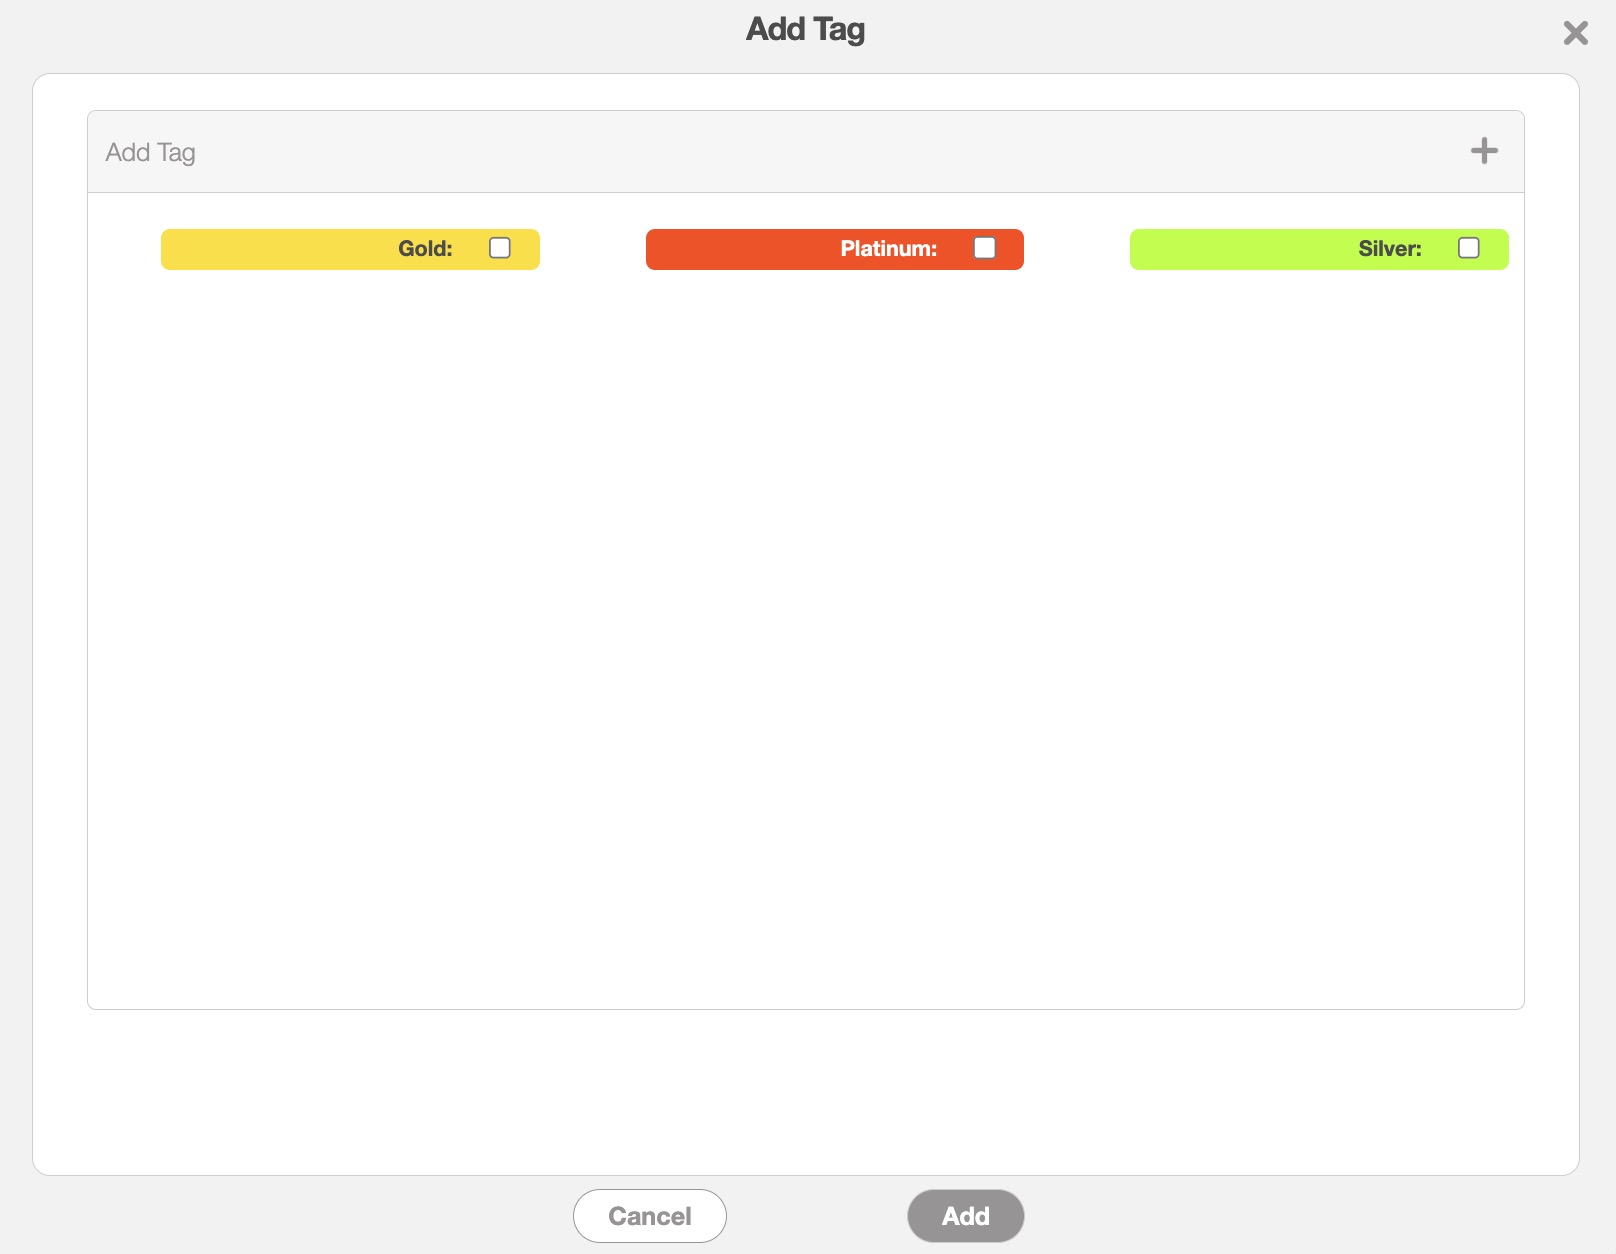
Select your desired tag from the Add Tag pop-up window:
After tagging your customers, you can sync them to Mailchimp from the Customer List page. On this page, click the More Actions button, then select either "Export Customers to Mailchimp Excel" or "Export Customer Contacts to Mailchimp (Default Audience)" from the drop-down menu.
For more information about these options, refer to the Customer List Mailchimp Actions subsection.
Your tagged customers will then sync to Mailchimp:

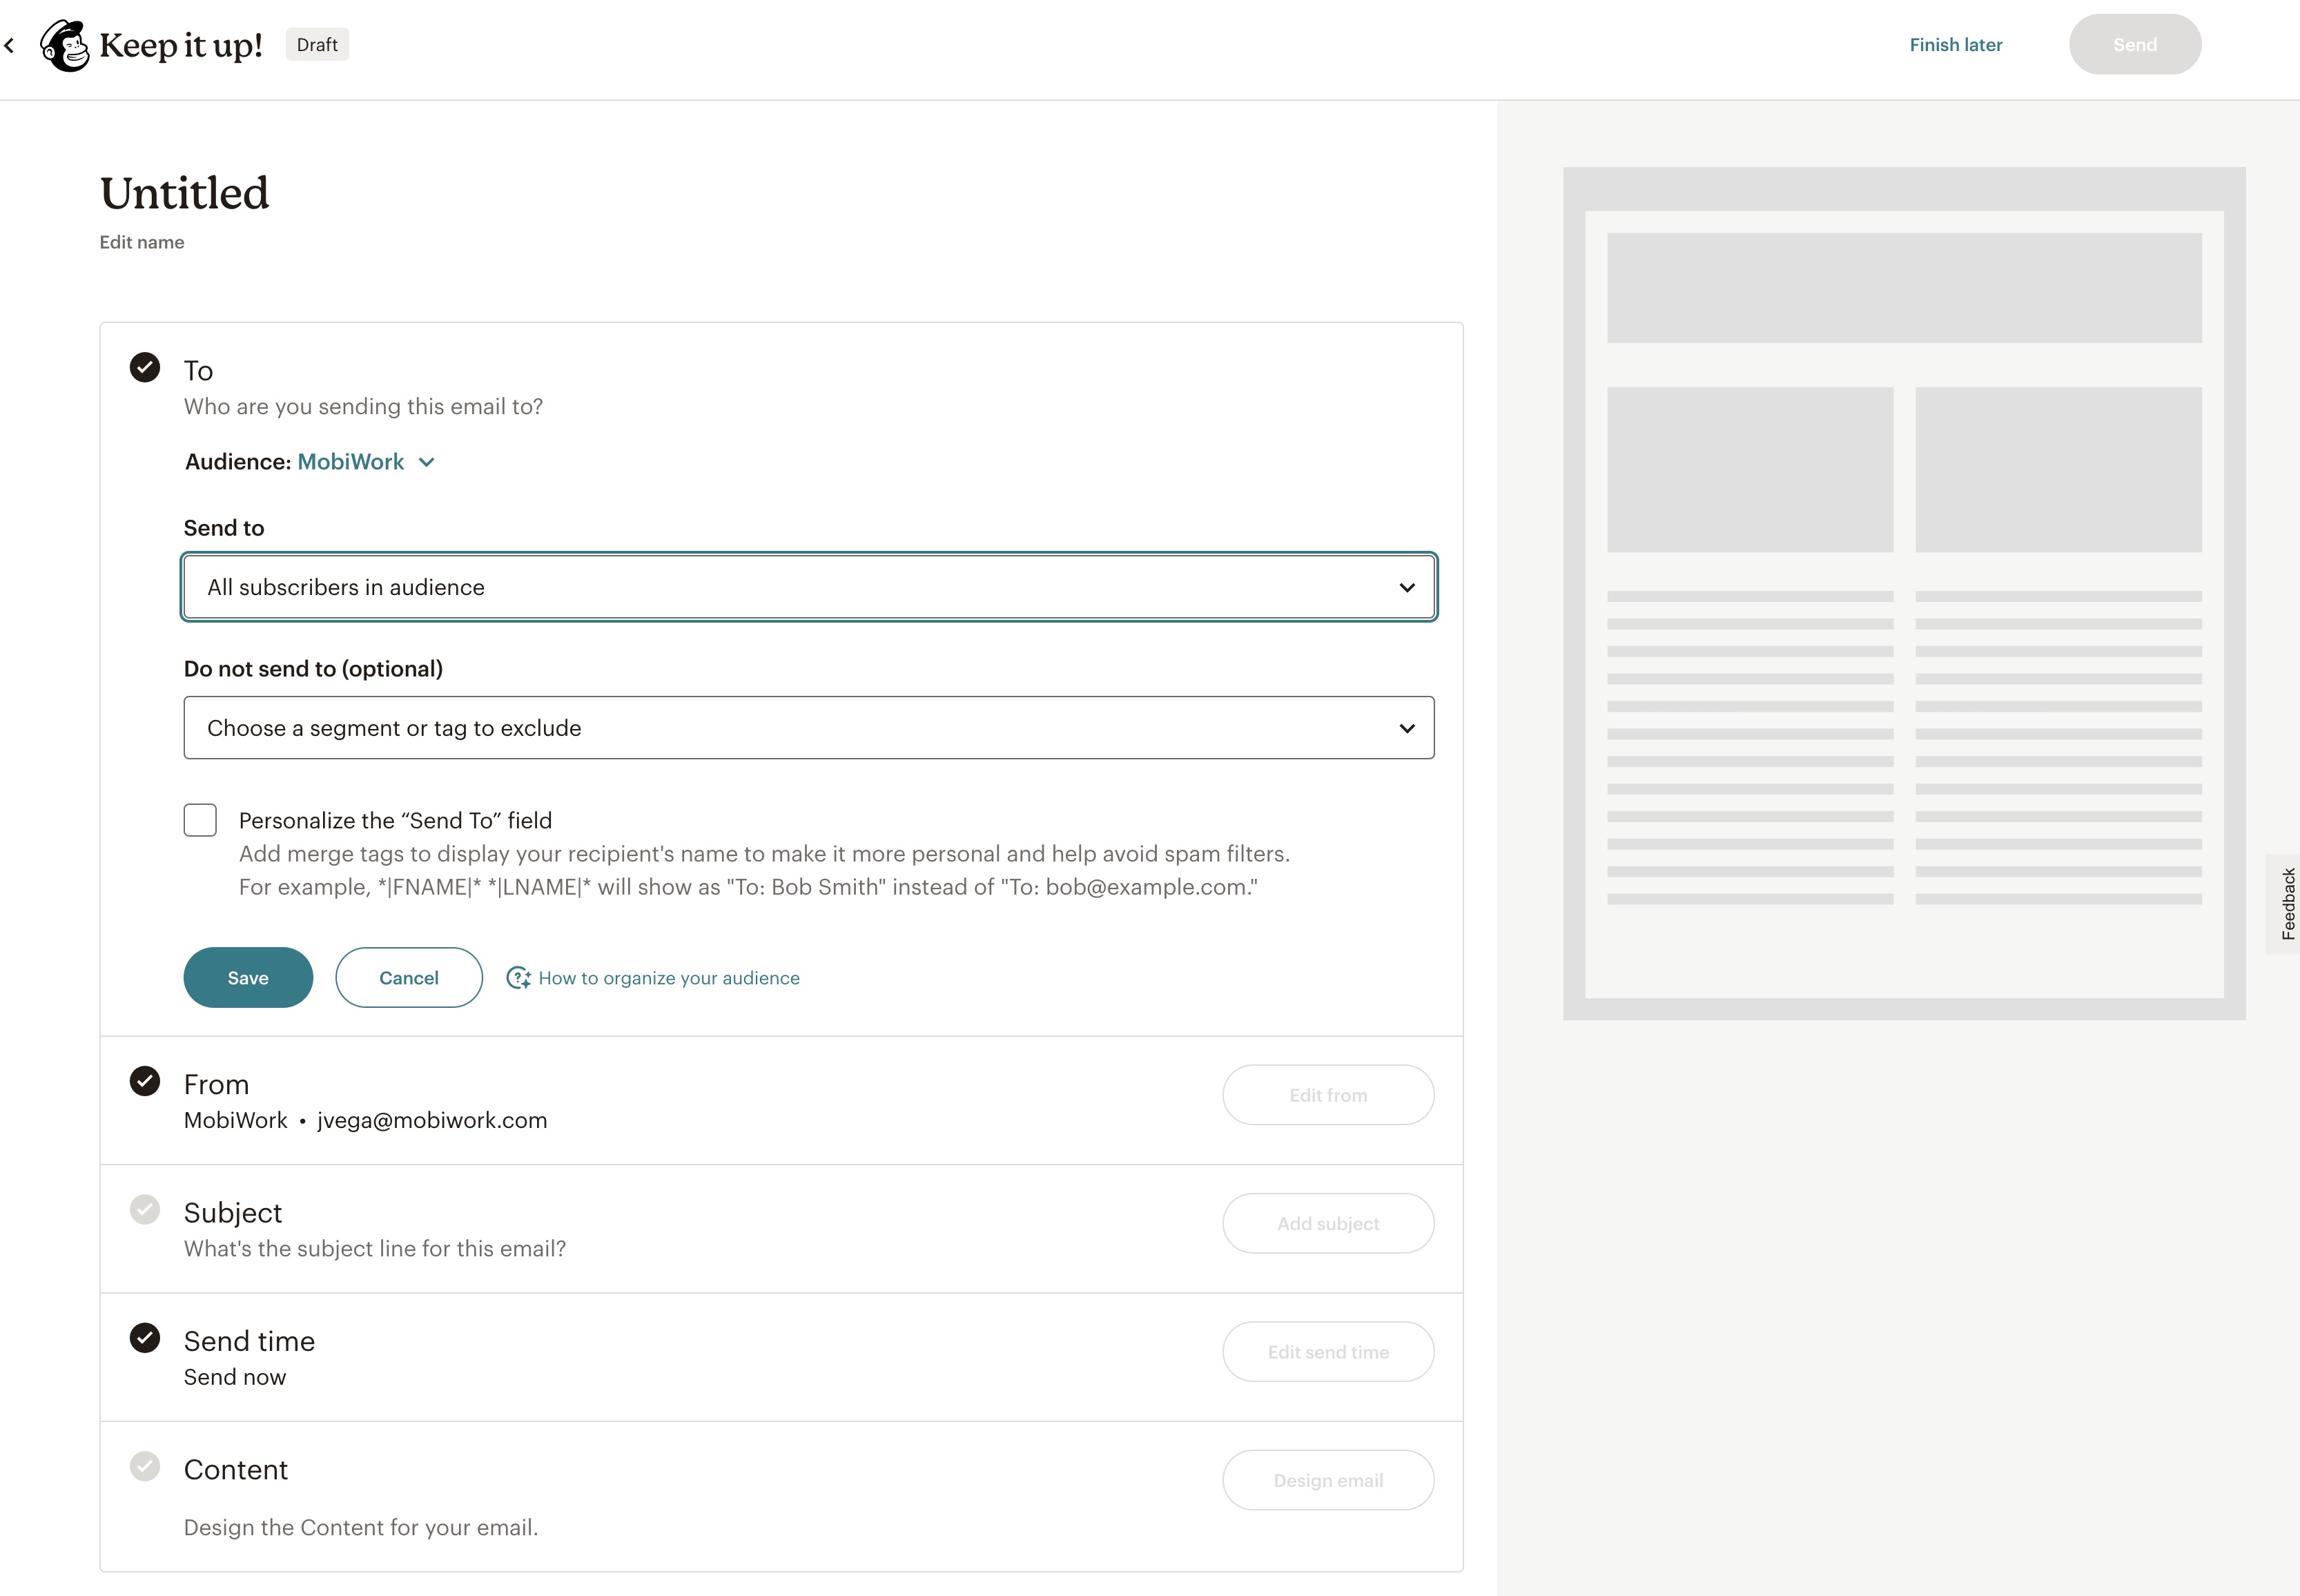
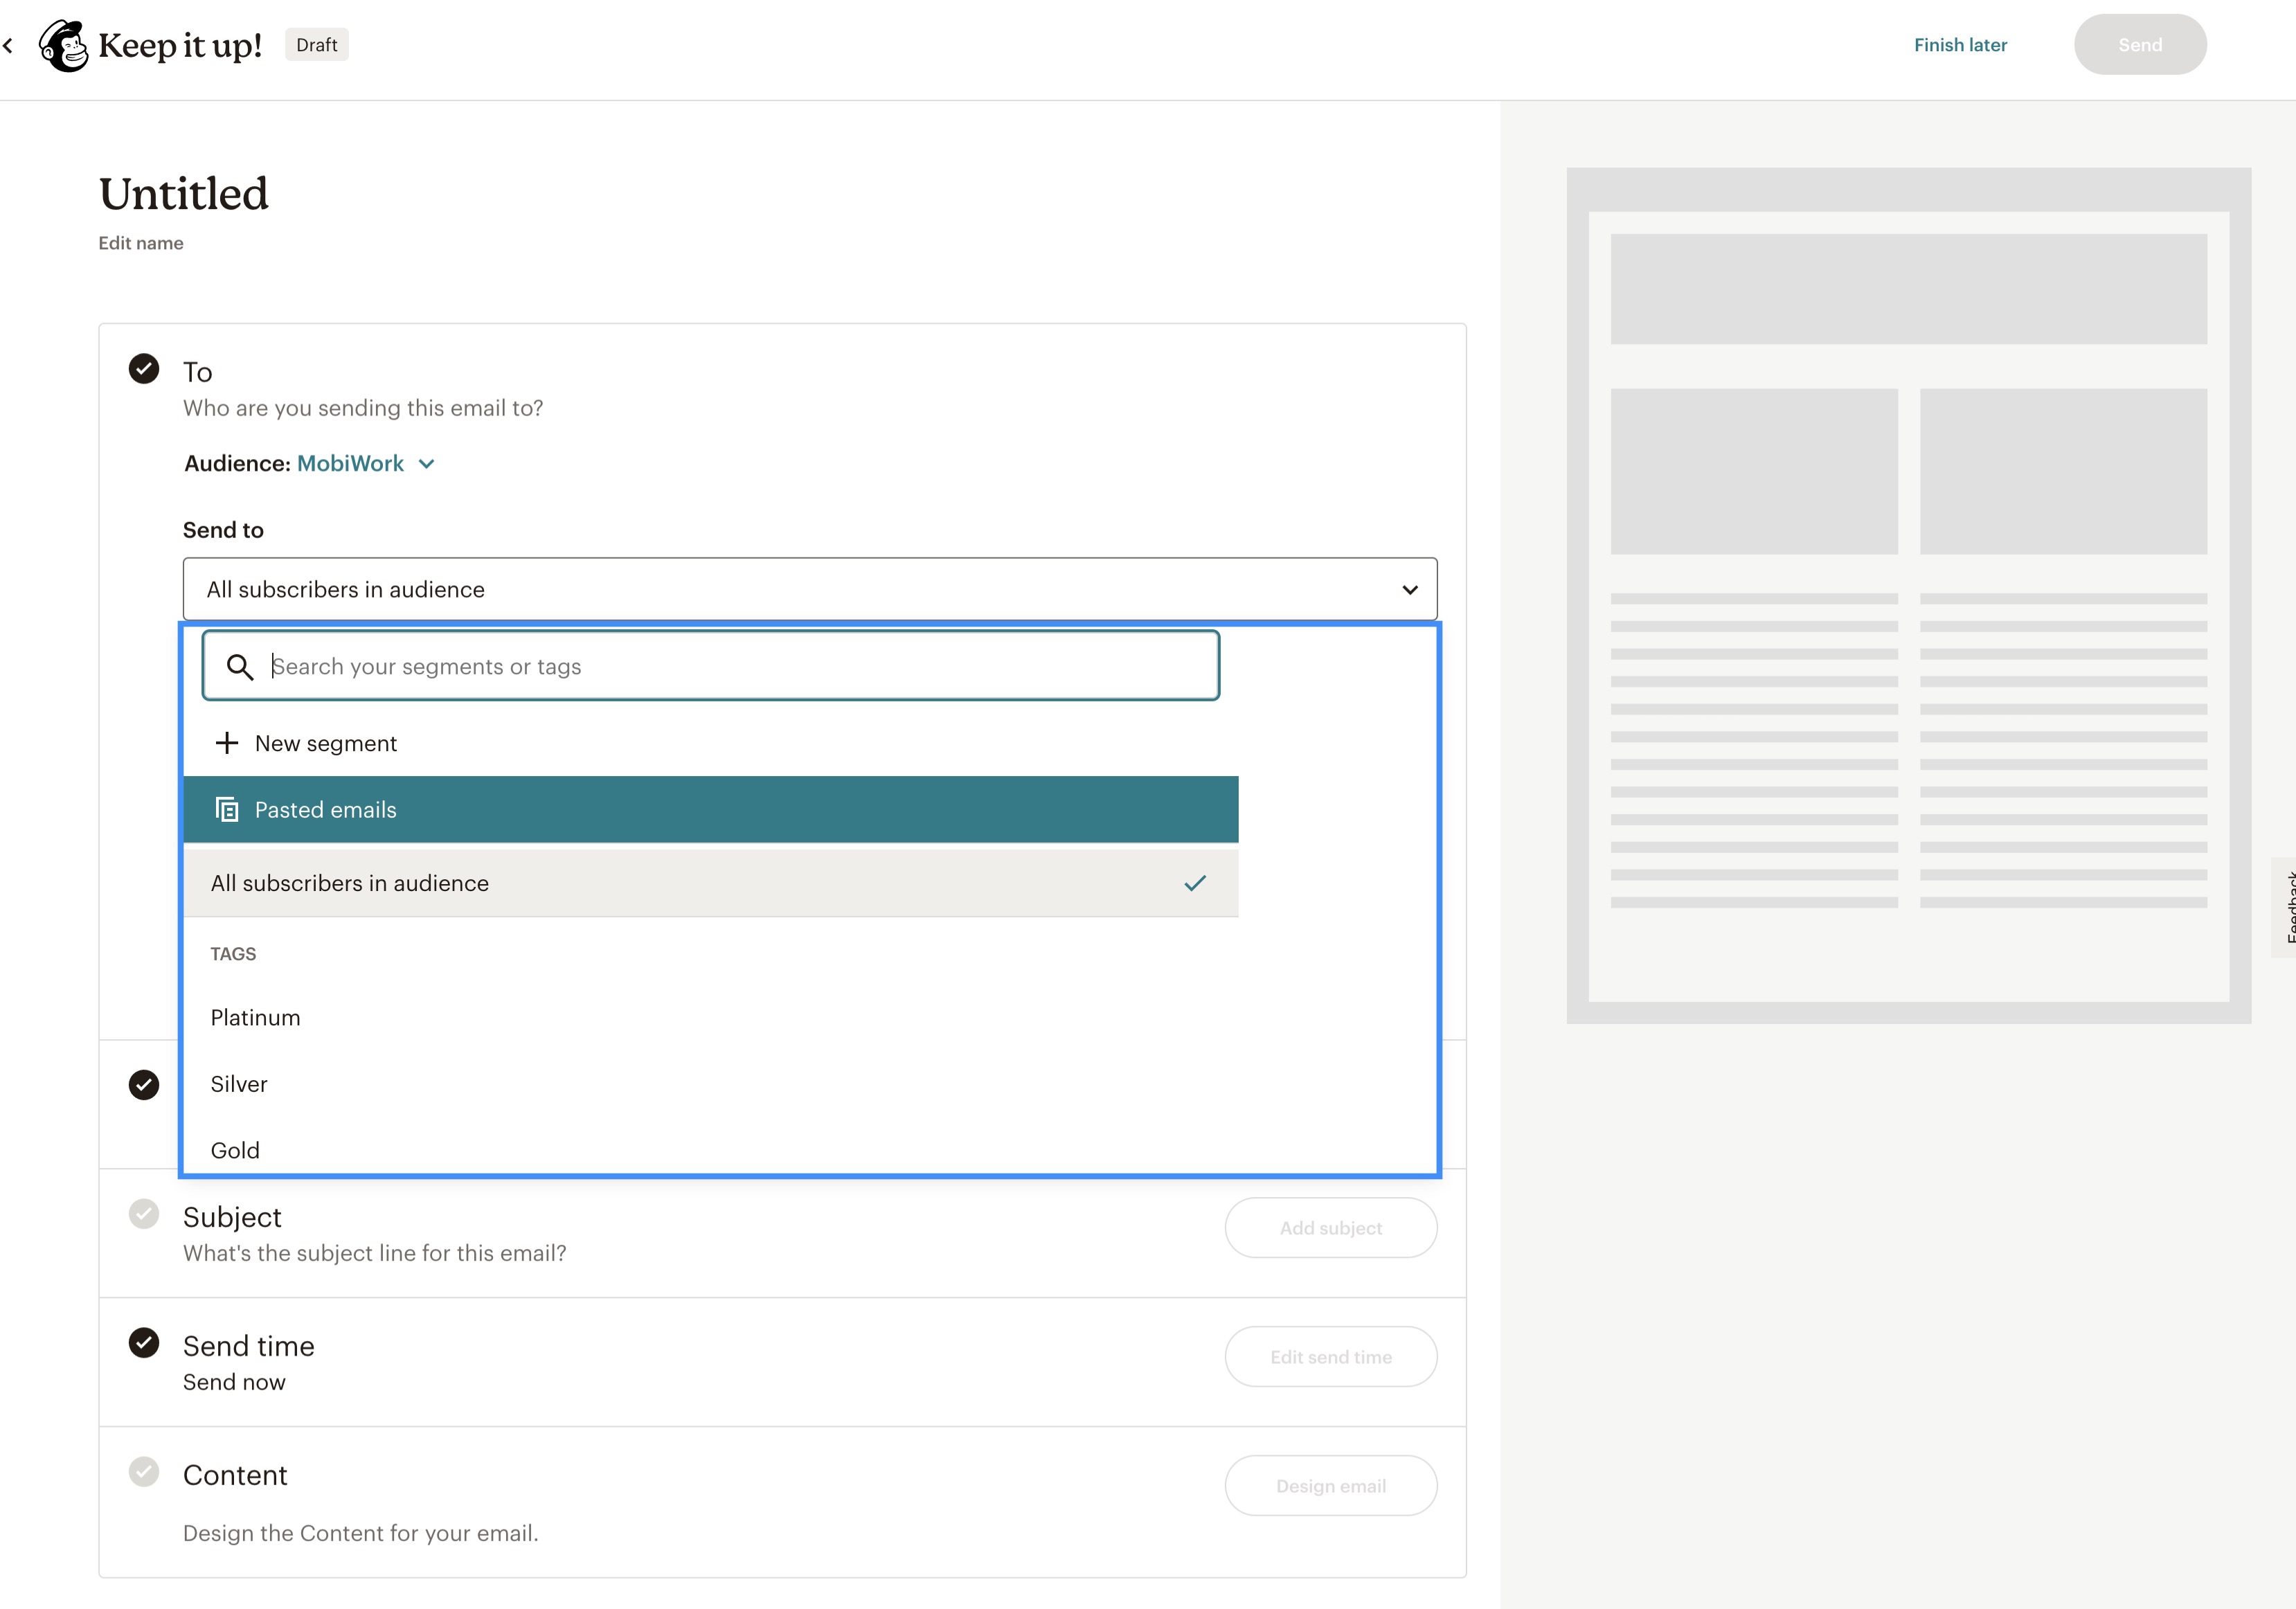
To create a targeted email campaign in Mailchimp using these tags, open the Mailchimp draft email campaign page, click the Edit Recipients button under the "To" field, and select the desired tag from the "Send To" drop-down menu.
You can also exclude recipients by selecting tags from the "Do Not Send to" drop-down:
Once you are satisfied with your selections, click the Save. You are now ready to send the campaign to your tagged customer segments:
To view the Mailchimp Connector Settings page, go to the "Connectors" tab on your Settings page. From there, click on Mailchimp's View icon:

This action will redirect you to the Mailchimp Connector Settings page. On this page, click Edit button to access the Mailchimp settings:

You will then be able to view the settings associated with the Mailchimp connector:
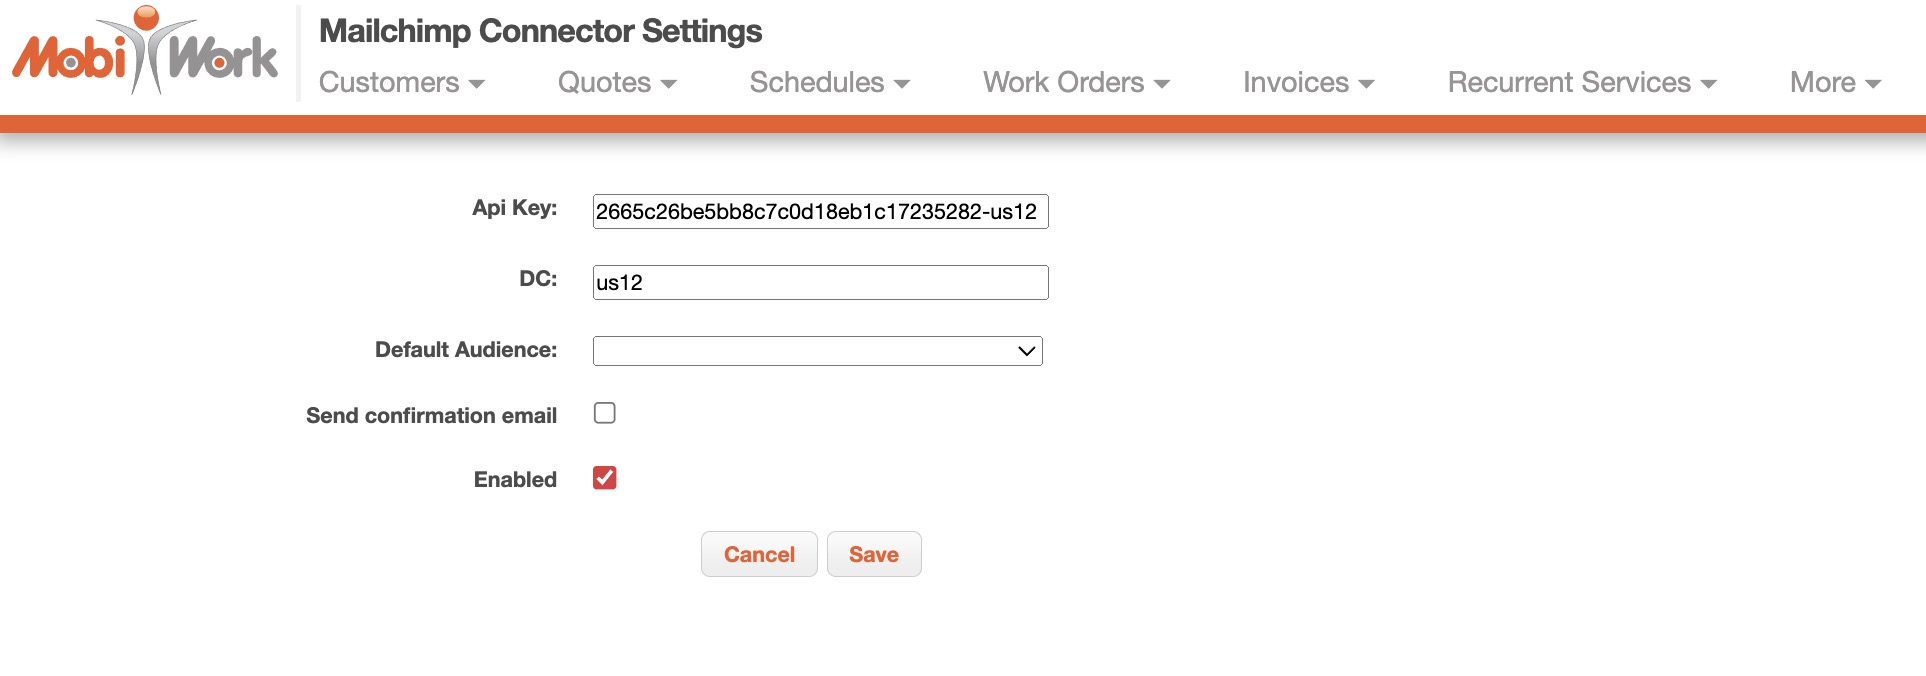
The settings found on this page are further explained below:
API Key - The numerical identifier used to sync MobiWork with Mailchimp.
DC - The Mailchimp Data Center that is dedicated to your Mailchimp acocunt.
Default Audience - After entering the "API Key" and "DC" fields and clicking the Save button, this drop-down will populate with your default Mailchimp audience. If there is not audience in the drop-down, you will be unable to access the Mailchimp export actions from the Customer List page.
Send Confirmation Email - When enabled, customers are automatically subscribed upon syncing. When disabled, customers must confirm the subscription through an automated email. Please note that if you check this setting after syncing, previously synced customers will not receive a new confirmation email if you sync them again.
Enabled - Will display if the connector is currently active.
Once you are satisfied with the data entered, click on the Save button.
If you have any questions or need further assistance, please let us know. We'd be happy to help!
