
To access a specific customer, simply select the desired customer from the Customers feature page:
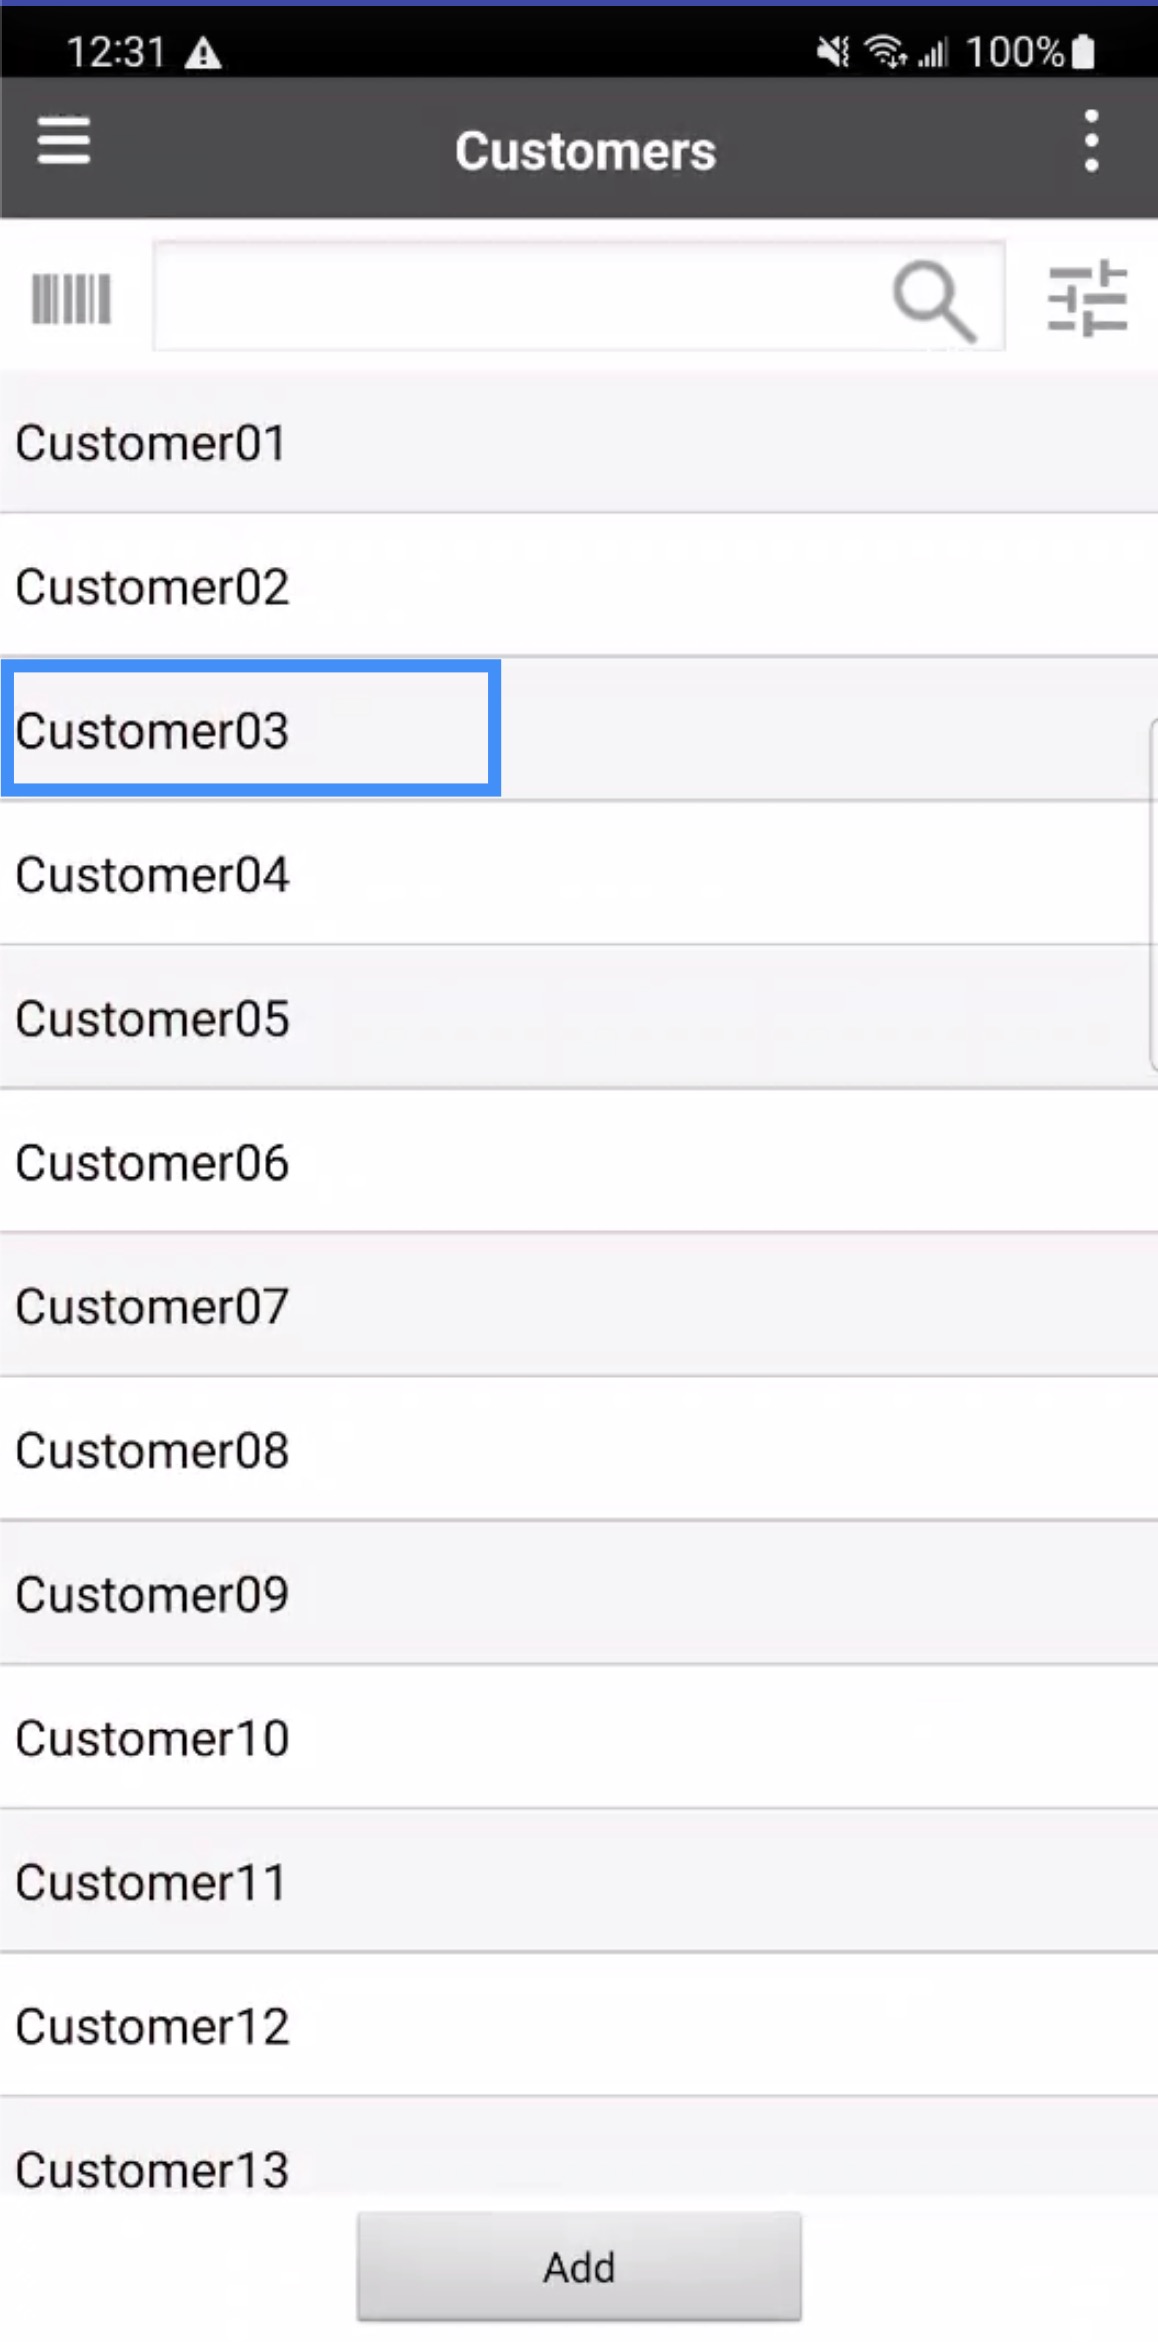
Once you select a customer, you will be redirected to the View Customer page. On this page, you can view the customer's contact information, the customer's outstanding balance, as well as the manager assigned to handle the customer.
From this page, you can also access a variety of customer-related actions, such as creating work orders, quotes, invoices, and sales orders. Any invoices, quotes, work orders, or other entites created from the customer profile will be linked to the corresponding customer.
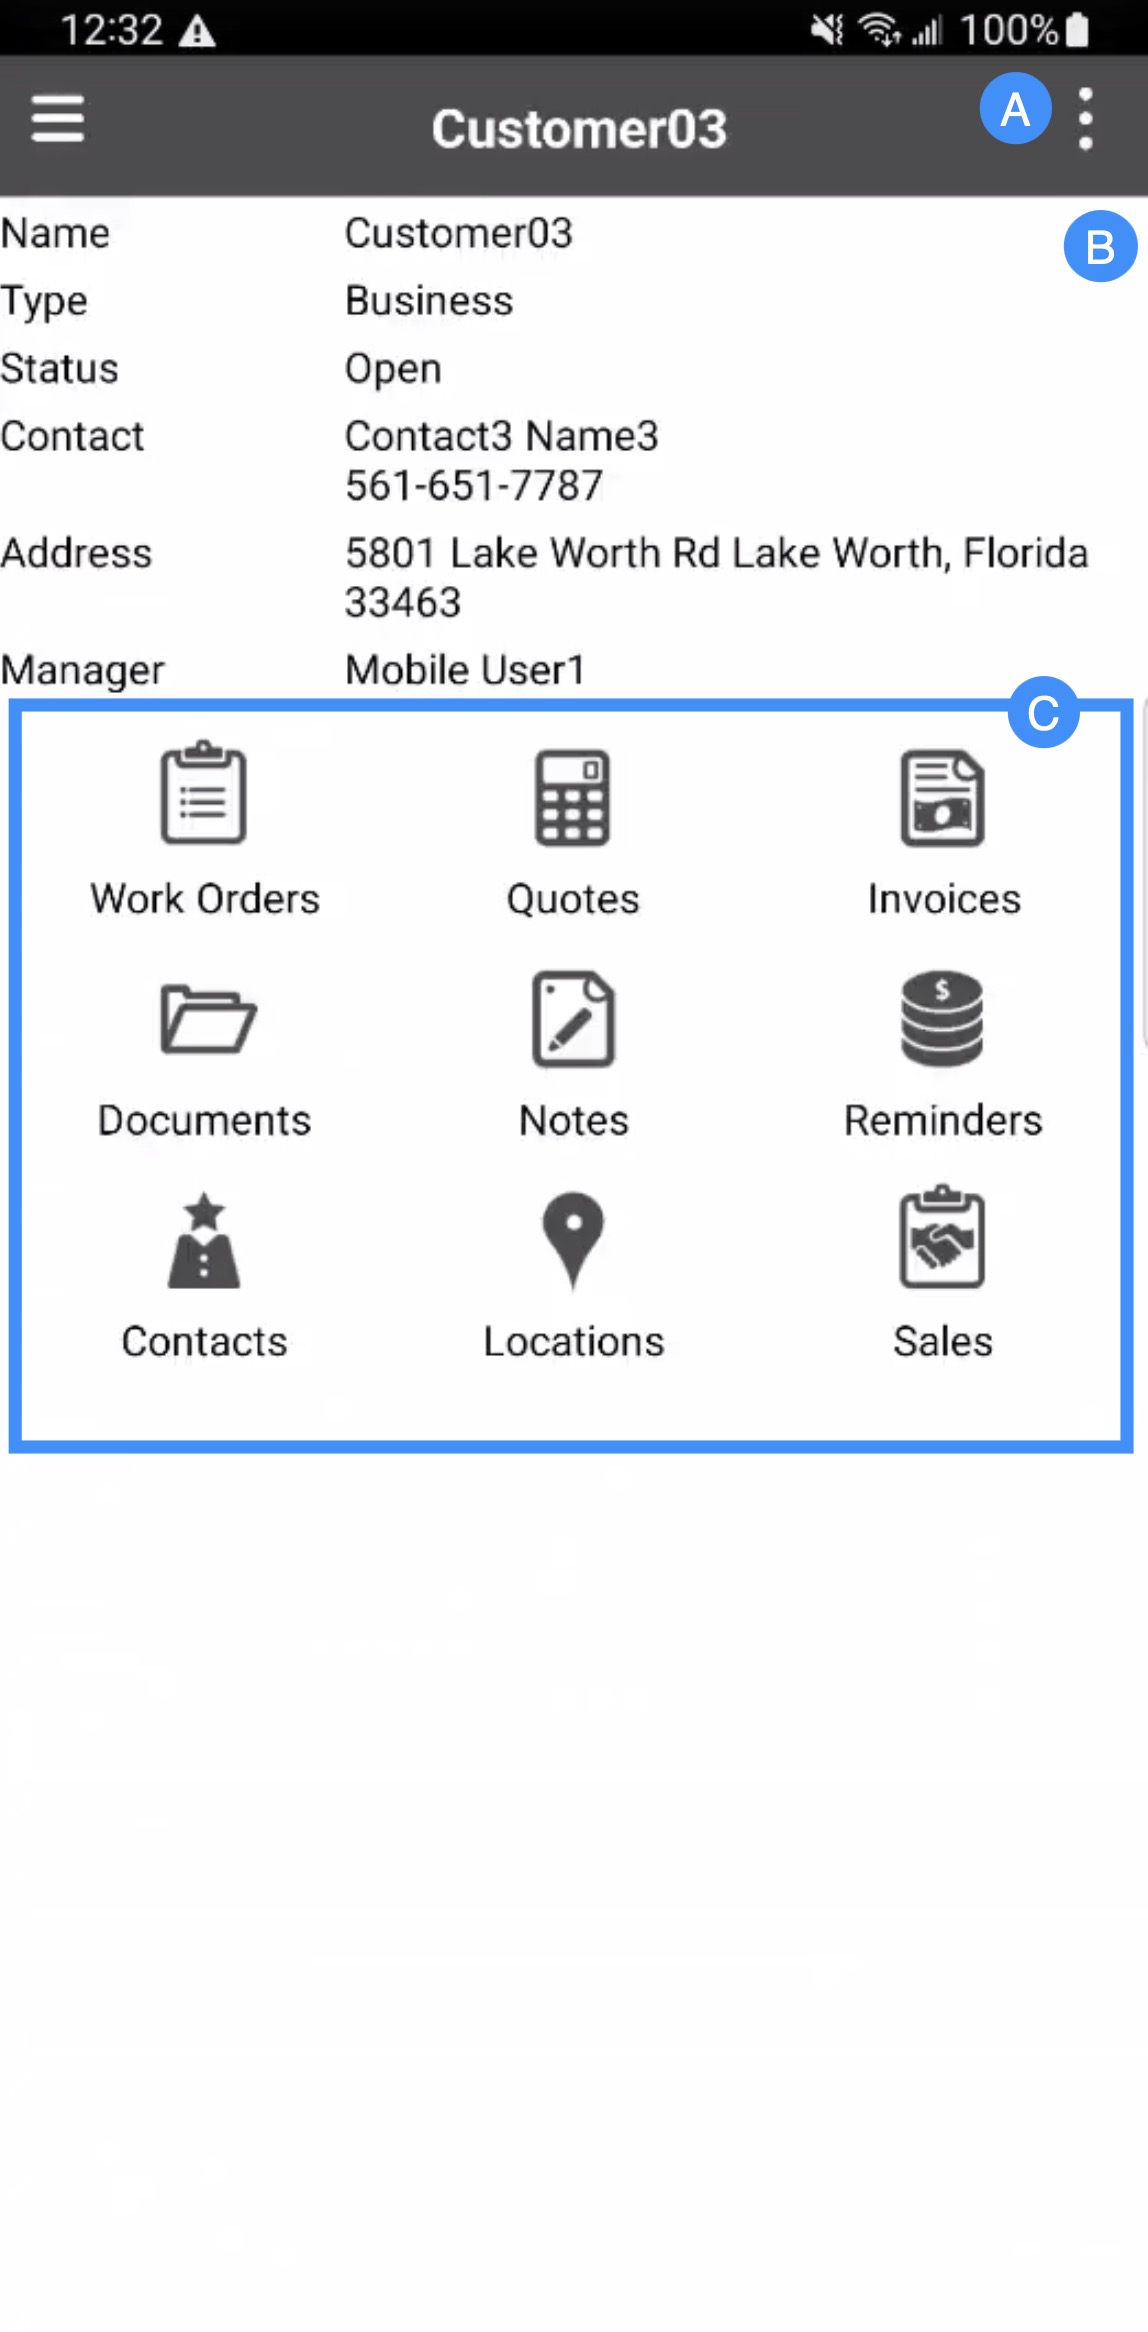
The View Customer page is organized into the following sections:
The Actions Panel provides access to additional customer-related actions, such as adding work orders, sales orders, documents, notes, reminders, and more.
The "Information Panel" will display key contact specific-data regarding the customer, including the name of the customer, the address of the customer, and more.
The "Custom Fields" section will display relevant MobiFields. By default the manager in charge of the customer and the outstanding balance will be shown; however, other custom fields can be made to display here. The MobiFields that cannot be displayed here include: forms, products, tables, customer status, work order status, the view form, and the view form print view.
The "Actions" section provides convenient access to frequently used functions, such as creating work orders, quotes, and invoices for the selected customer. From this section, you can also create reminders, notes, and upload images and forms.
Selecting the Actions Panel tile provides access to actions that can be performed on the selected customer.
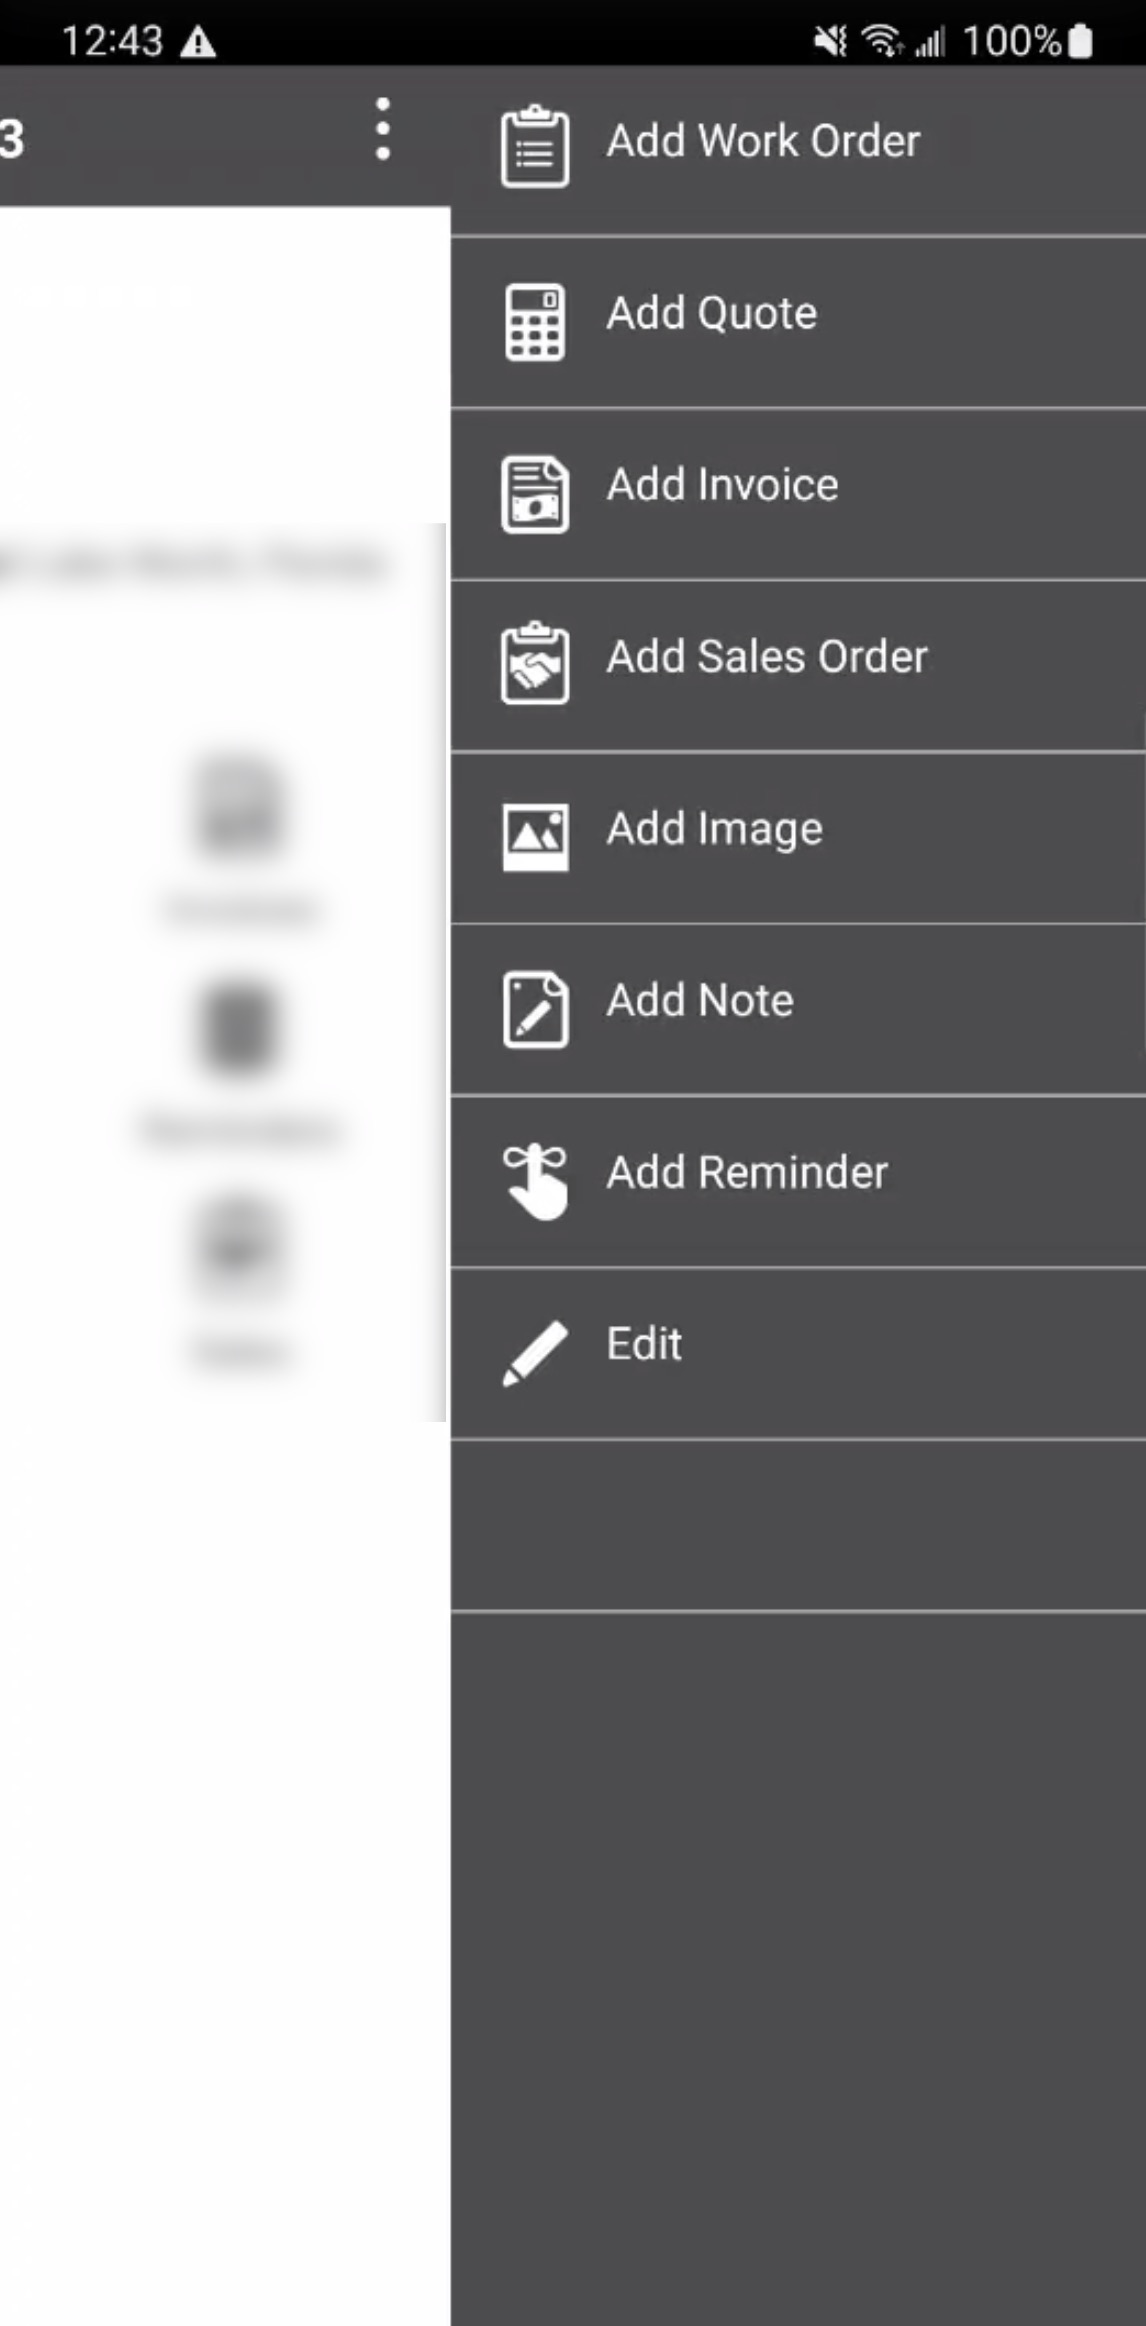
Some of these actions, like creating a work order, quote, etc. can also be accessed from the "Actions" section.
The following actions are available from the Actions Panel:
Add Work Order
The "Add Work Order" action will allow you to add a work order for the selected customer. For more information on how to add a work order through the mobile device, please see the Add Customer From the Mobile Device page. Since the work order is added through the customer profile, the work order will be linked to the corresponding customer.

Add Quote
The "Add Quote" action adds a quote to the customer; this quote will then be linked to the corresponding customer. For more information on adding a quote from your mobile device, please see the Add Quote page.

Add Invoice
The "Add Invoice" action allows you to create an invoice for the selected customer. The newly created invoice will be linked to the customer profile; this makes it convenient to manage customer billing directly from the customer profile. For more information on creating an invoice from your mobile device, see the Add an Invoice

Add Sales Order
This action will allow you to add a sales order for the selected customer. Because the sales order is created from the customer profile, it is automatically linked to the corresponding customer. For more information on how to add a sales order through the mobile device, please see the Add Sales Order page.

Add Image
The "Add Image" action allows you to attach images to the selected customer's profile. You can use your device's camera app to take a new picture, or select an existing image from your photo gallery using the Gallery tile:
Saved images can be accessed through the "Documents" action in the "Actions Panel or the "Actions" section.

Add Note
The "Add Note" action allows you to record important information about the selected customer. Notes can be used to keep office staff informed, document customer-related details, or provide information for future reference.

After entering the required information, select the Add tile to save the note. All notes associated with the customer can be accessed through the Notes feature in the Actions Panel.
Add Reminder
The "Add Reminder" feature will allow you to add a reminder for a specific user at a specific time.
Select the users that the reminder is intended for, and the date/time of the reminder. Once you are satisfied with the inputted information, press the Add tile to finalize the reminder:

These reminders can then be viewed in your device's Notification Center. For more information about the Notification Center, please see the Notification Center page.
Edit
This action will allow you to edit the customer profile from the mobile device. For more information on how to edit a customer through the mobile device, please see the Edit Customer page.

Edit Customer Credit
The "Edit Credit Balance" action allows you to update the credit balance associated with a customer directly from your mobile device. This feature is useful when you need to adjust a customer's available credit, such as when applying a credit, correcting a balance, or updating customer account information while working in the field. Keeping the credit balance accurate helps ensure that customer account details remain up to date and reflect the appropriate adjustments.

Add Credit Card
The "Add Credit Card" action allows you to add a credit card to the selected customer's profile directly from your mobile device. This feature is useful when setting up a customer's payment information, allowing you to securely record a credit card for future billing transactions. Keeping customer payment details up to date can help streamline payment processing and support more efficient account management.

Documents
The "Documents" feature will allow you to upload and view documents or images associated with the customer. You can quickly add a new photo to the customer profile by pressing the Plus Sign tile; you will then be prompted to upload an existing picture from your gallery or capture a new photo.
To view a document or an image, simply press on the desired file.
Office users can also upload documents through the "Documents" tab in the View Customer pop-up window. For more information on how office users can upload documents through the web application, please see the View Customer page.

Notes
The "Notes" feature allows you to record important information about the selected customer. Notes can be used to keep office staff informed, document customer-related details, or provide information about the customer for future reference.
To add a new note from the device, simply press the Plus Sign tile in the bottom right corner of your screen.
You will be redirected to the Add Note page; from this page you can indicate if the note should be customer-visible or not, as well as input the corresponding text for the note.
Once you are satisifed with the note, press the Add tile to save or press the Cancel tile to cancel.
Note: The "Notes" feature is ideal for text information, if you would like to save images please use the "Documents" feature.
All previously saved notes can be accessed from the Actions panel or through the files in the "Actions" section
Office users can also add notes through the "Summary" tab in the View Customer pop-up window. For more information on how office users can upload documents through the web application, please see the View Customer page.

Forms
online-help.platform.features.customers.mobile.formsCustomer.paragraph

Location
online-help.platform.features.customers.mobile.locationCustomer.paragraph

Contacts
The "Contacts" feature displays all contacts associated with the selected customer's profile, such as a spouse, family member, or other authorized contact. This provides a convenient way to access important contact information when communicating with customers or coordinating service activities.
Contacts can be added from the web user interface or directly from the mobile device.
For more information about editing or adding contacts from the web, please see the Contacts page.
To add contacts from your mobile device, simply press the Plus Sign tile in the bottom right of your screen.
In the Edit Contact Details page, you can input the first and last name of the contact, along with the contact information.
Once all the relevant information has been entered, press the Add tile to save the new contact. If you would like to exit out of the page, press the Cancel tile.

Invoice
The "Invoices" feature provides convenient access to all invoices associated with the selected customer. From this page, you can review the customer's invoice history and add new invoices directly from your mobile device. This makes it easier to manage customer billing information, review past transactions, and create invoices while working in the field.

Sales Orders
The "Sales Orders" feature provides convenient access to all sales orders associated with the selected customer. After pressing on the feature, you will be redirected to the Sales Orders page.
On this page, you can review existing sales orders and create new ones directly from your mobile device. This makes it easier to manage customer purchases, track order history, and create sales orders while working in the field.

Assets
The "Assets" feature provides a convenient overview of all assets associated with the selected customer. This allows you to quickly access and review customer-specific equipment, devices, or other tracked assets directly from your mobile device. From the Asset's Actions Panel, you can add additional assets to the customer's profile, helping you maintain accurate and up-to-date asset records. This is particularly useful when assigning new equipment to a customer, updating asset associations, or ensuring that all customer-related assets are properly documented in MobiWork.

The "Contact Information" Section section will display your customer's contact information; this will include the contact's phone number, name, and address.
Selecting the customer's address opens the Location Dialog Box, which provides convenient access to location-related actions. From this dialog box, you can view the address in your device's maps application, get directions to the customer's location, edit the customer's address, or update the latitude and longitude coordinates.

You can also upload an image that represents the customer's address or home location. This image can be updated or replace with a new photograph, helping ensure that the customer's profile contains current and relevant visual information. These options make it easier to verify customer locations, navigate to service sites, and maintain accurate location information.
The data listed in the "Information Panel" section are further defined below:
| Name: | Description: |
|---|---|
| "Name" | The name of the customer |
| "Type" | The type of customer (i.e., residential or business) |
| "Status" | The status of the customer. The status can be "Open," "Ongoing," "At Risk," "On Hold," or "Lost." |
| "Contact" | The main contact name and number |
| "Address" | The address of the customer |
| "Assigned To" | The assigned customer manager |
The "Custom Fields" section displays supported MobiFields associated with the selected customer, providing quick access to important customer-specific information.
By default, the customer's assigned manager and outstanding balance are displayed. However, additional supported MobiFields can be configured to appear in this section, allowing you to tailor the information displayed to your business needs and prioritize the details most relevant to your team.

This customization helps improve visibility into important customer information, making it easier for users to access key details without navigating through multiple pages or sections.
The MobiFields that cannot be displayed here include: forms, products, tables, customer status, work order status, the view form, and the view form print view.
The "Customer Actions" section provides convenient access to a variety of functions that can be applied to the specified customer. These actions allow you to manage customer-related activities directly from the customer profile, thus helping streamline workflows and improve efficiency.

For example, you can create a new work order or quote by selecting the corresponding tiles in the "Customer Actions" section.
Many of the available actions from this section overlap with those found in the Actions Panel; this layout thus allows multiple ways to easily access frequently used actions. The following subsections provide a detailed overview of the actions available in the "Customer Actions" section.
Work Orders
The "Add Work Order" action will allow you to add a work order for the selected customer. For more information on how to add a work order through the mobile device, please see the Add Customer From the Mobile Device page. Since the work order is added through the customer profile, the work order will be linked to the corresponding customer.

Quotes
The "Add Quote" action adds a quote to the customer; this quote will then be linked to the corresponding customer. For more information on adding a quote from your mobile device, please see the Add Quote page.

Add Invoice
The "Add Invoice" action allows you to create an invoice for the selected customer. The newly created invoice will be linked to the customer profile; this makes it convenient to manage customer billing directly from the customer profile. For more information on creating an invoice from your mobile device, see the Add an Invoice

Add Reminder
The "Add Reminder" feature will allow you to add a reminder for a specific user at a specific time.
Select the users that the reminder is intended for, and the date/time of the reminder. Once you are satisfied with the inputted information, press the Add tile to finalize the reminder:

These reminders can then be viewed in your device's Notification Center. For more information about the Notification Center, please see the Notification Center page.
Add Note
The "Add Note" action allows you to record important information about the selected customer. Notes can be used to keep office staff informed, document customer-related details, or provide information for future reference.

After entering the required information, select the Add tile to save the note. All notes associated with the customer can be accessed through the Notes feature in the Actions Panel.
online-help.platform.toc2.features.customers.mobileView.actions.actionsAddSpecialNote.title
The "Special Note" action will allow you to add or view an internal note; this note consists of important customer-specific information. For example, if you would like to make a note that a customer is elderly and has trouble walking, so will take longer to answer the door.

This feature is benefical if you want to record a customer-specific observation so that your users are aware. The "Special Note" action can only be accessed through the "Customer Actions" section.
online-help.platform.toc2.features.customers.mobileView.actions.forms.title
online-help.platform.features.customers.mobile.formsCustomer.paragraph

online-help.platform.toc2.features.customers.mobileView.actions.documents.title
The "Documents" feature will allow you to upload and view documents or images associated with the customer. You can quickly add a new photo to the customer profile by pressing the Plus Sign tile; you will then be prompted to upload an existing picture from your gallery or capture a new photo.
To view a document or an image, simply press on the desired file.
Office users can also upload documents through the "Documents" tab in the View Customer pop-up window. For more information on how office users can upload documents through the web application, please see the View Customer page.

online-help.platform.toc2.features.customers.mobileView.actions.assets.title
The "Assets" feature provides a convenient overview of all assets associated with the selected customer. This allows you to quickly access and review customer-specific equipment, devices, or other tracked assets directly from your mobile device. From the Asset's Actions Panel, you can add additional assets to the customer's profile, helping you maintain accurate and up-to-date asset records. This is particularly useful when assigning new equipment to a customer, updating asset associations, or ensuring that all customer-related assets are properly documented in MobiWork.

Contacts
The "Contacts" feature displays all contacts associated with the selected customer's profile, such as a spouse, family member, or other authorized contact. This provides a convenient way to access important contact information when communicating with customers or coordinating service activities.
Contacts can be added from the web user interface or directly from the mobile device.
For more information about editing or adding contacts from the web, please see the Contacts page.
To add contacts from your mobile device, simply press the Plus Sign tile in the bottom right of your screen.
In the Edit Contact Details page, you can input the first and last name of the contact, along with the contact information.
Once all the relevant information has been entered, press the Add tile to save the new contact. If you would like to exit out of the page, press the Cancel tile.

Locations
The "Locations" feature will display the customer locations:

online-help.platform.toc2.features.customers.mobileView.actions.recurrentServices.title
The "Recurrent Service" action will allow you to view the customer's corresponding recurent services. From the customer's recurrent service page, you will be able to add new recurrent services. These recurrent services are linked to the customer profile.

Please note that this action can only be accessed from the "Customer Actions" section.