- Overview
- Account Settings
- Assets
- Connectors Framework
- Overview
- QuickBooks Online
- QuickBooks Desktop Web Connector
- Azure AD
- Salesforce Integration
- FleetNet Connector
- Avalara Connector
- Inbound REST API
- Outbound REST API
- Mailchimp Connector
- Text Messaging Connector
- Clearent Connector
- Stripe Connector
- HubSpot Connector
- UKG Connector
- Paylocity Connector
- UKG Connector
- Gusto Connector
- iSolved Payroll Connector
- Customer Portal
- Customers
- Dashboards
- Devices
- Dispatching
- Forms
- Inventory
- Invoices & Billing
- Locations
- Payments
- Parts
- Projects
- Quotes
- Recurrent Routes
- Recurrent Services
- Reports
- Sales Orders
- Schedule
- Services
- Tasks
- Text Messaging
- Time Tracking
- Users
- Work Orders
The Price List page will display the discounts that are applicable to specific groups of customers, in addition to the discount percentage and the date of creation.
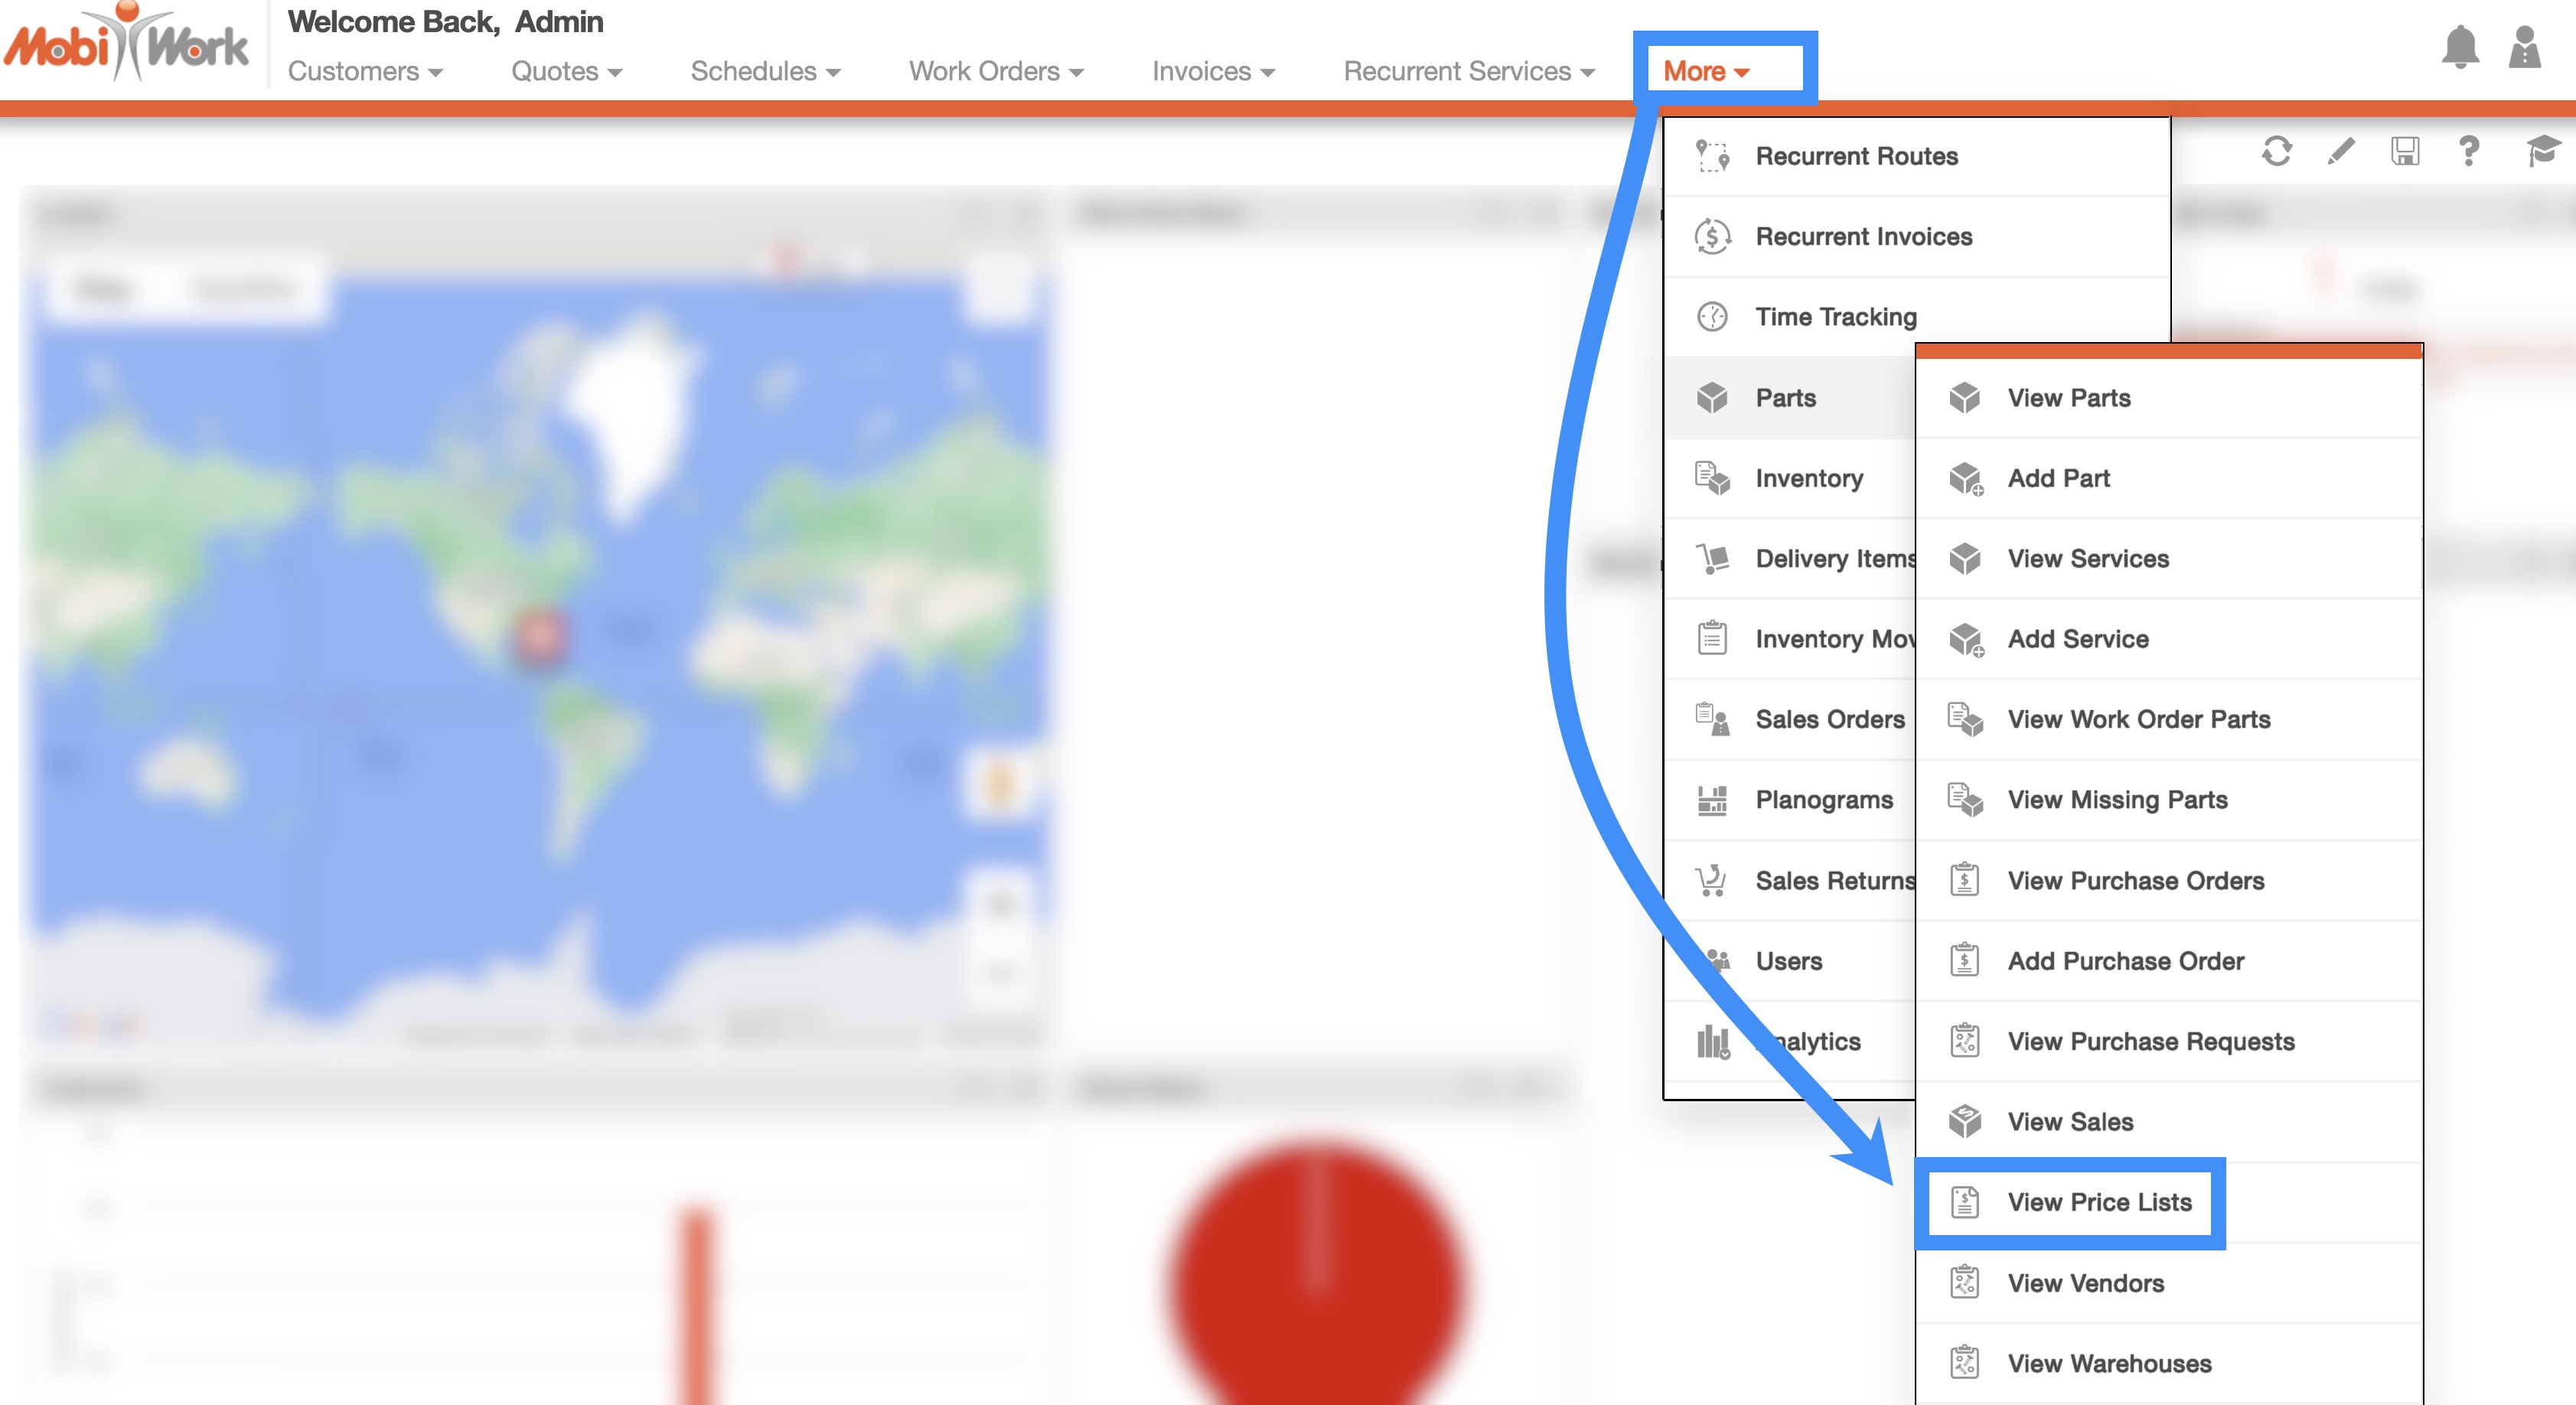
You can access the Price List page by hovering over the Parts feature from your MobiWork menu and clicking on the "View Price List" option when it appears:
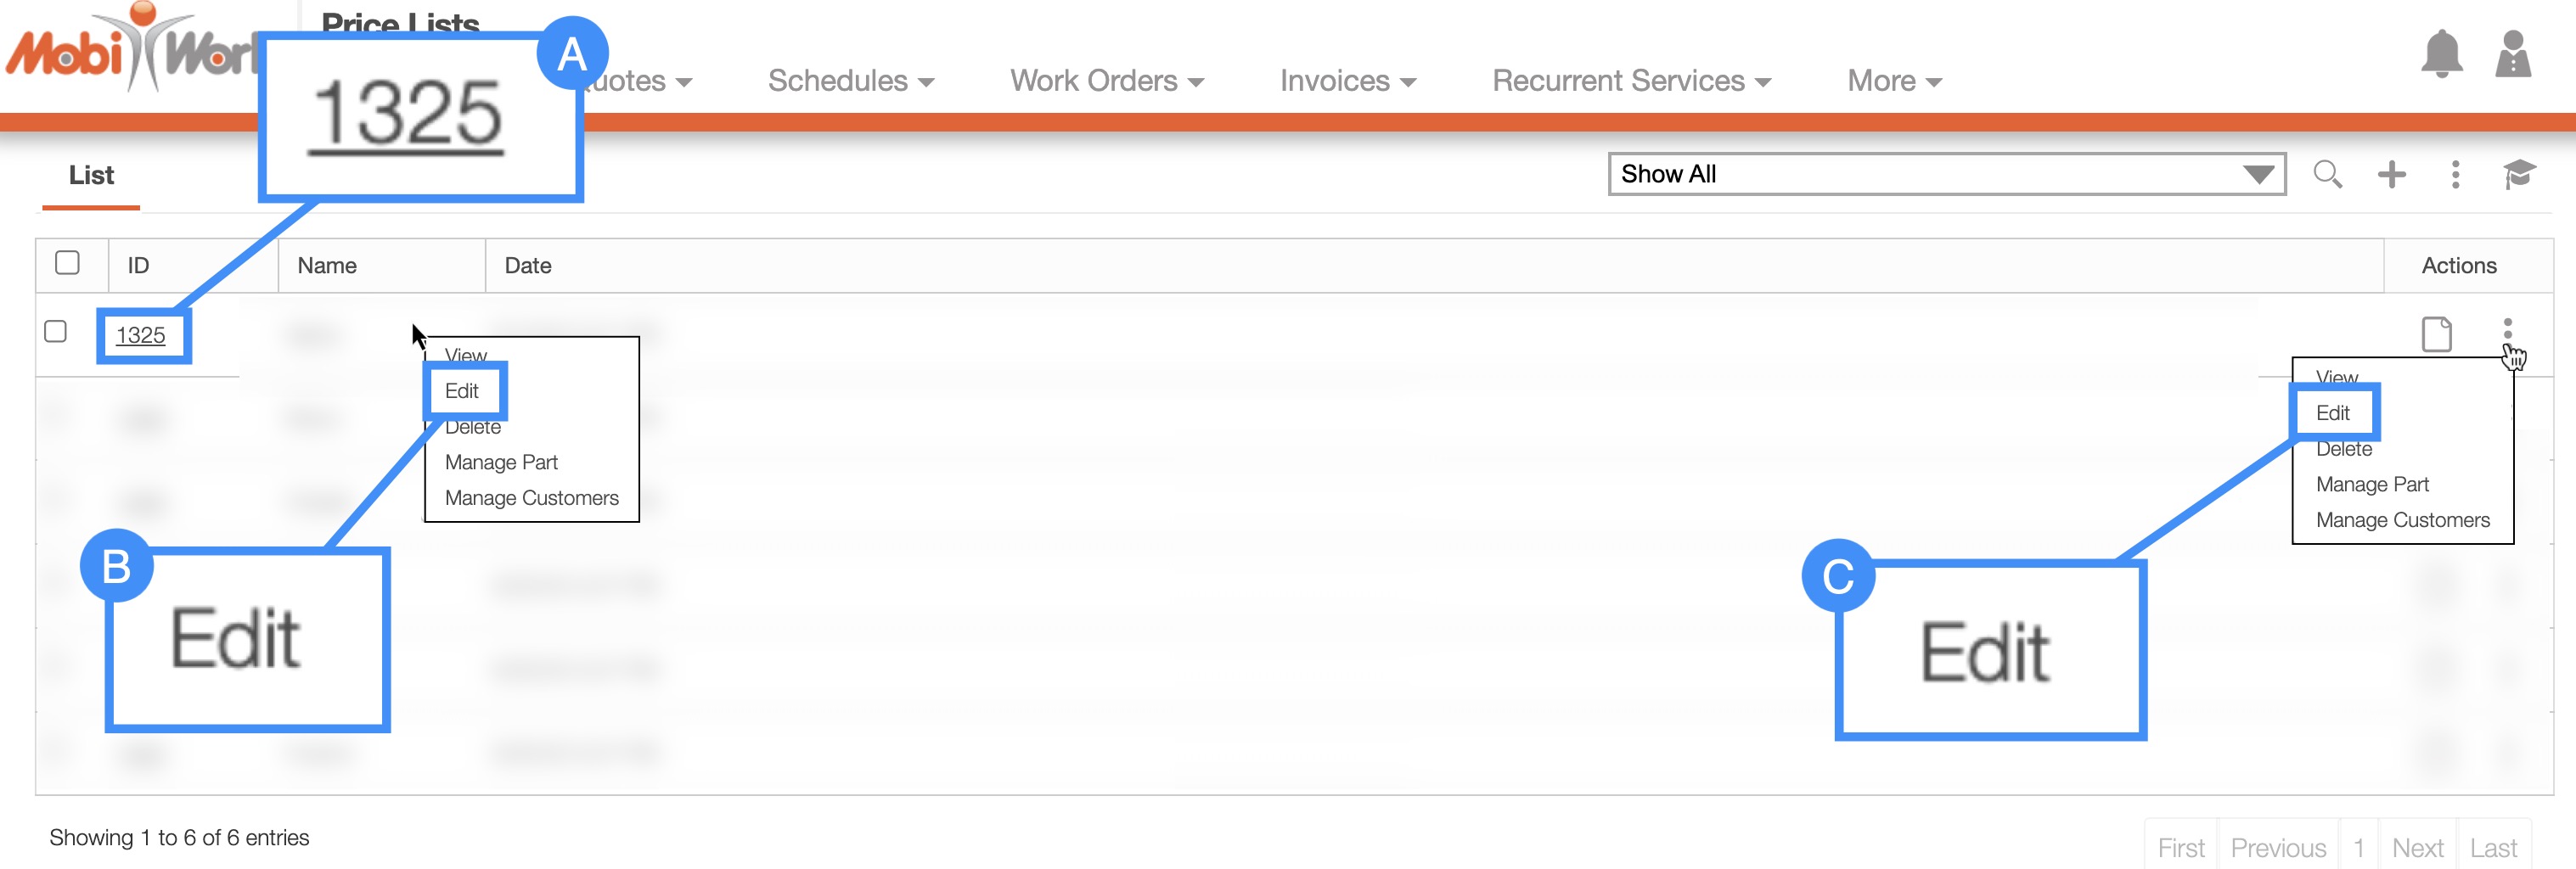
The Price List page is the default page once you access the "View Price List" option from the Parts feature:

The "Global Actions" section and search bar. The search bar will allow you to search through price lists and the More Actions button will allow you to export your price lists into an Excel file.
The Price List columns will display the corresponding data related to the specified price list, including the ID, the name, and the date the price list was created.
The right-click actions; these actions will allow you to view, edit, delete, manage part, and manage customers of the selected part or service. These actions are the same as those found in the Individual Actions.
The View icon will allow you to view the price list and the Individual Actions will allow you to view, edit, delete, manage part, and manage customers of the selected part or service. The actions are the same as when you right-click on a part or service.
To add a new price list, you will first need to access the Price List page. Once you are on this page, click on the Plus Sign button in the right corner:
The Add Price List pop-up window will then appear:
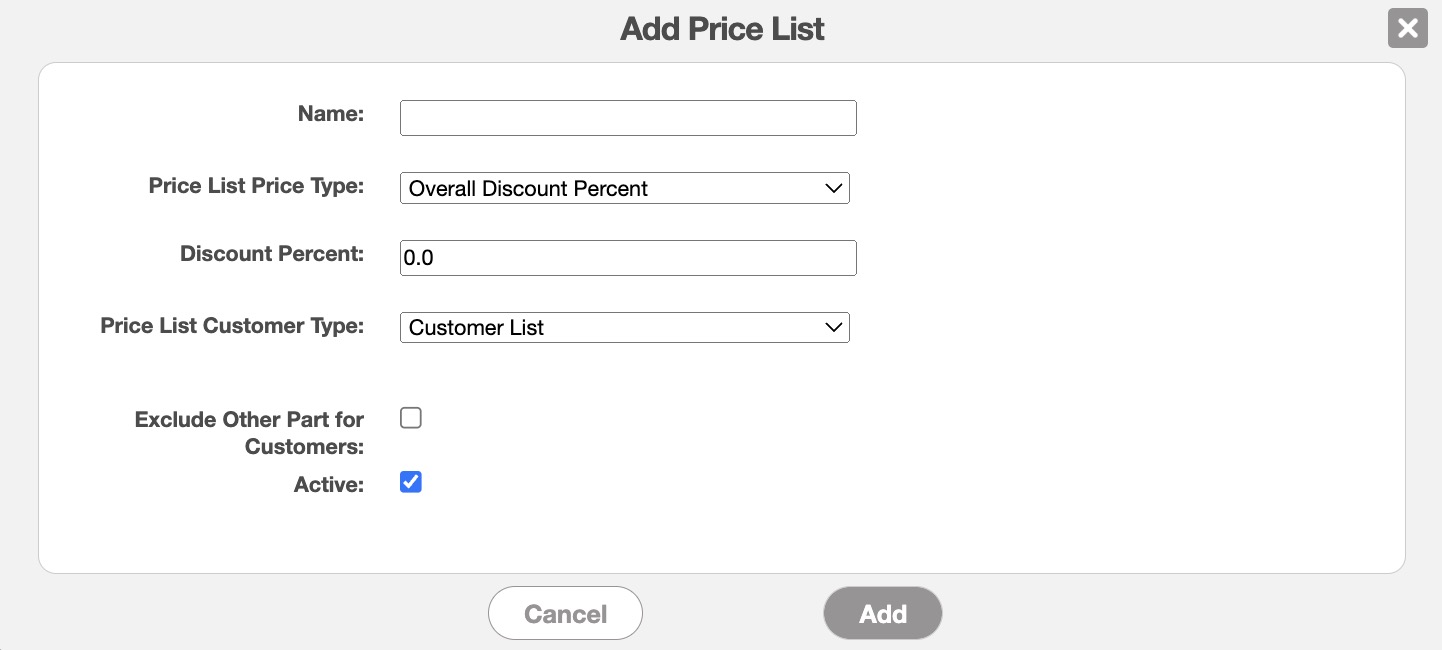
From this pop-up window input the:
The name of the price list.
The type of price list.
The discount or markup amount.
The customer list or category that the price list is associated with.
Use the checkbox to indicate if the price list should exclude the part for other customers.
Use the checkbox to indicate if the price list should be active.
Once you are satisfied with the new price list, click the Add button.
There are several ways you can edit your MobiWork price lists:
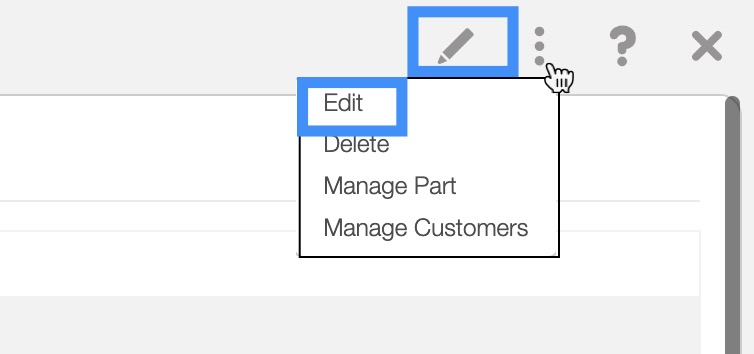
You can select the desired price list from the View Price List pop-up window. From the pop-up window you can click on the Pencil icon or the select the "Edit" option from the More Actions drop-down:
You can right-click on the desired price list and from the drop-down select the "Edit" option
Or you can click on the Individual Actions button and from the drop-down select the "Edit" option
Regardless of the method that you choose, the Edit Price List pop-up window will appear
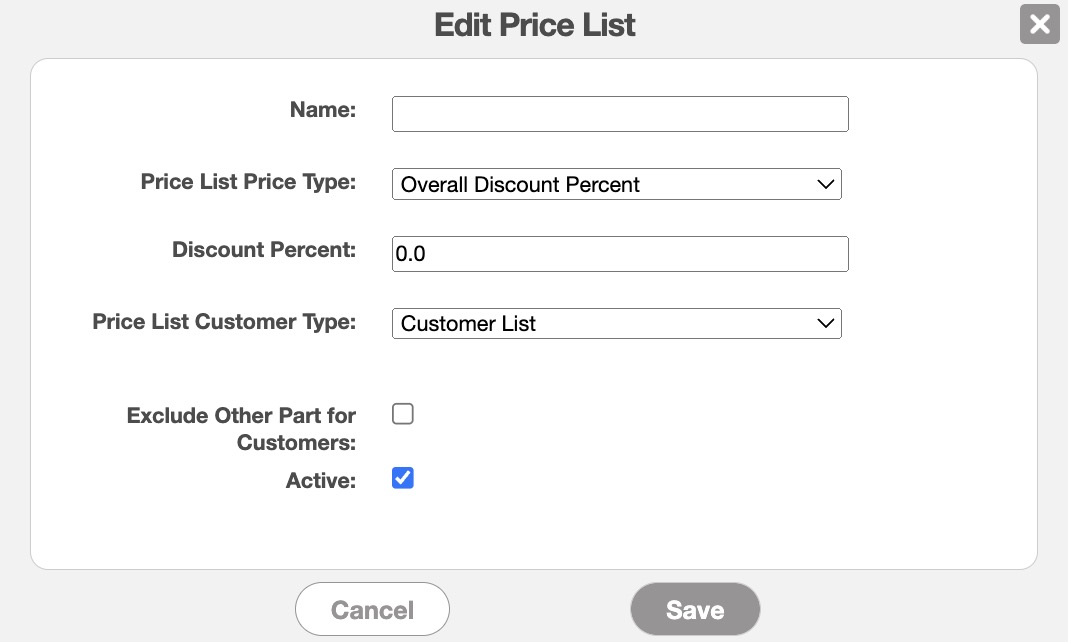
In the Edit Price List pop-up window, input the changes that you would like to make to the price list. Once you are satisfied with the updates, click the Save button.
To access the selected View Price List pop-up window, you can:
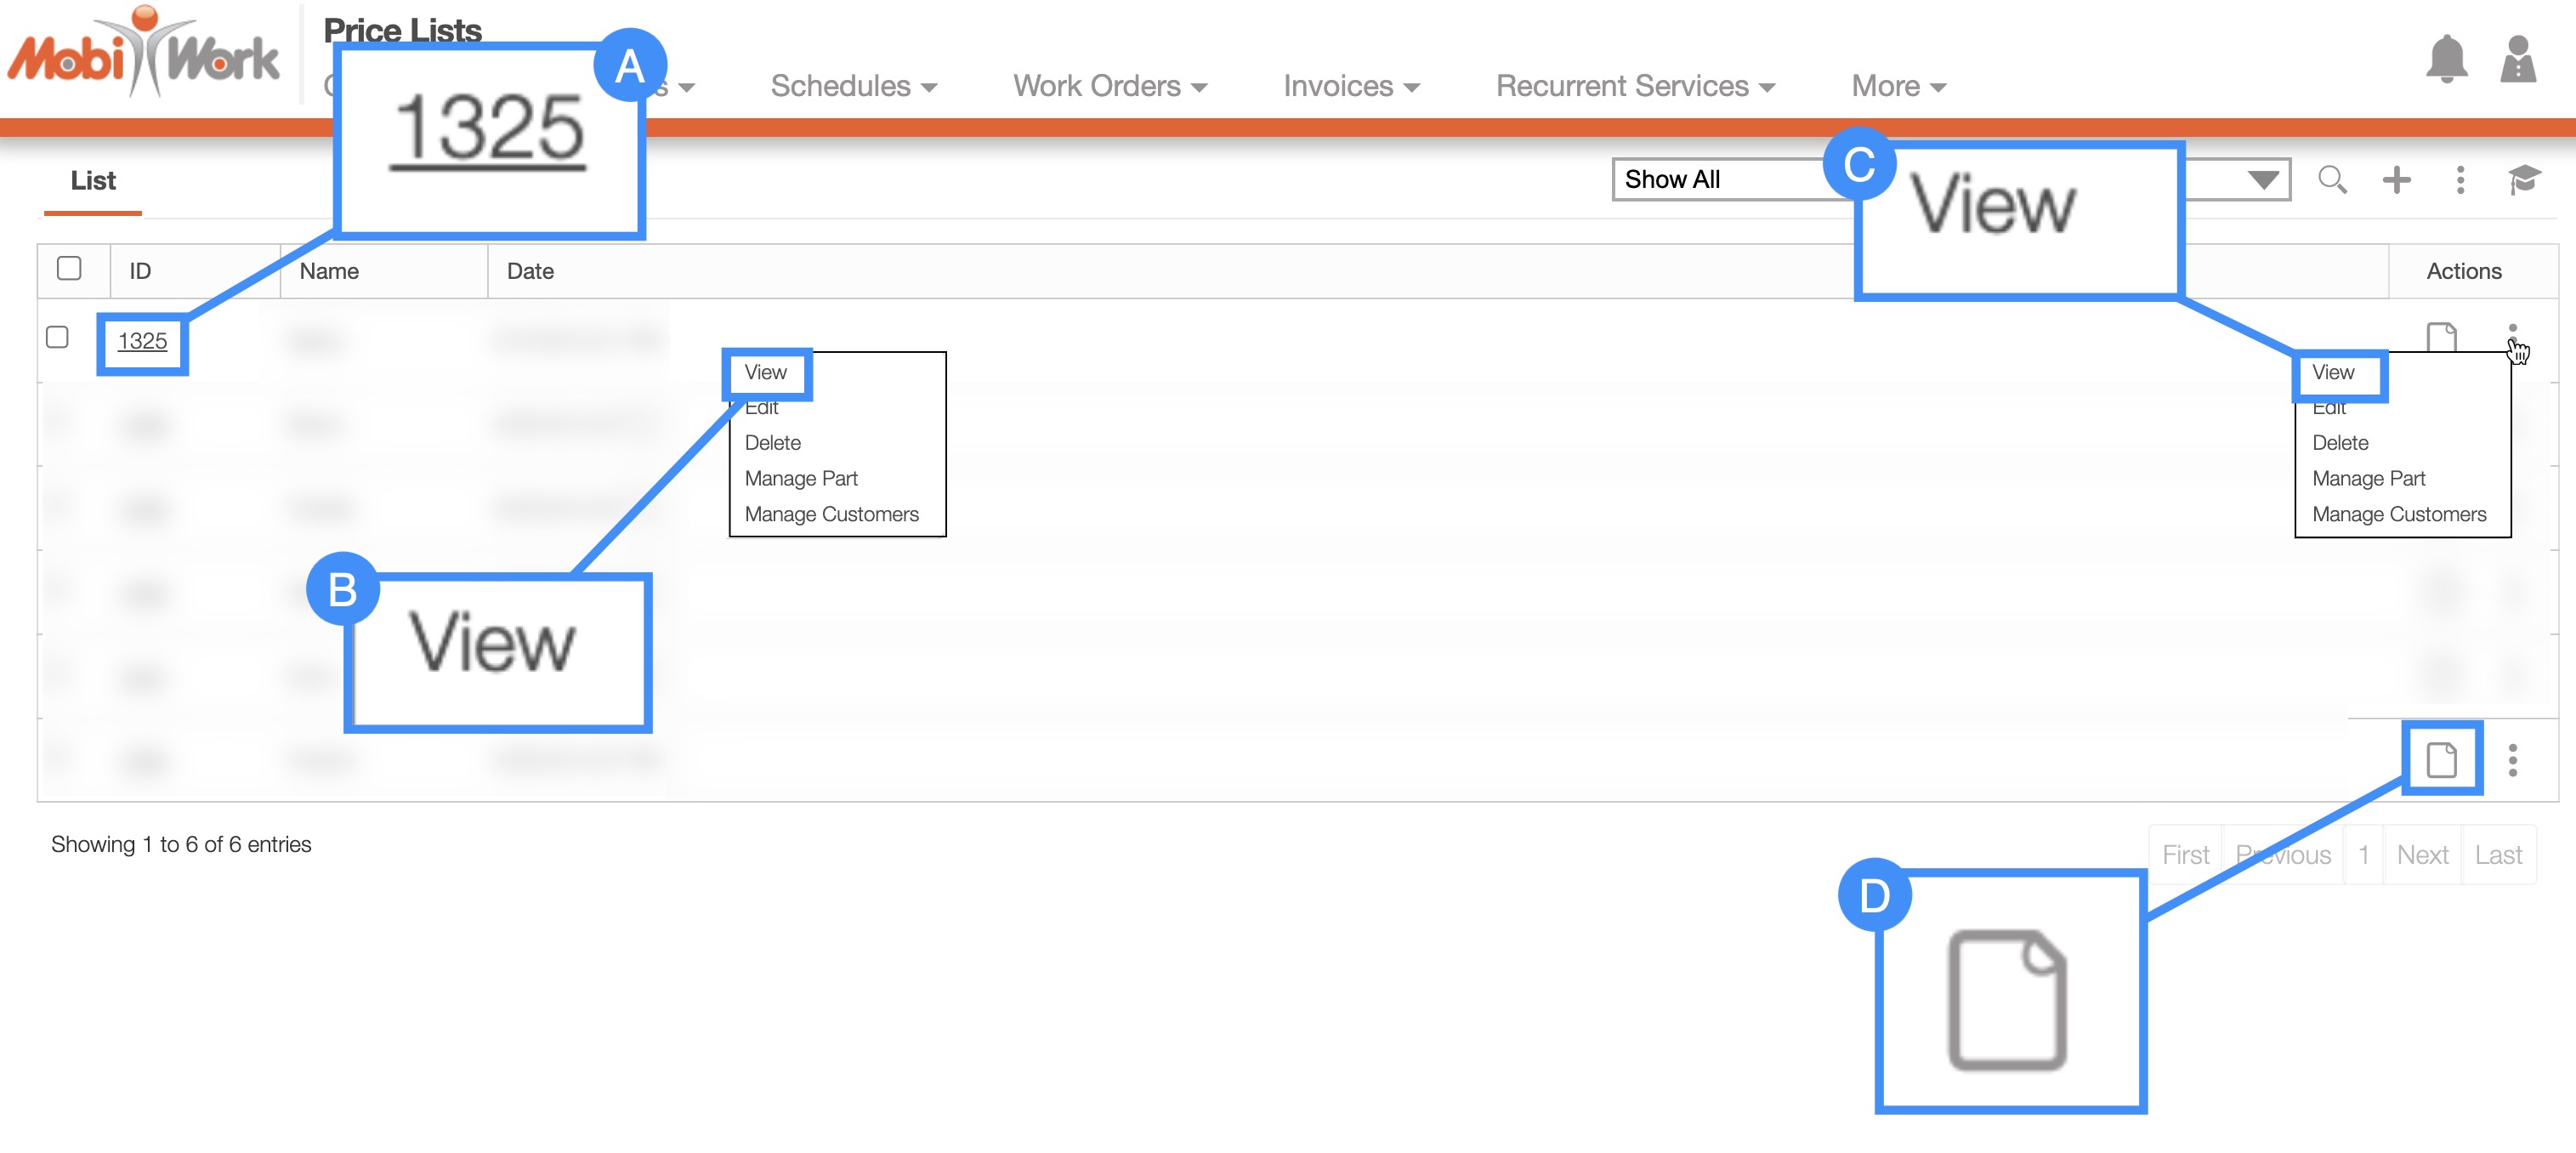
By clicking on the Price List ID.
By right-clicking on the desired price list and from the drop-down select the "View" option.
By clicking on the View icon.
Or you can click on the Individual Actions button and from the drop-down select the "View" option.
Regardless of the method that you choose, the View Price List pop-up window will open.
View Price List Layout
The View Price List pop-up window is structured the same way as the View Part pop-up window:

Price list Full-Size View
Price List Tabs
Upper Right Corner Actions
Summary Tab
The "Summary" tab is the default tab once you open the View Price List pop-up window. From this tab you will be able to view the name of the price list, the creation date, the discount percentage and more:
The list of terms found in this tab are defined below:
| Name: | Description: |
|---|---|
| "Name" | The name of the Price List |
| "Creation Date" | The date that the price list was created |
| "Discount Percent" | The percent amount of the Price List |
| "Price List Price Type" | The type of Price List (e.g., markup, discount, amount, or percentage) |
| "Price List Customer Type" | Indicates which customers the price list is applicable for |
| "Exclude Other Part for Customers" | Indicates if the price list should exclude the part for other customers. |
| "Note" | Allows you to add, edit, or view any notes associated with the price list |
Part Tab
The "Part" tab will display all the parts and services that are associated with the price list. On this tab you can export, import, or remove the parts associated with the price list:
The Delete button and the Remove Part From Price List button will preform the same function of removing the part from the price list.
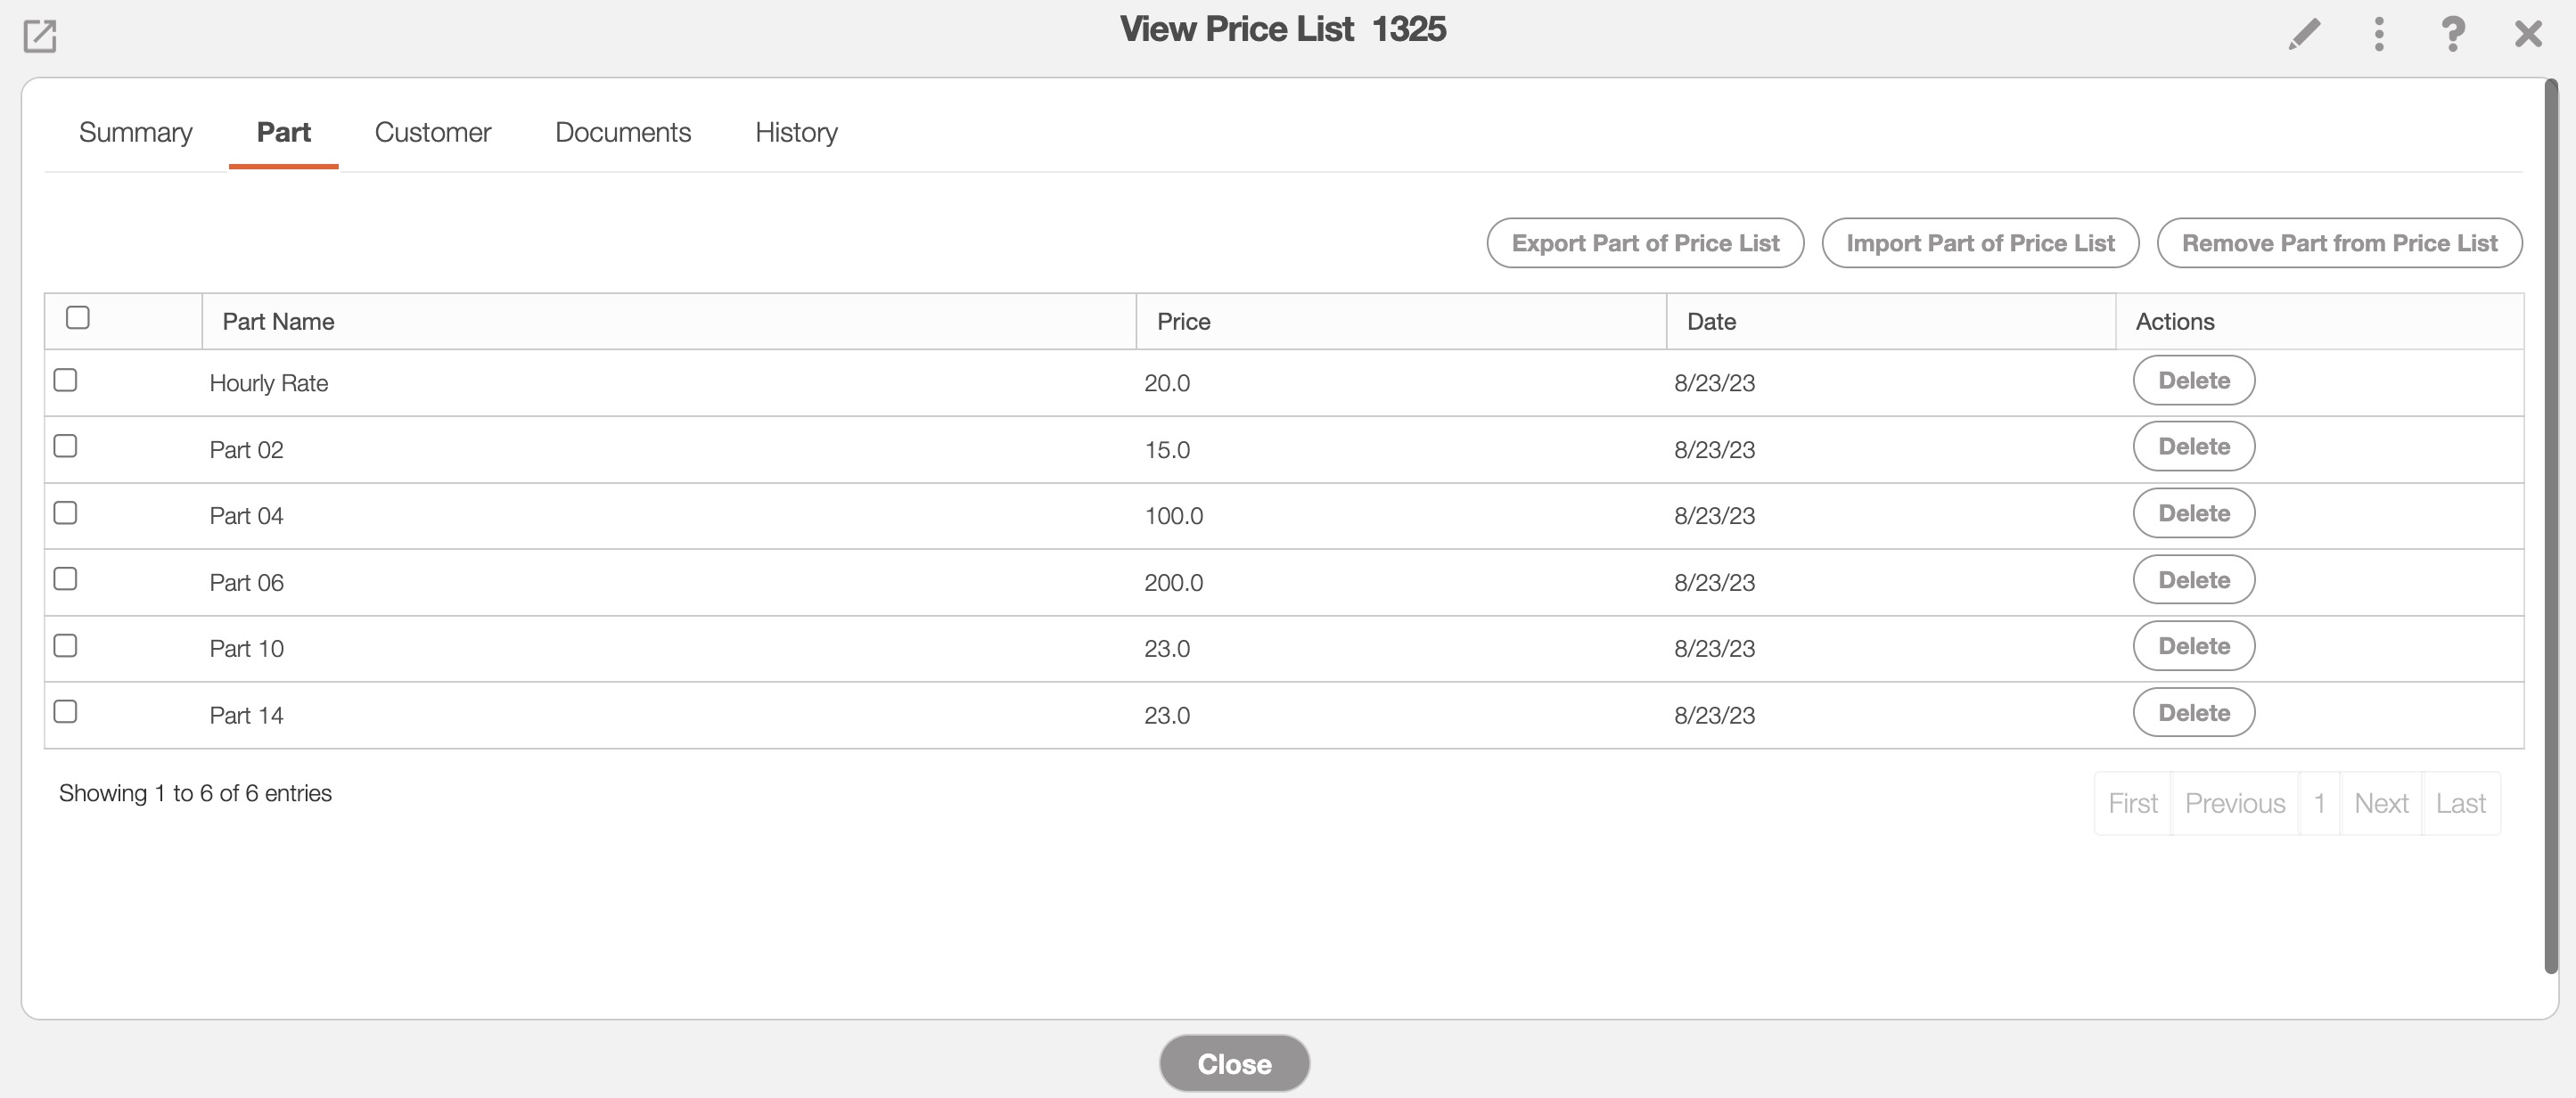
To initially manage the parts that are associated with the "Part" tab, please see the Manage Part section.
Customer Tab
The "Customer" tab will display all the customers that are associated with the price list. From this tab you can choose to remove a customer from the price list:
The Delete button and the Remove Customers From Price List button will preform the same function of removing the customer from the price list.
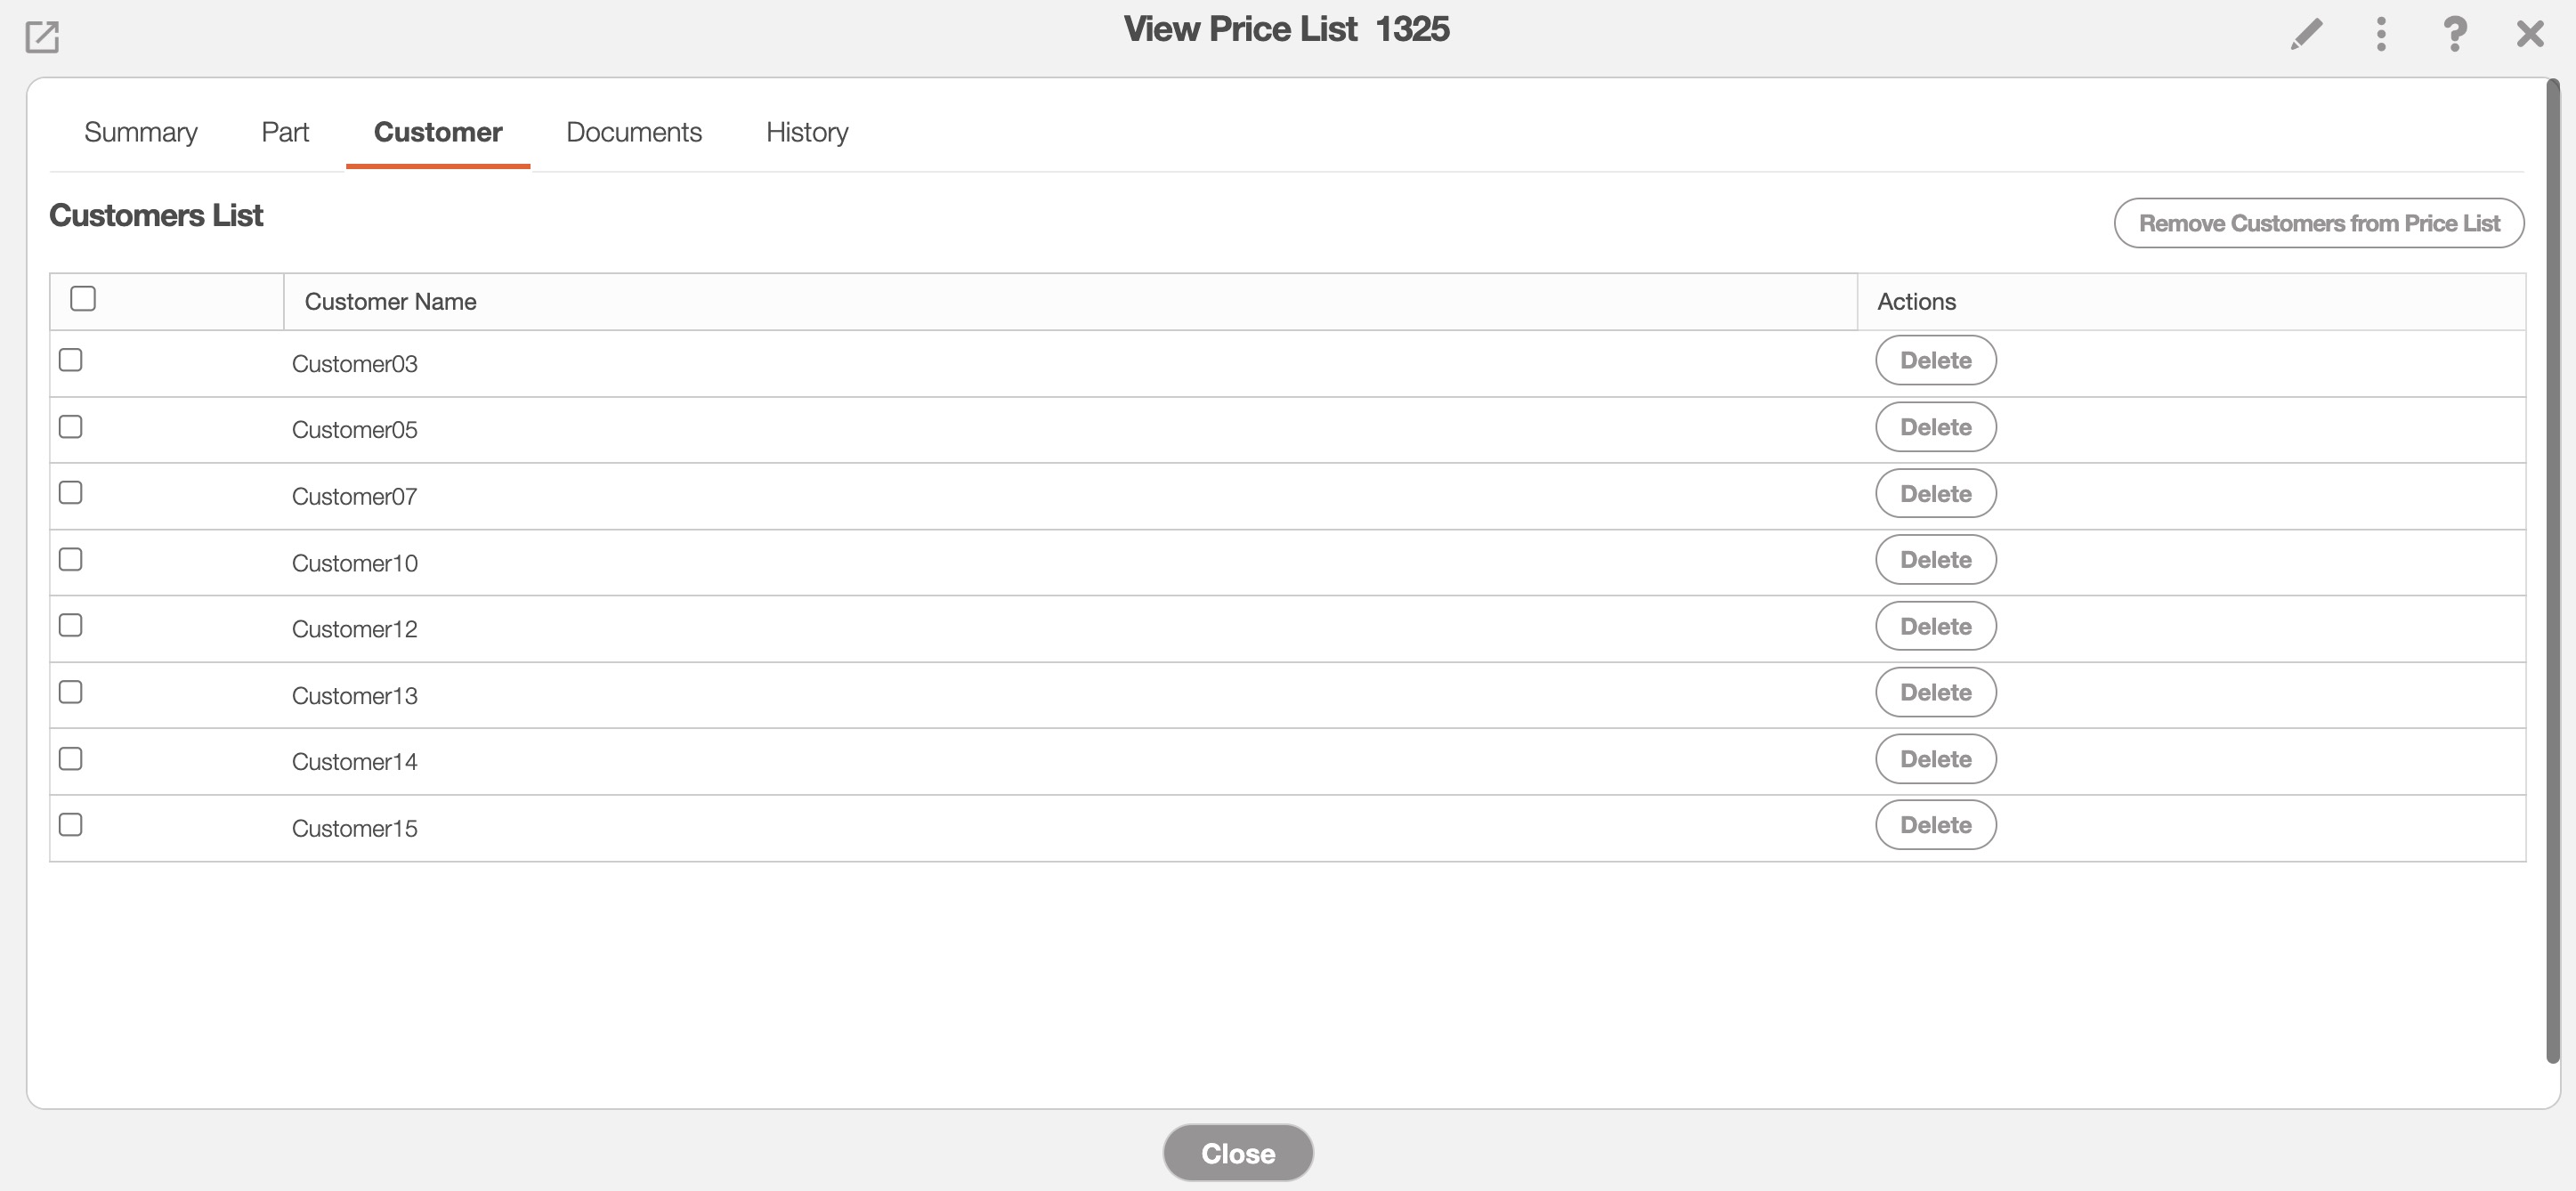
To initially manage the parts that are associated with the "Part" tab, please see the Manage Customer section.
Documents Tab
The "Documents" tab will allow you to store part-specific documentation (e.g., contracts, photos, etc.) for future use. This tab will also list the type of document file, the date it was uploaded, the user who uploaded it, and more:
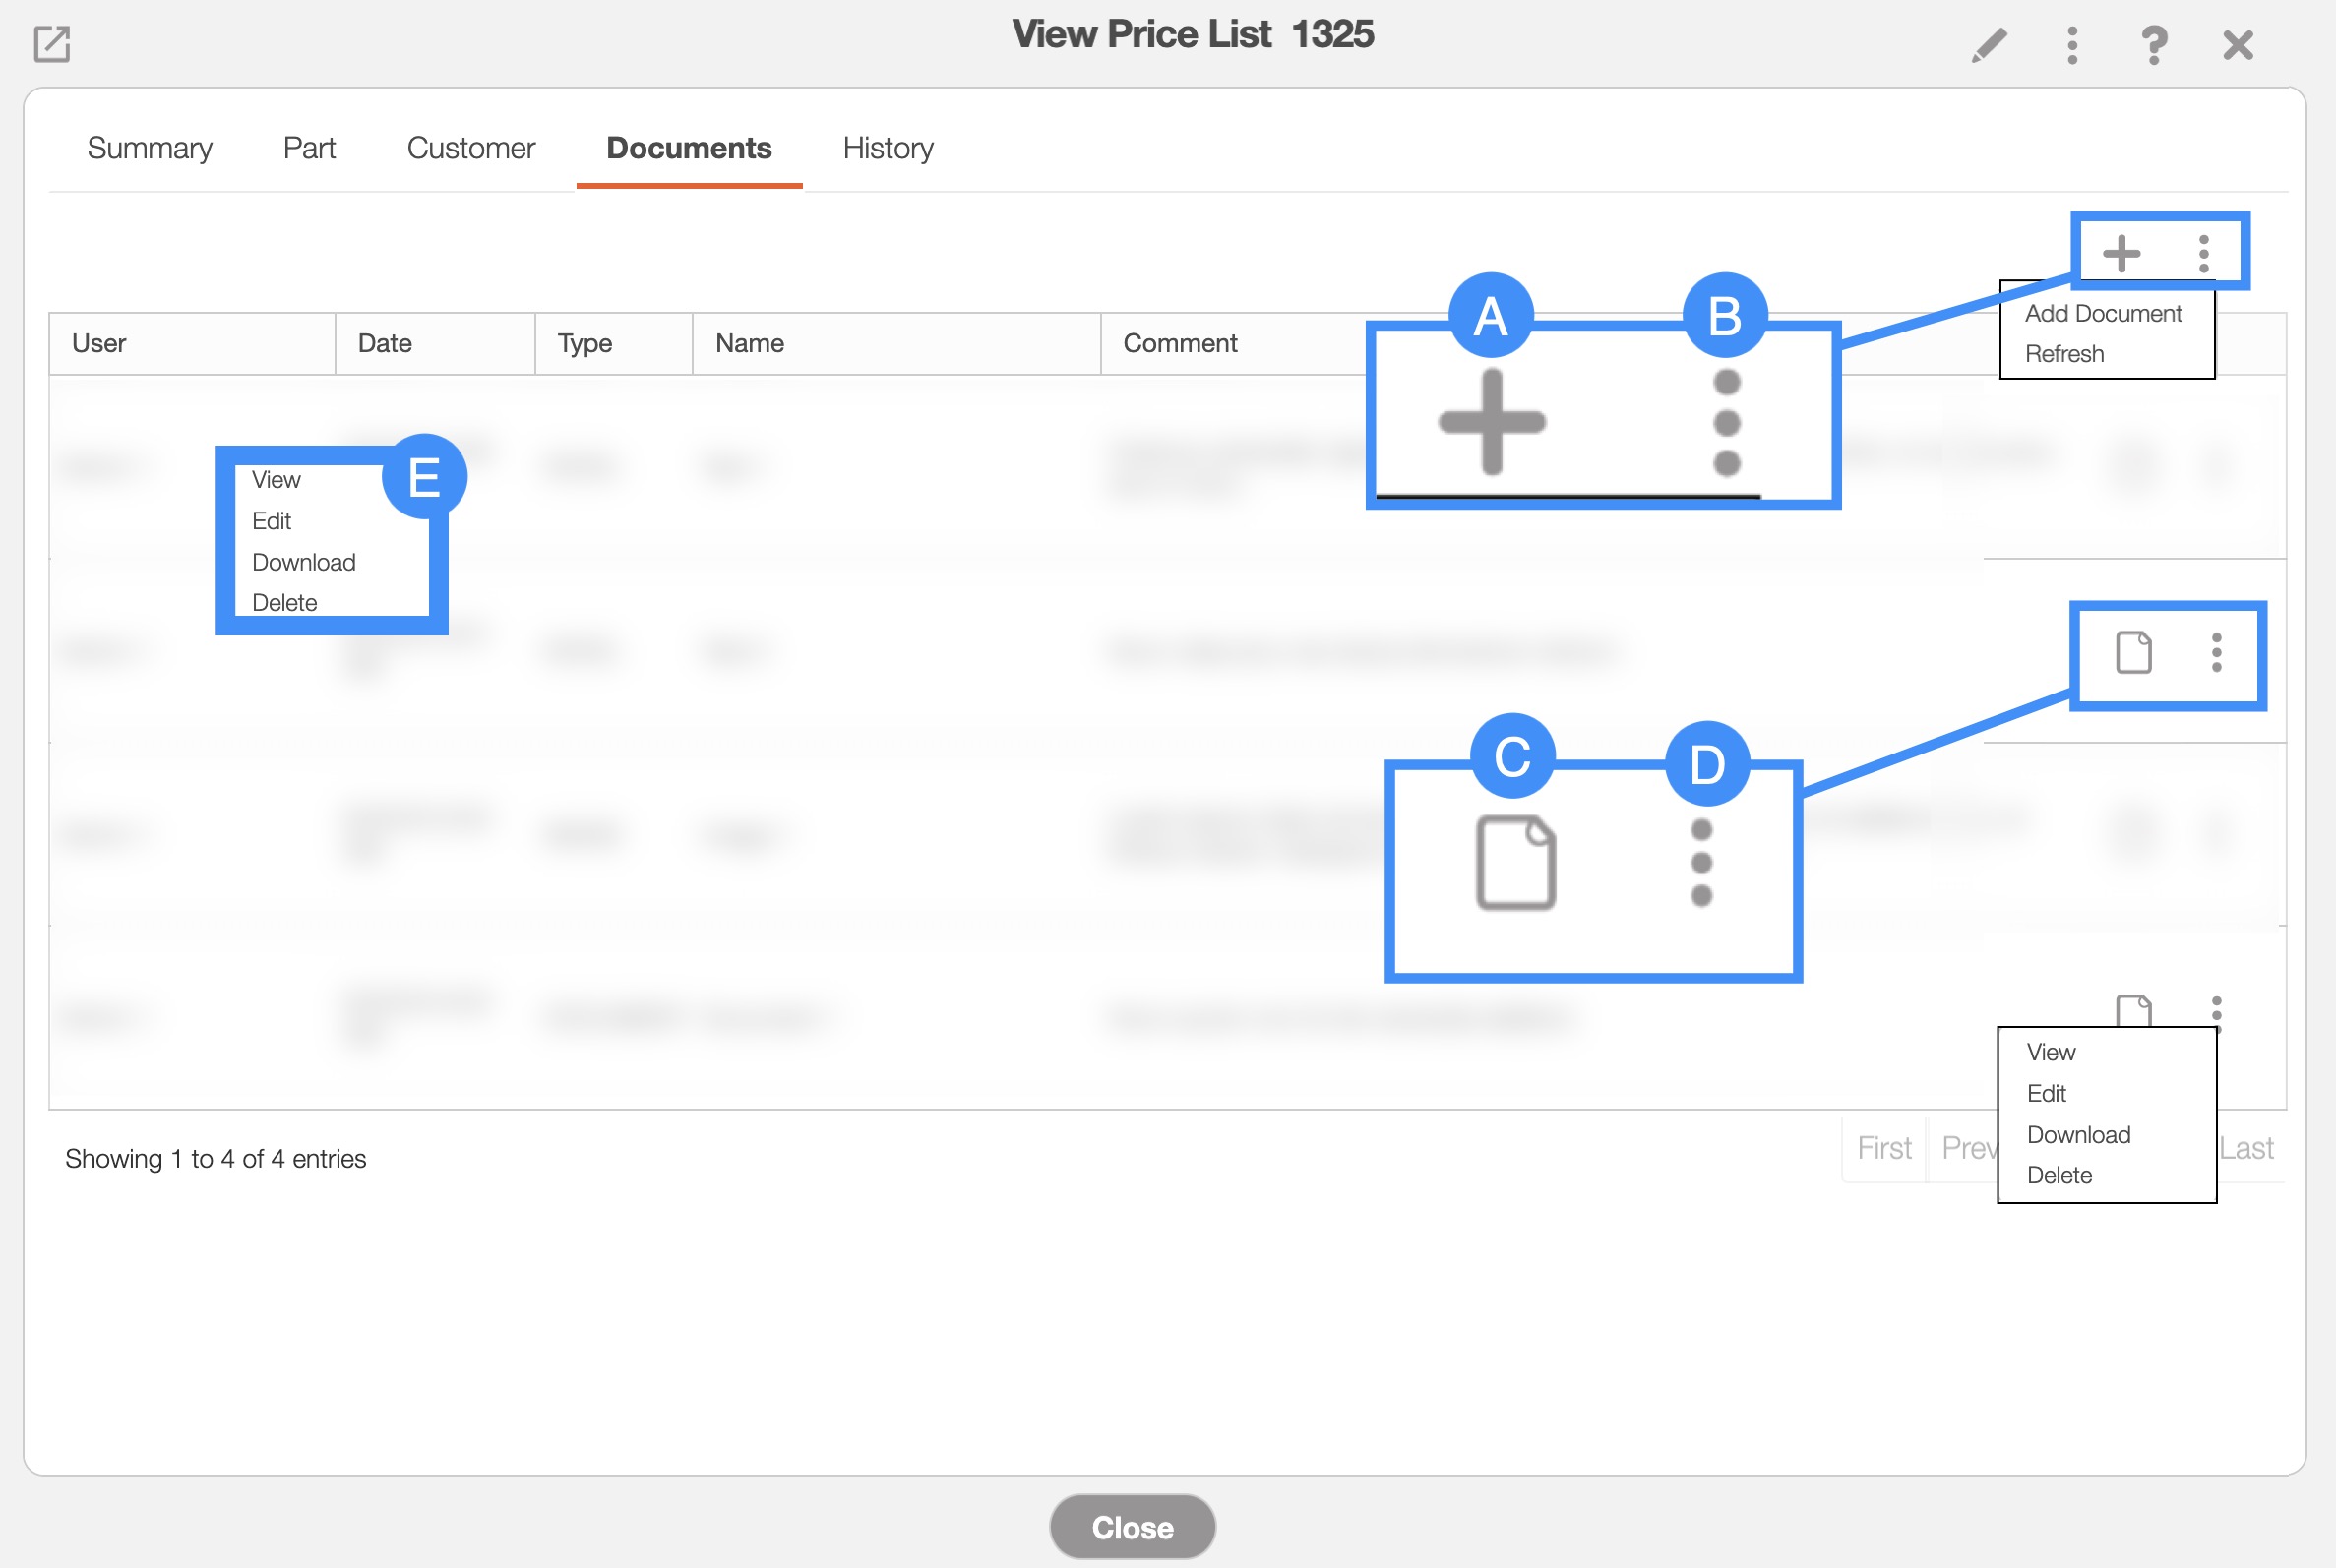
You can add a new document by clicking the Plus Sign button; only after you upload a file or document will you be able to access the Action options.
The top-most Individual Actions next to the Plus Sign will allow you to refresh the tab or add a new document.
The Individual Actions (the three dots next to the View icon) are identical to the right-click actions and will allow you to view, edit, download, or delete the document.
The View icon will allow you to download the document
By right-clicking you will bring up the right-click actions. These actions are identical to the Individual Actions and will allow you to view, edit, download, or delete the document.
History Tab
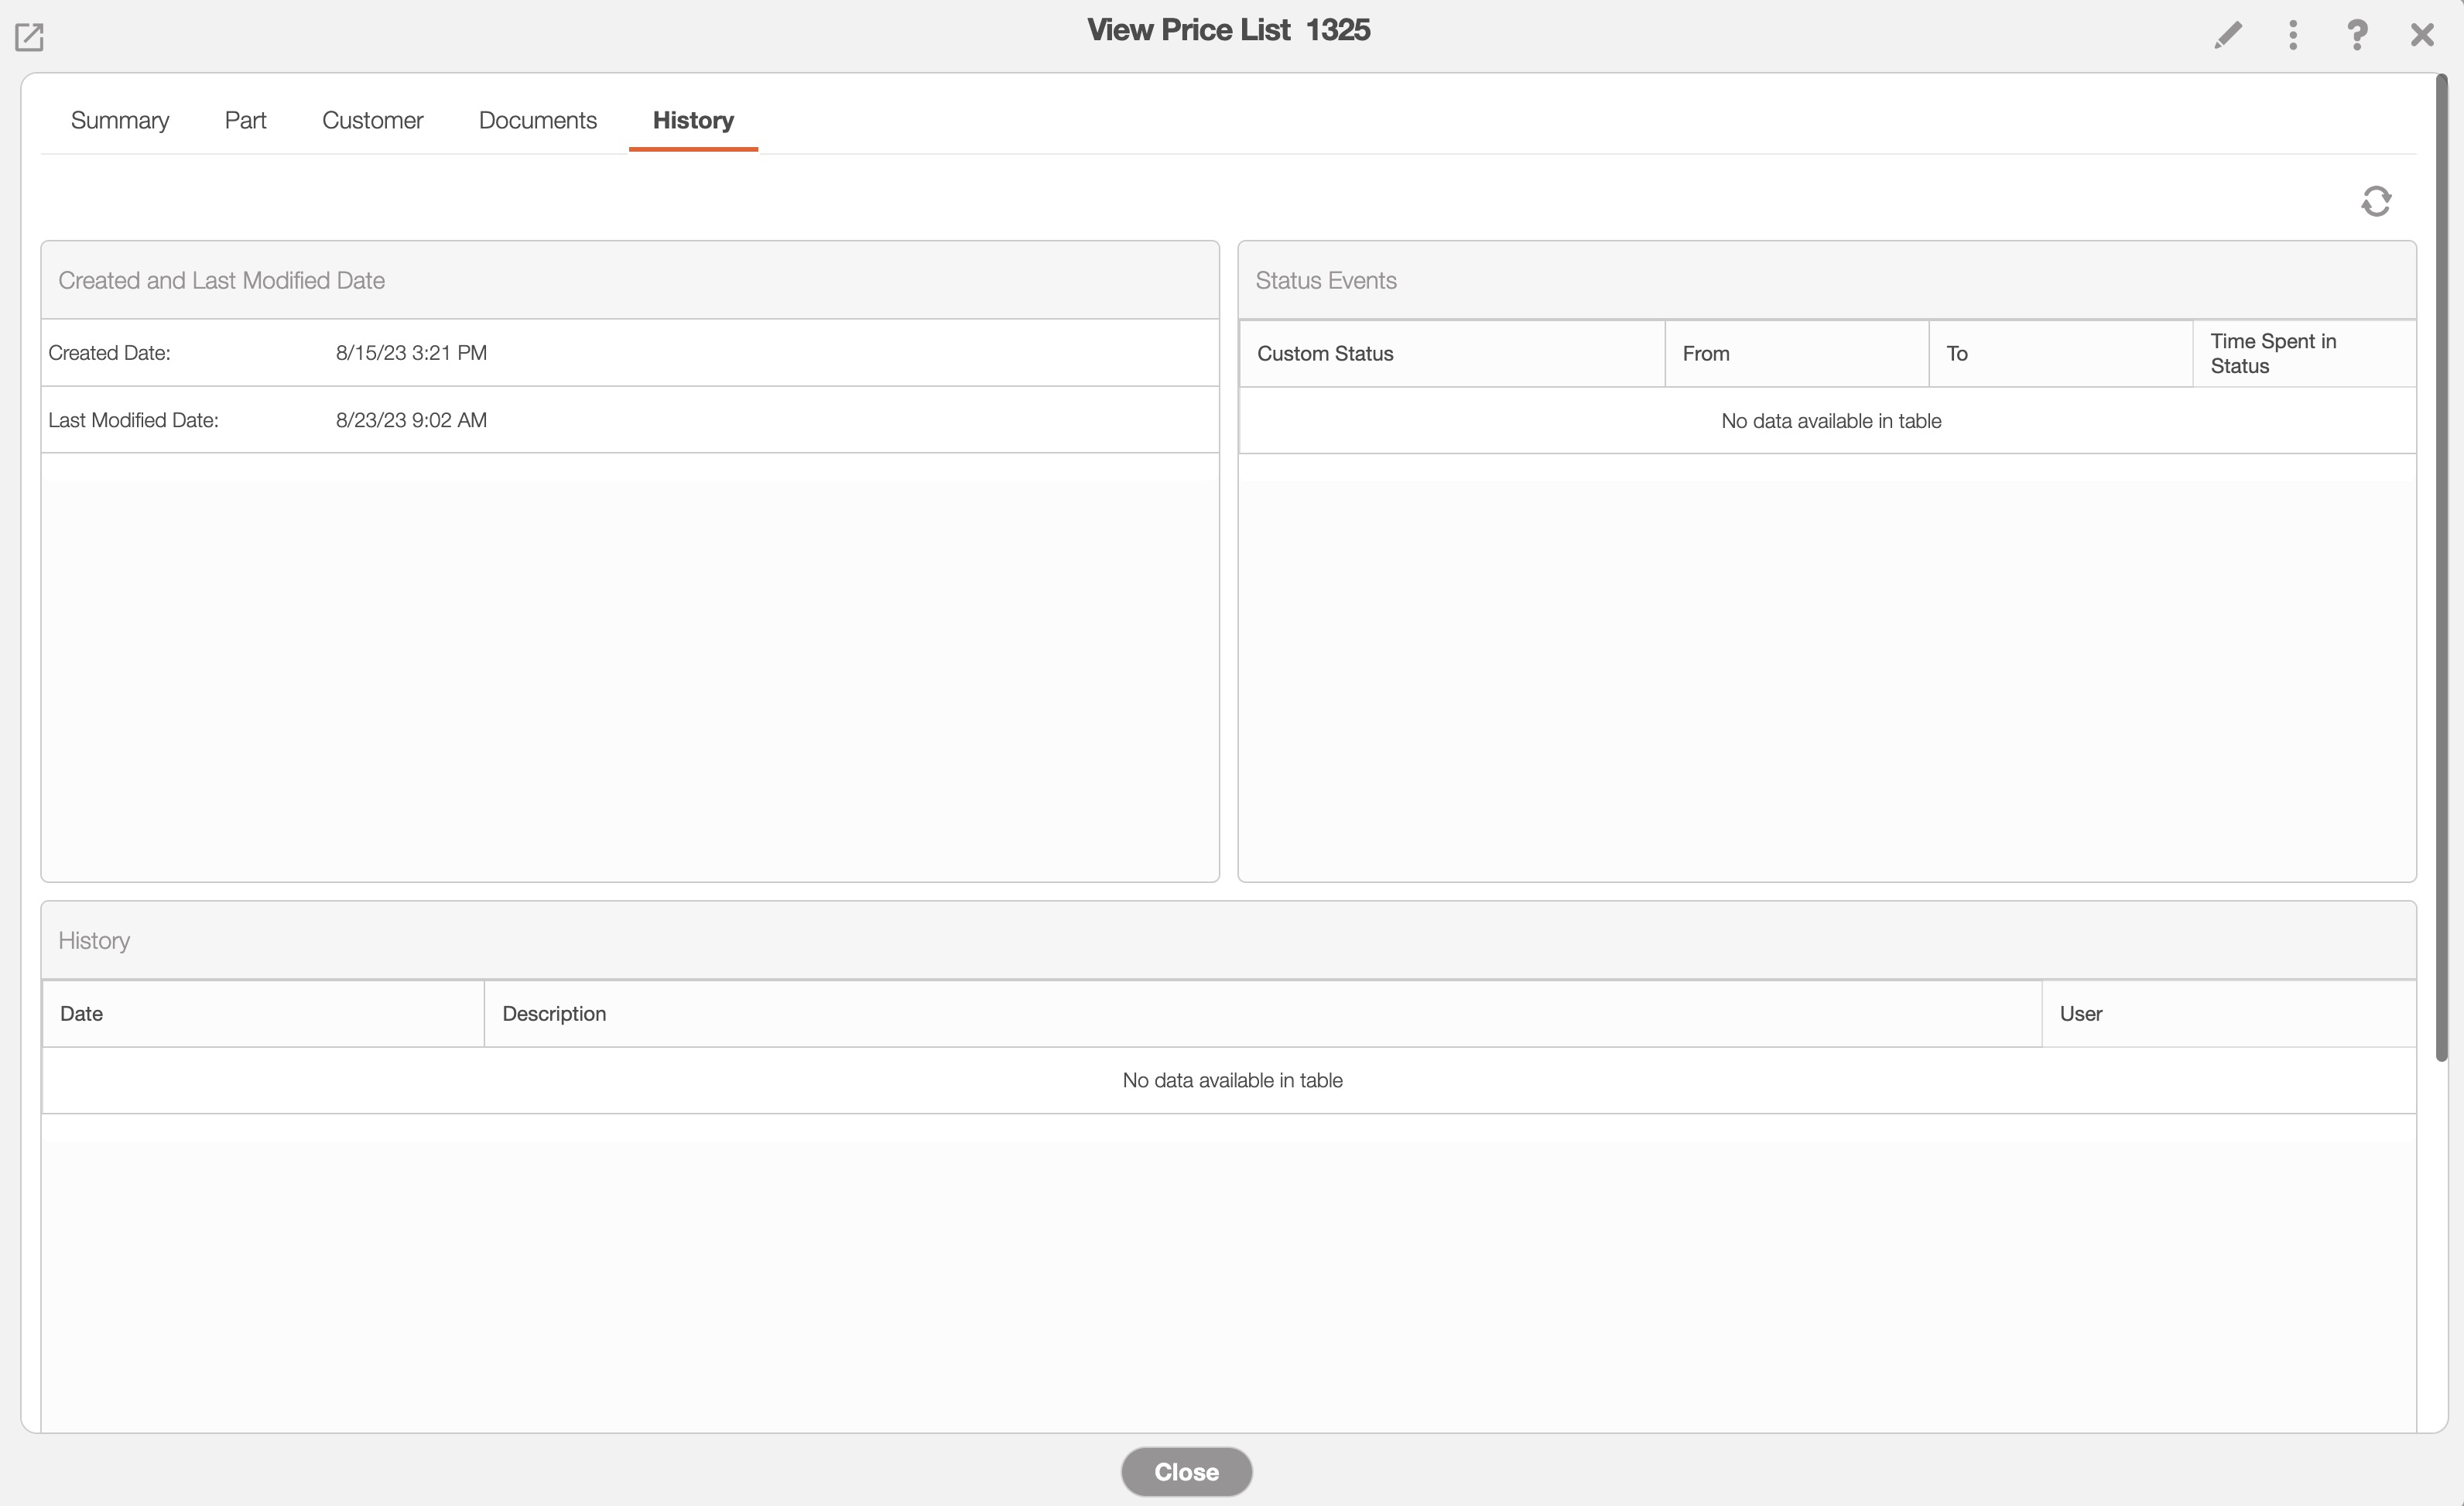
The "History" tab lists the historically recorded details of the price list. This data includes the date that the price list was created and the last date it was modified:
You can manage the parts and customers of a specified price list; to manage the parts and customers you must first be on the Price List page.
Once you are on this page, you can either right-click or click on the Individual Actions button and select the desired option:
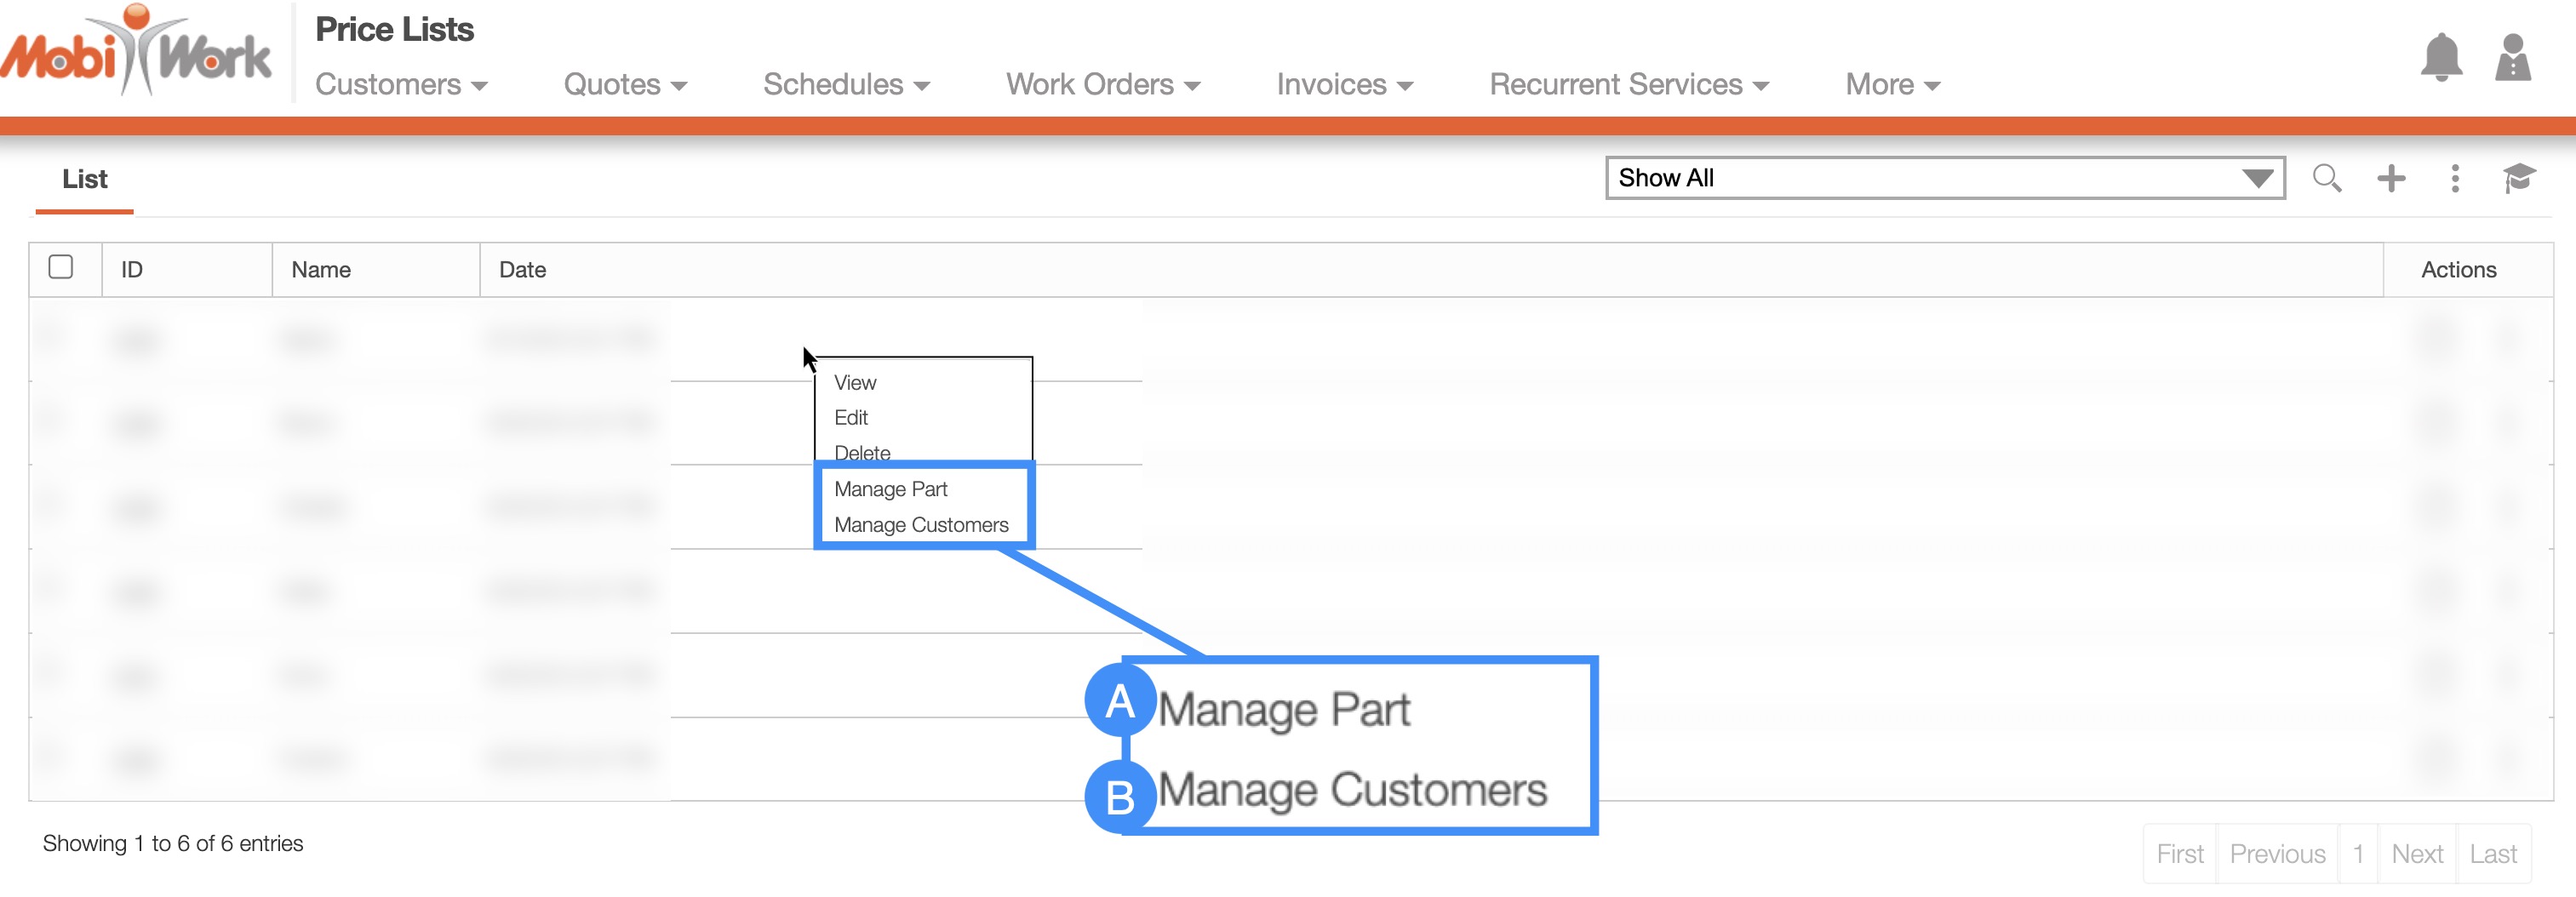
Manage Part
Manage Customer
Manage Part
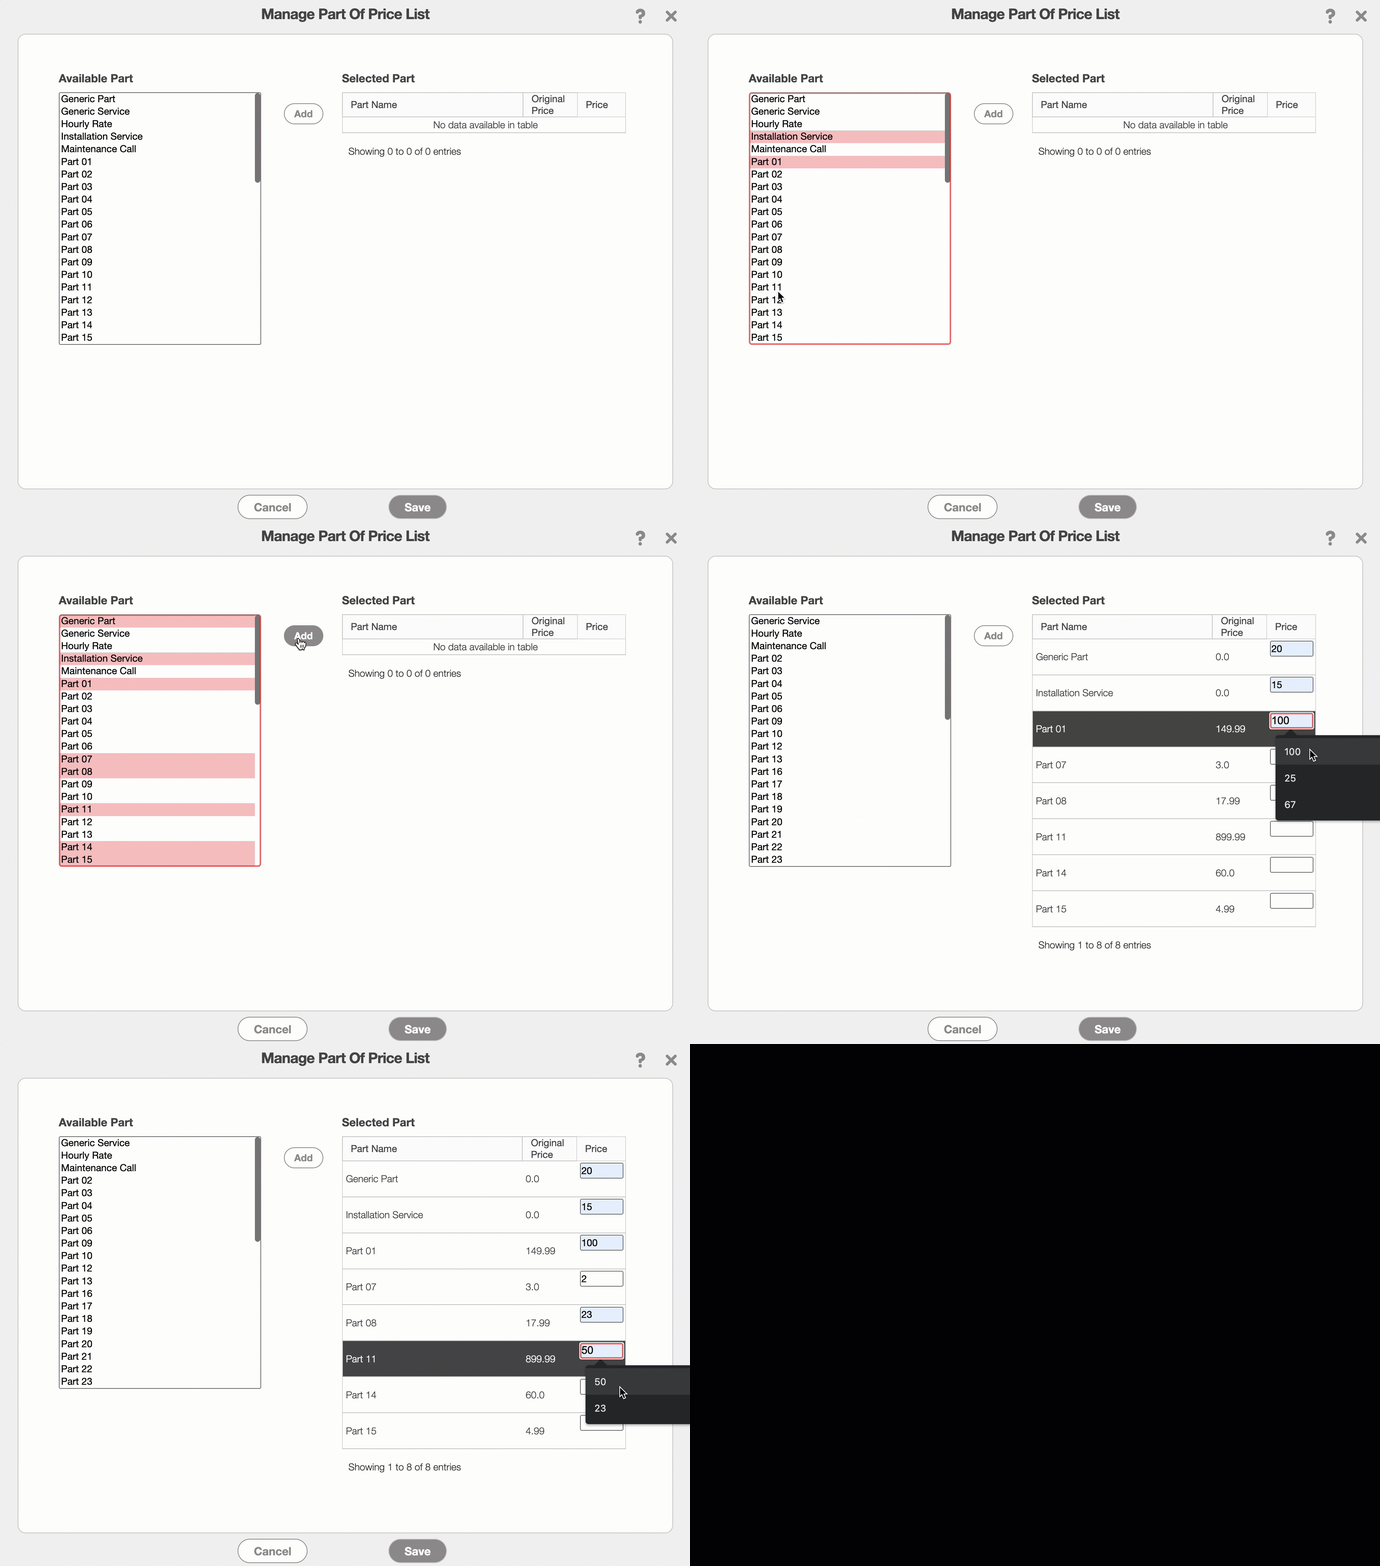
If you would like to associate parts with the price list, select the "Manage Part" option from the drop-down; the Manage Part of Price List pop-up window will then appear:
From this window, you can click & drag to highlight the desired parts or services. To highlight multiple parts or services, click with your mouse and hold the Command Key (Mac) or click with your mouse and hold the Control Key (Windows)
Once you are satisfied with your selection, click the Add button.
Then in the "Selected Part" column, input the new price:
To finalize the parts associated with the price list and the new prices, click the Save button.
Note: You can add a part or product to multiple price lists.
Manage Customer
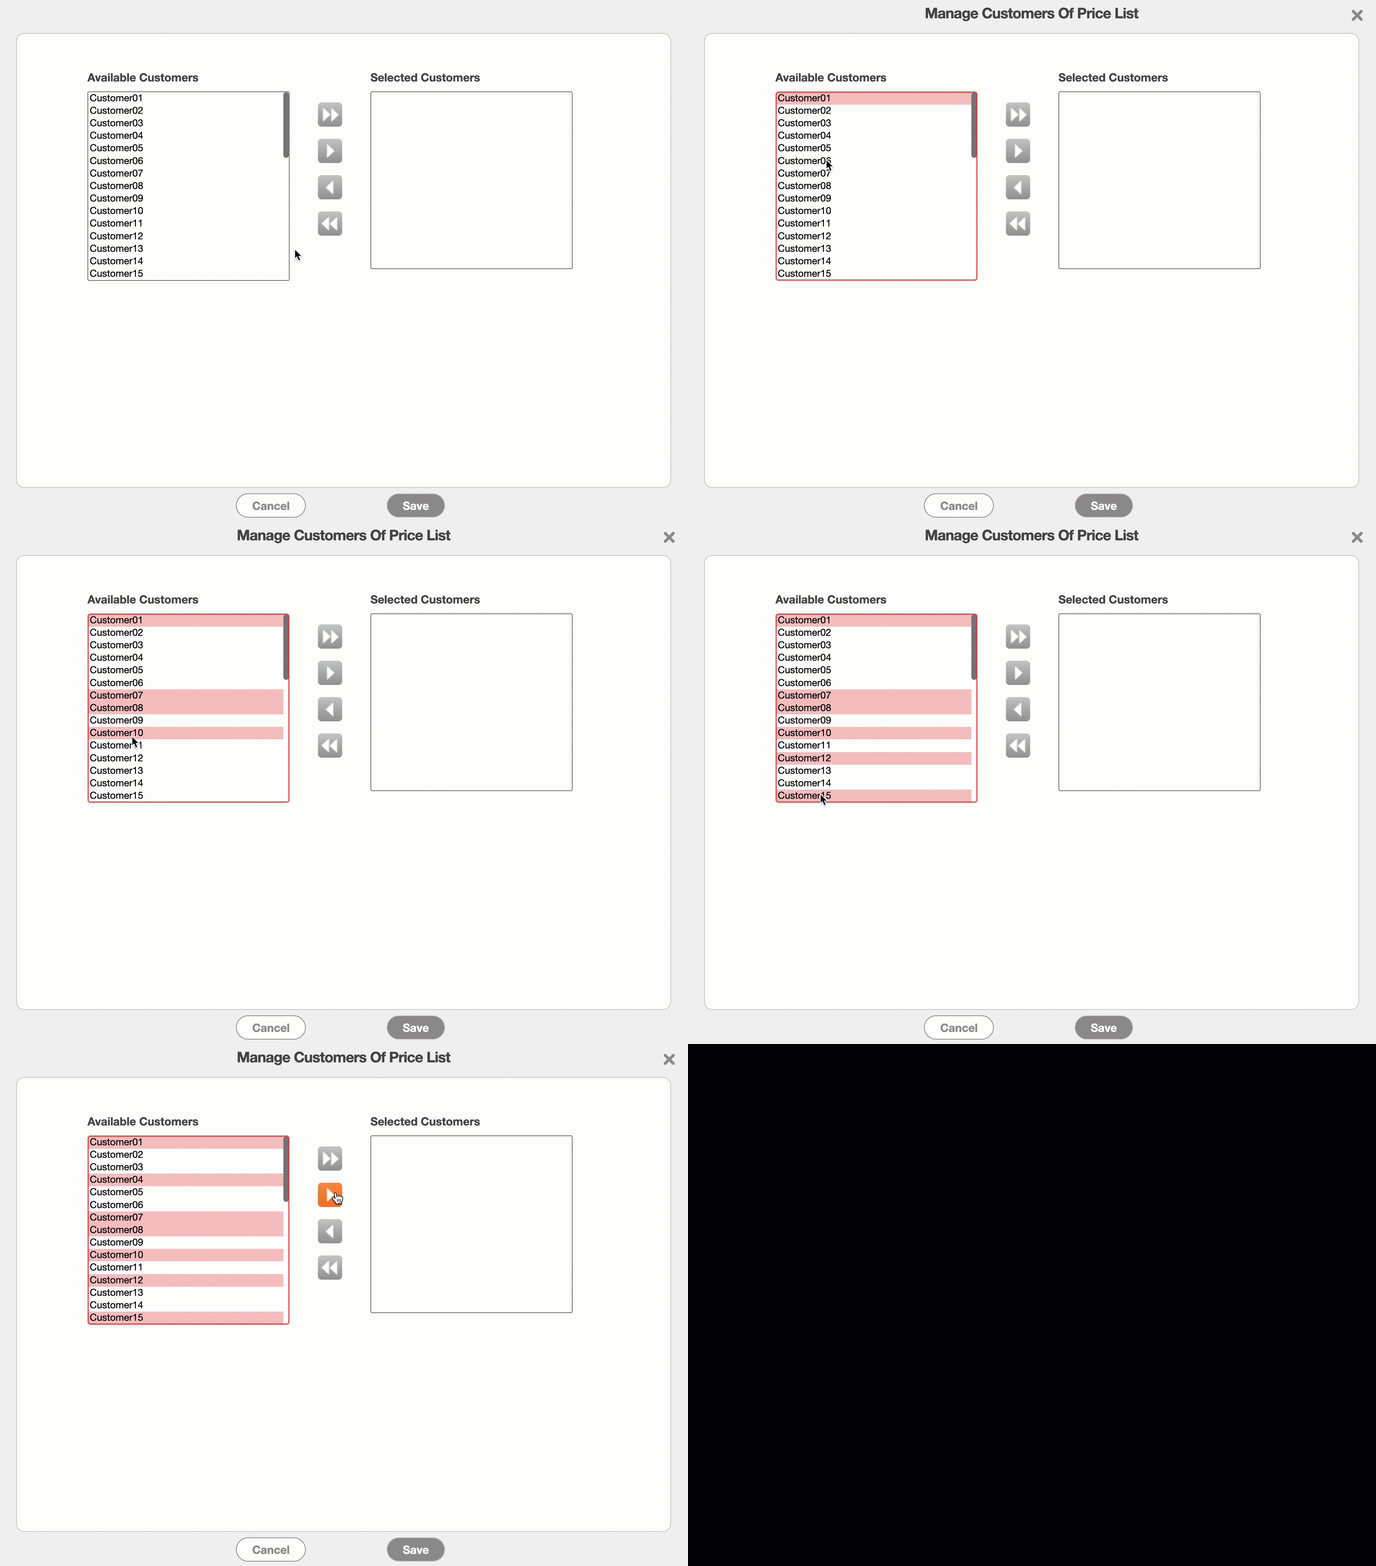
If you would like to associate customers with the price list, select the "Manage Customers" option from the drop-down; the Manage Customers of Price List pop-up window will then appear.
From this window, you can click & drag to highlight the desired customers. To highlight multiple customers, click with your mouse and hold the Command Key (Mac) or click with your mouse and hold the Control Key (Windows)
Once you are satisfied with your selection, click the right Arrow button to add them to the "Selected Customers" column. To add all the customers, click the Double Arrow button:
To finalize the customers associated with the price list, click the Save button.
Note: Please note that customers can only belong to one price list. If you try to add a customer to two different price lists, you will receive an error:

You can delete a selected price list from the Price List page. On this page, there are two different ways you can delete a price list:
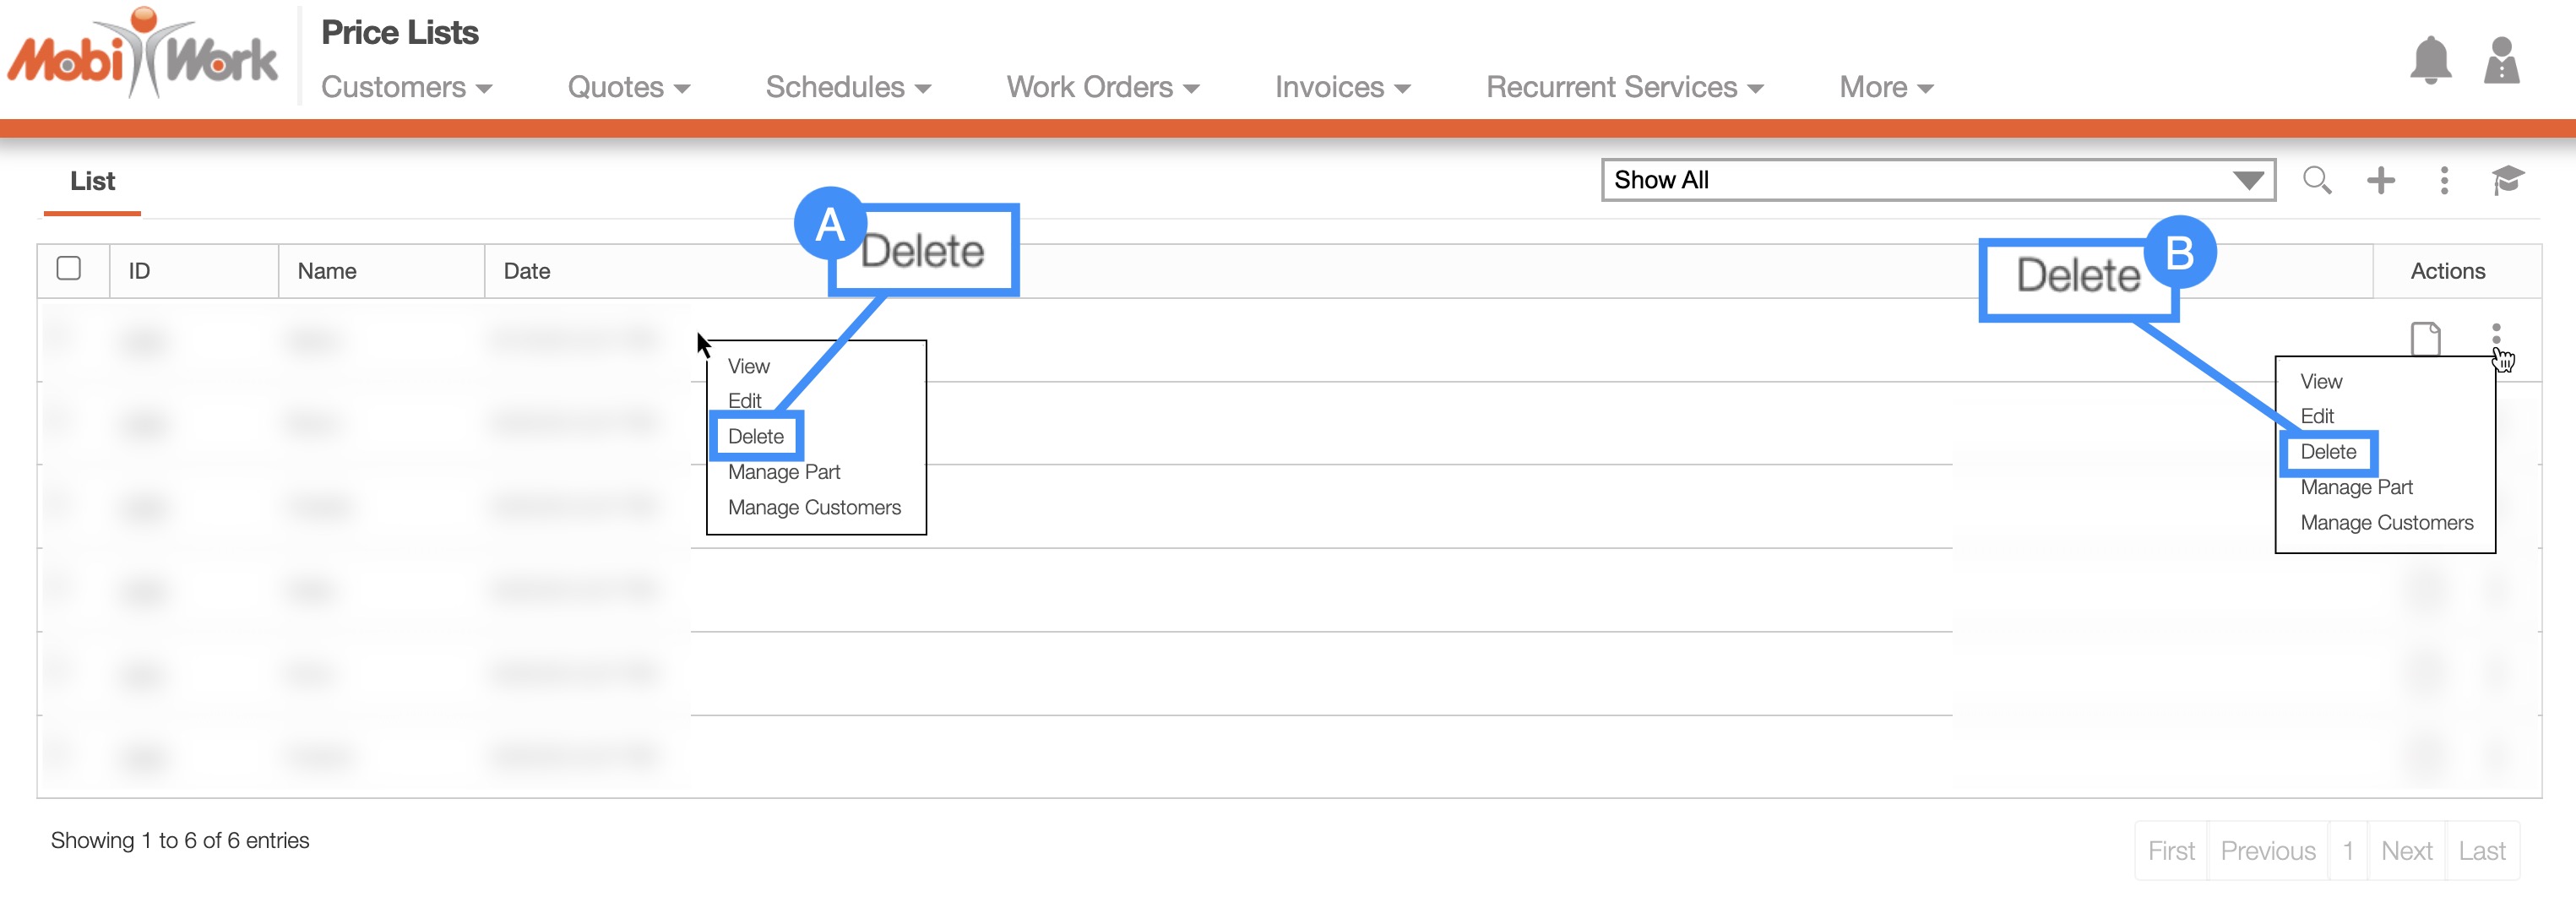
Right-click on the desired price list and from the drop-down select the "Delete" option
Or you can click on the Individual Actions button and from the drop-down select the "Delete" option
Regardless of the method you choose to delete the price list, the Delete pop-up window will appear asking you to confirm the deletion of the price list:
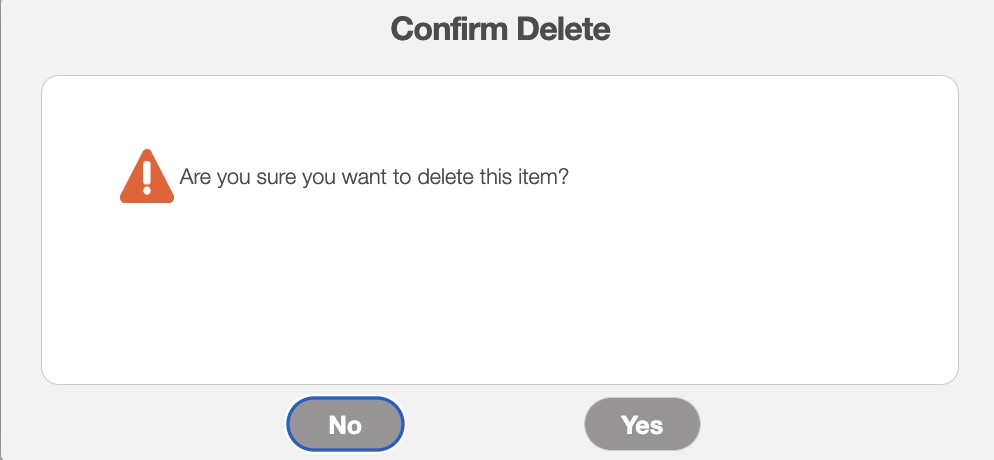
Please note that the deletion of a price list is permanent and cannot be undone.
If you have any questions or need further assistance, please let us know. We'd be happy to help!

