To export your invoices into a PDF, Excel, or a QuickBooks format you will first need to access the Invoice feature page. Please see Invoice List for more information on how to access this page.
There are several different ways you can export your invoice into a PDF and one way to export your invoice into Excel:
Export into PDF
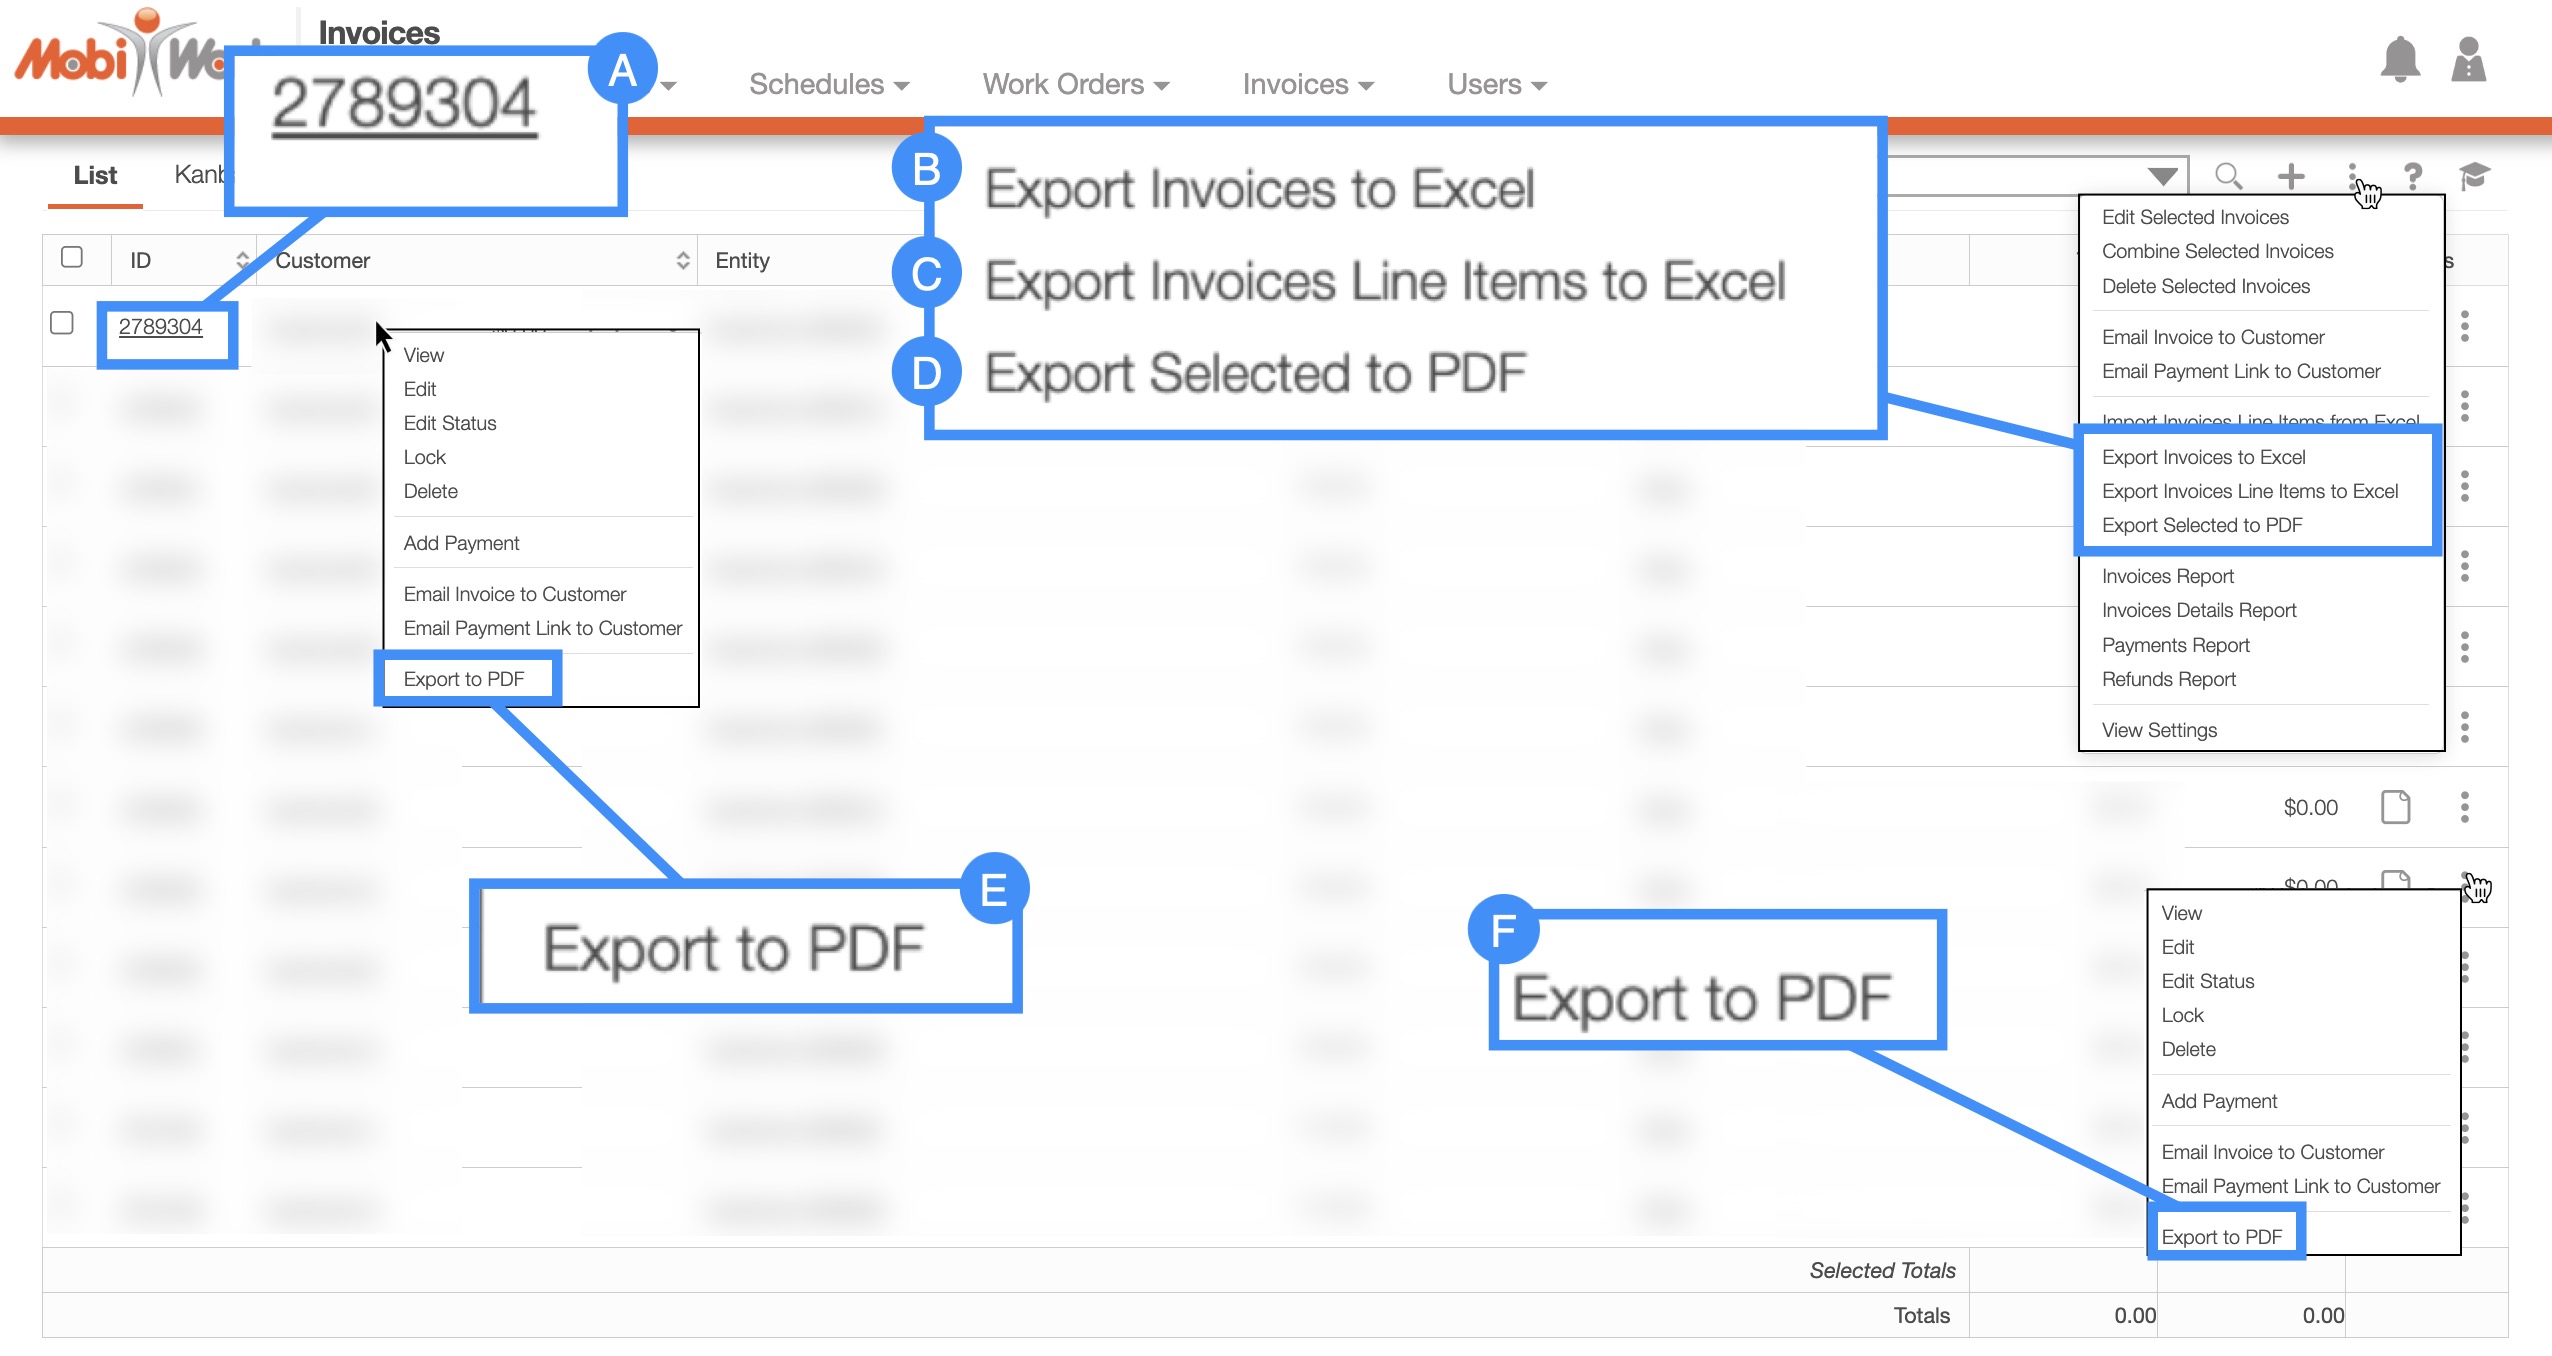
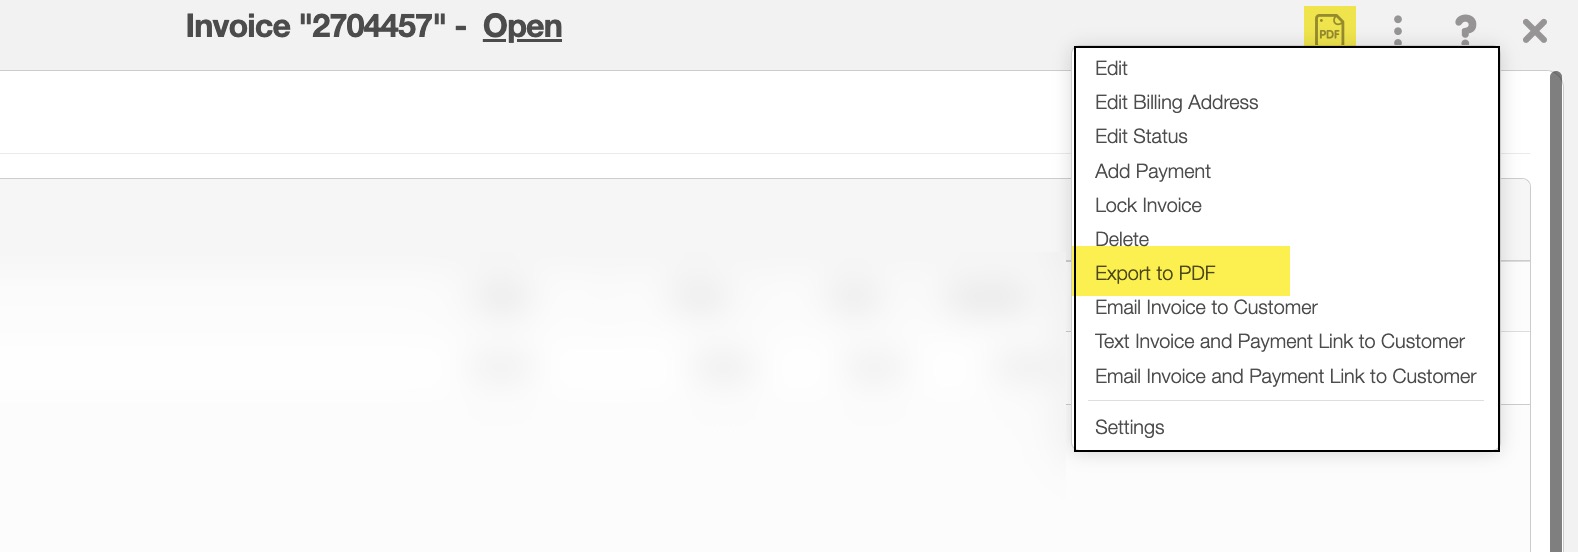
- Once you click on the Invoice ID, you will be directed to the View Invoice pop-up window. From this window you can click on the Individual Actions and select the "Export to PDF" option:
- Please note that there are various ways to access the View Invoice pop-up window. Please see the View an Invoice page for more information
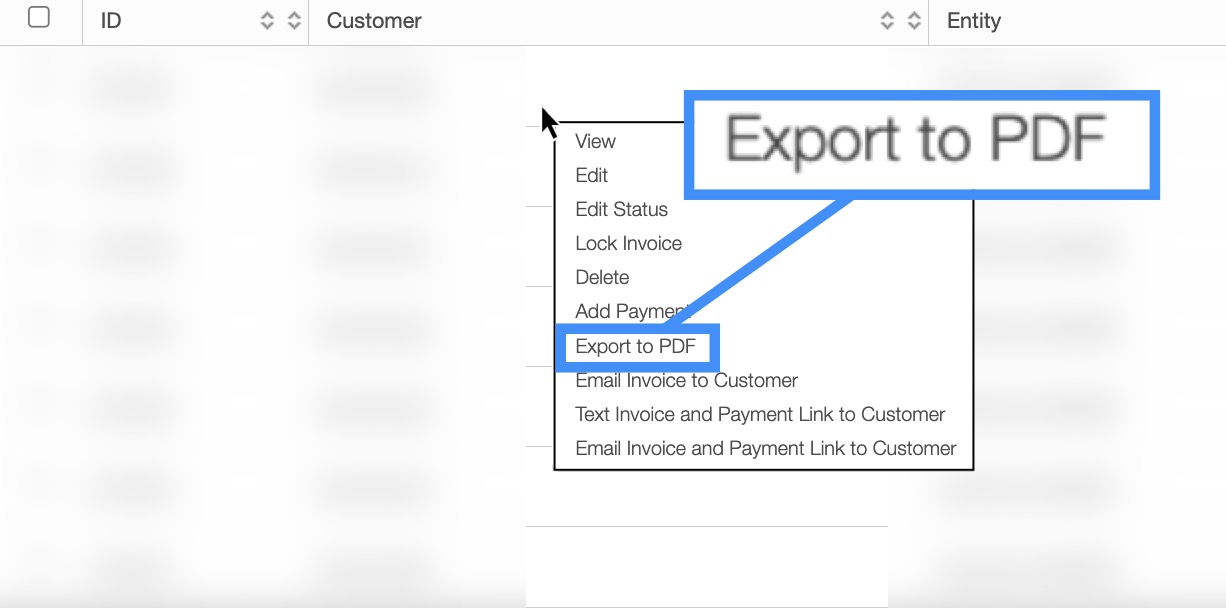
- Right-click the selected invoice and select the "Export to PDF" option from the drop-down.
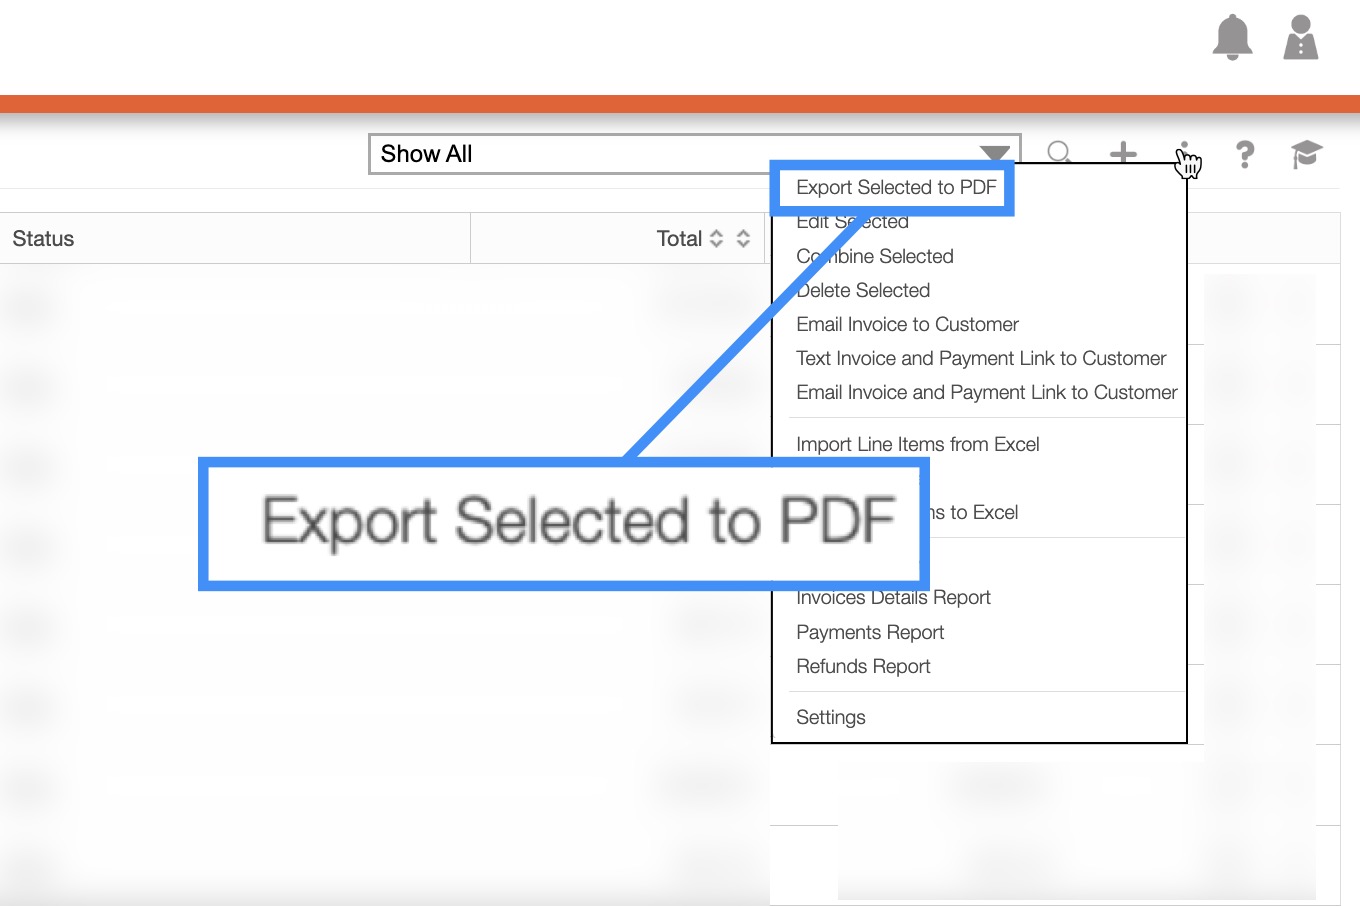
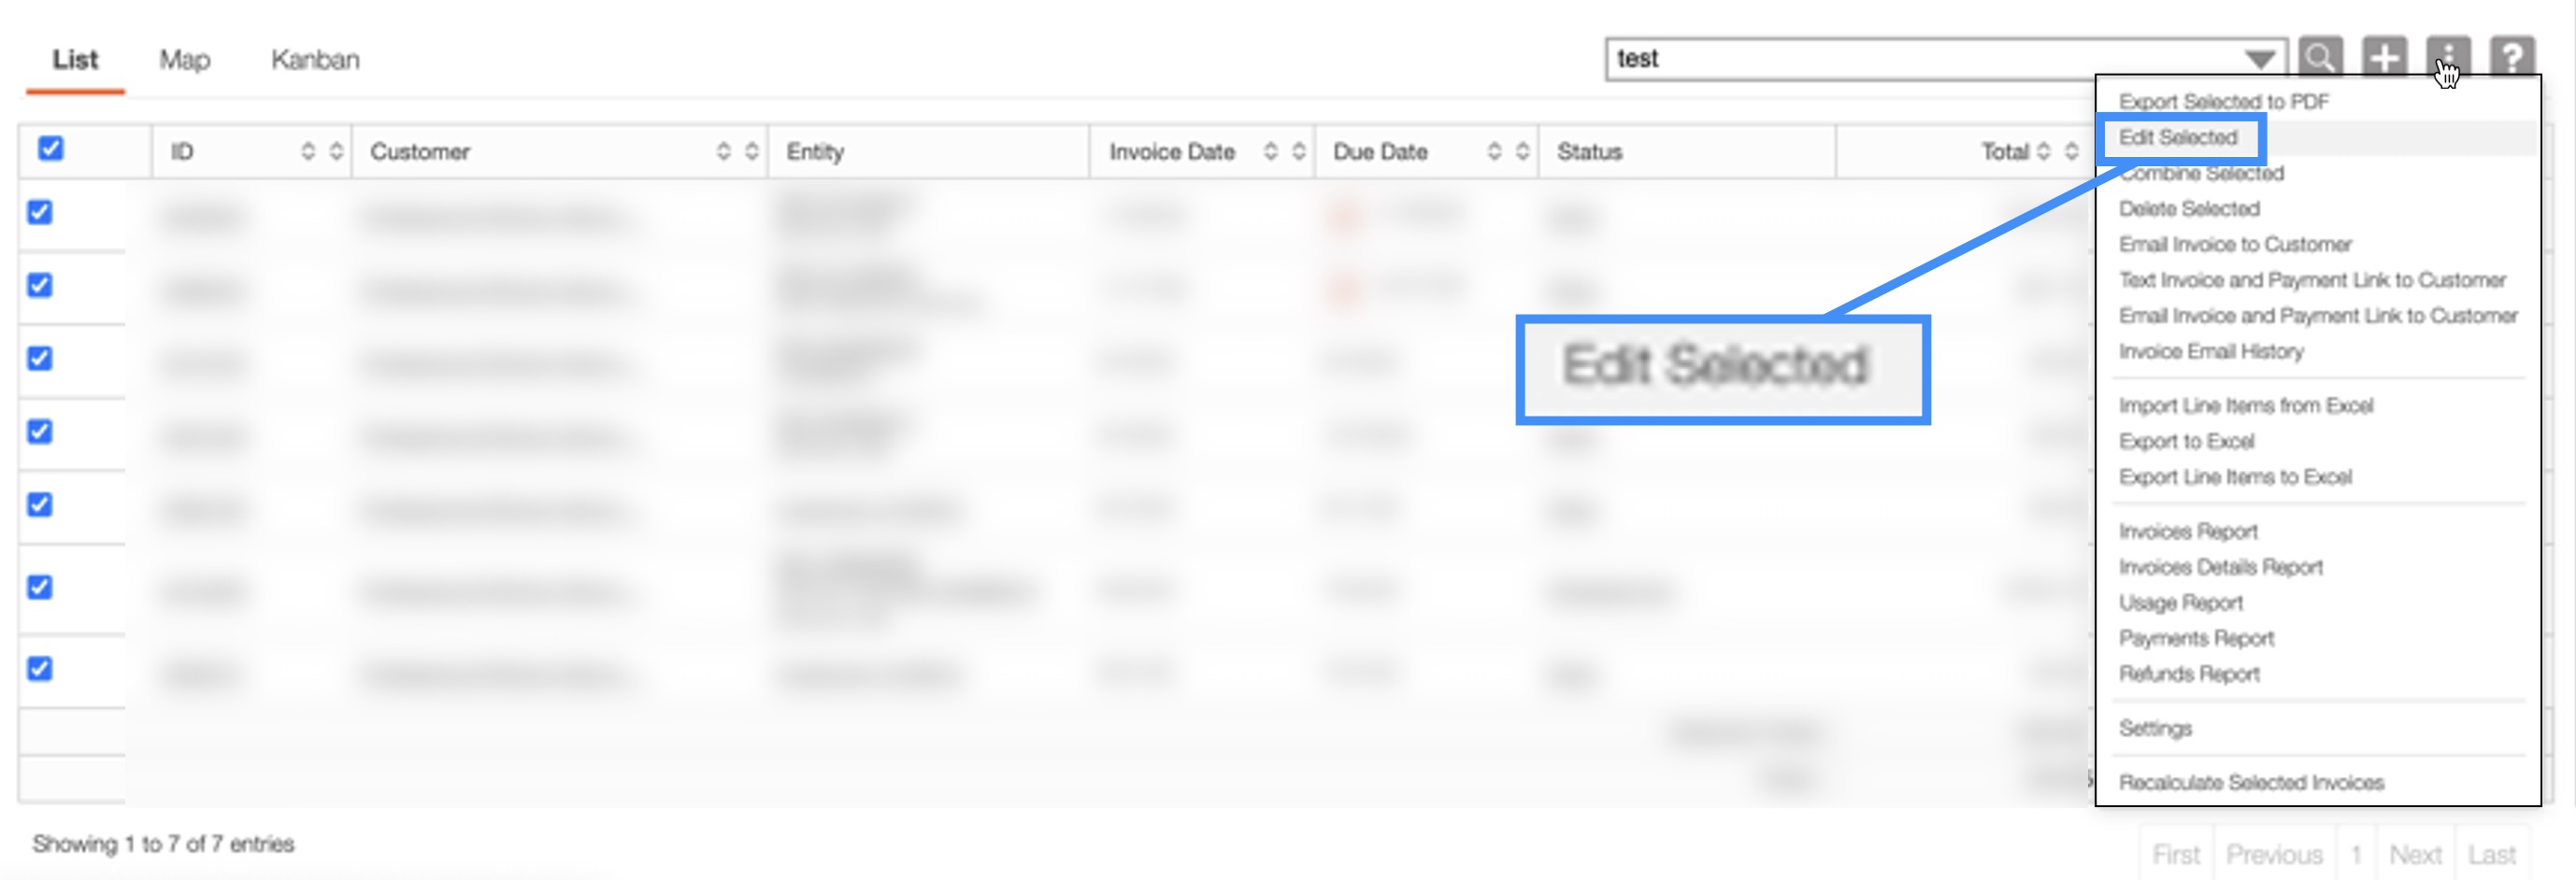
- Select the More Actions button and select the "Export Selected to PDF" option from the drop-down. Please note that this option will export multiple invoices into PDFs at once.
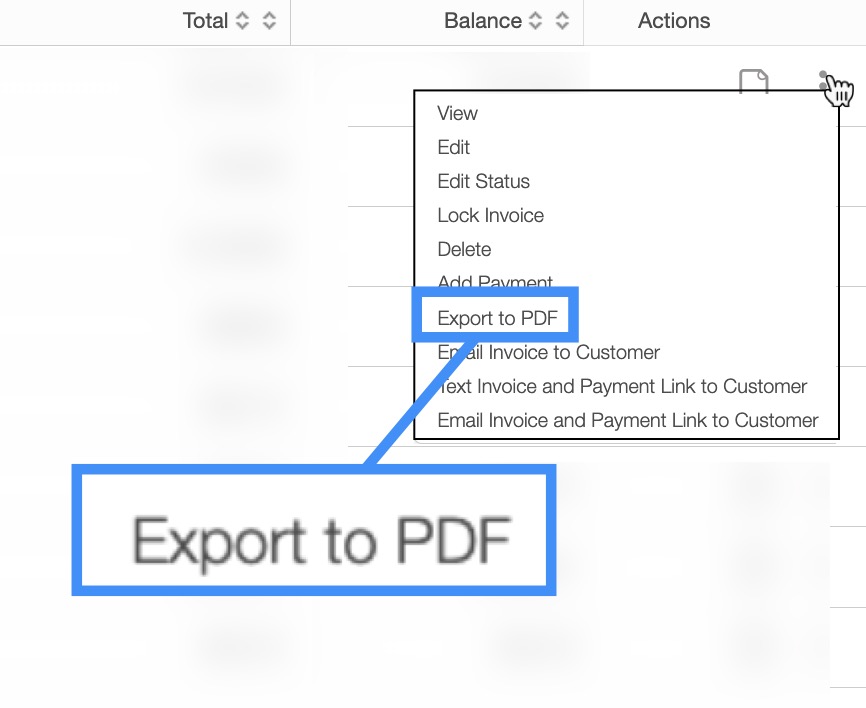
- Select the Individual Actions button under the "Actions" column and select the "Export to PDF" option from the drop-down.
Export into Excel
Click on the More Actions button and from the drop-down click on the "Export Invoice to QuickBooks" option.
Click on the More Actions button and from the drop-down click on the "Export Line Items to Excel" option.
To export an invoice into a PDF file, you will need to first be on the Invoice feature page. Regardless of the method that you choose:
Exporting the invoice through the View Invoice pop-up window:
Right-clicking and selecting the "Export to PDF" option from the drop-down:
Using the More Actions button and selecting the "Export Selected to PDF" option from the drop-down:
Or using the "Export to PDF" option from the Individual Actions button:
- Please note that if you would like to export all your invoices into a PDF you can click on the topmost checkbox (Multiple Selection Area) located in the "List" column:

The invoice will automatically be downloaded as a PDF to your computer. For more information about PDF invoices, please see the View an Invoice PDF page.
Select the invoice that you would like to export to Excel:
To export your invoices into Excel, you will first need to access the Invoice feature page:
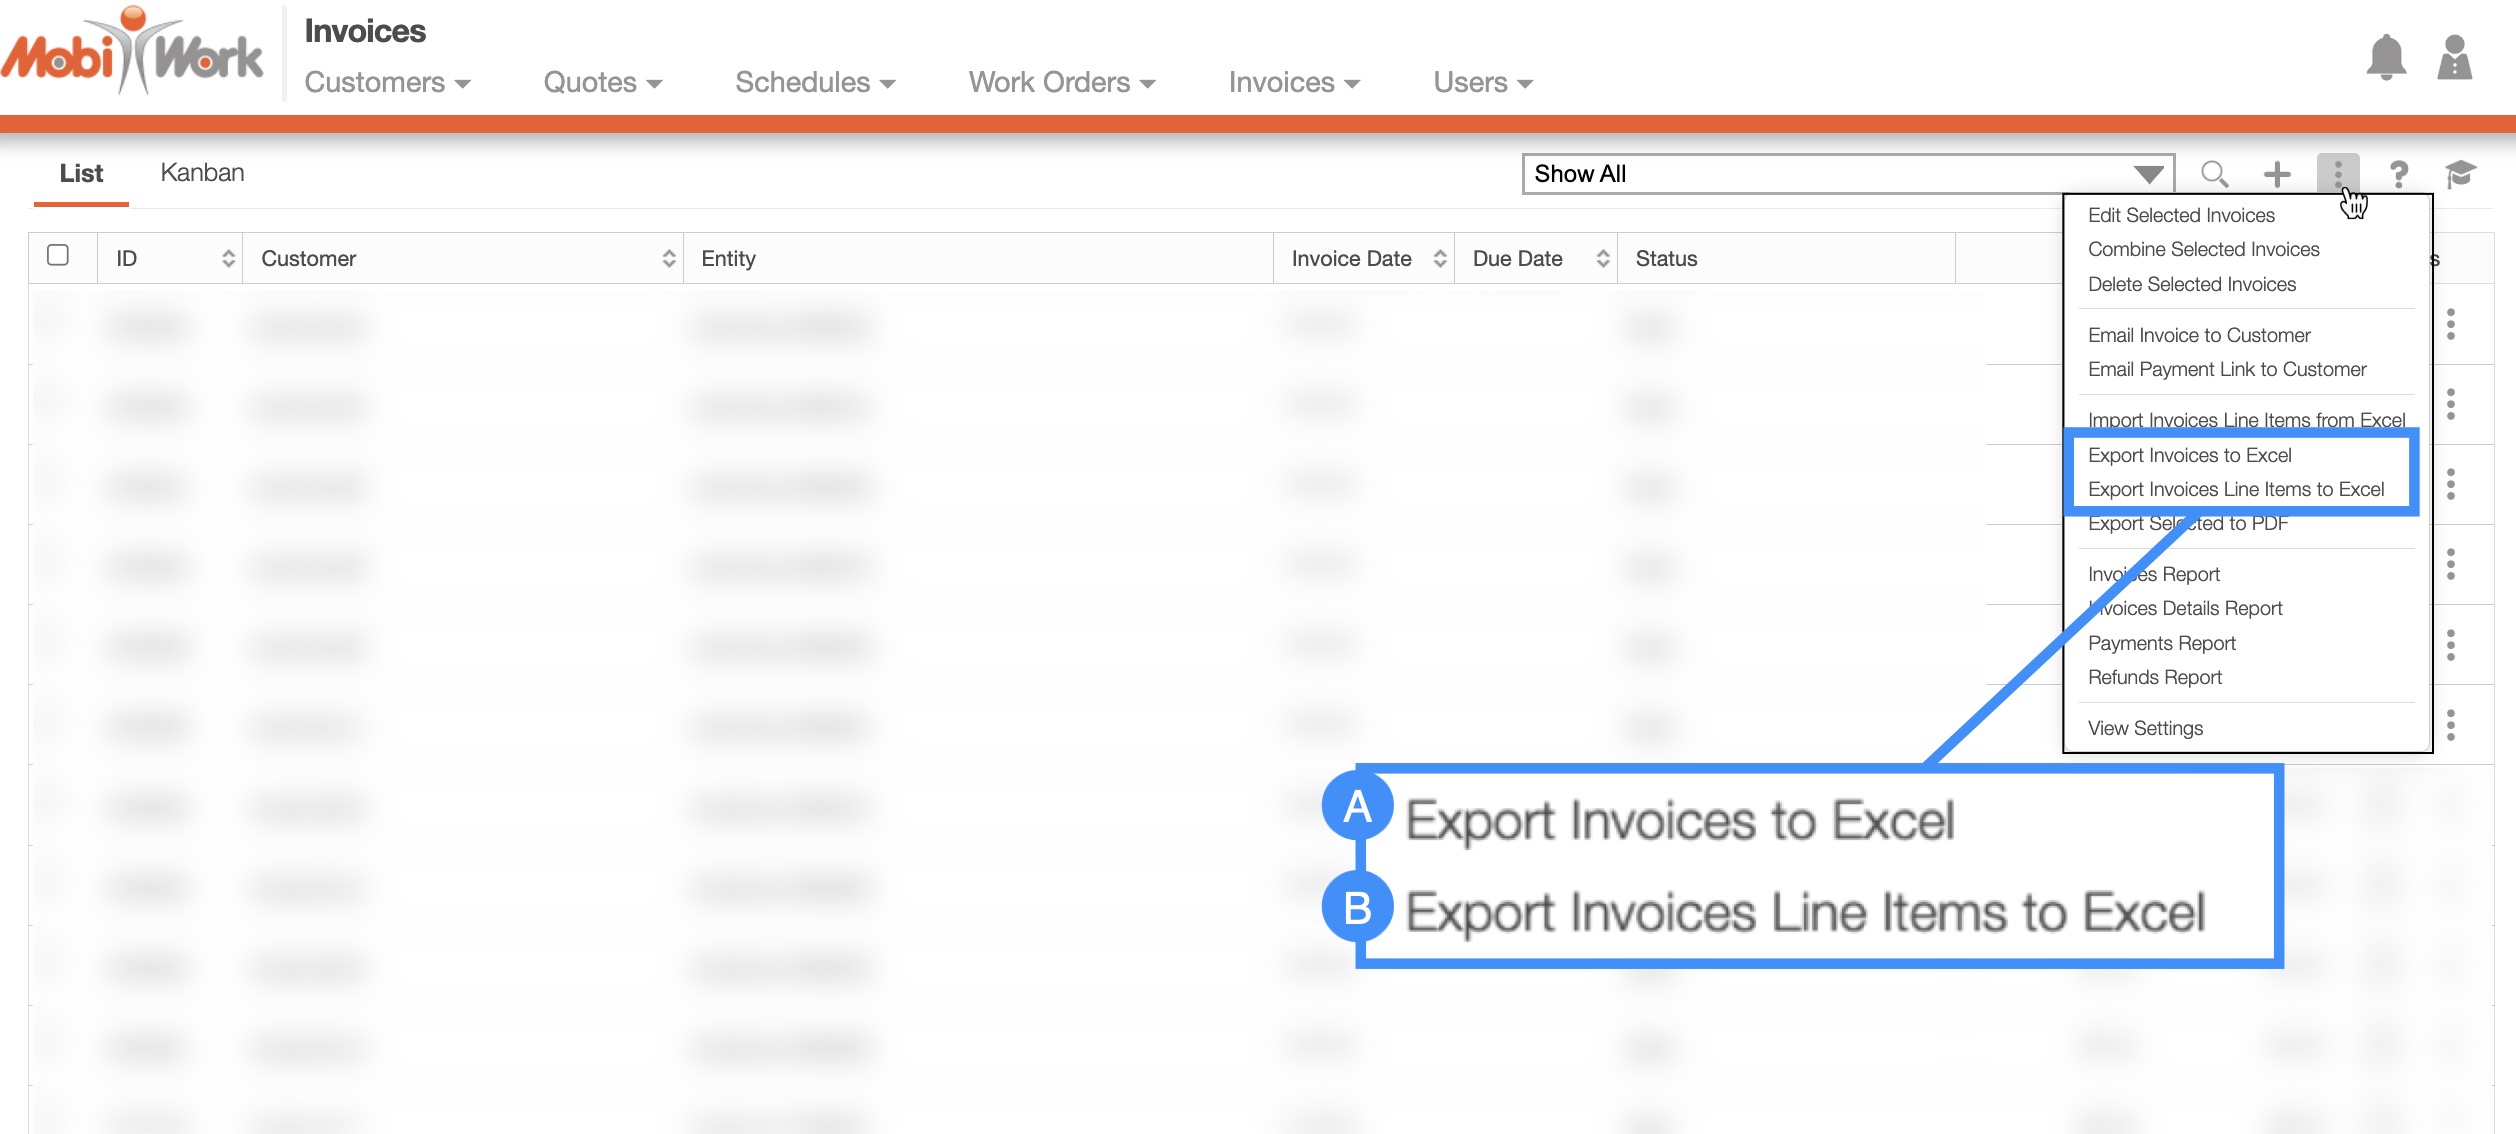
Once you are on the Invoice feature page there are two different ways you can export your invoices into Excel:
Export to Excel
Export Line Items to Excel
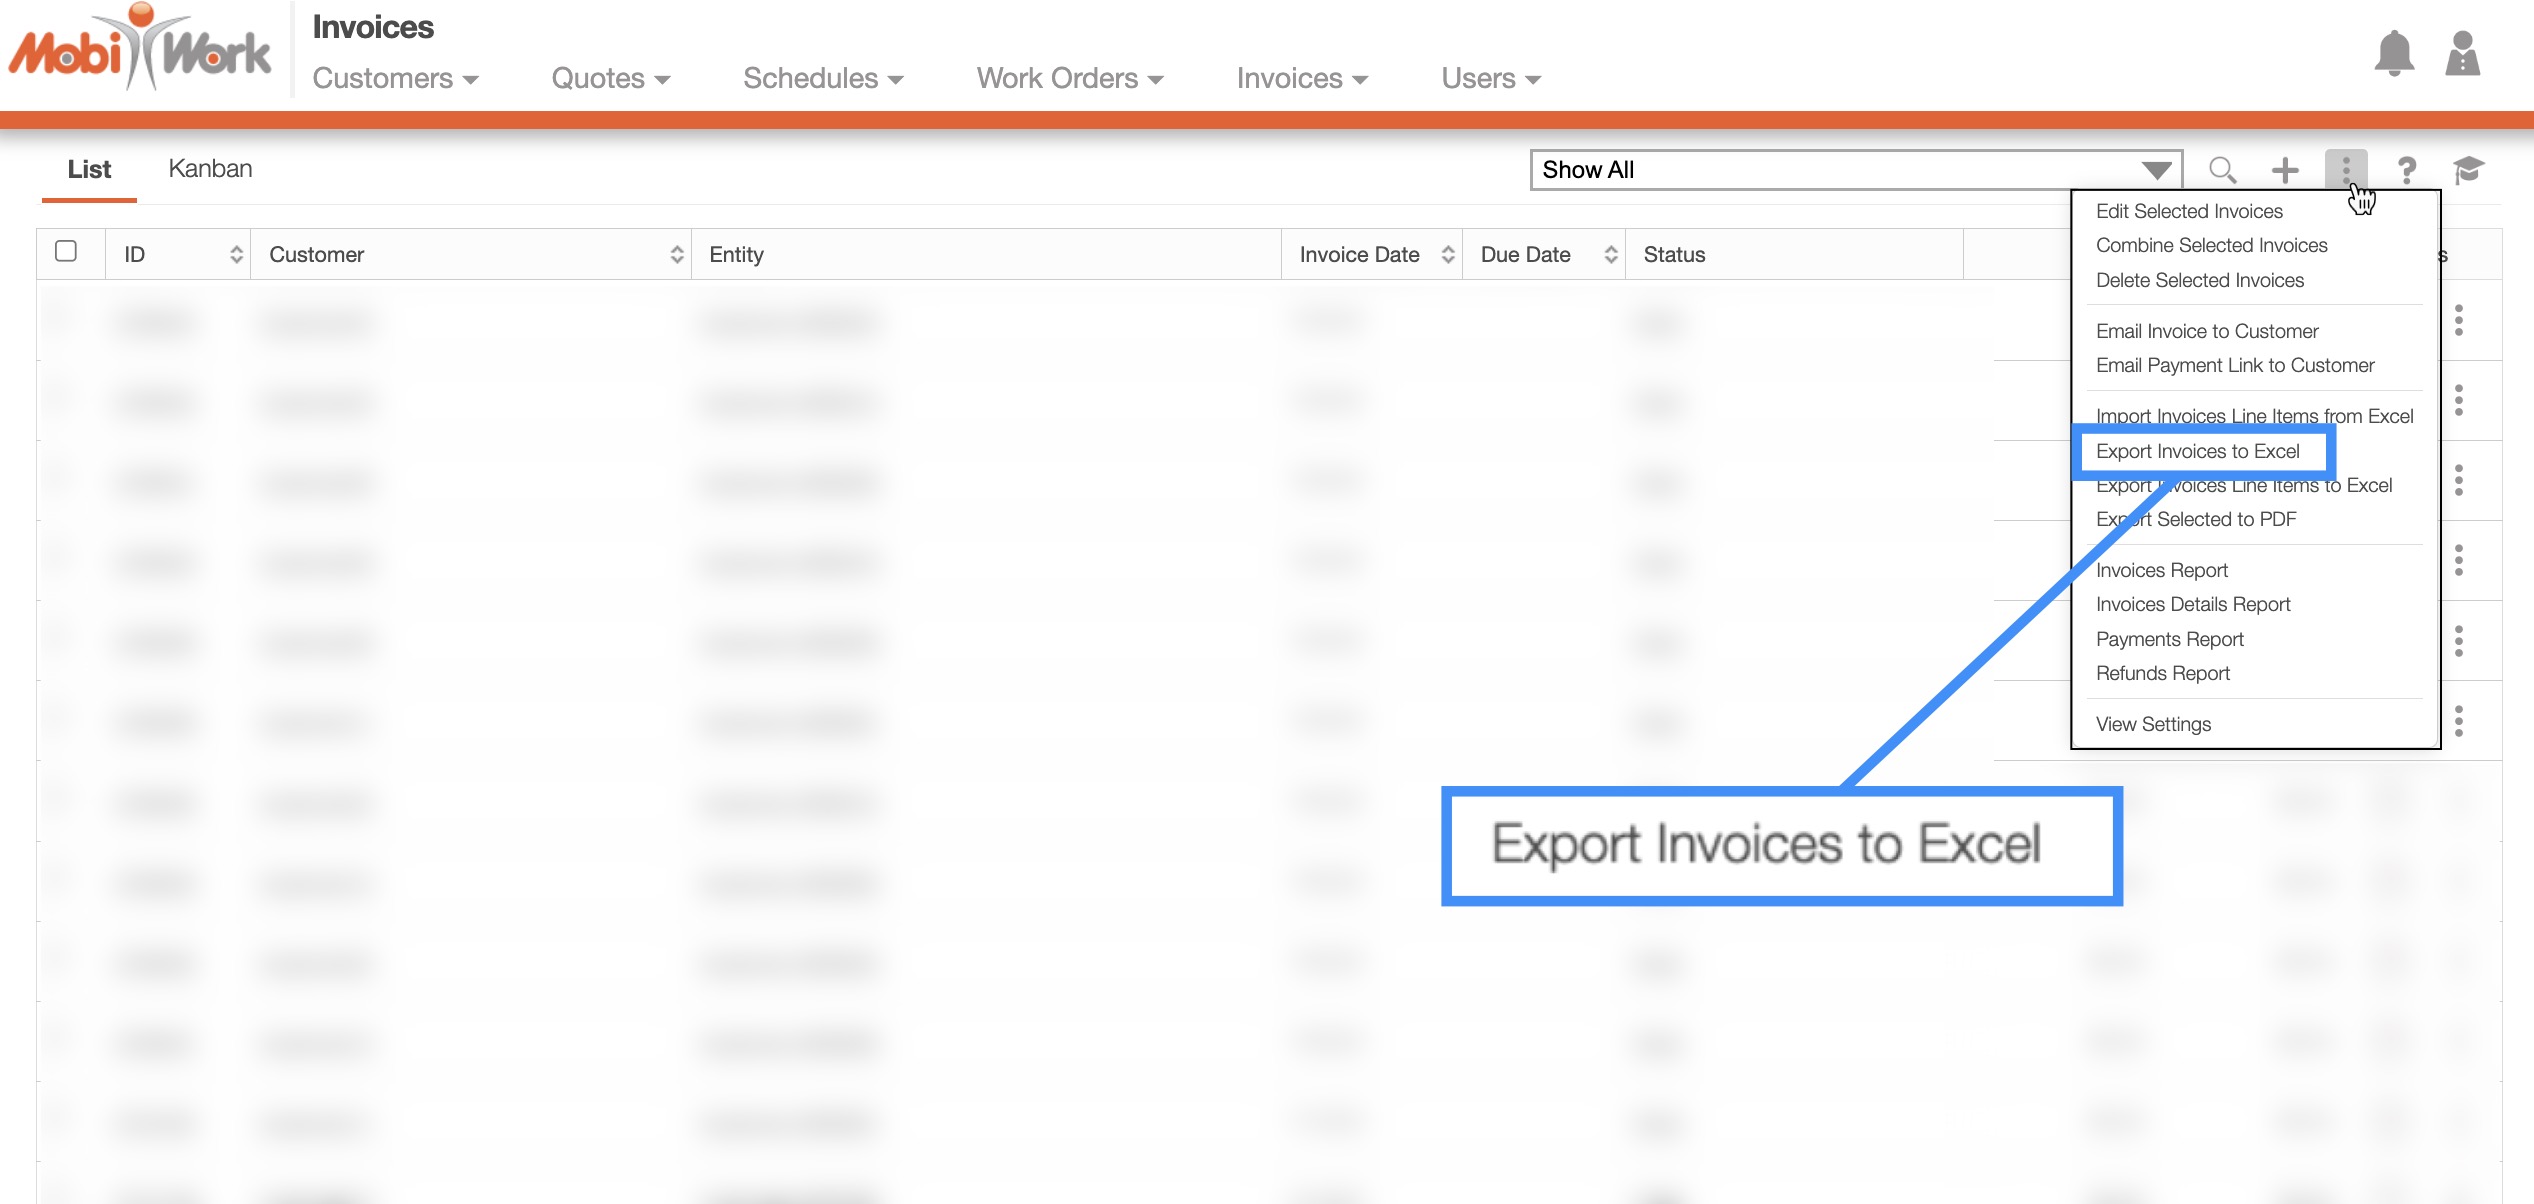
Export Invoices to Excel
To export this file from the Invoice feature page:
Select the invoice that you would like to export to Excel:
- Please note that if you would like to export all your invoices into Excel you can click on the topmost checkbox (Multiple Selection Area) located in the "List" column. Likewise, if you do not select any entries ALL records will be exported:
Click on the More Actions button and from the drop-down menu select the "Export Invoices to Excel" option:
The Excel file will automatically download, and you will be able to locate it in your computer's Download folder.
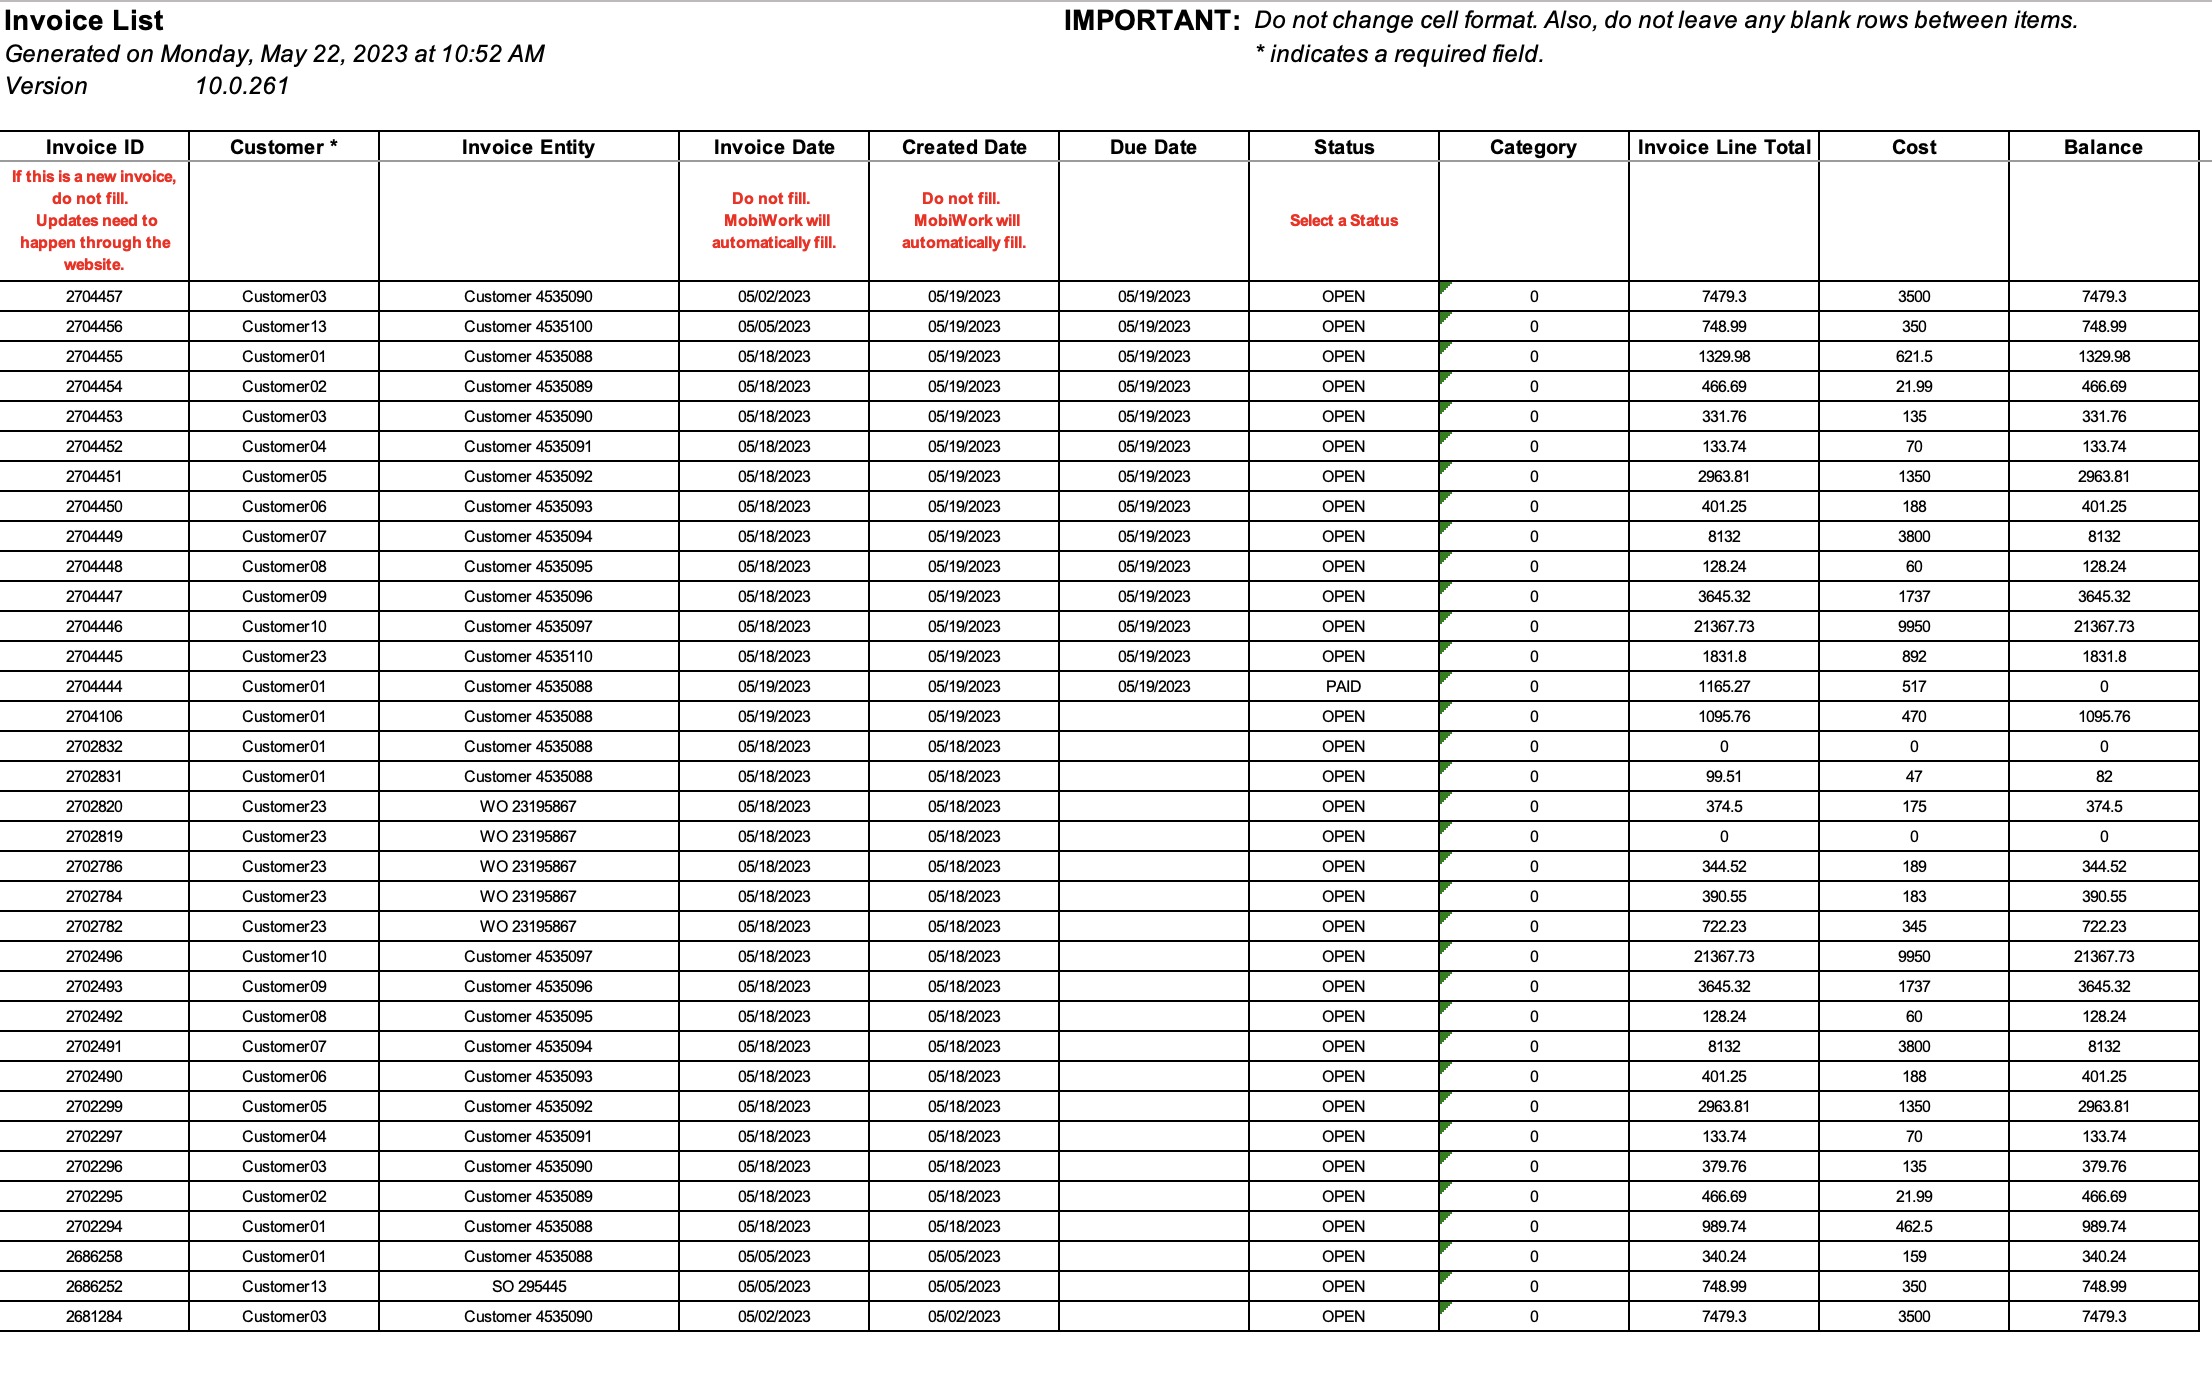
This export will display the basic invoice data (e.g. Invoice ID, customer, due date, status, cost, balance etc.) in an easy-to-read format. You can then use Excel to easily navigate through your company's invoices:
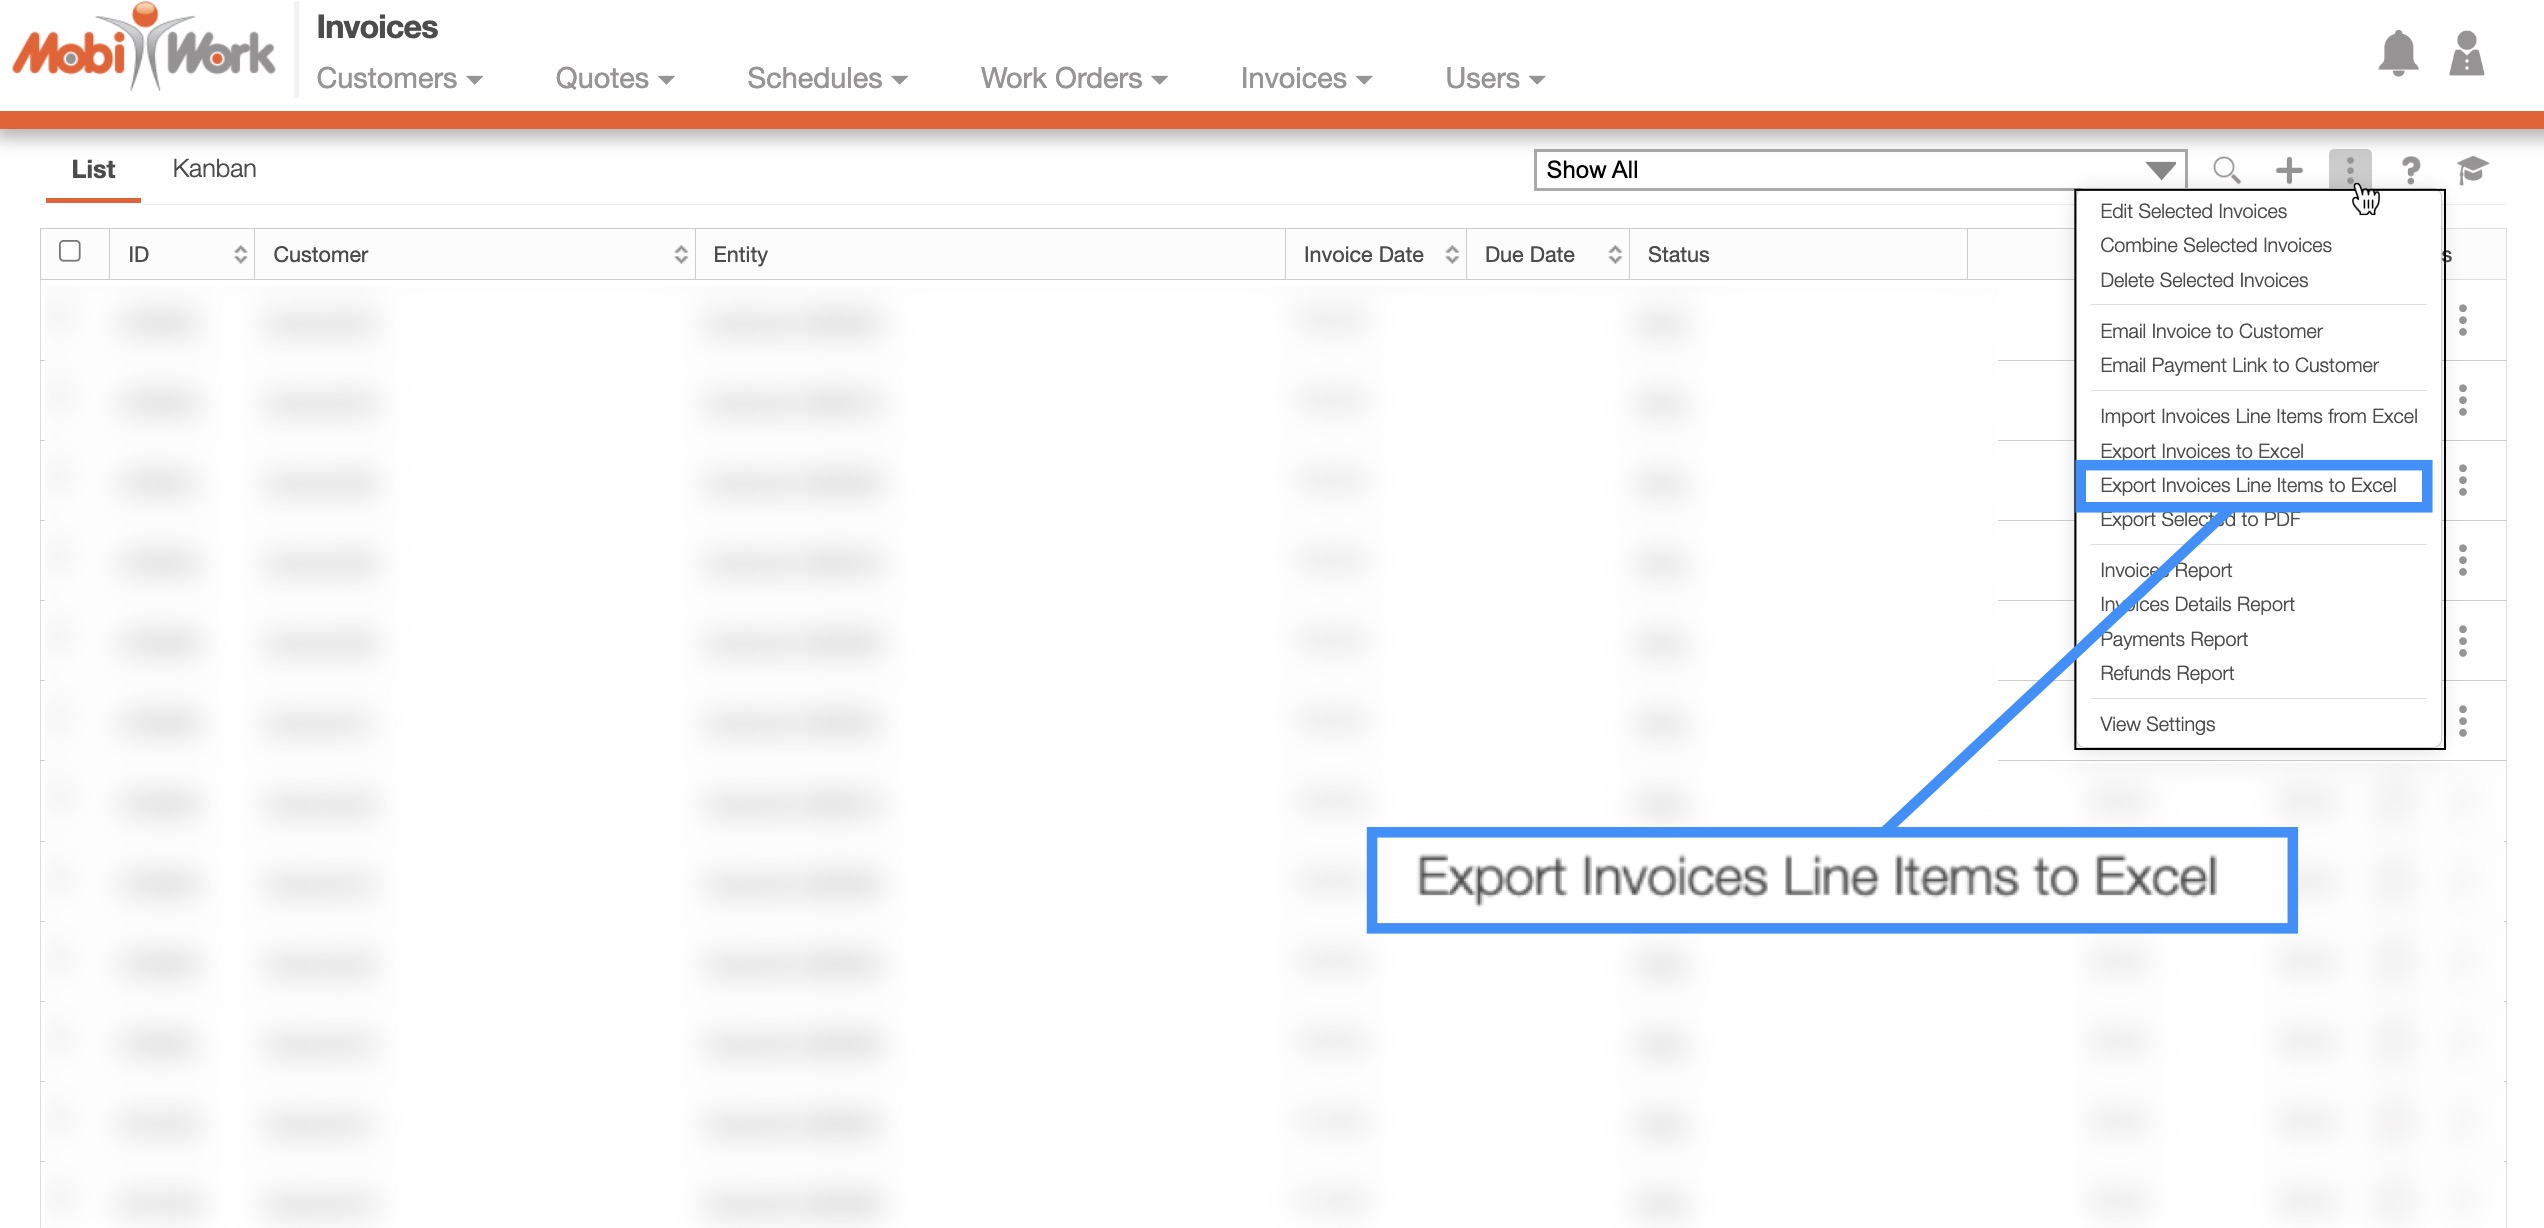
Export Invoices Line Items to Excel
To export this file from the Invoice feature page:
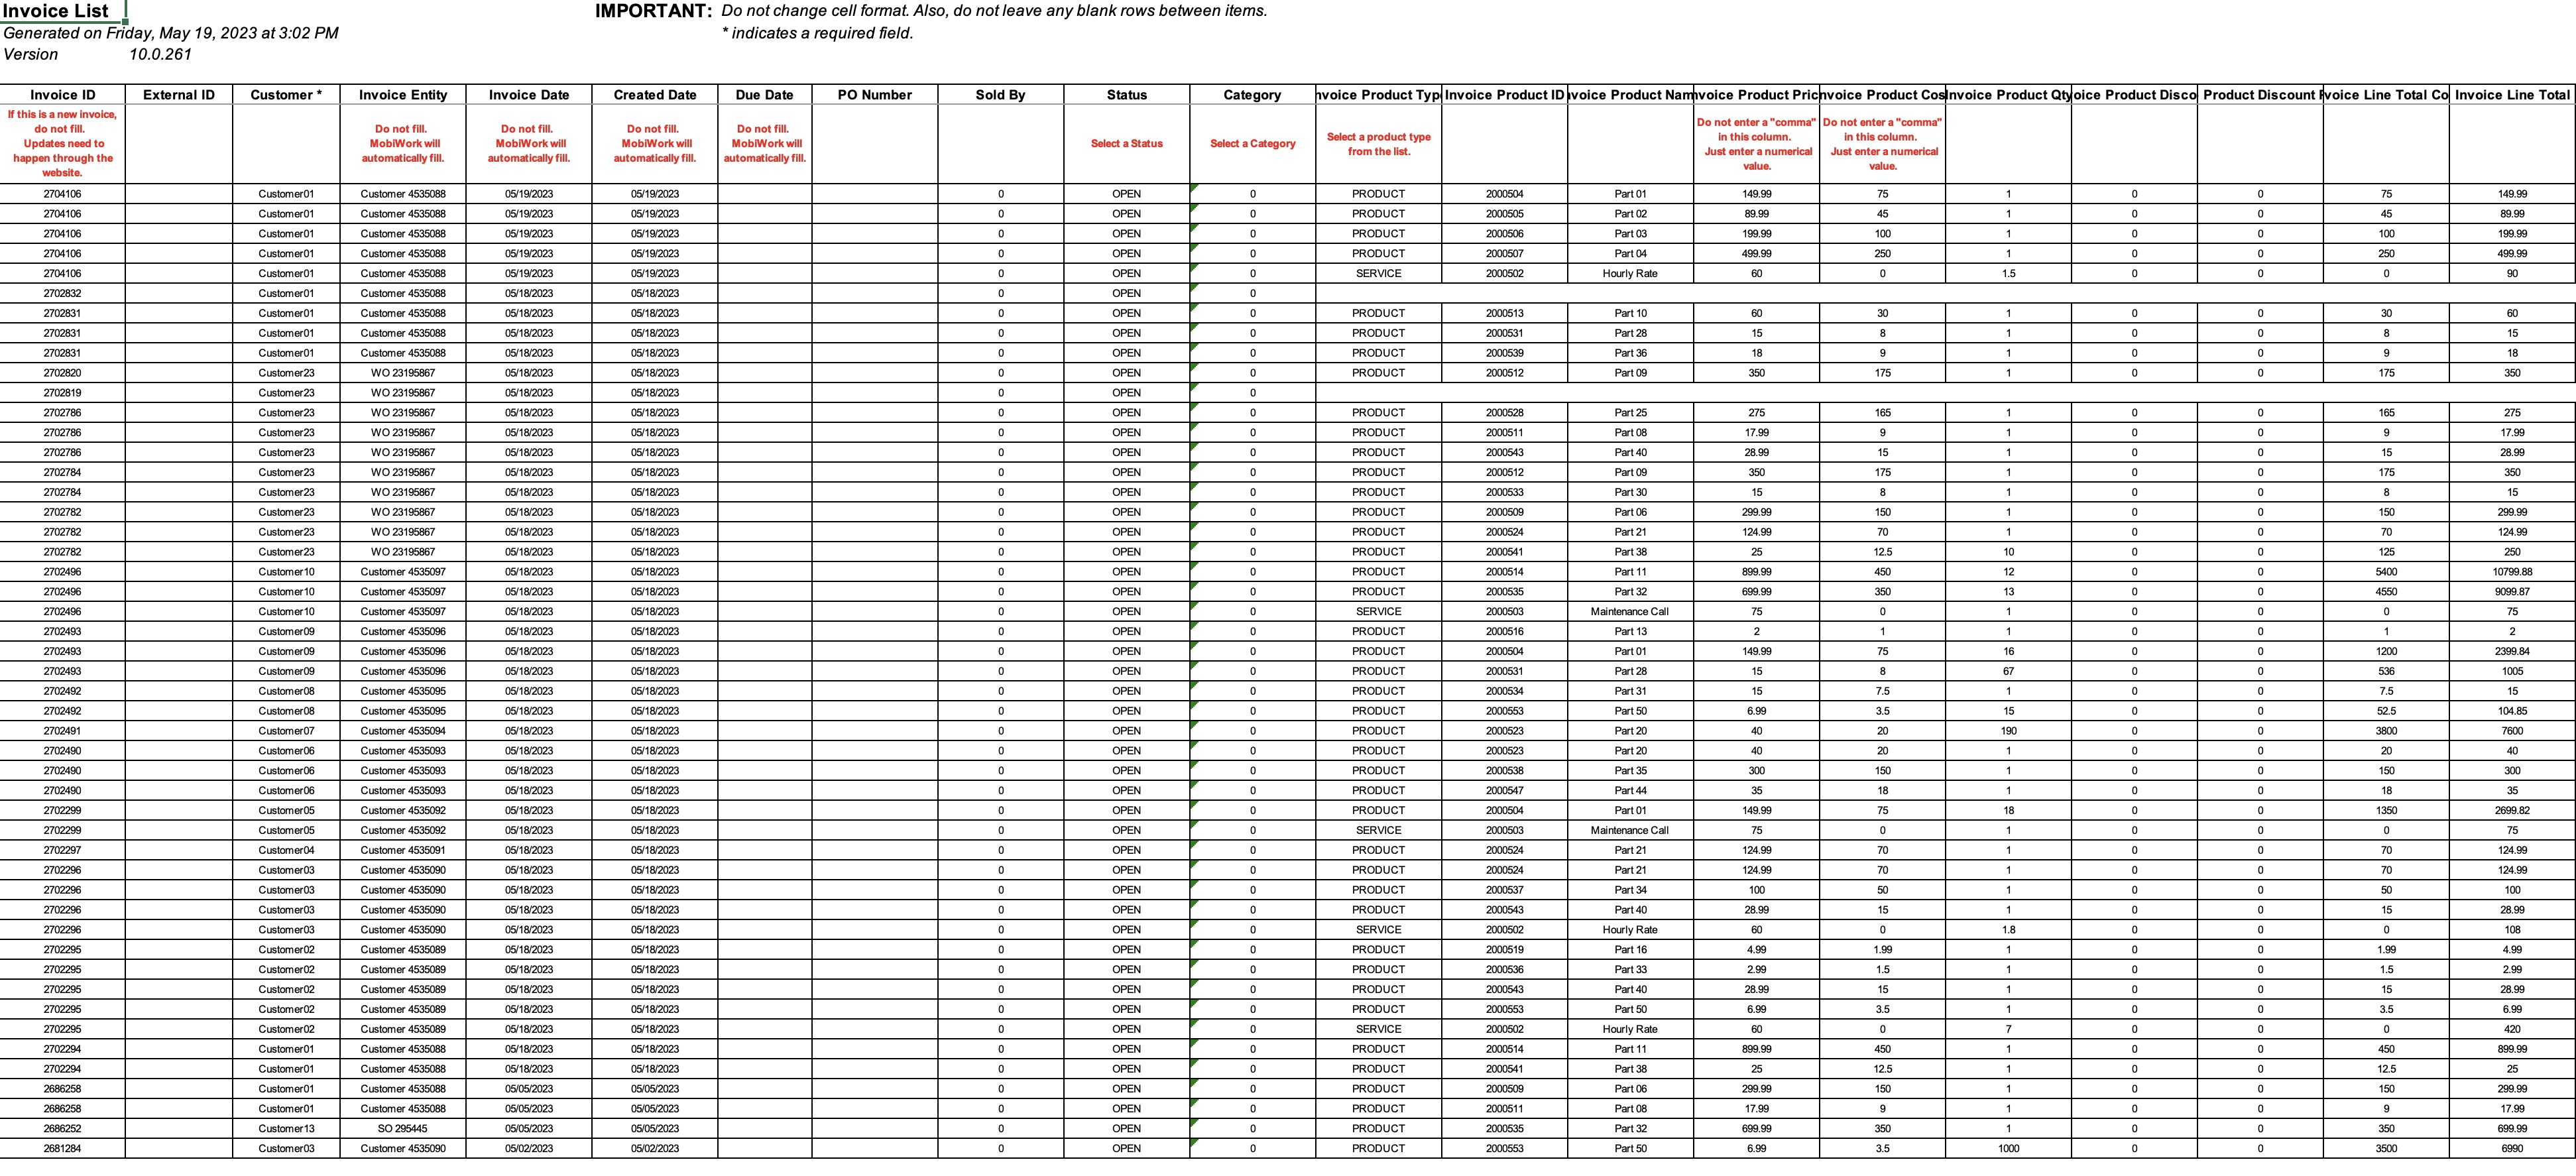
This Excel export will display a more detailed report on your listed invoices (e.g., service product type, invoice product number, rebate, quantity, etc.). After you have downloaded the Excel file, you can easily navigate through your company's invoices:
Select the invoice that you would like to export the line items to Excel:
- Please note that if you would like to export all your invoices into Excel you can click on the topmost checkbox (Multiple Selection Area) located in the "List" column. Likewise, if you do not select any entries ALL records will be exported:
Click on the More Actions button and from the drop-down menu select the "Export Invoices Line Items to Excel" option:
The Excel file will automatically download, and you will be able to locate it in your computer's Download folder.
Before exporting your invoice into QuickBooks Desktop, please make sure that you have a QuickBooks connector installed into your MobiWork Account. Please see the Connectors Framework: QuickBooks Desktop Web Connector for more information on how to use QuickBooks Desktop with MobiWork.
When syncing MobiWork invoices to QuickBooks Desktop, there are five integration statuses which are further defined below:
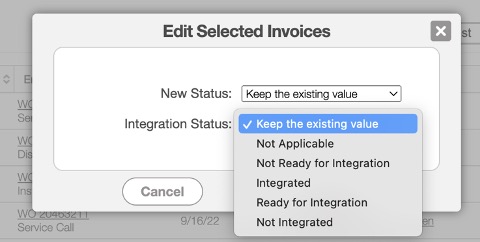
Not Applicable- The invoice does not need to be pushed to QuickBooks Desktop.
Not Ready for Integration- The invoice is still in review.
Ready for Integration- When the invoice is ready to be pushed to QuickBooks Desktop, this integration status must be manually selected. In this status, when the connector runs, the invoice will automatically be pushed to QuickBooks Desktop.
Integrated- If the invoice syncs successfully, an external ID will be created and this ID will confirm that the invoice was successfully pushed to QuickBooks Desktop.
Not Integrated- if the invoice does not successfully sync, the status is changed to "Not Integrated." Furthermore, an error message is added to the View Invoice pop-up window's "Note" Section.
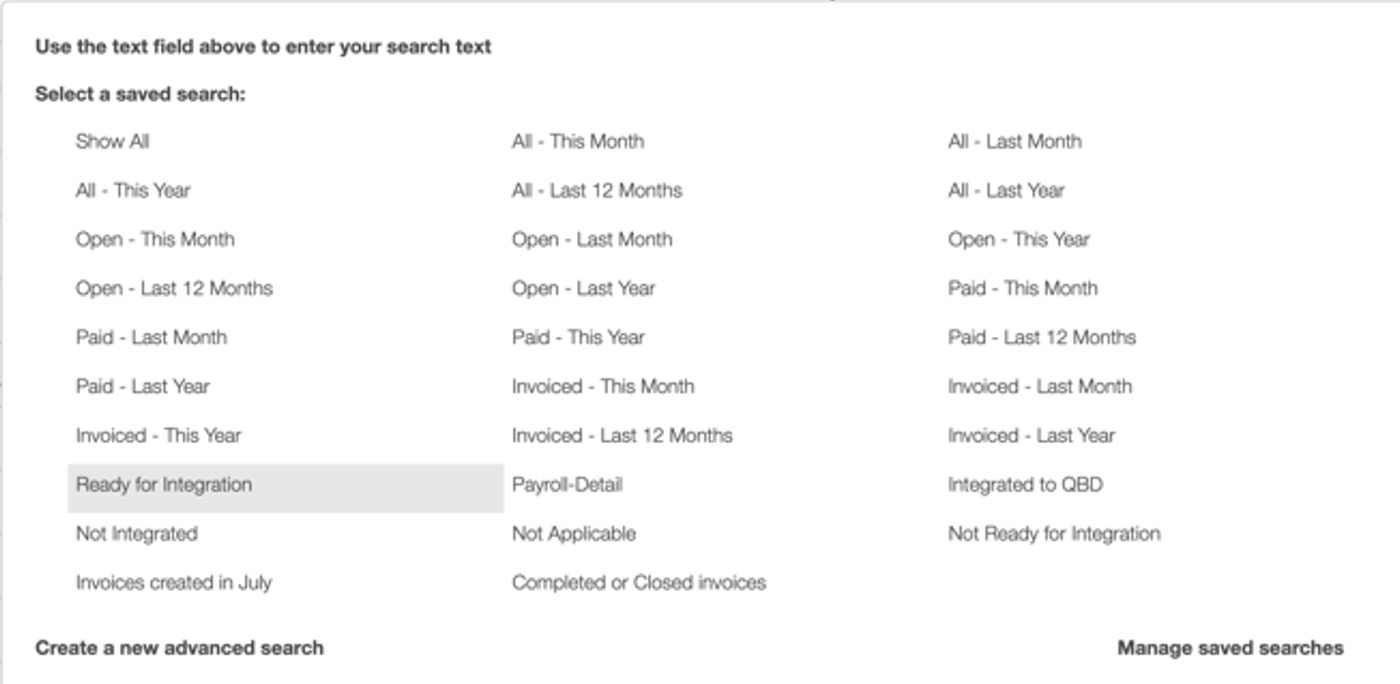
Note: Please note that you will be able to see invoices with a specific designated "Integration Status" through the predefined saved searches (e.g., invoices that have been successfully integrated "Integrated to QBD") Please see Step 4 in the "Syncing Invoices With QuickBooks Desktop" subsection for more information.
Syncing Invoices With QuickBooks Desktop
To sync your invoices, please follow the steps listed below:
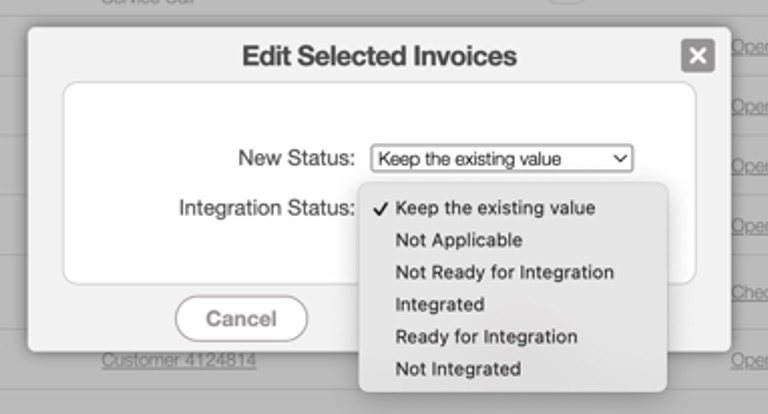
To set the desired invoices to the "Ready for Integration" status, you must first select the checkboxes of the selected invoices. Once you have chosen your invoices, click on the "Edit Selected" status from the More Actions button:
In the "Integration Status" drop-box select the "Ready for Integration" status:
- Navigate to your QuickBooks Desktop web connector pop-up window, and from this pop-up window click the Update Selected button:
- Make sure that the "Auto-Run" option is NOT checked, so that the application can run manually. Setting the connector to autorun, can implement/cause unwanted or accidental changes.
To view all the invoices that have the "Ready for Integration" status, you can select the "Ready for Integration" predefined saved search. You can also select the "Not Integrated" and "Integrated to QBD" predefined saved searches to see invoices with these designated “integration status” statuses:
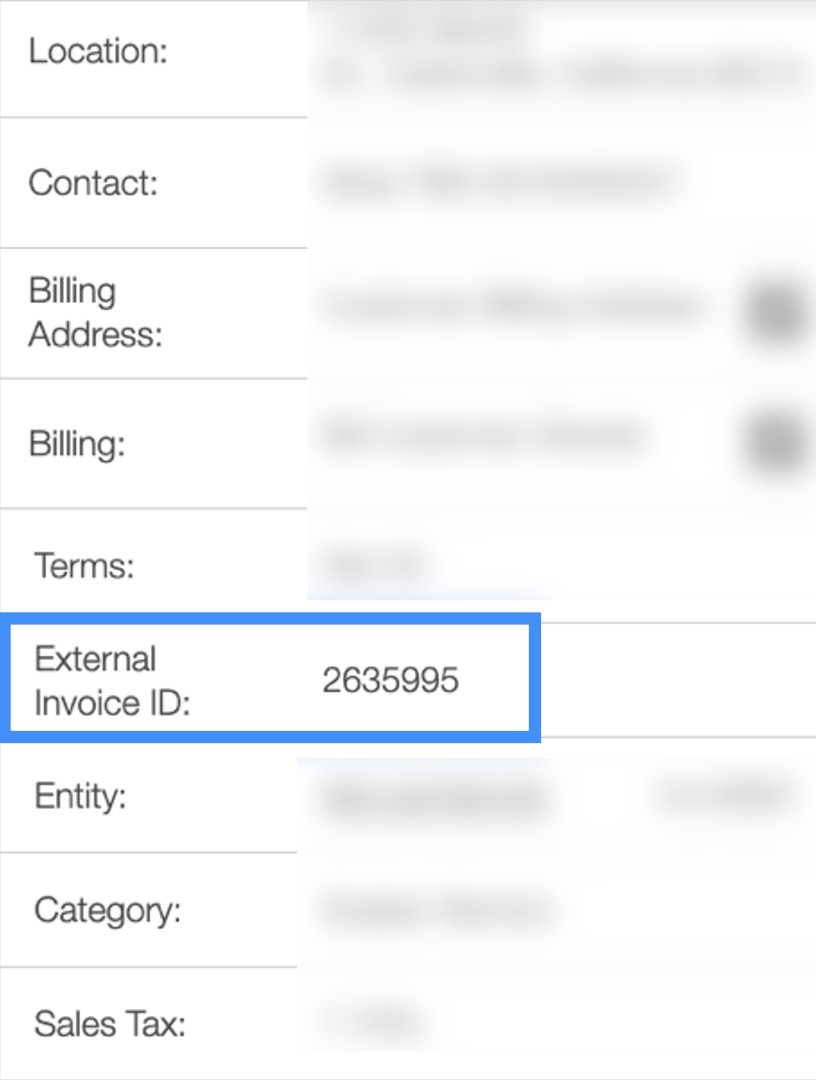
Please note that you will be able to see if the invoice has successfully been integrated or if it was unable to be integrated through the View Invoice pop-up window:
If the invoice syncs successfully, an external ID will be created and this ID will confirm that the invoice was successfully pushed to QuickBooks Desktop:
If the invoice does not successfully sync, the status is changed to "Not Integrated." Furthermore, an error message is added to the View Invoice pop-up window's "Note" Section.
Note: Please note that you can only sync up to 30 invoices with QuickBooks Desktop.