There are multiple ways to open the View Invoice pop-up window. The following subsections will outline three of the simplest methods for accessing the View Invoice pop-up window.
Invoices List View Page
The most direct and easiest method to view your invoice is to access the "List" tab. Please see Invoice List for more information on how to access this page.
Once you are on the "List" tab, there are four different ways to access the View Invoice pop-up window from this screen:
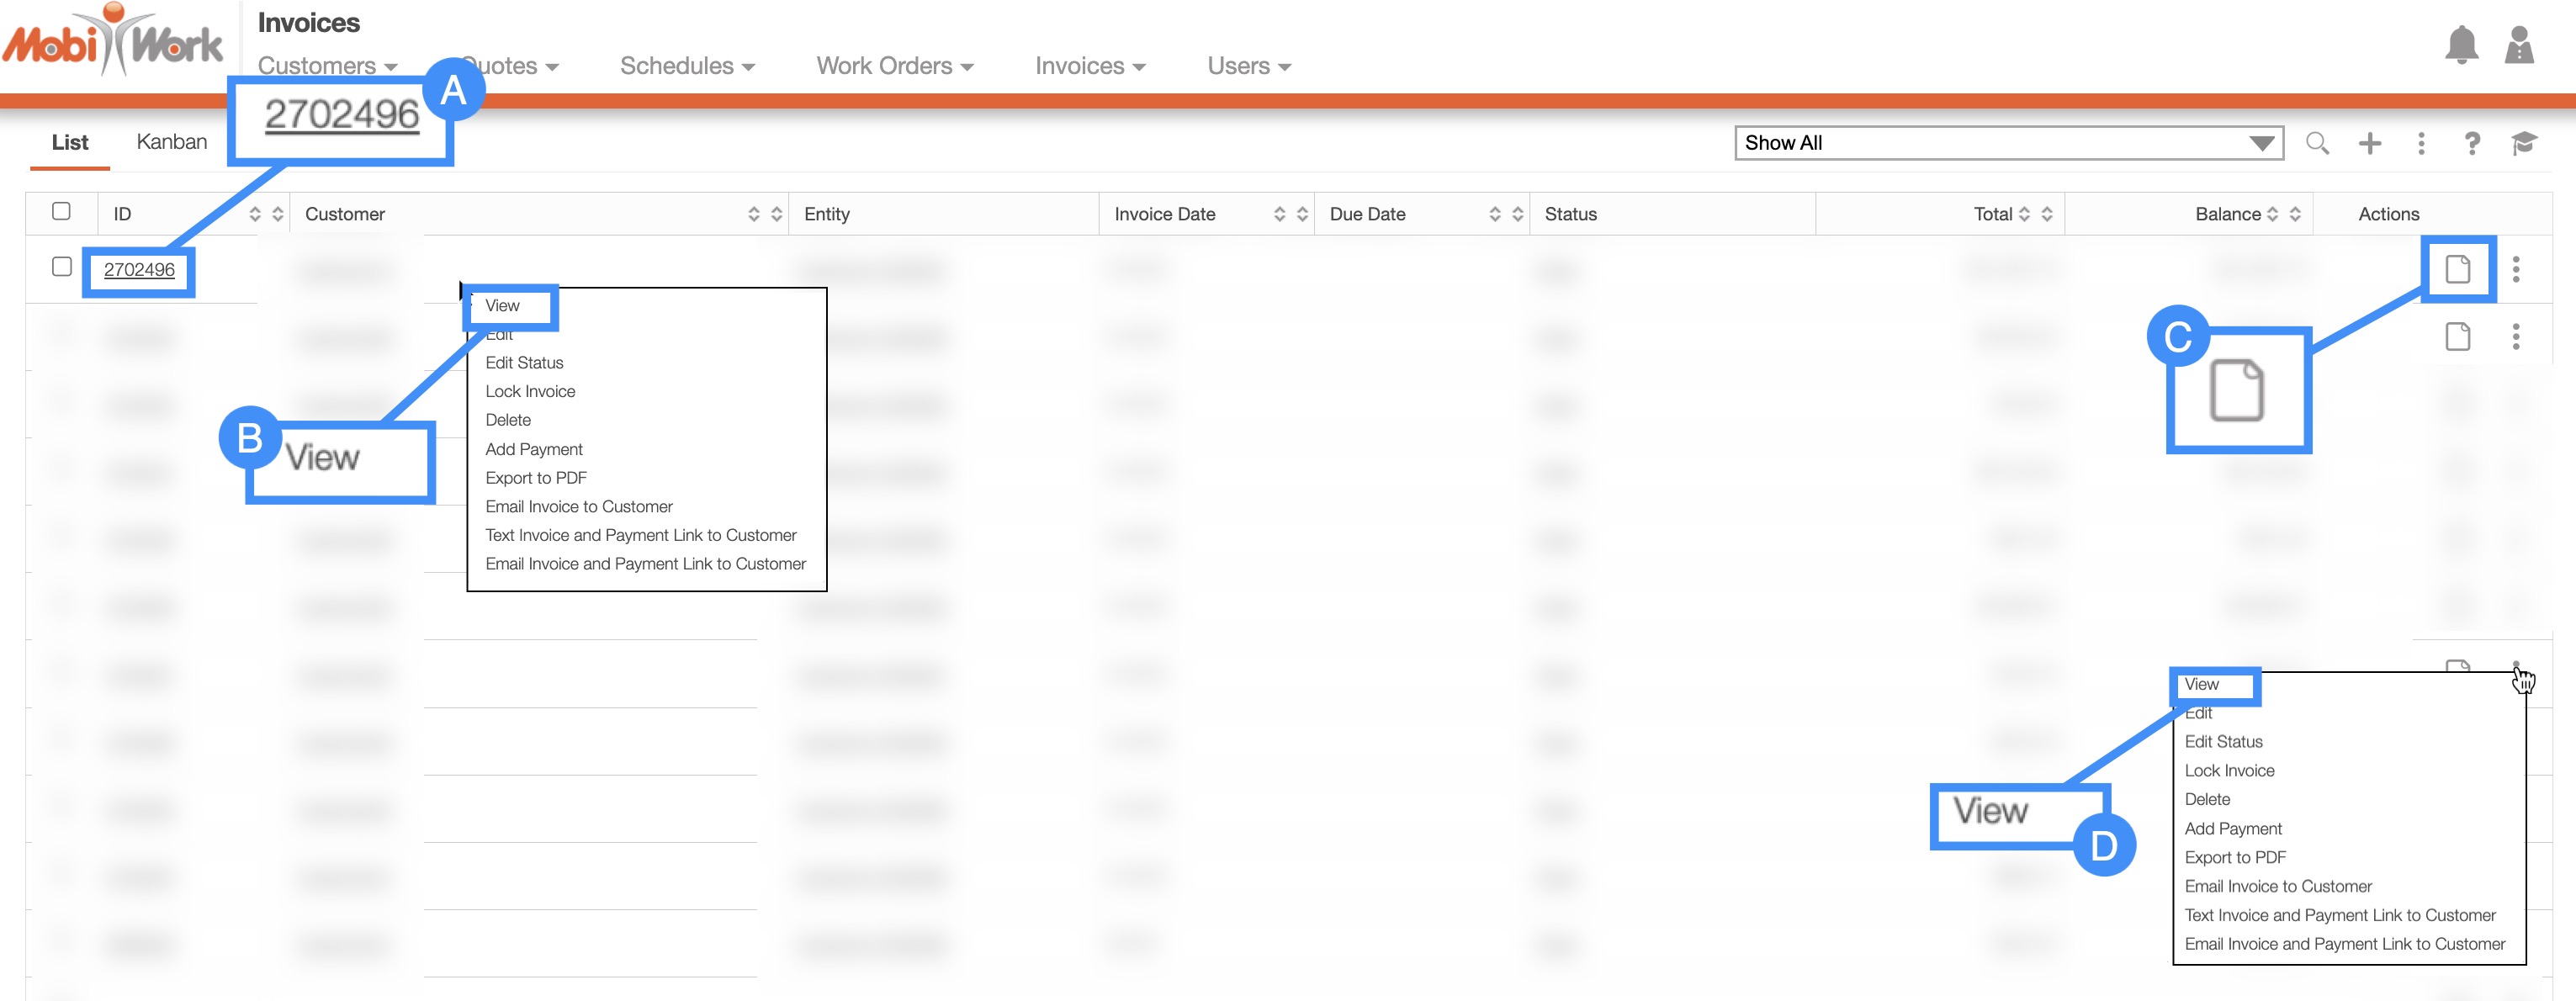
- Select the ID number of the desired invoice.
- Right-click on the selected invoice and click on the "View" option from the drop-down.
- Select the View icon under the "Actions" column.
- Click on the "View" option from the Individual Actions drop-down.
Work Orders
Another way you can access the View Invoice pop-up window is through the View Work Order pop-up window. For more information on how to access the View Work Order pop-up window please see the View Work Order page.
Once you have opened the View Work Order pop-up window, select the "Billing" tab:

All the invoices associated with the work order will be displayed on this tab. To access an individual invoice and open its View Invoice pop-up window click on the following:
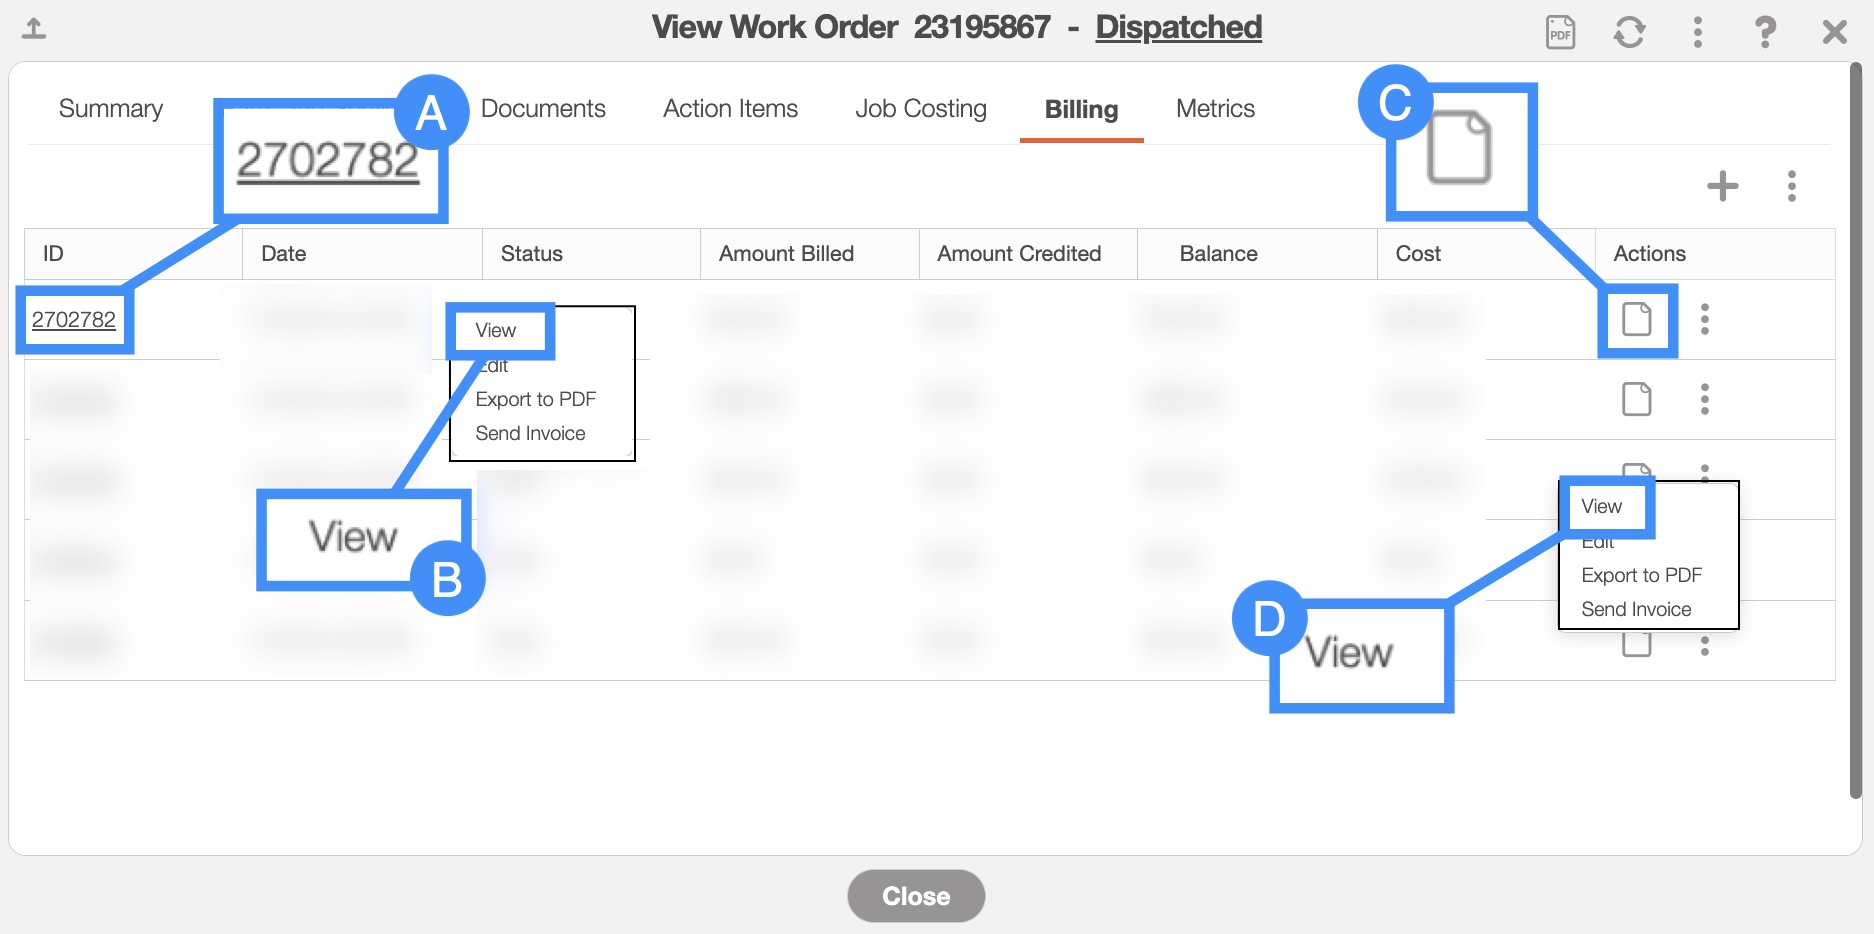
- Select the ID number of the desired work order.
- Right-click on the selected invoice and click on the "View" option from the drop-down.
- Select the View icon under the "Actions" column.
- Click on the "View" option from the Individual Actions drop-down.
Customers
You can also access the View Invoice pop-up window through the View Customer pop-up window. For more information on how to access the View Customer pop-up window please see the View Customer page.
Once you have opened the View Customer pop-up window, select the "Billing" tab:

All the invoices associated with the customer will be displayed on this tab. To access an individual invoice and open its View Invoice pop-up window click on the hyperlink for the desired invoice:
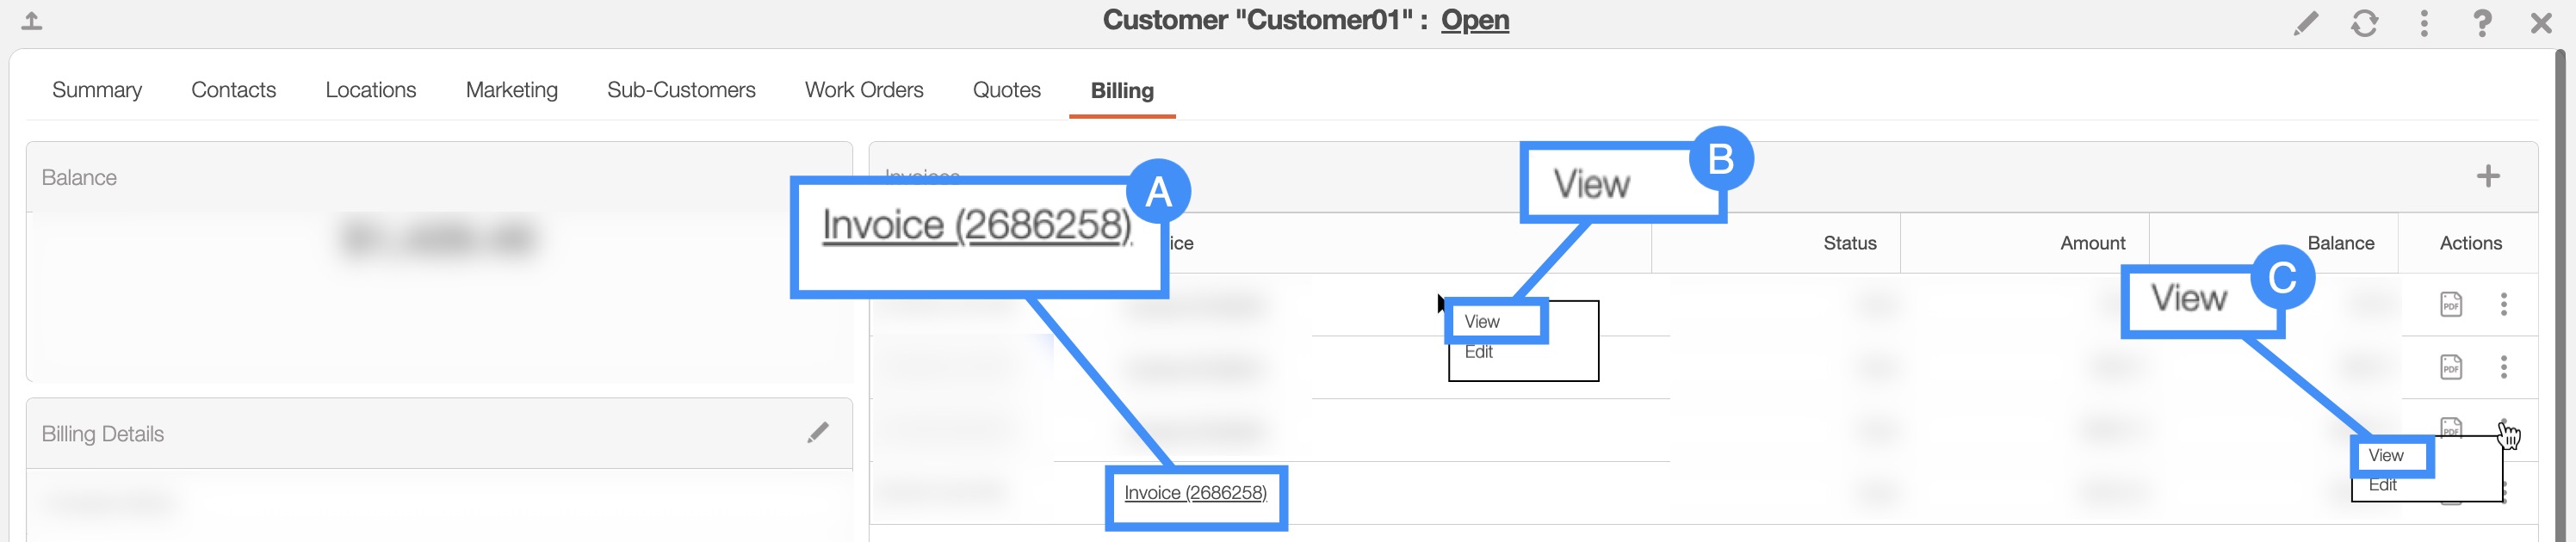
- Click on the desired Invoice ID.
- Right-click on the desired invoice, and select the "View" option from the drop-down options.
- Click on the Individual Actions button of the desired invoice, and select the "View" option from the drop-down options.
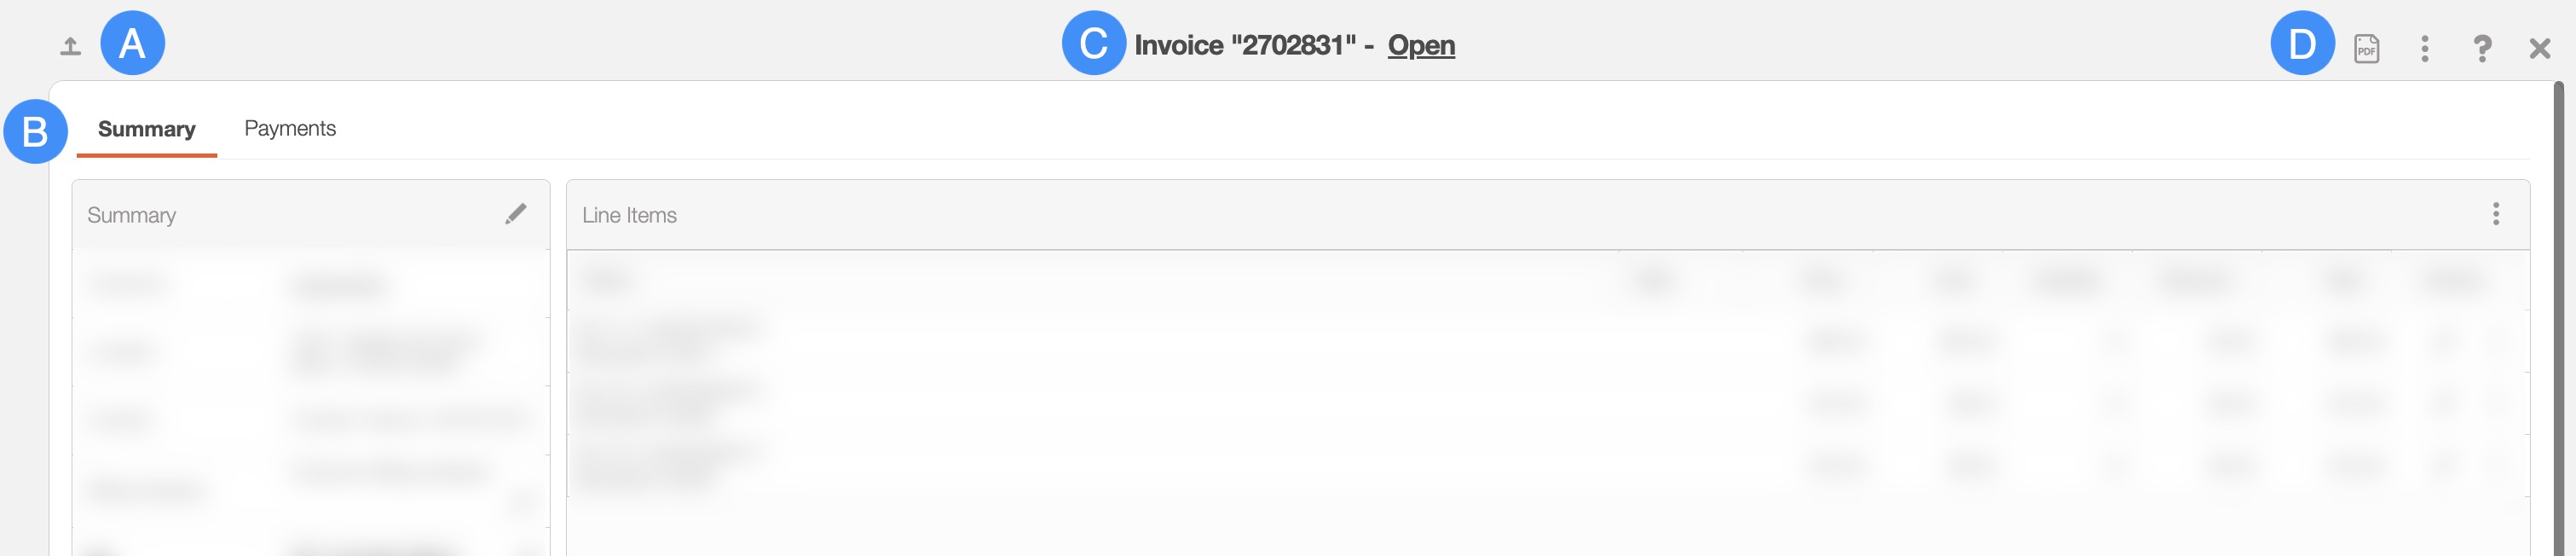
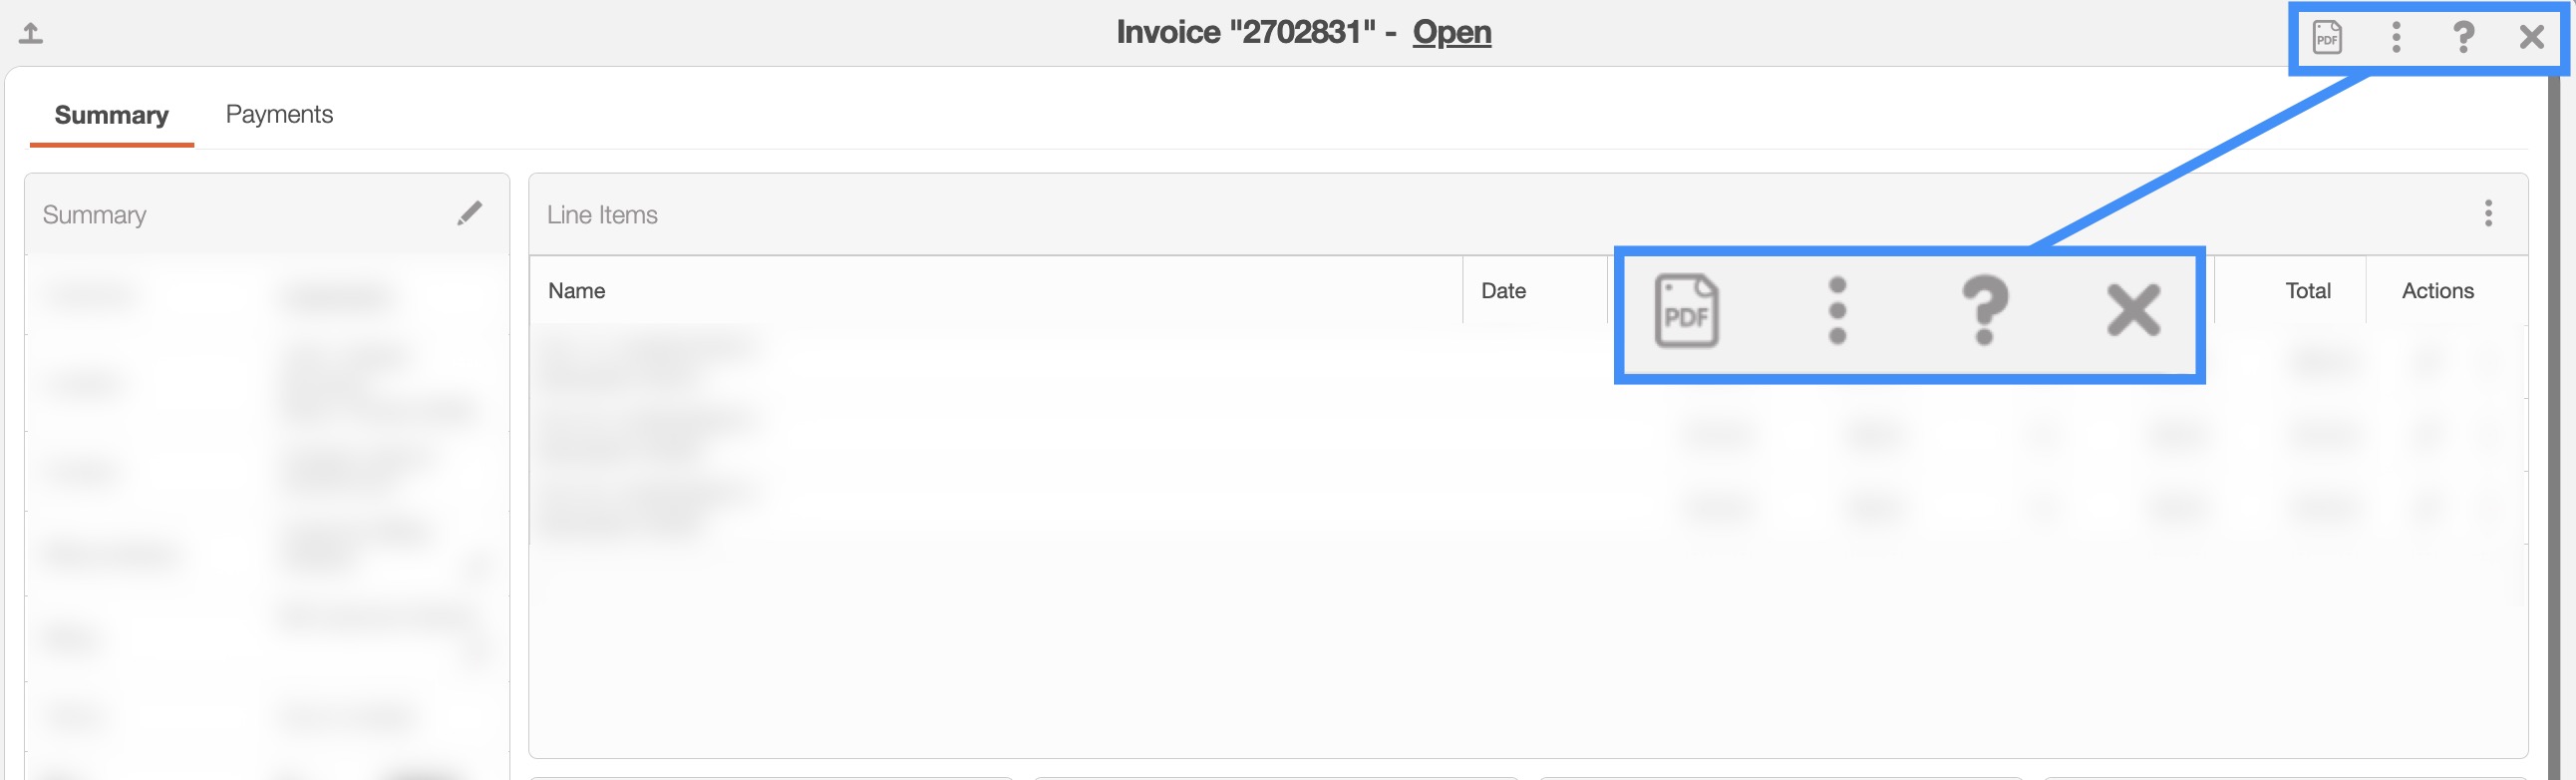
Once you open the View Invoice pop-up window, you will be automatically directed to the "Summary" tab:
Invoice Full-Size View
By clicking on the Arrow icon in the left-hand corner, you can expand the View Invoice pop-up window so that it is full-size:

The full-size View Invoice pop-up window can be seen below. All the tabs, buttons, and features are identical to how they would appear in the default pop-up window:
Invoice Tabs
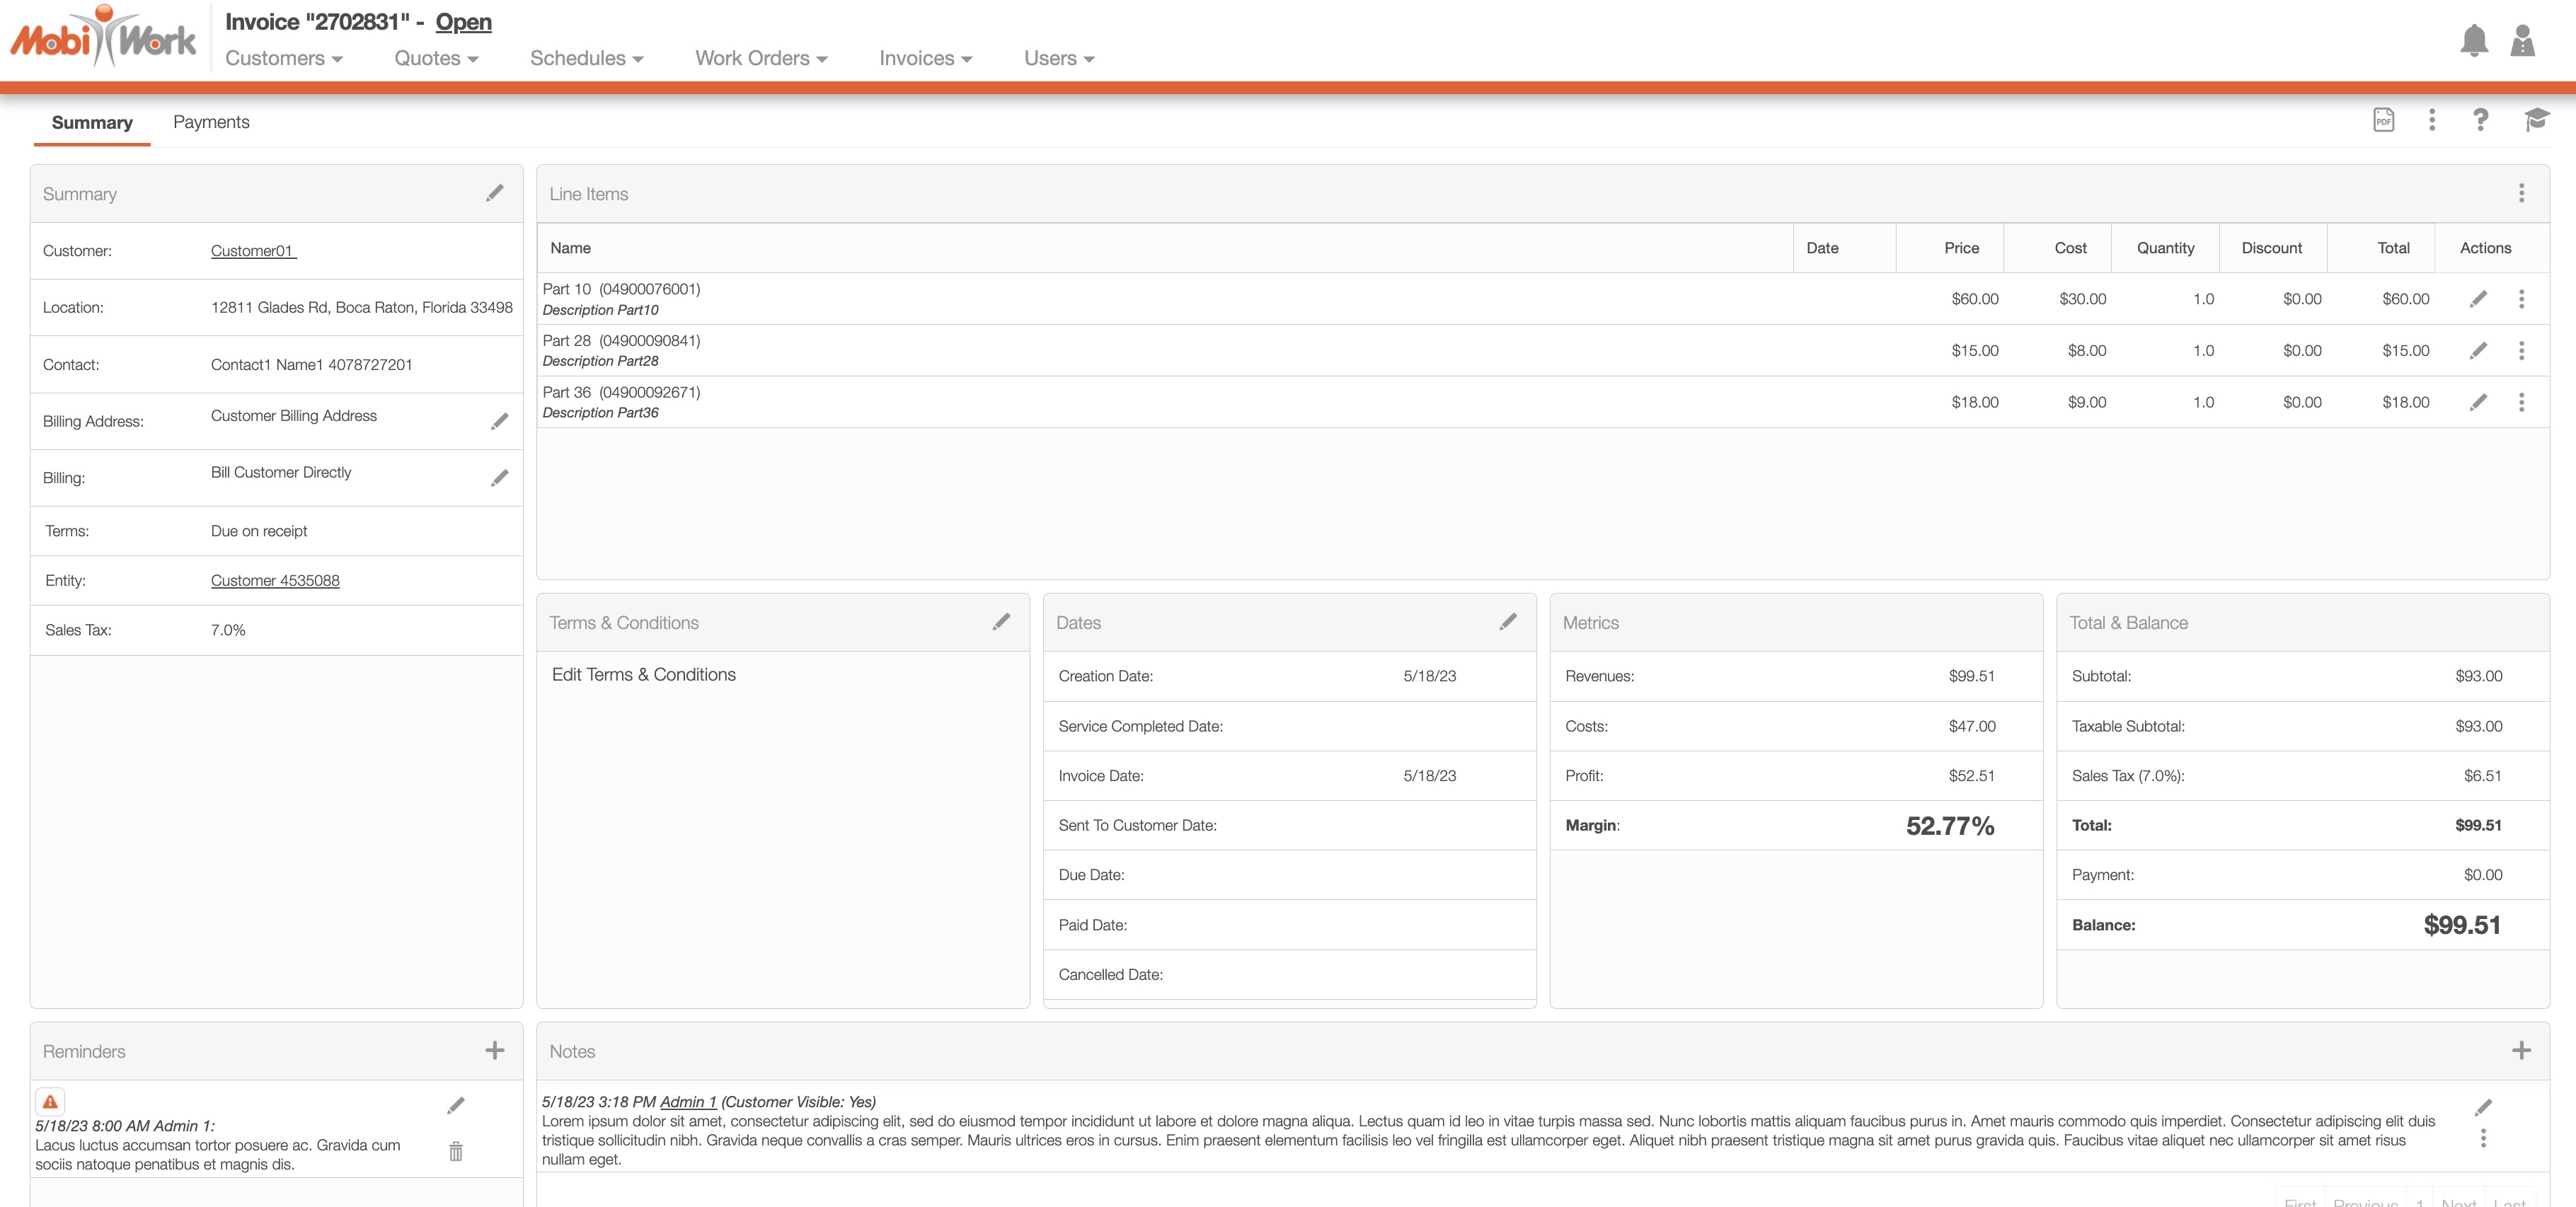
There are two tabs in the View Invoice pop-up window: "Summary" and "Payments." Each tab displays different information regarding the invoice:
You can navigate to other tabs by clicking on the desired tab.
Invoice ID Number and Status
The Invoice ID number and the status of the invoice will be displayed towards the top of the View Invoice pop-up window:

The statuses that are available are:
- "Open"- If the invoice has been generated but not sent to the customer.
- "Checked Out"- Once the invoice is checked out, the checkout process is initiated through the device, locking the invoice to prevent further edits from the field unless the user has specific permissions. Afterward, your Accounting Department should review the invoice details and set the status to "Customer Invoiced," ensuring no further changes can be made. Invoices can only be unlocked through the web interface.
- "Service Completed"- The service listed on the invoice has been completed.
- Customer Invoiced- The invoice has been sent to the customer. Once the status has been set to this, then the balance of that invoice will automatically appear on the customer portal invoice tab. For more information about this status, please see the View Invoice page.
- "Paid"- The customer has paid the invoice.
- "Cancelled"- The invoice has been cancelled.
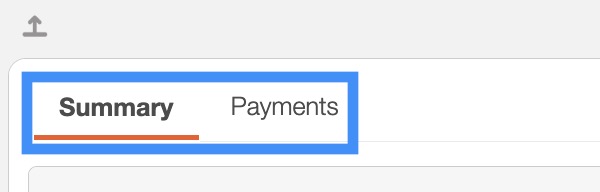
Upper Right Corner Actions
In the upper right corner of the View Invoice pop-up window there will be five buttons that will allow you to perform additional actions on the invoice:
- The PDF button will allow you to export the invoice into a PDF.
- The Individual Actions button will allow you to perform various actions, such as:
- Editing the invoice.
- Editing the billing address that the invoice is directed to.
- Editing the status of the invoice (i.e. "Open," "Checked Out," "Service Completed," "Customer Invoiced," "Paid," and "Cancelled").
- Exporting the invoice to PDF
- Emailing or texting the invoice and/or payment link to the customer.
- Viewing the Settings page.
- The Question Mark button which will direct you to the respective MobiWork Features page.
- The X will close out of the View Invoice pop-up window.
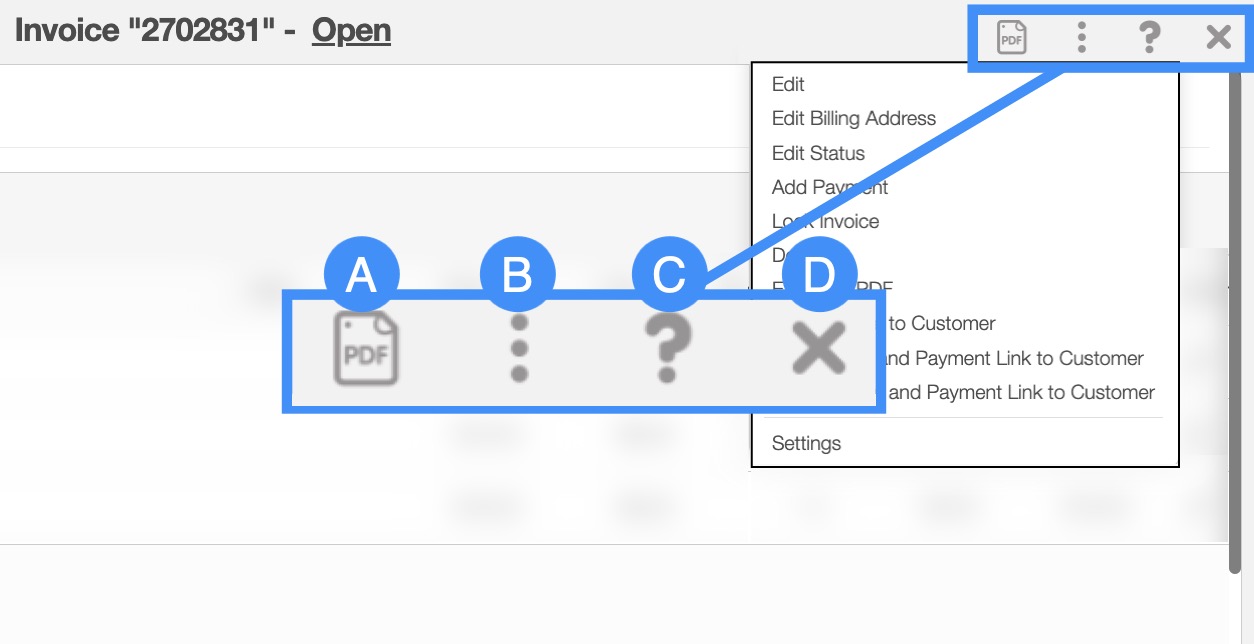
The Invoice's Upper Right Corner Actions can be found in the top-right corner of the View Invoice pop-up window. These actions are located in this section, regardless of the tab you are on:
The Upper Right Corner Actions section includes:
The PDF button will allow you to export the invoice into a PDF.
The Individual Actions will allow you to perform various actions.
The Question Mark button which will direct you to the respective MobiWork Features page.
The X will close out of the View Invoice pop-up window.
After clicking on the vertical three dots in the top-right corner, the Individual Actions drop-down menu will appear:
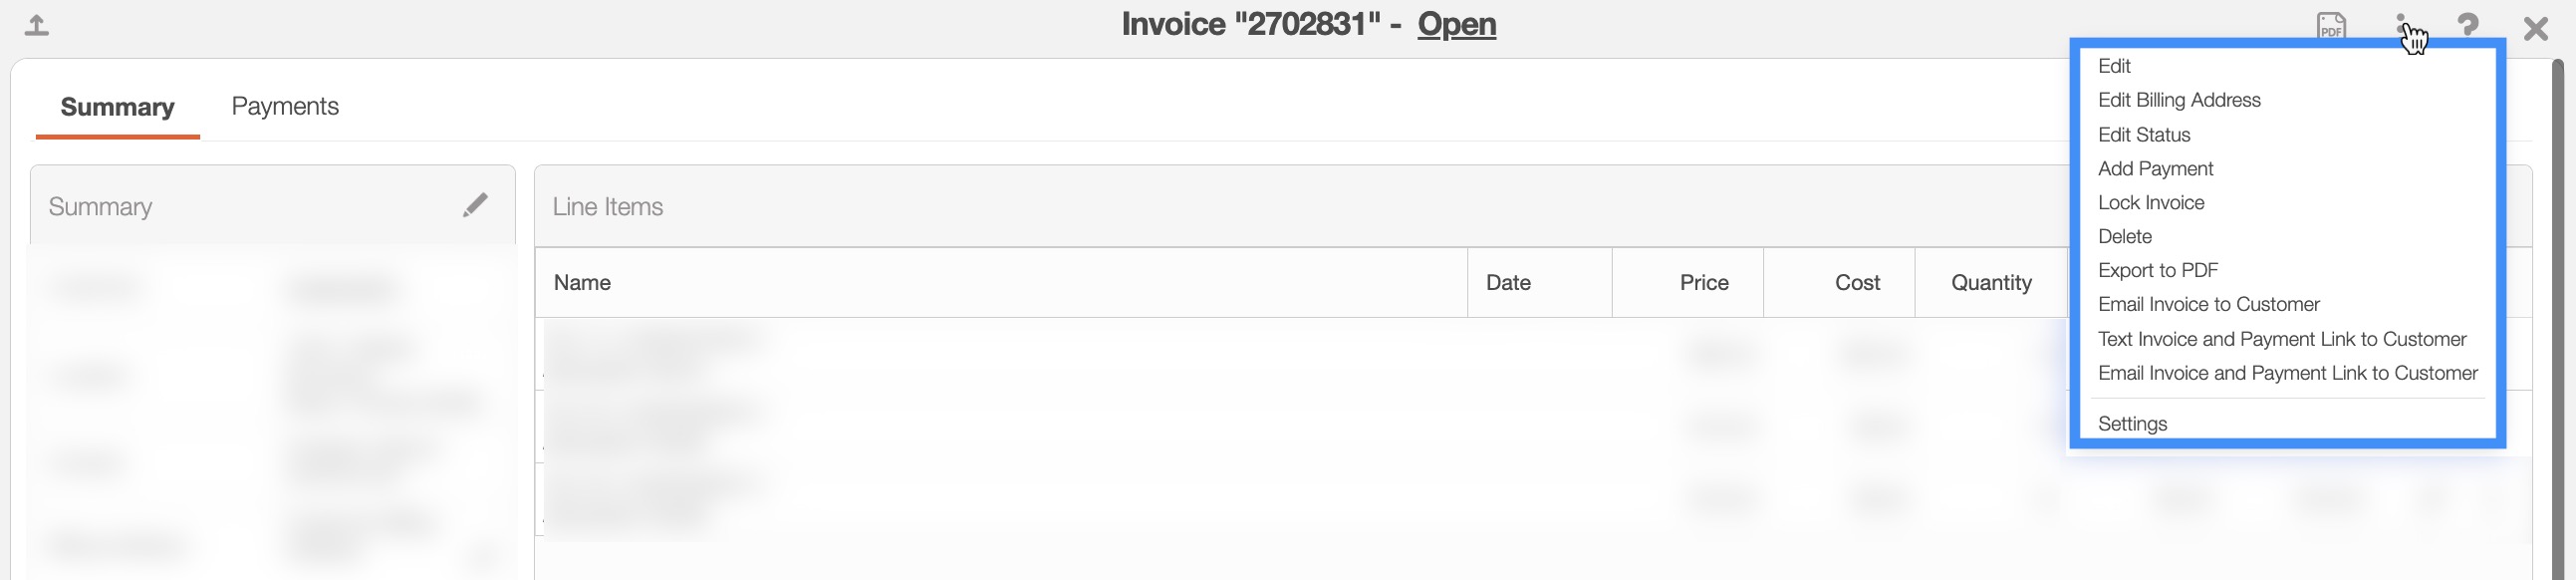
From the Individual Actions drop-down menu, you can select various actions that will help manage the specified invoice.
The complete list of actions found in the Individual Actions drop-down menu are defined below:
| Name: | Description: |
|---|---|
| "Edit" | Allows the user to edit the specified invoice. |
| "Edit Billing Address" | Allows the user to edit the billing address of the invoice. |
| "Edit Status" | Allows the user to edit the status of the invoice. |
| "Lock" | Locks the invoice so further changes to the itemized list cannot be done. |
| "Delete" | Deletes the invoice. |
| "Add Payment" | Adds a payment to the invoice. |
| "Export to PDF" | Exports the invoice into a PDF. |
| "Send Invoice" | Allows the user to send the invoice as an email, an email with a payment link, or text message, to the customer. |
| "Settings" | Directs the user to the Invoice Settings page. |
Overview and Layout
The "Summary" tab is the default tab you will be directed to; it will display all the requisite information regarding an invoice.
The panels found on the "Summary" tab will summarize the data from the other View Invoice tabs, including customer information, reminders, line items, the balance due, and more:
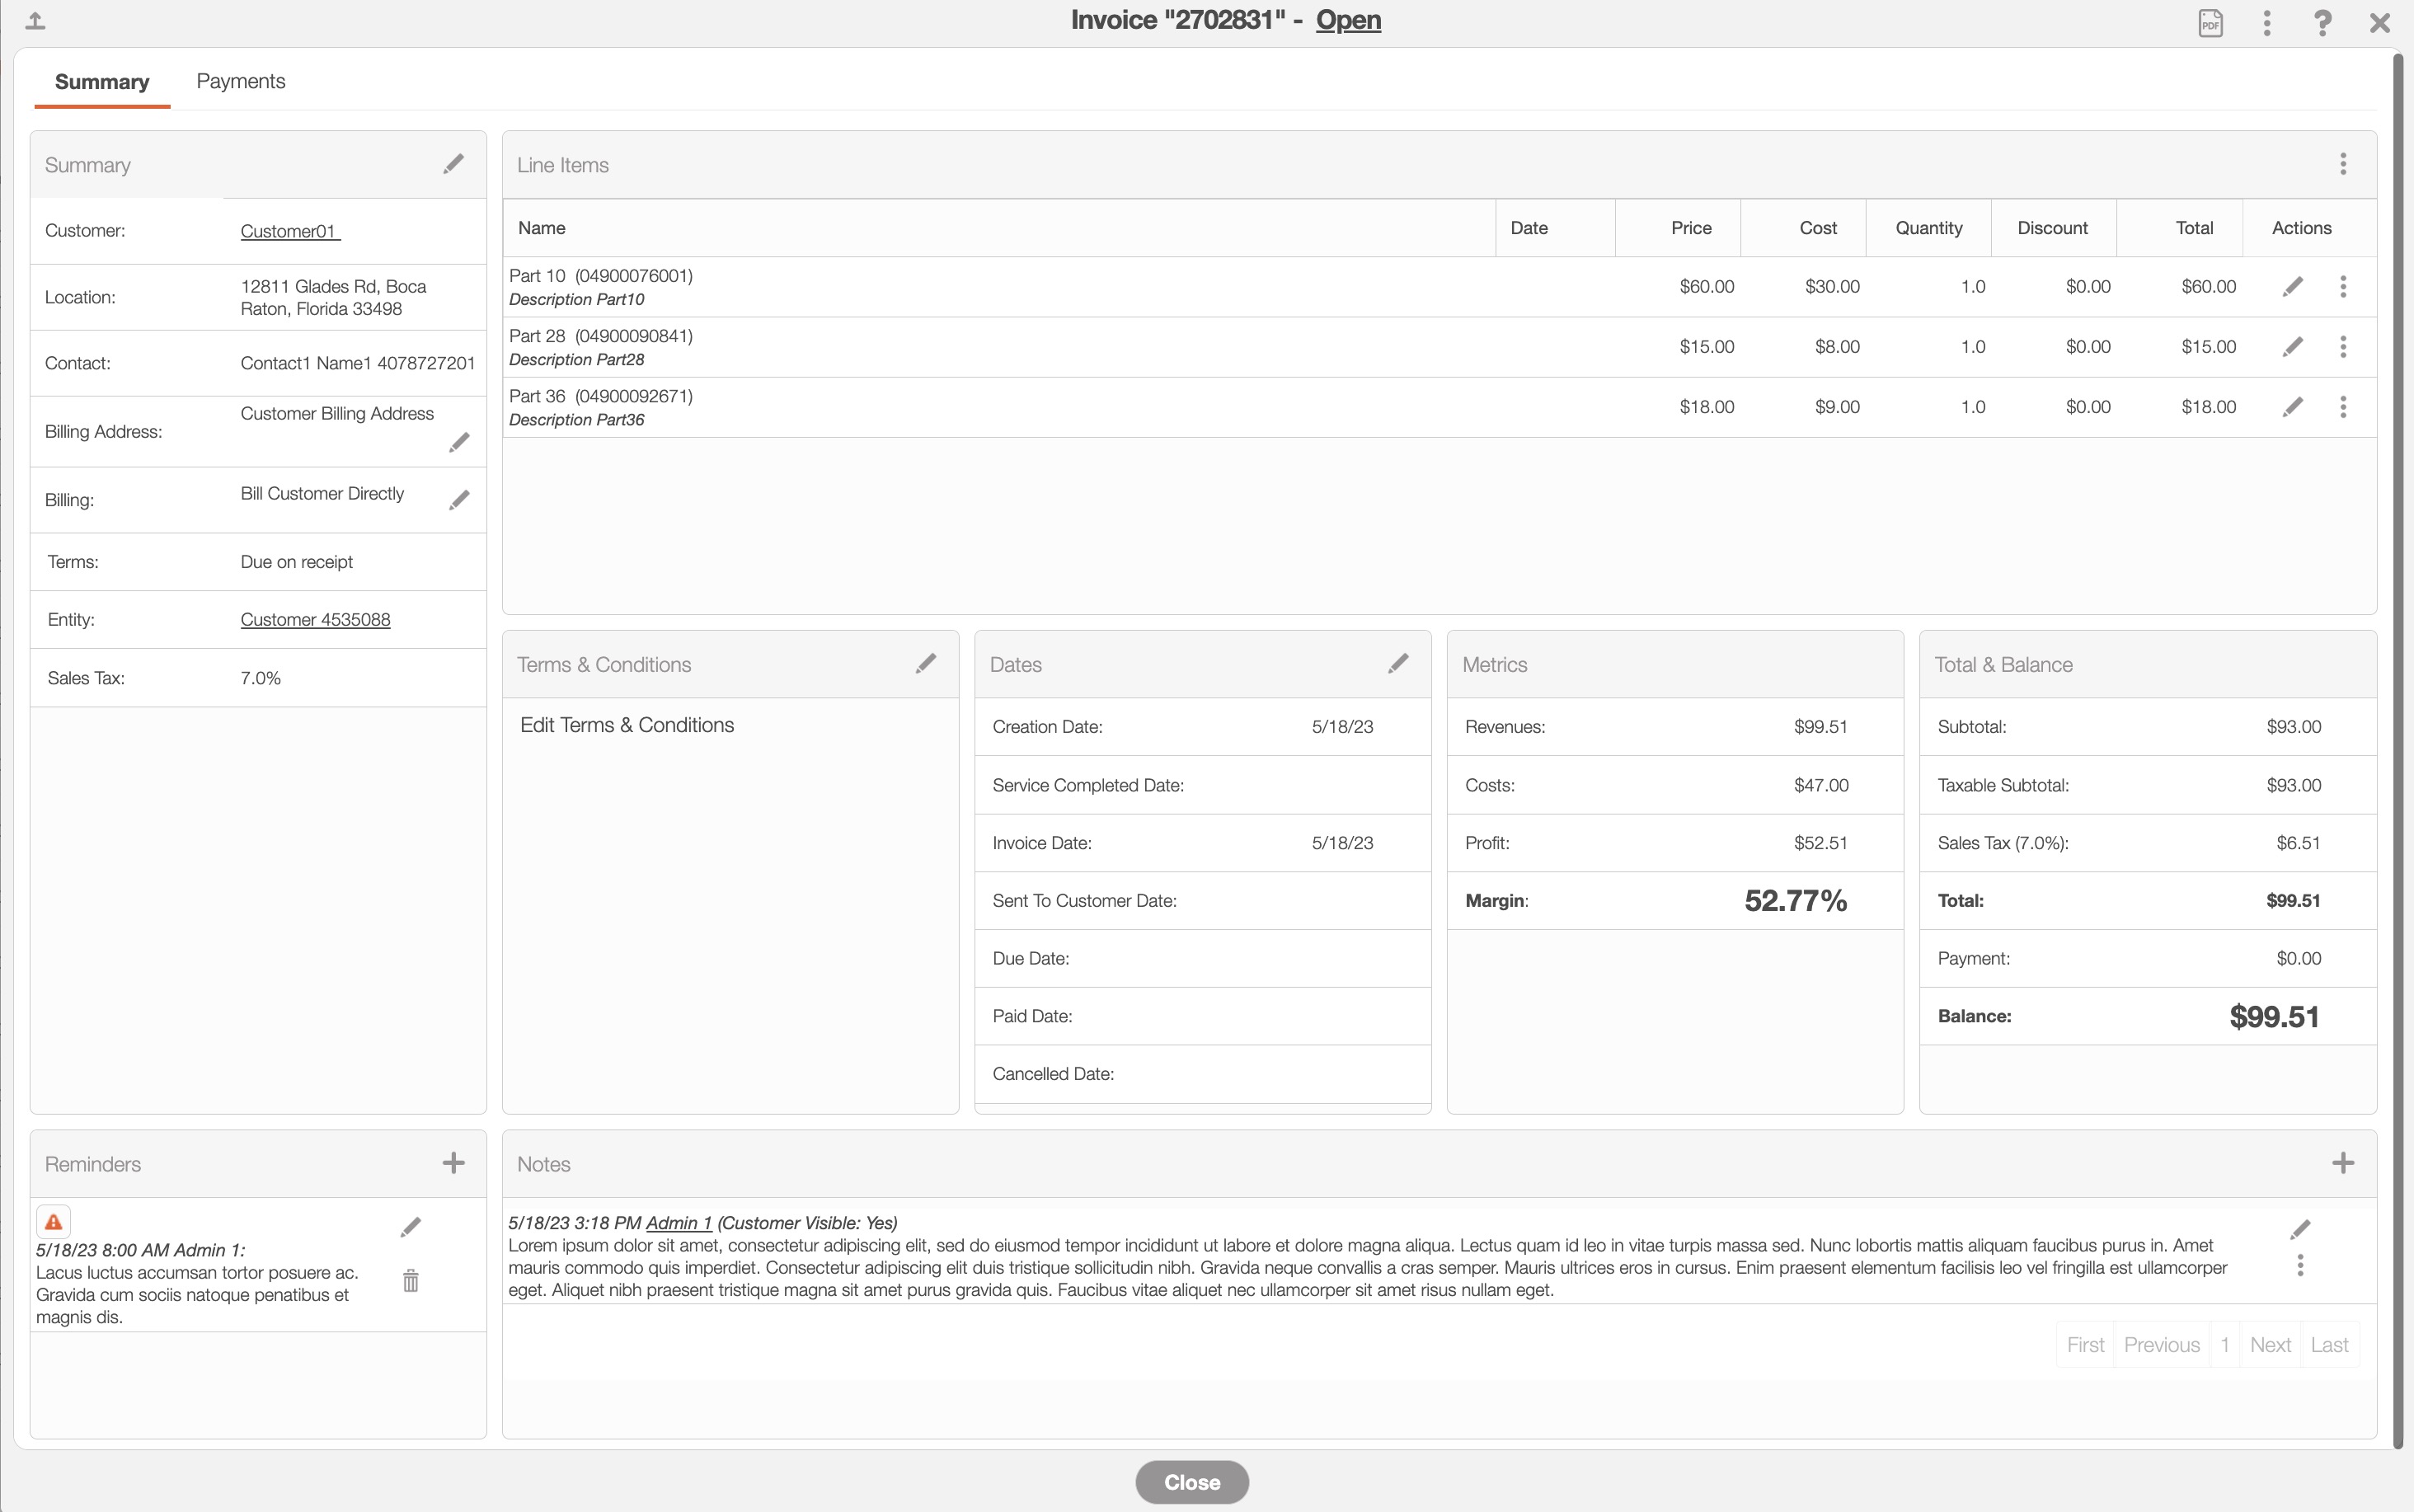
Where applicable, you can edit or add additional information directly in the "Summary" tab:
The Arrow icon (found in the top left of designated boxes) will open the corresponding tab in the View Invoice pop-up window.
The Individual Actions button (the three dots) will display different options (e.g., view, edit, delete, etc.) depending on the corresponding panel.
The View icon will allow you to view the selected data in a separate window.
The Pencil icon will allow you to edit the selected data or field.
The Plus Sign icon will allow you to add additional notes, reminders, etc.
The Trash Can icon will allow you to delete the selected data.
Sales Tax Note: Please note that MobiWork partners with Zip Tax. Zip Tax provides, free of charge, over 42,000 sales tax percentages based on the customer’s zip code. MobiWork also partners with Avalara for more advanced sales requirements. For more information about our Avalara connector, please see the Avalara Connector page.
The "Payments" tab is the second tab located in the View Invoice pop-up window. This tab will display the amount paid to the invoice as well as the balance remaining.
This tab will also allow you to add payments (cash, check, or credit card) to the invoice:
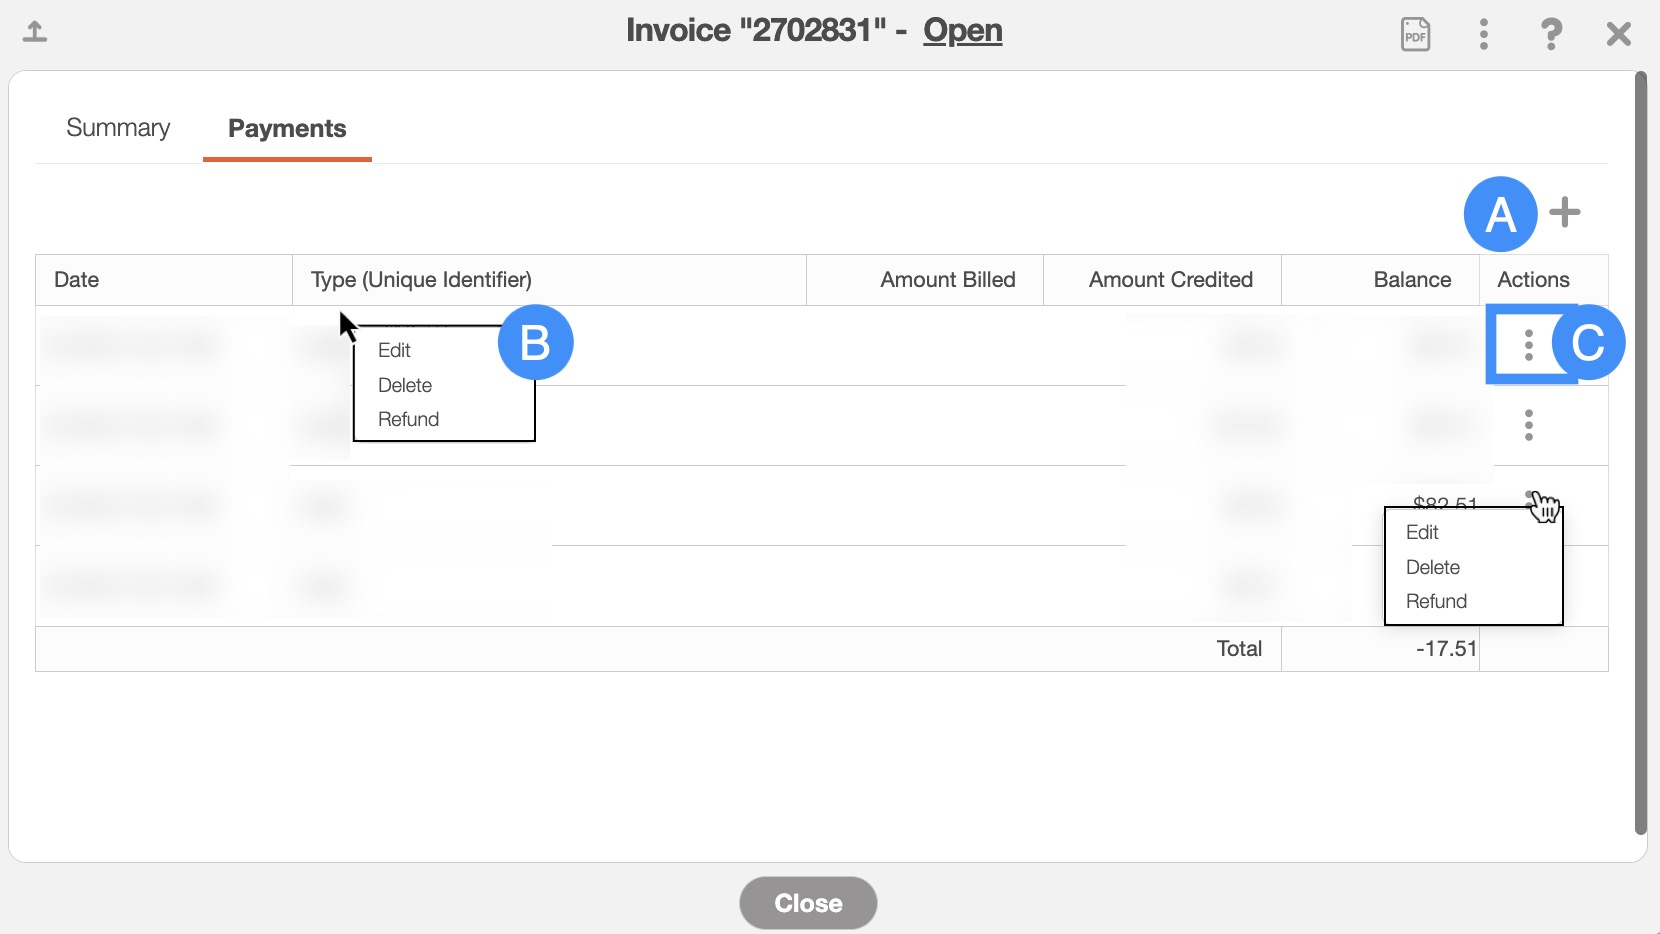
- By right-clicking you will bring up the right-click actions. These actions are identical to the Individual Actions and will allow you to view, edit, export the invoice to PDF, and email the invoice. You can also view, edit, or delete if selecting a payment.
- The View icon will allow you to view the invoice in the full-size view.
- The Individual Actions (the three dots next to the View icon) are identical to the right-click actions and will allow you to view, edit, export the invoice to PDF, and email the invoice. You can also view, edit, or delete if selecting a payment.
- The Plus Sign and the three dots next to it will both allow you to add a payment to the invoice.
The columns in this tab are defined below:
| Name: | Description: |
|---|---|
| "Date" | Displays the date the invoice was created. |
| "Type" | Displays the invoice ID, number, or another unique identifier. |
| "Amount" | Displays the amount billed to the customer. |
| "Amount Credited" | Displays the amount paid by the customer. |
| "Balance" | Displays remaining balance on the invoice. |
| "Actions" | Where the View icon and the Individual Actions buttons are located; with the Individual Actions you can edit the payment, issue a refund, or delete the payment. |