There are several different ways you can access the View Customer pop-up window in MobiWork. Any time you see a hyperlinked customer or company name, you can click on it to see the pop-up window.
The following sections demonstrate some common methods of how to access the View Customer pop-up window from your MobiWork web platform:
Customers Tabs
The easiest way to access the View Customer pop-up window through the "Customer List (All)." For more information on how to access the "Customer List (All)" please see the Customer List page.
Once you are in the "Customer List (All)," there are four different ways to access the View Customer pop-up window:
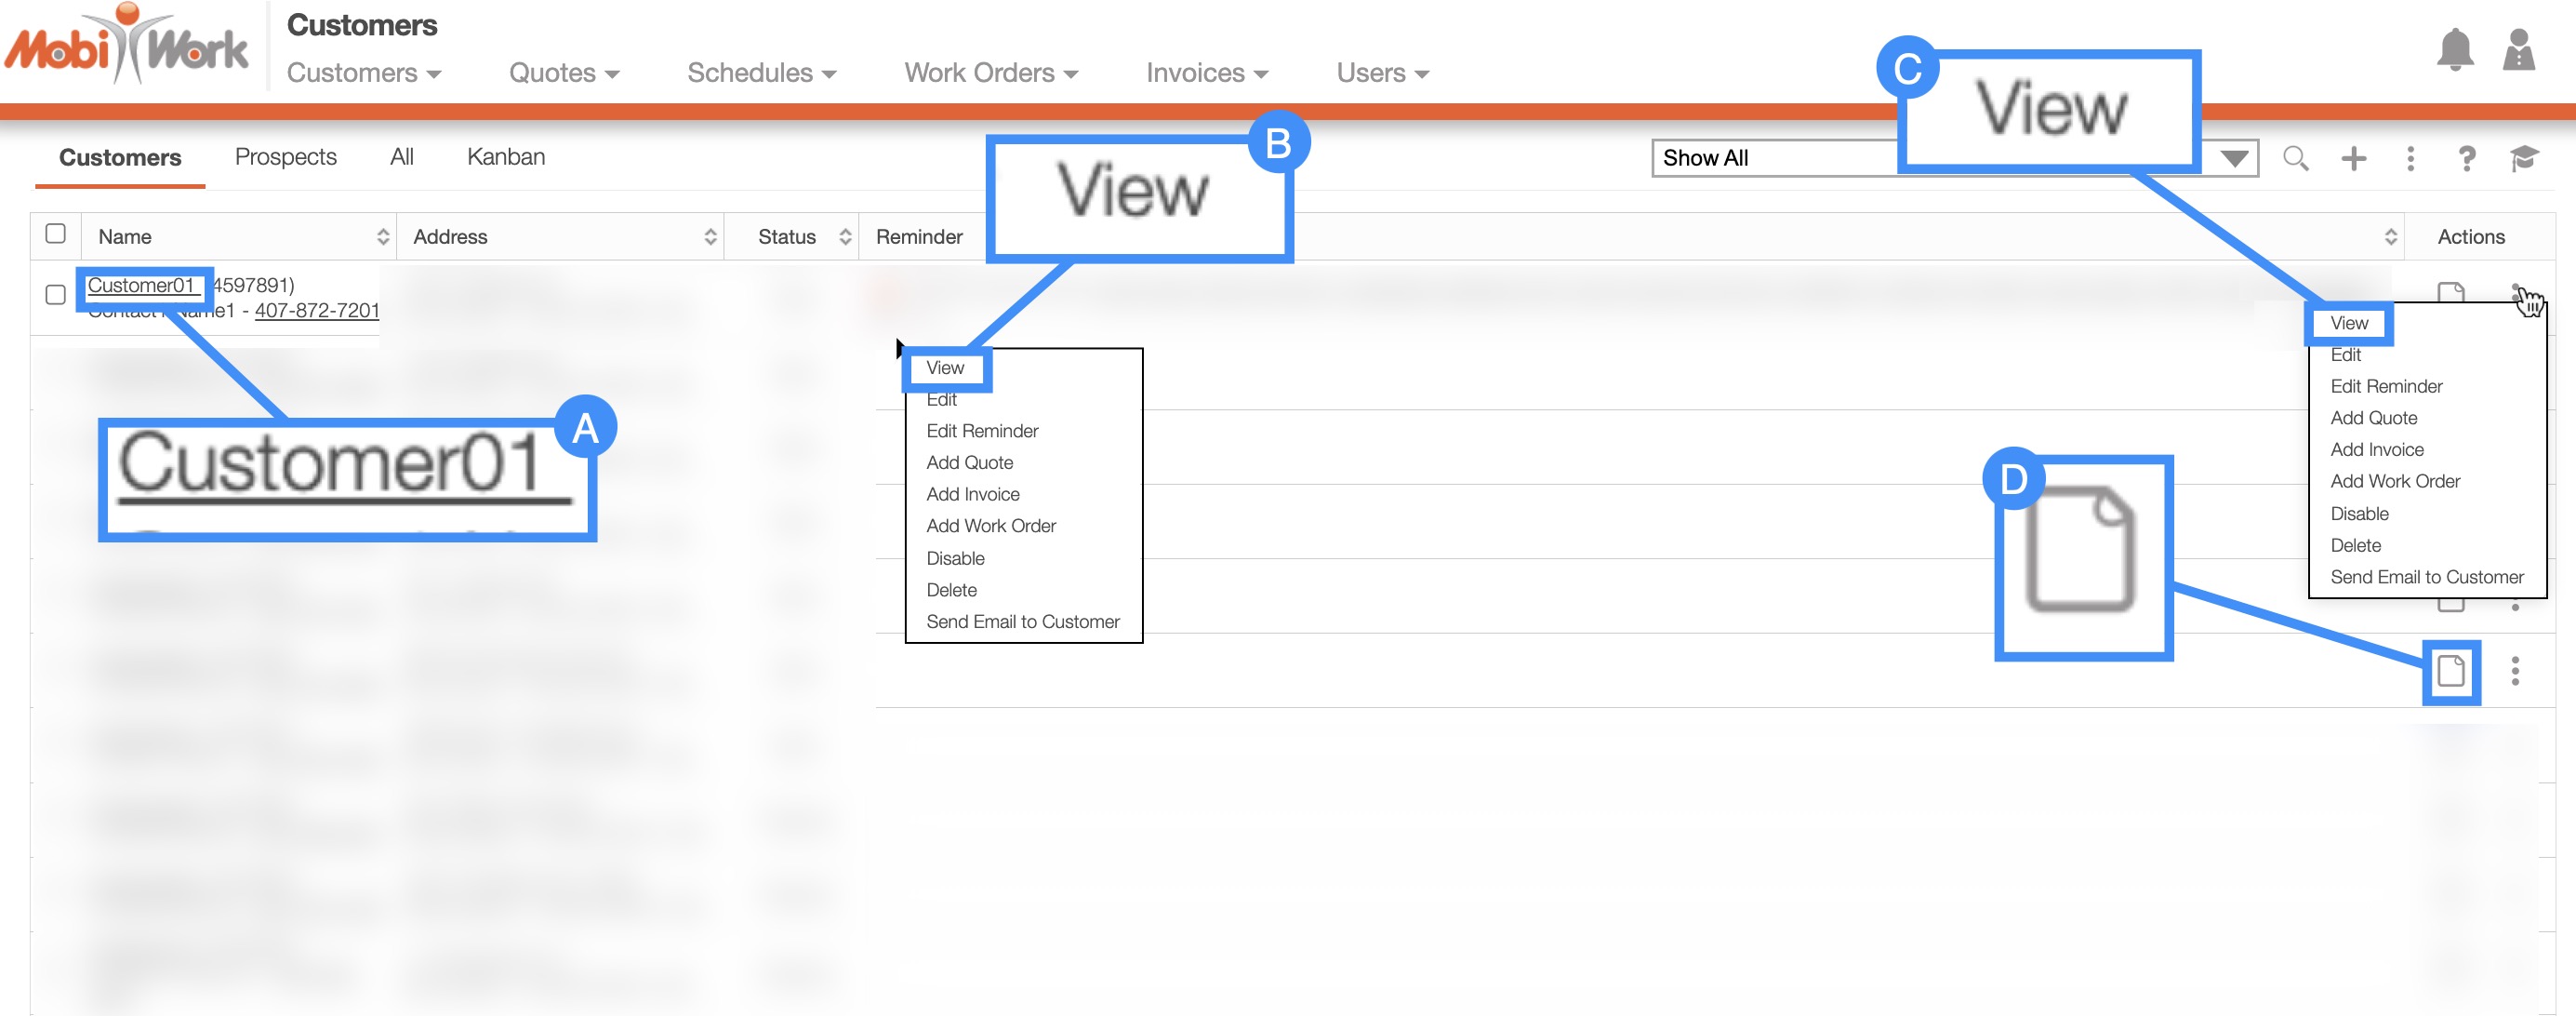
Select the desired Customer ID.
Right-click on the selected customer and click on the "View" option from the drop-down.
Click on the "View" option from the Individual Actions drop-down.
Select the View icon under the "Actions" column.
You can use these features to access the View Customer pop-up window in any of the Customers tabs except the "Territories," "Map," and "Kanban" tabs.
To see how to access the View Customer pop-up window please see the subsequent sections, "Customers Tab: Territories," "Customers Tab: Map," and "Customers Tab: Kanban."
Customers Tab: Kanban
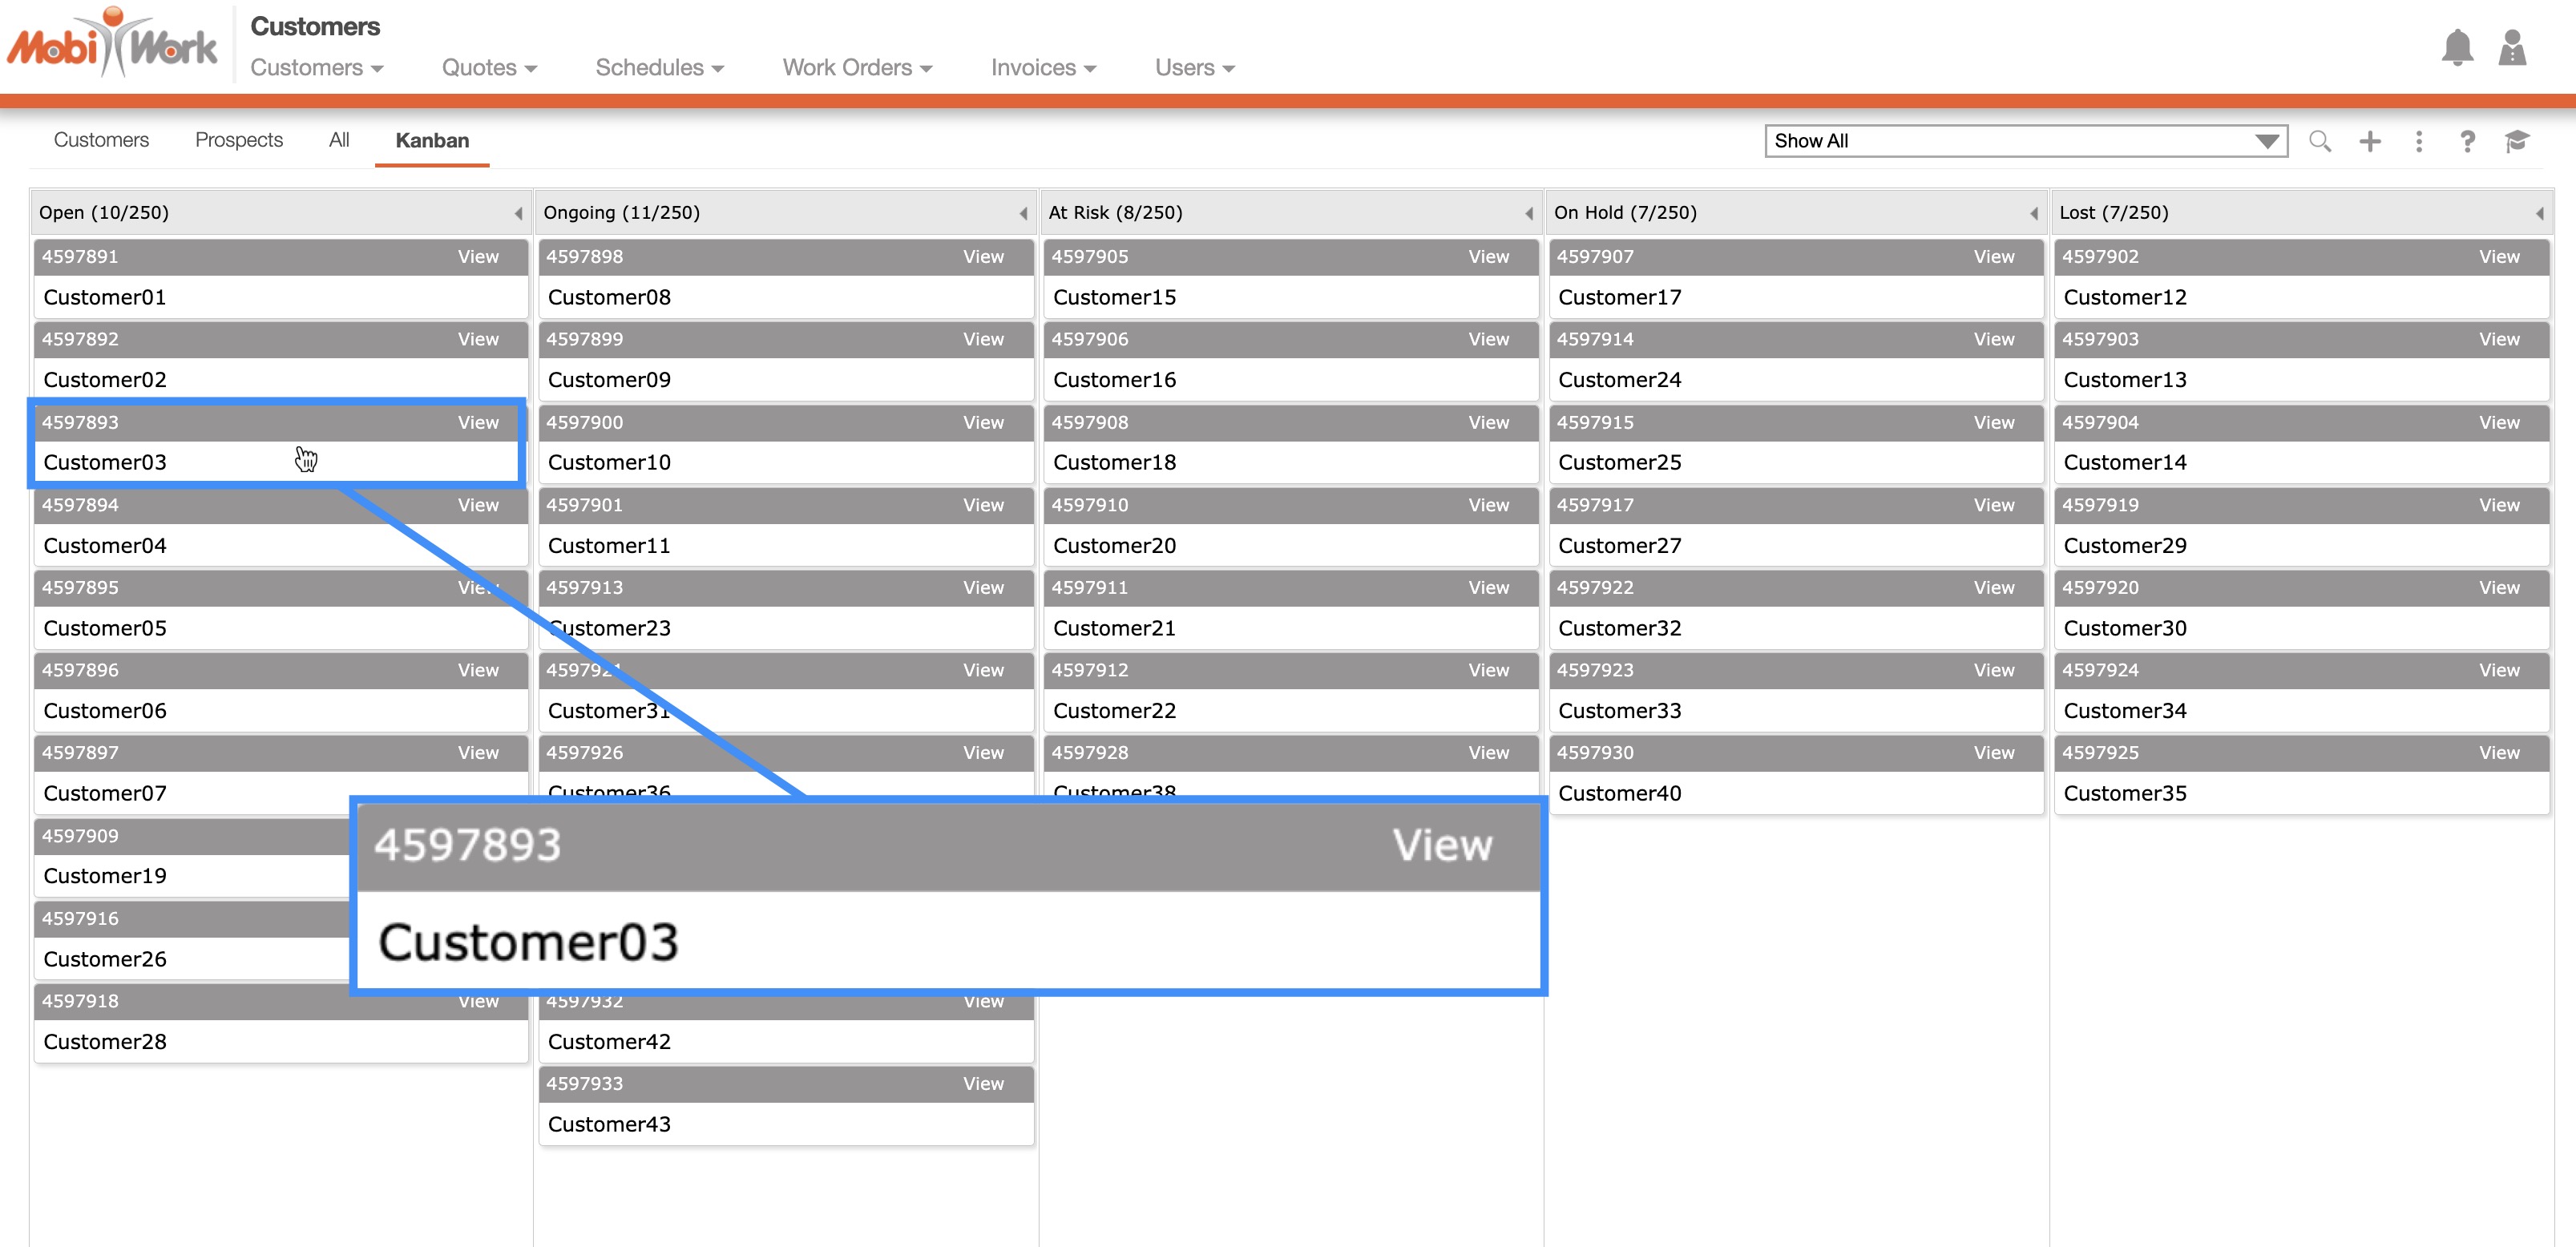
For more information on how to access the "Kanban" tab please see the Customer List page.
Click on the desired customer or company name to open the View Customer pop-up window:
Quotes
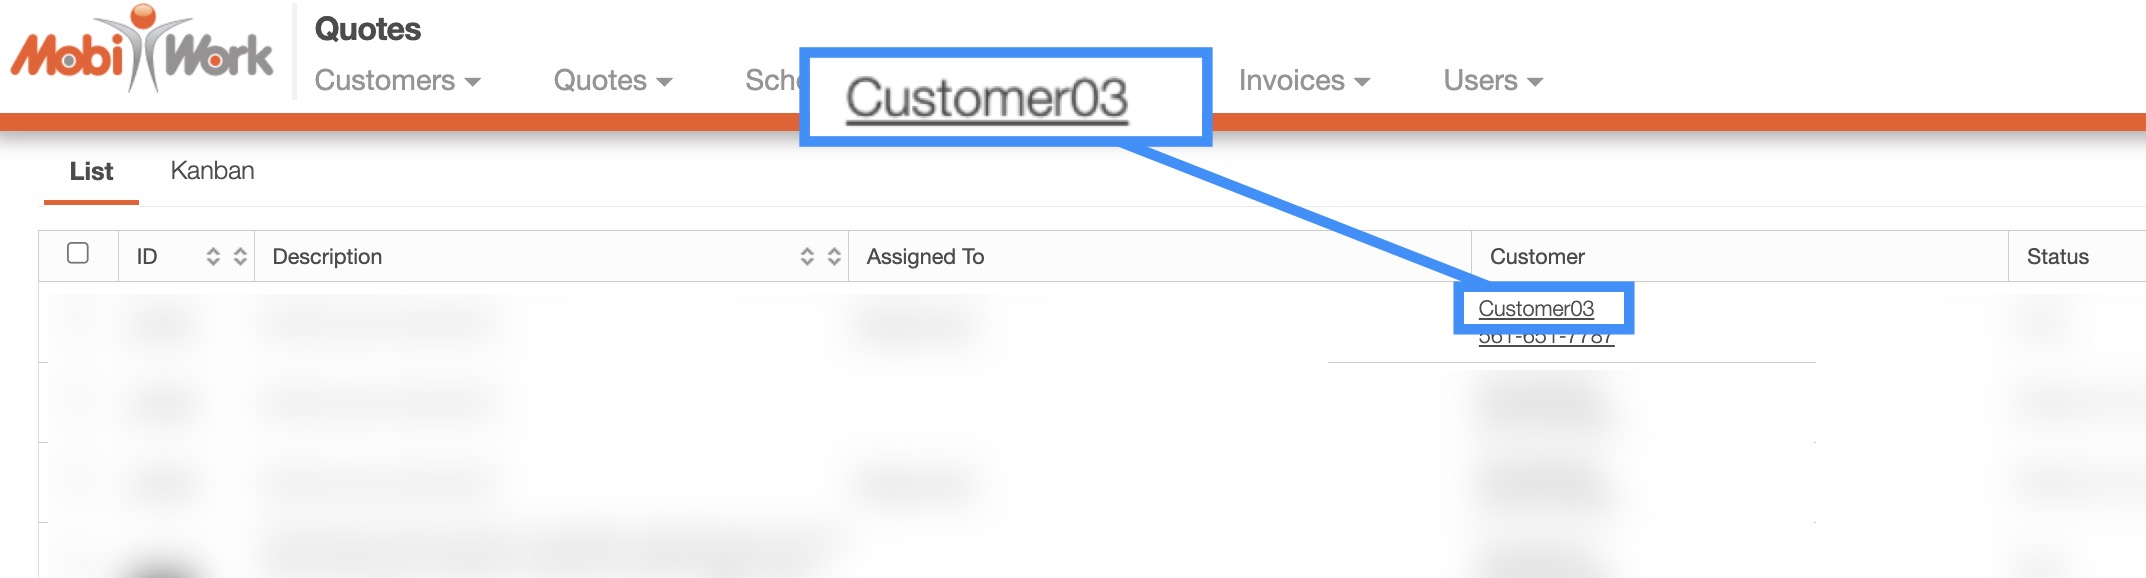
For more information about how to access the Quotes feature, please see Quotes List page.
Click on the desired customer's name to open the View Customer pop-up window:
Schedules
For more information about how to access the Schedules feature, please see Schedule List page.
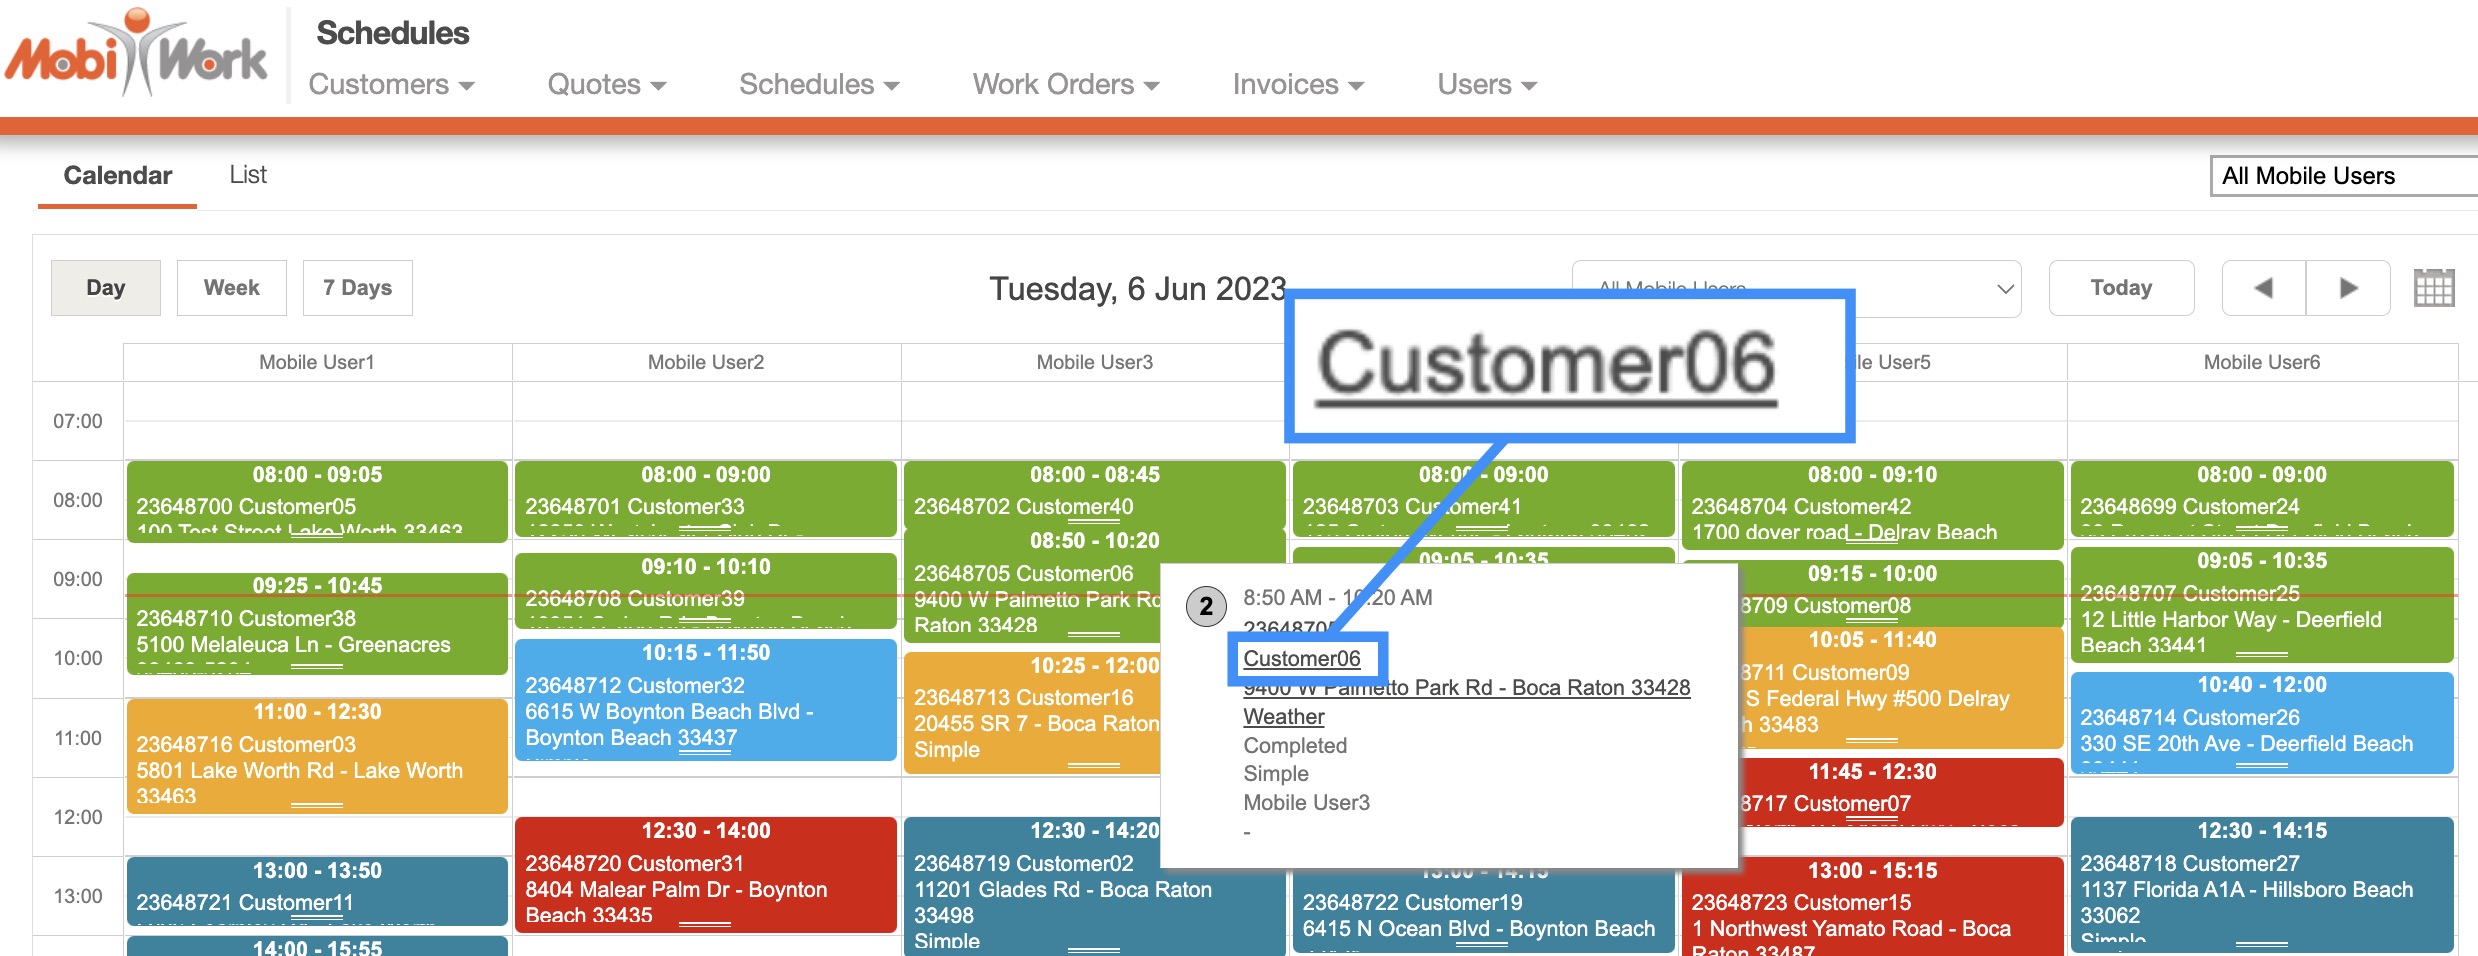
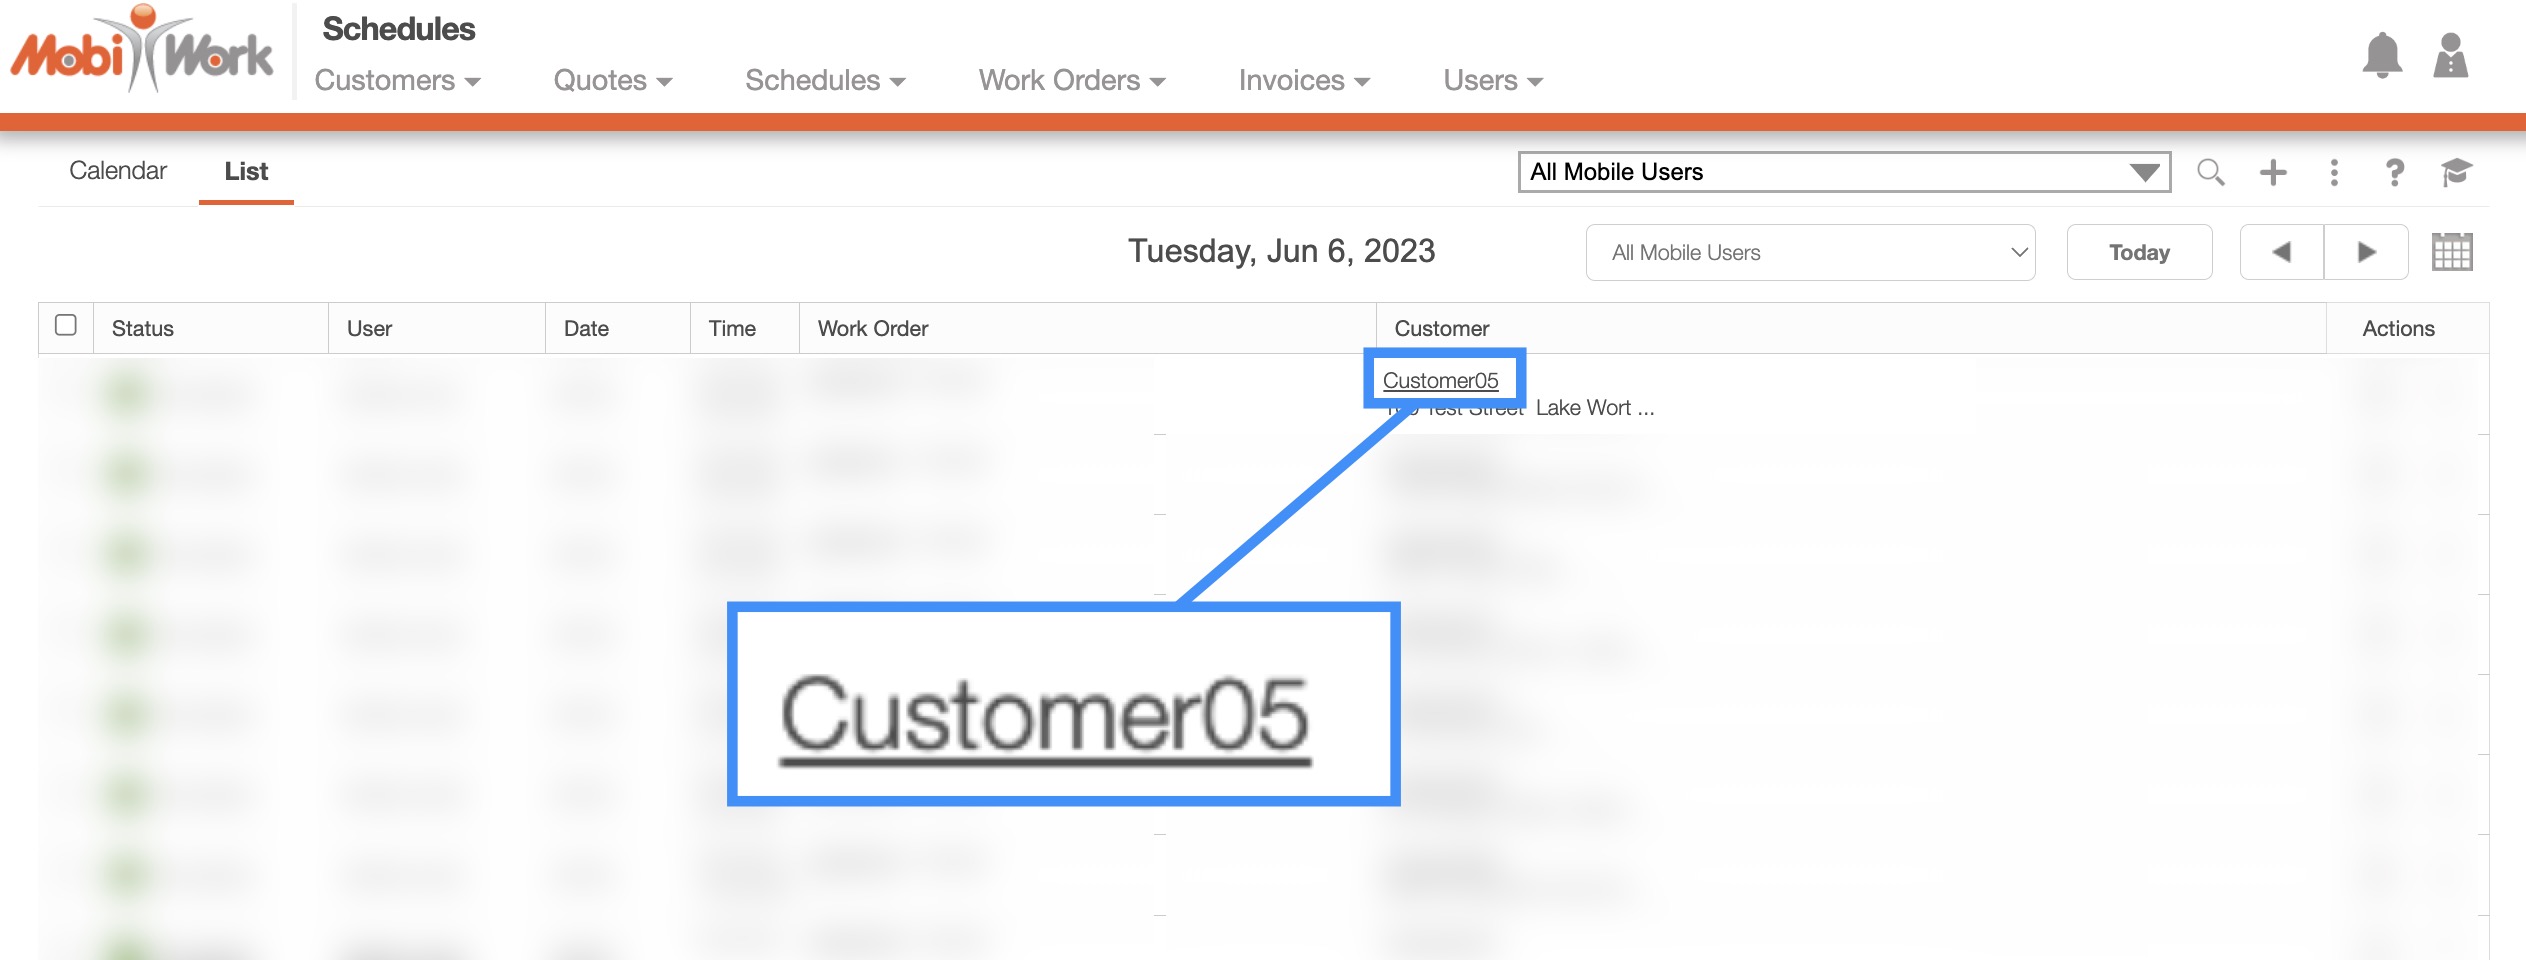
On the Schedules "List" tab to access the View Customer pop-up window:
Click on the desired customer from the "Customer" column and the View Customer pop-up window will automatically appear:
Work Orders
For more information on how to access the Work Orders feature, please see the Work Orders List page.
When you are on the "List" tab, click on the customer or company name to access the View Customer pop-up window:

By clicking on the ID number of the Work Order you will be able to open the View Customer pop-up window:
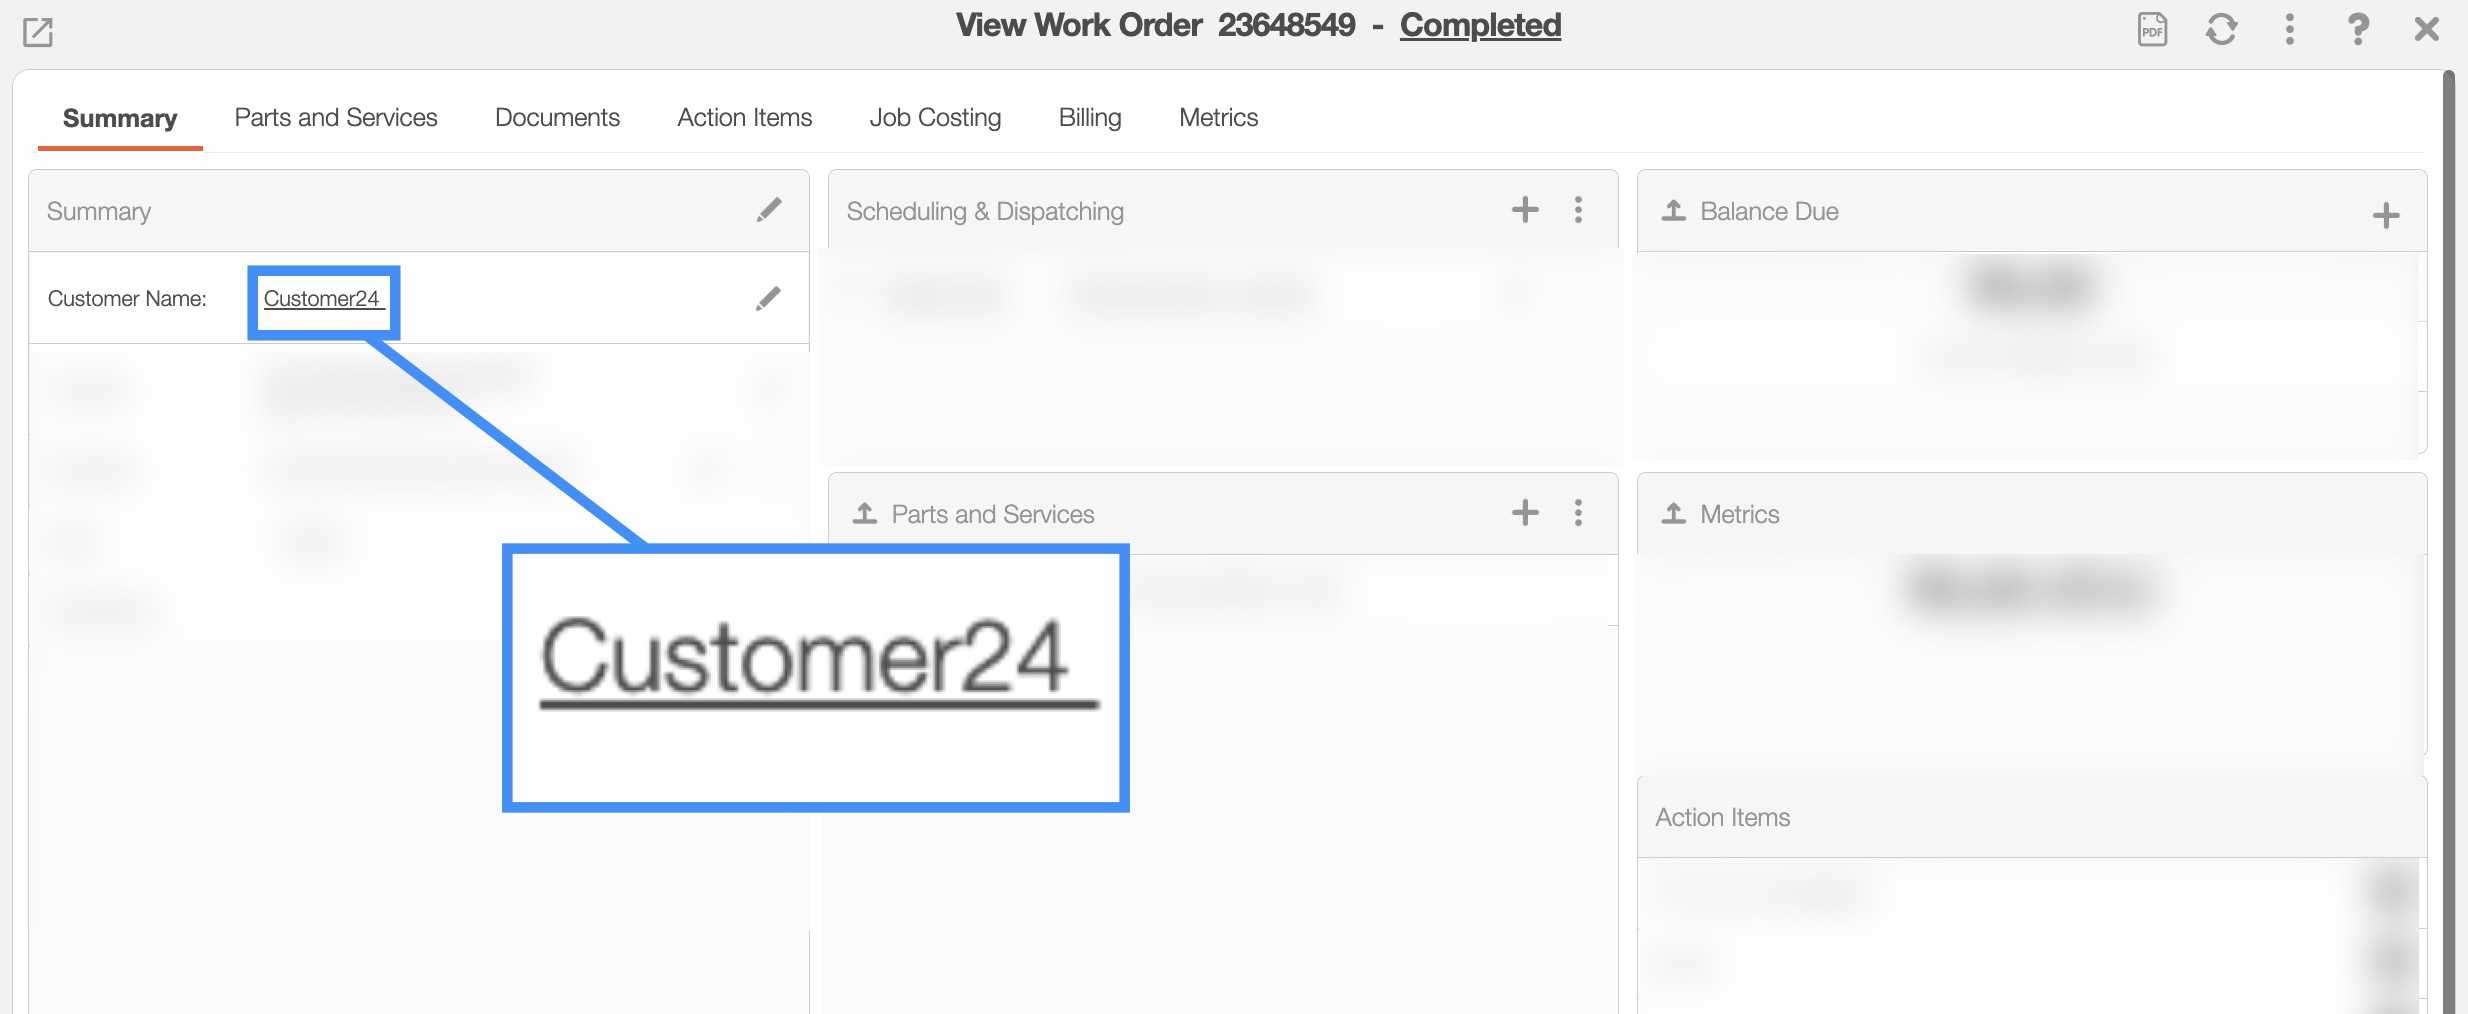
You can also access the View Customer pop-up window from the View Work Order pop-up window. For the different ways to access this pop-up window, please see the View an Invoice. Once you are on the View Invoice pop-up window open, click on the customer's name:
Invoices
To learn how to access the Invoices feature, please see the Invoices List for more information.
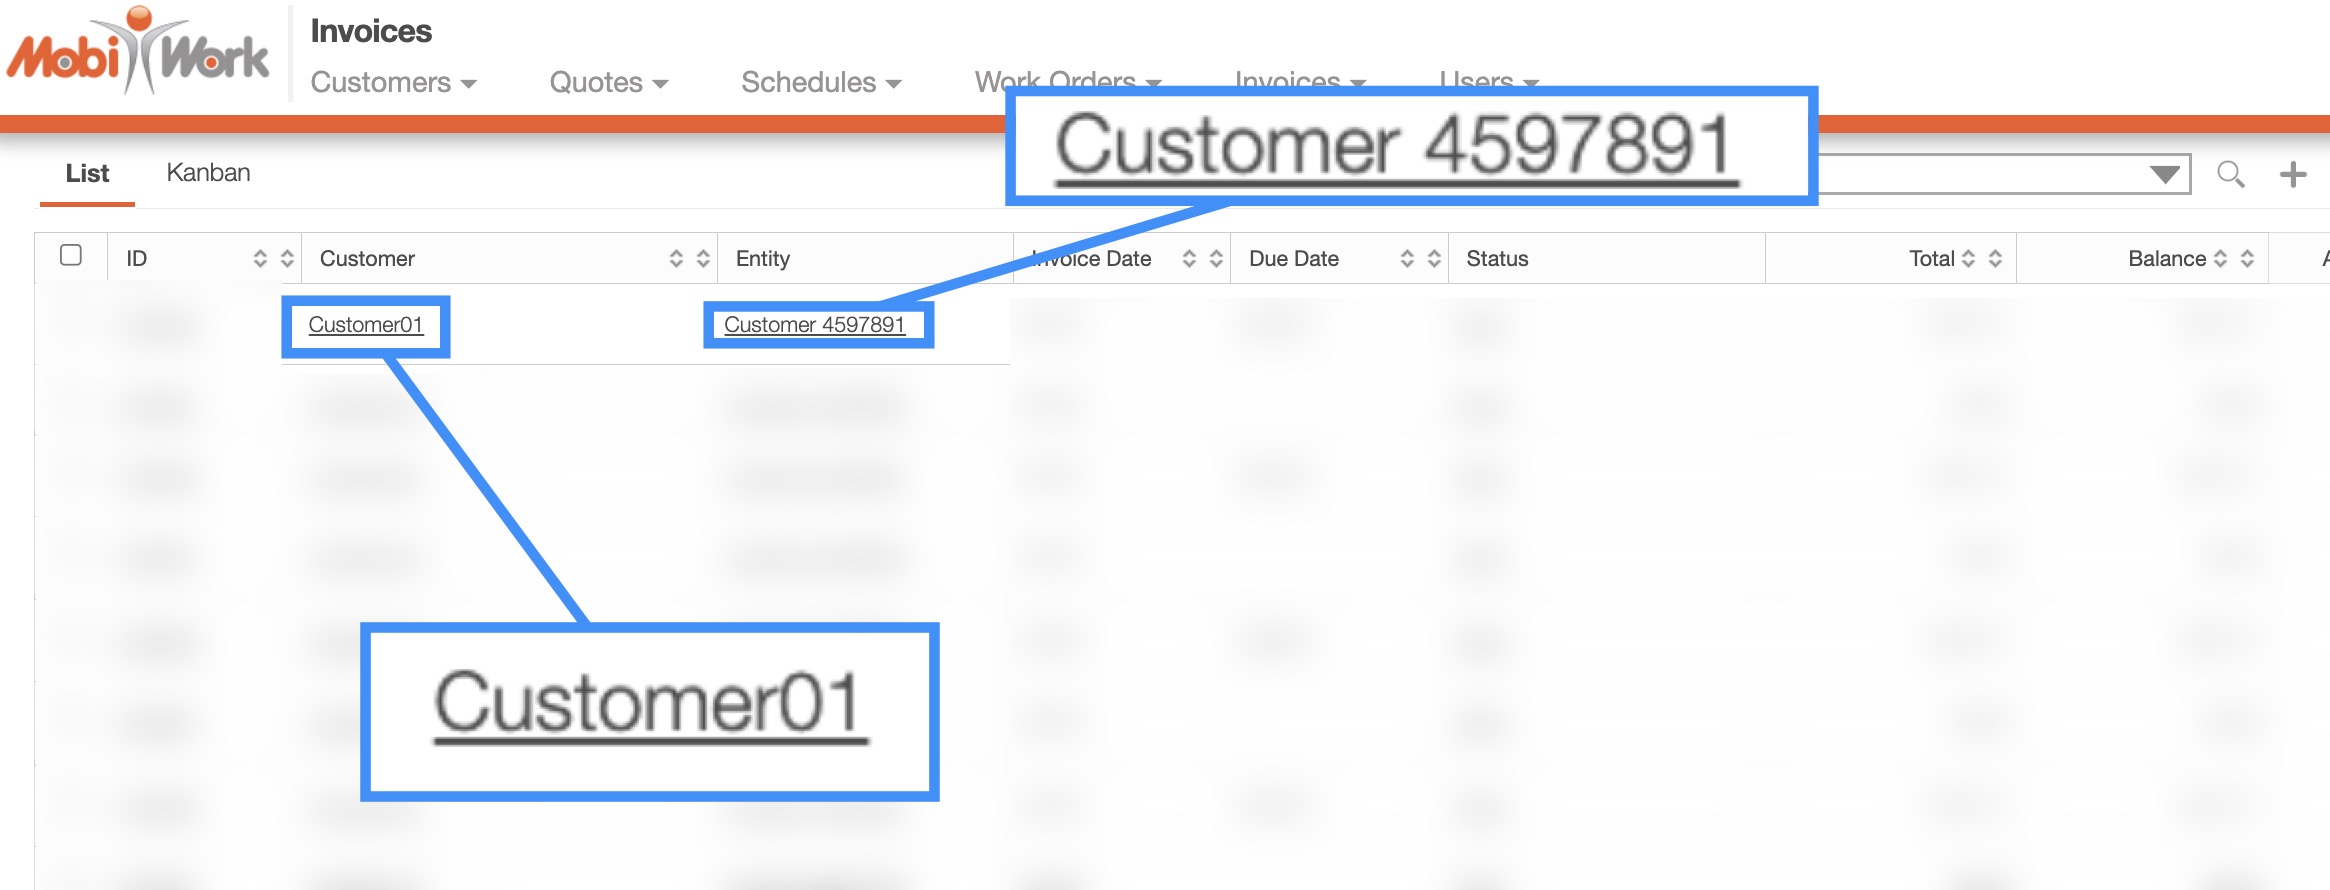
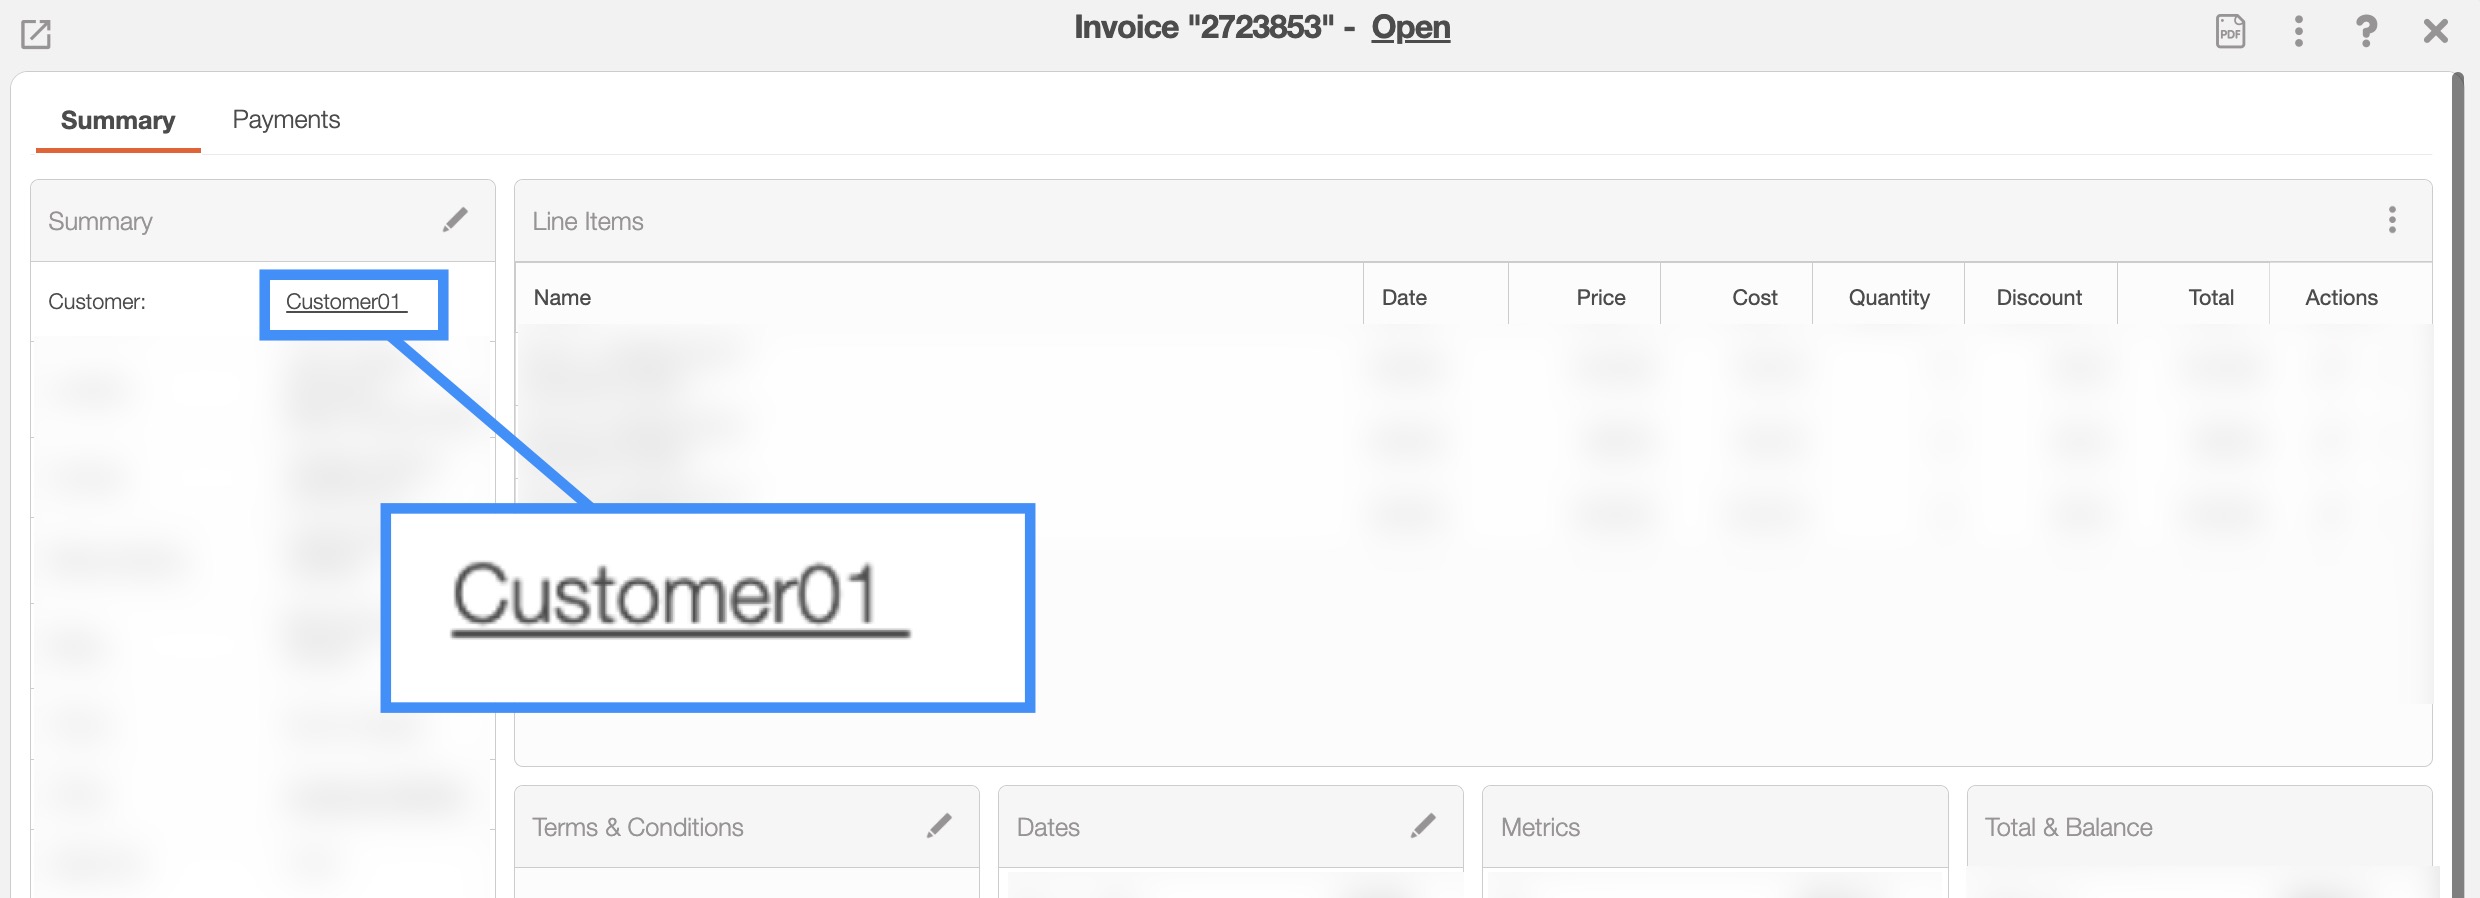
By clicking either on the customer's name or the entity name you will automatically be redirected to the View Customer pop-up window:
You can also access the View Customer pop-up window by clicking on the Invoice ID:
You can also access the View Customer pop-up window from the View Invoice pop-up window. For the different ways to access this pop-up window, please see the View Work Order. Once you are on the View an Invoice pop-up window open, click on the customer's name:
Regardless of the method that you choose to access the View Customer pop-up window, it will automatically appear.
Overview and Layout
Once you open the View Customer pop-up window, you will be automatically directed to the "Summary" tab:

These features are available in all fourteen tabs and in both, the pop-up window, and the full-size view:
Please note that if you would like to easily close this pop-up window, you can click on the esc button from your keyboard.
Customer Full-Size View
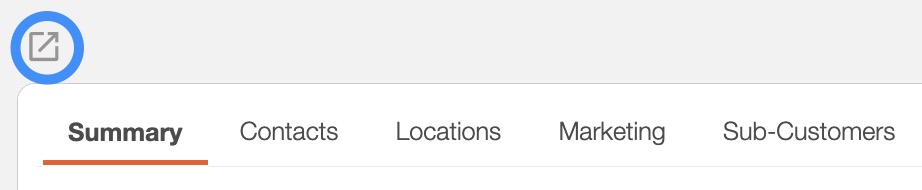
By clicking on the upwards arrow in the left-hand corner, you can expand the View Customer pop-up window so that it is full-size:
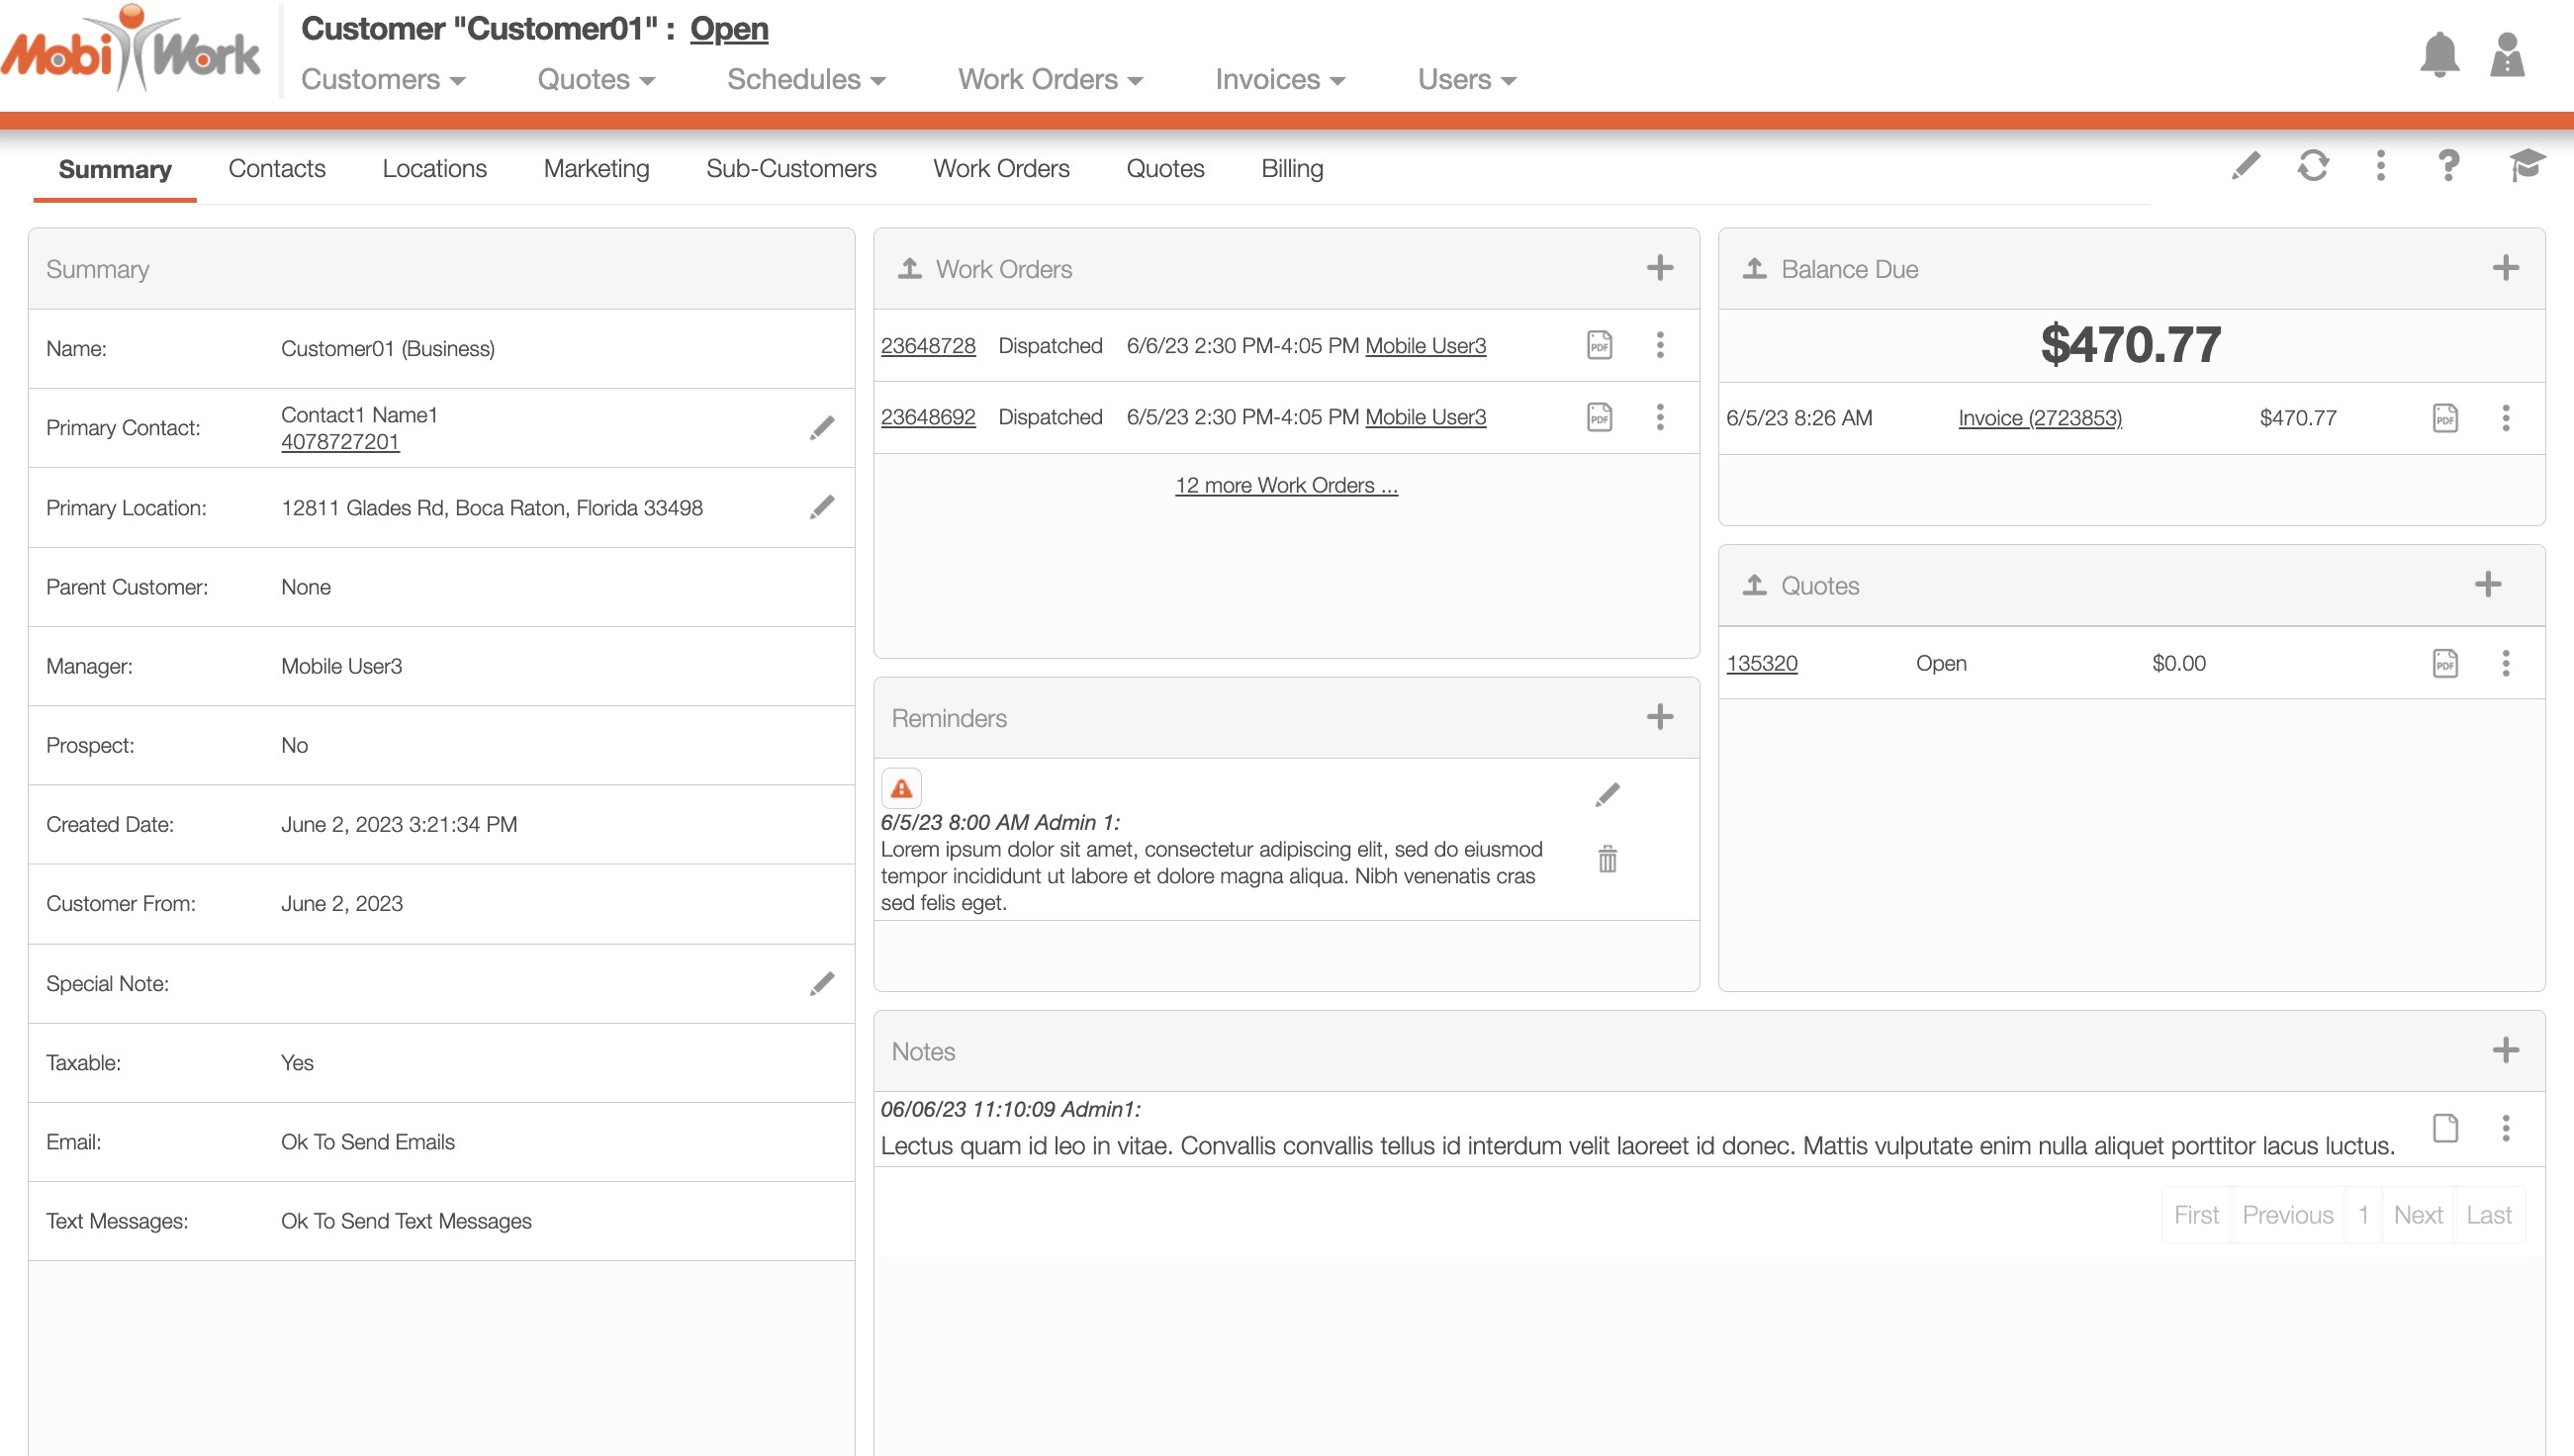
The full-size View Customer pop-up window can be seen below. All the tabs, buttons, and features are identical to how they would appear in the pop-up window:
Customer Tabs
There are eight tabs in all for the View Customer pop-up window; each tab displays different information regarding the customer:

You can navigate to other tabs by clicking on the desired tab.
Customer Name and Status
The customer's name and the status will be displayed towards the top of the View Customer pop-up window:

You can quickly change the status of the customer by clicking on the status and selecting the desired new status.
The statuses that are available are:
Open
Ongoing
At Risk
On Hold
Lost
Upper Right Corner Actions
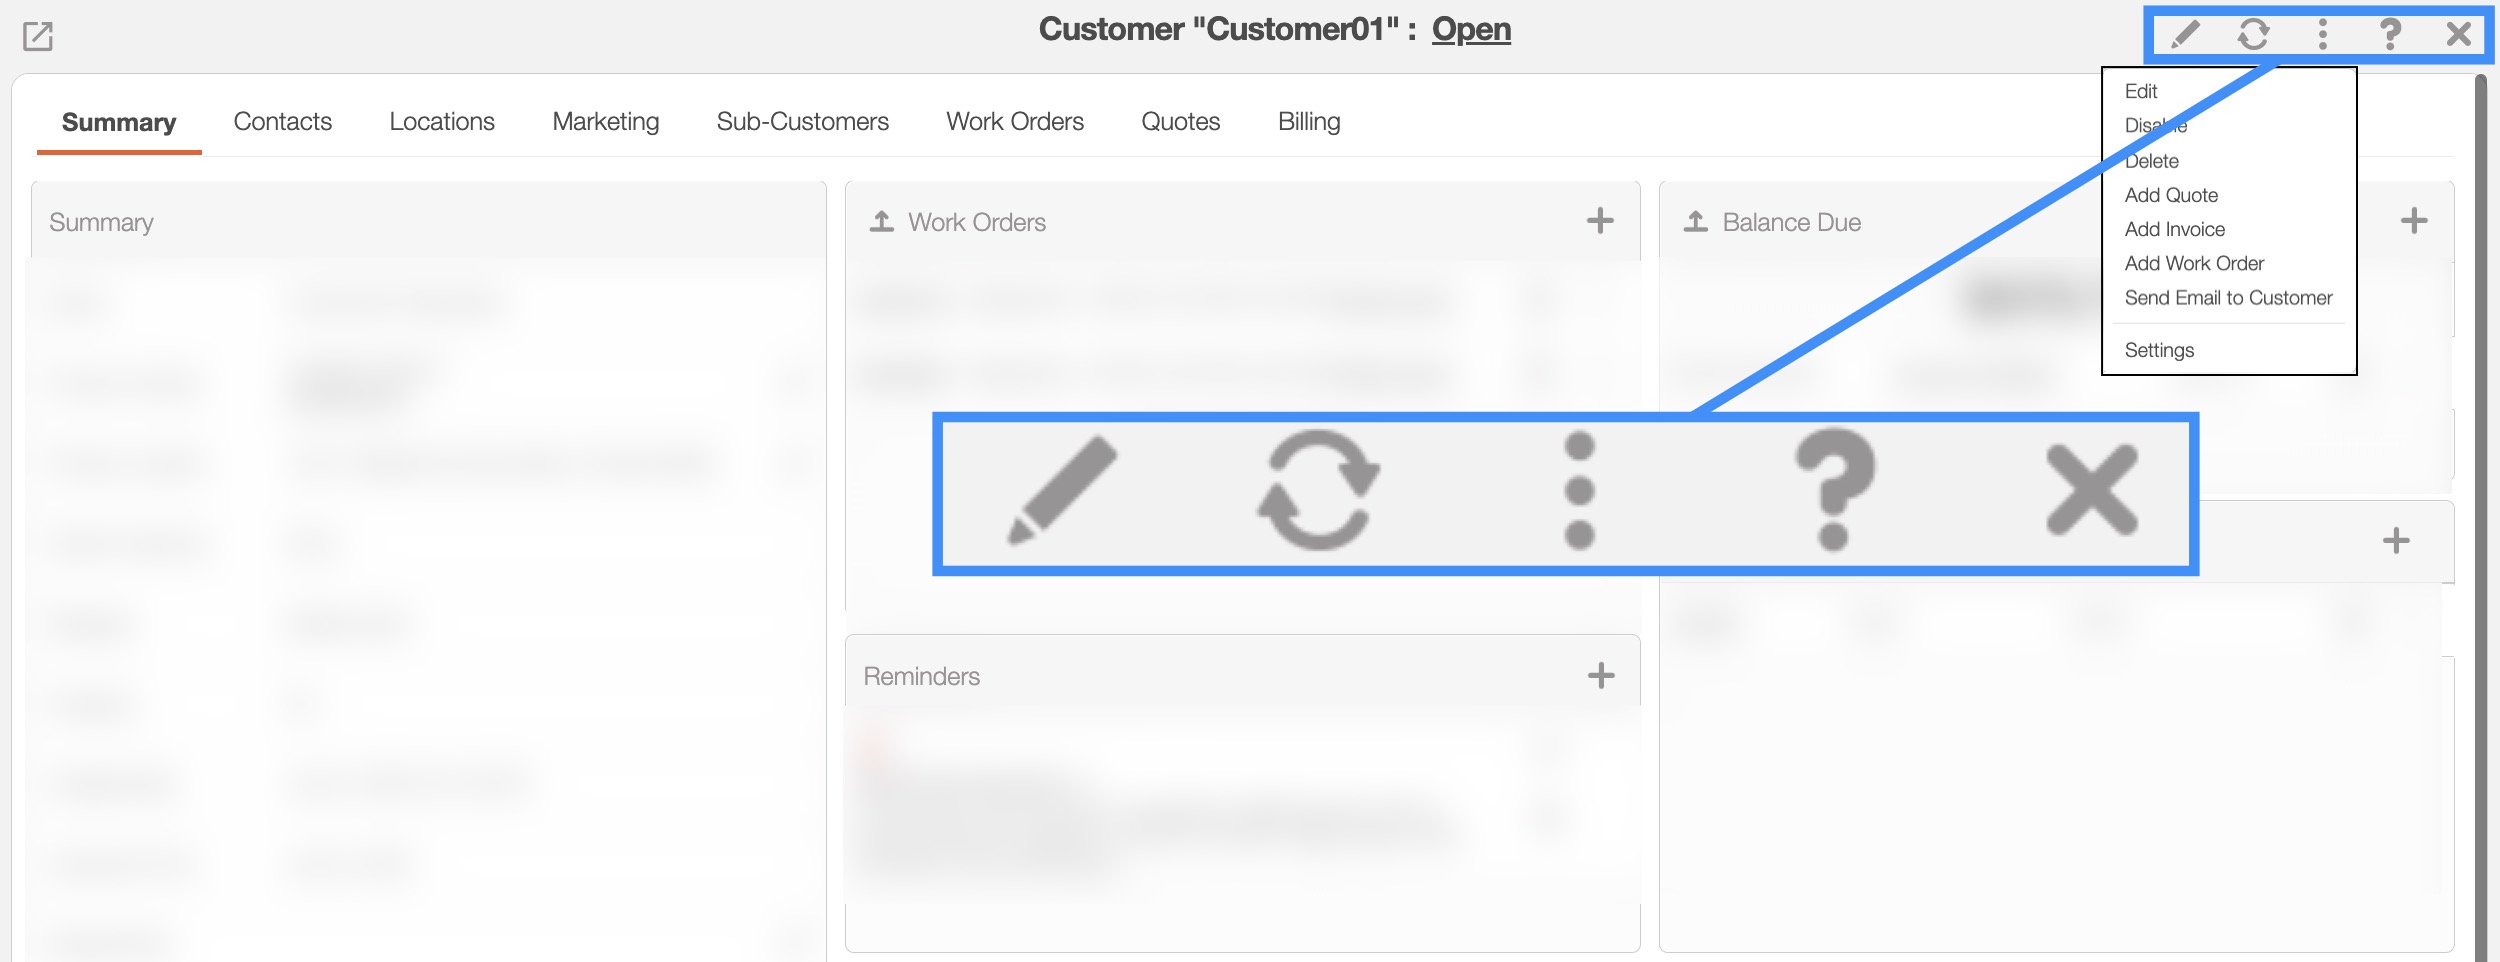
In the upper right corner of the View Customer pop-up window there will be four buttons that will allow you to perform additional actions on the customer:
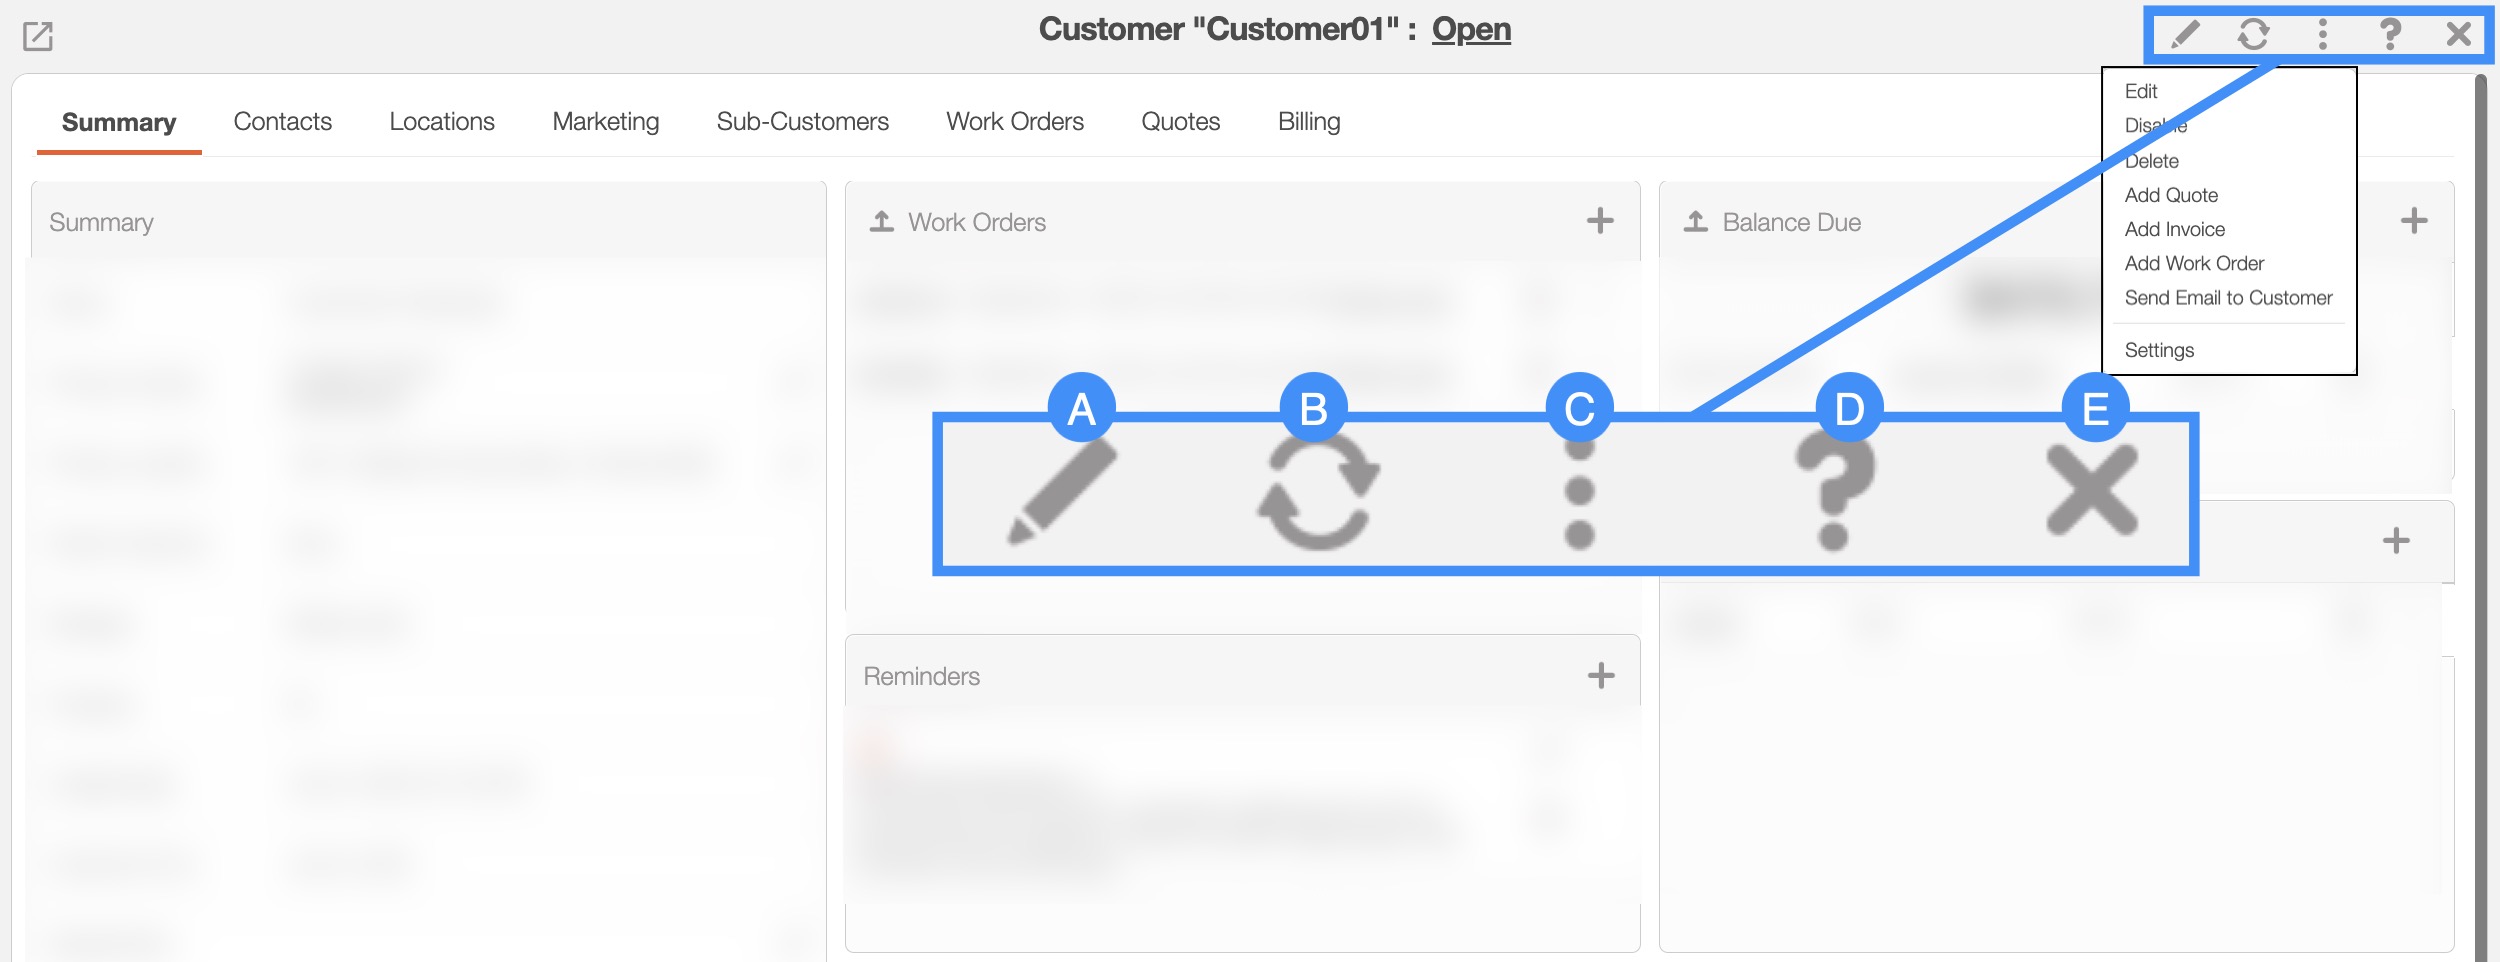
The Pencil button will allow you to edit the customer.
The Refresh button will allow you to refresh the customer's data to the most up-to-date version.
The Individual Actions button will allow you to perform various actions, such as:
- Editing the customer.
Editing the customer portal settings.
Disabling the ability to create work orders for the customer and deactivates the customer so they no longer appear on the Customer tab.
Deleting the customer.
Adding a quote to the customer profile.
Adding an invoice to the customer profile.
Adding a work order to the customer profile.
Sending an email, text message, the customer portal log-in details, or customer statements to the customer.
Exporting the customer to QuickBooks.
Viewing the Settings page.
The Question Mark button which will direct you to the respective MobiWork Features page.
The X will close out of the View Customer pop-up window.
The Customer's Upper Right Corner Actions can be found in the top-right corner of the View Customer pop-up window. These actions are located in this section, regardless of the tab you are on:
The Upper Right Corner Actions section includes:
The Pencil button will allow you to edit the customer.
The Refresh button will allow you to refresh the customer's data to the most up-to-date version.
The Individual Actions button will allow you to perform various actions.
The Question Mark button which will direct you to the respective MobiWork Features page.
The X will close out of the View Customer pop-up window.
After clicking on the vertical three dots in the top-right corner, the Individual Actions drop-down menu will appear:
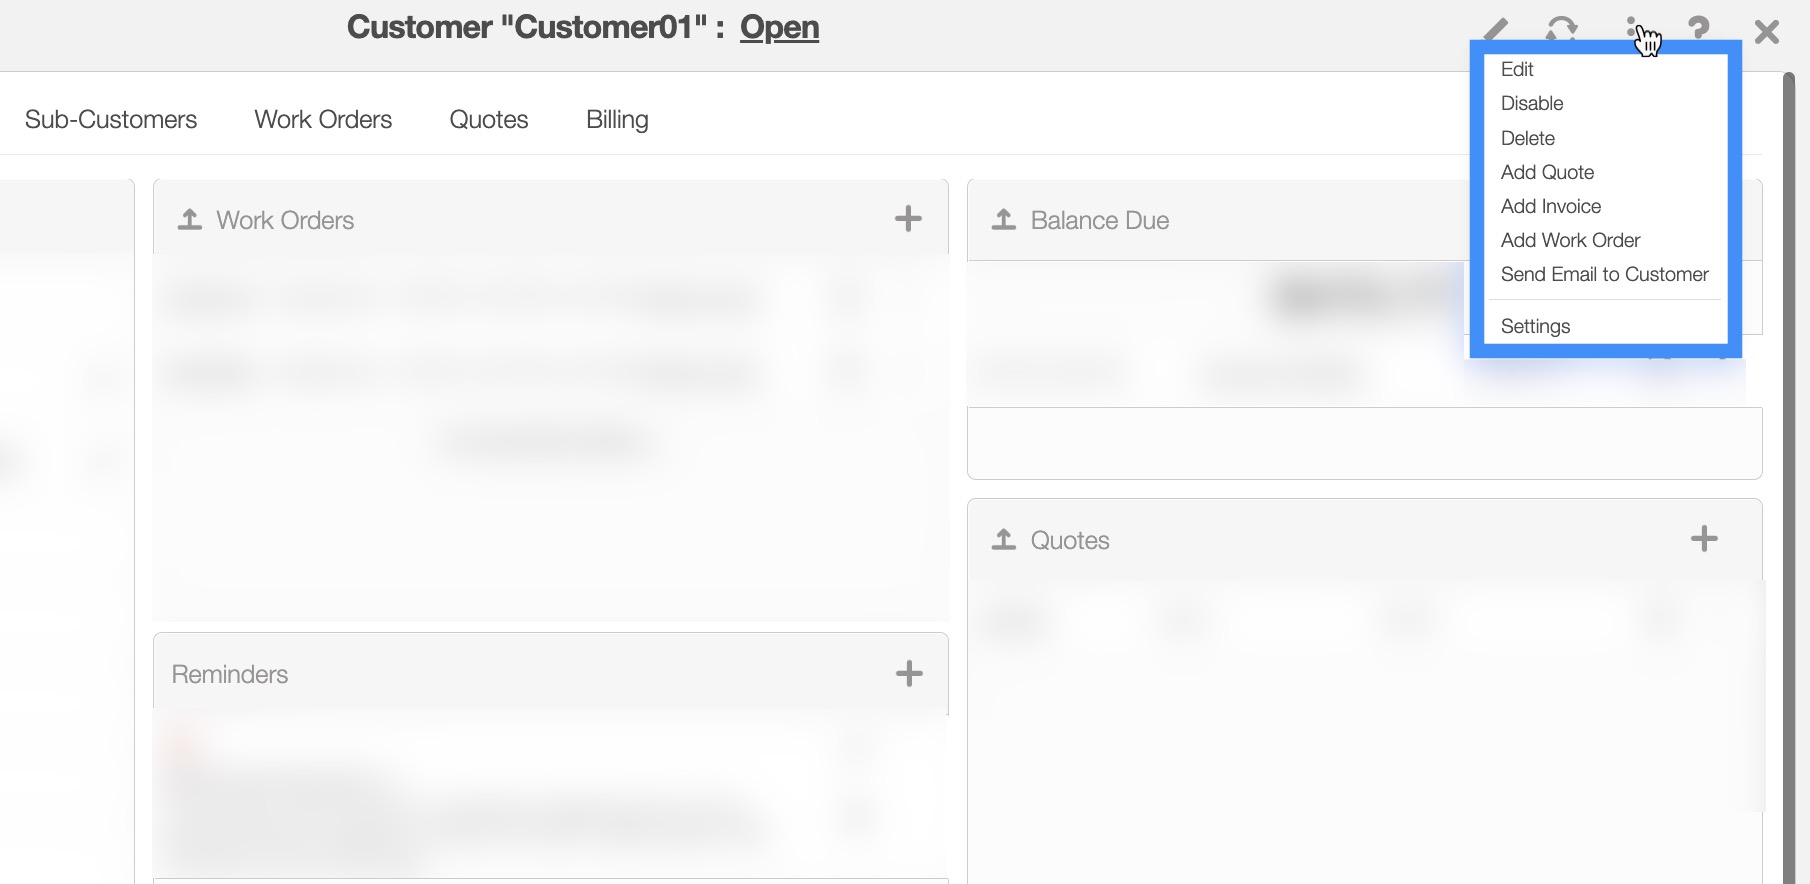
From the Individual Actions drop-down menu, you can select various actions that will help manage the specified customer.
The complete list of actions found in the Individual Actions drop-down menu are defined below:
| Name: | Description: |
|---|---|
| "Edit" | Allows the user to edit the specified customer. |
| "Edit Customer Portal" | Allows the user to edit the customer portal permissions for the selected user. |
| "Disable" | Disables the customer so that future work orders or recurrent services cannot be generated for them. |
| "Delete" | Deletes the customer from MobiWork. |
| "Add Quote" | Adds a quote to the customer's profile. |
| "Add Invoice" | Adds an invoice to the customer's profile. |
| "Add Work Order" | Adds a work order to the customer's profile. |
| "Send Email" | Allows you to send an email to the customer. |
| "Send Text Message" | Allows you to send a text message to the customer. |
| "Send Customer Portal Credentials Emails" | Allows you to send a text message to the customer. |
| "Export Customer to QuickBooks" | Exports the customer to QuickBooks. |
| "Settings" | Directs the user to the Customer Settings page. |
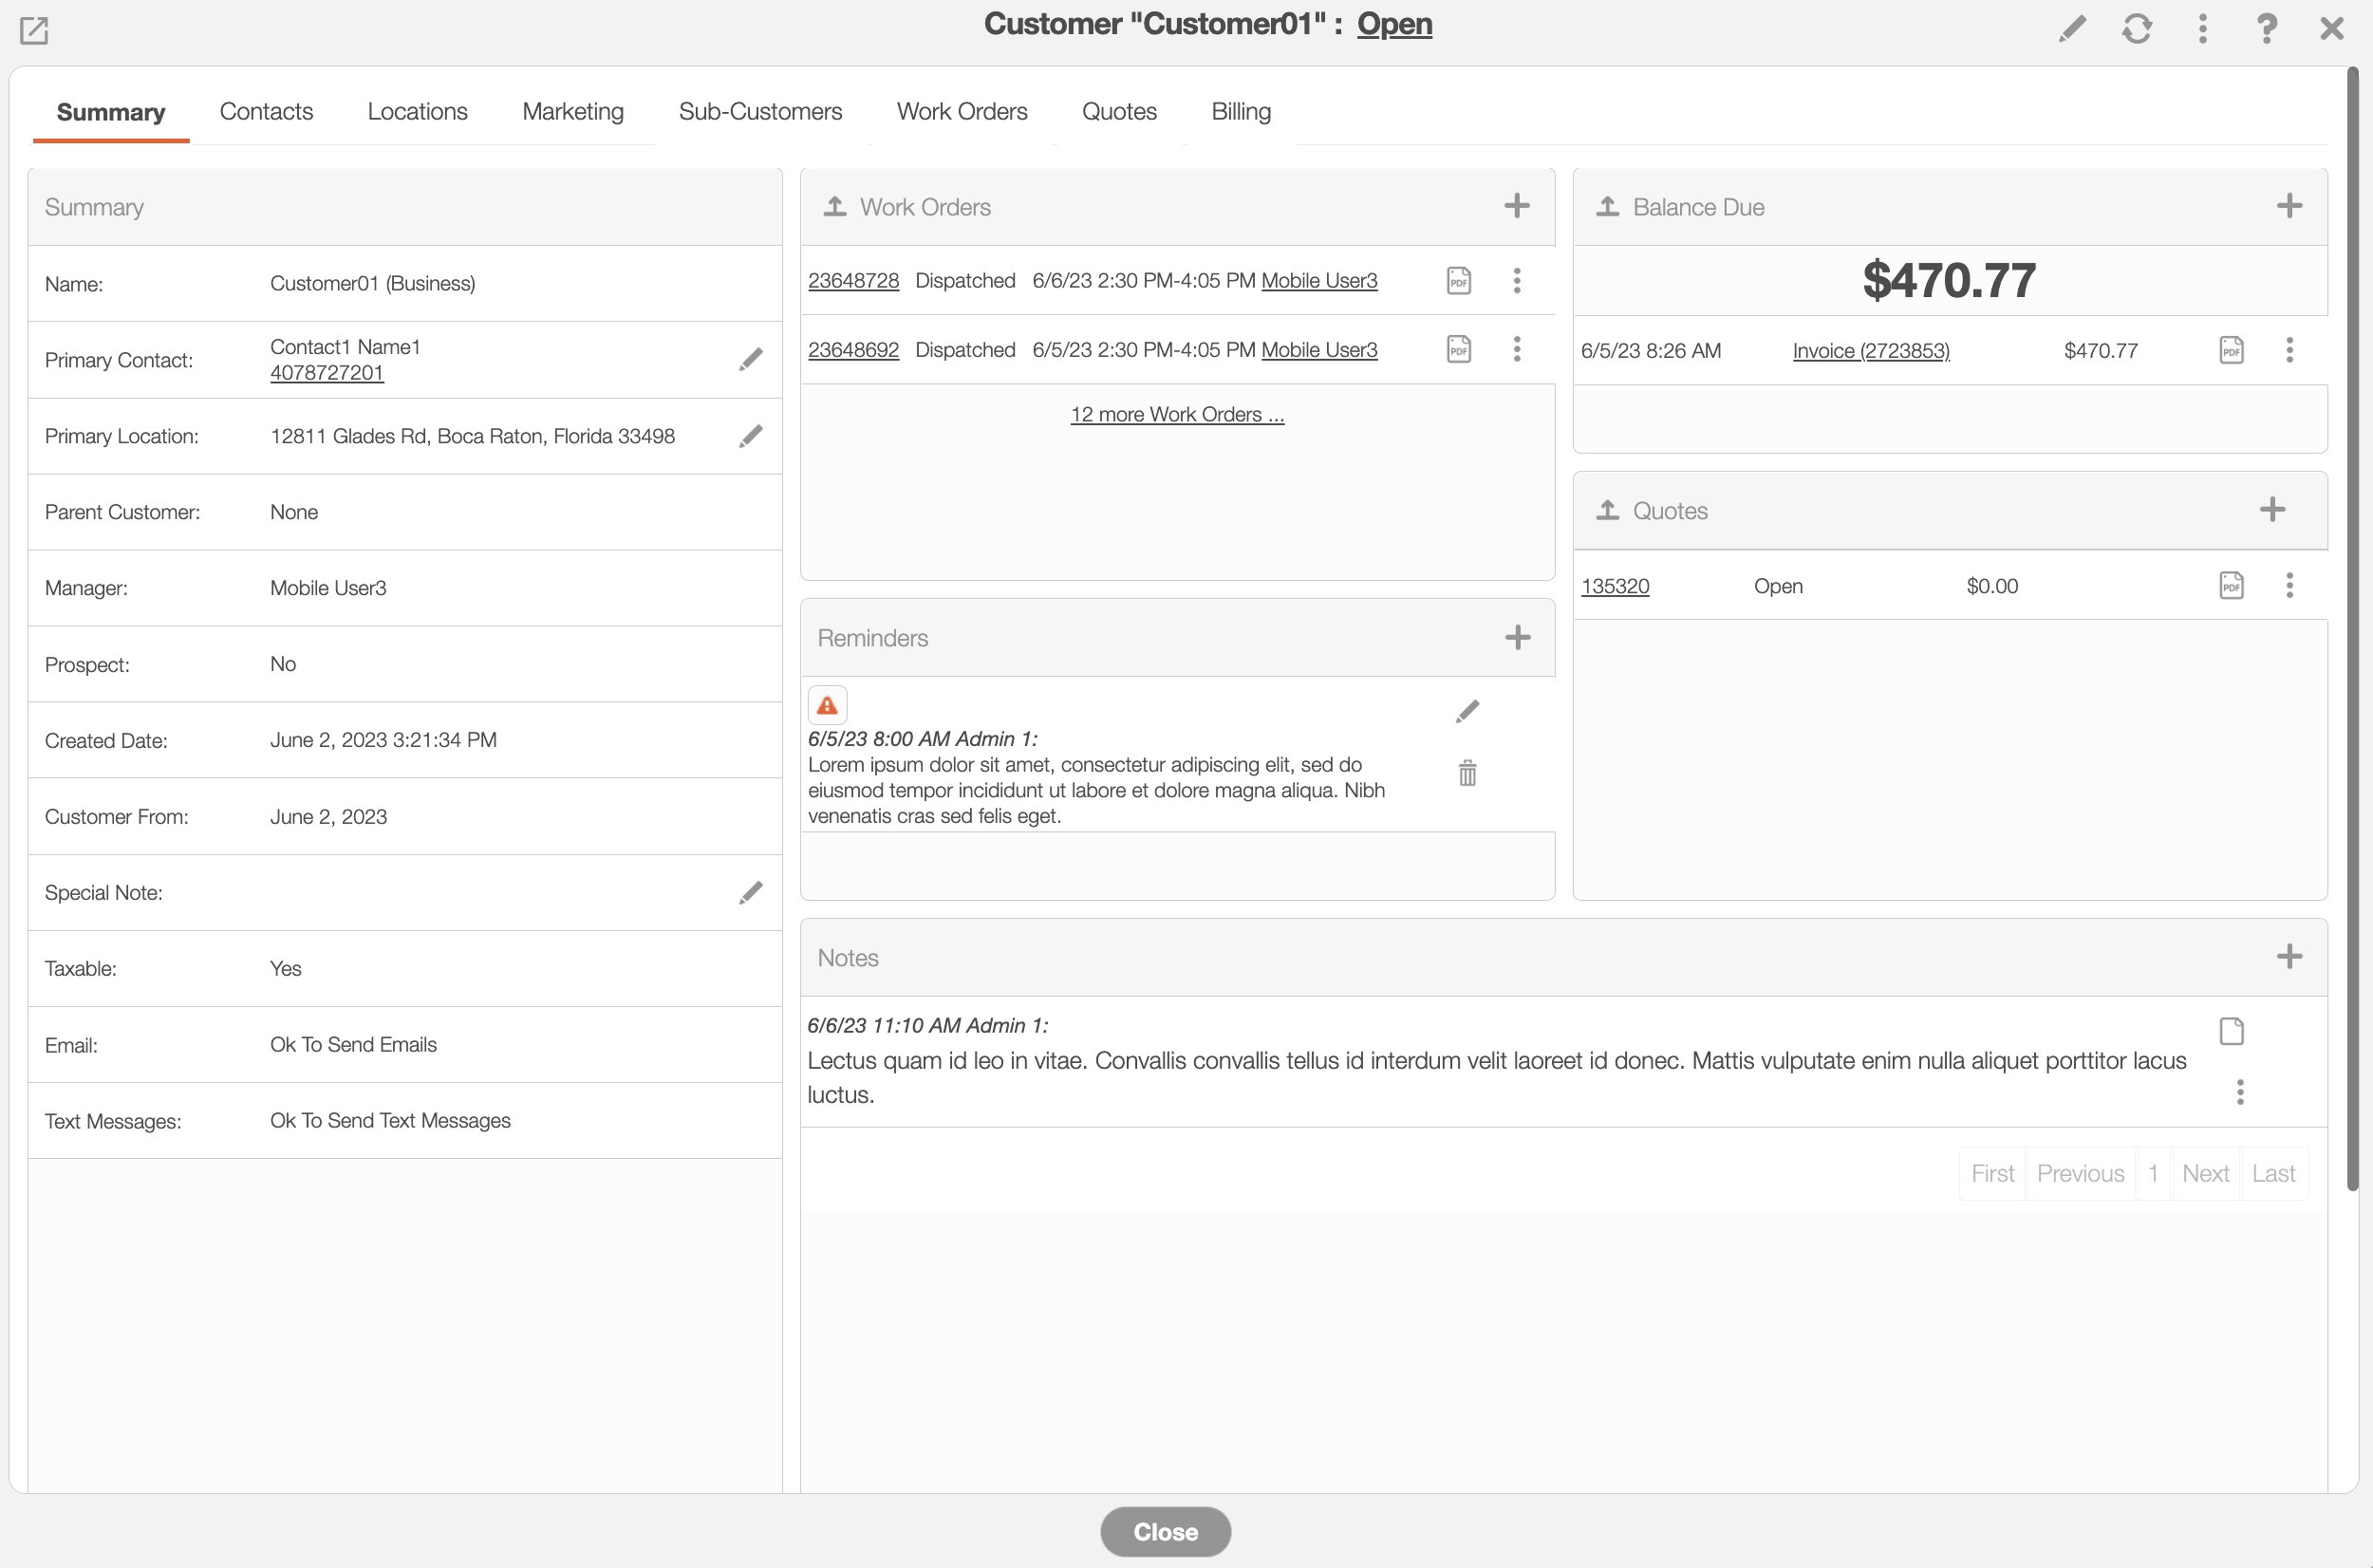
The "Summary" tab is the default tab you will be directed to; it will display all the requisite information regarding a customer.
The panels found on the "Summary" tab will summarize the data from the other View Customer tabs, including notes, any assets associated with the customer, and more.
The "Summary" box in the "Summary" tab will display the manager in charge of the customer as well as if the customer is associated with a parent customer.
Please note that a Special Note is an internal note in which users are notified of important customer-specific information, (e.g., the customer is elderly and has trouble walking, so will take longer to answer the door):
Where applicable, you can edit or add additional information directly in the "Summary" tab:
The Arrow icon (found in the top left of designated boxes) will open the corresponding tab in the View Customer pop-up window.
The Individual Actions button (the three dots) will display different options (e.g., view, edit, delete, etc.) depending on the corresponding panel.
The View icon will allow you to view the selected data in a separate window.
The Pencil icon will allow you to edit the selected data or field.
The Plus Sign icon will allow you to add additional special notes, notes, reminders, assets, work orders, etc.
The Trash Can icon will allow you to delete the selected data.
The "Contacts" tab will list all the individuals who are the designated contacts for the customer or company profile:
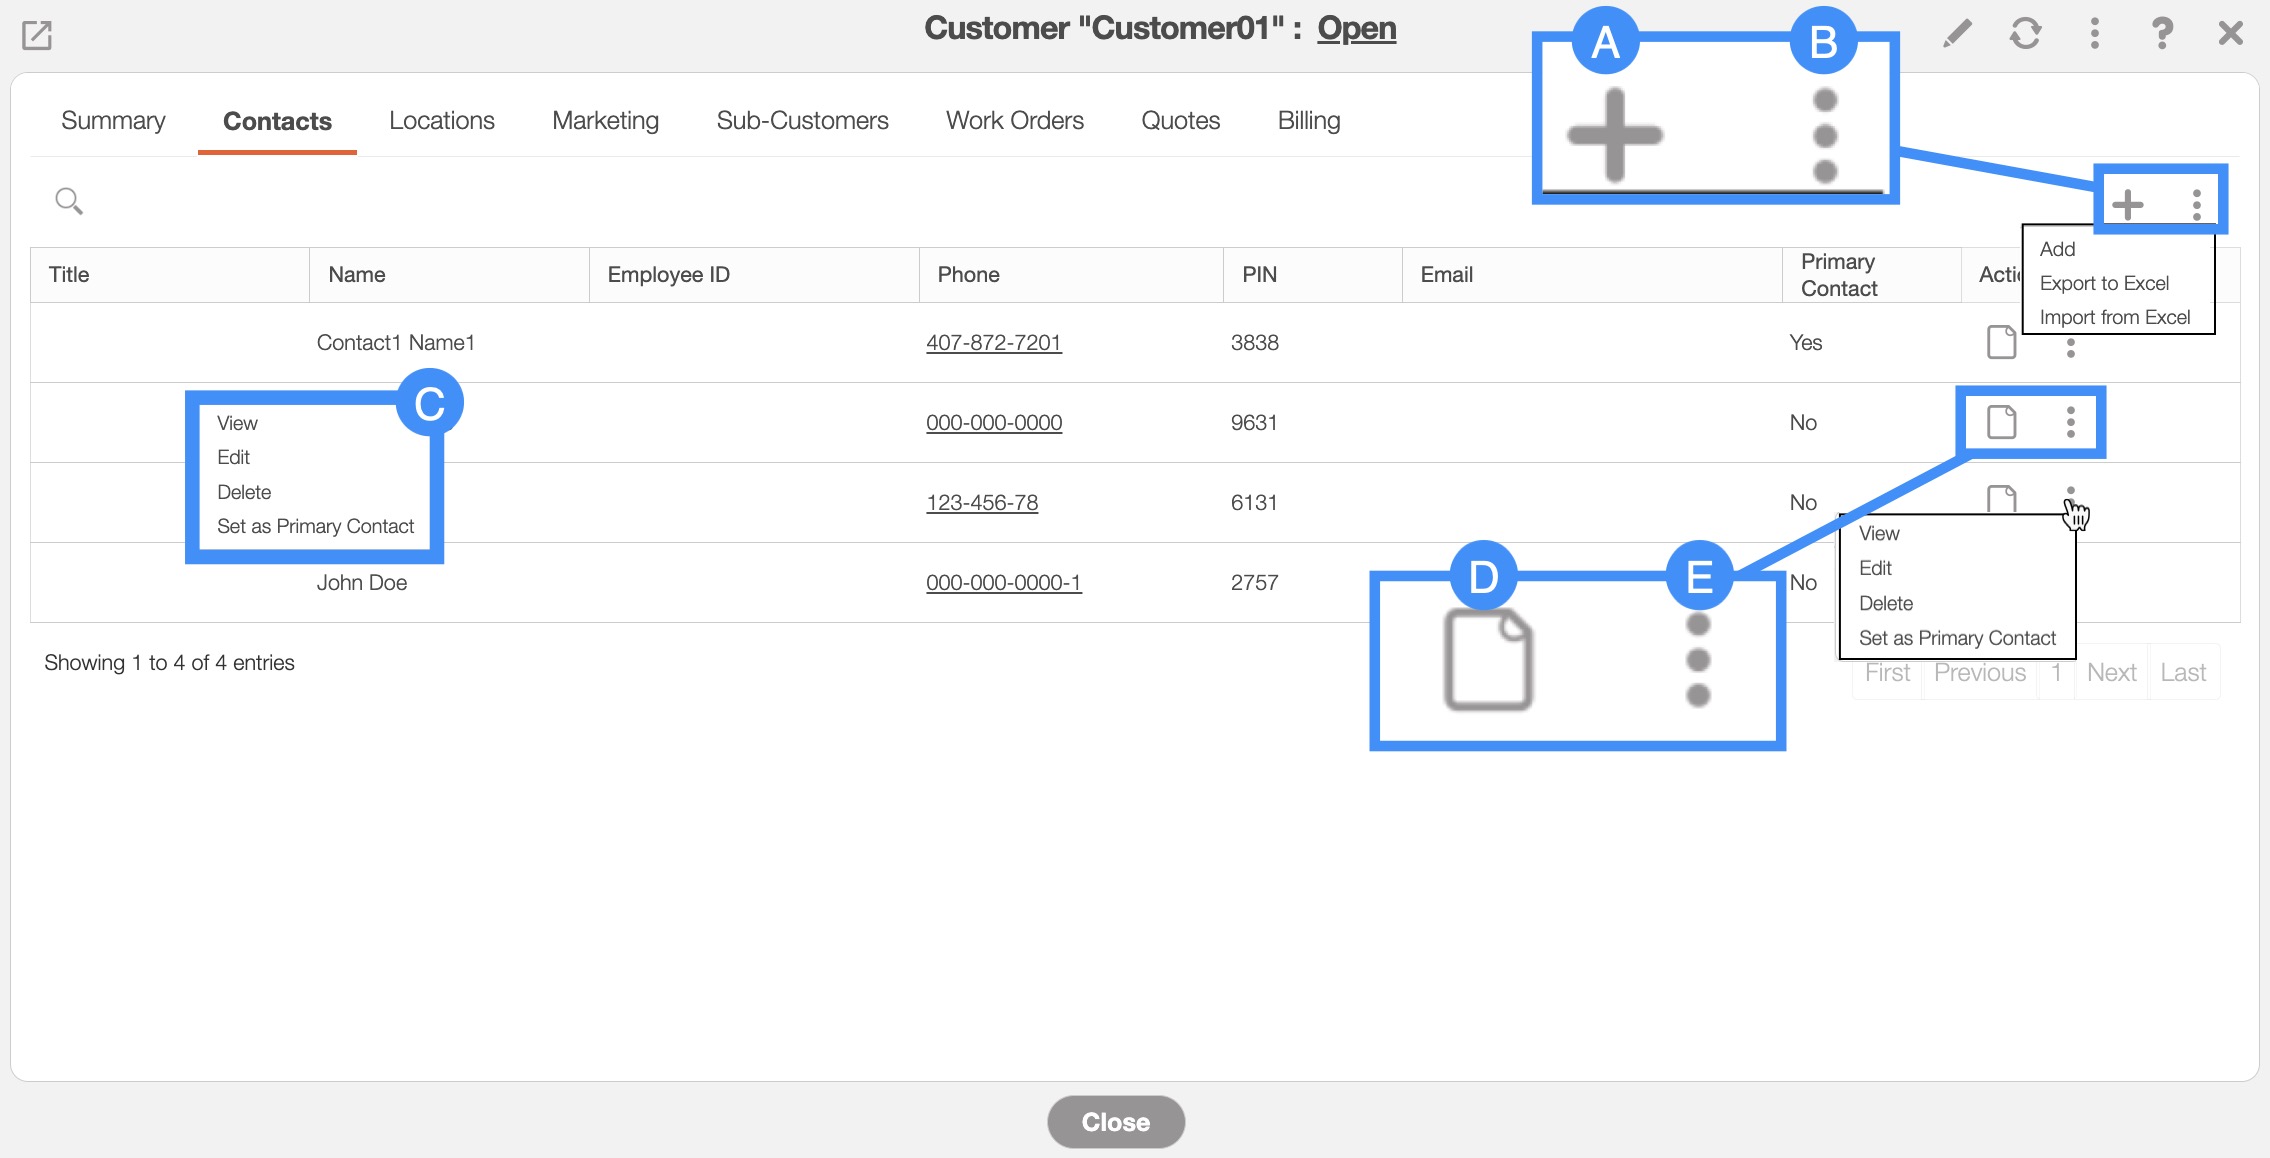
The Plus Sign will add a new customer contact.
The More Actions drop-down will allow you to add a new customer contact, export the contacts to Excel, or import contacts from Excel.
By right-clicking you will bring up the right-click actions. These actions are identical to the Individual Actions and will allow you to view, edit, or delete the customer.
The View icon will allow you to view specific details related to the selected customer in the full-size view:
The Individual Actions (the three dots next to the View icon) are identical to the right-click actions and will allow you to view, edit, or delete the customer.
| Name: | Description: | The columns for "Contacts" tab are defined below:
|---|---|
| "Title" | The honorific associated with the customer (e.g., Mr. or Ms.). |
| "Name" | The full business name of the customer. |
| "Employee ID" | The ID that is used to classify the customer. |
| "Phone" | The phone number associated with the customer. It is also serves as the user ID for the customer portal. |
| "PIN" | The customer's password for the customer portal. |
| "Email" | The email address of the customer. |
| "Actions" | Allows you to view, edit, or delete the customer contact information. |
The "Locations" tab displays the name and address of the specified contacts' locations, as well as offering options to edit or view the location details.
This tab will list the location information of the customer; it also will display all the locations associated with the customer:
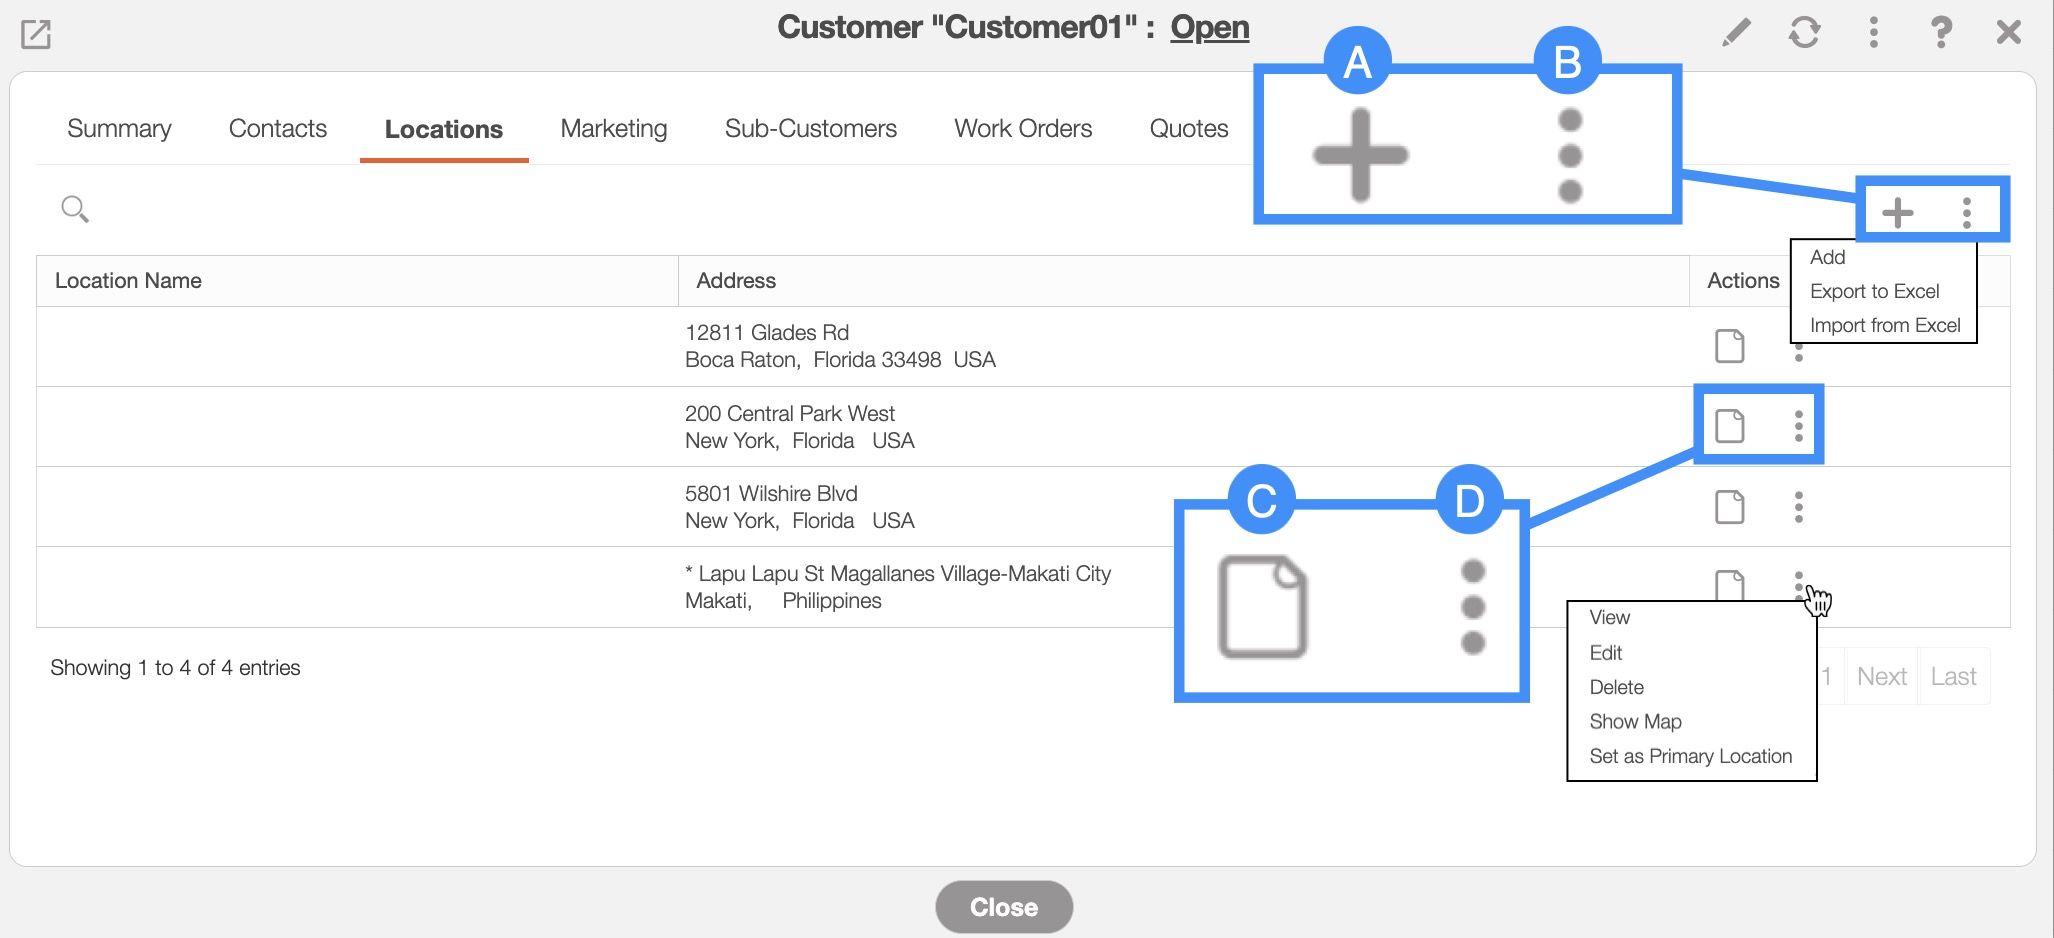
The Plus Sign will add a new customer location.
The More Actions drop-down will allow you to add a new customer location, export the location to Excel, or import the location from Excel.
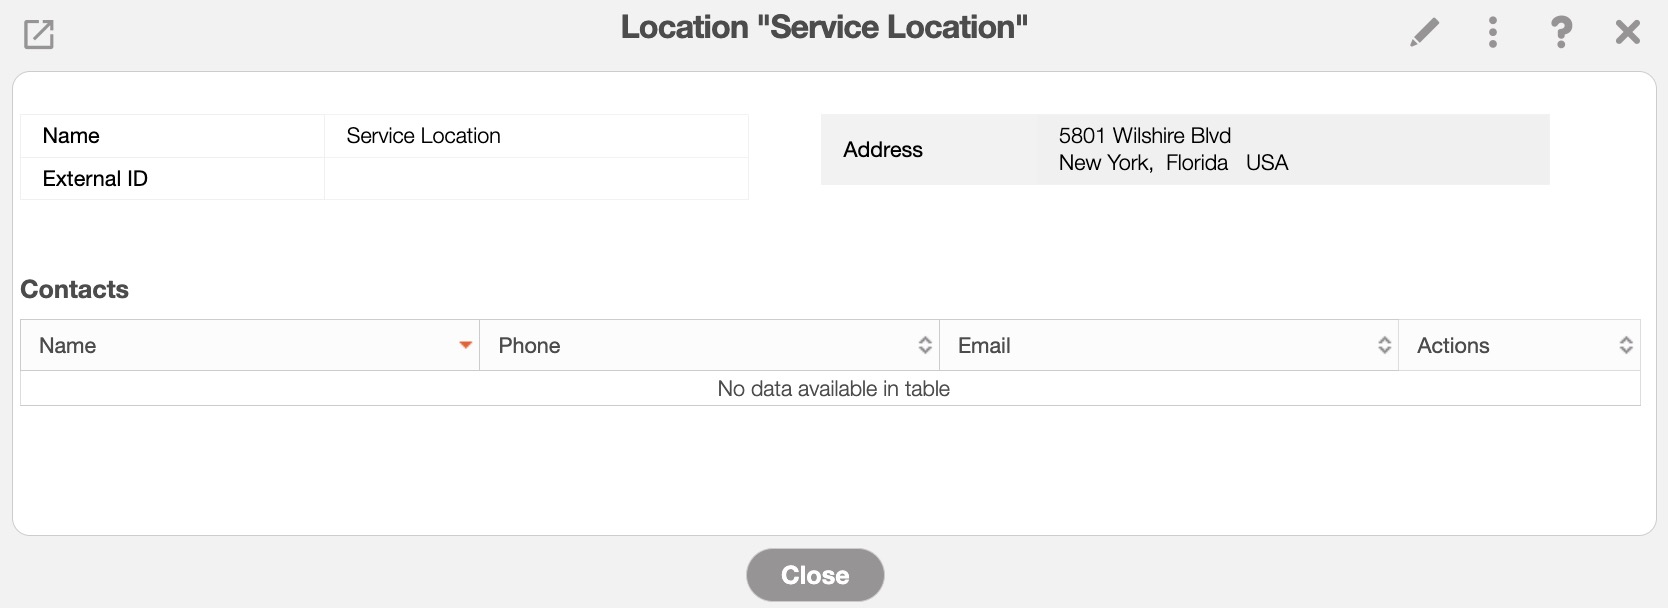
The View icon will allow you to view specific details related to the selected customer location in the full-size view; this includes the phone number and email address of the contact:
The Individual Actions (the three dots next to the View icon) will allow you to view, edit, or delete, or show the location on the map.
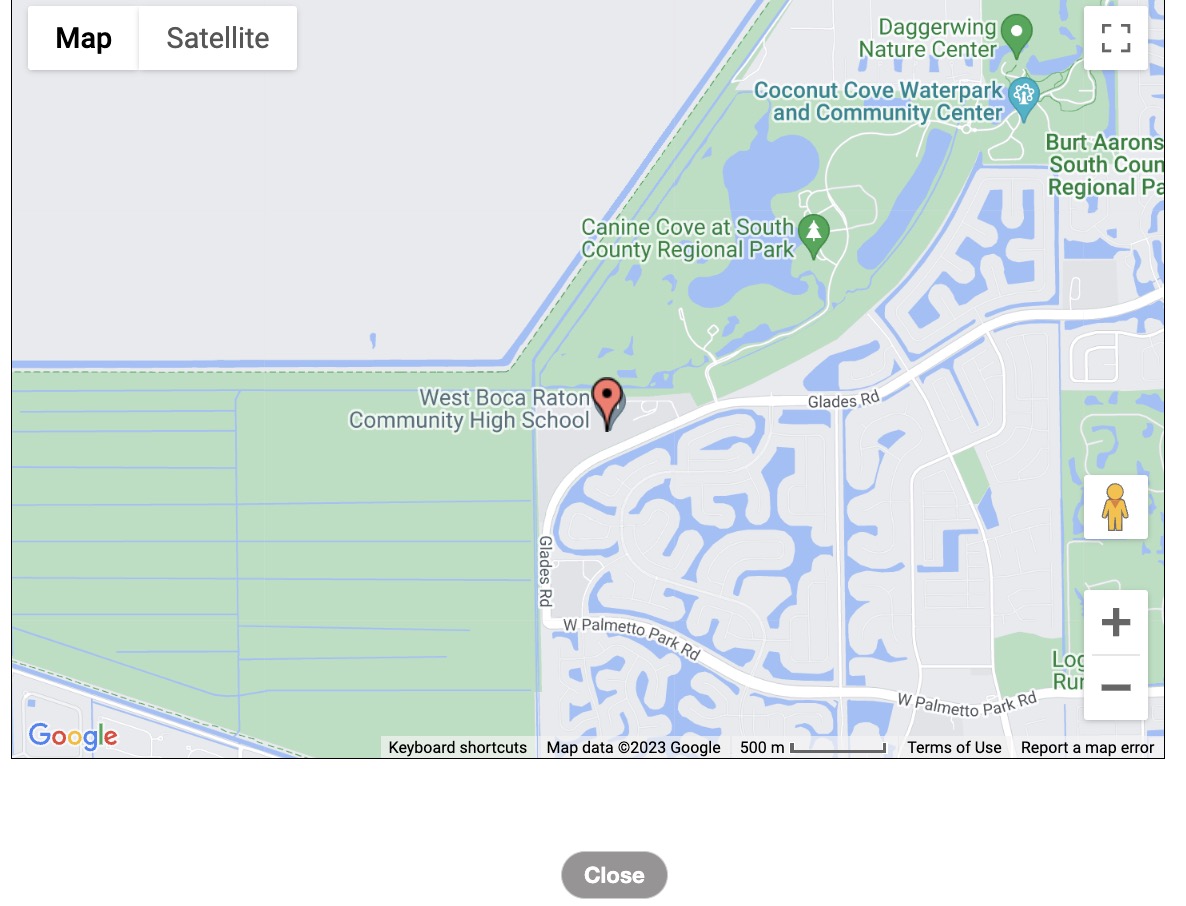
By selecting the "Show Location on Map" option, you will be able to view the location on a map:
| Name: | Description: | The columns for "Locations" tab are defined below:
|---|---|
| "Location Name" | The name of the location. |
| "Address" | The address of the location. |
| "Actions" | Allows you to view, edit, or delete, or show the location on the map. |
The "Marketing" tab will have the marketing campaign fields for your company:
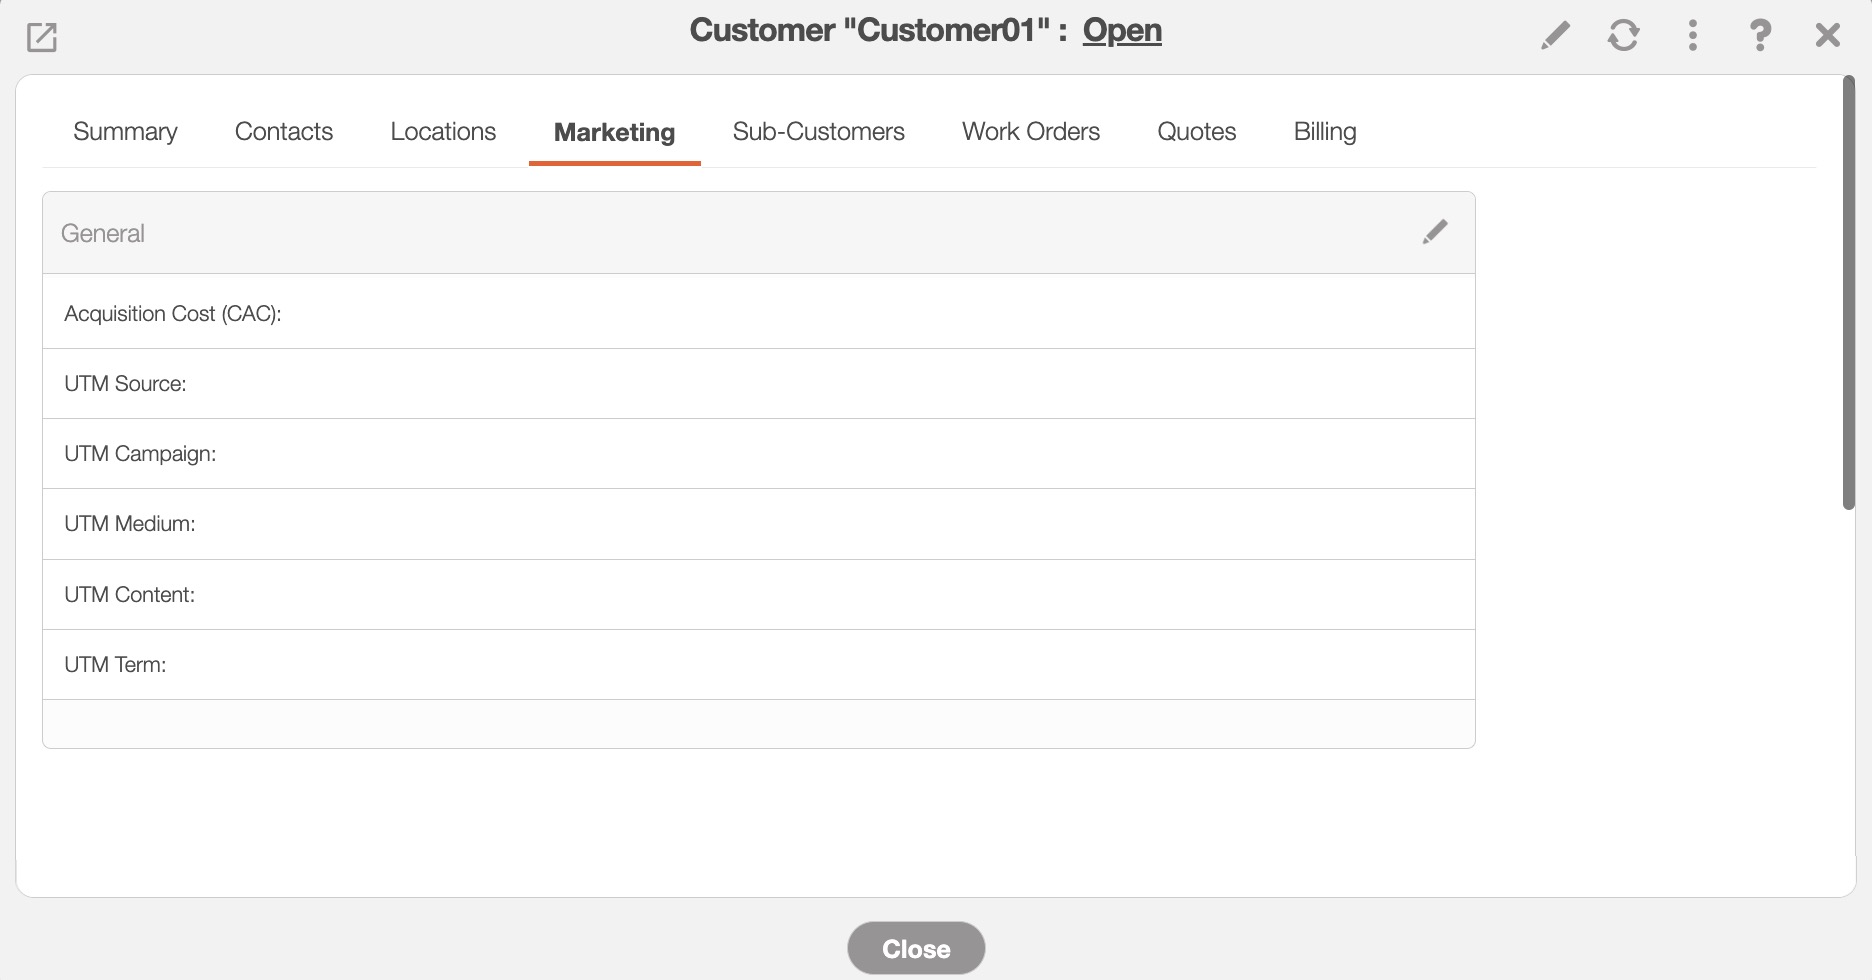
By clicking on the Pencil icon, you will also be able to edit the marketing campaign fields that are available; once you click on the Pencil icon, the Edit Marketing Information pop-up window will appear:
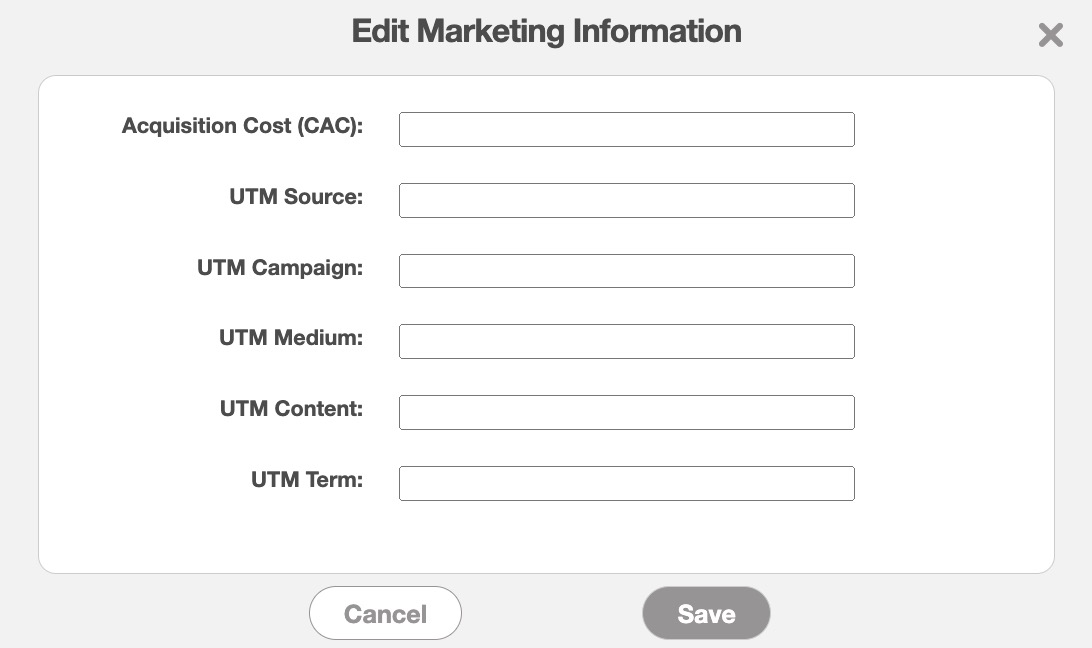
In this pop-up window, you can input the new values. Once you are satisfied with the new data, click the Save button.
The "Sub-Customers" tab will list all of the sub-customers that are associated with the parent customer.
The image below will display the overall layout of the "Sub-Customers" tab and the different actions that you can perform on the sub-customers:
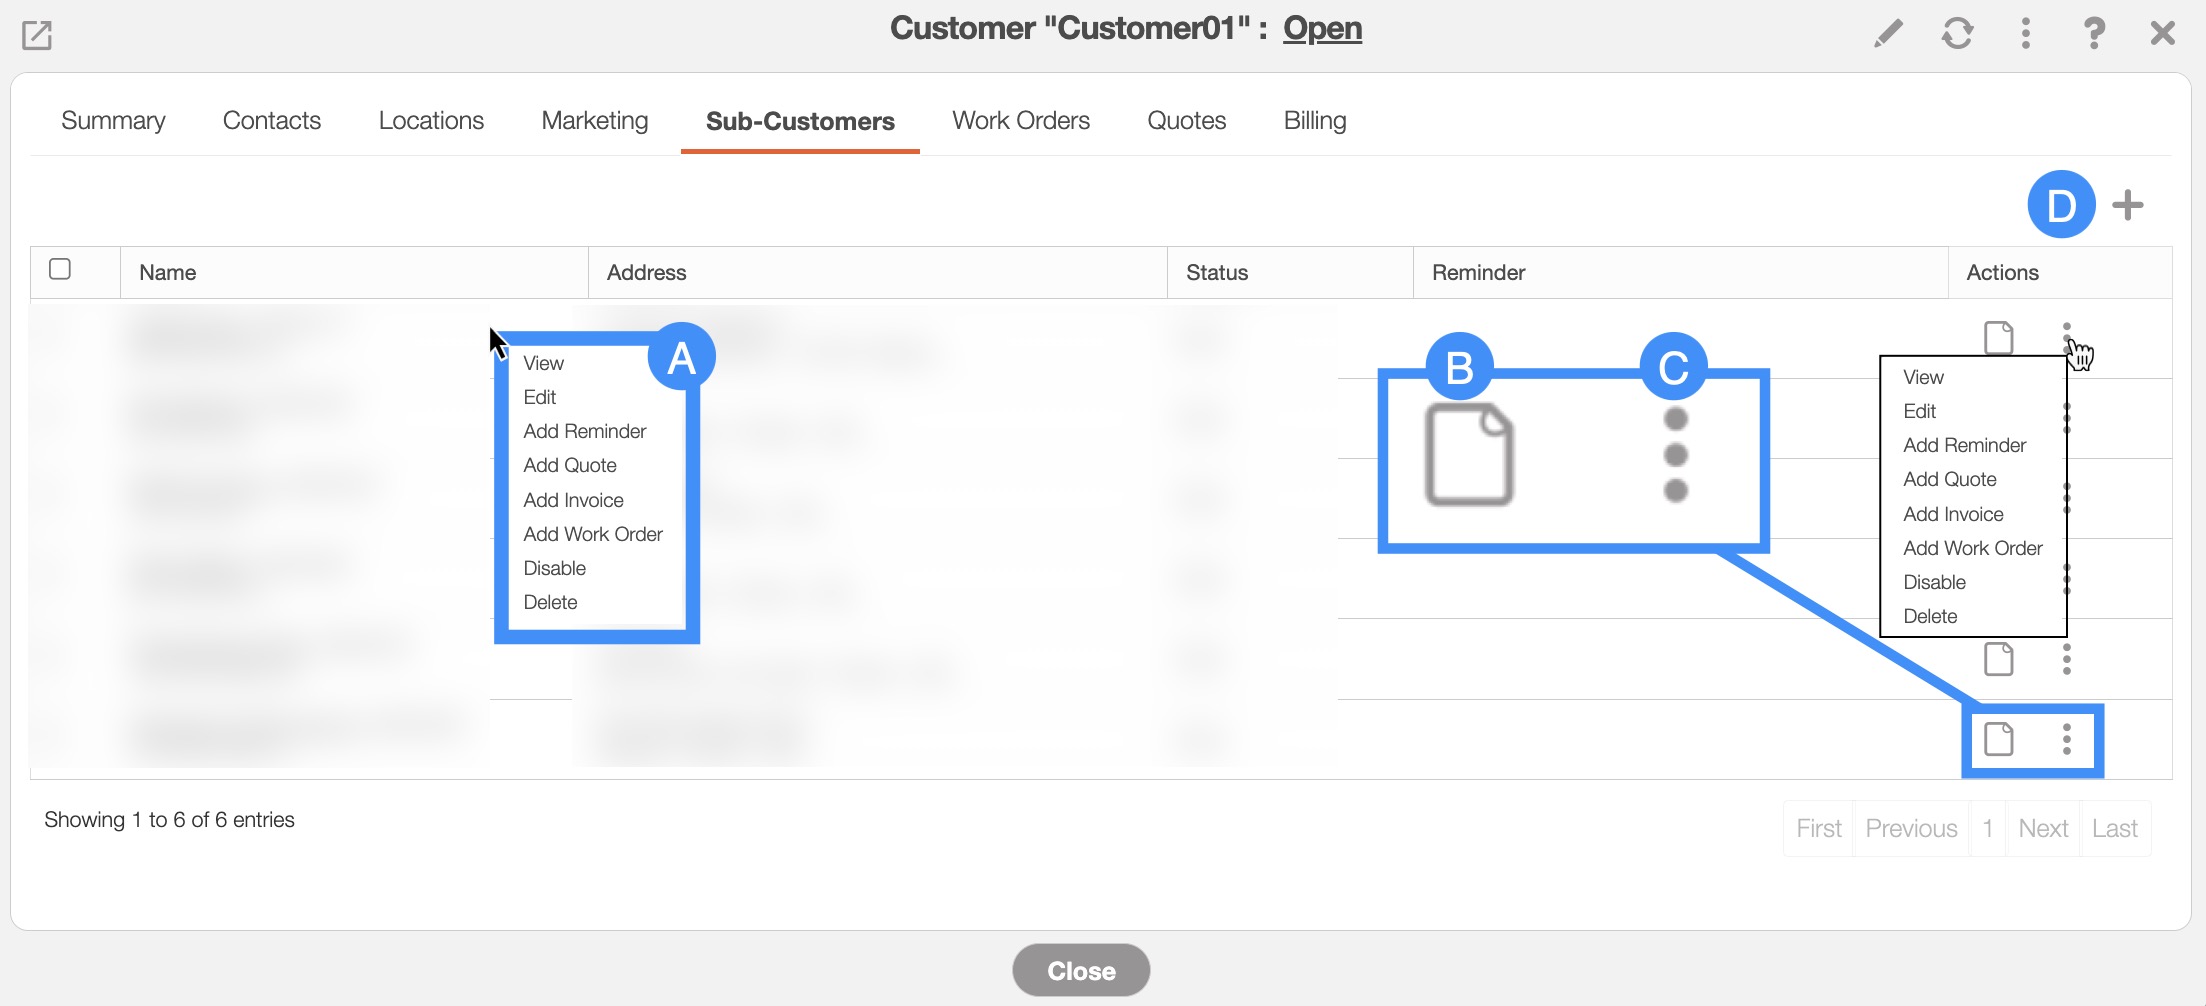
By right-clicking you will bring up the right-click actions. These actions are identical to the Individual Actions and will allow you to view, edit, add quote, add invoice, add work order, disable, or delete the sub-customer.
The View icon will allow you to open the selected sub-customer and view its respective View Customer pop-window.
The Individual Actions (the three dots next to the View icon) are identical to the right-click actions and will allow you to view, edit, add quote, add invoice, add work order, disable, or delete the sub-customer.
The Plus Sign button will allow you to add a new sub-customer to the parent customer.
For more information on how to add a sub-customer, please see the Add Customer page.
The "Work Orders" tab lists all the work orders associated with the customer; it will also display information regarding the work order, including the type of work order, the work order ID, the status, and more:
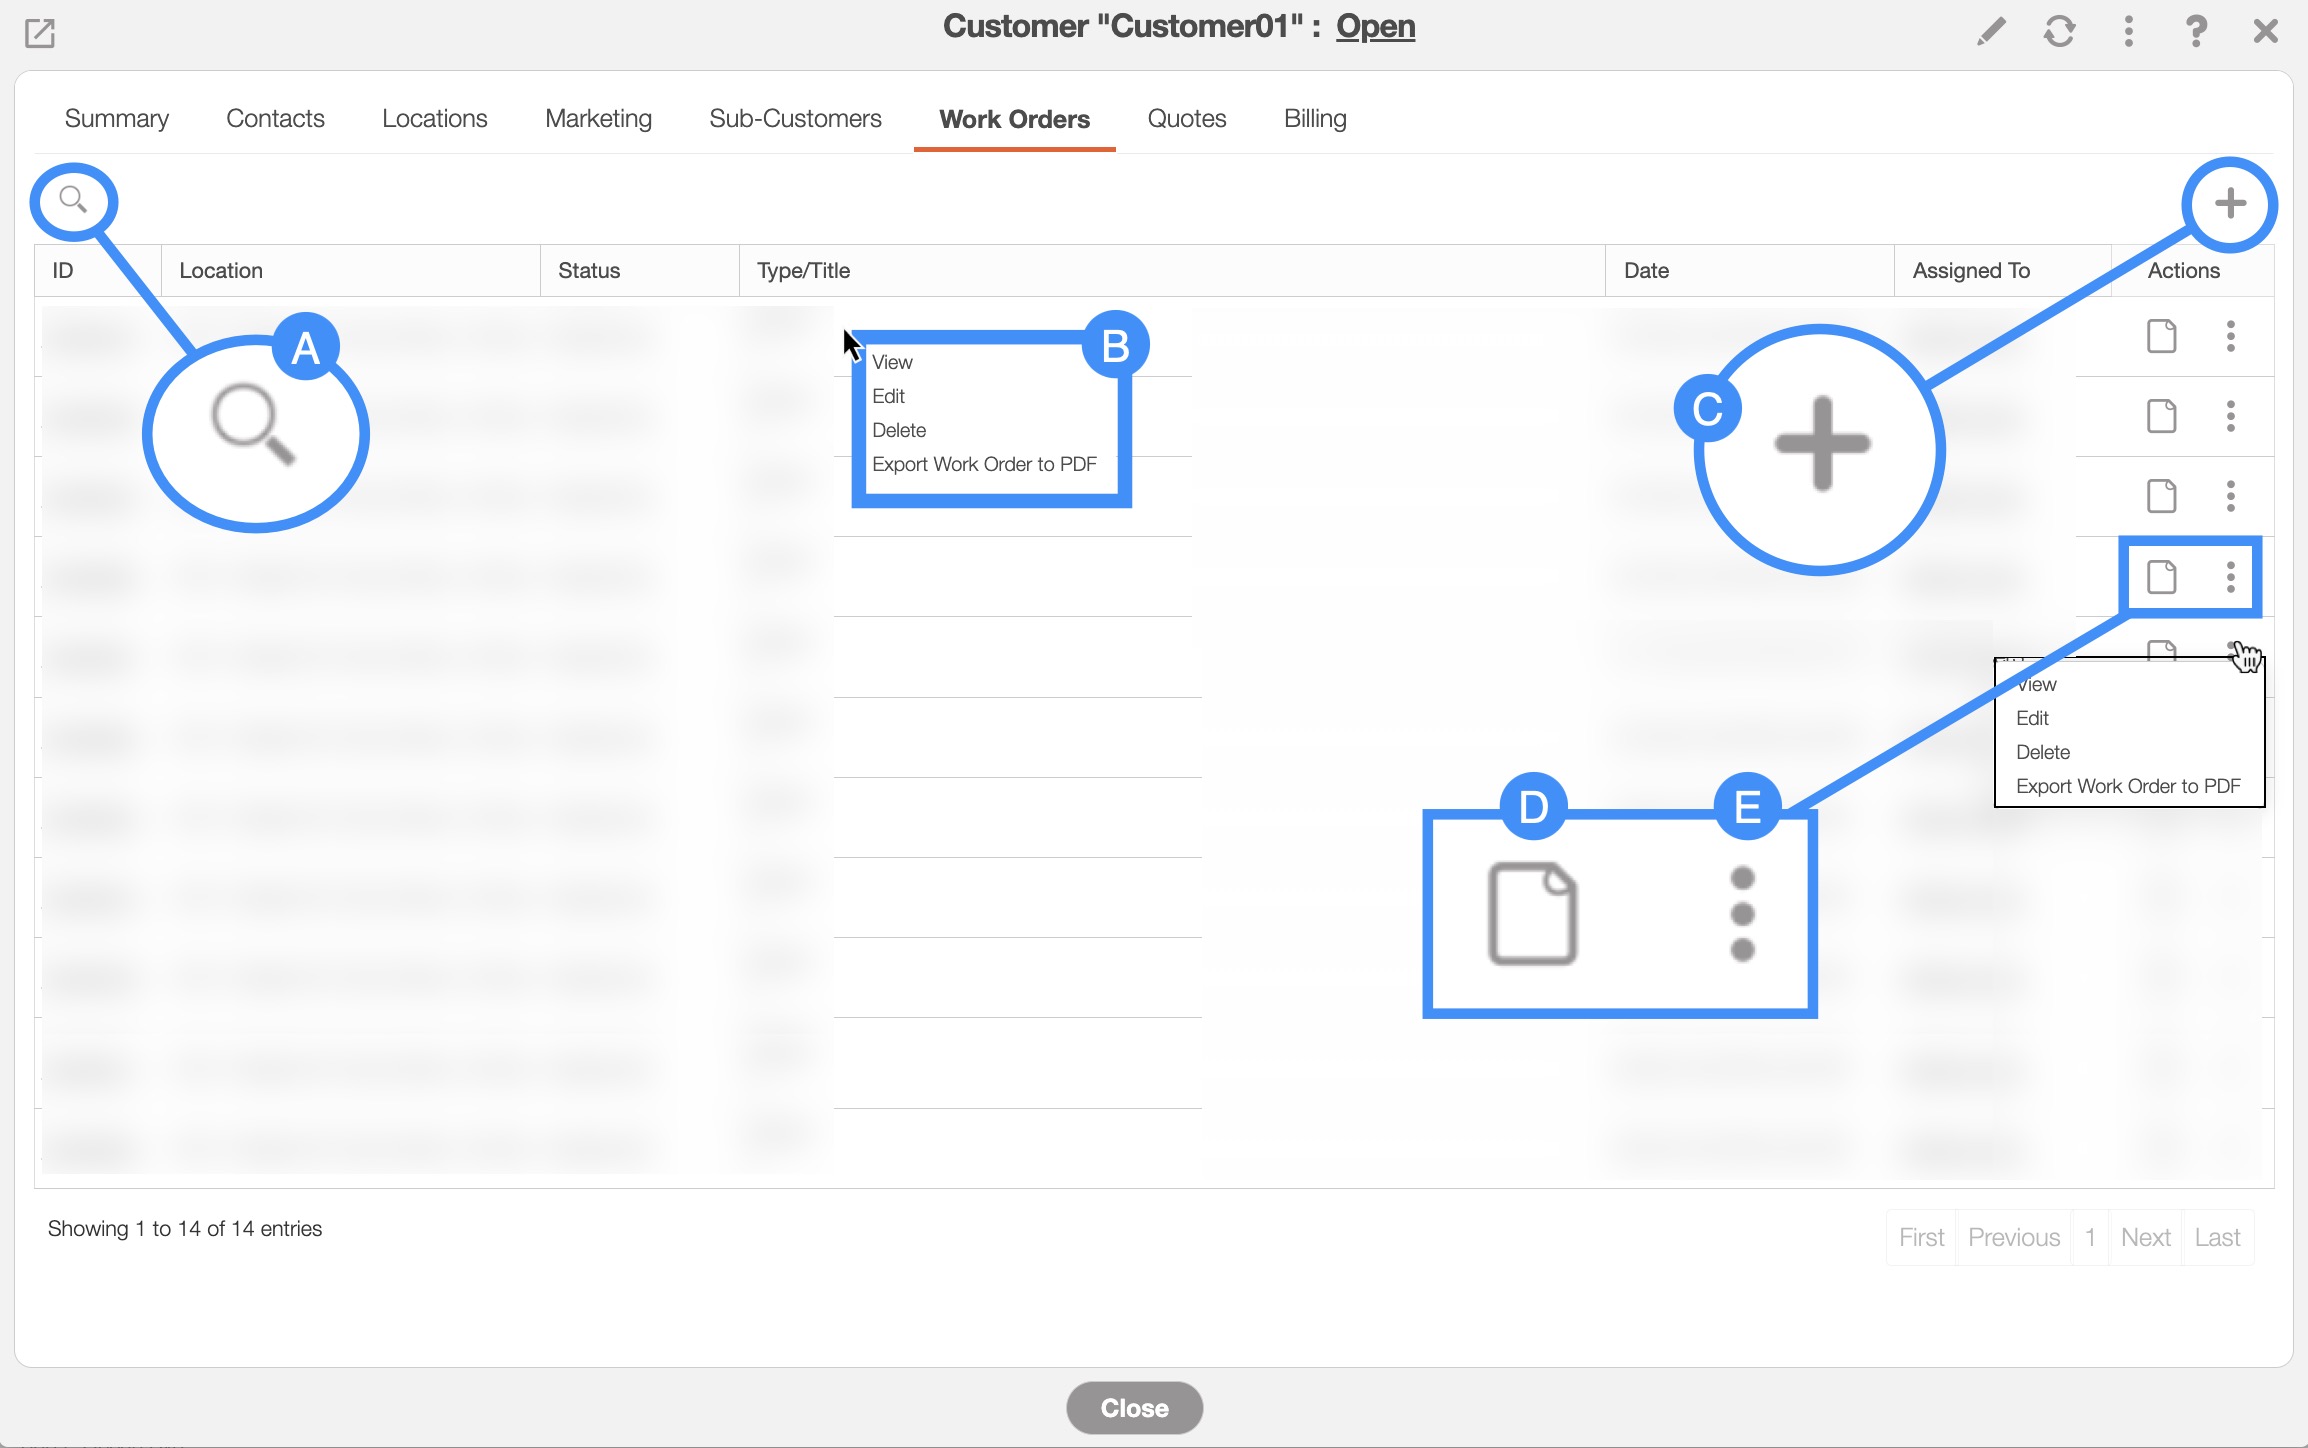
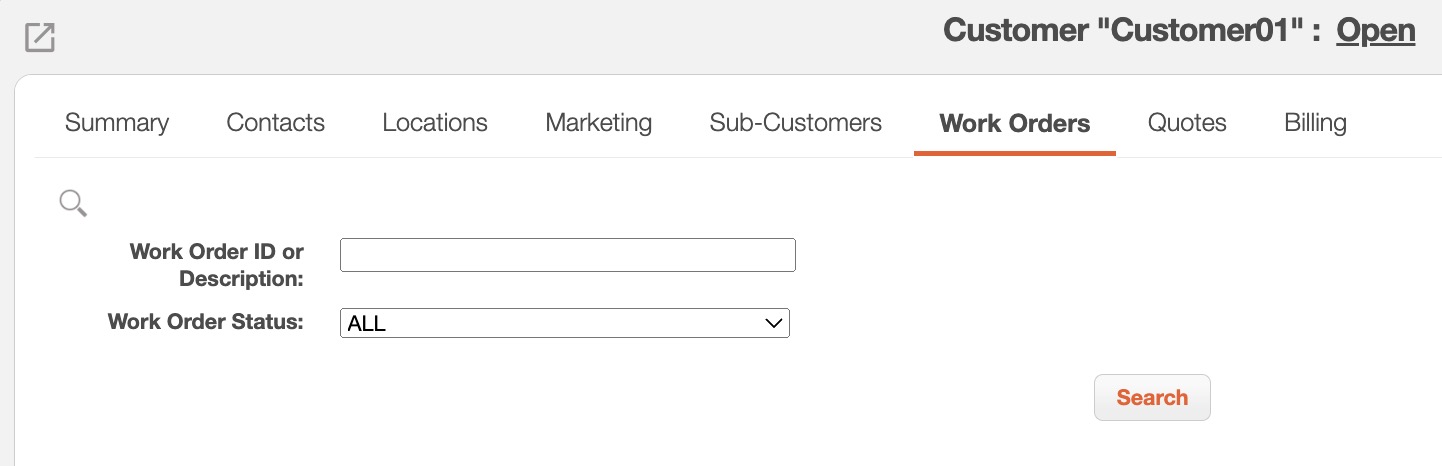
The Magnifying Glass will allow you to search for a specific work order:
By right-clicking you will bring up the right-click actions. These actions are identical to the Individual Actions and will allow you to view, edit, repeat the work order, delete, or export the work order.
The Plus Sign will add a new work order.
The View icon will allow you to open the View Work Order pop-up window.
The Individual Actions (the three dots next to the View icon) are identical to the right-click actions and will allow you to view, edit, repeat the work order, delete, or export the work order.
The columns for the "Work Orders" tab are defined below:
| Name: | Description: |
|---|---|
| "ID" | The ID of the work order. |
| "Location" | The address of the customer. |
| "Status" | The status of the work order (e.g., if the user is on site, if follow-up on the work order is needed, or if the work order is completed). |
| "Date" | The date that the work order was created in MobiWork. |
| "Assigned To" | The user assigned to the work order. |
| "Actions" | Allows you to view, edit, repeat the work order, delete, or export the work order to PDF. |
The "Quotes" tab will display all the quotes associated with the customer including with the quote ID, status, the date the quote is due, and more:
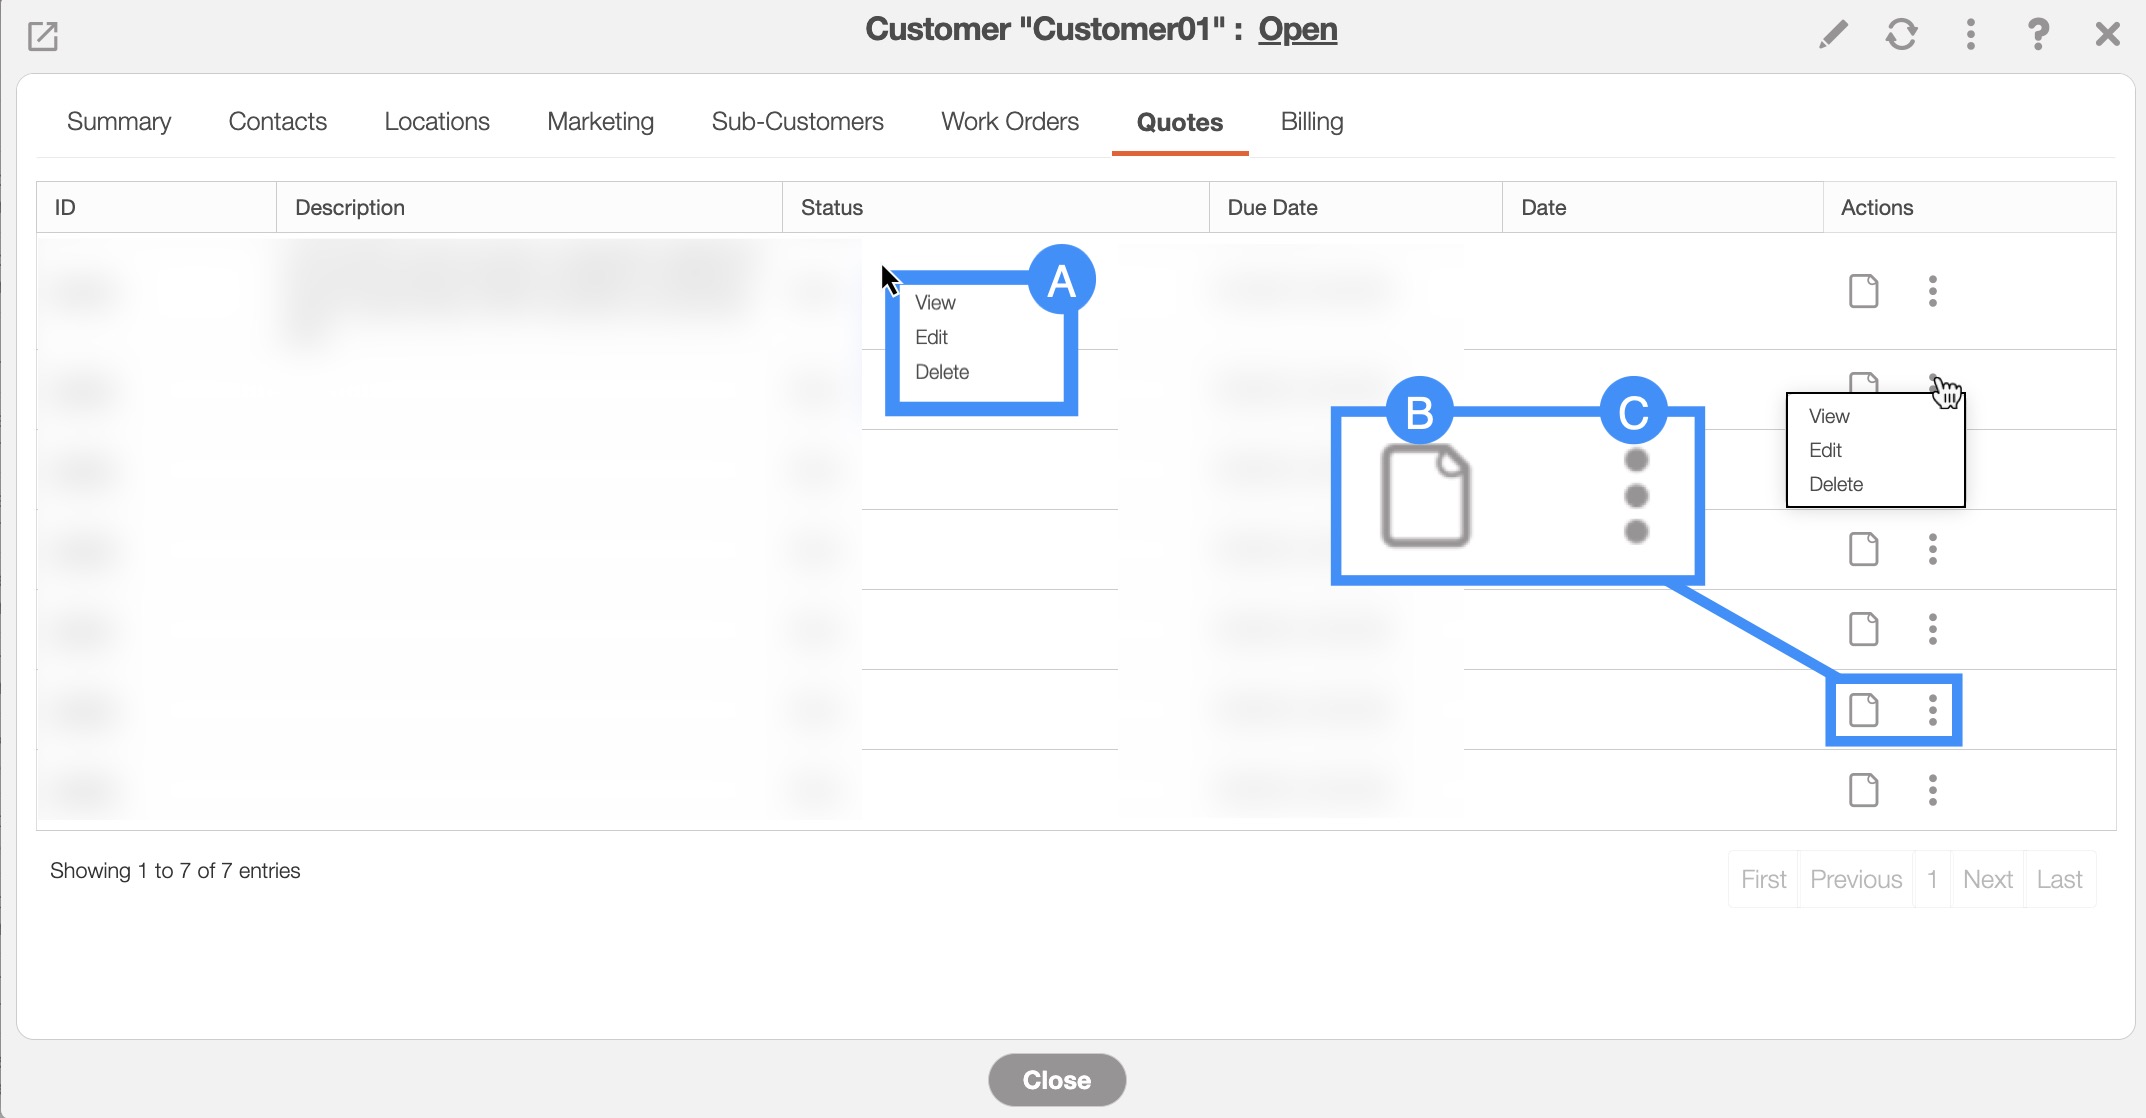
By right-clicking you will bring up the right-click actions. These actions are identical to the Individual Actions and will allow you to view, edit, and delete the quote.
The View icon will allow you to open the View Quote pop-up window.
The Individual Actions (the three dots next to the View icon) are identical to the right-click actions and will allow you to view, edit, and delete the quote.
The columns for the "Quotes" tab are defined below:
| Name: | Description: |
|---|---|
| "ID" | The quote ID. |
| "Description" | The description of the quote. |
| "Status" | The status of the quote (e.g., if it has been approved, rejected, waiting for approval, etc.). |
| "Due Date" | The date the quote needs to be approved. |
| "Date" | The date of the quote. |
| "Actions" | Allows you to view, edit, or delete the quote. |
The "Billing" tab will display the billing information of the customer; this will include the balance, when the invoice was created, any notes involved regarding the invoice, and more:
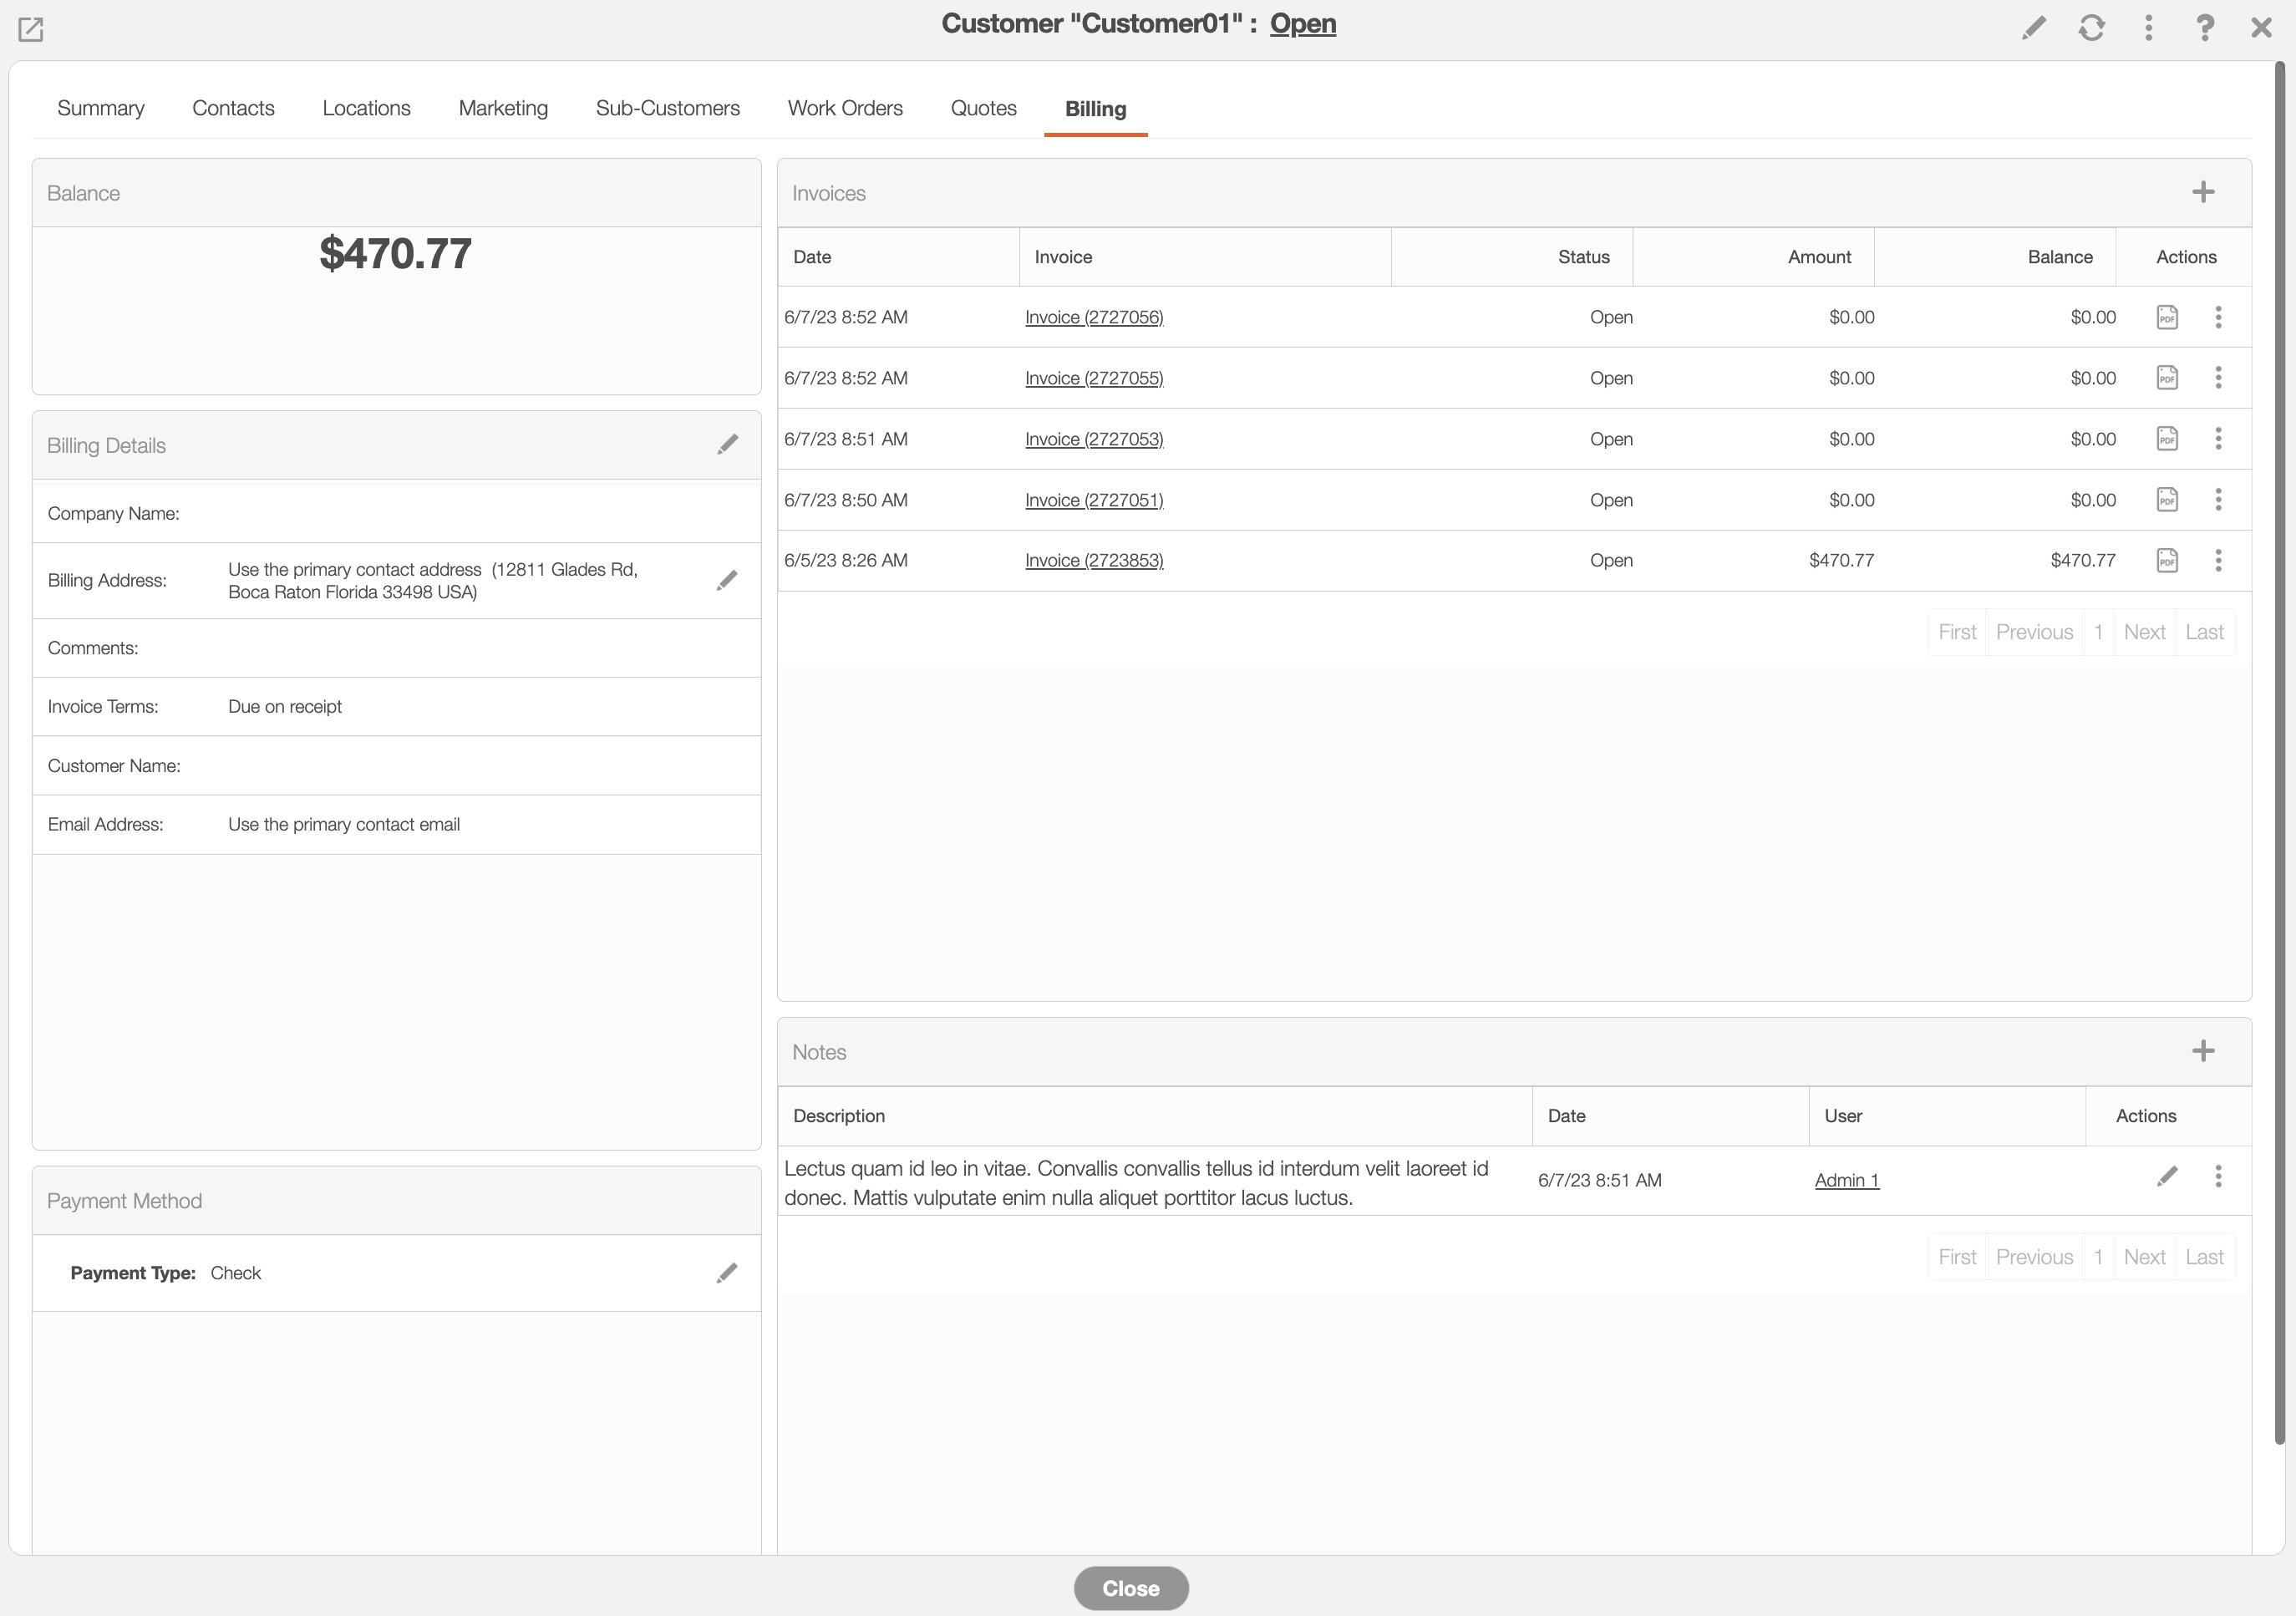
From this tab, you will be able to view the customer's balance, the billing details, the payment method, and any invoices or notes related to the customer.
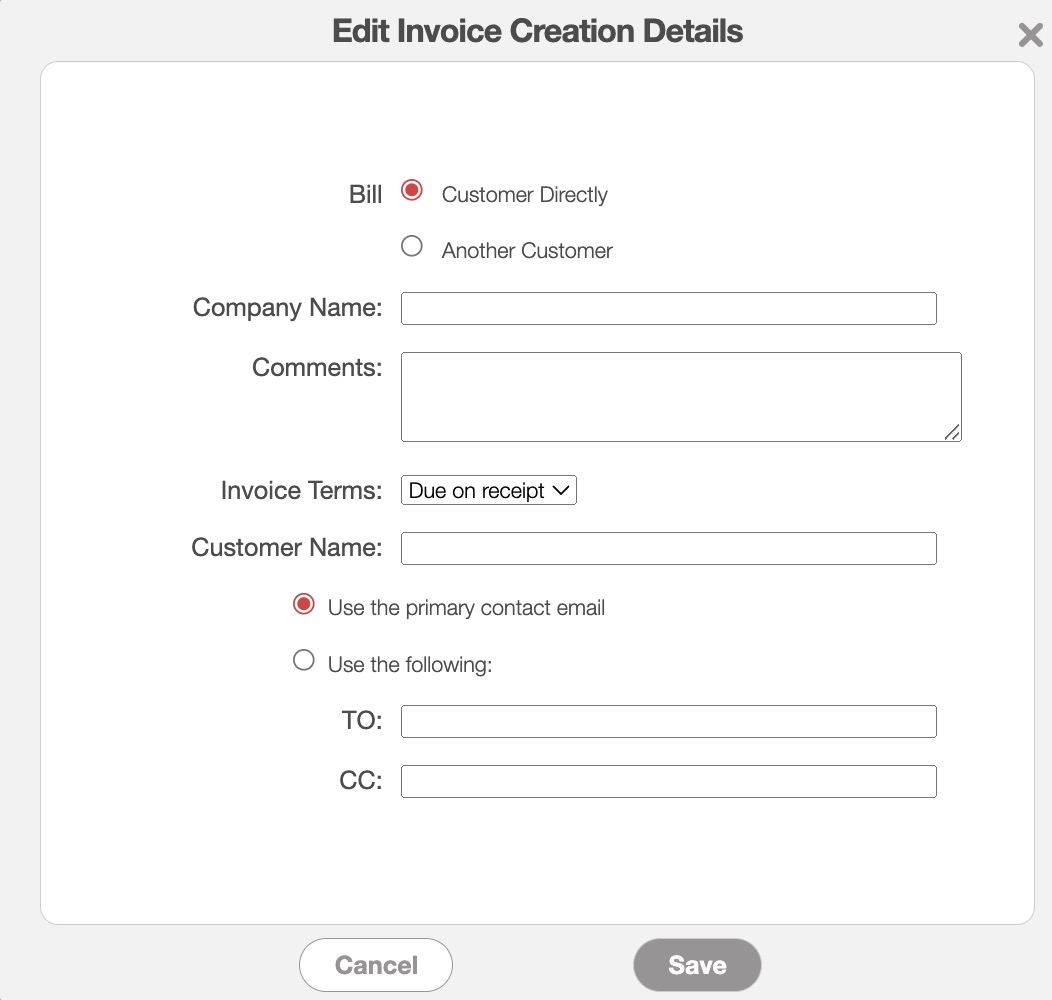
In the "Billing Details" box, you will also be able to edit the billing details and invoice-recipient:
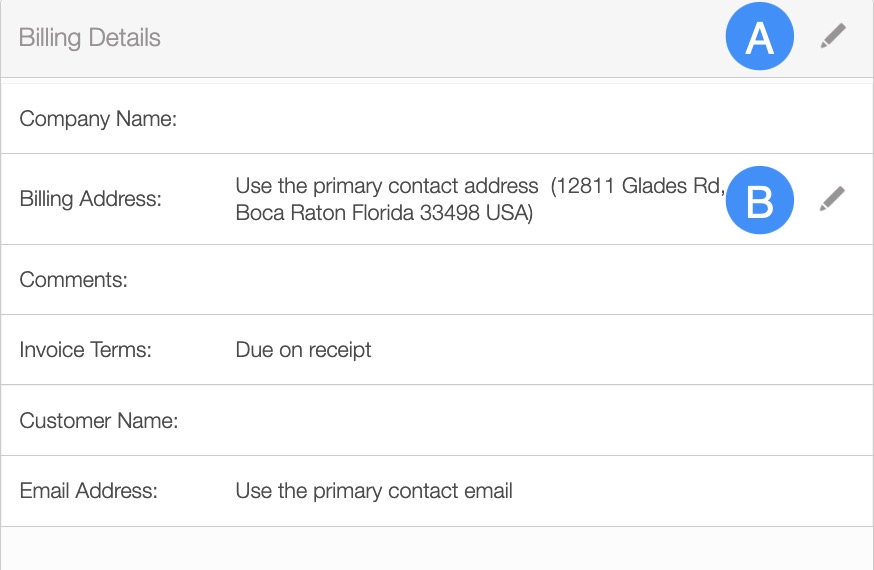
You can edit the invoice-recipient so you can bill another customer within the same entity by pressing the Pencil icon on the "Billing" column border:
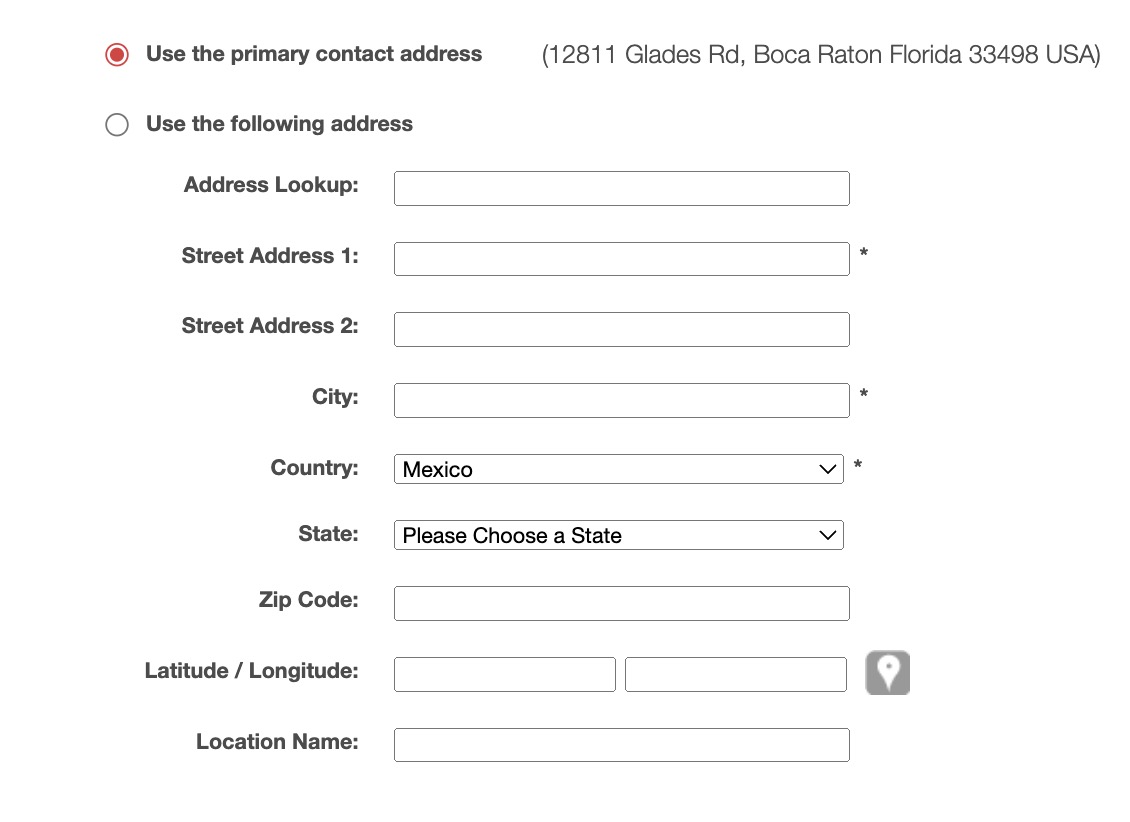
You can also edit the billing address to a new address instead of using the default address (by clicking on the Pencil icon by the Billing Address field). This is helpful when the billing address is different from the company's address; please see the View an Invoice PDF for more information about having a different billing address on the invoice PDF:
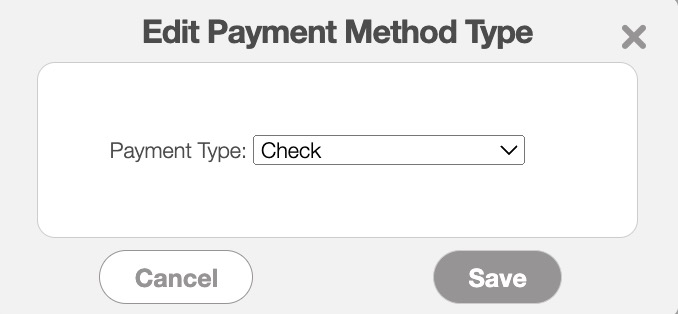
In the "Payment Method" box, you can adjust the payment method to new payment method (i.e., cash, check, credit card) by clicking on the Pencil icon: