- Overview
- Account Settings
- Assets
- Connectors Framework
- Overview
- QuickBooks Online
- QuickBooks Desktop Web Connector
- Azure AD
- Salesforce Integration
- FleetNet Connector
- Avalara Connector
- Inbound REST API
- Outbound REST API
- Mailchimp Connector
- Text Messaging Connector
- Clearent Connector
- Stripe Connector
- HubSpot Connector
- UKG Connector
- Paylocity Connector
- UKG Connector
- Gusto Connector
- iSolved Payroll Connector
- Customer Portal
- Customers
- Dashboards
- Devices
- Dispatching
- Forms
- Inventory
- Invoices & Billing
- Locations
- Payments
- Parts
- Projects
- Quotes
- Recurrent Routes
- Recurrent Services
- Reports
- Sales Orders
- Schedule
- Services
- Tasks
- Text Messaging
- Time Tracking
- Users
- Work Orders
The View User pop-up window has all the information you need regarding your selected users; in this pop-up window you can access your users' time off requests, their assigned work orders, and more.
The following sections will detail all the actions and information you can access from this pop-up window.
- How to Access the Page
- View User Layout
- Upper Right Corner Actions (Detailed)
- Pencil Button
- Individual Actions Button
- Edit User
- Edit Profile Image
- Reset Password
- Add Authorization Code
- Remove Device Associations
- Edit Group
- Last Known Location
- View MobiTimeSheet
- View MobiPath
- User Settings
- Question Mark
- X Button
- Details Tab
- Work Orders Tab
- Notes Tab
- Devices Tab
- Documents Tab
- Settings Tab
There are many ways you can access the View User pop-up window; for example, if the username is a hyperlink, you can click on the text and the View User pop-up window will automatically appear.
You can also access the View User pop-up window from the following features.
User List Page
The easiest way to access the View User pop-up window is through the "List" tab. For more information on how to access the "List" tab, please see the User List page.
Once you are on the "List" tab, there are four different ways to access the View User pop-up window:

Select the desired User Login ID
Right-click on the selected user and click on the "View" option from the drop-down..
Click on the "View" option from the Individual Actions drop-down.
Select the View icon under the "Actions" column
Customer
You can access the View User pop-up window through many of the tabs found in the View Customer pop-up window. For more information about how to access the View Customer pop-up window, please see the View Customer page.
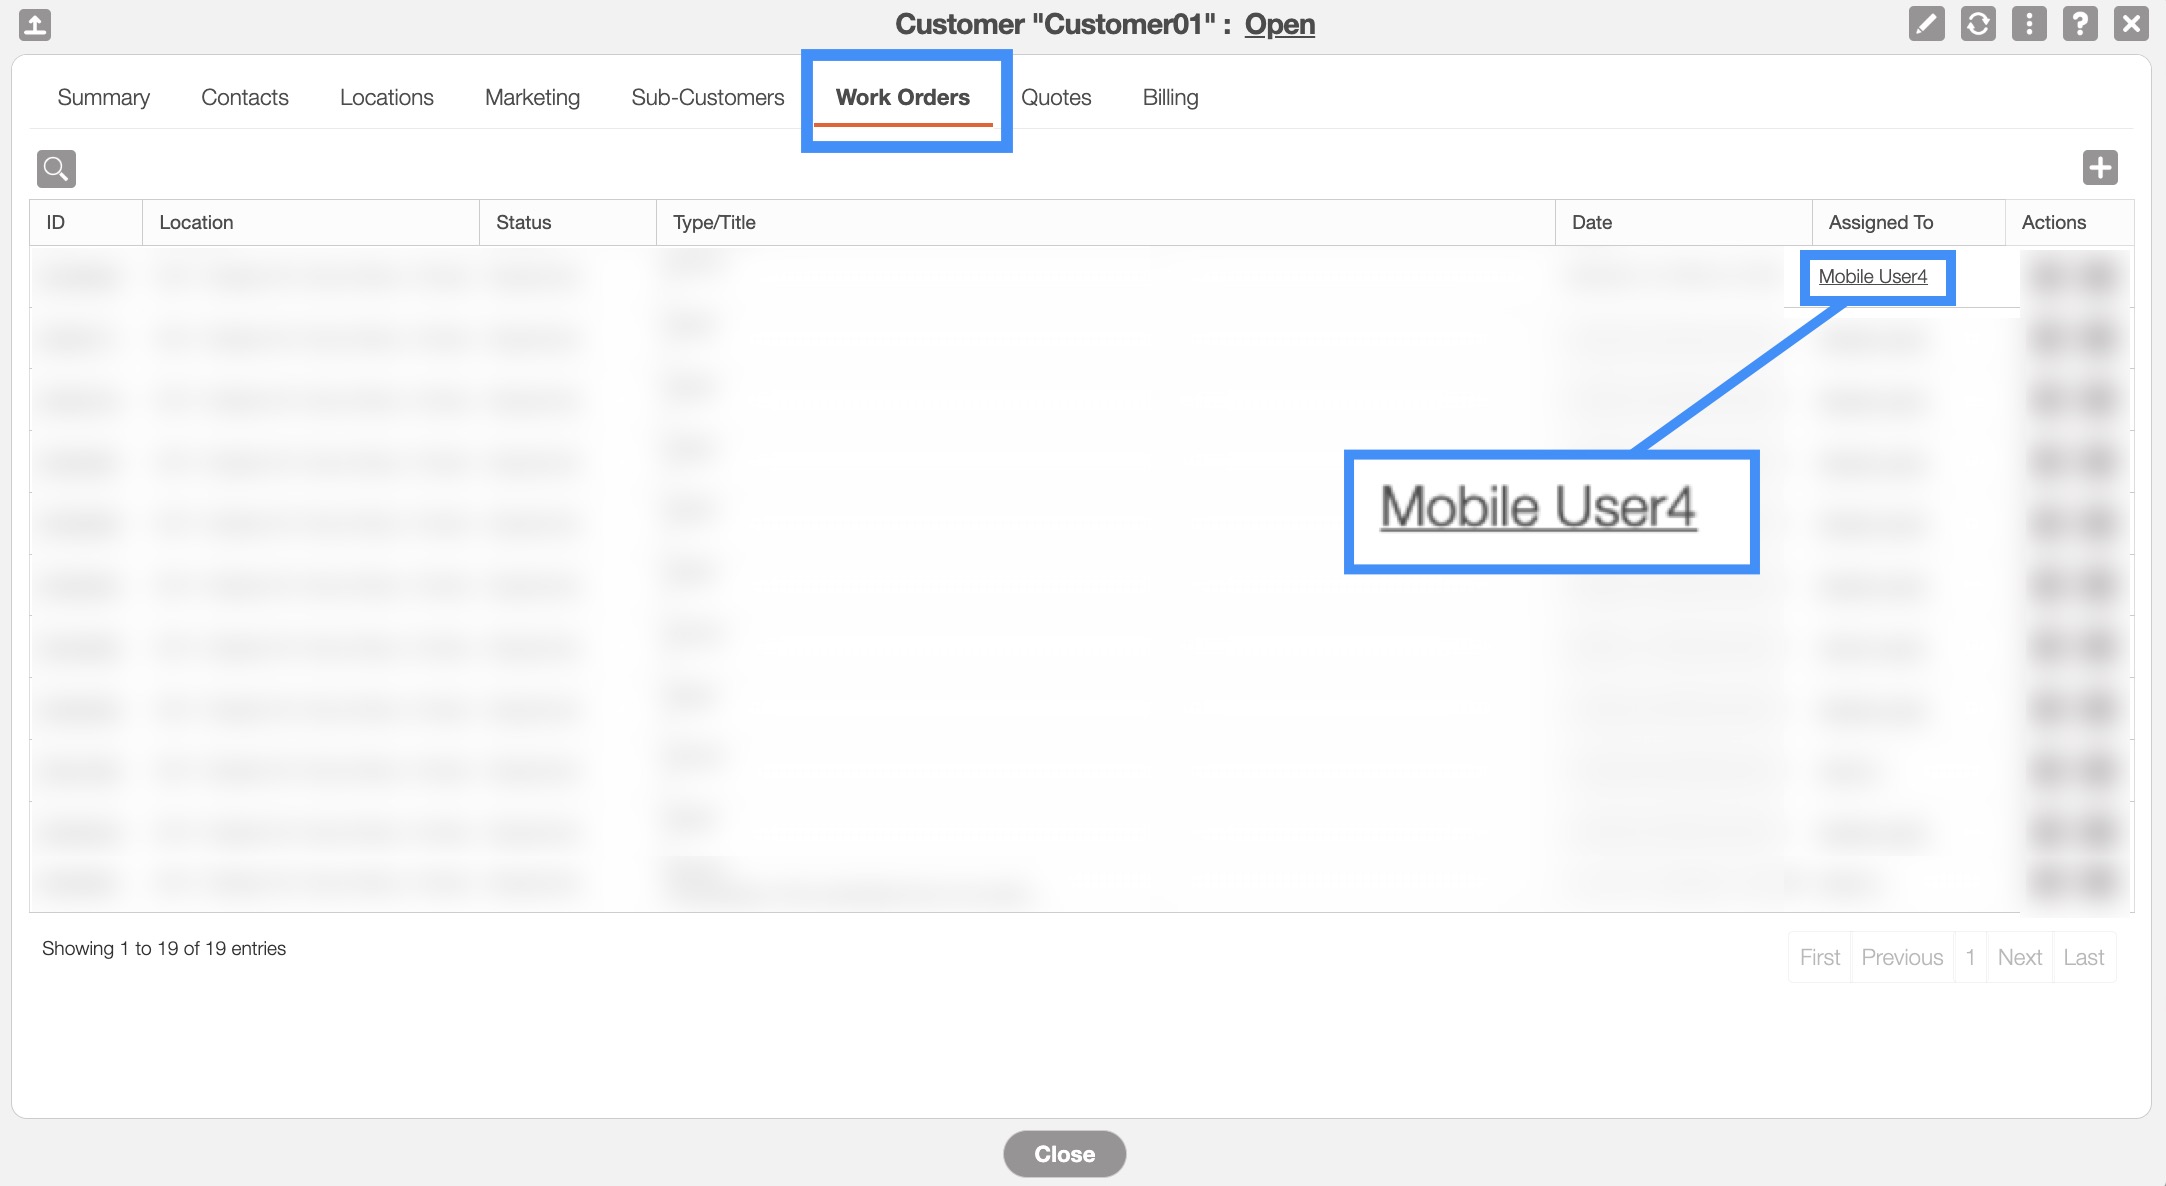
On the View Customer "Work Order" tab, you will be able to access the View User pop-up window by clicking on the desired user underneath the "Assigned To" column:
Quotes
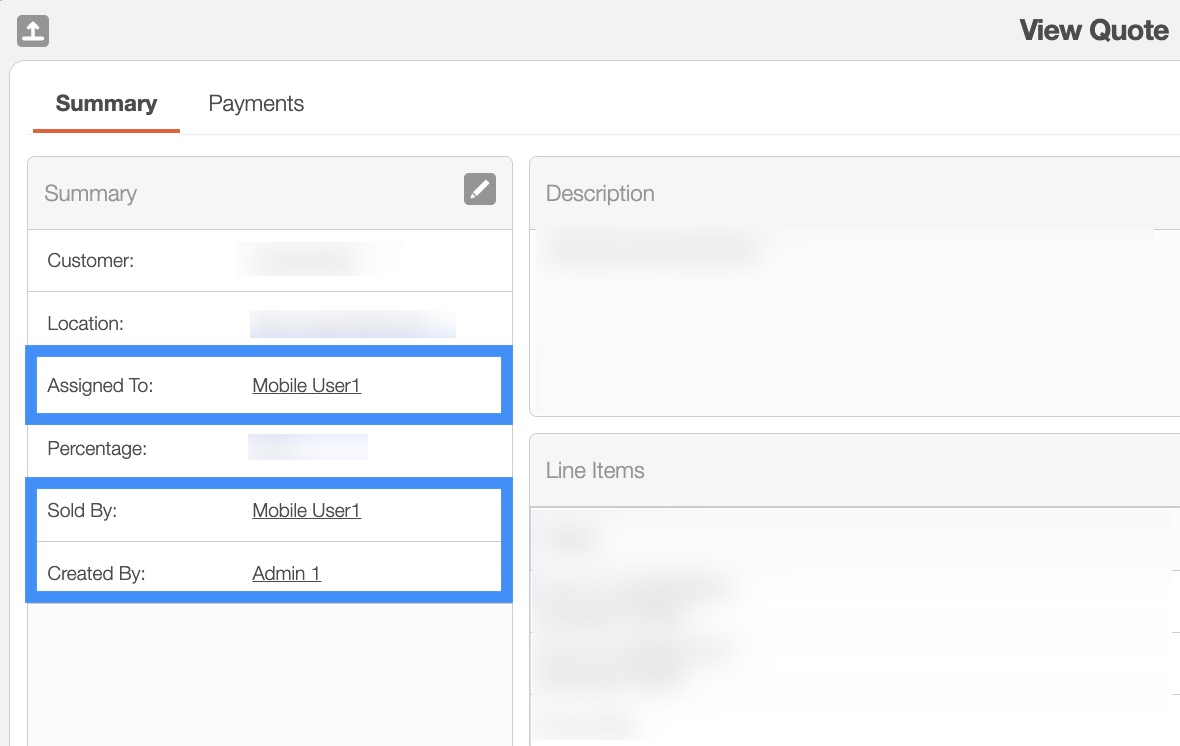
On the View Quotes pop-up window, there are also a few ways you can access the View User pop-up window. For more information on how to access the View Quotes pop-up window, please see the View Quotes page.
- Click on the hyperlink text of the user's name:
Work Orders
On the View Work Order pop-up window, there are also a few ways you can access the View User pop-up window. For more information on how to access the View Work Order pop-up window, please see the View Work Order page.
On the View Work Order "Summary" tab, you will be able to access the View User pop-up window from the following location:

Invoices
On the View Invoice pop-up window, there are also a few ways you can access the View User pop-up window. For more information on how to access the View Invoice pop-up window, please see the View an Invoice page.
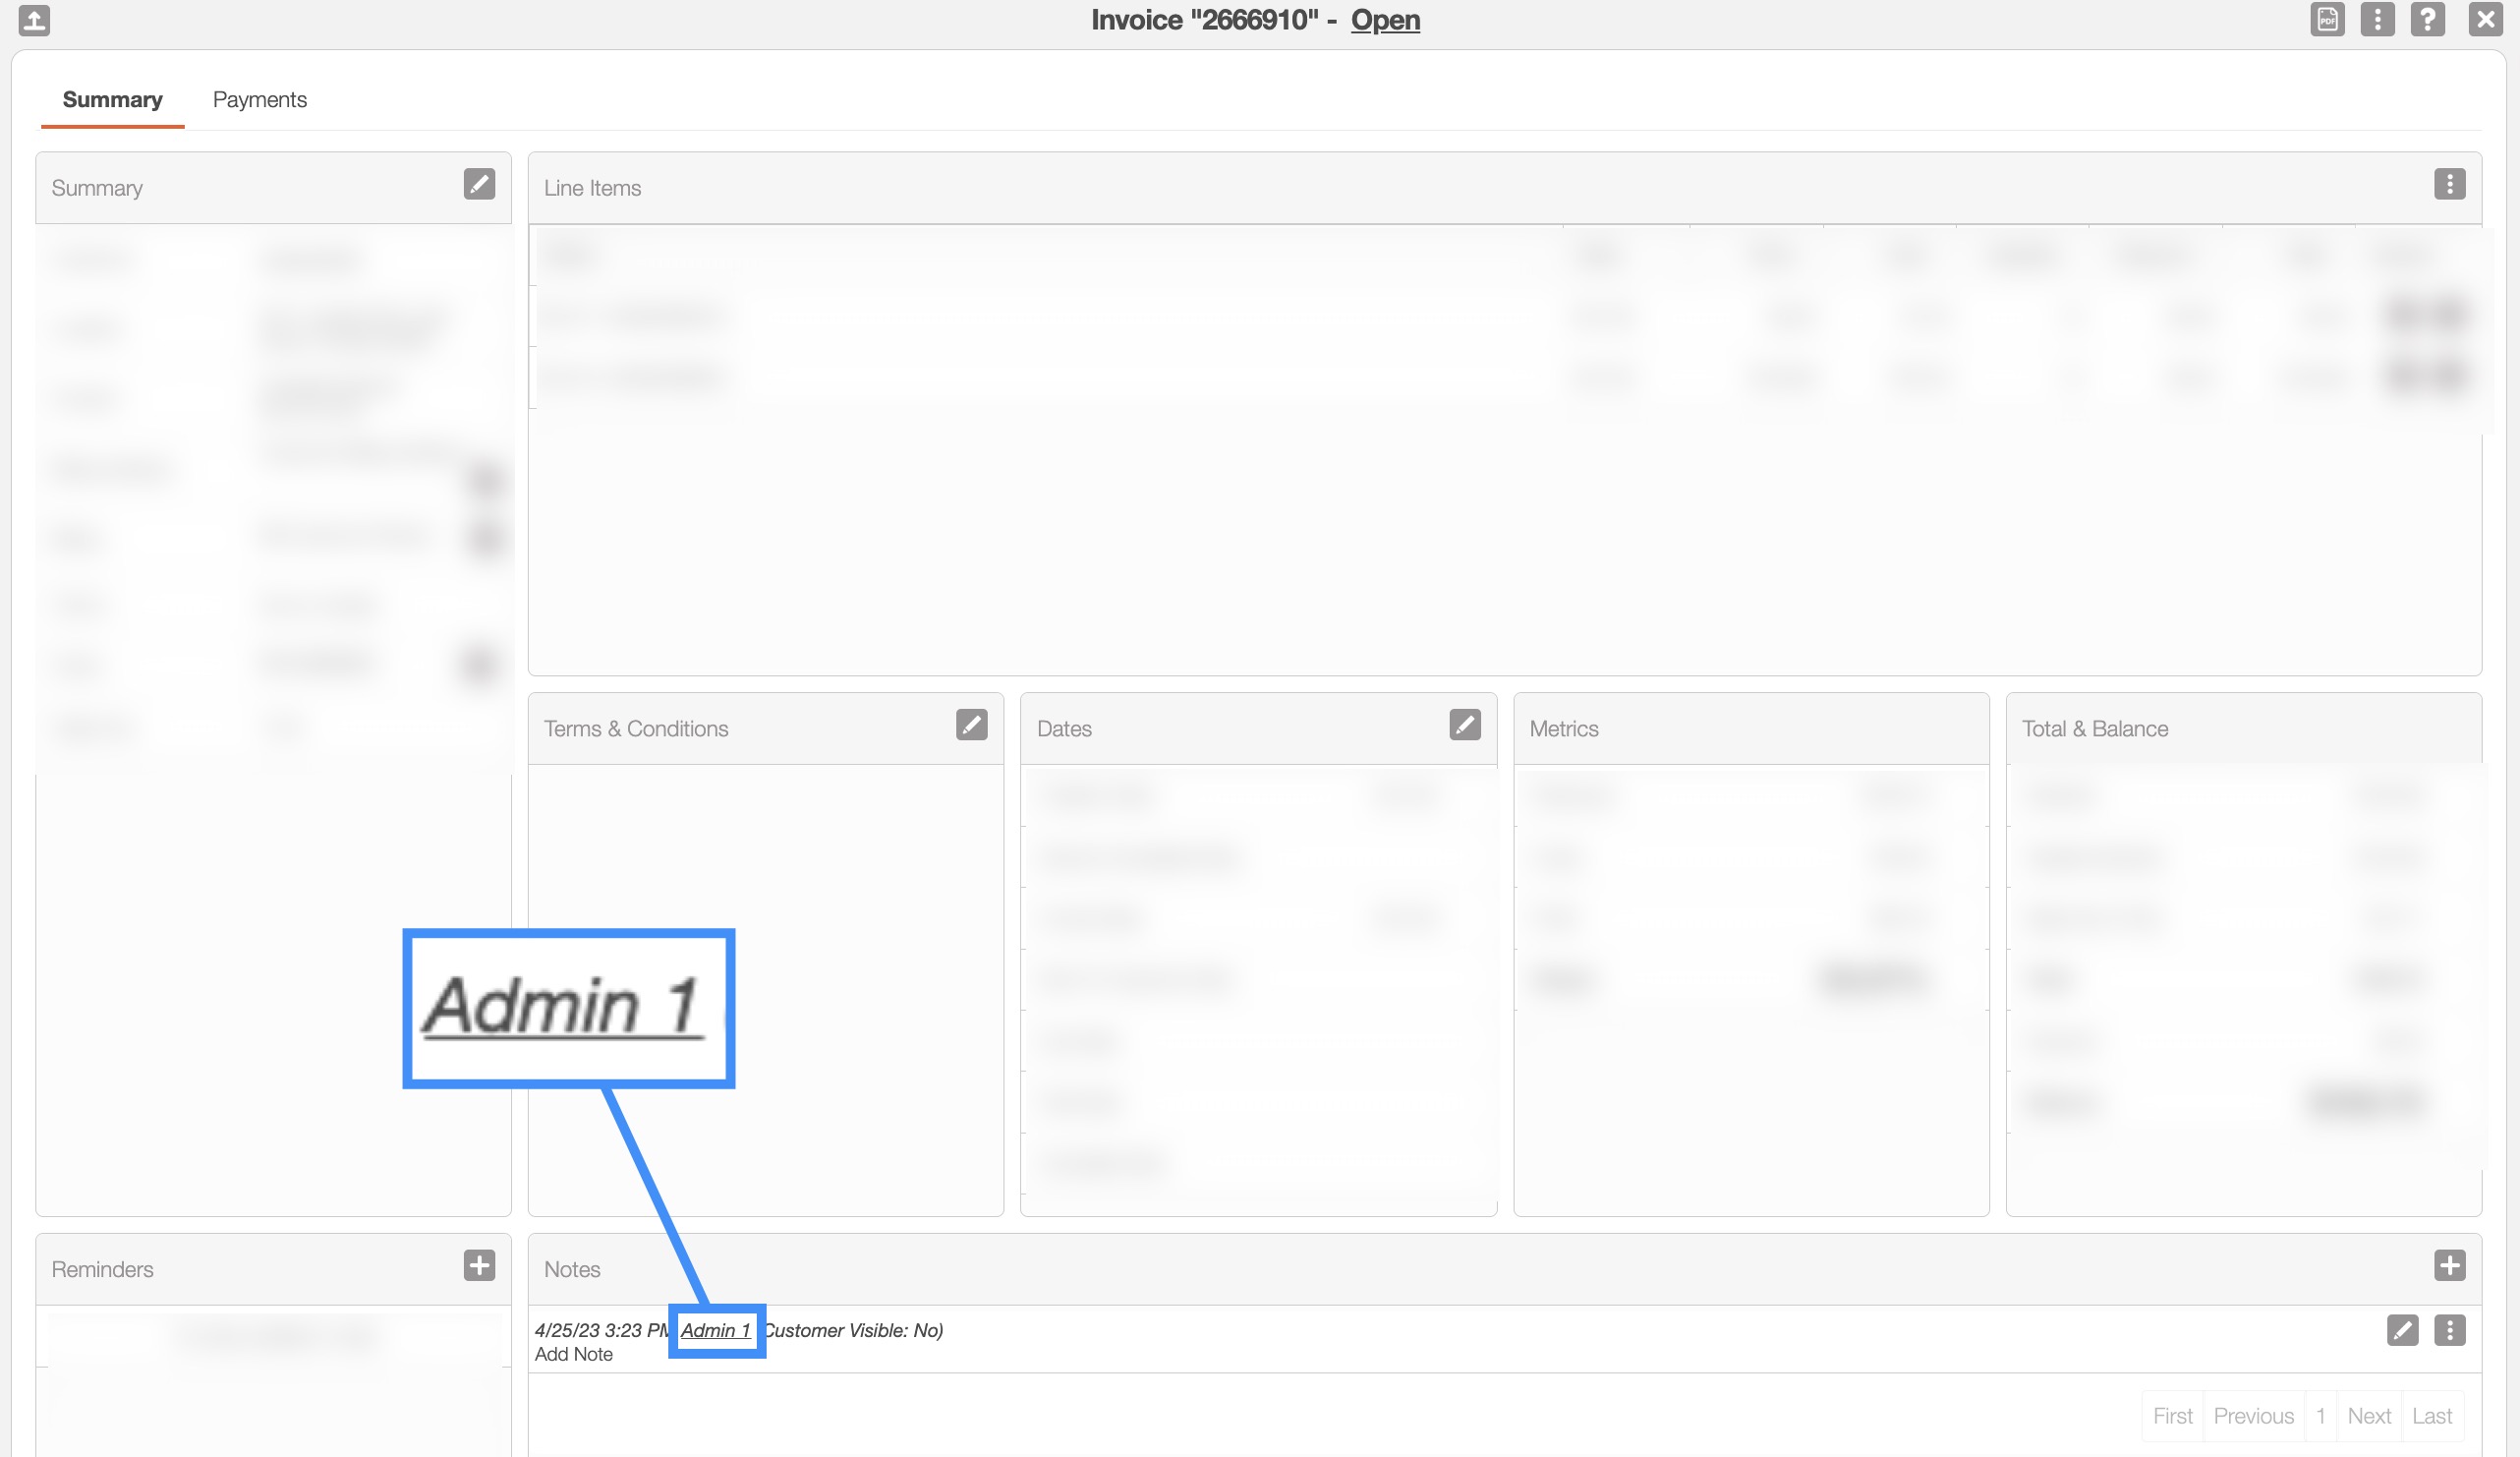
On the View Invoice "Summary" tab, you will be able to access the View User pop-up window from any notes left there by the user:
Overview and Layout
Once you open the View User pop-up window, you will be automatically directed to the "Details" tab:

These features are available in all eleven tabs and in both, the pop-up window and the full-size view:
Please note that if you would like to easily close this pop-up window, you can click on the esc button from your keyboard.
User Full-Size View
By clicking on the upwards arrow in the left-hand corner, you can expand the View User pop-up window so that it is full-size:

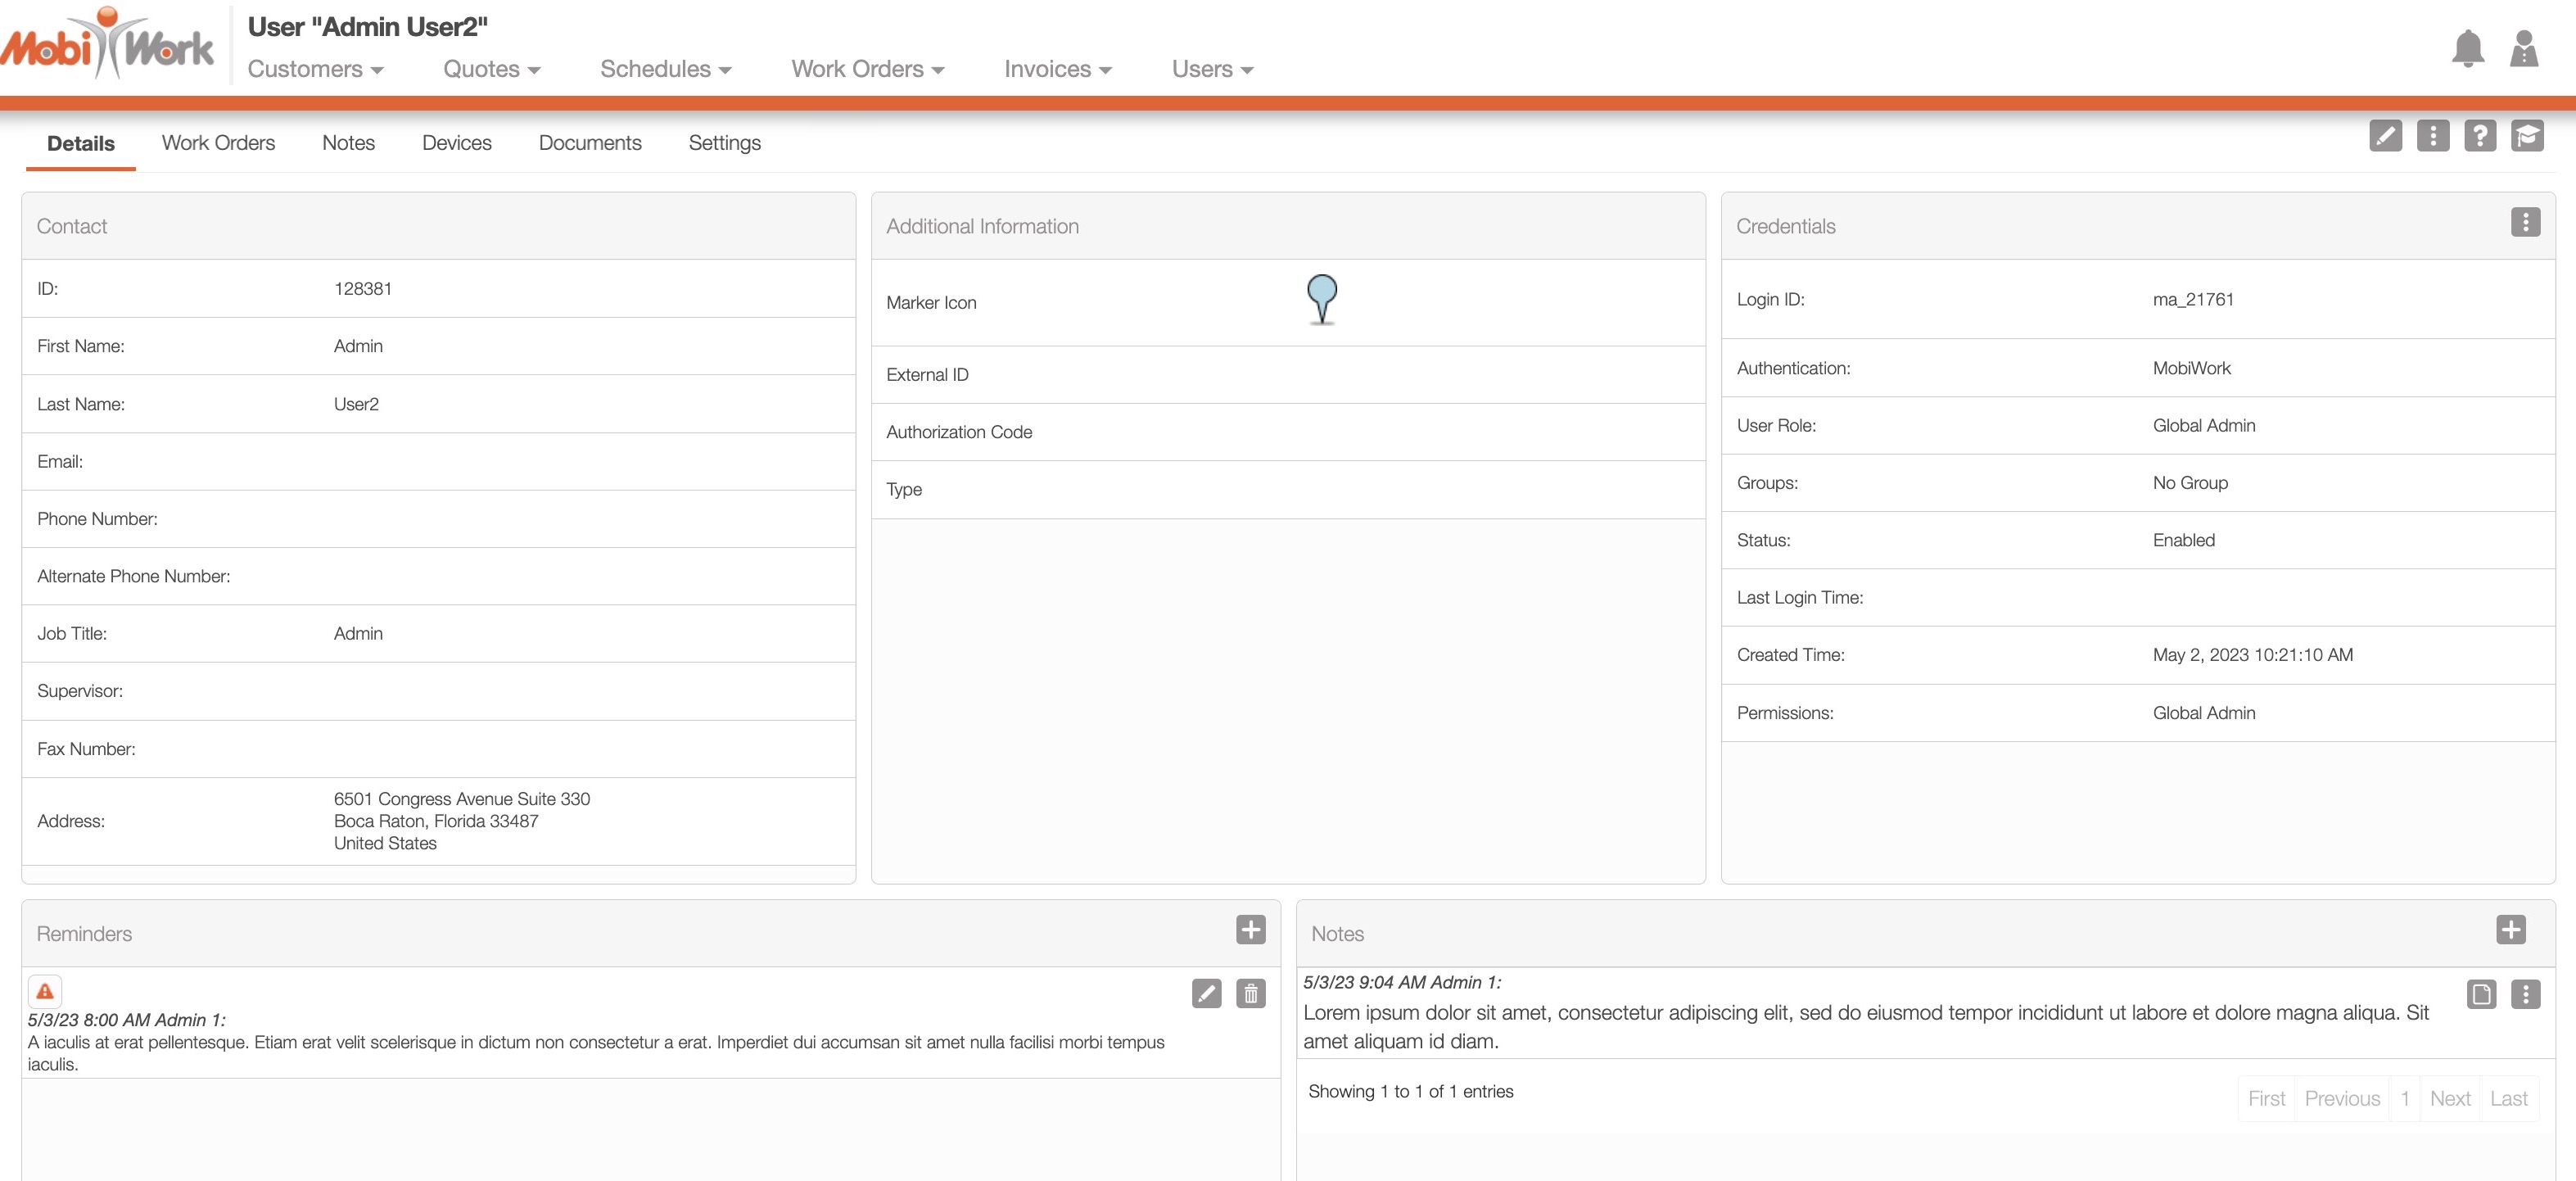
The full-size View User pop-up window can be seen below. All the tabs, buttons, and features are identical to how they would appear in the pop-up window:
User Tabs
There are eleven tabs in all for the View User pop-up window; each tab displays different information regarding the user:

You can navigate to other tabs by clicking on the desired tab.
User Name
The User's name will be displayed here:

Upper Right Corner Actions
In the upper right corner of the View User pop-up window there will be four buttons that will allow you to perform additional actions on the user:
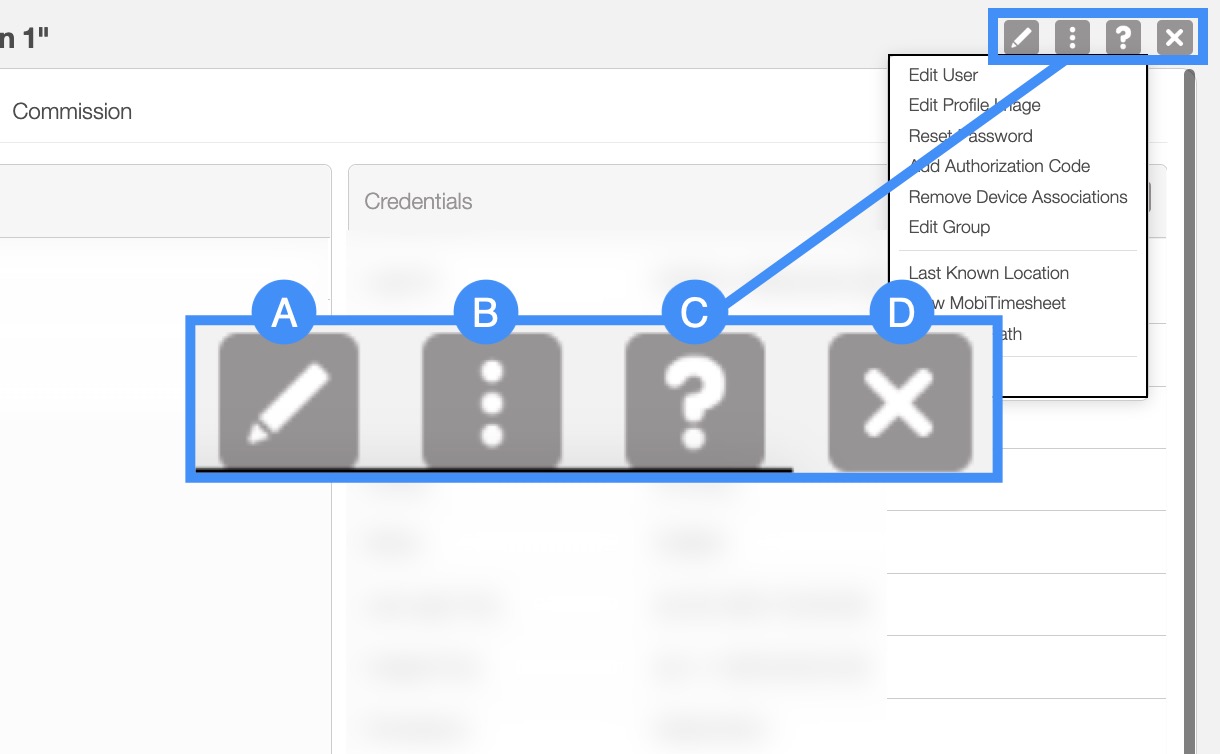
The Pencil button will allow you to edit the user.
The Individual Actions button will allow you to perform various actions, such as:
Editing the user
Editing the image that is used for the user profile
Resetting the user's password
Editing the user's permissions (access) to limit or increase the ability to add, edit, view, etc., features within MobiWork
Adding an authorization code for the user
Removing the devices (e.g., phones, tablets, etc.) that the user has access to
Editing the group that the user is associated with
Displaying the last known location of the user
Allows you to view the time sheet associated with the user
Allows you to view the routes and paths associated with the user
Viewing the Settings page
The Question Mark button which will direct you to the respective MobiWork Features page.
The X will close out of the View User pop-up window.
The User's Upper Right Corner Actions can be found in the top-right corner of the View User pop-up window. These actions are located in this section, regardless of the tab you are on:

The Upper Right Corner Actions section includes:
The Pencil button will allow you to edit the user.
The Individual Actions will allow you to perform various actions.
The Question Mark button which will direct you to the respective MobiWork Features page.
The X will close out of the View User pop-up window.
After clicking on the vertical three dots in the top-right corner, the Individual Actions drop-down menu will appear:
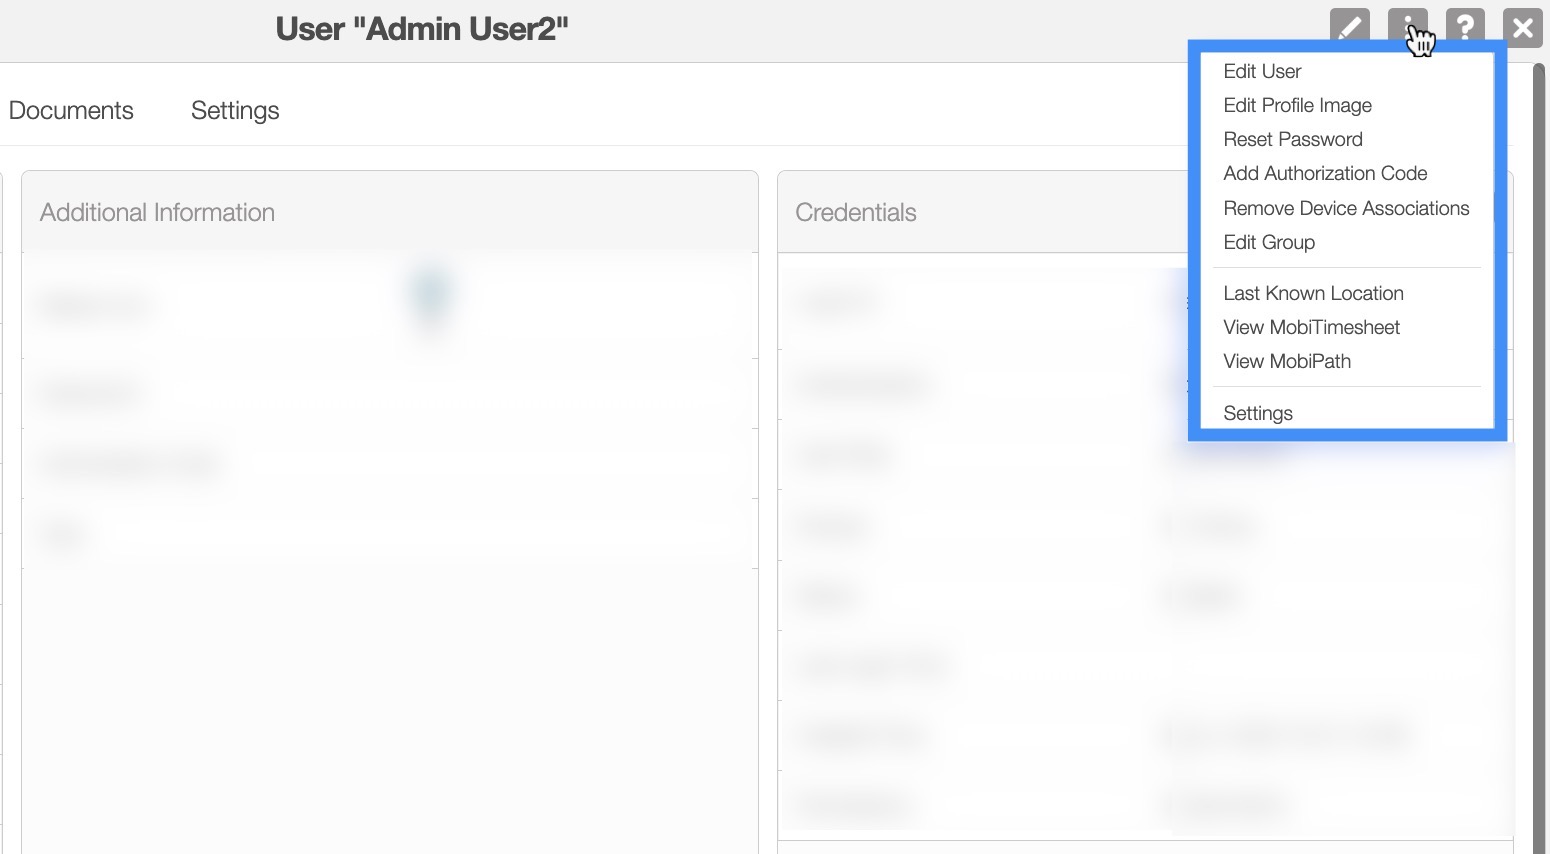
From the Individual Actions drop-down menu, you can select various actions that will help manage the specified user.
The complete list of actions found in the Individual Actions drop-down menu are defined below:
| Name: | Description: |
|---|---|
| "Edit User" | Allows the user to edit the specified user |
| "Edit Profile Image" | Allows the user to edit the specified user's profile image |
| "Reset Password" | Resets the password for the specified user |
| "Add Authorization Code" | Adds an authorization code for the user |
| "Remove Device Associations" | Removes the user's association with a device |
| "Edit Group" | Edits the group that the user is associated with |
| "Last Known Location" | The last known location of the user |
| "View MobiTimesheet" | Views the timesheet of the user |
| "View MobiPath" | Views the path of the user |
| "Settings" | Directs the user to the Users Settings page |
The "Details" tab is the default tab you will be directed to; it will display all the requisite information regarding a user.
The boxes found on the "Details" tab will summarize the data from the other View User tabs, including the user's name, email, address, notes, and more.
The "Details" column in the "Summary" tab will display the user's name, phone number, as well as the user's ID and authentication method:
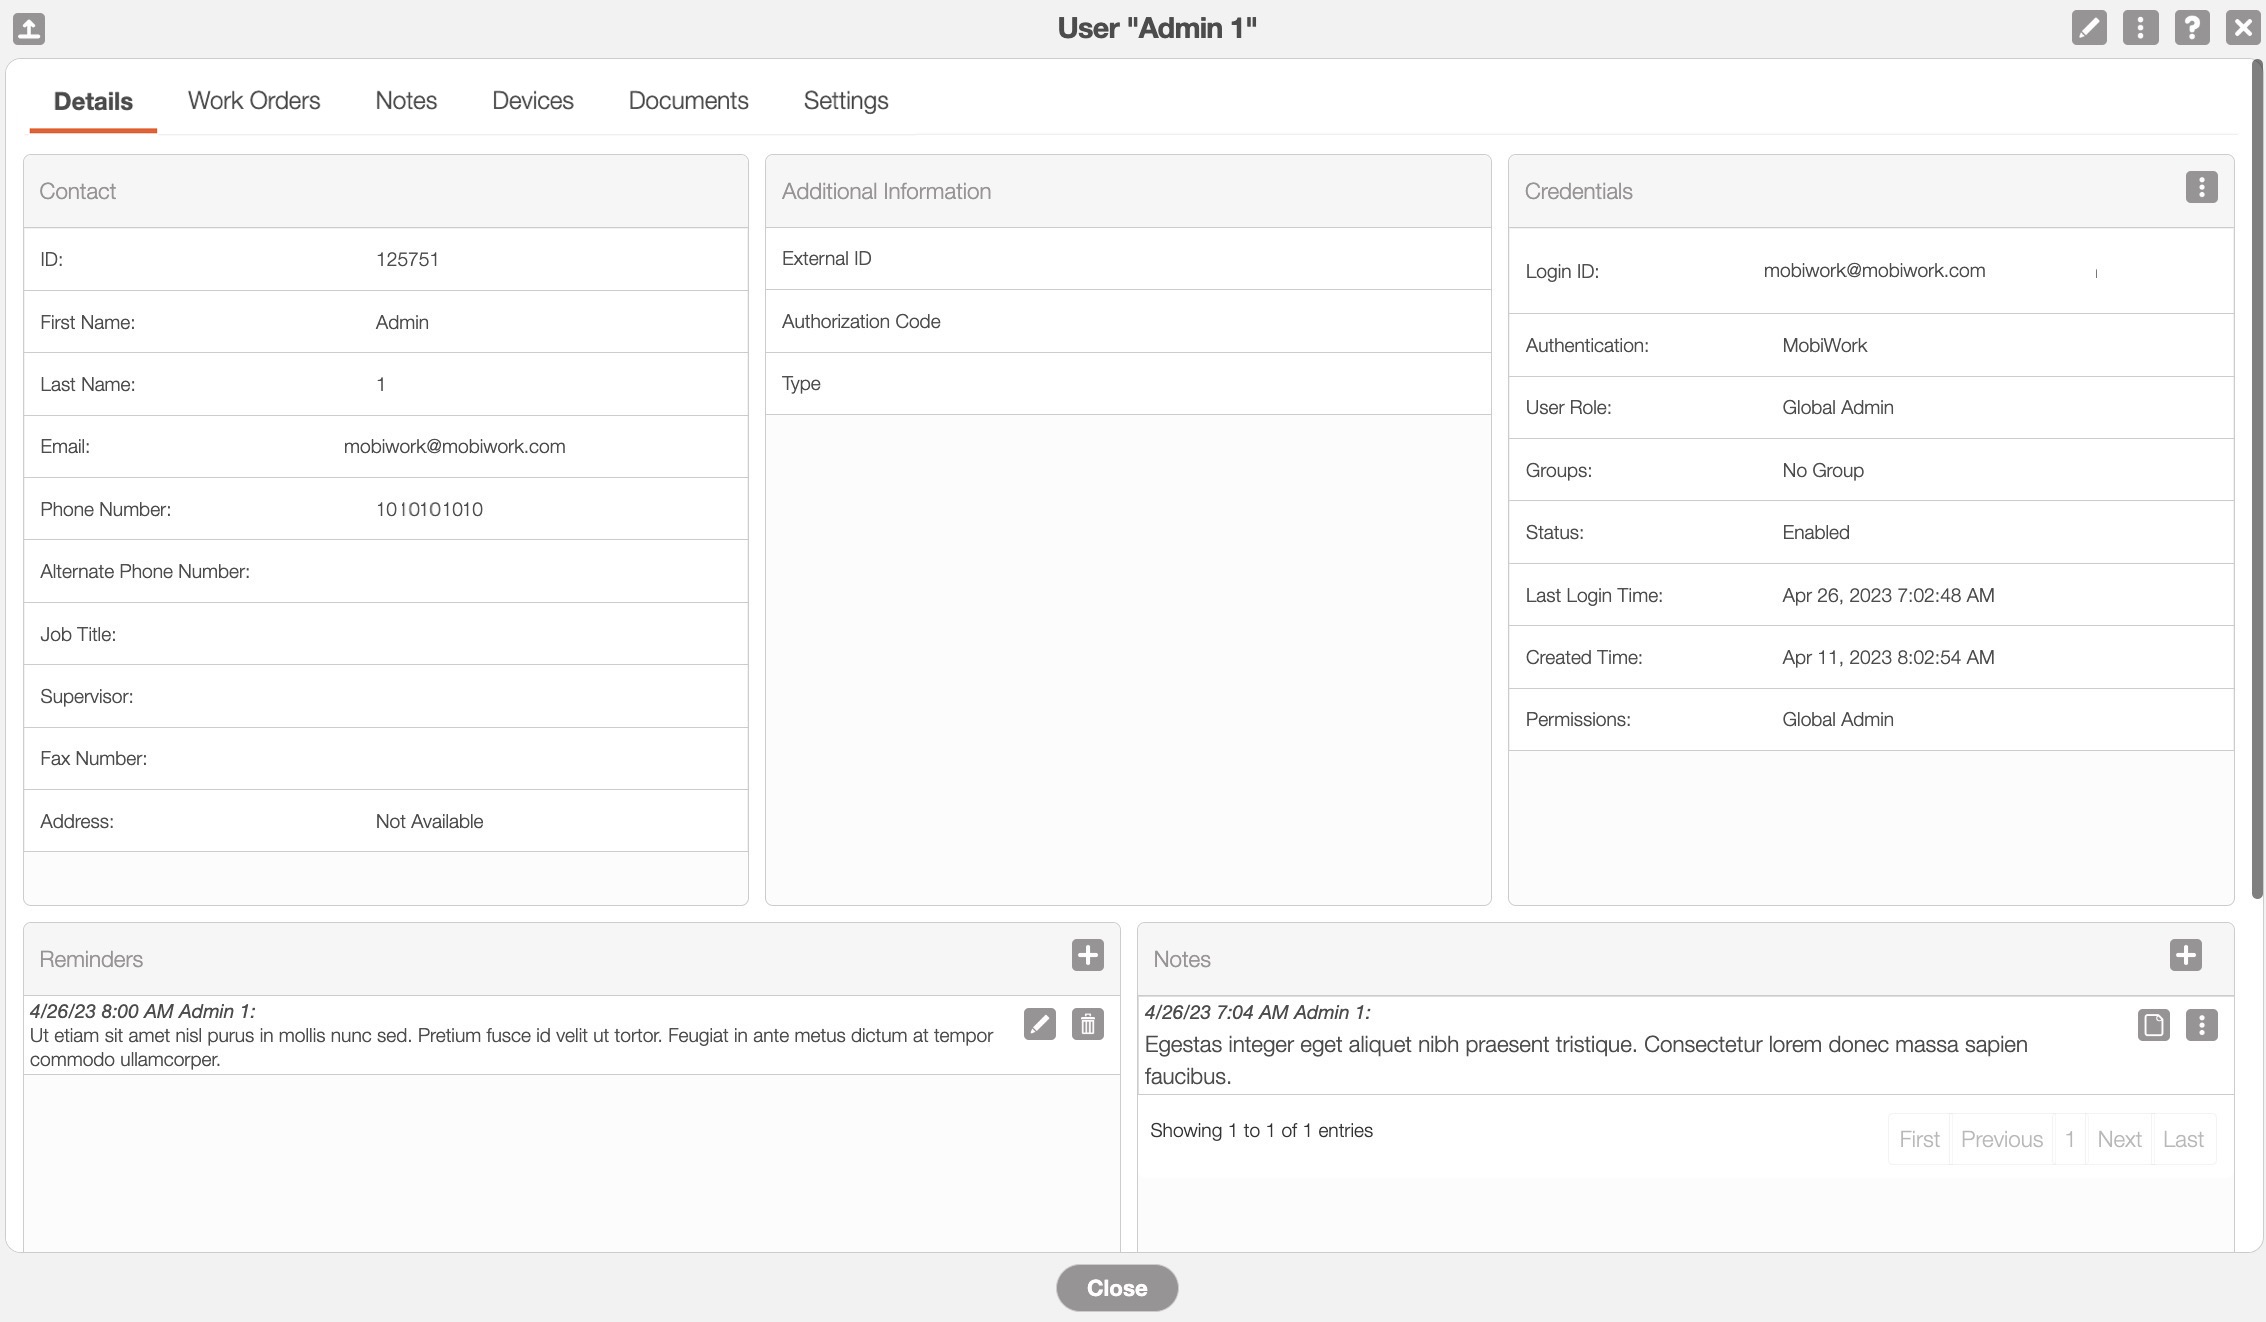
Where applicable, you can edit or add additional information directly in the "Summary" tab:
The Individual Actions button (the three dots) will display different options (e.g., view, edit, delete, etc.) depending on the corresponding panel.
The View icon will allow you to view the selected data in a separate window.
The Pencil icon will allow you to edit the selected data or field.
The Plus Sign icon will allow you to add additional special notes, notes, reminders, assets, work orders, etc.
The Trash Can icon will allow you to delete the selected data.
The "Work Orders" tab is the second tab located in the View User pop-up window. This tab will display all the work orders that are assigned to the user:
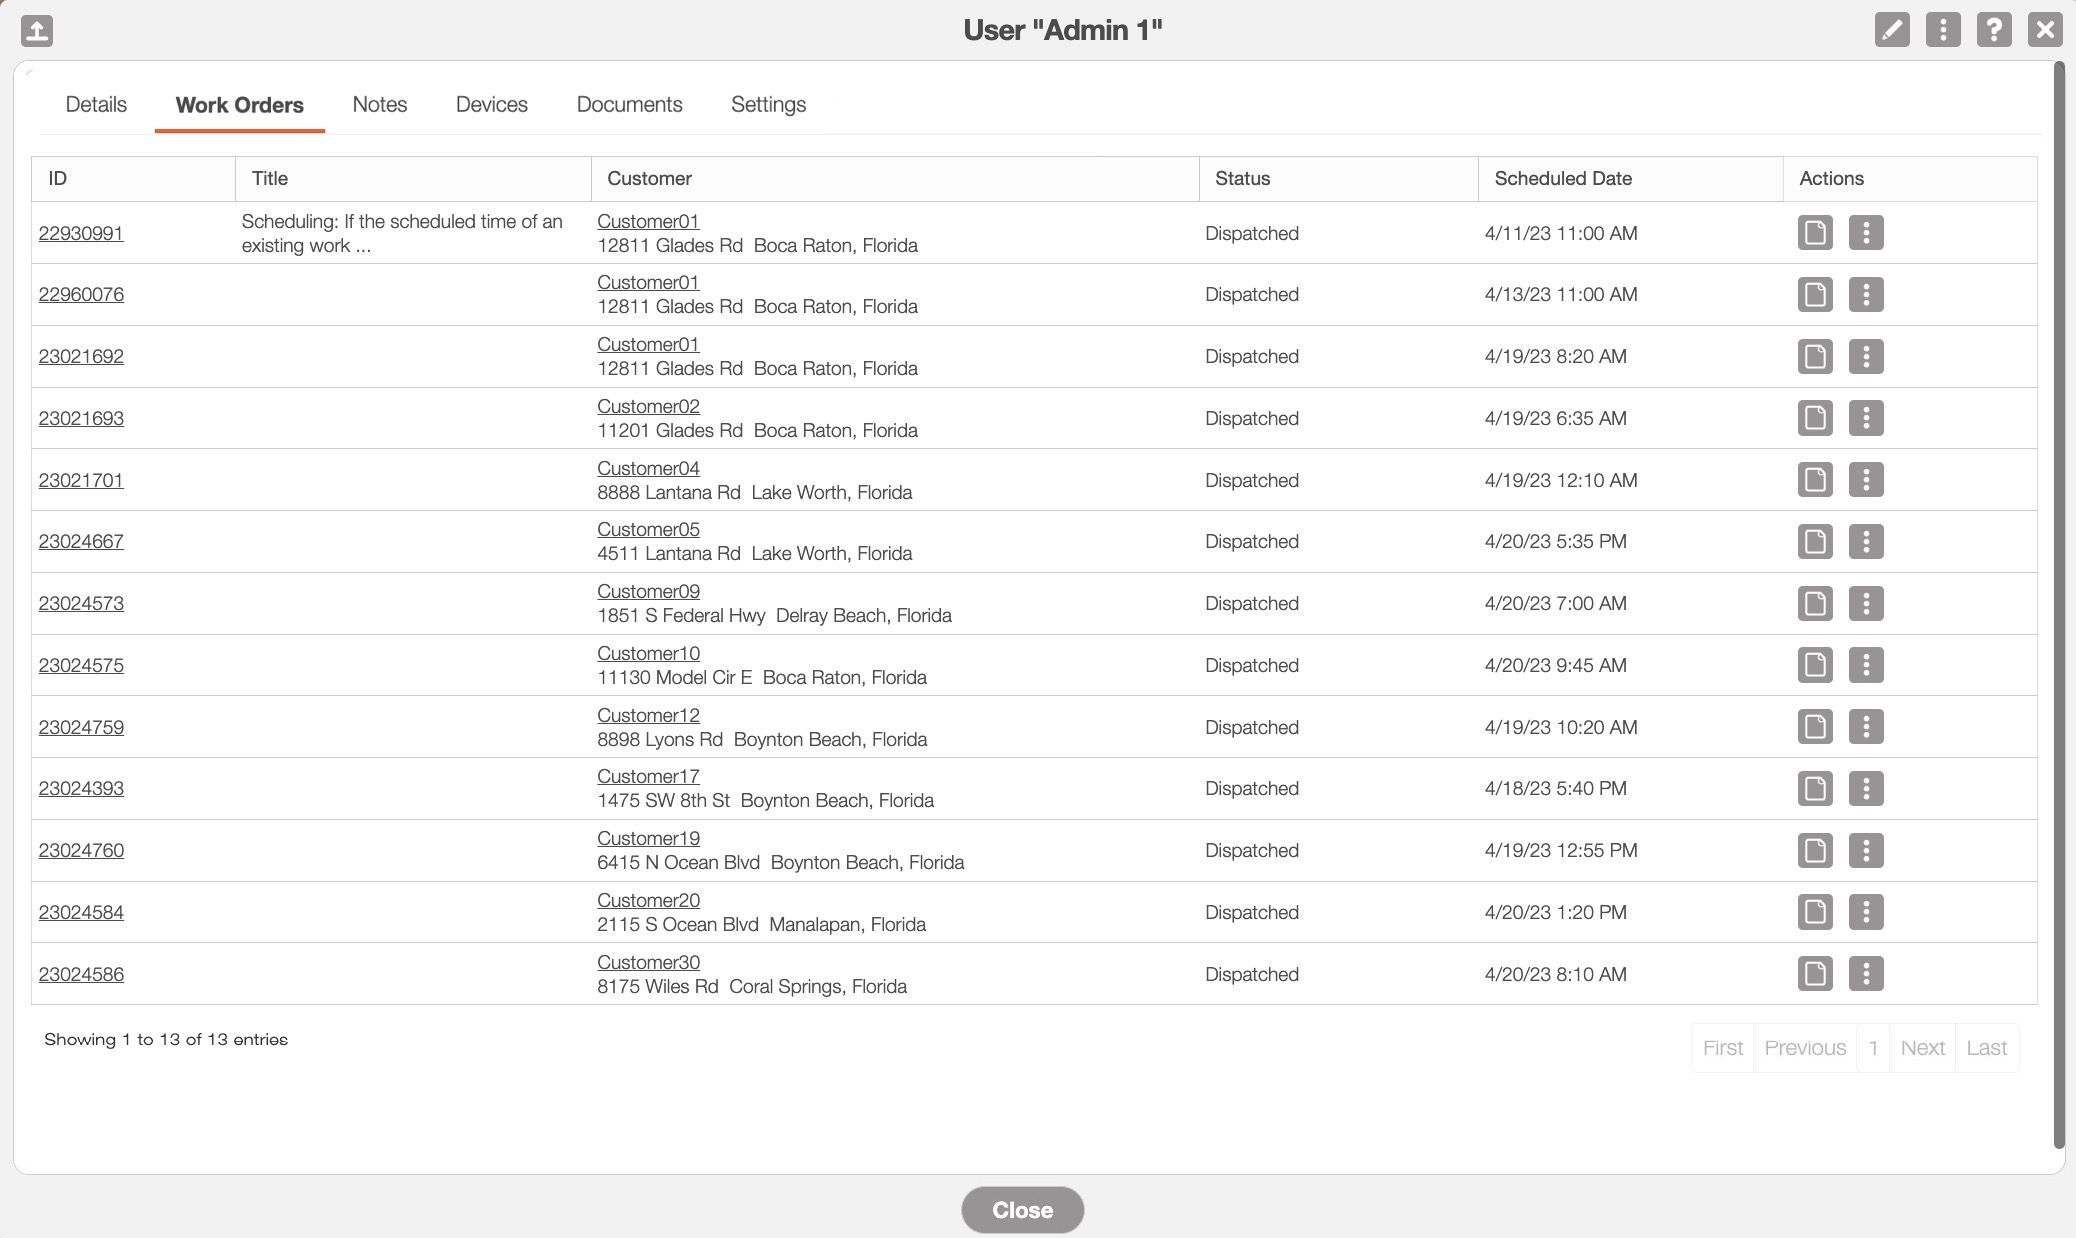
You can click on the Work ID to directly open the corresponding work order or on the customer's name to open the View Customer pop-up window.
You will also be able to view type of work order, the status of the work order, when it is scheduled, etc.
The columns for the "Work Orders" tab are defined below:
| Name: | Description: |
|---|---|
| "ID" | The ID of the work order. |
| "Title" | The type of work order that is being performed (e.g., repair, installation, etc.). |
| "Customer" | The customer that the work order is being performed for. |
| "Status" | The status of the work order associated with the user. |
| "Scheduled Date" | The scheduled date and time of the work order associated with the user. |
| "Actions" | By clicking on the View icon or the Individual Actions button you will be able to access the "View" or "Repeat" option. The "Repeat" option allows you to repeat a work order; please see the Add Work Order section for more information about repeating work orders. |
The "Notes" tab will list any notes associated with the user:
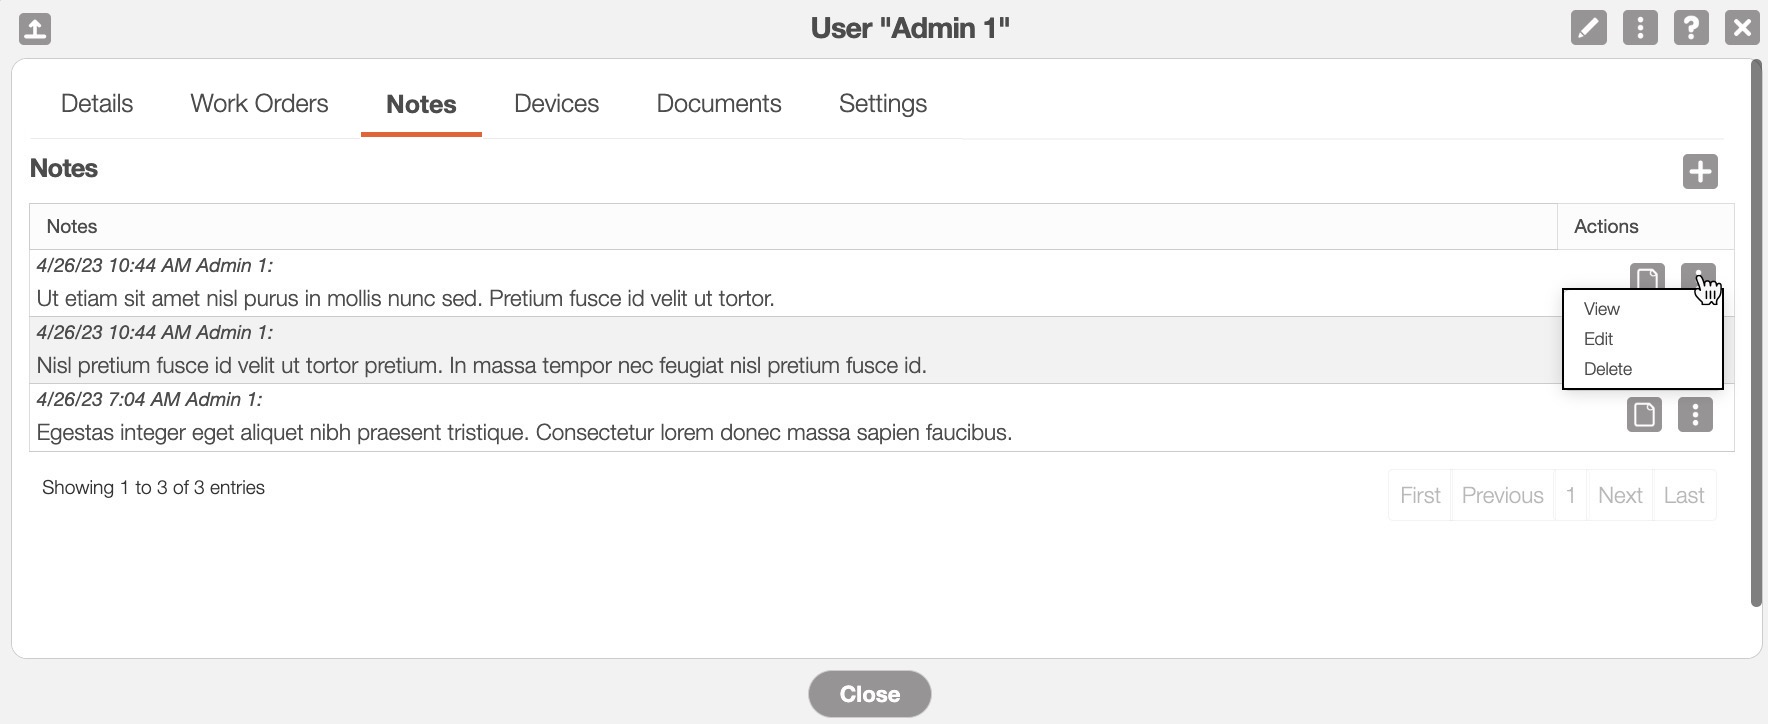
To add a new note, simply press the Plus Sign button in the top right-corner.
If you would like to view the note in a read-only window, you can click on the View icon or select the "View" option from the Individual Actions button.
The Individual Actions button will also allow you to edit or delete the specified note.
The list of devices that the user has access to will be displayed here. You will be able to view the last time that the user logged on to the specified device, as well as, see a more in-depth analysis once you click on the device:
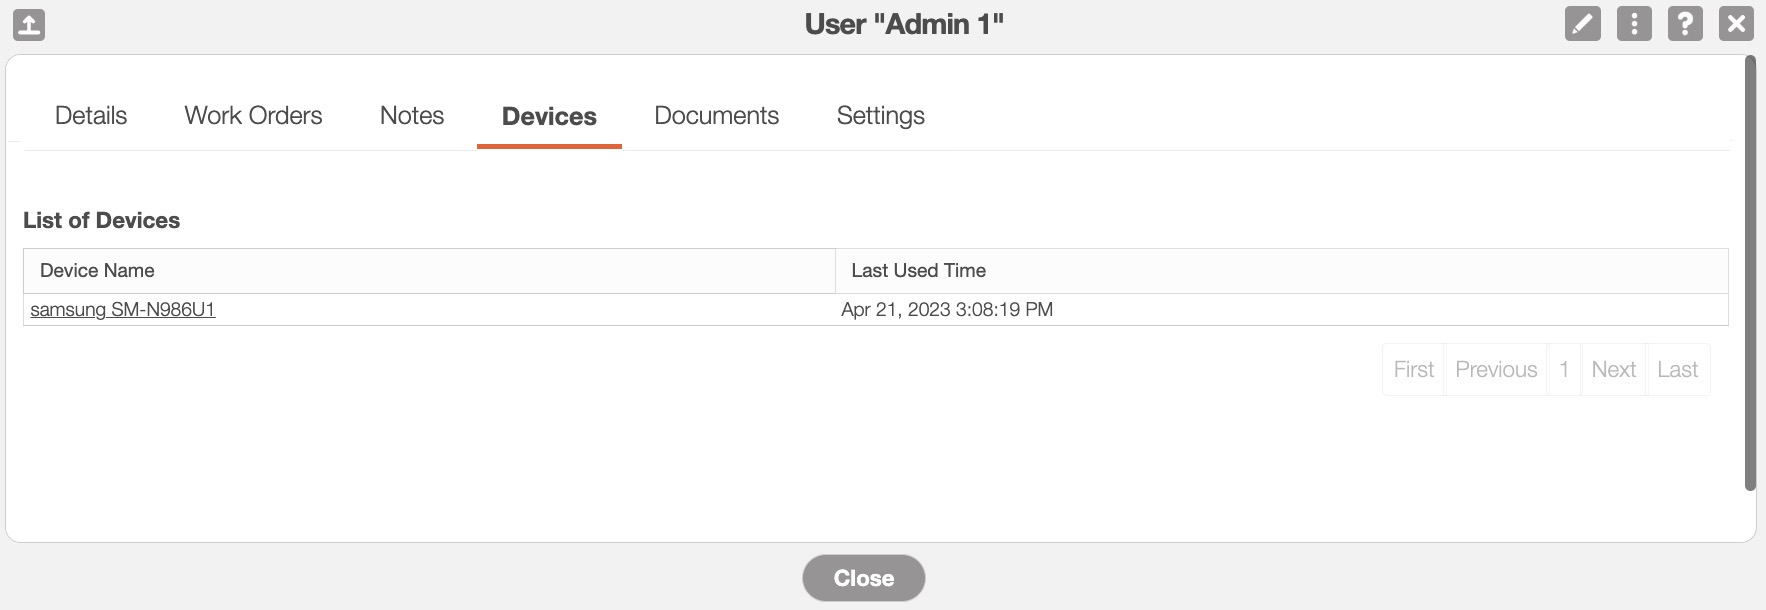
The "Devices" tab will list all the devices that are associated with the user (i.e., the devices that the users log into).
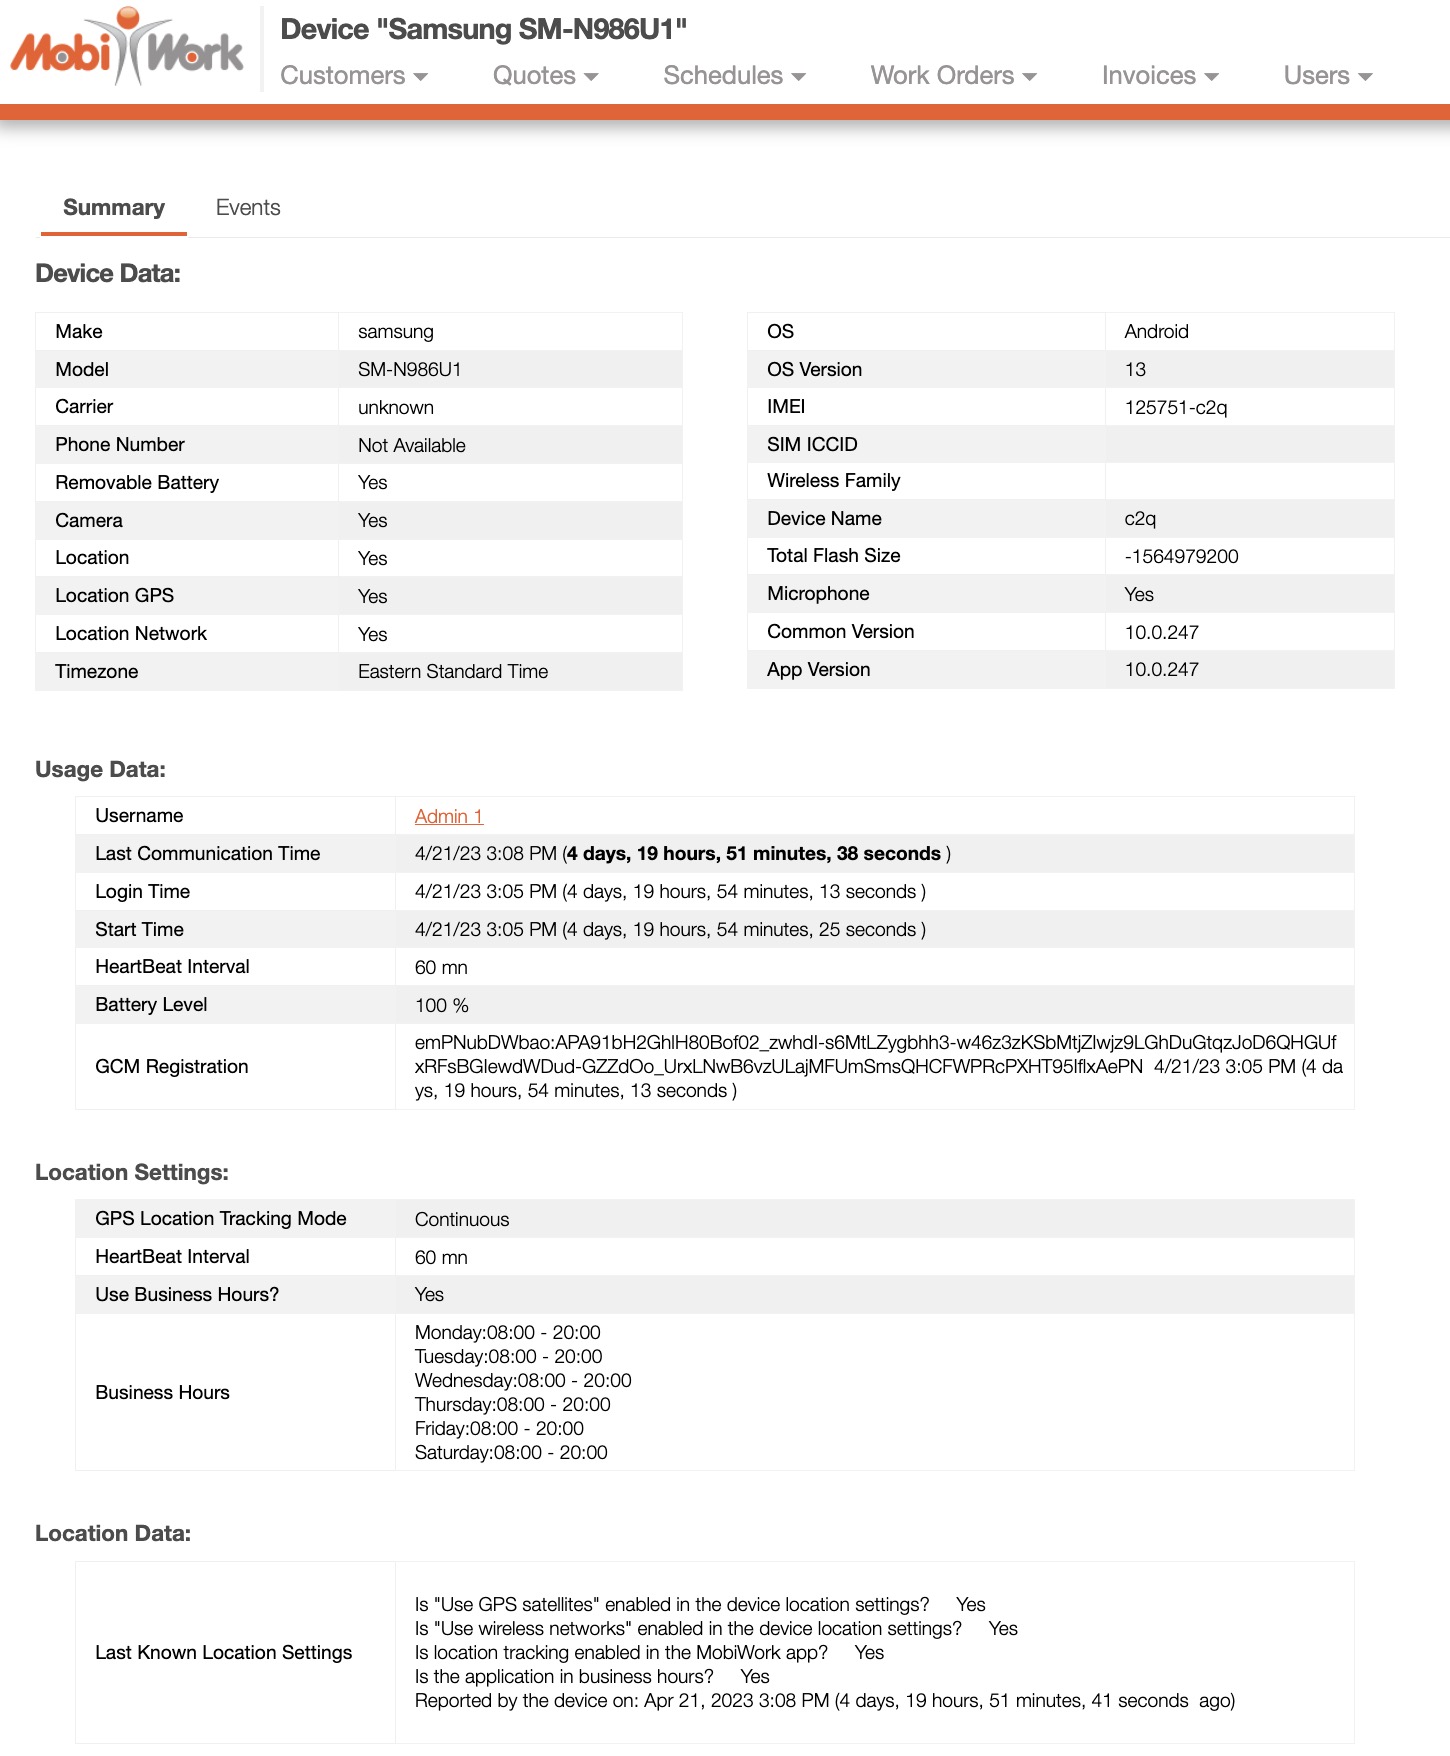
Once you click on the selected device, you will be redirected to the Device page. This page will display the data associated with the selected device:
The "Documents" tab will contain any documentation associated with the user. This tab will display the type of document listed, the user who posted the document, and more:
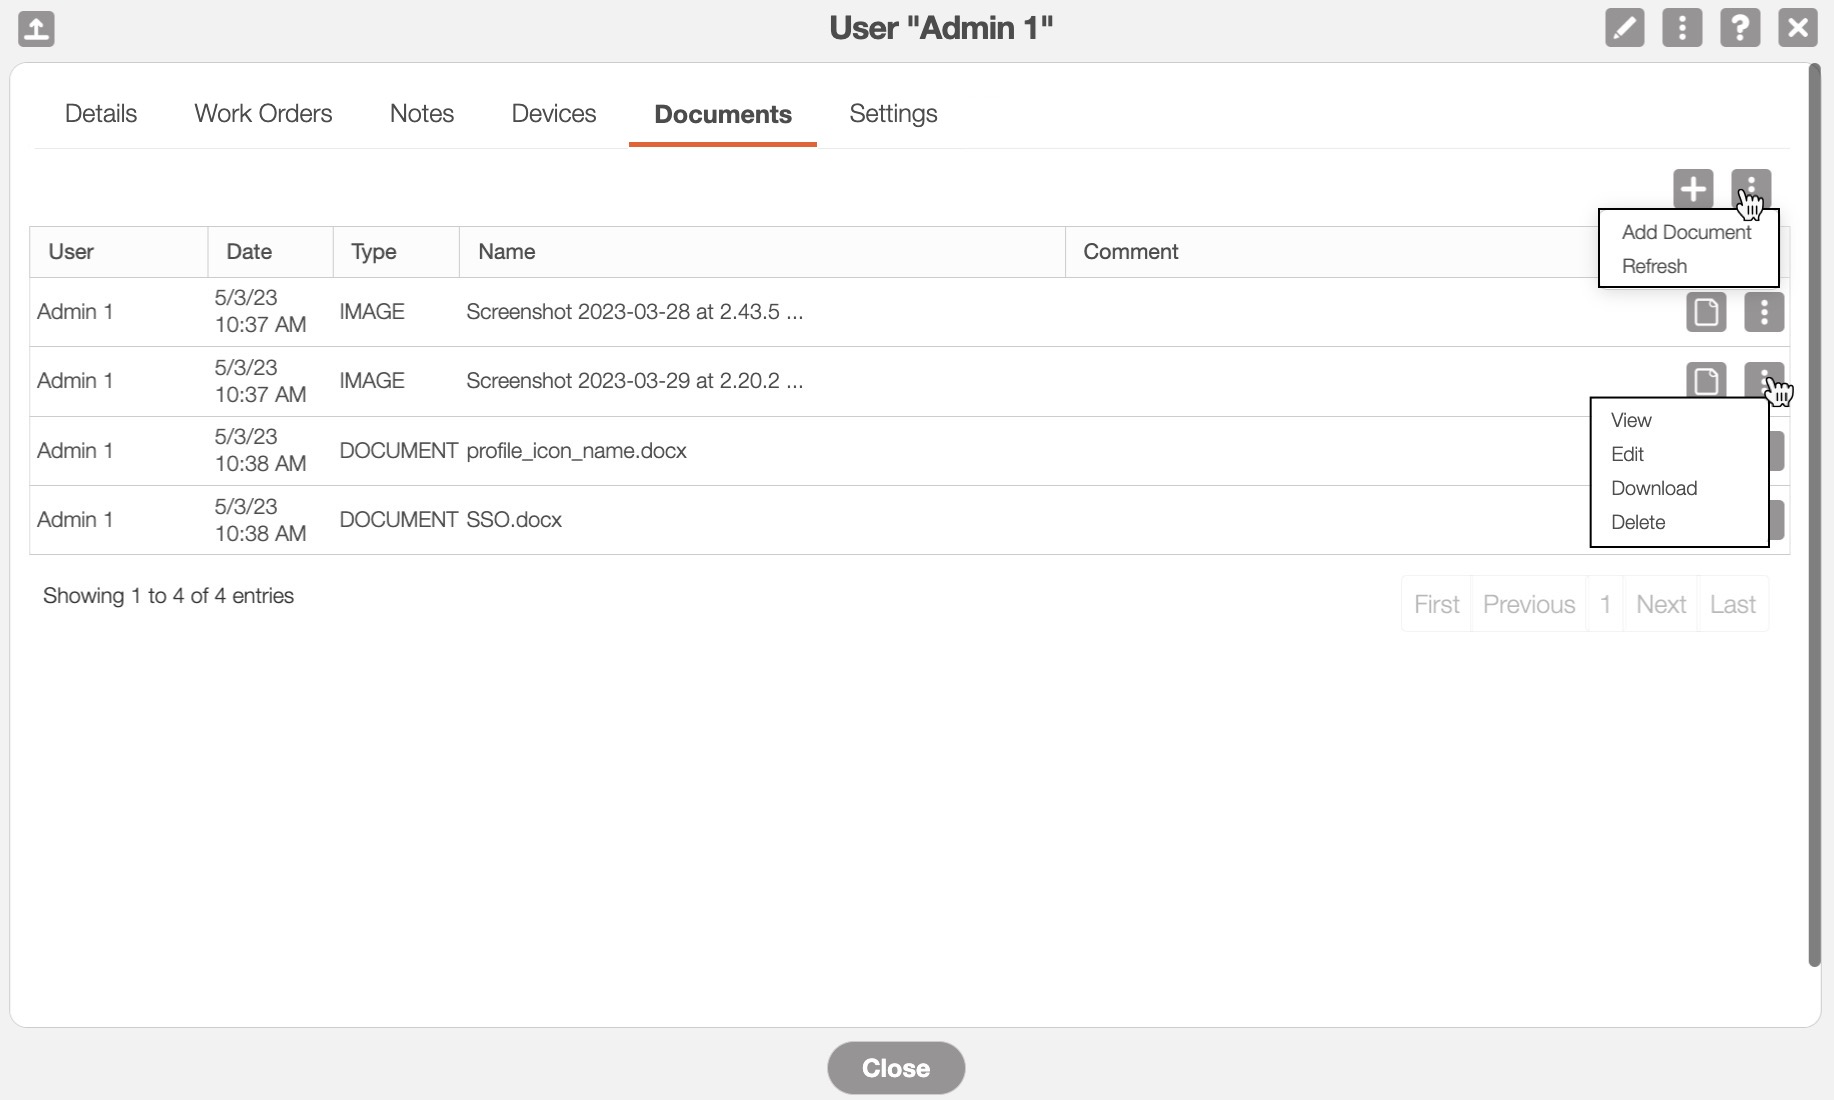
You can use the Plus Sign button or the More Actions button to add a new document for the user.
The columns for the "Documents" tab are defined below:
| Name: | Description: |
|---|---|
| "User" | The user who posted the document |
| "Date" | The date and time that the document was posted to the user |
| "Type" | The type of document that is associated with the user |
| "Name" | The name of the document associated with the user |
| "Comment" | Any comments associated with the document |
| "Actions" | Will allow you to view, edit, download, or delete the specified document |
The "Settings" tab will allow you to view the specified settings for the user; you can utilize the global settings for the user, or you can customize the settings accordingly:
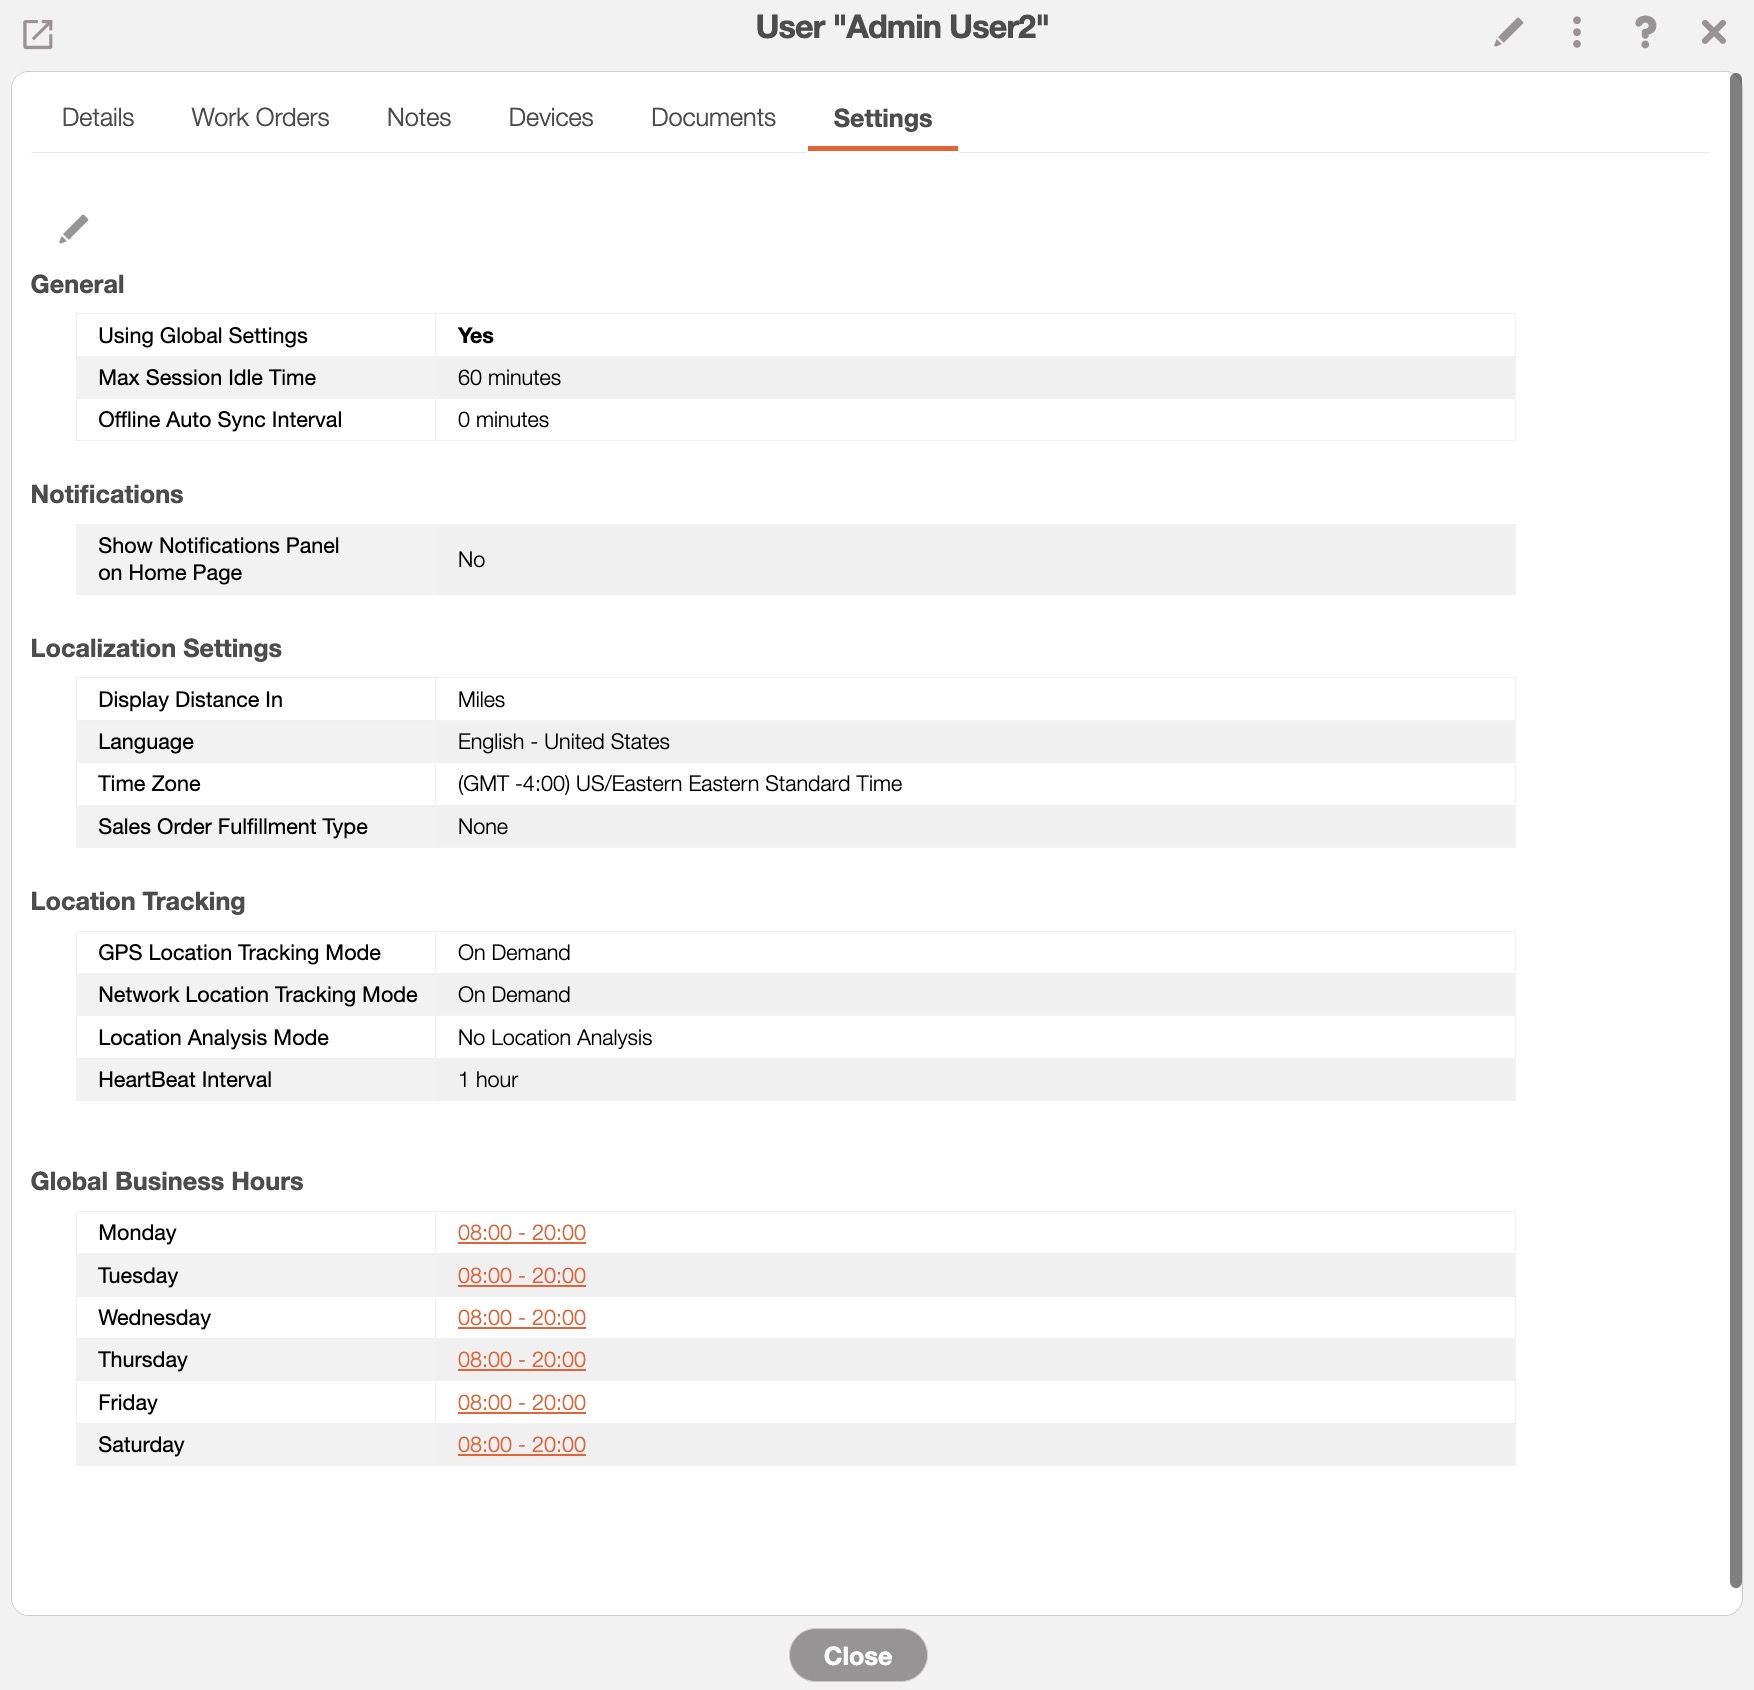
To edit the settings for the user, click on the Pencil icon above the "General Section." You will then be redirected to Edit Settings for User page:
To input settings that differ from the Global Settings for the specific user, uncheck the "User Global Settings" option:

Once the "User Global Settings" option is unchecked, you will be able to make the necessary changes to the specified user's settings. Once you are satisfied with the changes, click on the Save button:
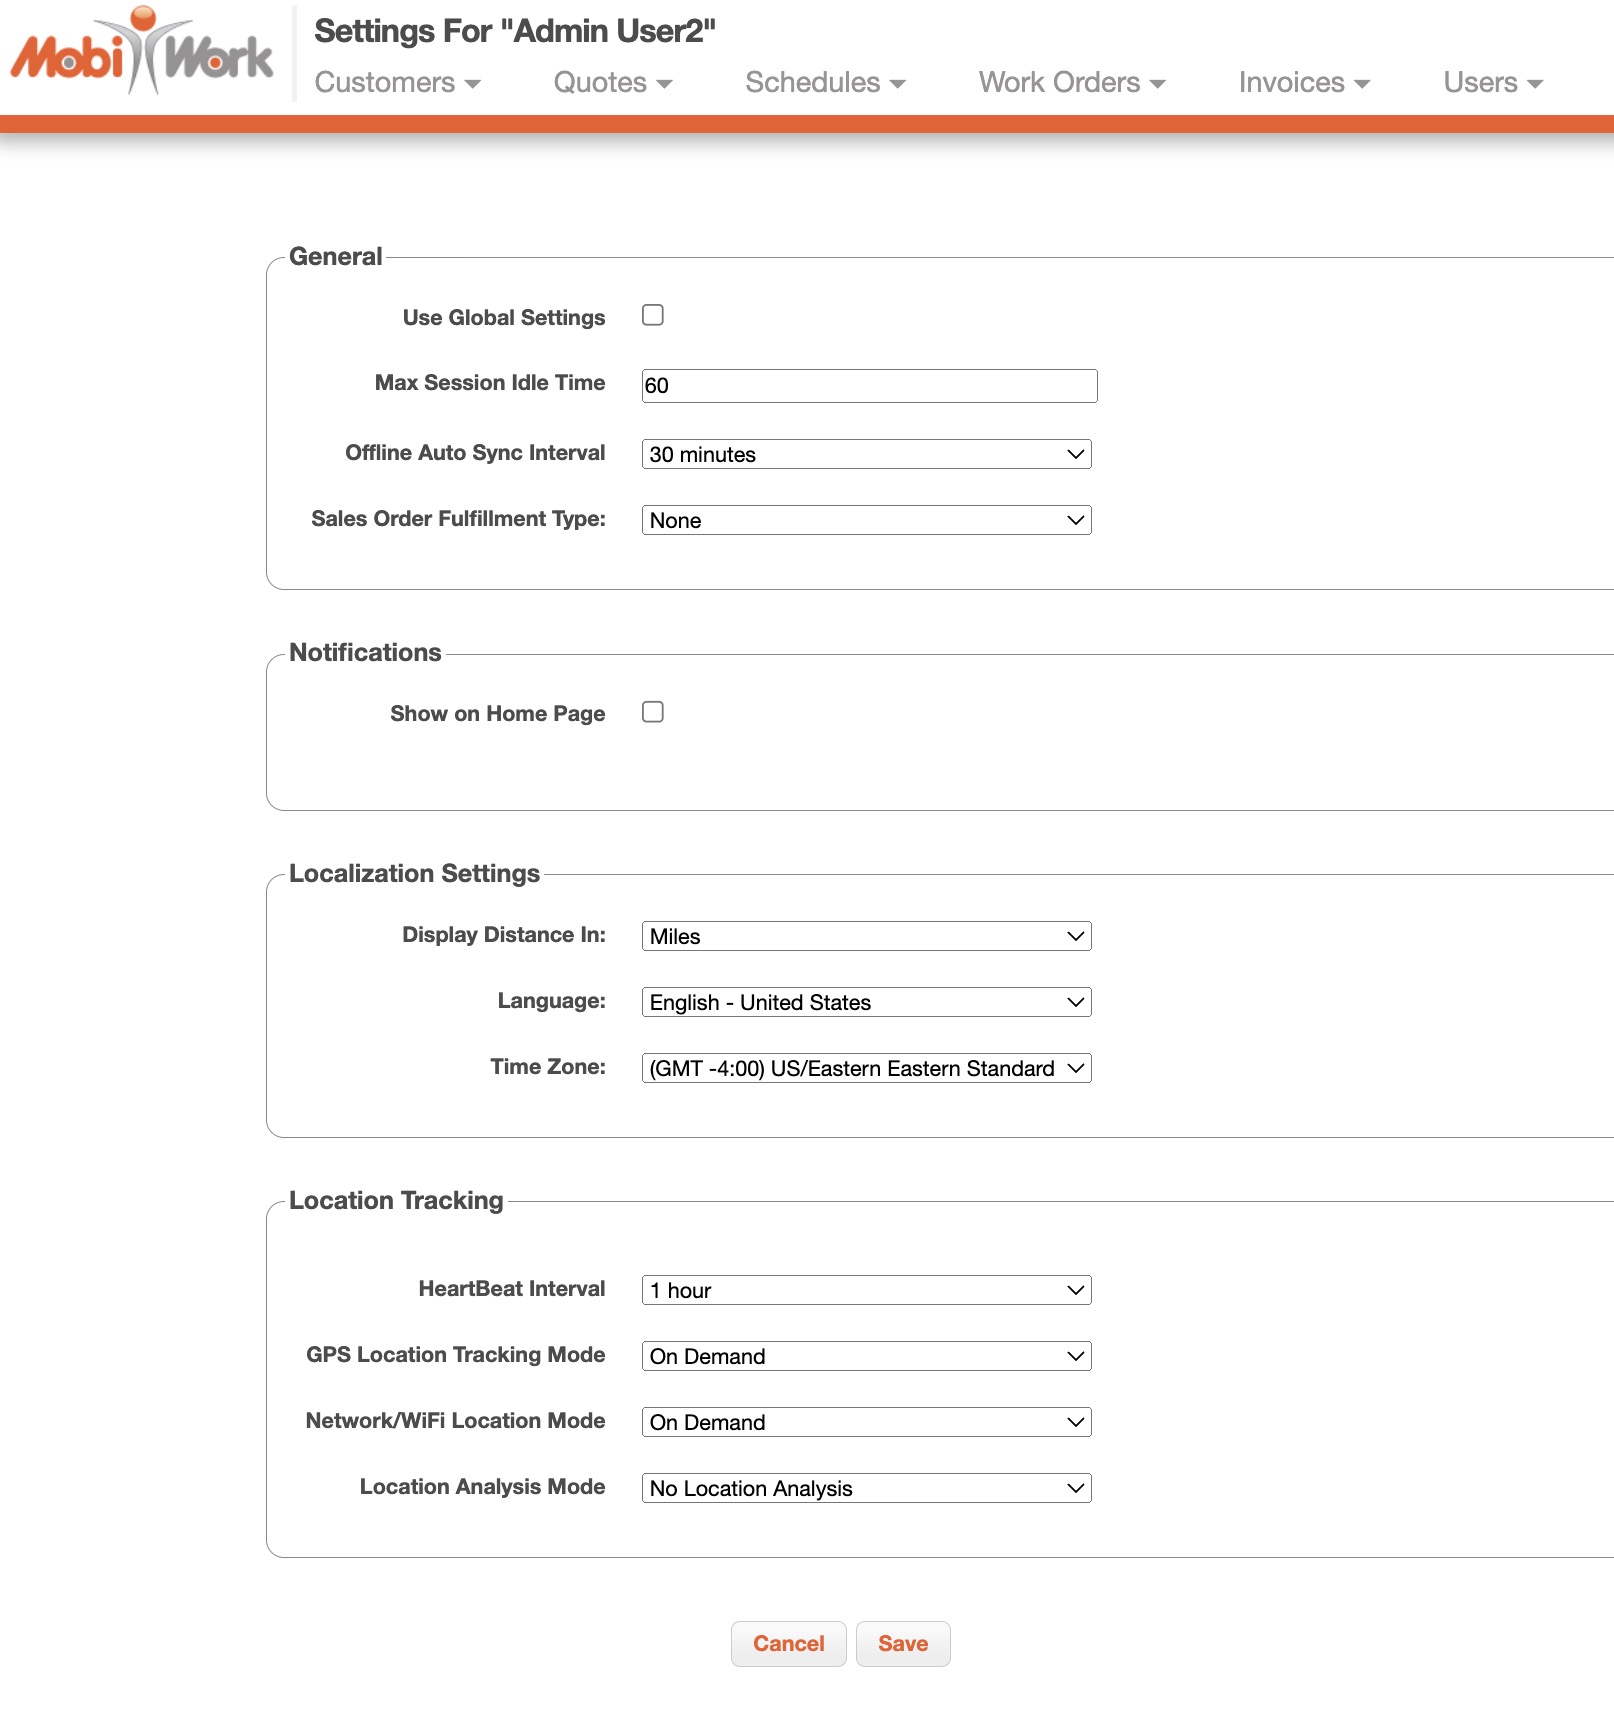
The columns for the "Settings" tab are defined below:
| Name: | Description: |
|---|---|
| "Use Global Settings" | Uses the settings configured at the company level. If unchecked the settings will be tuned for the specified user |
| "Max Session Idle Time" | The max session idle time before MobiWork automatically logs out |
| "Offline Auto Sync Interval" | How often the device will try to communicate with the server when it is in offline mode |
| "Sales Order Fulfillment Type" | Indicates how the user can fulfill a sales order (i.e., from their personal inventory or the backend process) |
| "Show on Home Page" | Shows the notification panel on the home Page |
| "Display Distance In" | The measurement of distance that will display for the user in MobiPath, MobiTimesheet, and work order assignments by location |
| "Language" | The language that the text within MobiWork will be displayed in |
| "Time Zone" | The time zone the user is in |
| "HeartBeat Interval" | How often location information from the user's device will be sent to MobiWork |
| "GPS Location Tracking Mode" | The continuous, no location tracking, frequency mode (at defined intervals), or on demand (on the device, the user can specify when they want to be tracked) |
| "Use Business Hours" | The user will be tracked during business hours. If unchecked, the user will be tracked 24/7 |
| "Global Business Hours" | The business hours for the user |
| "Network/WIFI Location Tracking Mode" | Determines how often the user can be tracked. (i.e., continuous, no location tracking, a set number of minutes, or on demand). For "On Demand" the user can specify when they want to be tracked |
| "Location Analysis Mode" | Allows you to analyze all locations, analyze POI locations only, or no location analysis |
If you have any questions or need further assistance, please let us know. We'd be happy to help!
