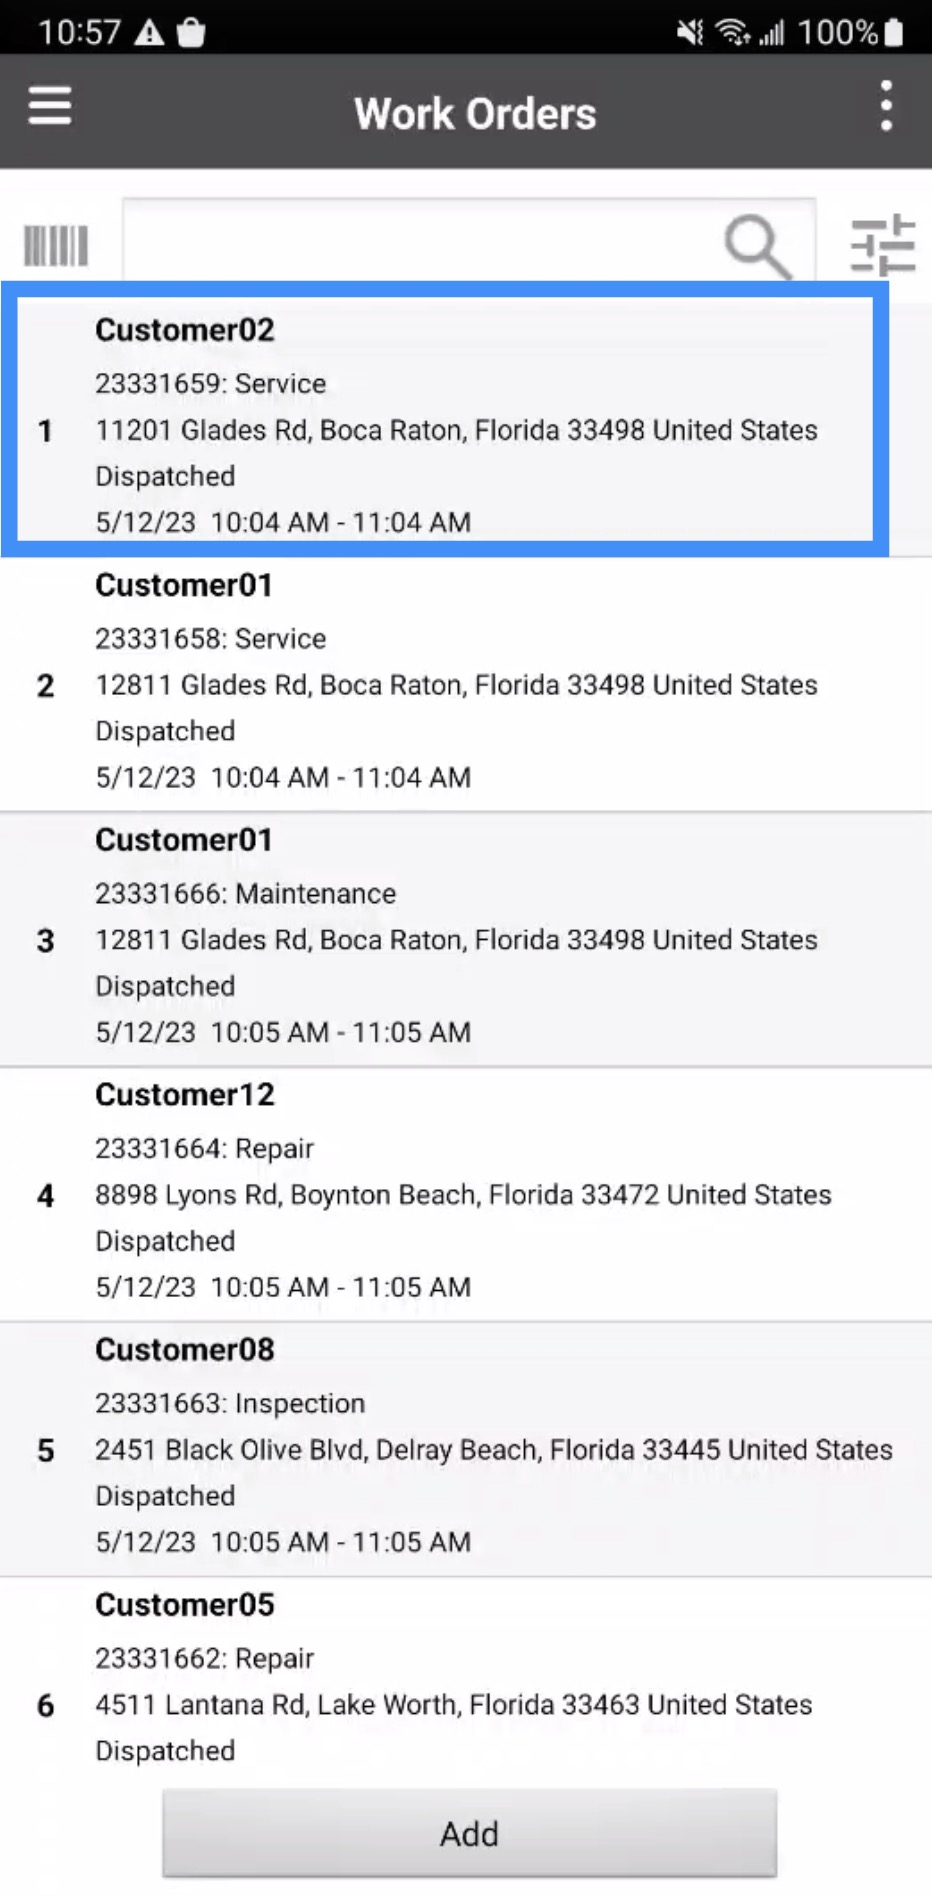
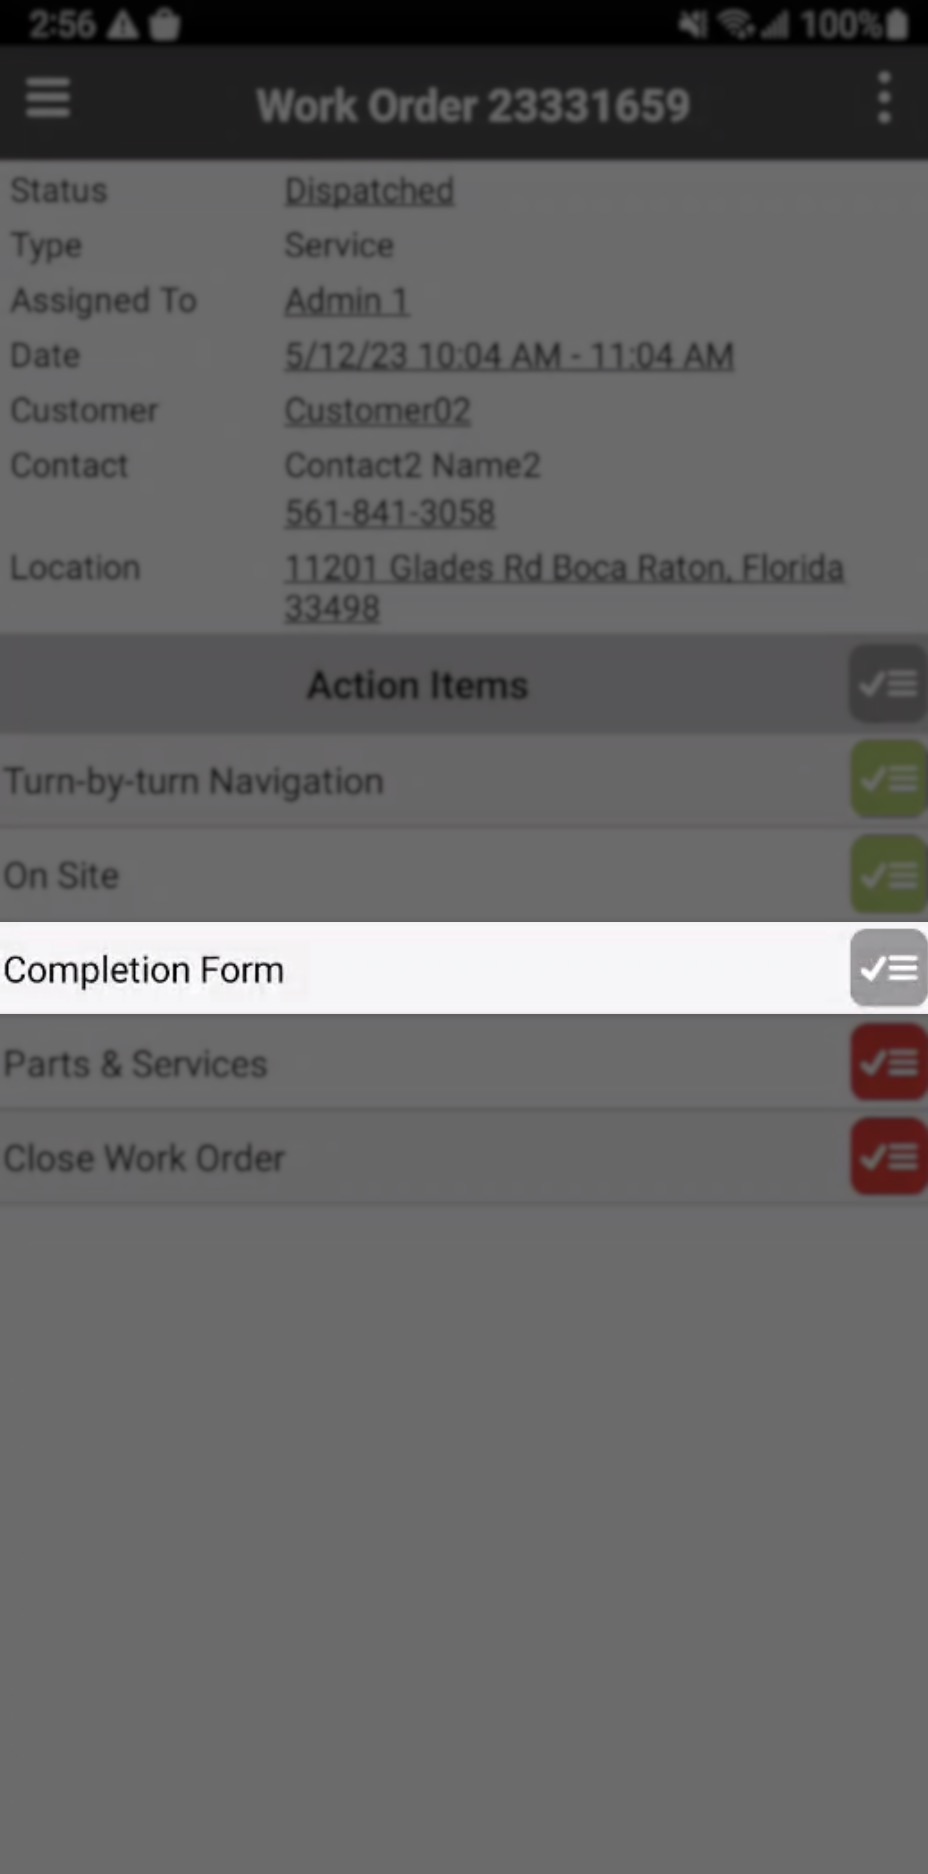
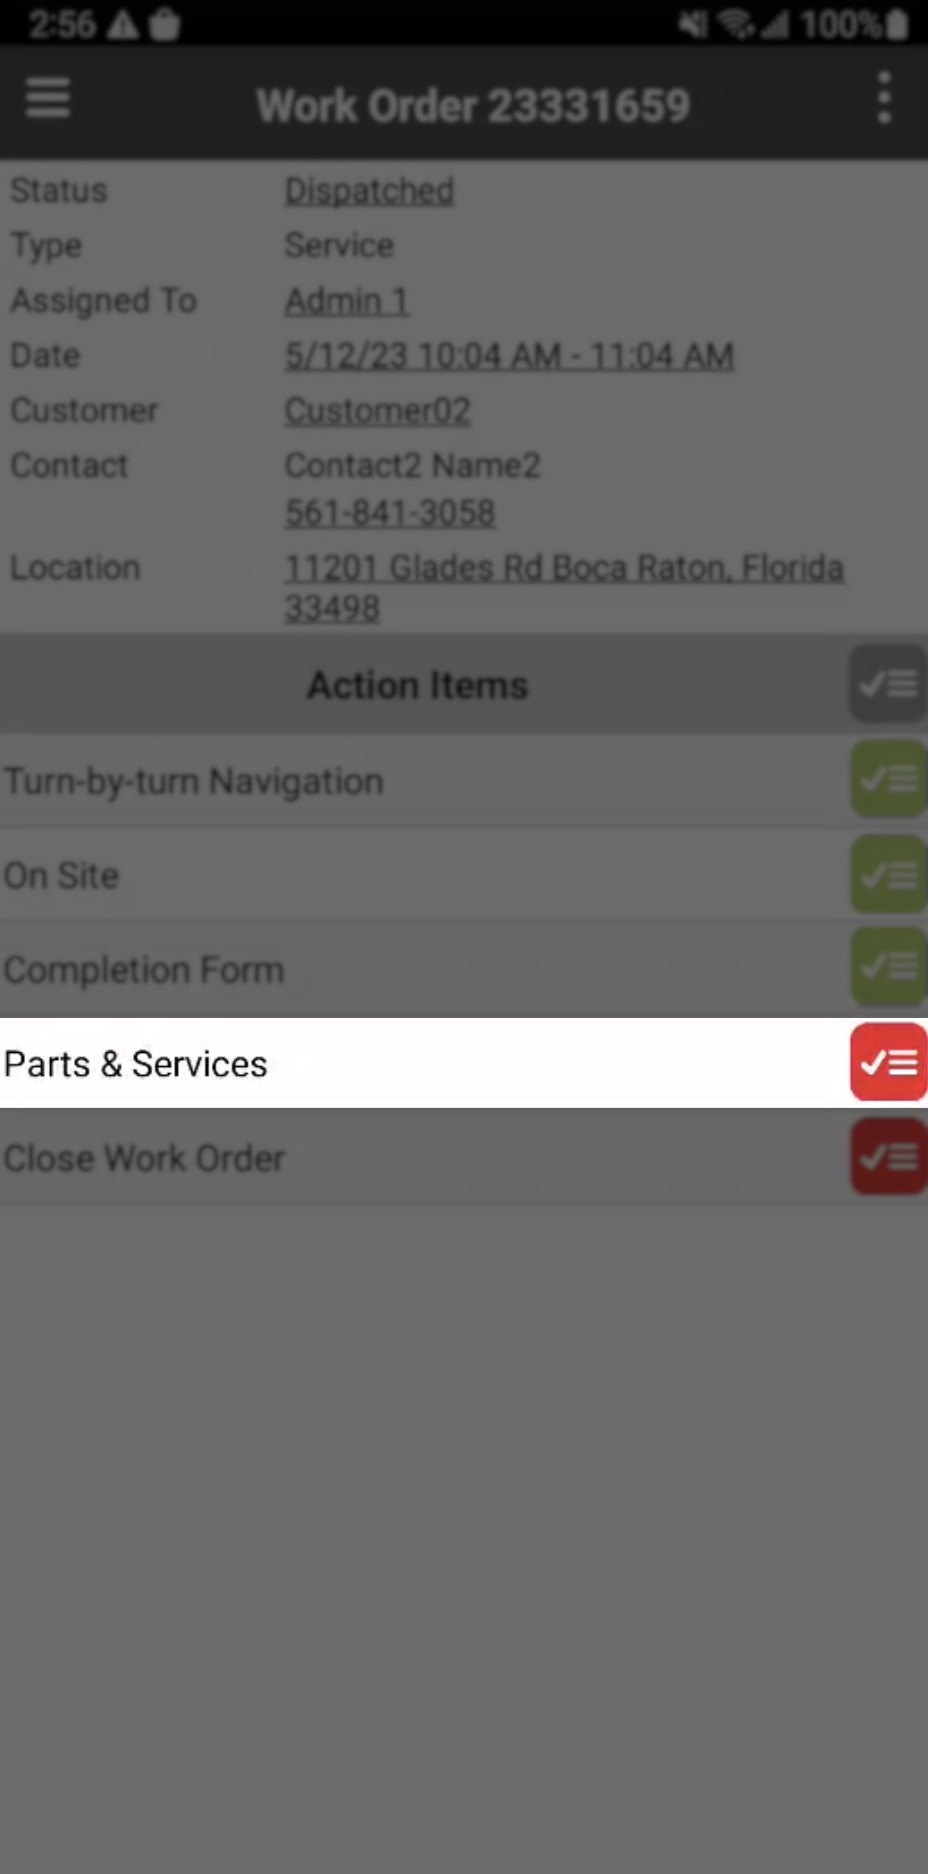
To complete a work order you will first need to access the View Work Order page. From the Work Order feature page, select your desired work order:
Please note that different work order types may have different tasks that need to be done in order to complete the work order. The example below, illustrates a "Repair" work order type.
To see all the different work order types, please see the Work Order Types page for more information. The tasks listed for the "Repair" work order below can be applicable for the "Generic Service," "Maintenance," "Installation," and "Inspection," work order types:

To complete this work order, all the red Action Items must be toggled to green. You can toggle these tasks by pressing directly on the specified Action Item button. You can also toggle the gray Action Items as complete, though these tasks are optional.
Please note that you can add additional Action Items, make specific Action Items required/optional, and more through the MobiWork Work Orders web application. For more information on how to accomplish this please see the Action Items Tab page.
The example below will show the default Action Items of a "Repair" work order.
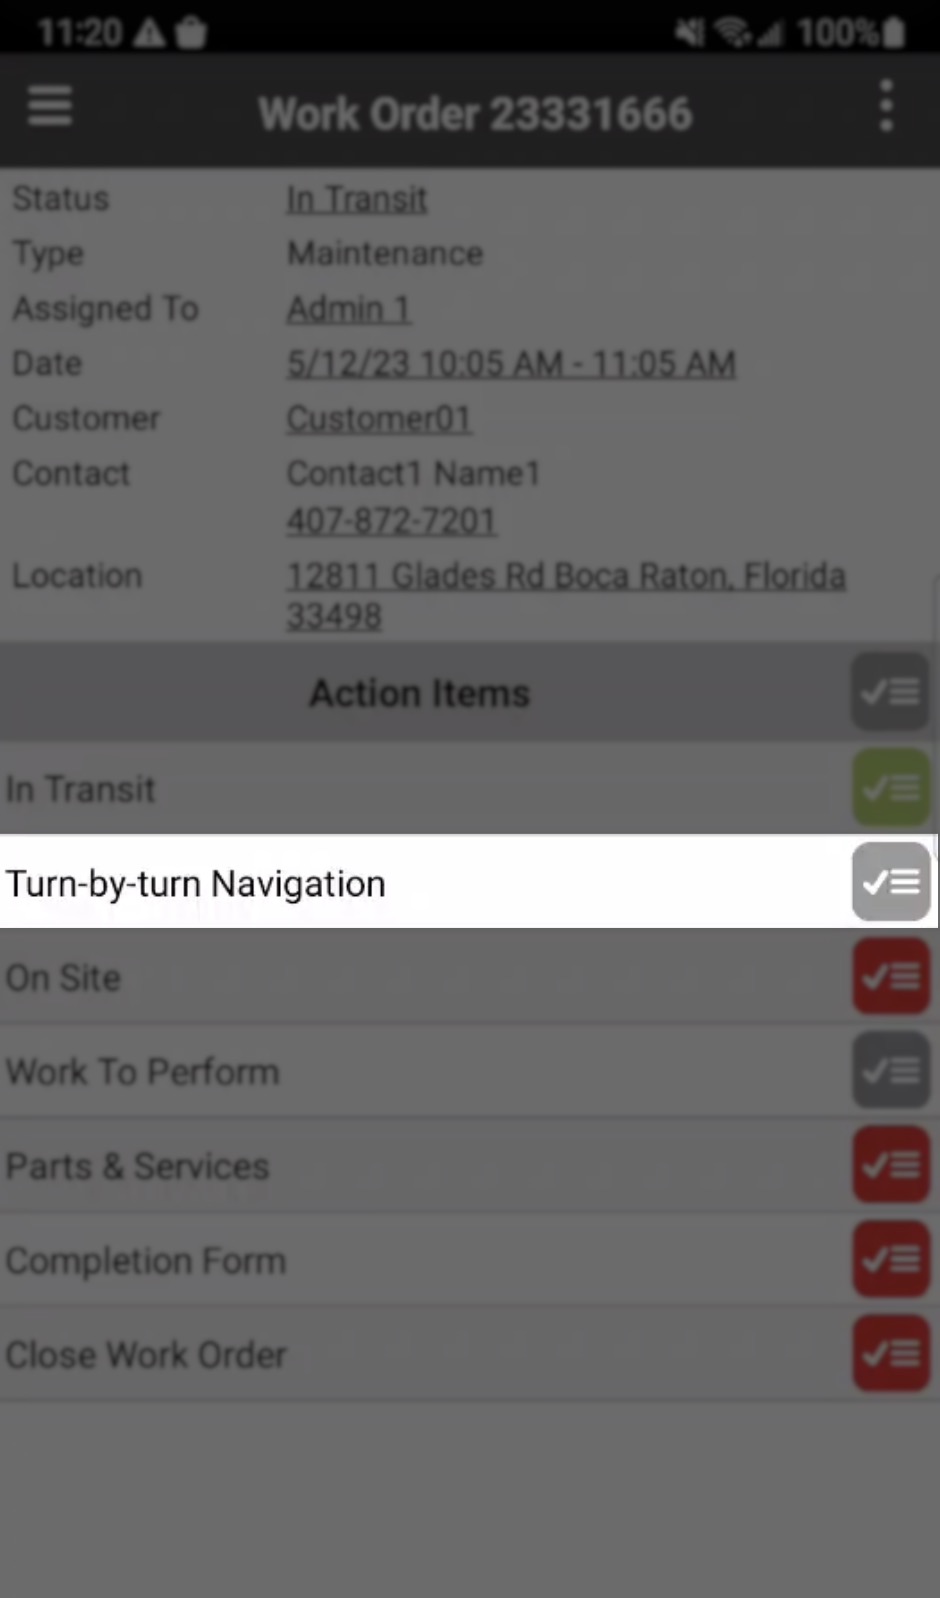
STEP 1: Arriving to the Job Site
The first Action Item to complete is to indicate if you are in transit to the job site. Once you are on your way, you can toggle this Action Item as green:
As you are navigating to the job site, you can activate the turn-by-turn navigation to assistance. If you do not require assistance, you can skip this step:
Once you arrive at the job site, you can toggle the "On Site" Action Item as green:
![]()

STEP 2: Performing the Job
Once you arrive on the job site, you can use the optional "Work to Perform" option to take pictures of the work or obtain the customer's signature before starting:
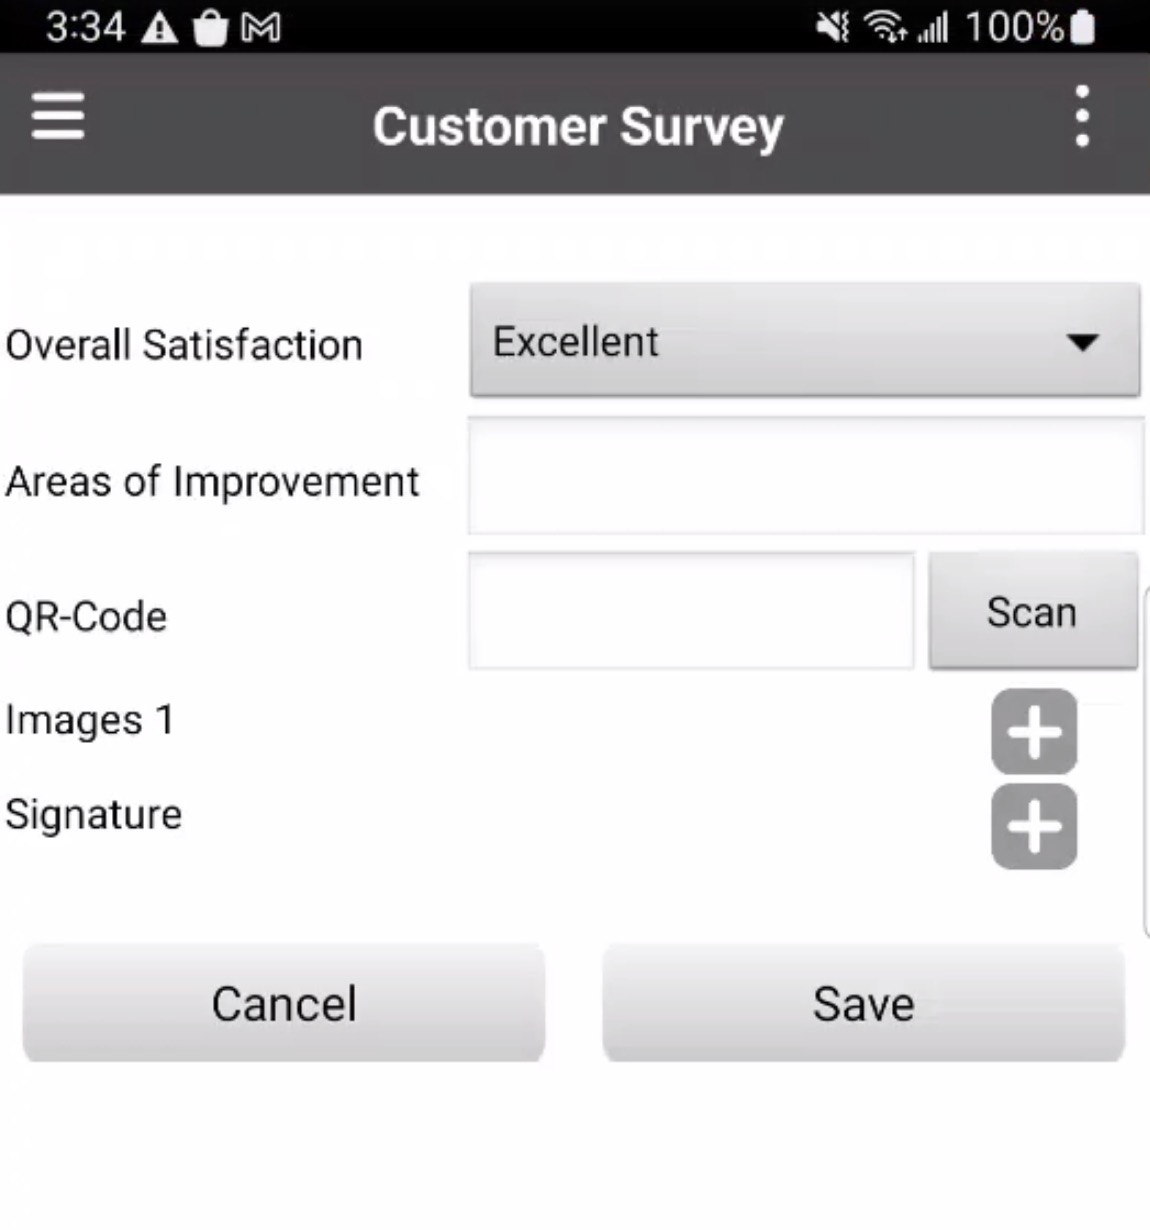
The "Completion Form" is for once you are done with the work order; you can take another photo of the completed job and the customer's signature:

-
Please note that the image below is applicable for both the "Work to Perform" option and the "Completion Form" tasks:

-
Input any comments in the designated field; if you would like to add a picture or signature press the Plus Sign button. Once you are satisfied with the information provided, press the Save button.
Please note that you will be able to view the forms (including any signatures, pictures, etc. associated with the form) through the Forms feature in the Actions Panel of the selected work order.
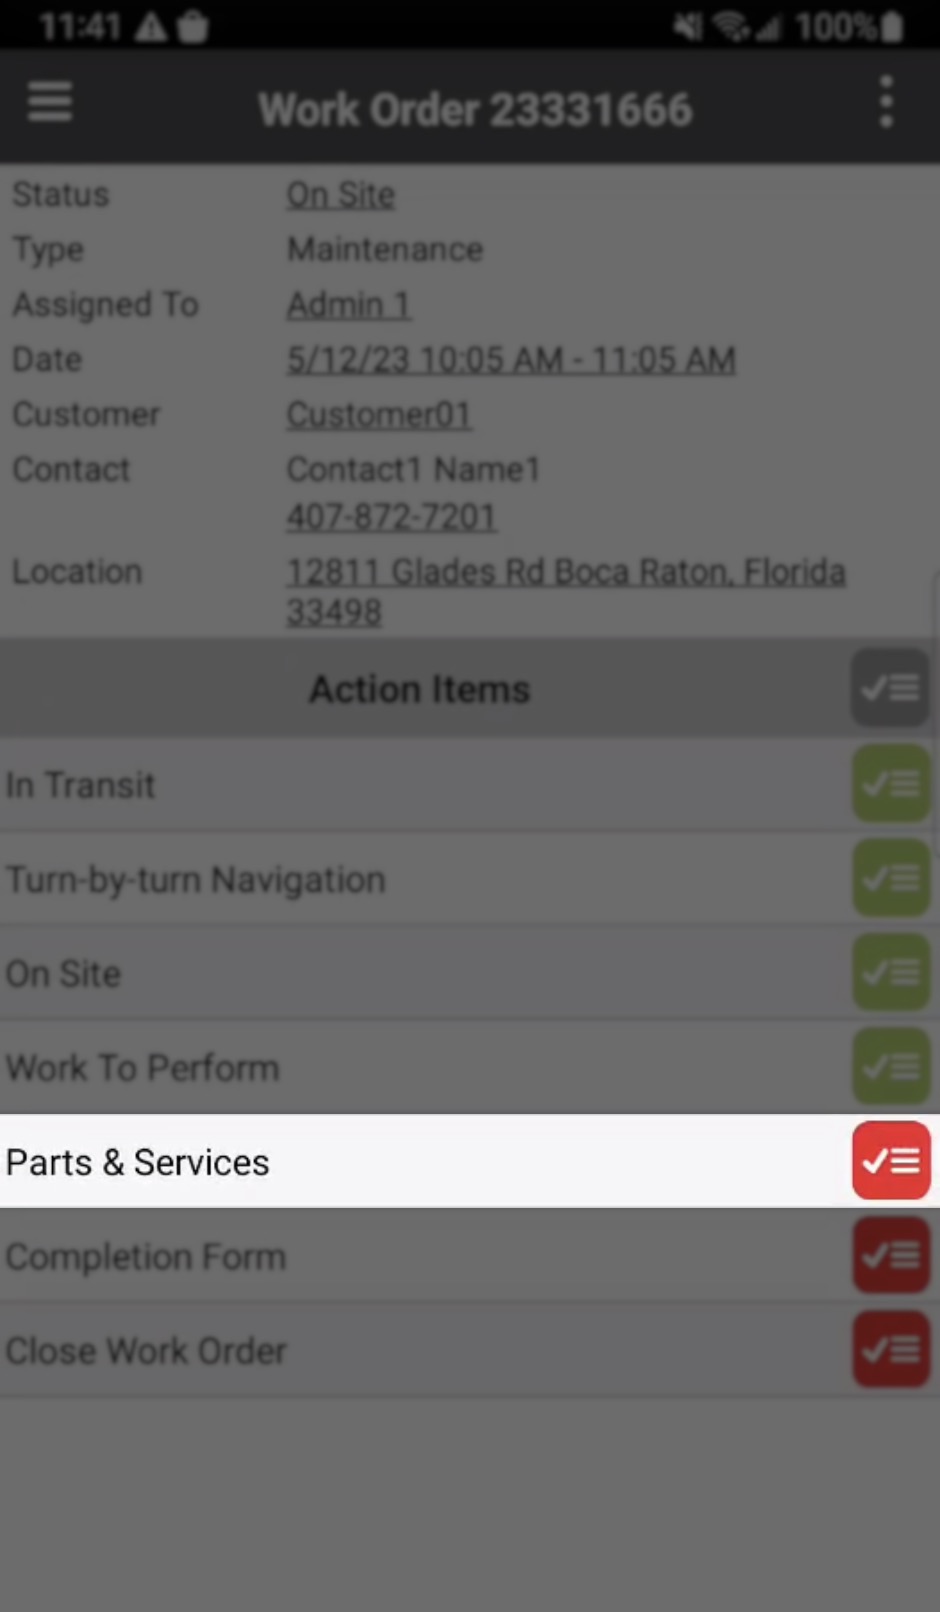
STEP 3: Adding Parts & Services
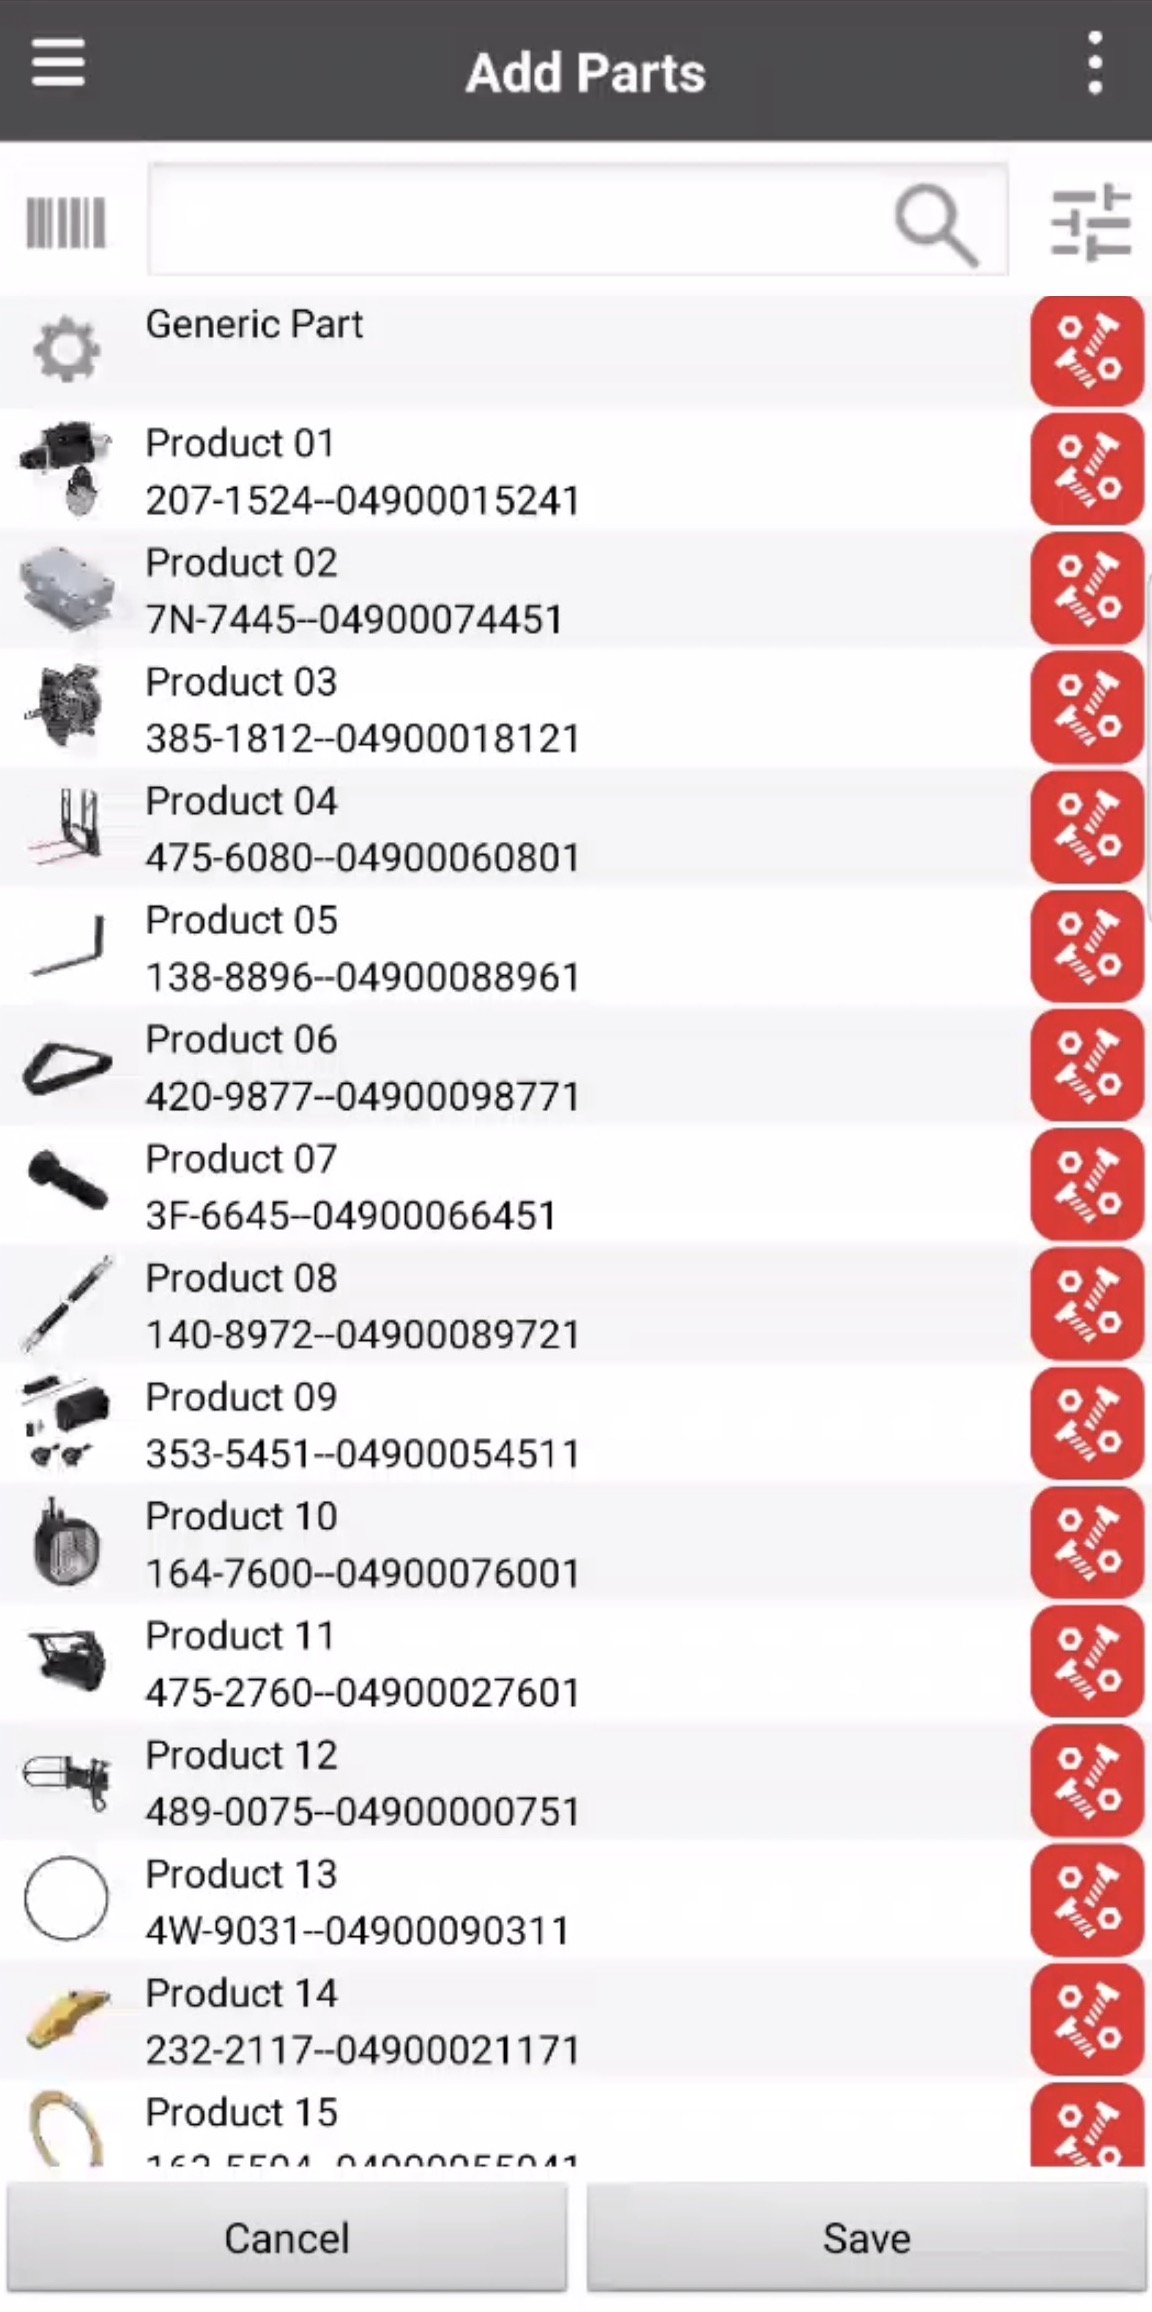
Once the "Work to Perform" option has been toggled to green, it is time to add the parts and services that were used to complete the work order. It is through this action, that you will be able generate an invoice associated with the work order:
This will redirect you to the Parts & Services page where you can add the desired parts and services that were used in the work order, order missing parts, and more. Once you are done adding all the parts and services, you can then generate the invoice:

-
If you would like more information about Parts & Services in the mobile device please see the Add an Invoice page.
Please note that different work order types may have different tasks that need to be done in order to complete the work order. The example below, illustrates a "Sales" work order type.
To see all the different work order types, please see the Work Order Types page for more information. The tasks listed for the "Sales" work order below are only applicable for a "Sales" work order:

To complete this work order, all the red Action Items must be toggled to green. You can toggle these tasks by pressing directly on the specified Action Item button. You can also toggle the gray Action Items as complete, though these tasks are optional.
Please note that you can add additional Action Items, make specific Action Items required/optional, and more through the MobiWork Work Orders web application. For more information on how to accomplish this please see the Action Items Tab page.
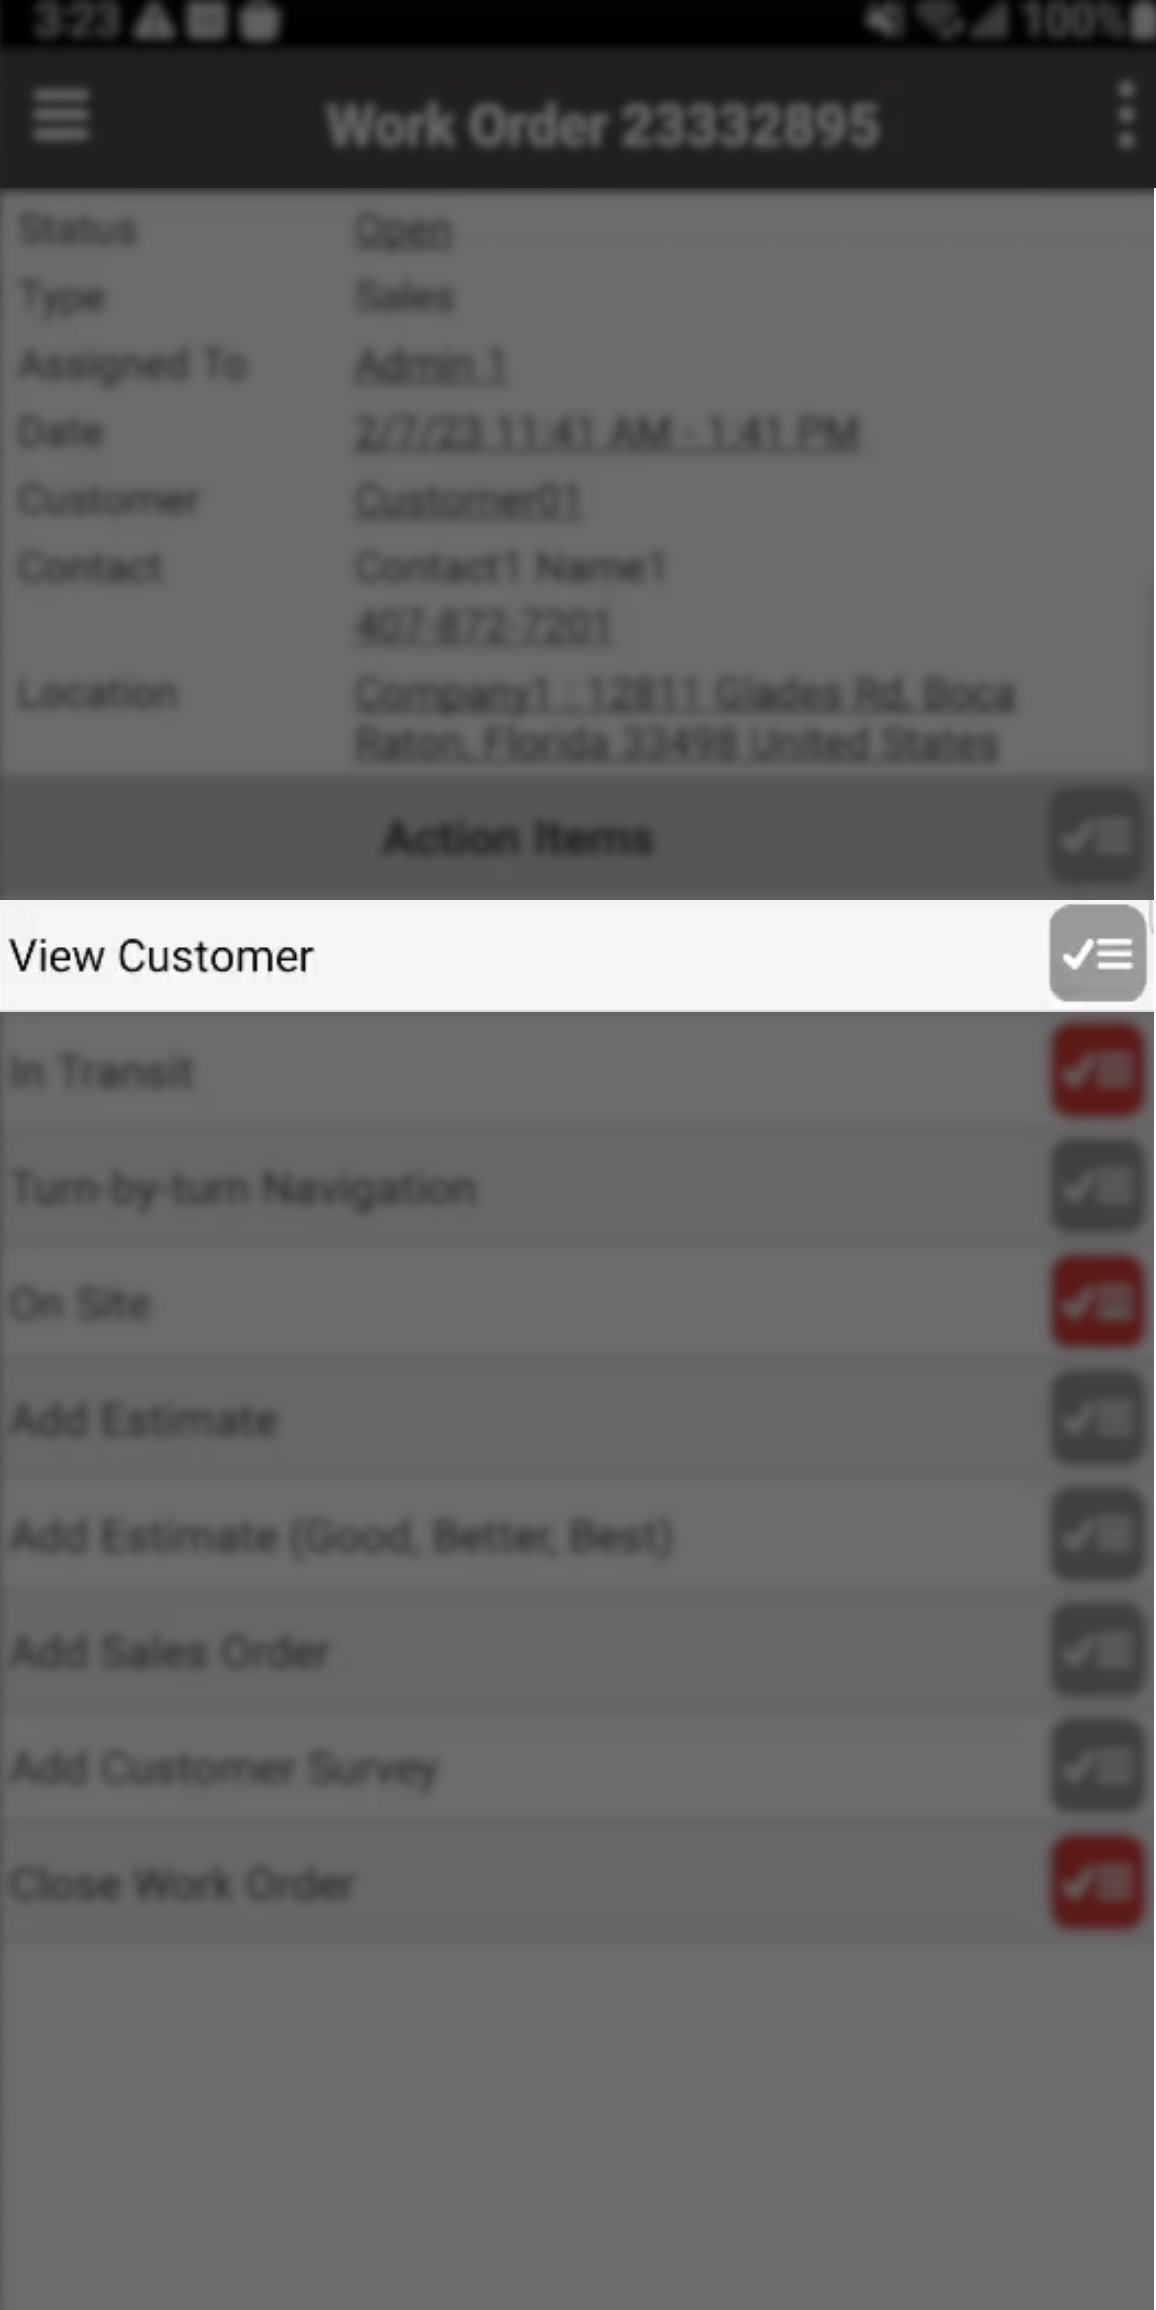
STEP 1: View Customer
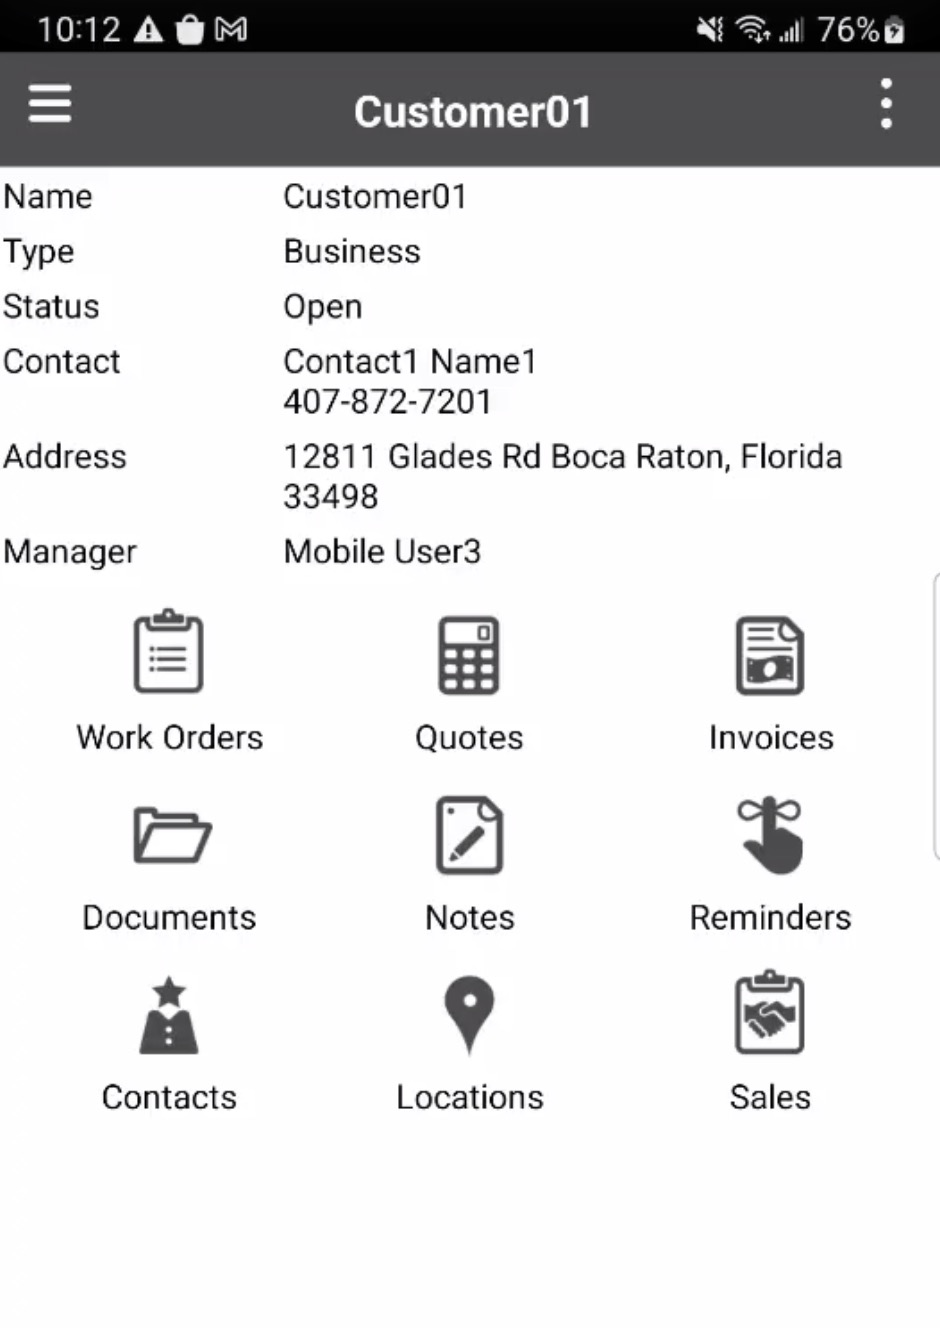
Before arriving to the job location, you can view the customer profile:
- By pressing the "View Customer" option, you will be able redirected to the customer page where all the customer data will be displayed:
STEP 2: Arriving to the Job Site
The next Action Item is to indicate if you are in transit to the job site. Once you are on your way, you can toggle this Action Item as green:
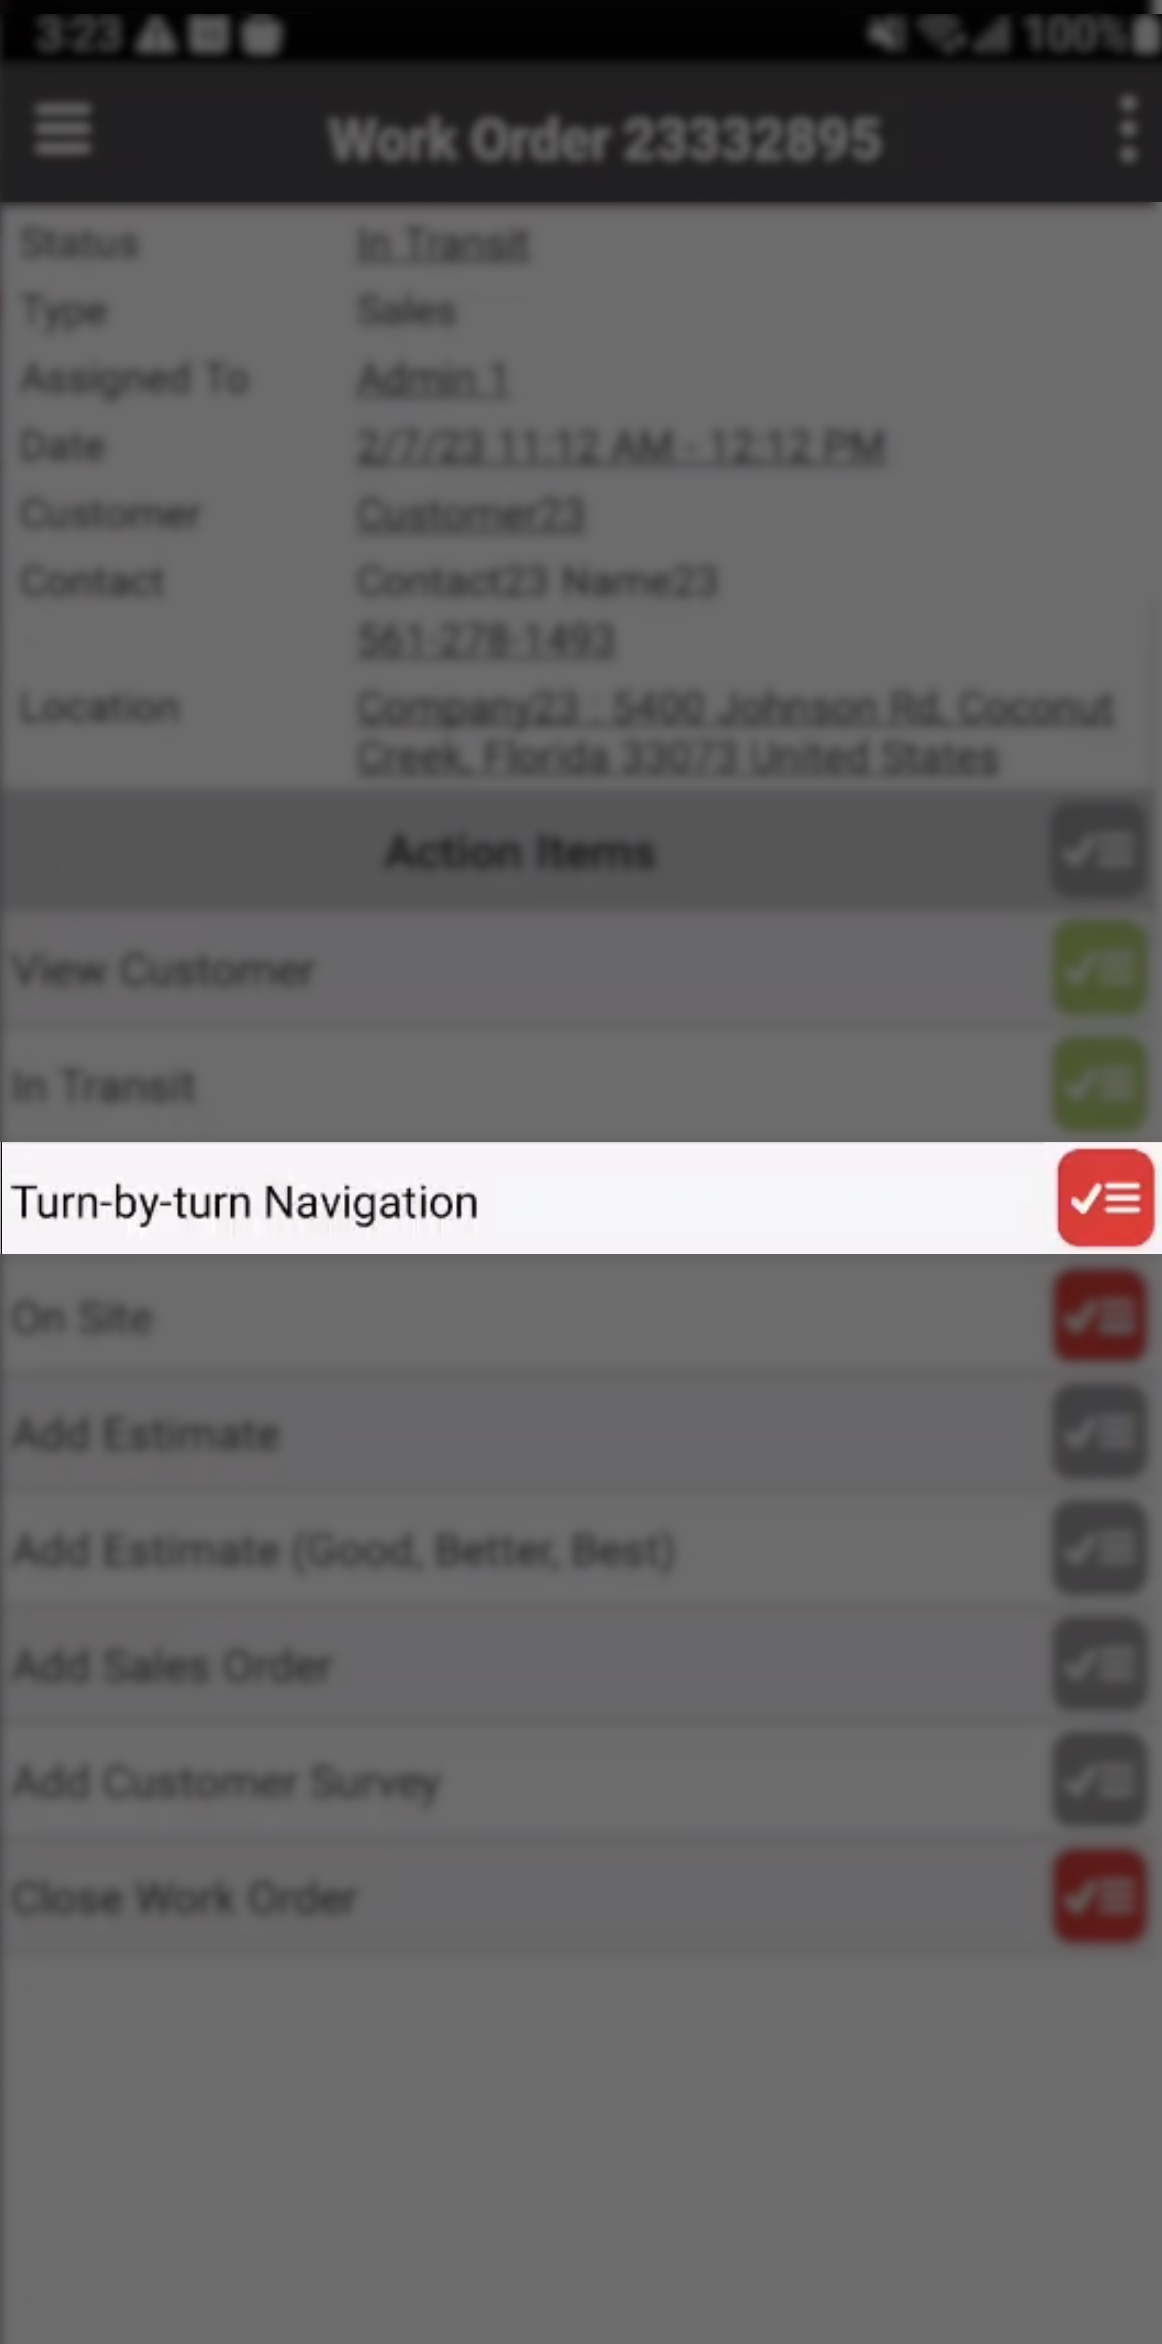
As you are navigating to the job site, you can activate the turn-by-turn navigation to assistance. If you do not require assistance, you can skip this step:
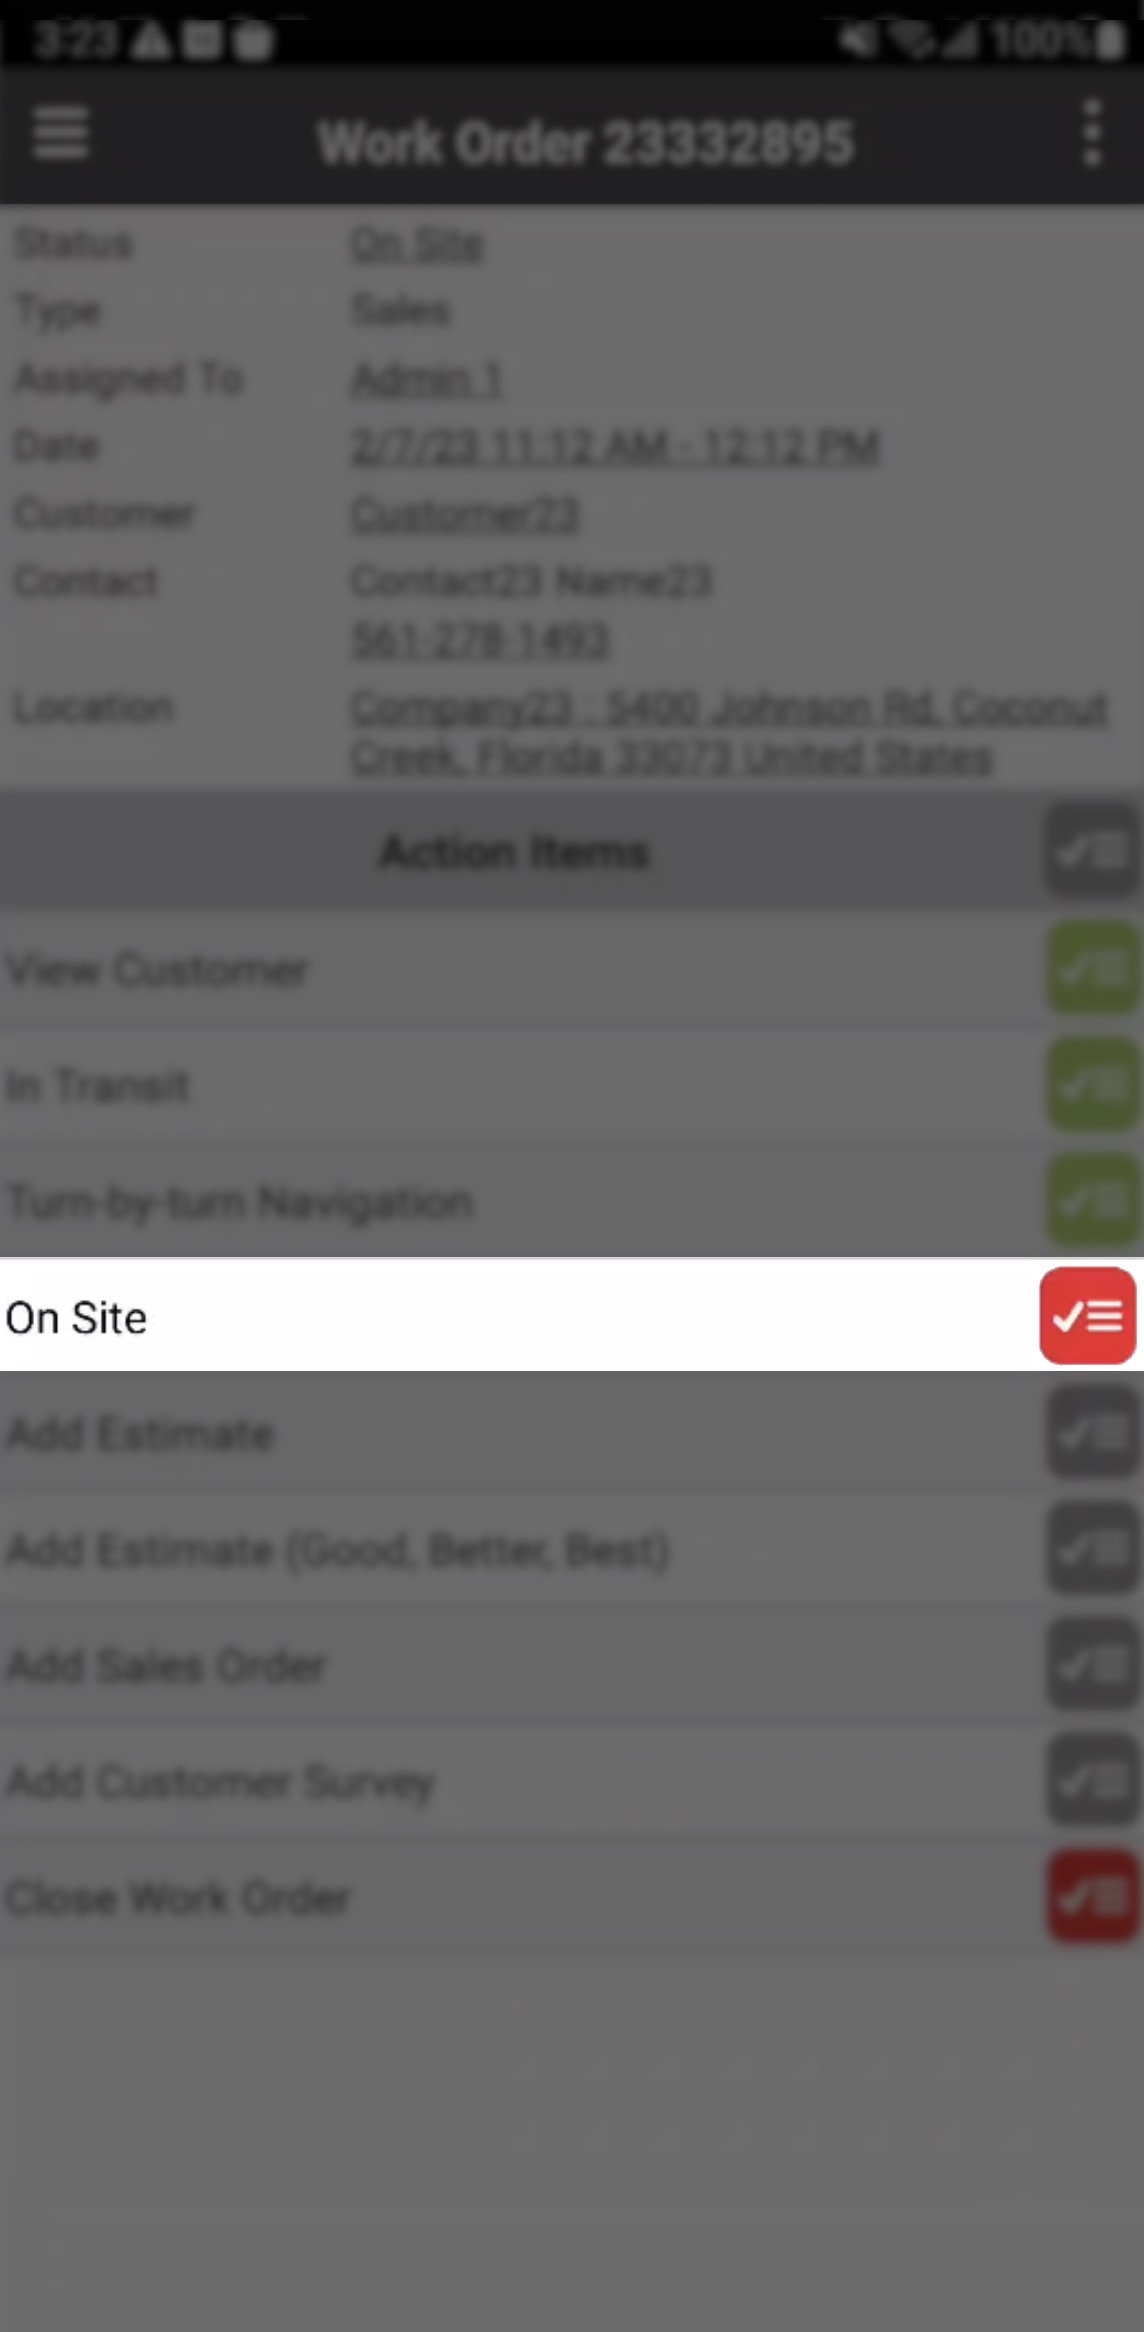
Once you arrive at the job site, you can toggle the "On Site" Action Item as green:
![]()
STEP 3: Adding Quotes
- With the "Sales" Work Order type, you will be able to create estimates related to the customer. There are two different estimates that can be created for a "Sales" Work Order type, they are the "Add Estimate" and "Add Estimate (Good, Better, Best)":

Add Estimate
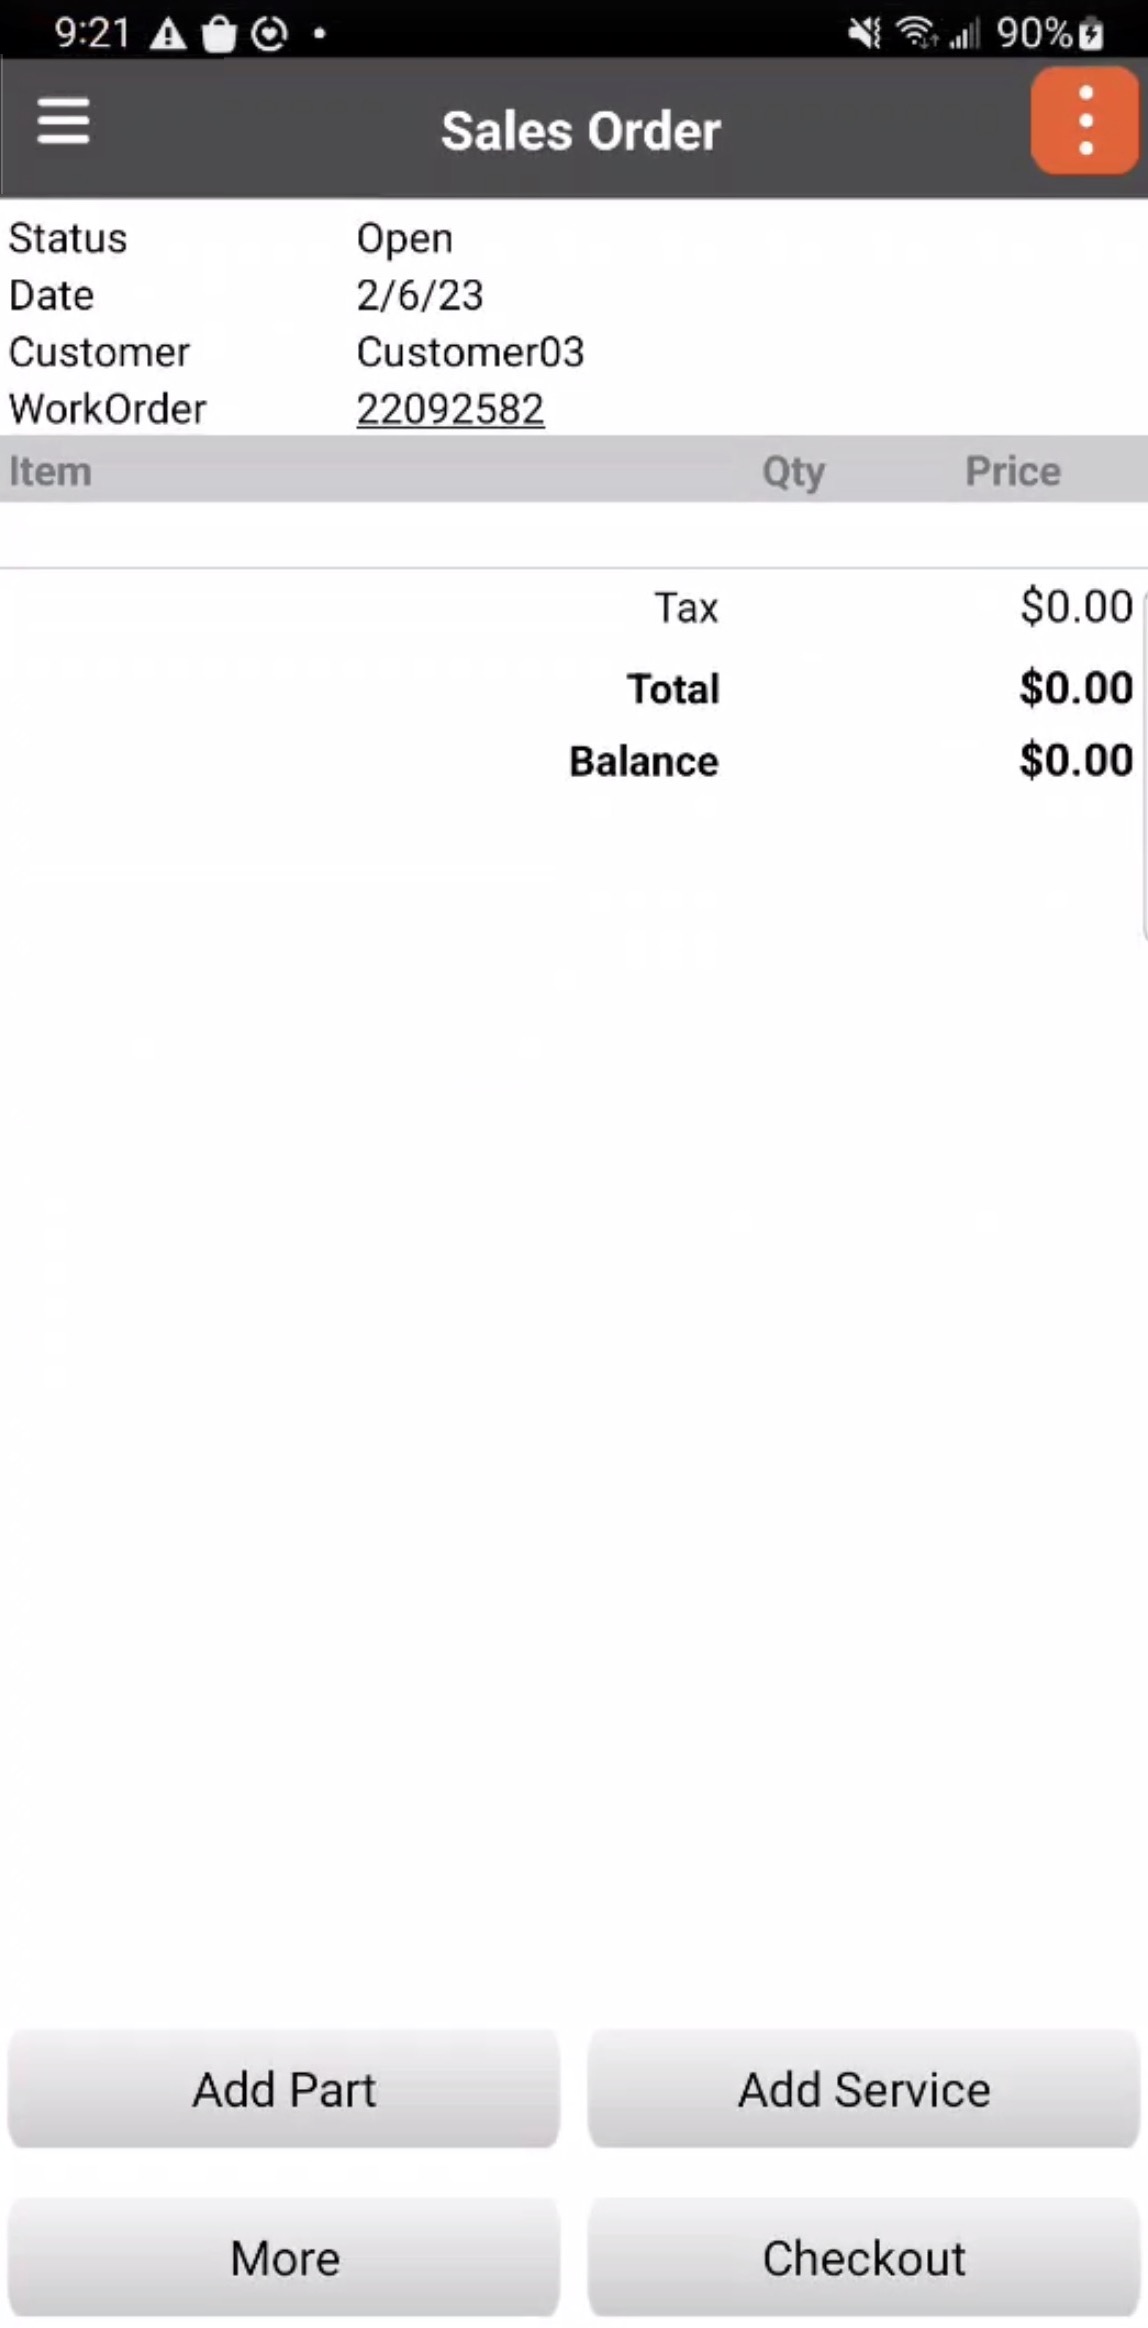
You can also add quotes associated with the work order:

To populate the quote, you should use the Add Part and Add Service buttons. Once the quote is ready, you can press the Checkout button to finalize it and add it to the work order:

Please note that quote templates can be added through the MobiWork web application for quotes. For more information about quote templates, please see the Quote Templates page. For more information about quotes on the mobile device, please see the Quotes page.
Add Estimate (Good, Better, Best)
This estimate type will allow your customer to compare different quote options, ranging from good to best:

When pressing on the "Add Estimate (Good, Better, Best)" you will have the ability to add additional quotes for each category (i.e., a quote for Good, a quote for Better, and a quote for Best).
After selecting the category, the process of adding an estimate through the "Add Estimate (Good, Better, Best)" is the same when you when you add an estimate through the "Add Estimate" feature.
Once you are done adding a quote for each category, you can convert them all into a PDF document.
STEP 4: Adding Sales Order
With the "Sales" Work Order type, you will be able to create sales orders related to the customer:

You can add a sales order to the work order on behalf of a customer. To populate the sales order, you should use the Add Part and Add Service buttons.
Once the sales order is ready, you can press the Checkout button to finalize it and add it to the work order:
For more information about sales orders, please see the Sales Orders page.
STEP 5: Customer Survey
By pressing on the "Add Customer Survey" action, you will be able to add a customer survey form to the work order:
This button will redirect you to the "Customer Survey" form where the customer can input their impression of the work order:
Please note that different work order types may have different tasks that need to be done in order to complete the work order. The example below, illustrates a "Service" work order type.
online-help.platform.fon.mobile_work_orders_complete_main_tasks_service.paragraph1

To complete this work order, all the red Action Items must be toggled to green. You can toggle these tasks by pressing directly on the specified Action Item button. You can also toggle the gray Action Items as complete, though these tasks are optional.
Please note that you can add additional Action Items, make specific Action Items required/optional, and more through the MobiWork Work Orders web application. For more information on how to accomplish this please see the Action Items Tab page.
The example below will show the default Action Items of a "Repair" work order.
STEP 1: Arriving to the Job Site
As you are navigating to the job site, you can activate the turn-by-turn navigation to assistance. If you do not require assistance, you can skip this step:
Once you arrive at the job site, you can toggle the "On Site" Action Item as green:


STEP 2: Performing the Job
The "Completion Form" is for once you are done with the work order; you can take another photo of the completed job and the customer's signature:
-
Input any comments in the designated field; if you would like to add a picture or signature press the Plus Sign button. Once you are satisfied with the information provided, press the Save button.
Please note that you will be able to view the forms (including any signatures, pictures, etc. associated with the form) through the Forms feature in the Actions Panel of the selected work order.
STEP 3: Adding Parts & Services
Once the "Work to Perform" option has been toggled to green, it is time to add the parts and services that were used to complete the work order. It is through this action, that you will be able generate an invoice associated with the work order:
This will redirect you to the Parts & Services page where you can add the desired parts and services that were used in the work order, order missing parts, and more. Once you are done adding all the parts and services, you can then generate the invoice:
-
If you would like more information about Parts & Services in the mobile device please see the Add an Invoice page.
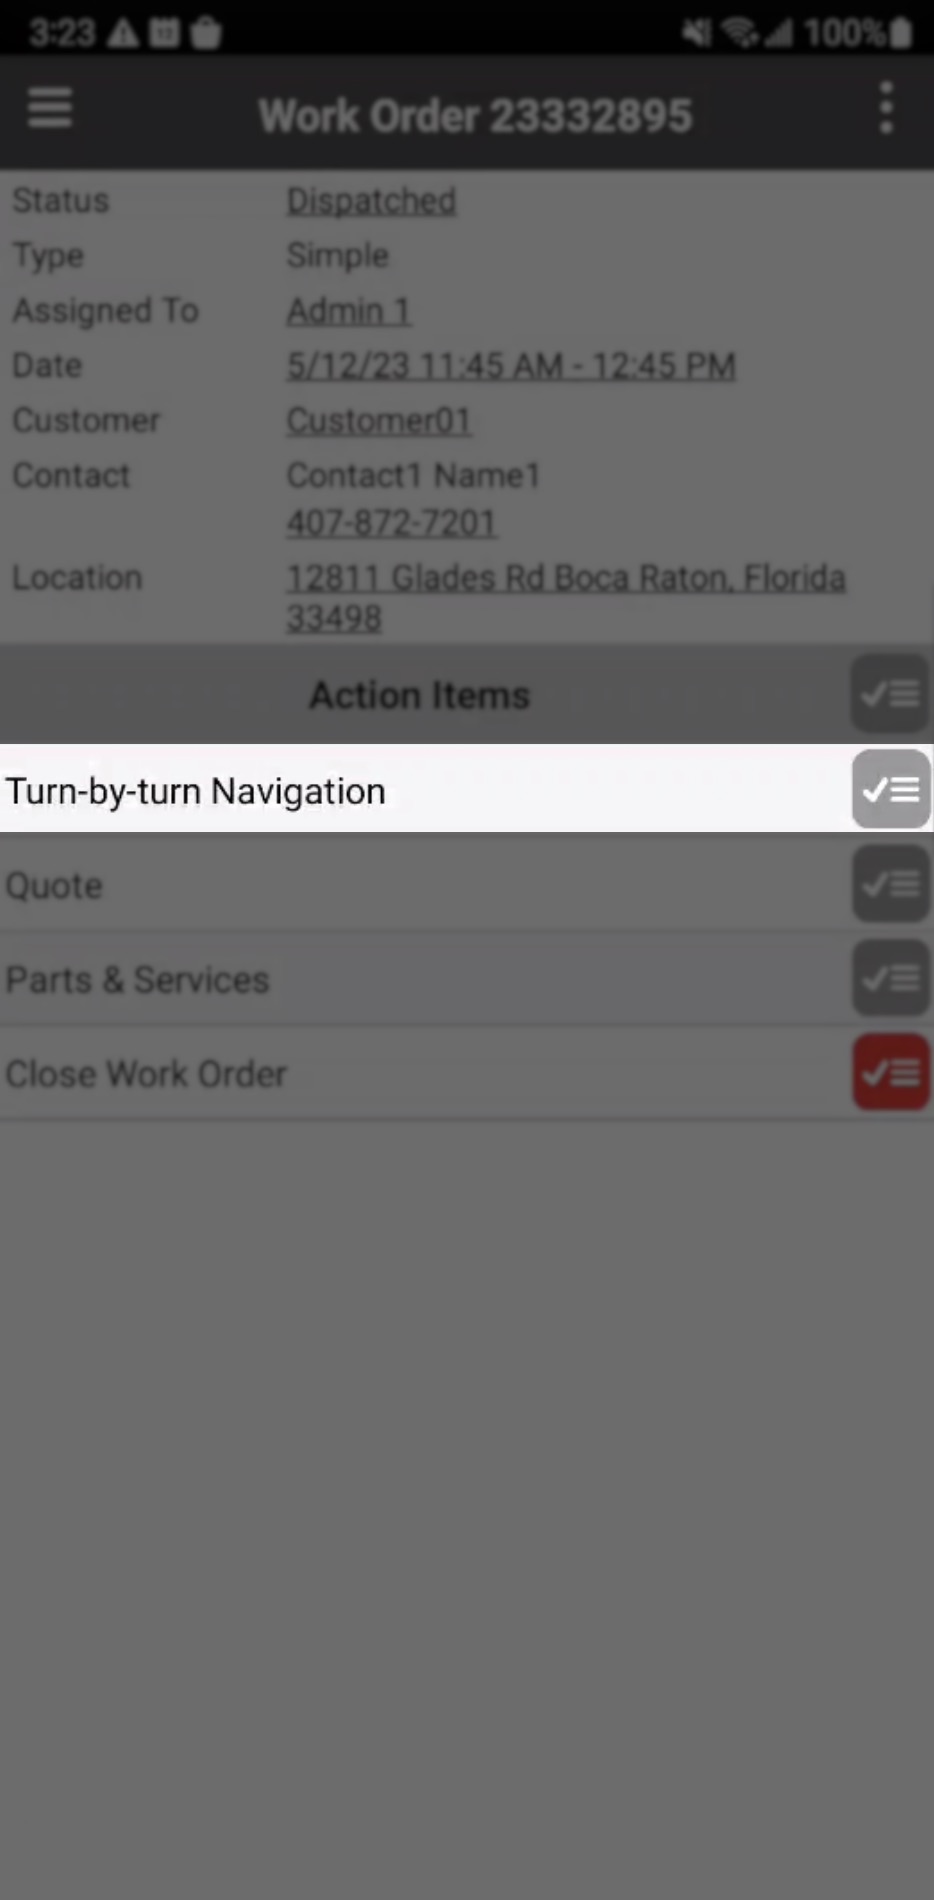
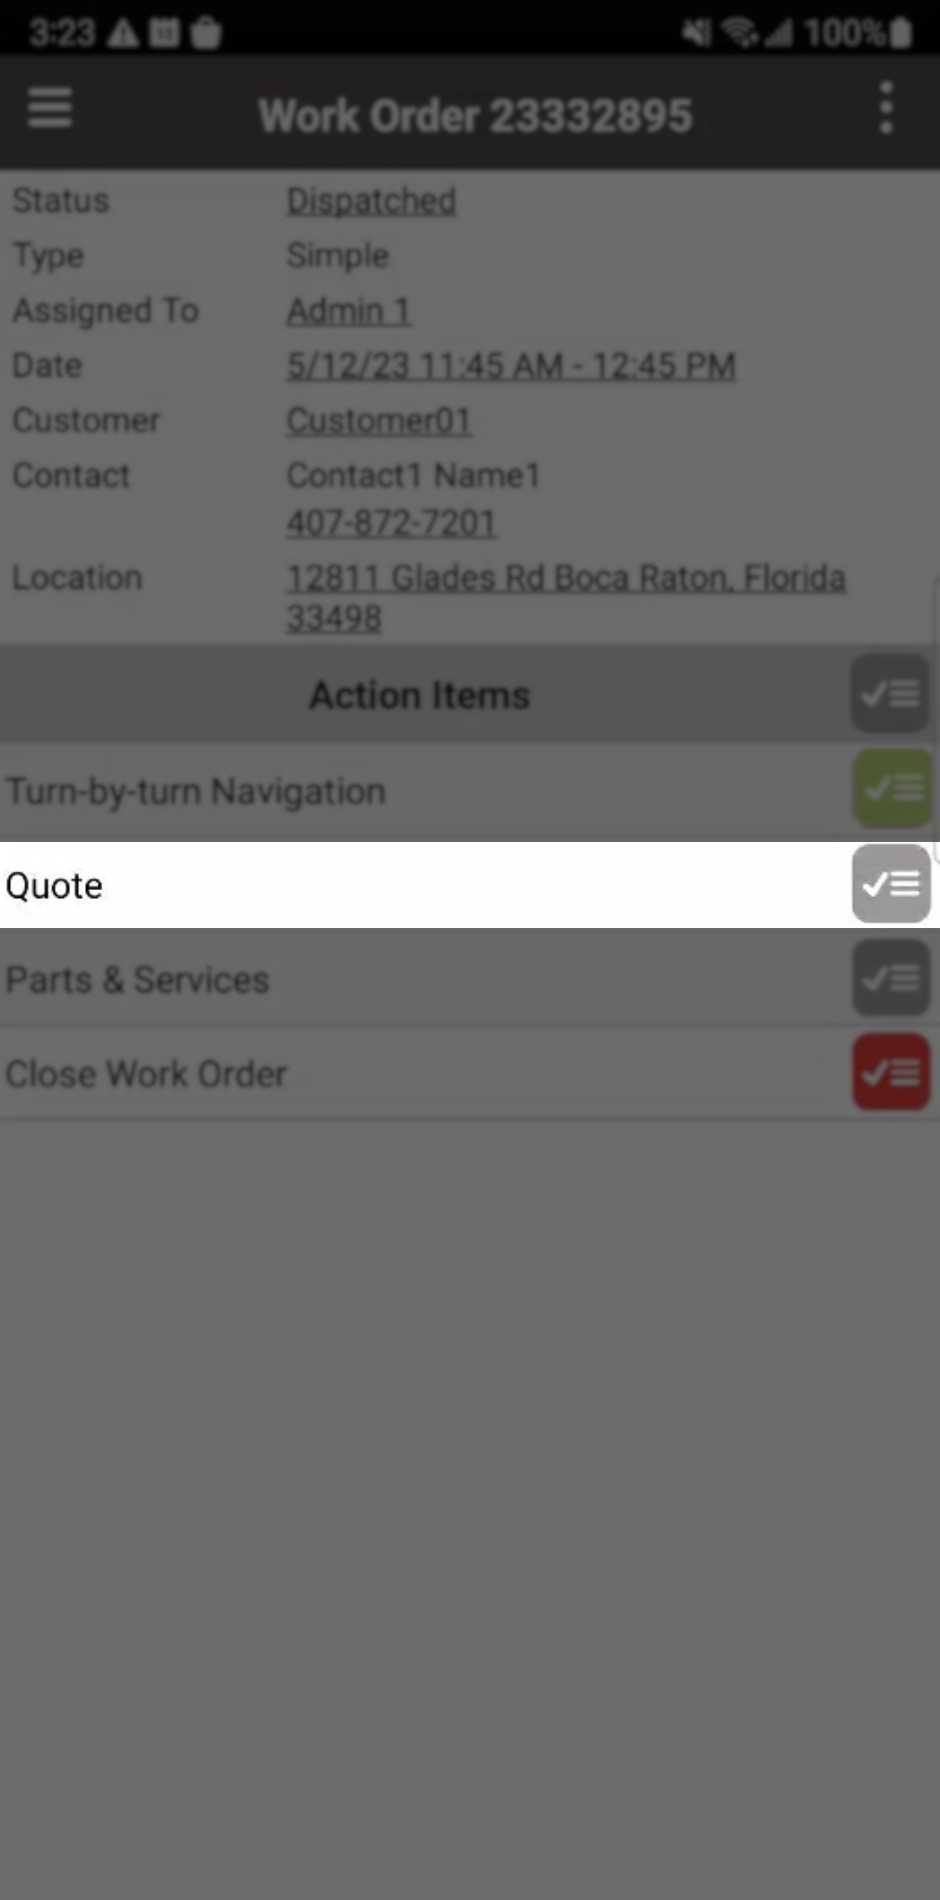
Please note that different work order types may have different tasks that need to be done in order to complete the work order. The example below, illustrates a "Simple" work order type.
To see all the different work order types, please see the Work Order Types page for more information. The tasks listed below are for the "Simple" work order:

To complete this work order, all the red Action Items must be toggled to green. You can toggle these tasks by pressing directly on the specified Action Item button. You can also toggle the gray Action Items as complete, though these tasks are optional.
Please note that you can add additional Action Items, make specific Action Items required/optional, and more through the MobiWork Work Orders web application. For more information on how to accomplish this please see the Action Items Tab page.
The example below will show the default Action Items of a "Simple" work order.
STEP 1: Arriving to the Job Site
As you are navigating to the job site, you can activate the turn-by-turn navigation to assistance. If you do not require assistance, you can skip this step:
STEP 2: Adding Quotes
You can also add quotes associated with the work order:
Please note that quote templates can be added through the MobiWork web application for quotes. For more information about quote templates, please see the Quote Templates page. For more information about quotes on the mobile device, please see the Quotes page.
STEP 3: Adding Parts & Services
Once you are ready, it is time to add the parts and services that were used to complete the work order. It is through this action, that you will be able generate an invoice associated with the work order:
This will redirect you to the Parts & Services page where you can add the desired parts and services that were used in the work order, order missing parts, and more. Once you are done adding all the parts and services, you can then generate the invoice:

-
If you would like more information about Parts & Services in the mobile device please see the Add an Invoice page.
If you would like to add additional tasks to the work order, you will be able to do so with the Secondary Action Items. These action items will allow you to request missing parts, add expenses, add sales orders, and more:

For more information on how to access the Secondary Action Items, please see the View Work Order on Device page; once you are on this page, you will be able to toggle the desired Action Items. The following subsections will further outline the different actions that can be utilized for the work order.
Need Follow Up
The "Need Follow Up" option will allow you to indicate if the work order will need to be followed up in the future:

Request Missing Parts
The "Request Missing Parts" option will allow you to indicate which items are needed to complete the work order; the admin would then need to create a purchase order in order to obtain these selected items. To indicate which parts are missing and are required toggle the red Item icon and once you are satisfied, press the Save button:
If you would like more information regarding how to request missing parts and the catalog screen, please see the Add an Invoice page.
Order Missing Parts (PO)
To fulfill the requested missing parts from the work order, the admin can generate a purchase order (PO) to officially order the items. From this page input the description, status, vendor, and how/where the item will be shipped:
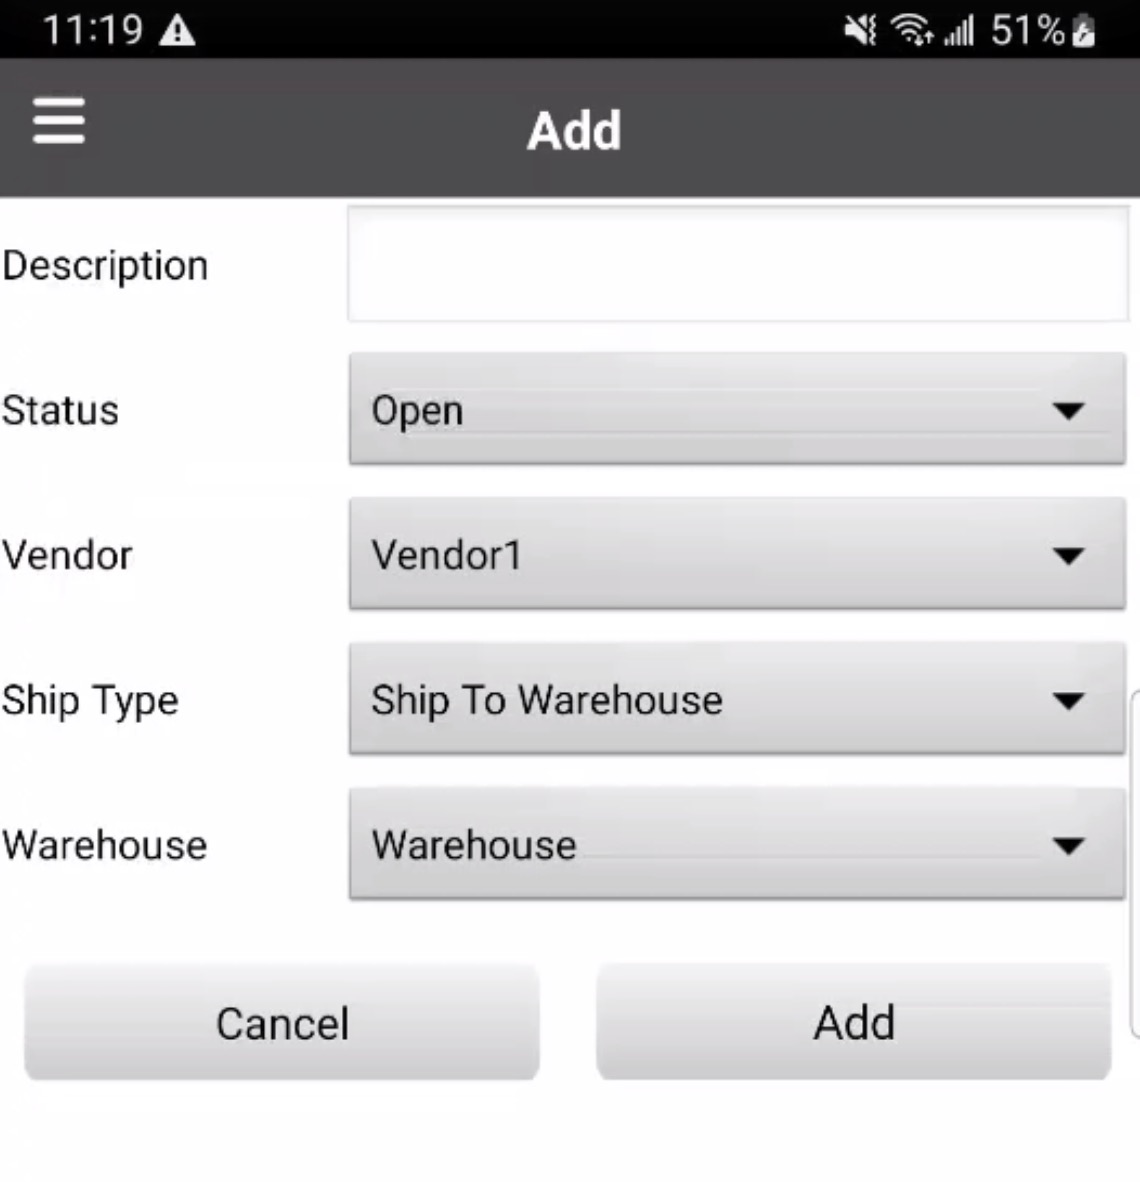
You will then be redirected to the Purchase Order page, where you can add the specified items with the Add Part button, or press the Checkout button when you are done adding products to the Order Missing Parts submission:

If you would like more information regarding how to submit a purchase order for missing parts, please see the Add an Invoice page.
Add Expense
You can add expenses related to costs incurred during the completion of the work order (e.g., gas for travel between jobs):

Once added, you will be able to view all the documented expenses in the Expenses feature of your mobile device. For more information about expenses, please see the Expenses page.
Add Quote
You can also add quotes associated with the work order:
To populate the quote, you should use the Add Part and Add Service buttons. Once the quote is ready, you can press the Checkout button to finalize it and add it to the work order:
Please note that quote templates can be added through the MobiWork web application for quotes. For more information about quote templates, please see the Quote Templates page. For more information about quotes on the mobile device, please see the Quotes page.
Add Sales Order
You can add a sales order to the work order on behalf of a customer. To populate the sales order, you should use the Add Part and Add Service buttons.
Once the sales order is ready, you can press the Checkout button to finalize it and add it to the work order:
For more information about sales orders, please see the Sales Orders page.
Update Time Tracking
By selecting the "Update Time Tracking," you will be able to view and update the time spent completing different tasks for the work order:

You can choose to start the time tracking, stop the time tracking, or even retroactively adjust the hours worked on a task through the Add button.
Please note that when adjusting the time tracking from the Time Tracking page, you will only be able to view your time tracking. For more information about time tracking, please see the Time Tracking Device Layout page.
Update Crew Time Tracking
The "Update Crew Time Tracking" feature, will allow the admin in charge of the work order to view and update the time spent on the work order for various users:
![]()
You can choose to start the time tracking, stop the time tracking, or even retroactively adjust the hours worked on a task through the Add button. This action will apply for all the users associated with the work order.
Please note from the Update Crew Time Tracking page, you will be able to view all your users. For more information about time tracking, please see the Time Tracking Device Layout page.
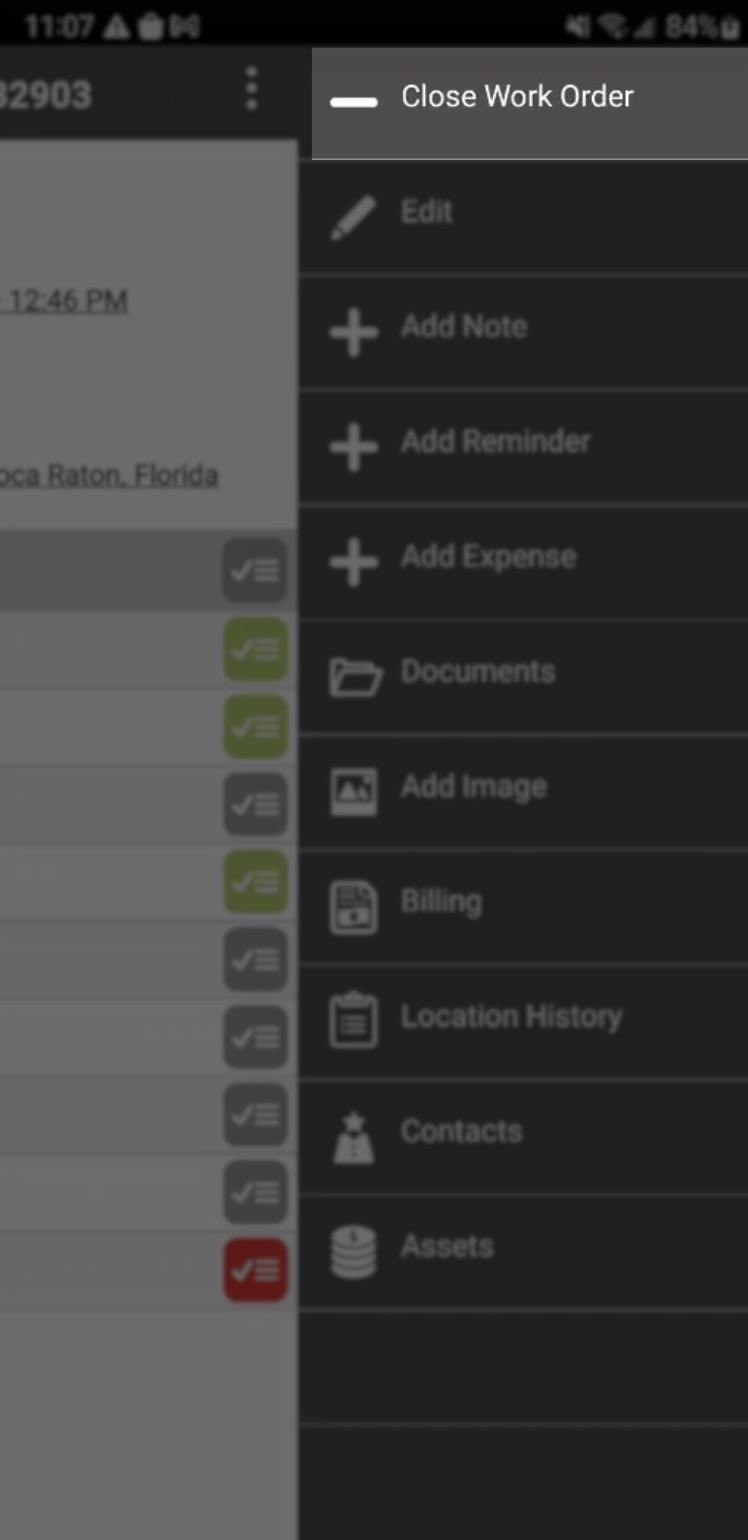
On the View Work Order page, you will be able to access the Actions Panel. With these actions, you will be able to access more features while completing the work order:
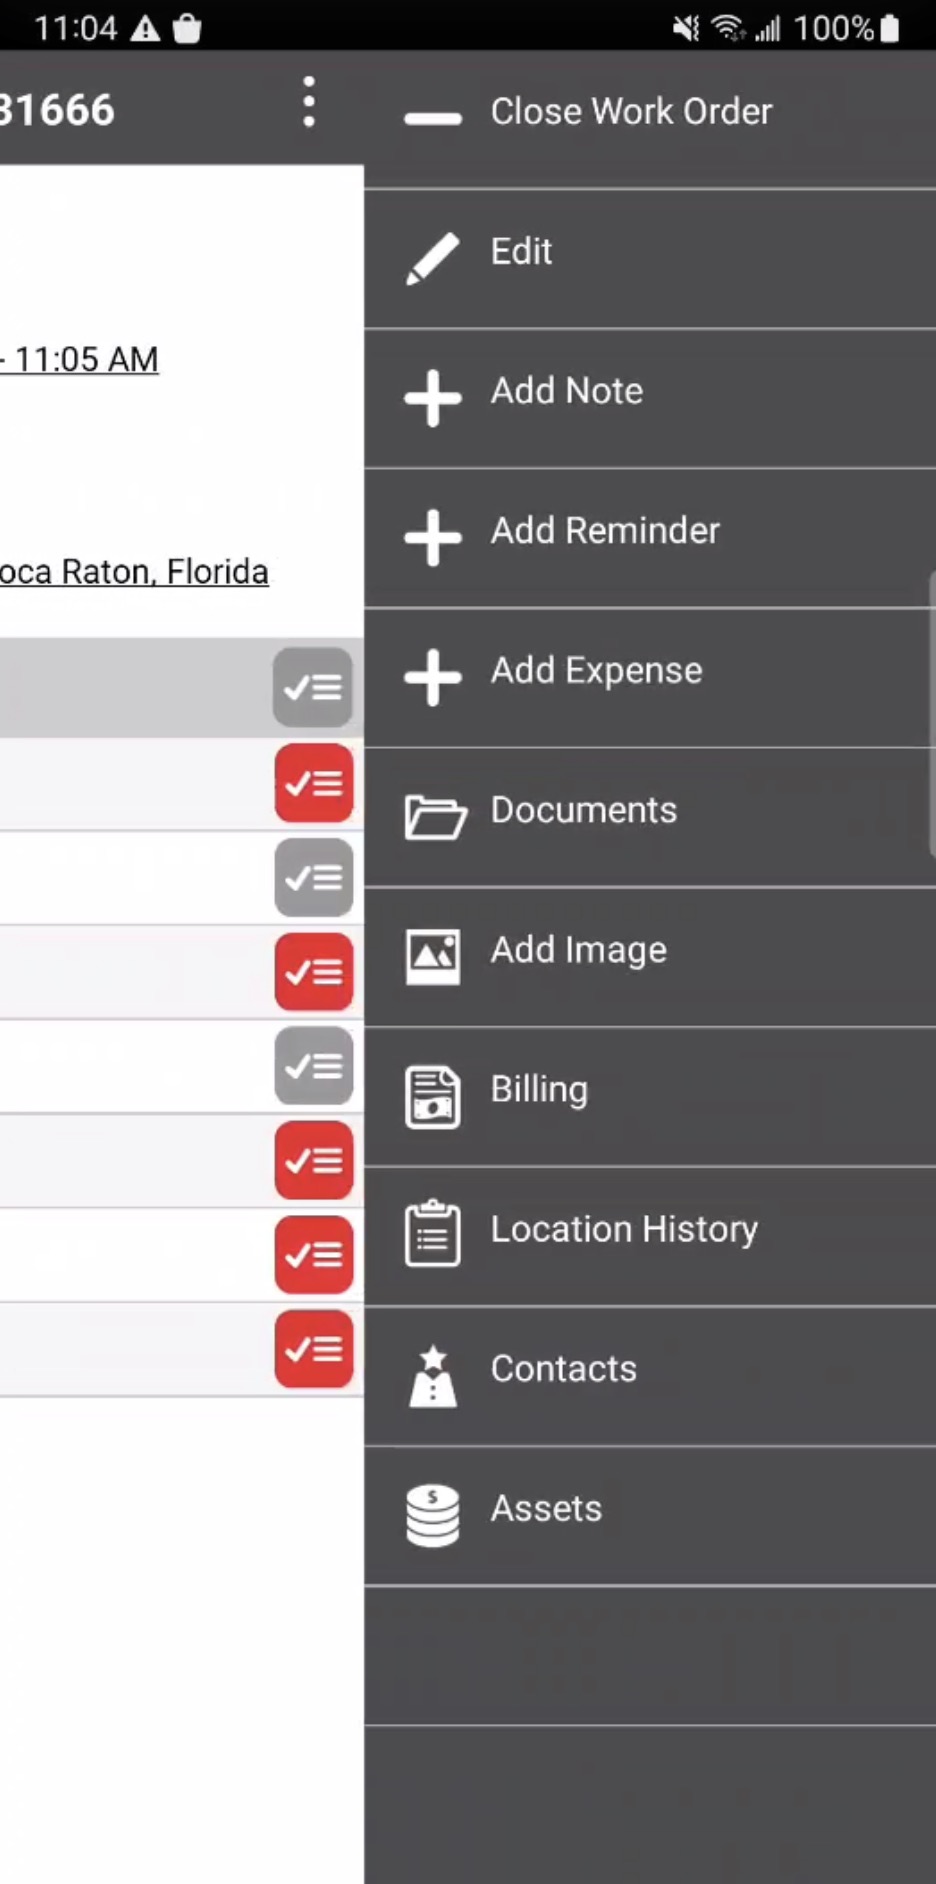
The following subsections will go into further detail regarding the features that can be found in this menu.
Close Work Order
For more information on how to close a work order, please see the Complete/Close Work Order section.
Edit Work Order
For more information on how to edit a work order, please see the Edit Work Order page.
Add Note
You can add a note regarding the work order (e.g., to keep the office appraised or as a note for future reference). This note can also be visible to the customer (by pressing the checkbox for "is Visible to the Customer"):

Once satisfied with the information included in the note, press the Add button to save the note.
The note will then be displayed towards the bottom of the View Work Order page:

Add Reminder
The "Add Reminder" feature will allow you to add a reminder for a specific user at a specific time.
Select the users that the reminder is intended for, and the date/time of the reminder. Once you are satisfied with the inputted information, press the Add button to finalize the reminder:

These reminders can then be viewed in your device's Notification Center. For more information about the Notification Center, please see the Notification Center page.
Add Expense
You can add expenses related to costs incurred during the completion of the work order (e.g., gas for travel between jobs):
Once added, you will be able to view all the documented expenses in the Expenses feature of your mobile device. For more information about expenses, please see the Expenses page.
Documents
The "Add Documents" feature will allow you to upload and view documents associated with the work order. Office users can also upload documents for the field user to view through the Work Order web application. For more information on how office users can upload documents to the work order through the web application, please see the View Work Order page.
To view a document, press the right facing Arrow button:

To add a new image or audio file, press the Actions Panel and select the desired format:

When uploading a new image, you can select to take a new picture or use the gallery to select an image that is already stored on your phone:

When uploading a segment of audio, you can choose to start, stop, or save by pressing the respective buttons:

Add Image
The "Add Image" feature will promptly bring up your device's camera app; once you take a picture, you will have the option to approve the image or try again. If you approve the image, you can then add a name, comment, or rotate the photograph before saving:
You can then see these images in either the "Images" feature or the "Documents" feature in the Actions Panel.
Add Image
The "Image" feature will allow you to view your device's image gallery or to take a new photo:
Billing
The "Billing" feature will display the invoice associated with the work order. From this page, you can access the invoice features (e.g., add a payment, converting the invoice to PDF, editing, etc.):
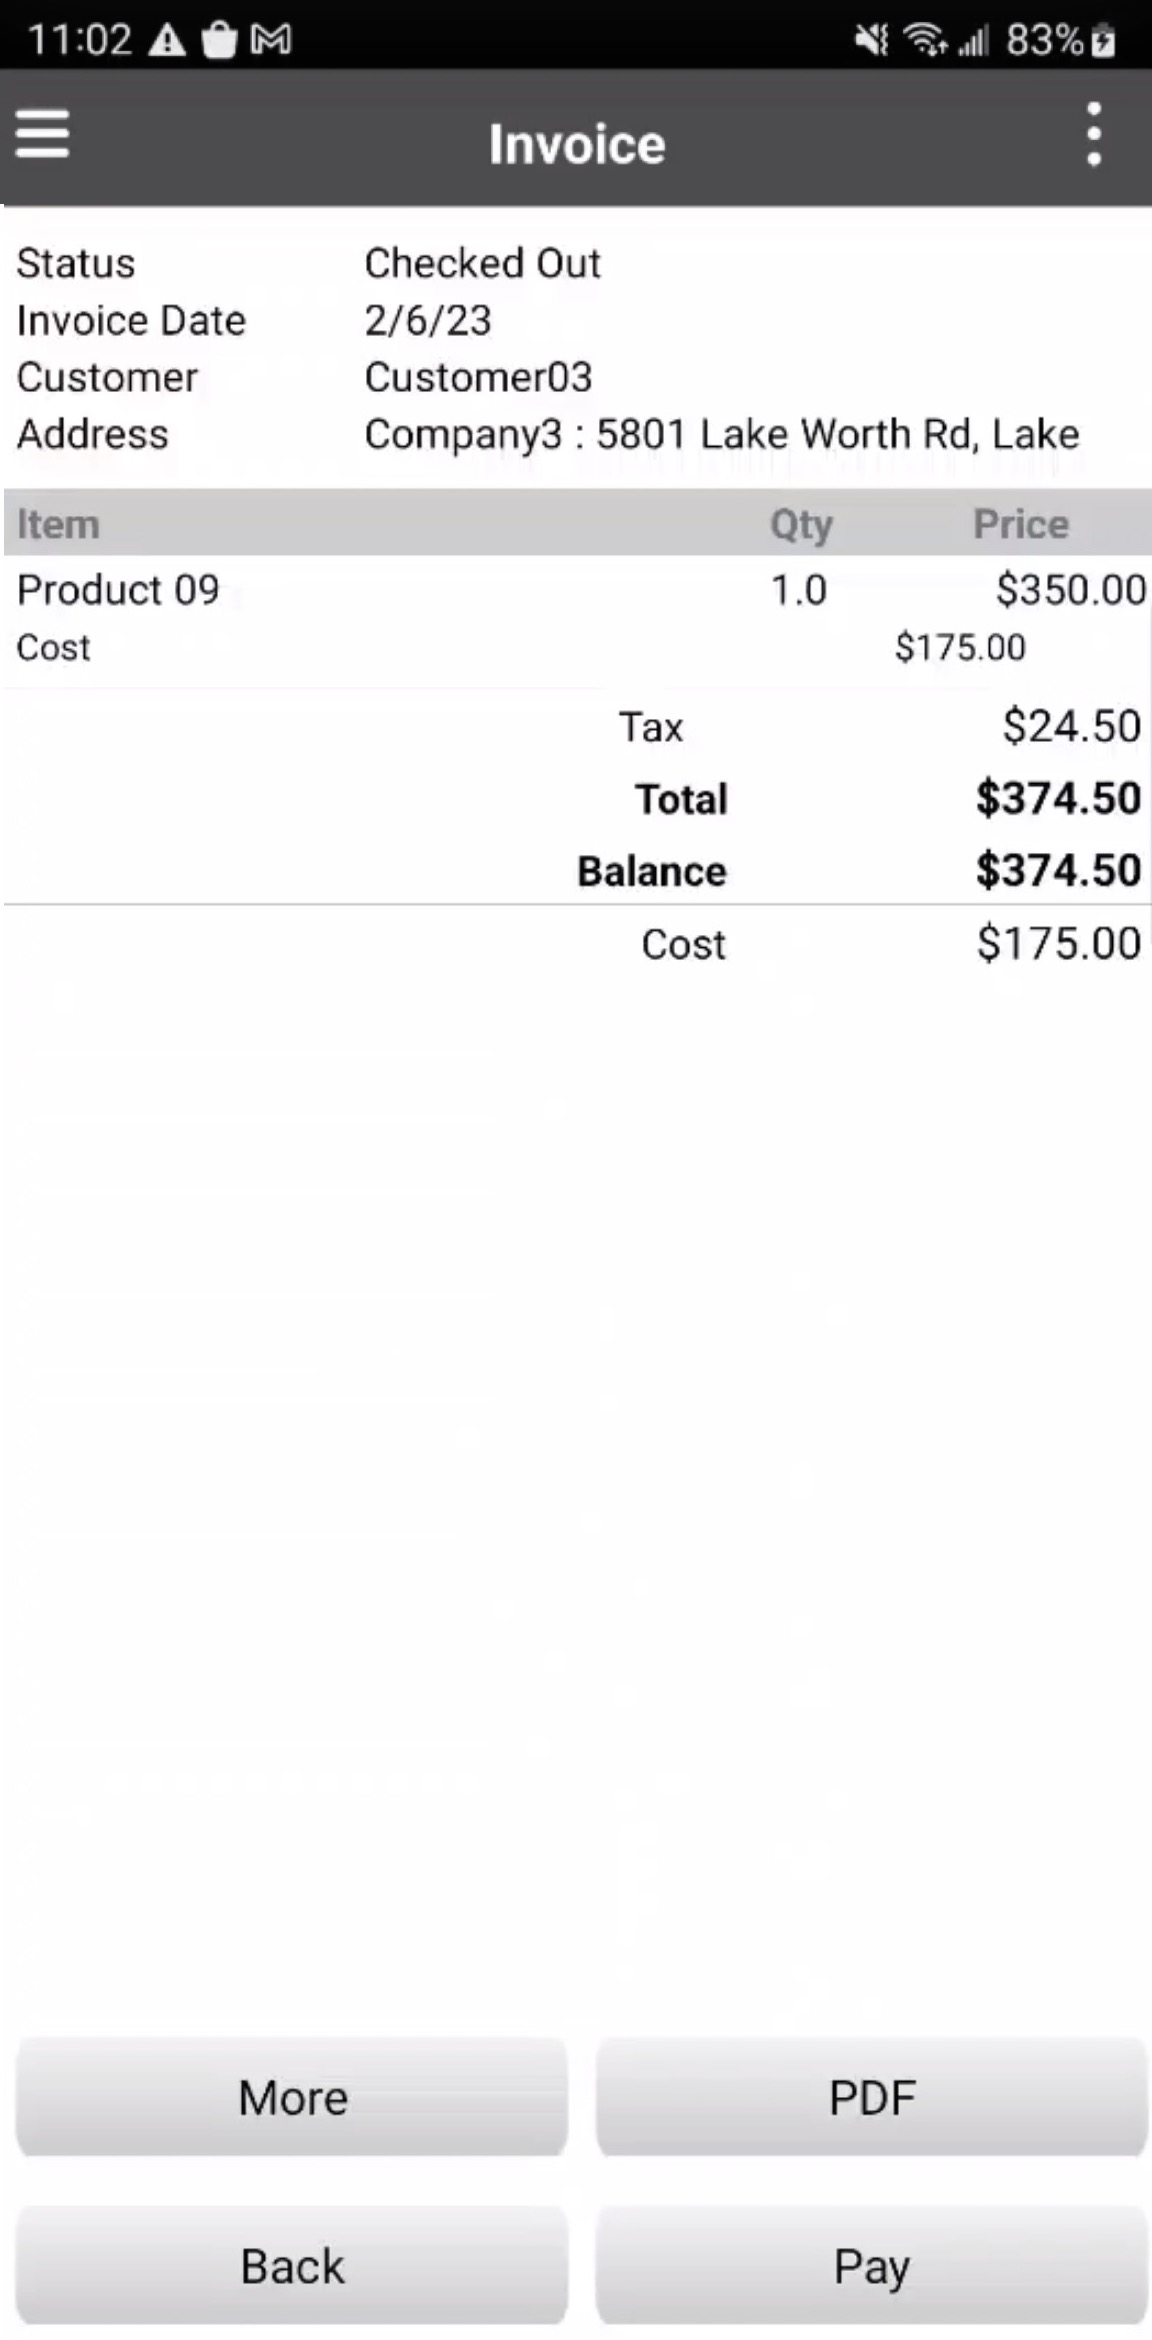
For more information about the "Billing" feature on the mobile device, please see the Mobile Invoices Layout page.
Location History
The "Location History" feature will list all the past work orders for the client or customer:

You can also view previously filled forms, notes, images, etc. of the various work orders associated with the customer.
Contacts
The "Contacts" feature will allow you to view all the contacts associated with the customer profile. By pressing the Pencil icon, you will be able to edit the contact information and if you would like to add a new contact, press the Add button:

For more information about the mobile device's contacts feature, please see the Customers page.
Assets
The "Assets" feature will allow you to search for all the assets associated with your company and add them to the work order. For more information about assets, please see the Assets page.
Once you have completed all the necessary and optional tasks for the selected work order, you will be able to close out the work order. There are two different ways to accomplish this task:
You can go through the Action Items and ensure that all the red Action Items are toggled to green:
Or you can use the "Close Work Order" option from the Actions Panel when you access the work order:

Once a work order is closed, it will have a darker gray background compared to the open work orders listed on the Work Orders feature page:
