There are several different ways you can access the View Asset pop-up window in MobiWork.
The following sections demonstrate some common methods of how to access the View Asset pop-up window from your MobiWork web platform.
Asset List Page
The easiest way to access the View Asset pop-up window is through the Assets feature page. For more information on how to access the Assets feature page please see the Asset List Page section.
Once you are on the Assets feature page, there are four different ways to access the View Asset pop-up window:
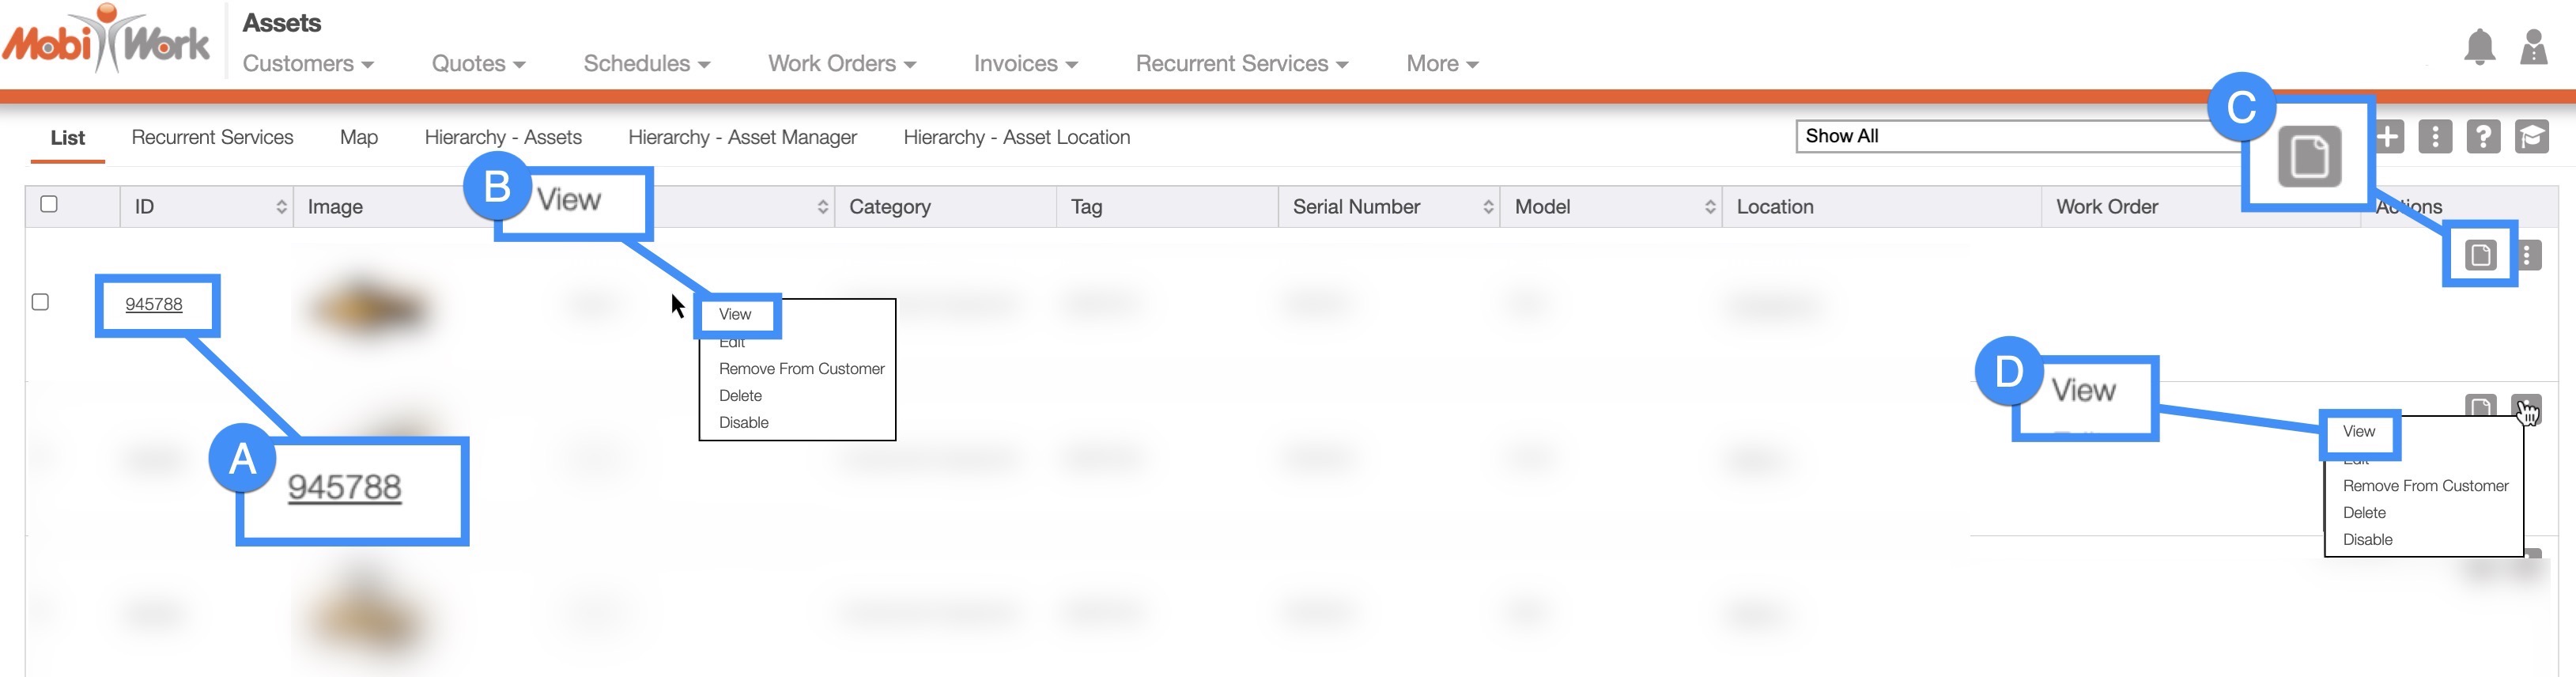
Select the desired Asset ID
Right-click on the selected asset and click on the "View" option from the drop-down.
Select the View icon under the "Actions" column.
Click on the "View" option from the Individual Actions drop-down.
You can also use these features to access the View Asset pop-up window in the "Recurrent Services" tab.
To see how to access the View Asset pop-up window from the "Map" and "Hierarchy" tabs, please see the following subsections.
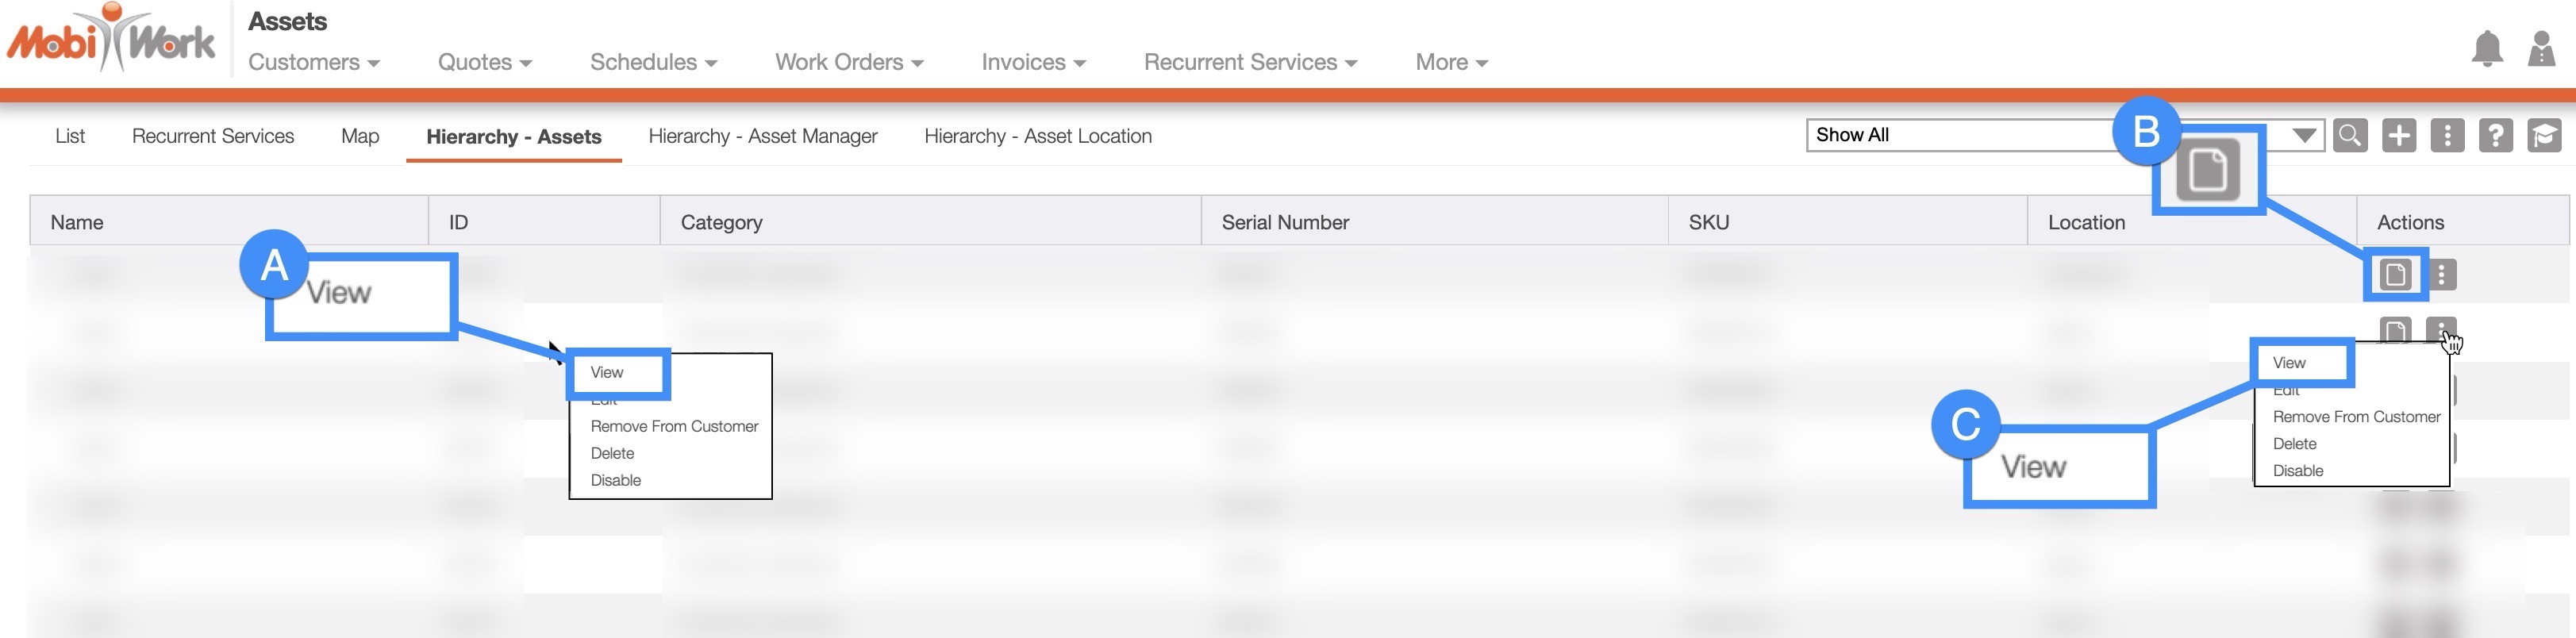
Right-click on the selected asset and click on the "View" option from the drop-down.
Select the View icon under the "Actions" column.
Click on the "View" option from the Individual Actions drop-down.
Assets Tab: Map
For more information on how to access the "Map" tab please see the Asset List page.
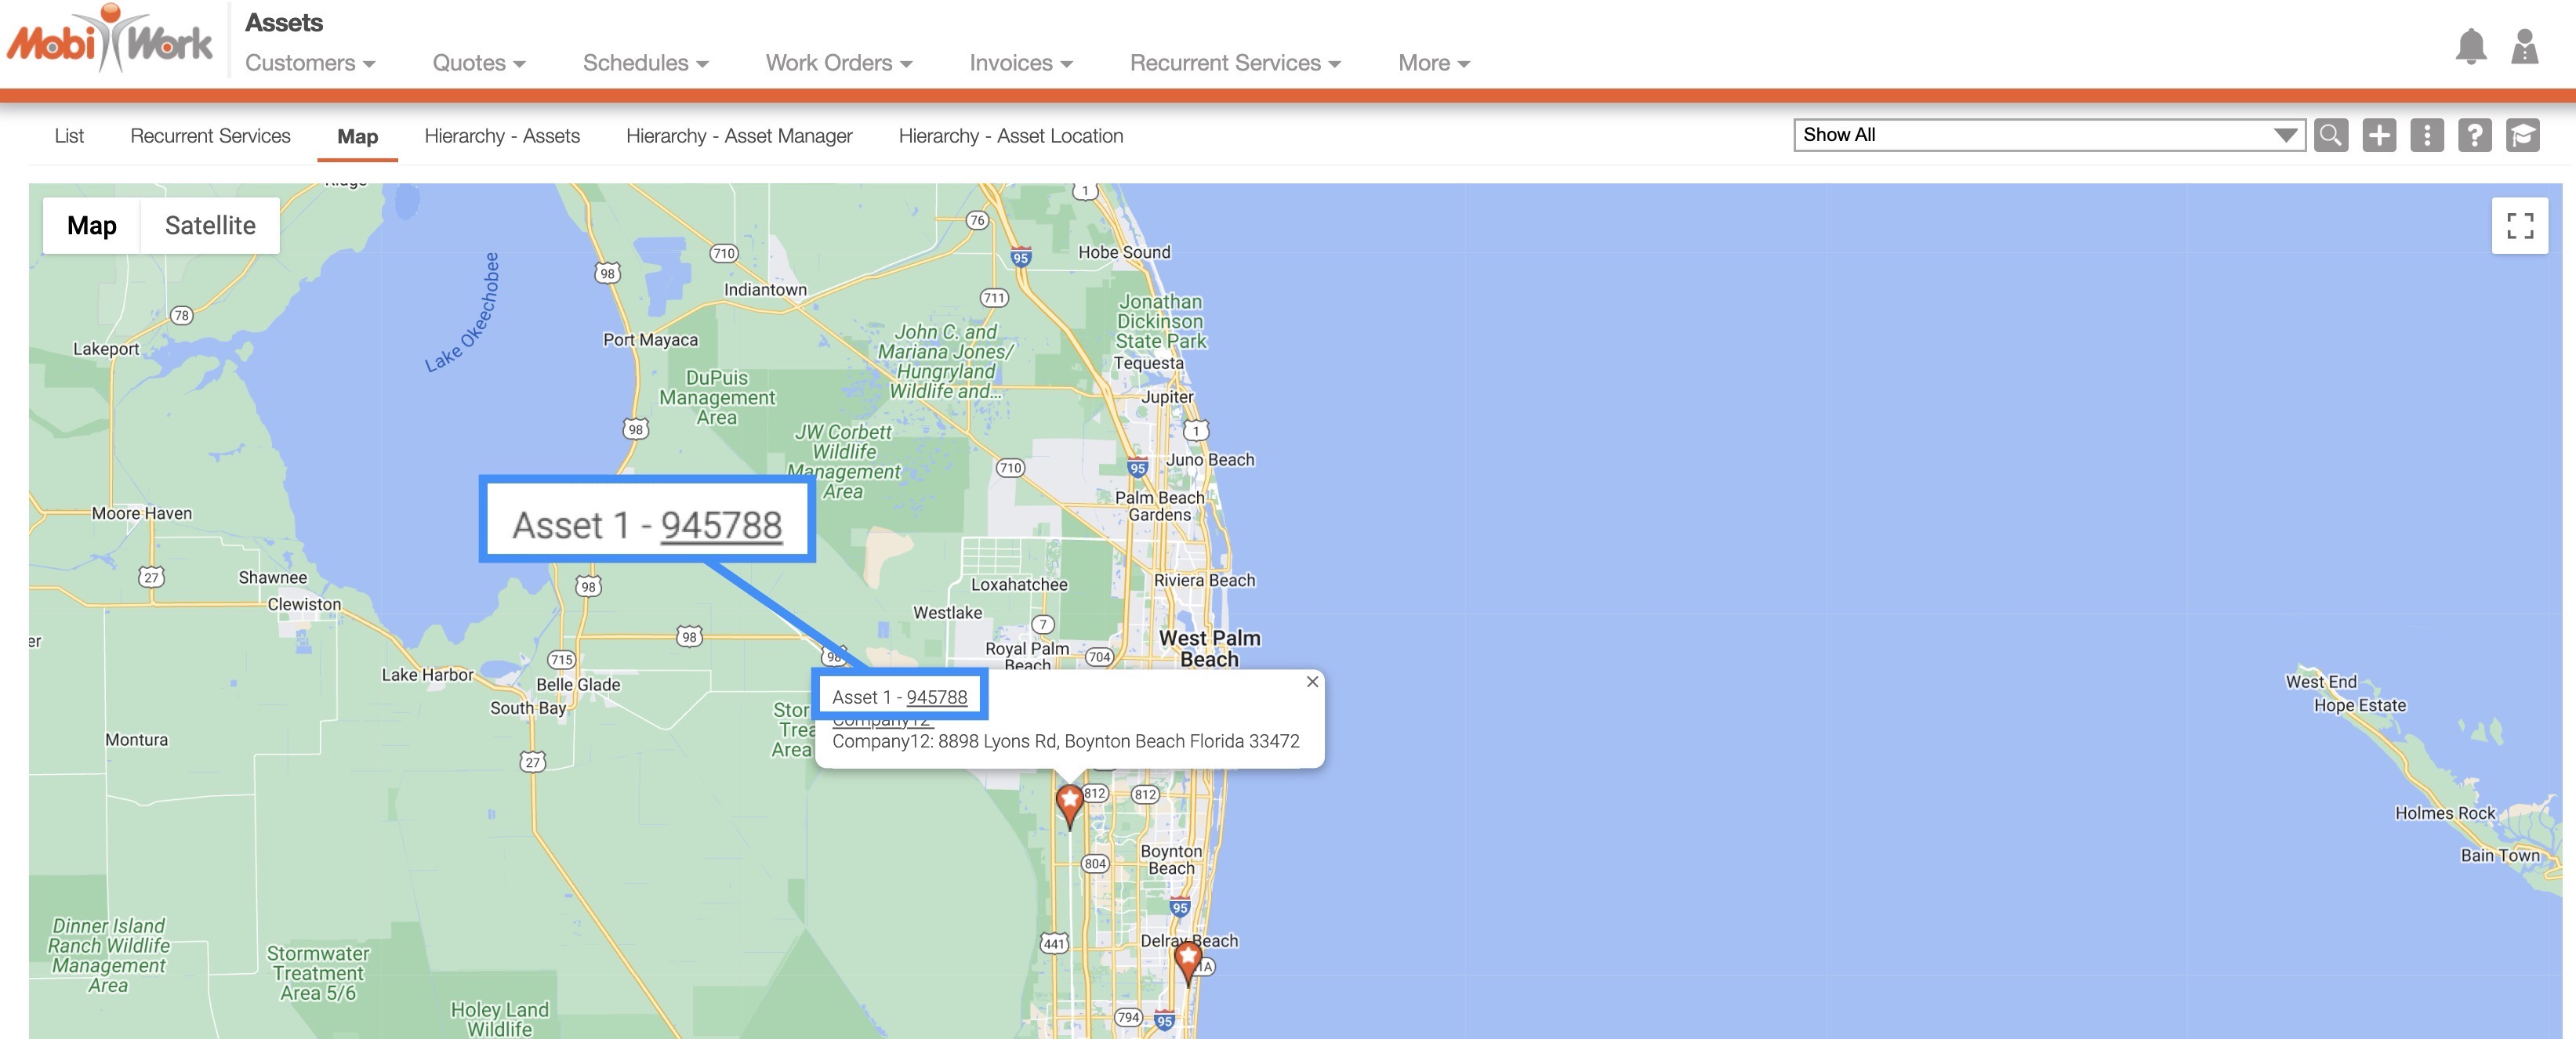
You can click on the desired pin to open the customer and asset information. From this window, click on the Asset ID number from to open the View Asset pop-up window:
Assets Tab: Hierarchy
For more information on how to access the "Hierarchy" tabs please see the Asset List page.
Once you are on any of the "Hierarchy" tabs, there are three different ways to access the View Asset pop-up window:
Customers
Another way you can access the View Asset pop-up window is through the View Customer pop-up window. For more information on how to access the View Customer pop-up window please see the View Customer page.
Once you are on this page select the "Assets" tab:

All the assets associated with the customer will be displayed on this tab. To access an individual asset and open its View Asset pop-up window please see the following actions:
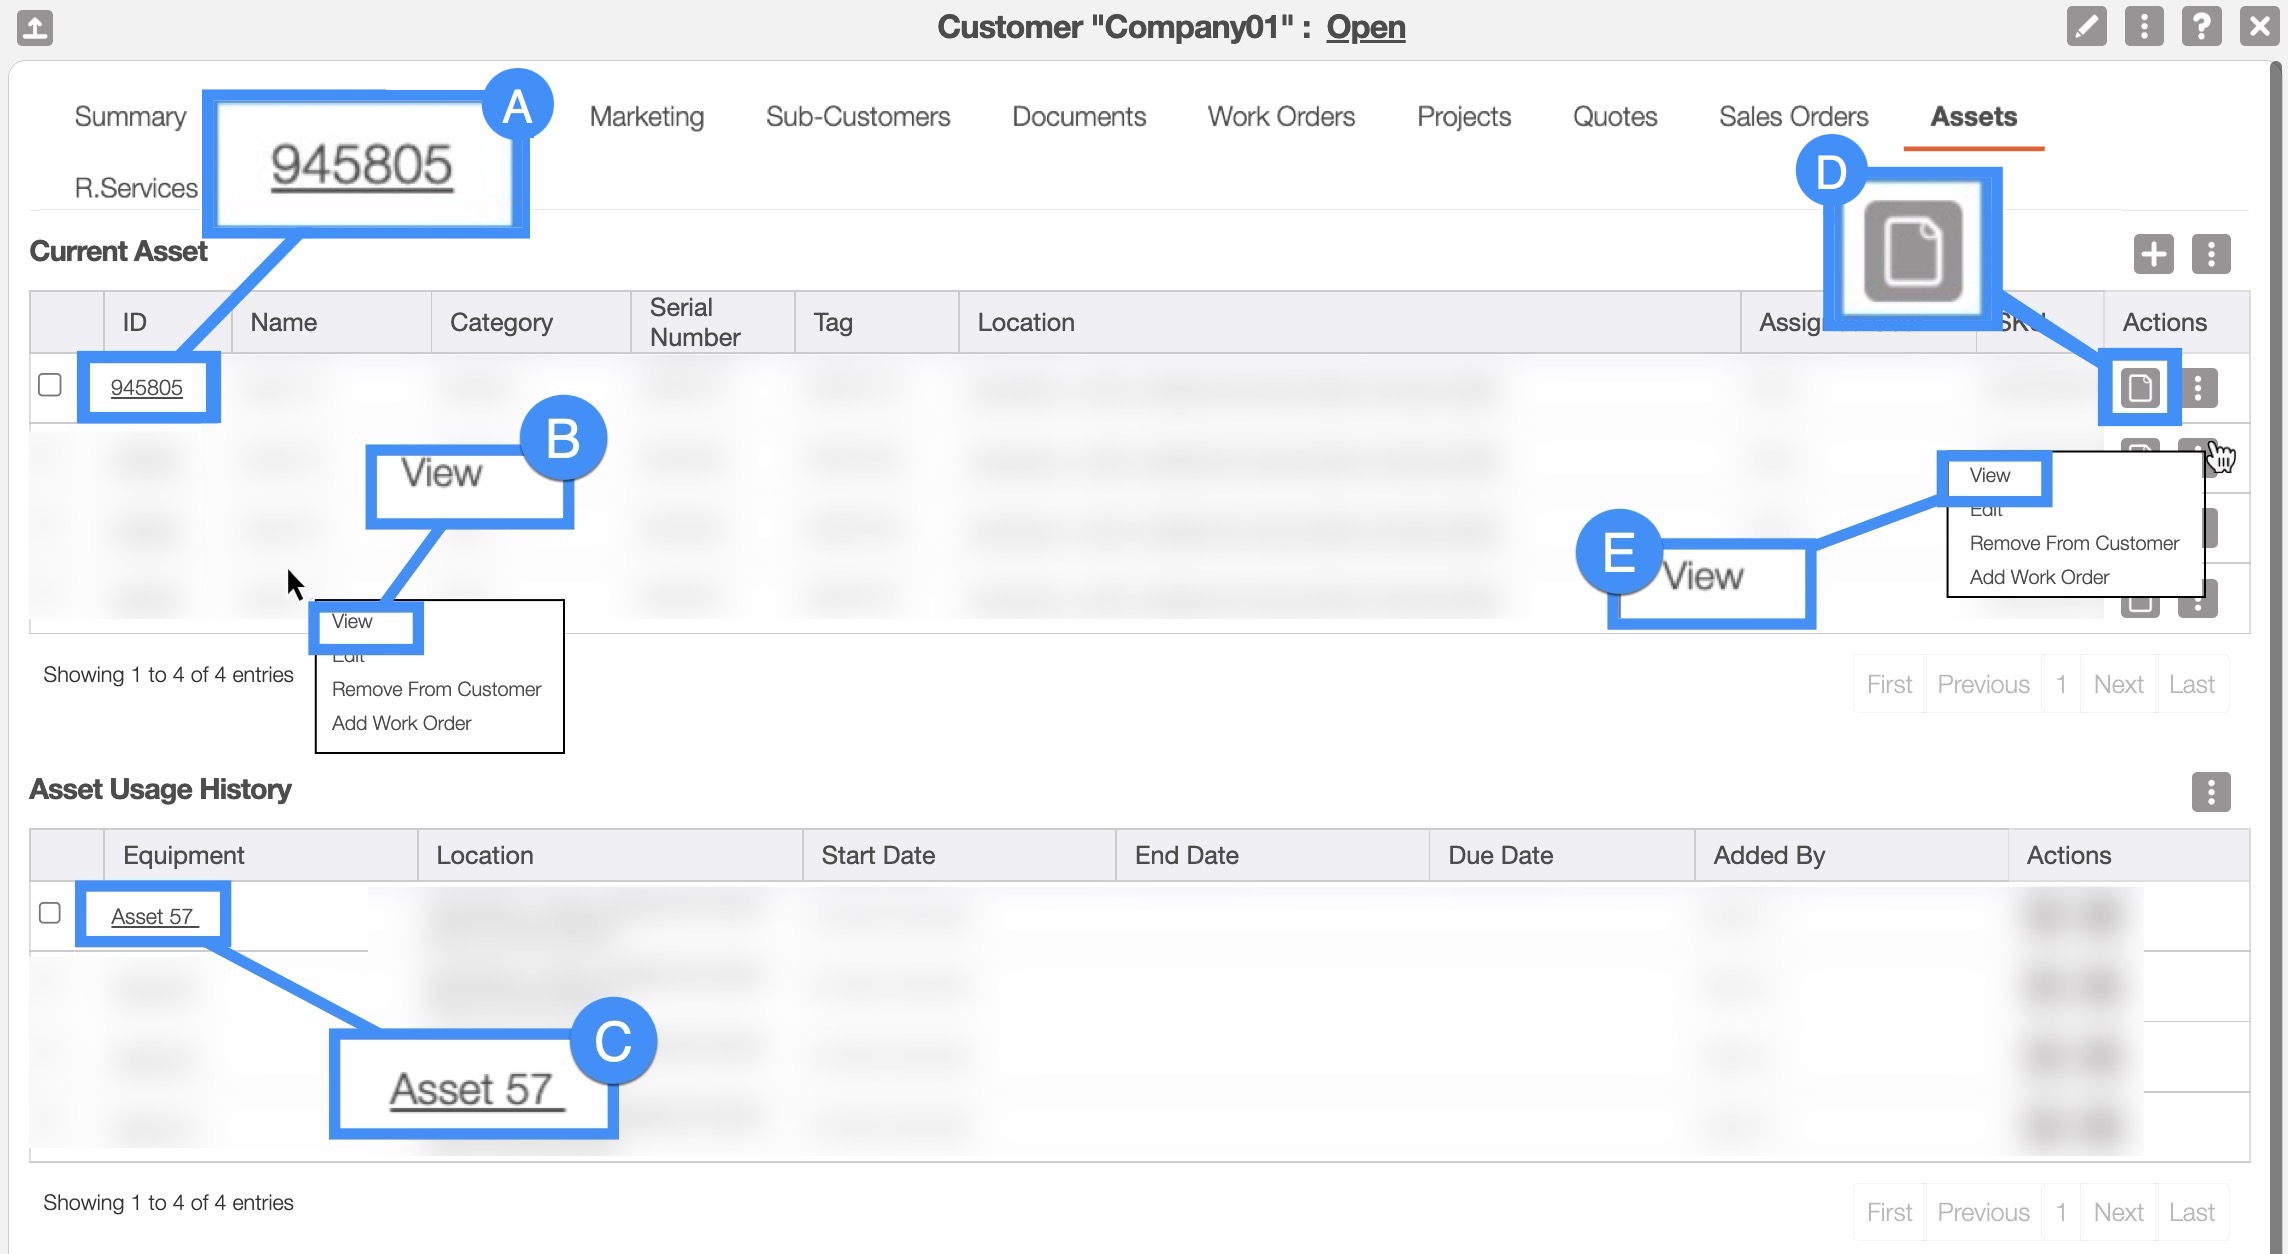
In the "Current Asset" section, select the desired Asset ID.
Right-click on the selected asset and click on the "View" option from the drop-down.
In the "Asset Usage History," select the desired Asset ID.
Select the View icon under the "Actions" column.
Click on the "View" option from the Individual Actions drop-down.
Work Orders
For more information on how to access the View Work Order pop-up window, please see the View Work Order page.
Once you are on this page select the "Assets" tab:

All the assets associated with the work order will be displayed on this tab. To access an individual asset and open its View Asset pop-up window please see the following actions:
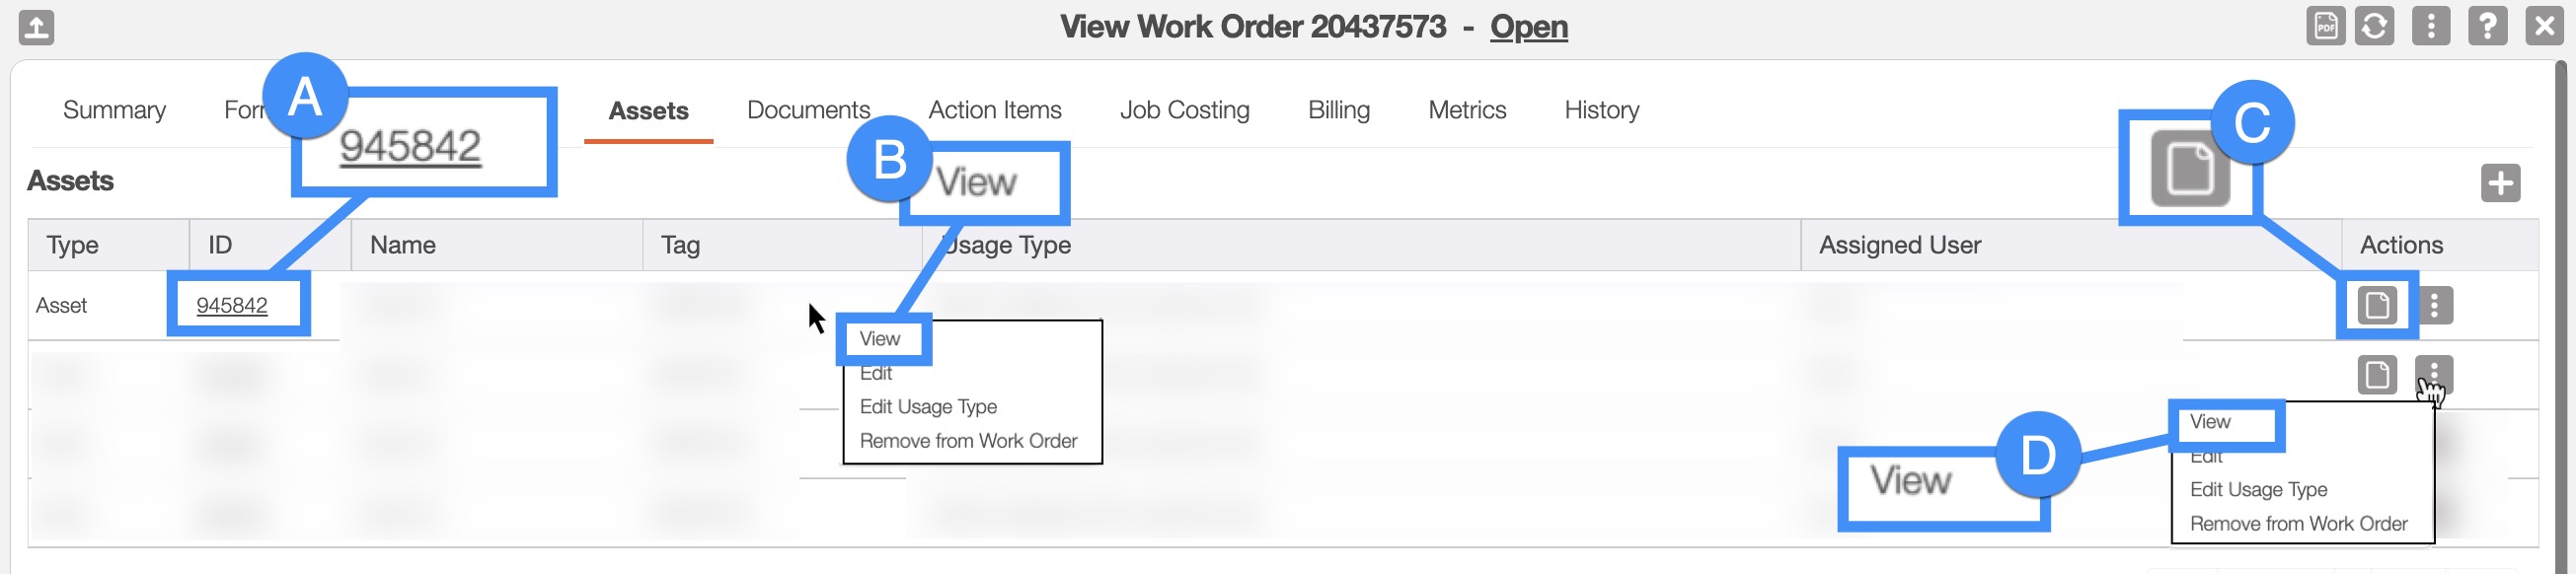
Select the desired Asset ID.
Right-click on the selected asset and click on the "View" option from the drop-down.
Select the View icon under the "Actions" column.
Click on the "View" option from the Individual Actions drop-down.
Recurrent Services
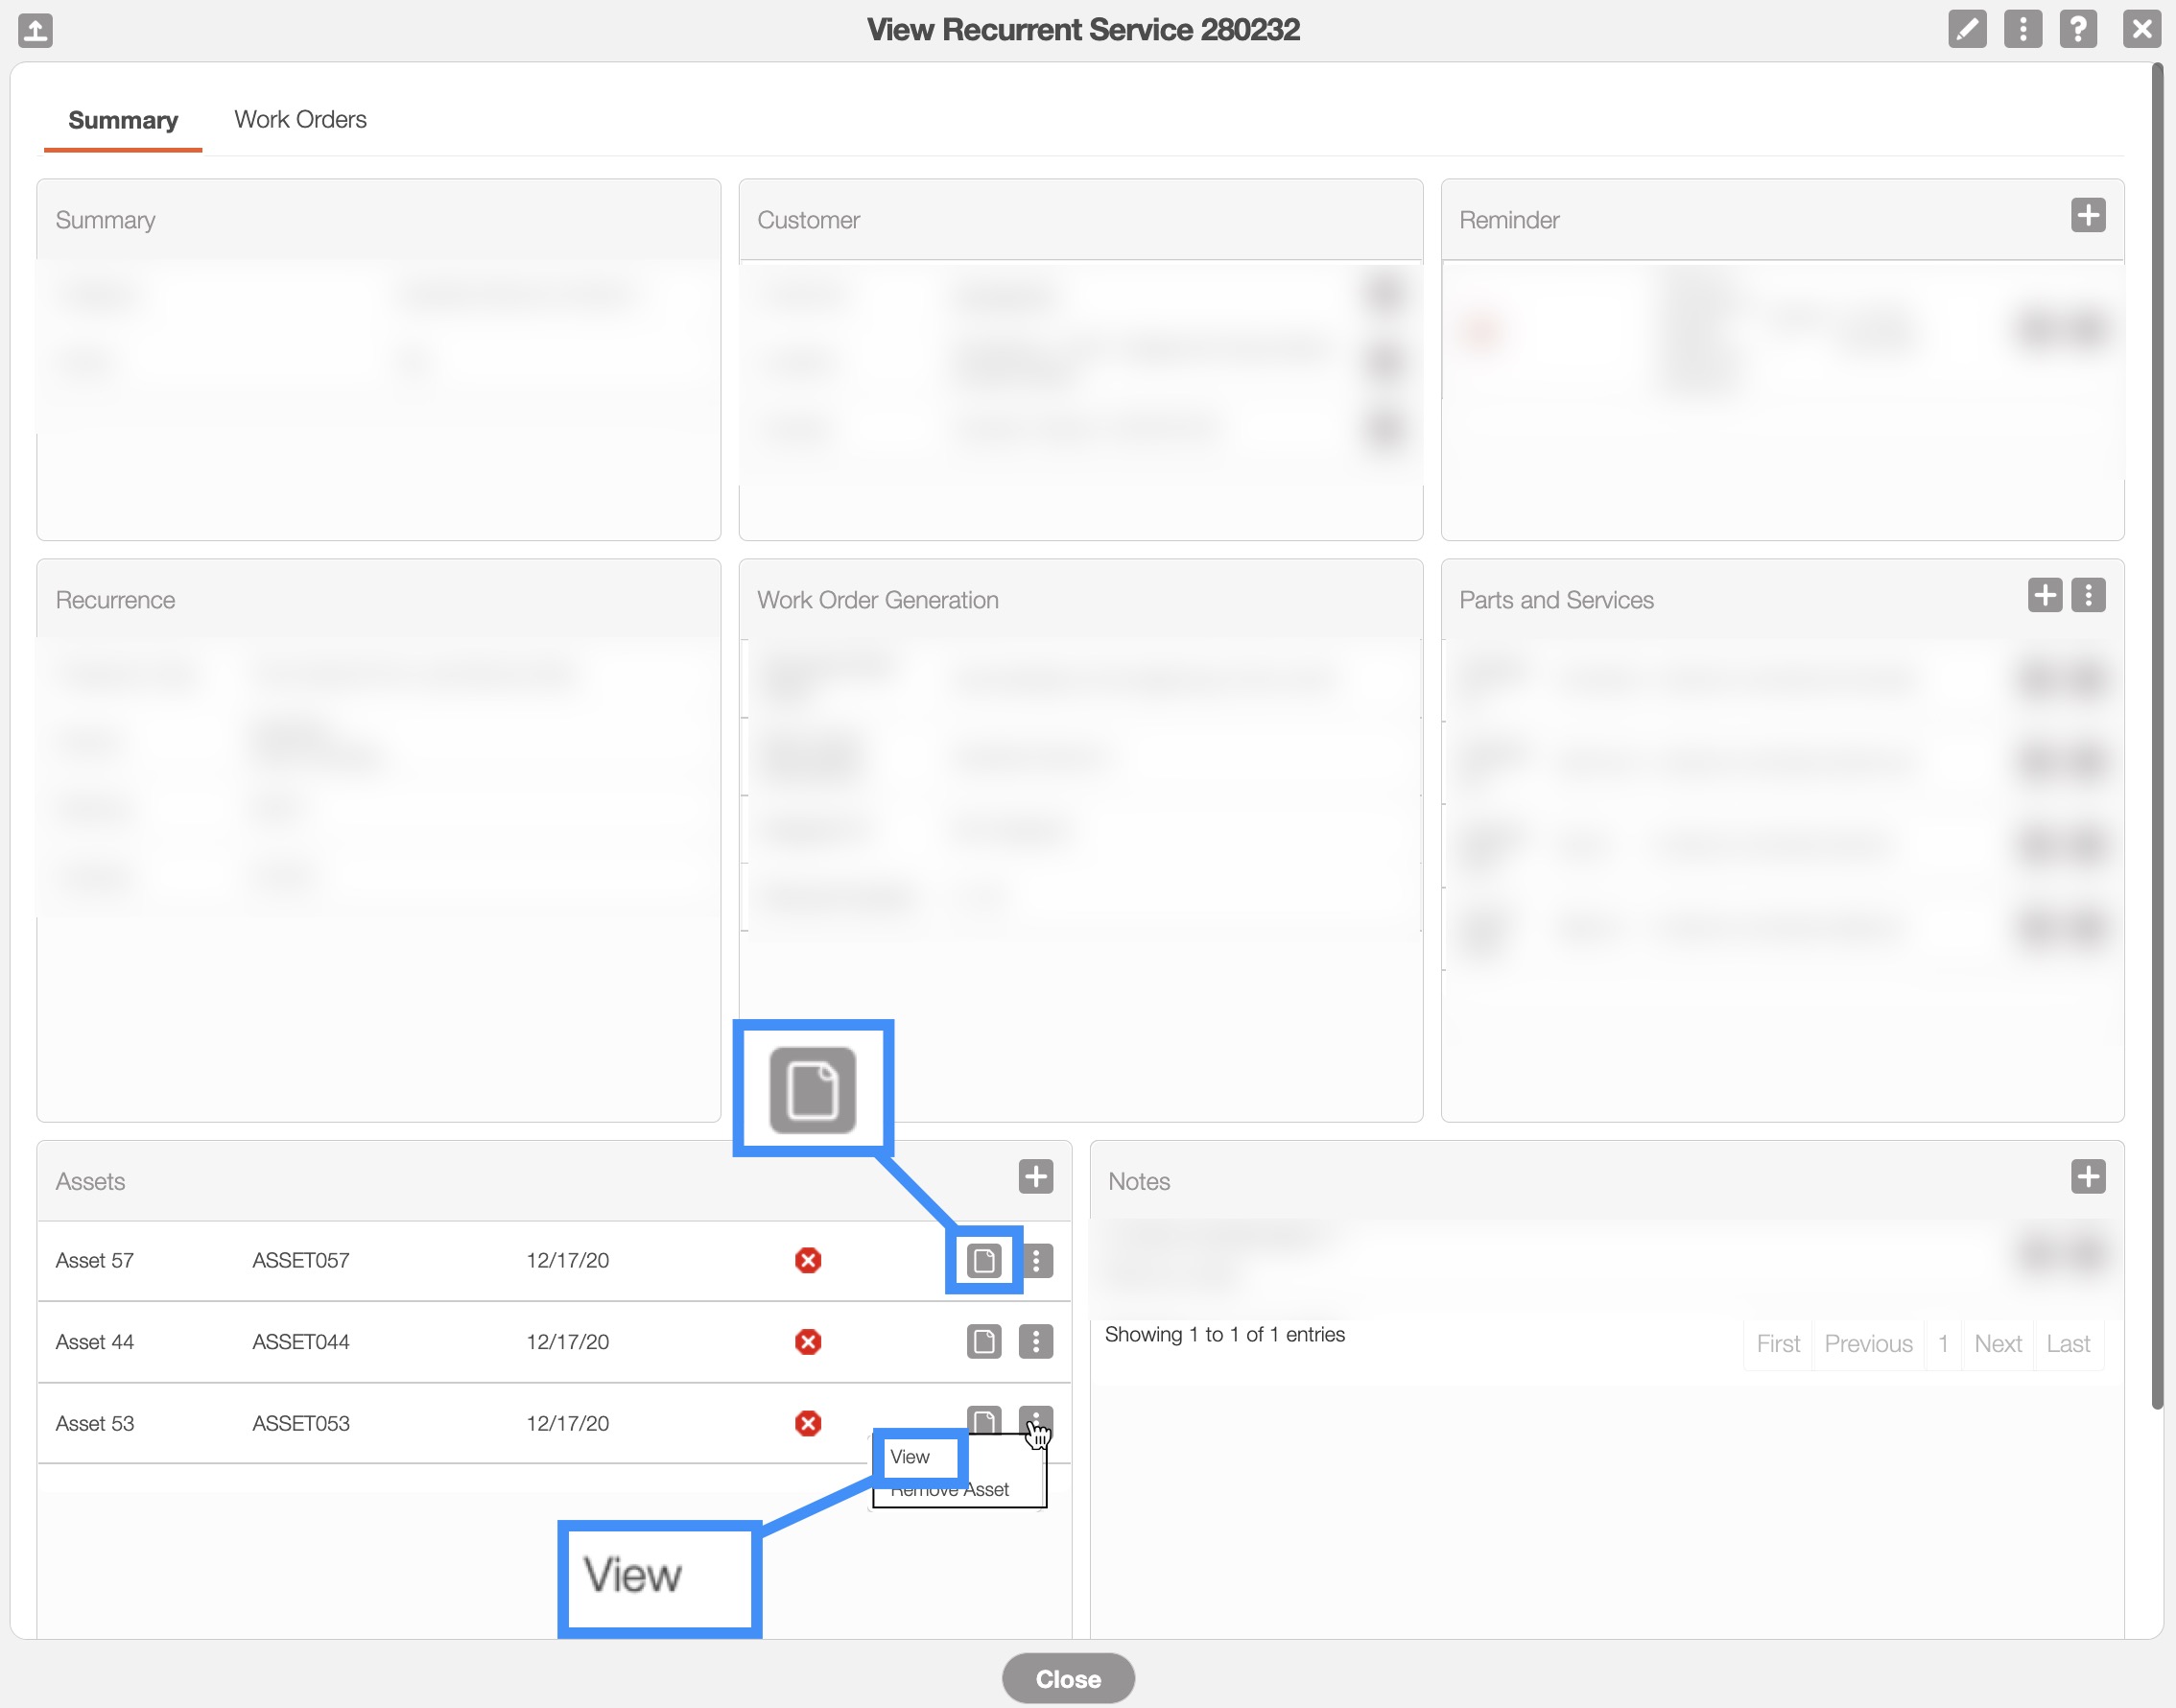
For more information on how to access the View Recurrent Services pop-up window, please see the View Recurrent Services page.
Once you open the View Recurrent Services pop-up window, the assets associated with the recurrent service will be listed under the "Assets" column. From this column to view the desired asset, click the View icon or the "View" option from the Individual Actions drop-down:
Overview and Layout
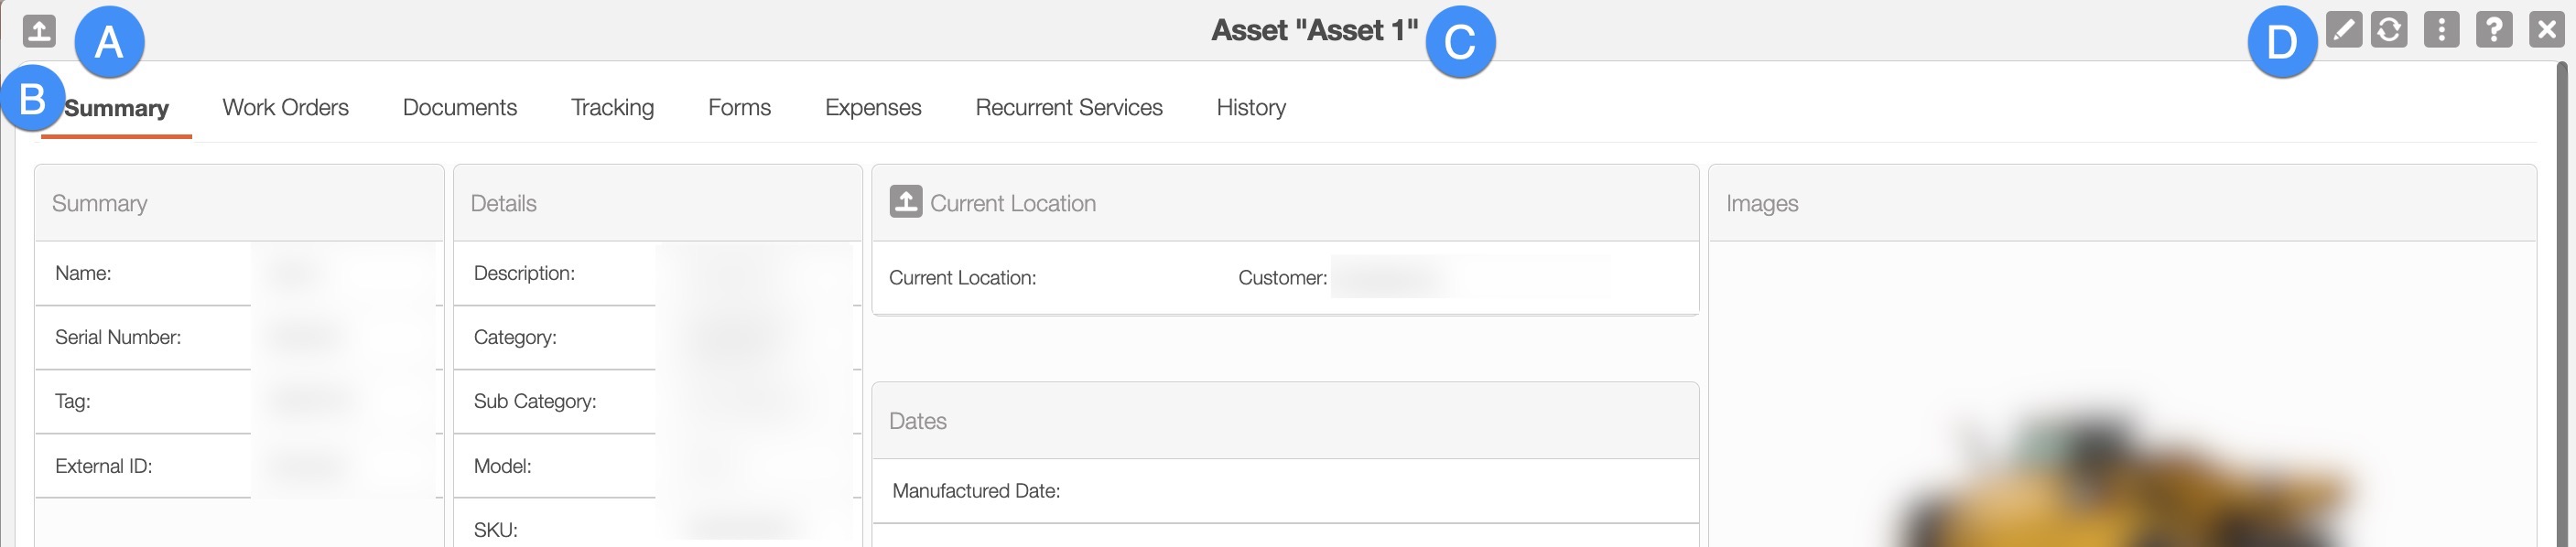
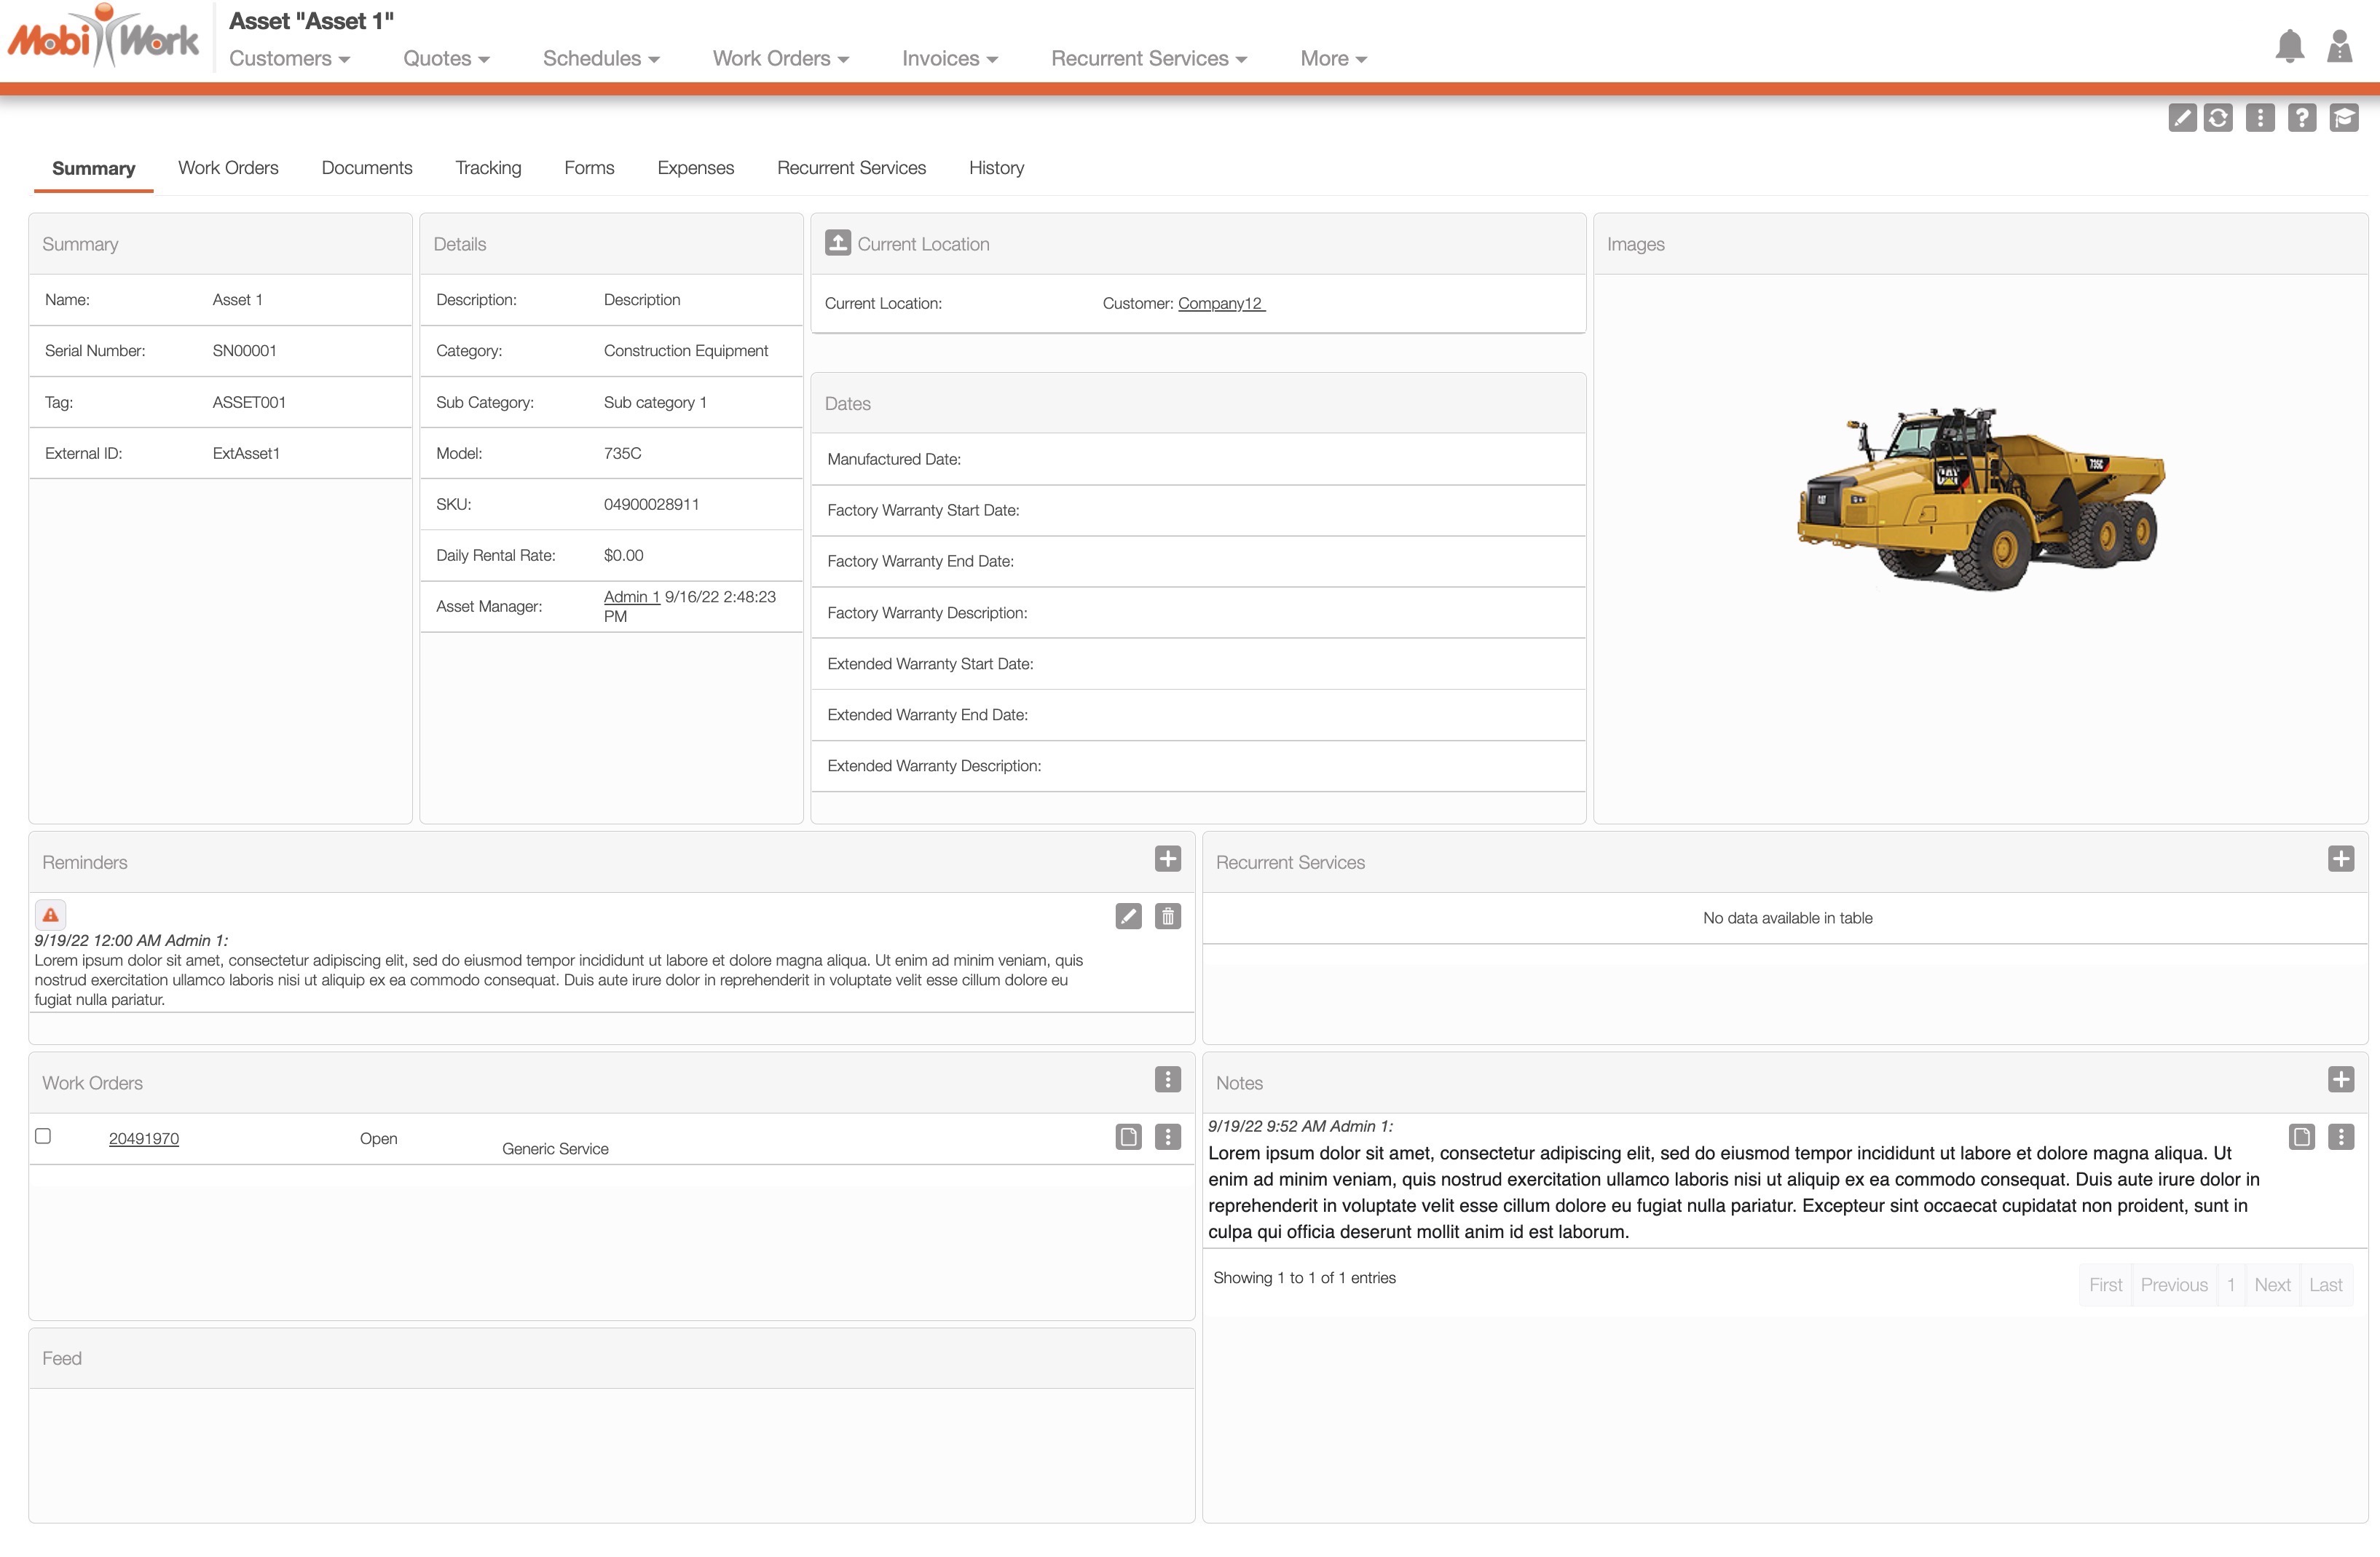
Once you open the View Asset pop-up window, you will be automatically directed to the "Summary" tab:
These features are available in all eight tabs and in both, the pop-up window and the full-size view:
Please note that if you would like to easily close this pop-up window, you can click on the esc button from your keyboard.
Asset Full-Size View
By clicking on the upwards arrow in the left-hand corner, you can expand the View Asset pop-up window so that it is full-size:
![]()
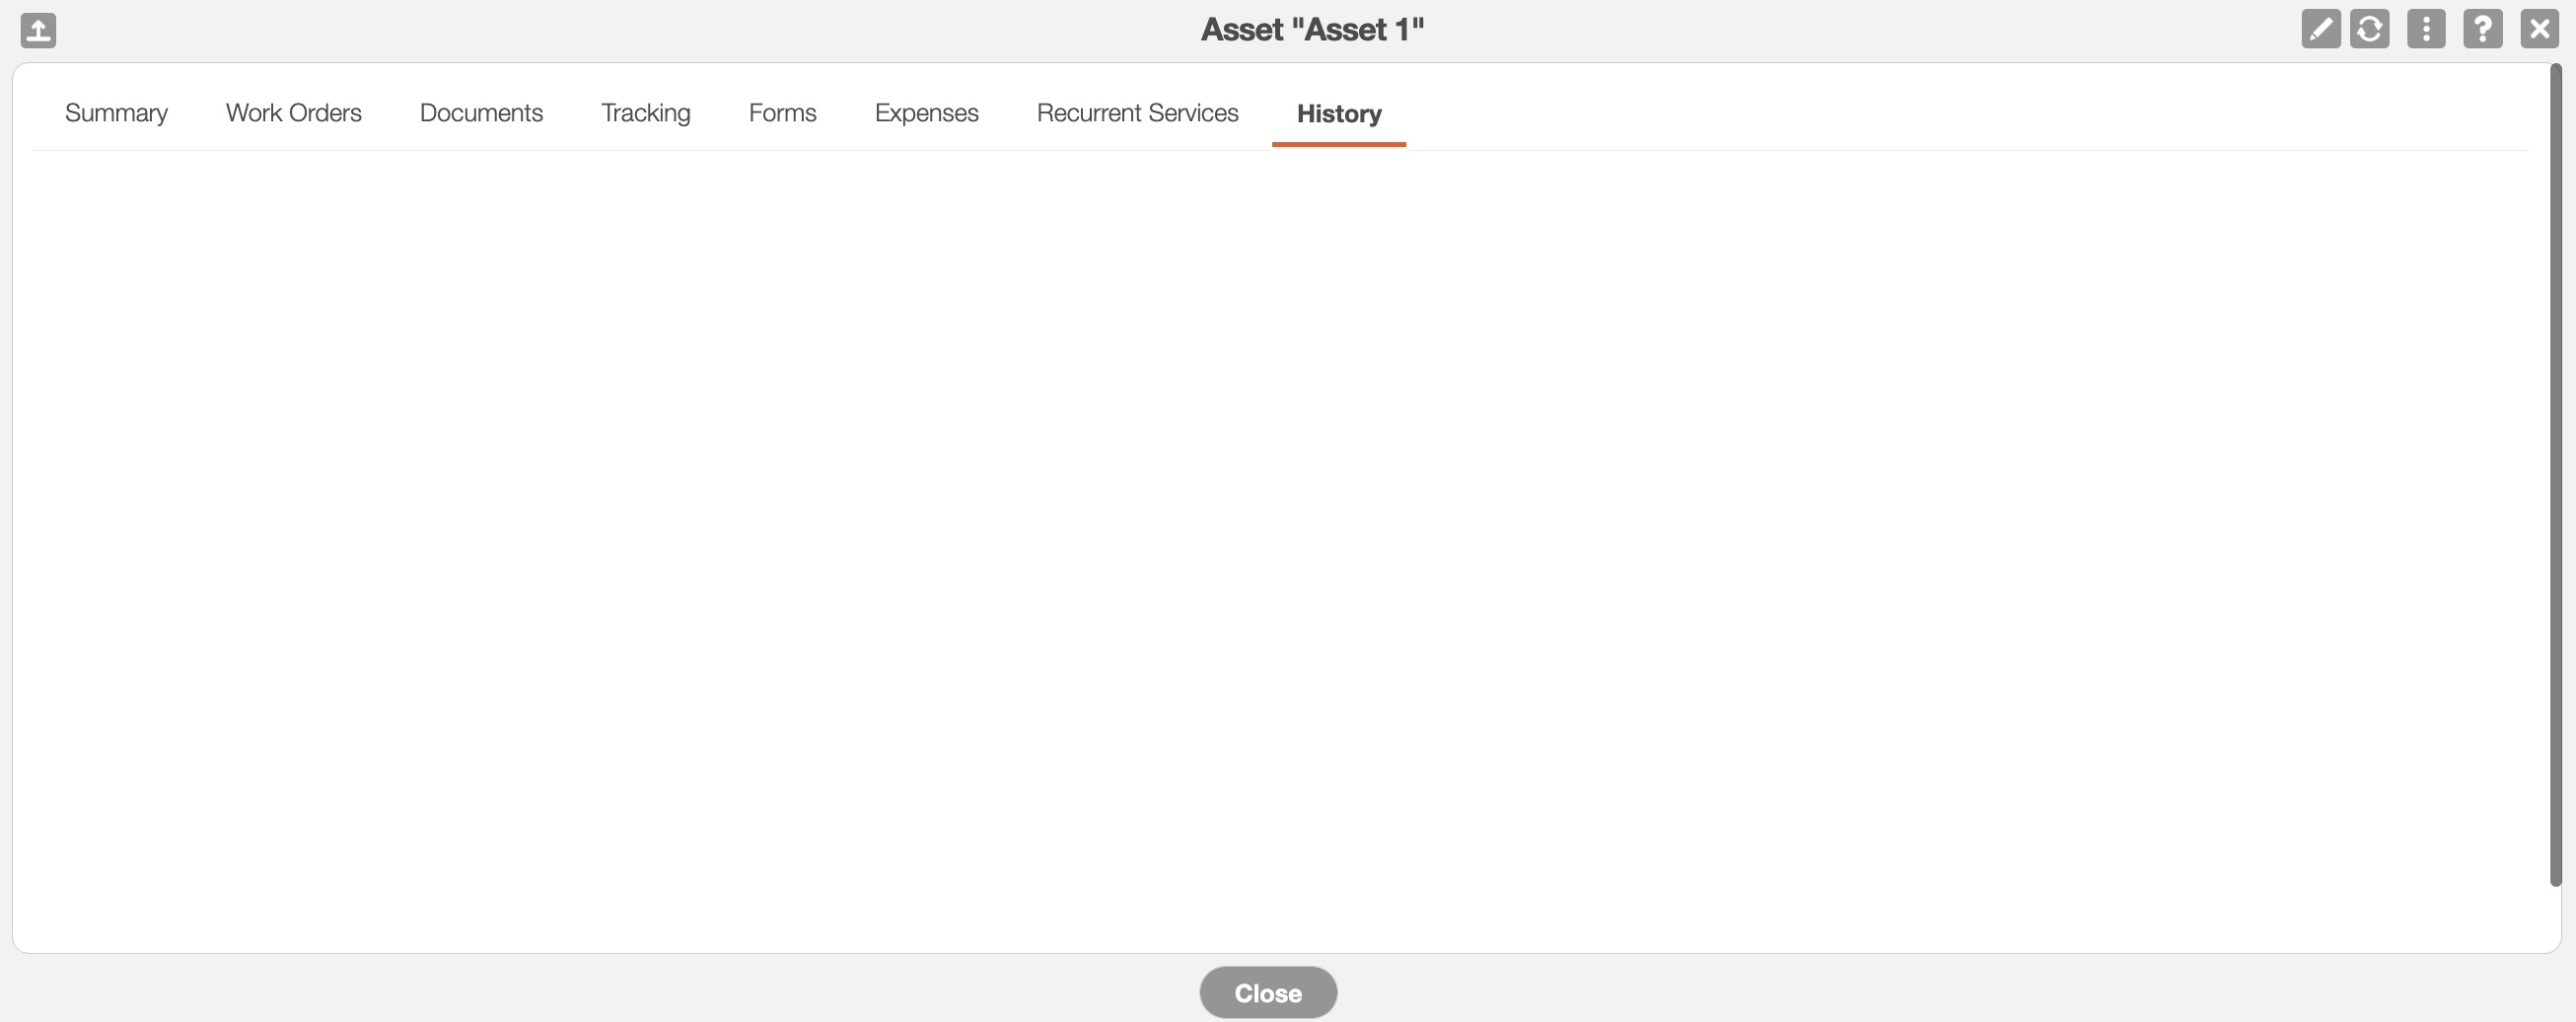
The full-size View Asset pop-up window can be seen below. All the tabs, buttons, and features are identical to how they would appear in the pop-up window:
Asset Tabs
There are eight tabs in all for the View Asset pop-up window; each tab displays different information regarding the asset:

You can navigate to other tabs by clicking on the desired tab.
Asset Name
The asset's name will be displayed here:

Upper Right Corner Actions
In the upper right corner of the View Asset pop-up window there will be five buttons that will allow you to perform additional actions on the asset:
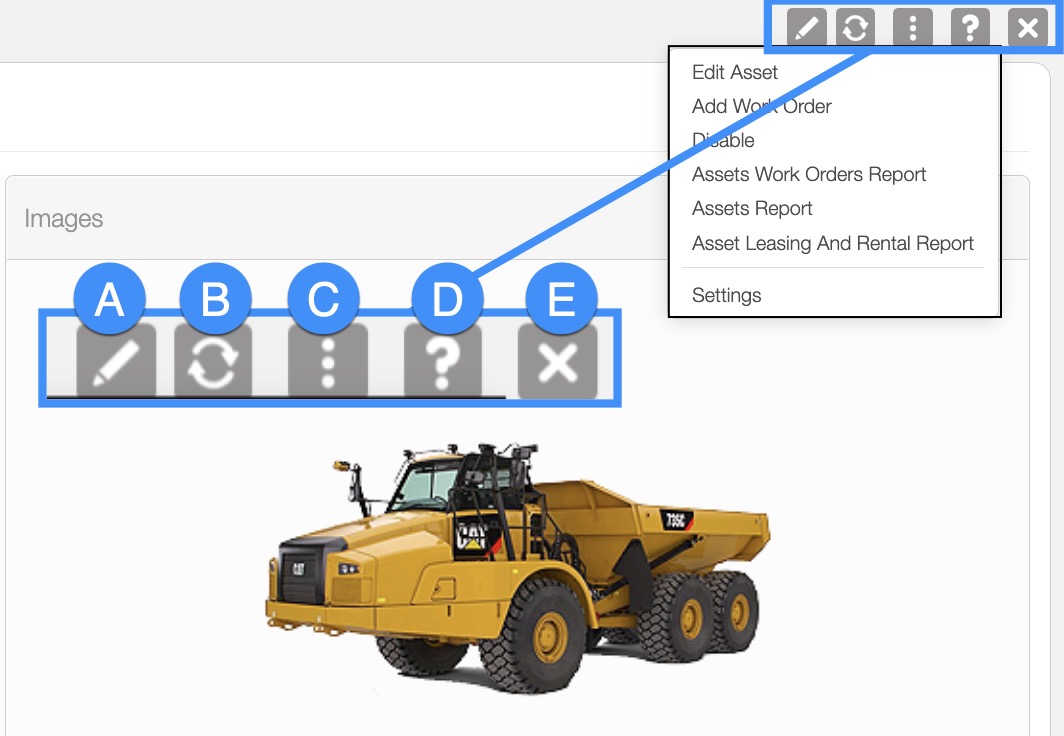
The Pencil button will allow you to edit the asset.
The Refresh button will allow you to refresh the asset's data to the most up-to-date version.
The Individual Actions button will allow you to perform various actions, such as:
Editing the asset.
Adding a work order associated with the asset.
Disabling an asset.
Viewing the Settings page.
The Question Mark button which will direct you to the respective MobiWork Features page.
The X will close out of the View Asset pop-up window.
The Asset's Upper Right Corner Actions can be found in the top-right corner of the View Asset pop-up window. These actions are located in this section, regardless of the tab you are on:
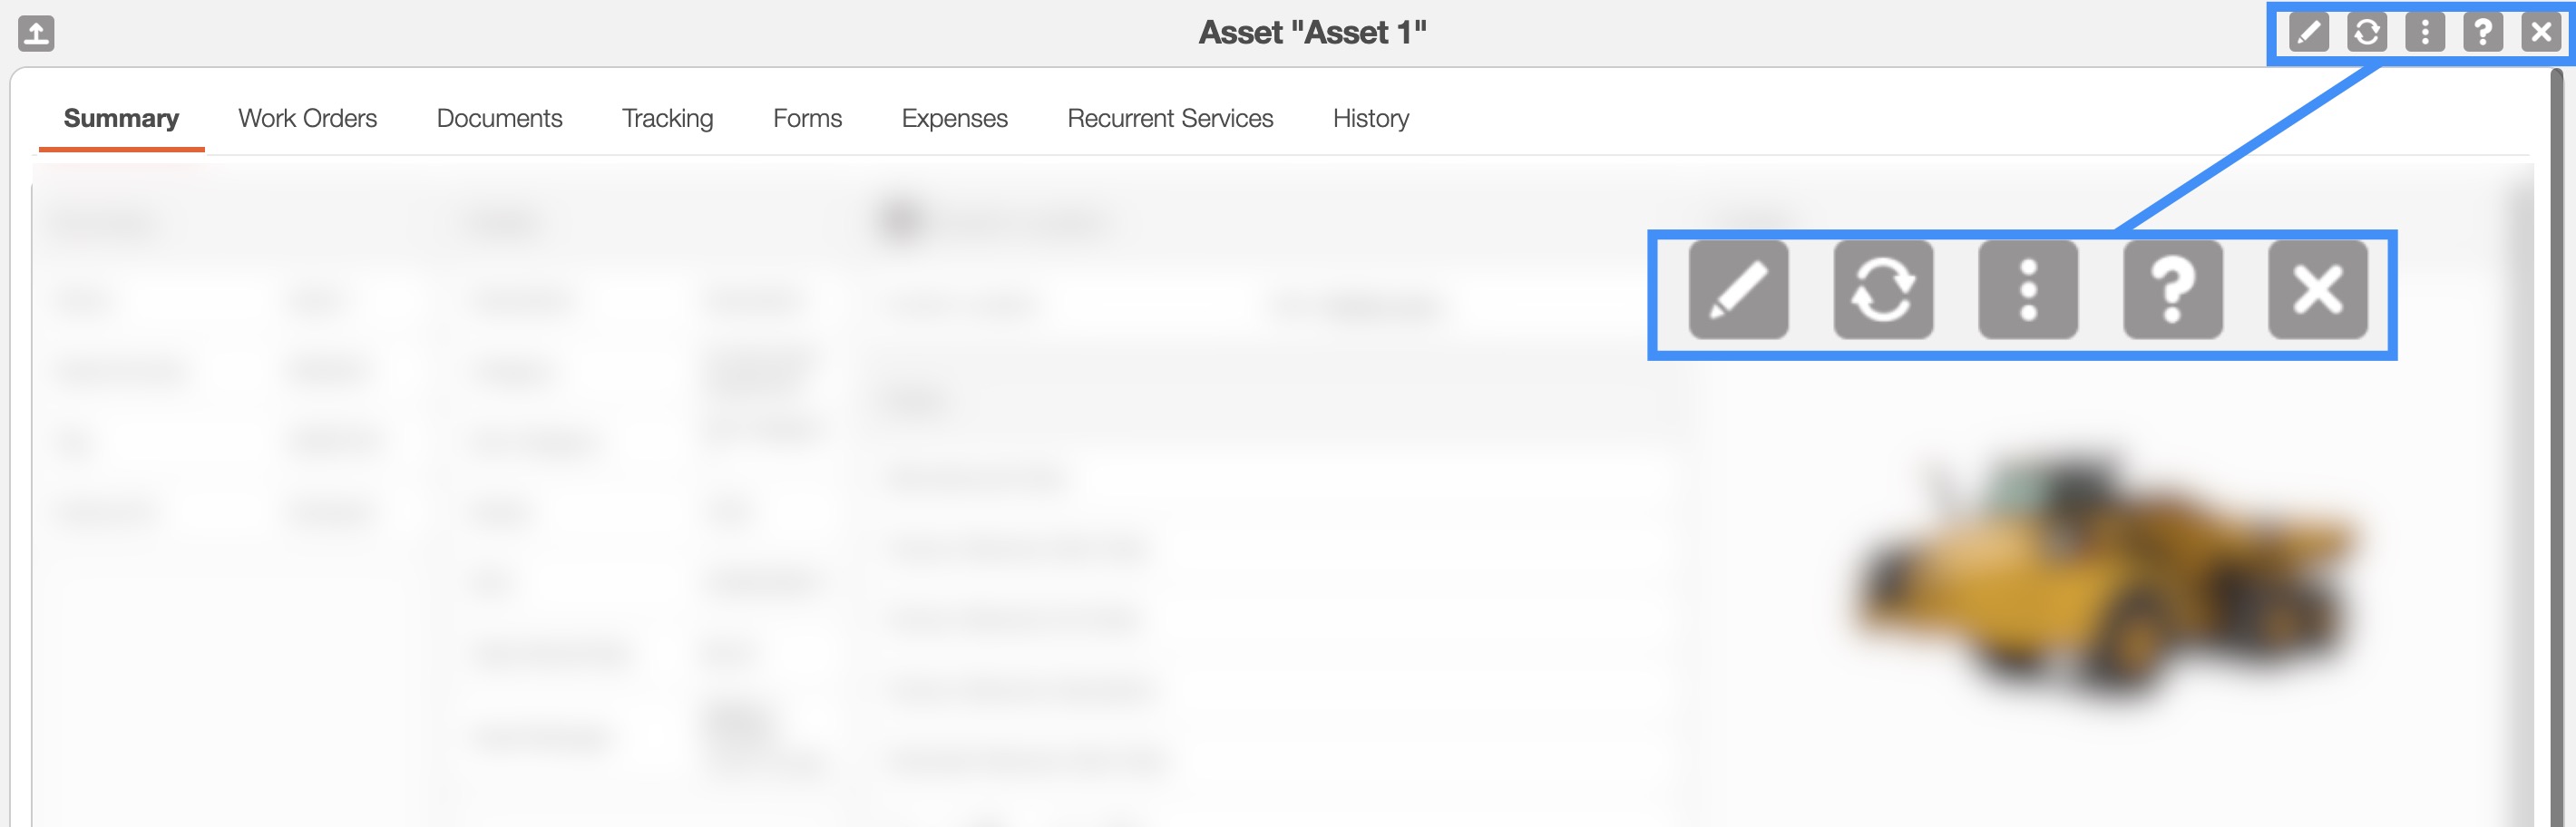
The Upper Right Corner Actions section includes:
The Pencil button will allow you to edit the asset.
The Refresh button will allow you to refresh the asset's data to the most up-to-date version.
The Individual Actions button will allow you to perform various actions.
The Question Mark button which will direct you to the respective MobiWork Features page.
The X will close out of the View Asset pop-up window.
After clicking on the vertical three dots in the top-right corner, the Individual Actions drop-down menu will appear:
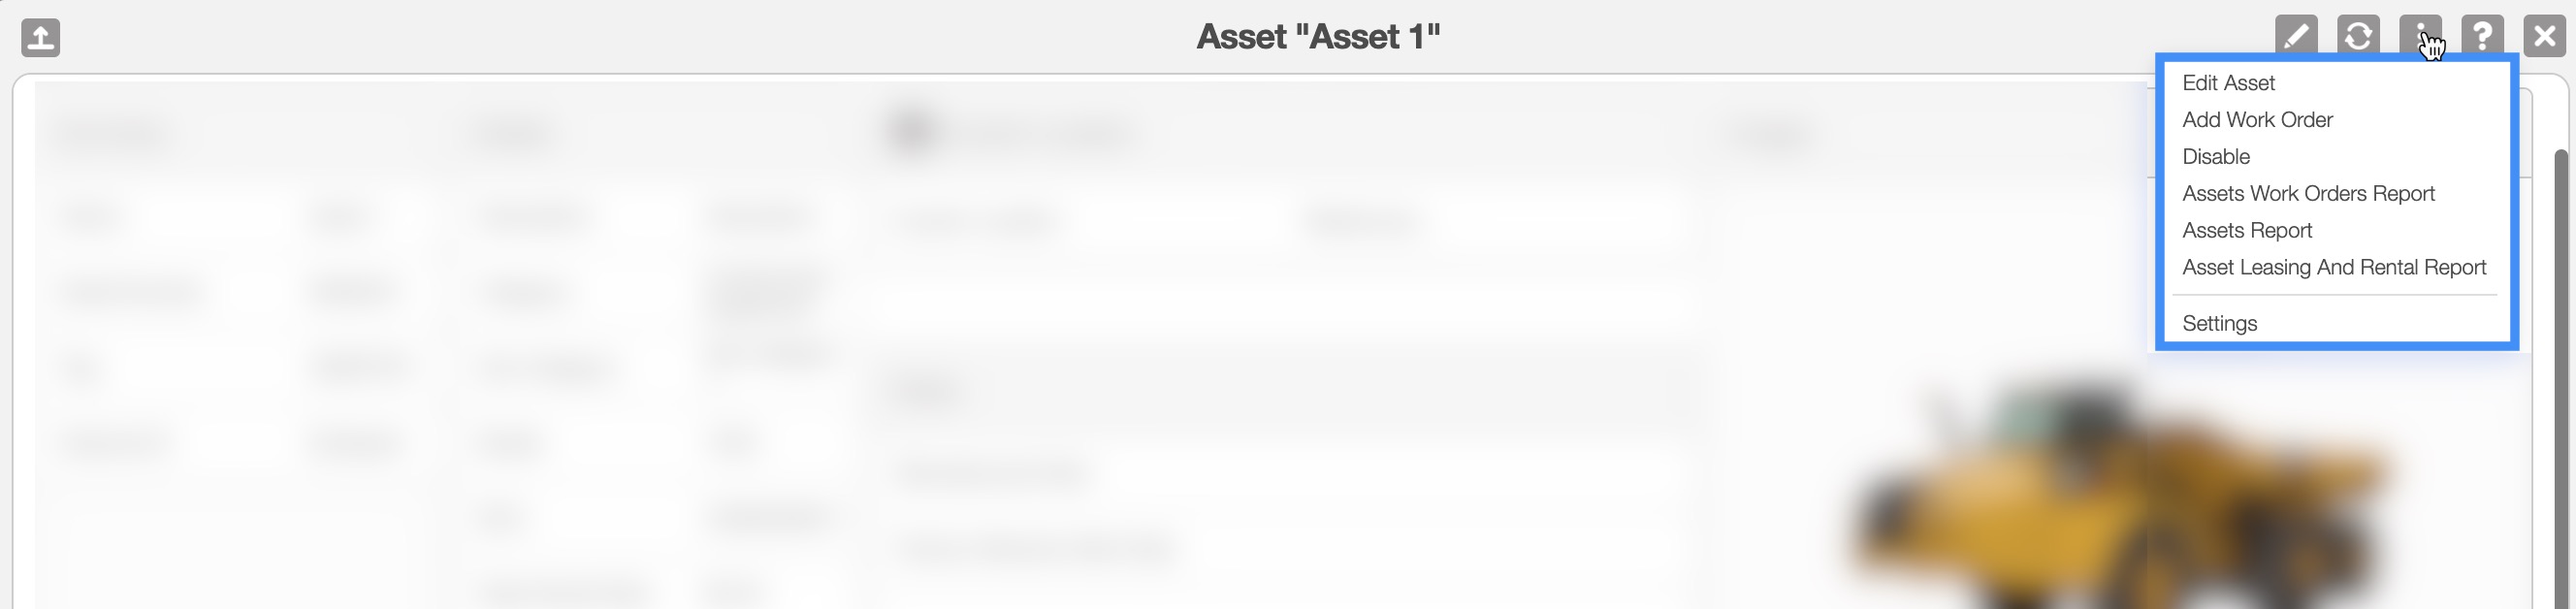
From the Individual Actions drop-down menu, you can select various actions that will help manage the specified asset.
The complete list of actions found in the Individual Actions drop-down menu are defined below:
| Name: | Description: |
|---|---|
| "Edit Asset" | Allows the user to edit the specified asset. |
| "Add Work Order" | Allows the user to add a work order associated with the asset. |
| "Disable" | Disables the specified asset so that work orders or recurrent services cannot be generated from it. |
| "Reports" | Depending on the report chosen, will run a Assets Work Orders Report, Assets Report, or an Asset Leasing and Rental Report. |
| "Settings" | Directs the user to the Asset Settings page. |
The "Summary" tab is the default tab that will appear once you open the View Asset pop-up window. This tab will display all the requisite information regarding an asset; the information is also displayed in an accessible and practical manner.
The panels found on the "Summary" tab will summarize the data from the other tabs found in the View Asset pop-up window:
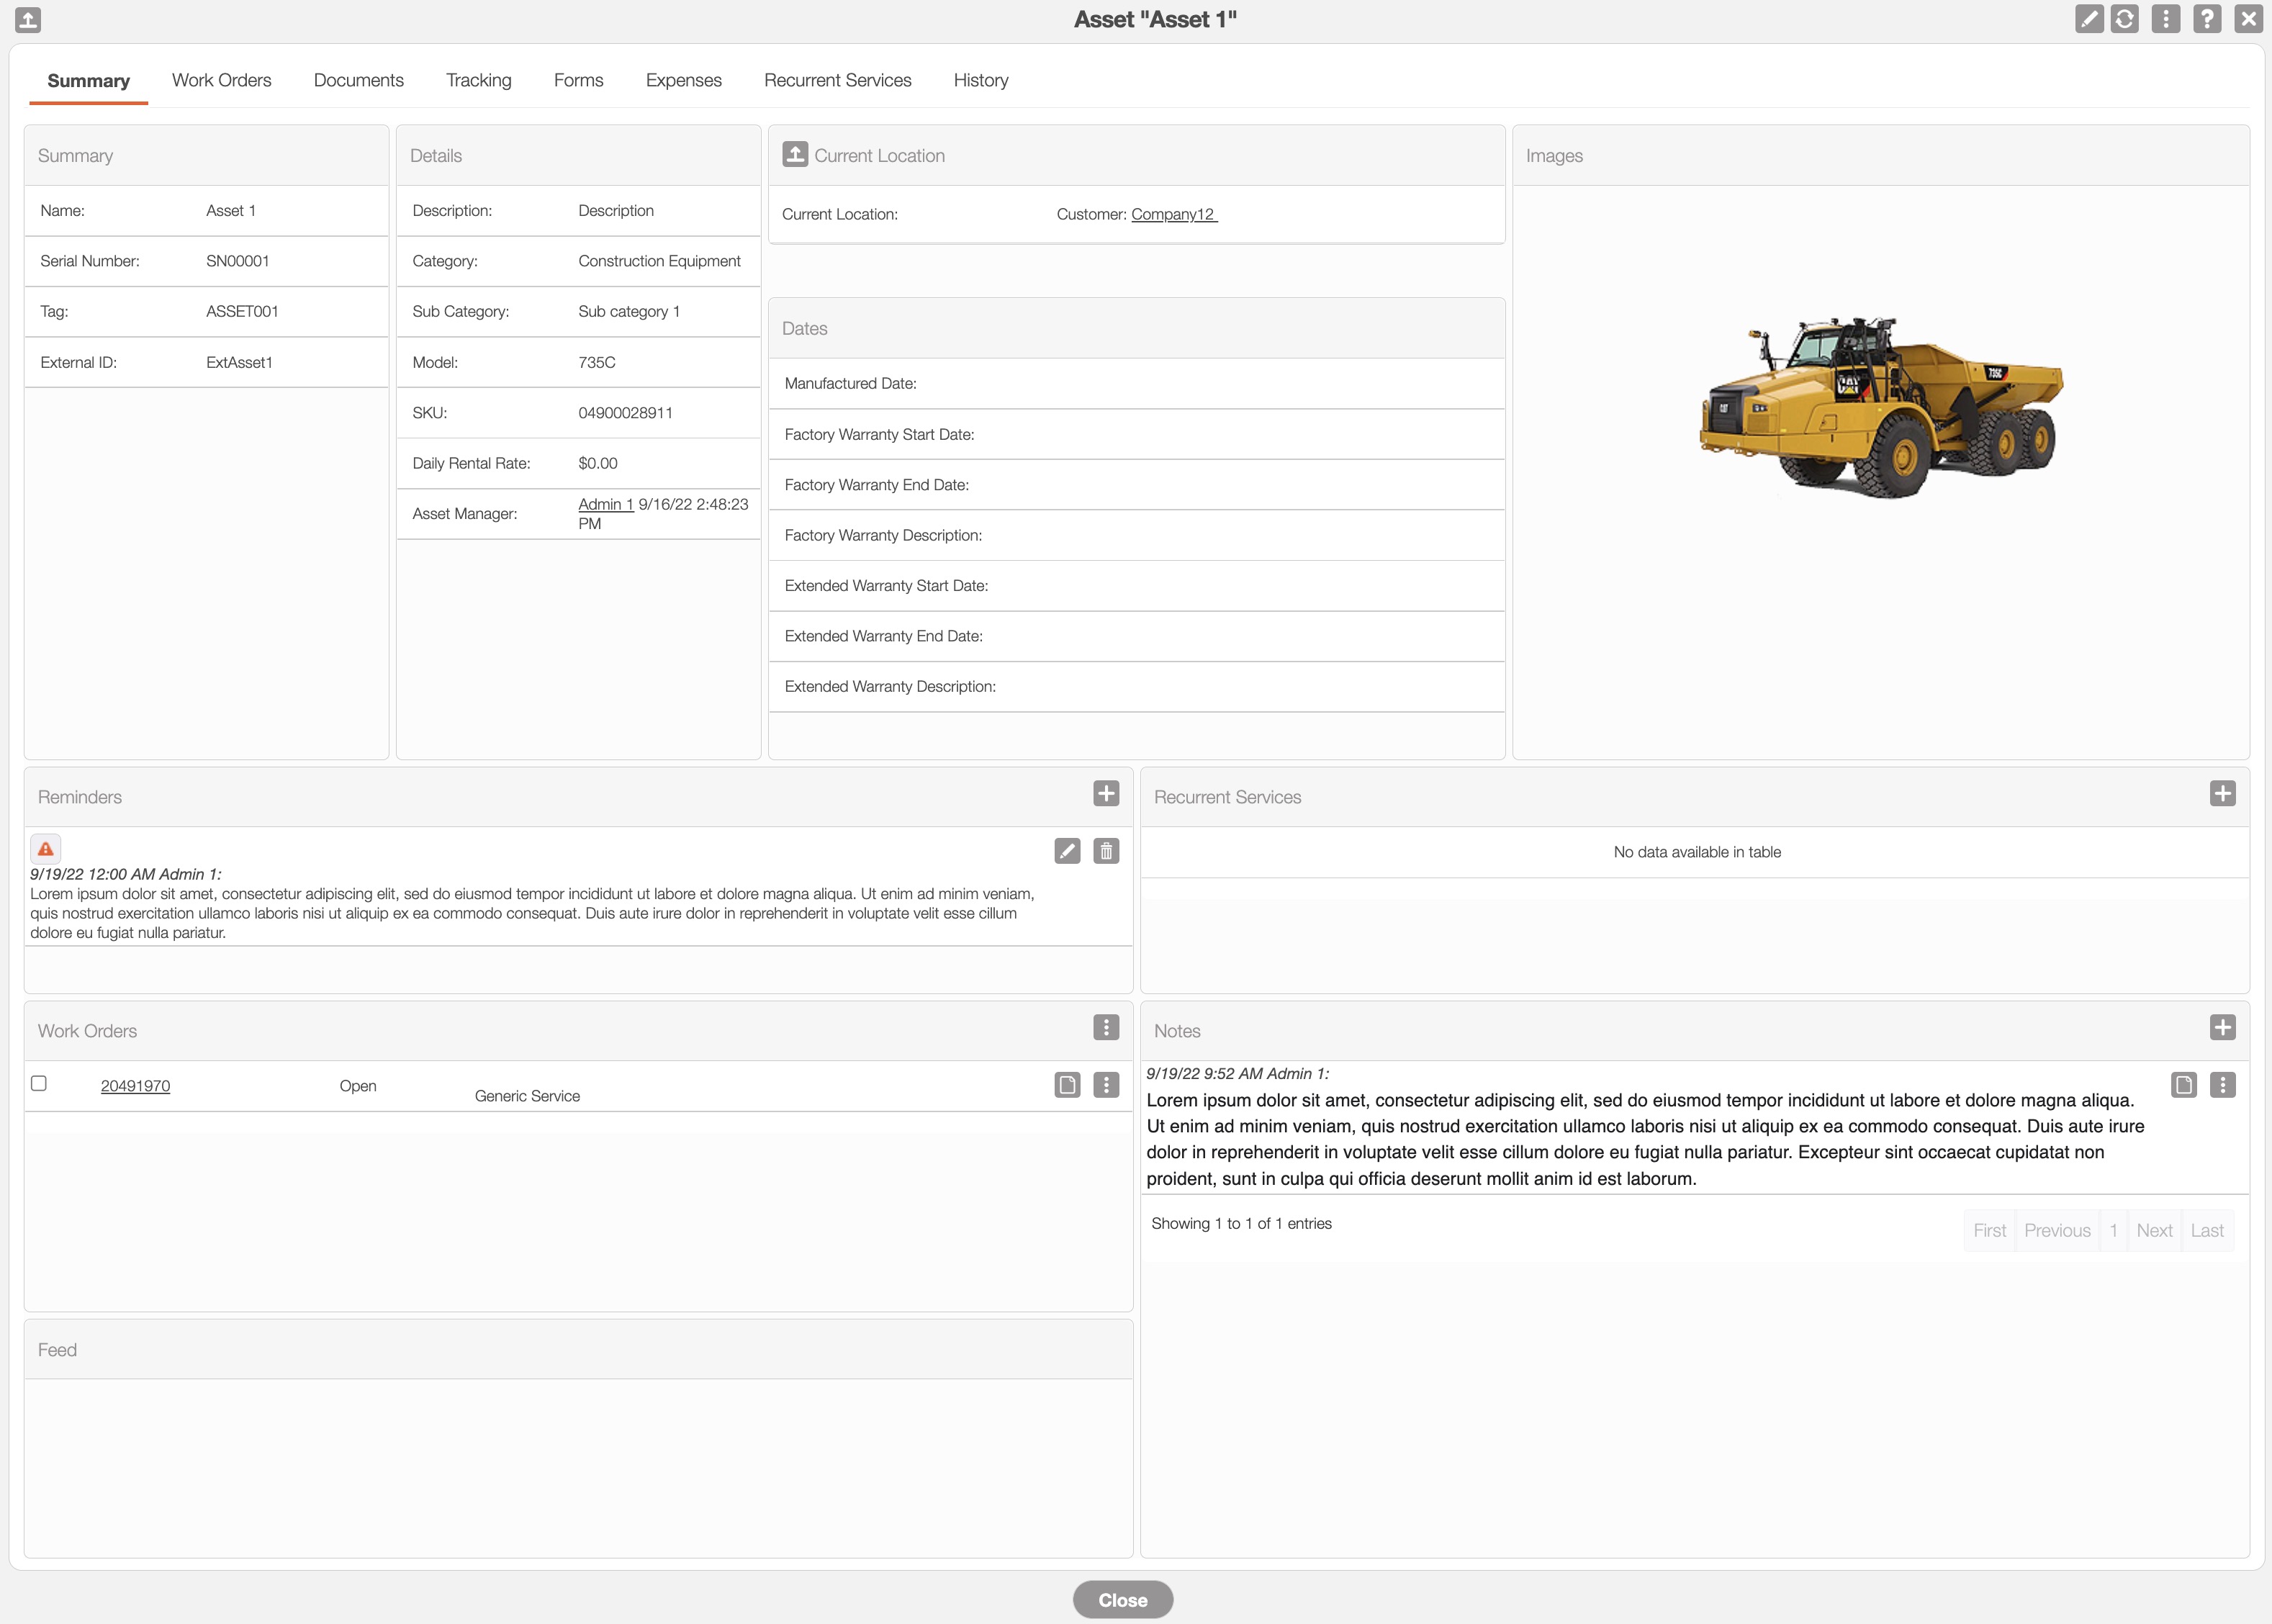
Where applicable, you can edit or add additional information directly in the "Summary" tab:
The Arrow icon (found in the top left of designated boxes) will open the corresponding tab in the View Asset pop-up window.
The Individual Actions button (the three dots) will display different options (e.g., view, edit, delete, etc.) depending on the corresponding panel.
The View icon will allow you to view the selected data in a separate window.
The Plus Sign icon will allow you to add additional recurrent services or notes.
The Trash Can icon will allow you to delete the selected data.
The "Work Order" tab will display all the work orders that are associated with the selected asset.
From this section you can view the status of the work order, the work order dates, the assigned user, the work order ID, and the type of service that the work order falls under.
By clicking on the work order ID you will also be able to open the View Work Order pop-up window:
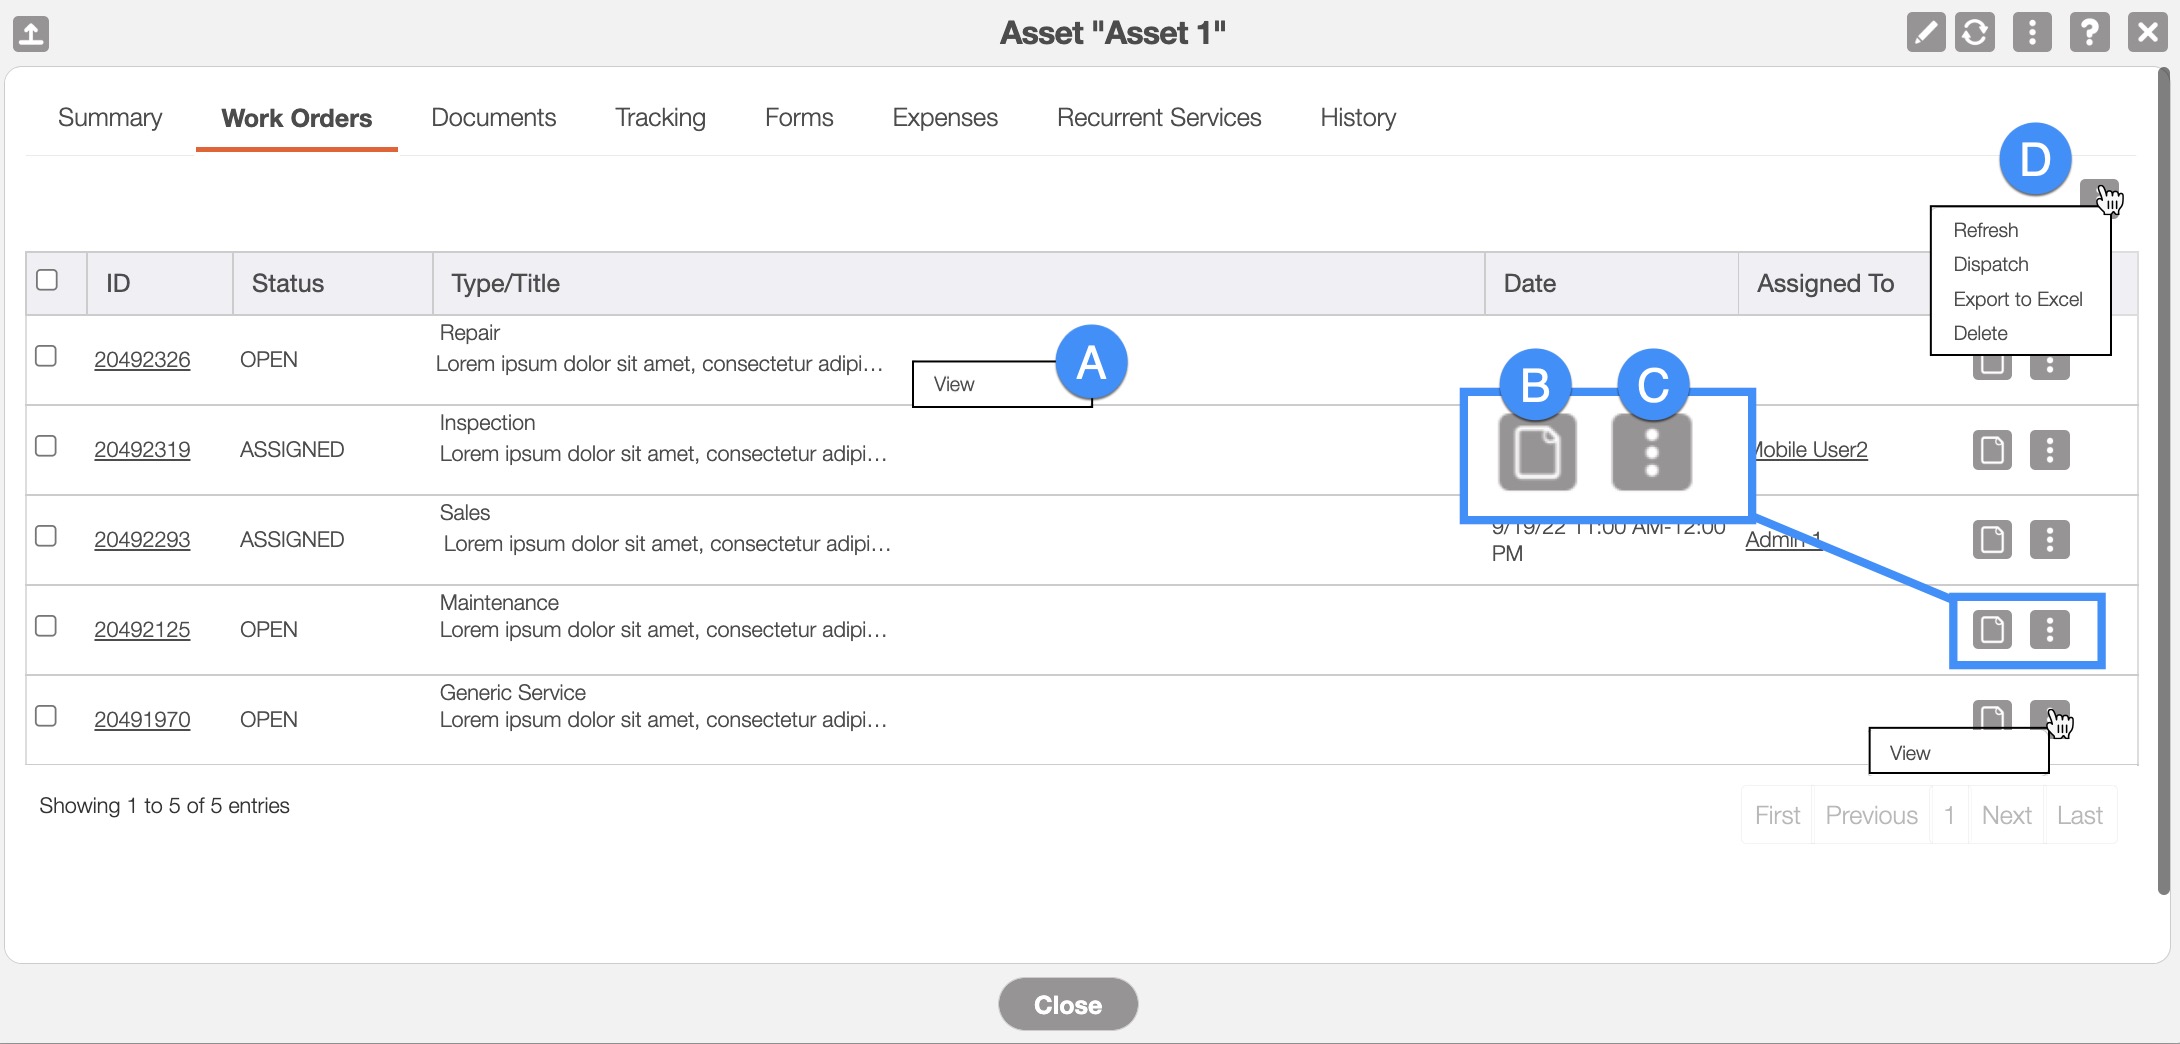
By right-clicking you will bring up the right-click actions. These actions are identical to the Individual Actions and will allow you to view the asset.
The View icon will allow you to open the View Asset pop-up window.
The Individual Actions (the three dots next to the View icon) are identical to the right-click actions and will allow you to view the asset.
The More Actions button will allow you to refresh, dispatch, export to excel, or delete the associated work orders.
All the terms from the "Work Order" tab are defined below:
| Name: | Description: |
|---|---|
| "ID" | The ID number of the work order. |
| "Status" | The work order status (i.e., open, assigned, or closed). |
| "Type & Description" | The type and a brief description of the work order. |
| "Date" | The date that the work order was completed. |
| "Assigned To" | The user assigned to complete the work order. |
| "Actions" | Will allow you to view the work order. |
The "Documents" tab will display all the documents that are associated with the asset; this can include images of any contracts, the asset itself, user manuals, troubleshooting guides, etc.
This section will display the user who uploaded the document, the date the document was uploaded, the type of file, the name of the document, and any comments associated with the document. You also can add a new document, by clicking the Plus Sign button:
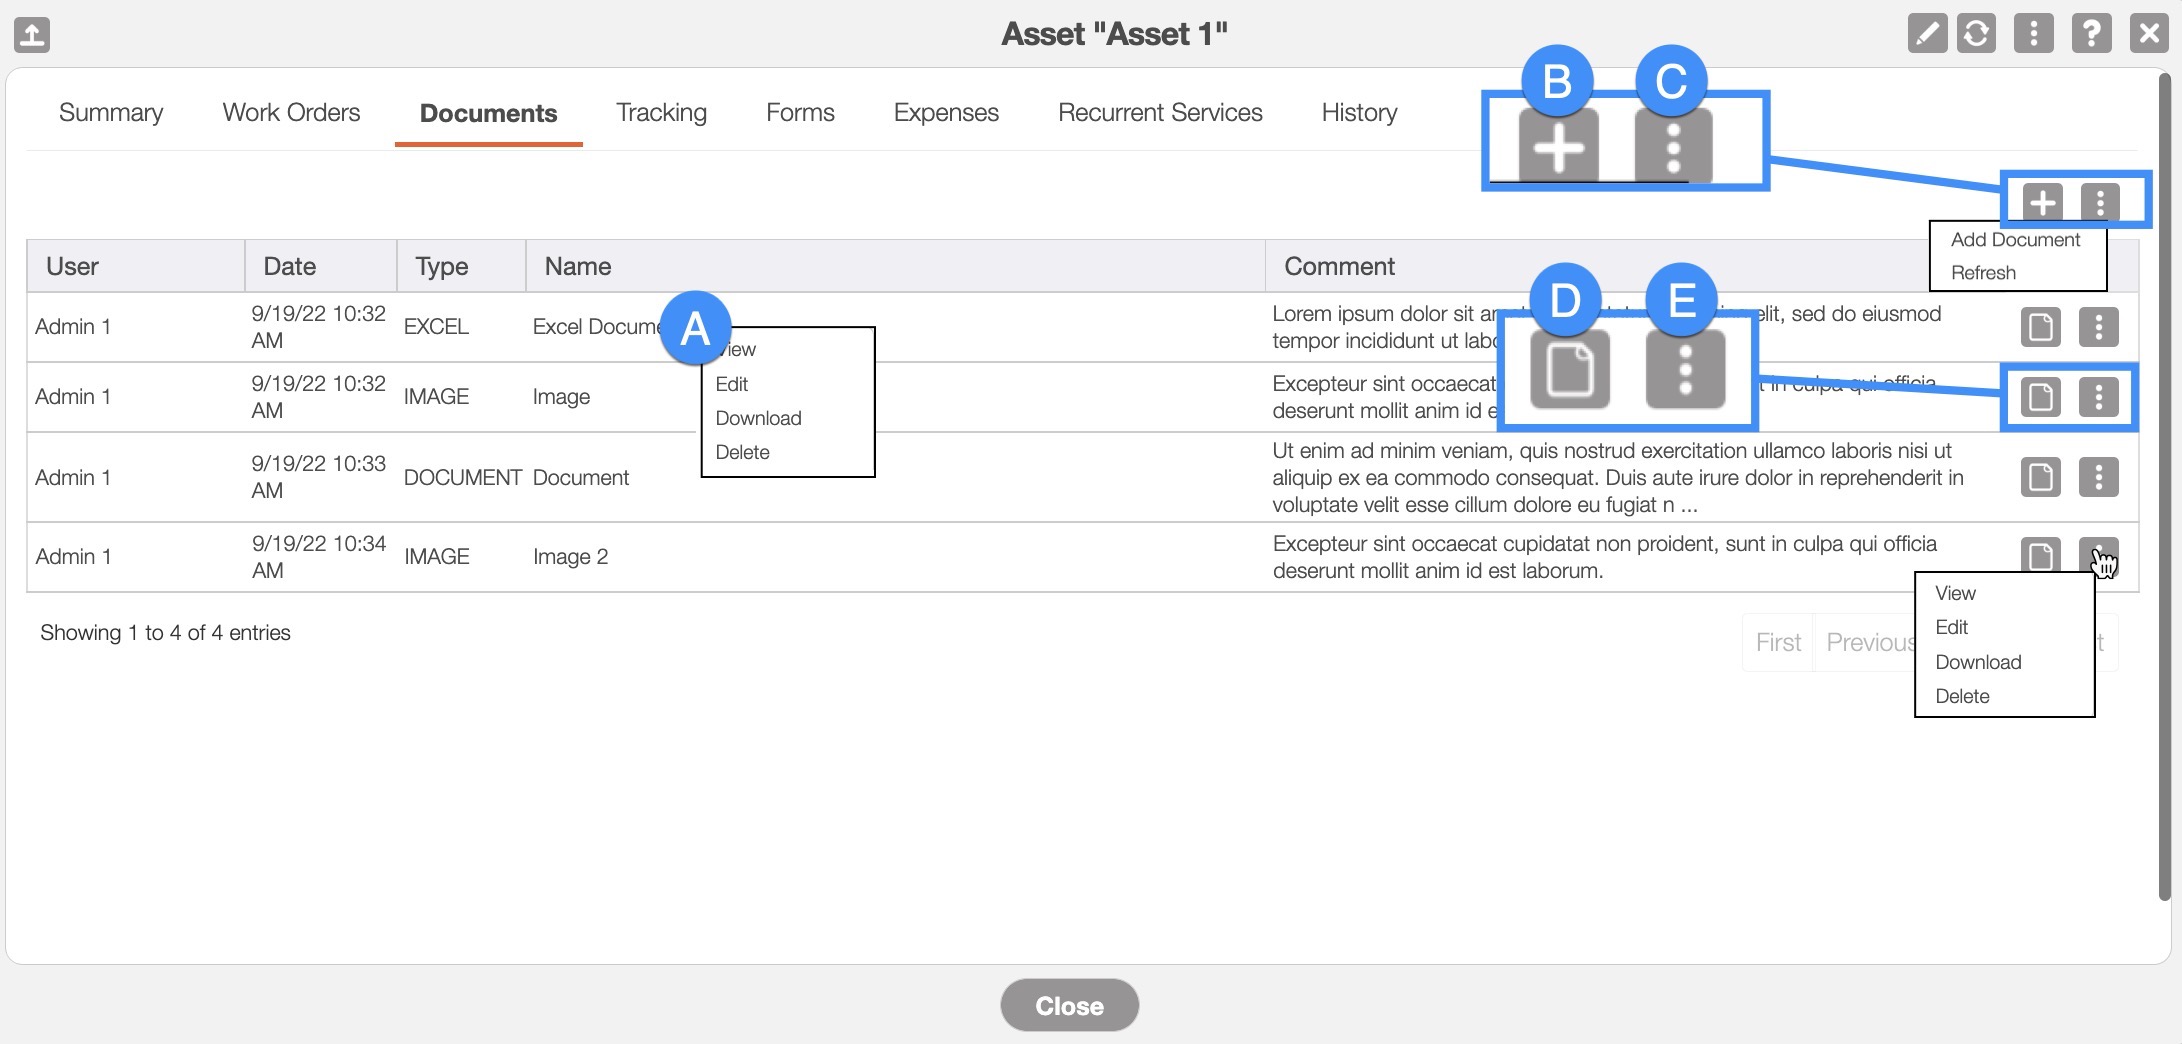
By right-clicking you will bring up the Right-Click Actions. These actions are identical to the Individual Actions and will allow you to view, edit, download, or delete the document.
The Plus Sign button will allow you to add a new document.
The More Actions button will allow you to add a new document or refresh the "Documents" tab.
The View icon will allow you to open the document.
The Individual Actions (the three dots next to the View icon) are identical to the right-click actions and will allow you to view, edit, download, or delete the document.
All the terms from the "Documents" tab are defined below:
| Name: | Description: |
|---|---|
| "User" | The user who uploaded the document or file. |
| "Date" | The date that the document or image file was uploaded. |
| "Type" | The type of document (e.g., PDF, Word, image, Excel, etc.). |
| "Name" | The name of the document. |
| "Comment" | Any comments or notes associated with the document. |
| "Actions" | Allows you to view, edit, download, or delete the document. |
The "Tracking" tab will display the historical and current location of the asset. This tab is divided into four subsections- "Current Location," "Geotags," "Tracking History," and "Customer Installations."
These subsections will show the date and time that the asset was transferred to locations, allow you to view the select location on a map, as well as the user who authorized the transfer.
![]()
Current Location
The "Current Location" subsection will display the current location of an asset in addition to the duration of how long (i.e., date and time) the asset has been at the current location.
You can click on the customer's name to open the View Customer pop-up window:
![]()
Geotags
The "Geotags" subsection will display the latitude and longitude coordinates of the asset. You can also click on these coordinates to visually view them on a map:
To add additional coordinates, click on the Plus Sign:
![]()
All the terms from the "Geotags" subsection are defined below:
| Name: | Description: |
|---|---|
| "Geotag Date" | The date and time that the geotags for the asset was added to the tab |
| "Lat/Long" | The latitude and longitude coordinates of the asset |
| "Origin" |
Tracking History
The "Tracking History" subsection will display the previous locations where the asset was held, the date of transfer, the user who created the transfer, and the load event ID:
Whenever an asset is transferred to a new location, the data (e.g., date/time, user, the transfer location, etc.) will automatically display in this subsection:
![]()
All the terms from the "Tracking History" subsection are defined below:
| Name: | Description: |
|---|---|
| "Event" | The recipient of the asset transfer |
| "Date" | The date that the asset was transferred to the respective warehouse or customer |
| "Created By" | The user who authorized the transfer of the asset |
| "Load Event ID" | Whenever you use the More Actions button to transfer the asset to a warehouse, user, or customer, the record of the event can be seen/accessed from this ID |
Customer Installations
The "Customer Installation" subsection will show the details of the customer who has the asset; these details include the customer's name, location, start/end date of when the asset is used, and the user who added the asset to the customer profile.
You can also edit or delete the customers in this subsection:

By right-clicking you will bring up the right-click actions. These actions are identical to the Individual Actions and will allow you to view or delete the customer associated with the asset.
The Pencil icon will allow you to edit the installation information:
The Individual Actions (the three dots next to the Pencil icon) are identical to the right-click actions and will allow you to view or delete the customer associated with the asset.
![]()
All the terms from the "Customer Installations" subsection are defined below:
| Name: | Description: |
|---|---|
| "Customer" | The customer associated with the asset installation |
| "Location" | The location where the asset installation will take place |
| "Start Date" | The start date of the installation (when the asset is assembled) |
| "End Date" | The end date of the installation (when the asset is dissembled) |
| "Added By" | The user who added the asset installation for the customer |
| "Actions" | Allows you to edit or delete the customer installation information |
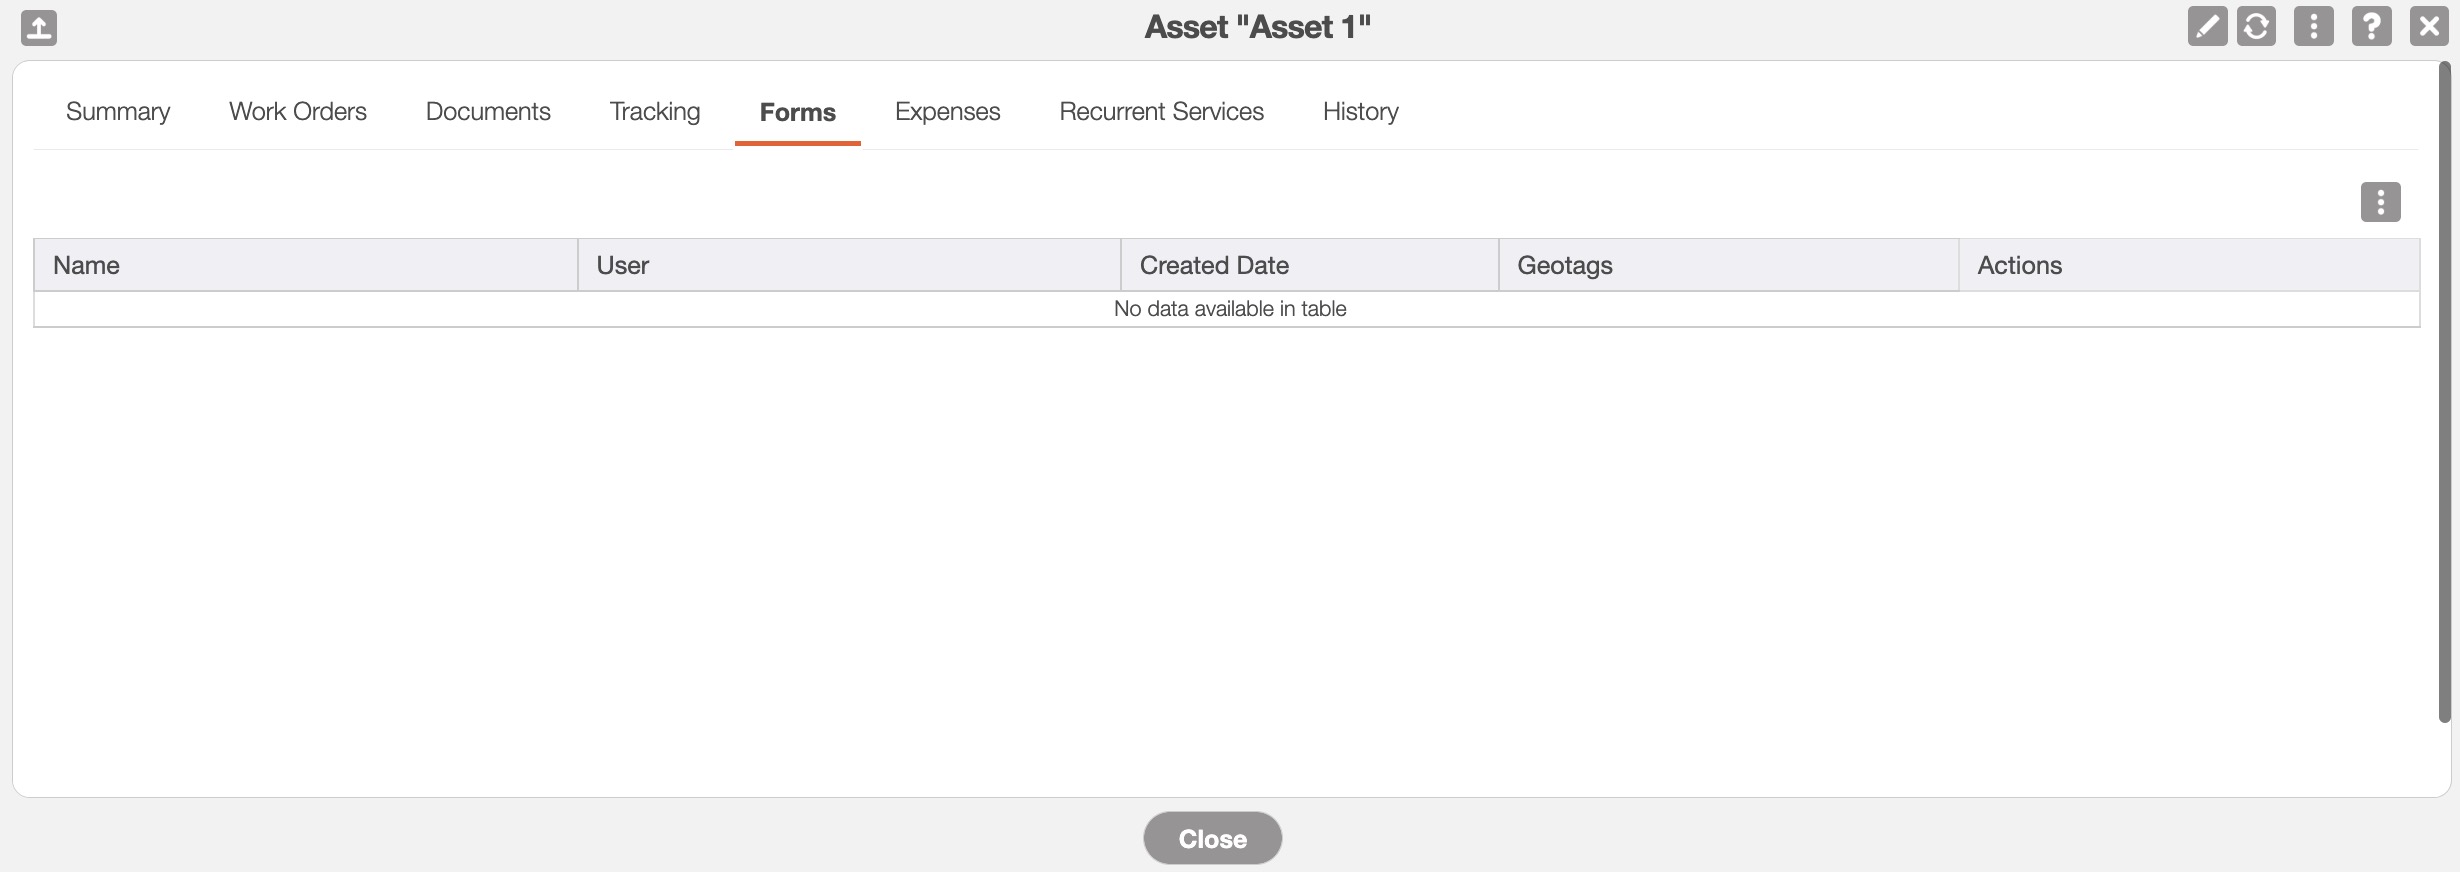
The "Forms" tab will display the forms that are associated with the asset. This tab will be blank at first; to associate forms with your assets you will first need to set them up in the Asset Settings page.
For more information on how to set up your forms, please see the Asset Settings page:
All the terms from the "Forms" tab are defined below:
| Name: | Description: |
|---|---|
| "Name" | The name / type of form associated with the asset |
| "User" | The user who uploaded the form to the asset |
| "Created Date" | The date and time that the form was uploaded to the asset |
| "Geotags" | The geographical location of where the form was created |
| "Actions" | Will allow you to view, edit, or export the MobiForm to PDF |
The "Expenses" tab will list all the expenses associated with the asset as well as the user who issued the expense.
The date, expense amount, name of the expense, and payment type will also be displayed in this tab:
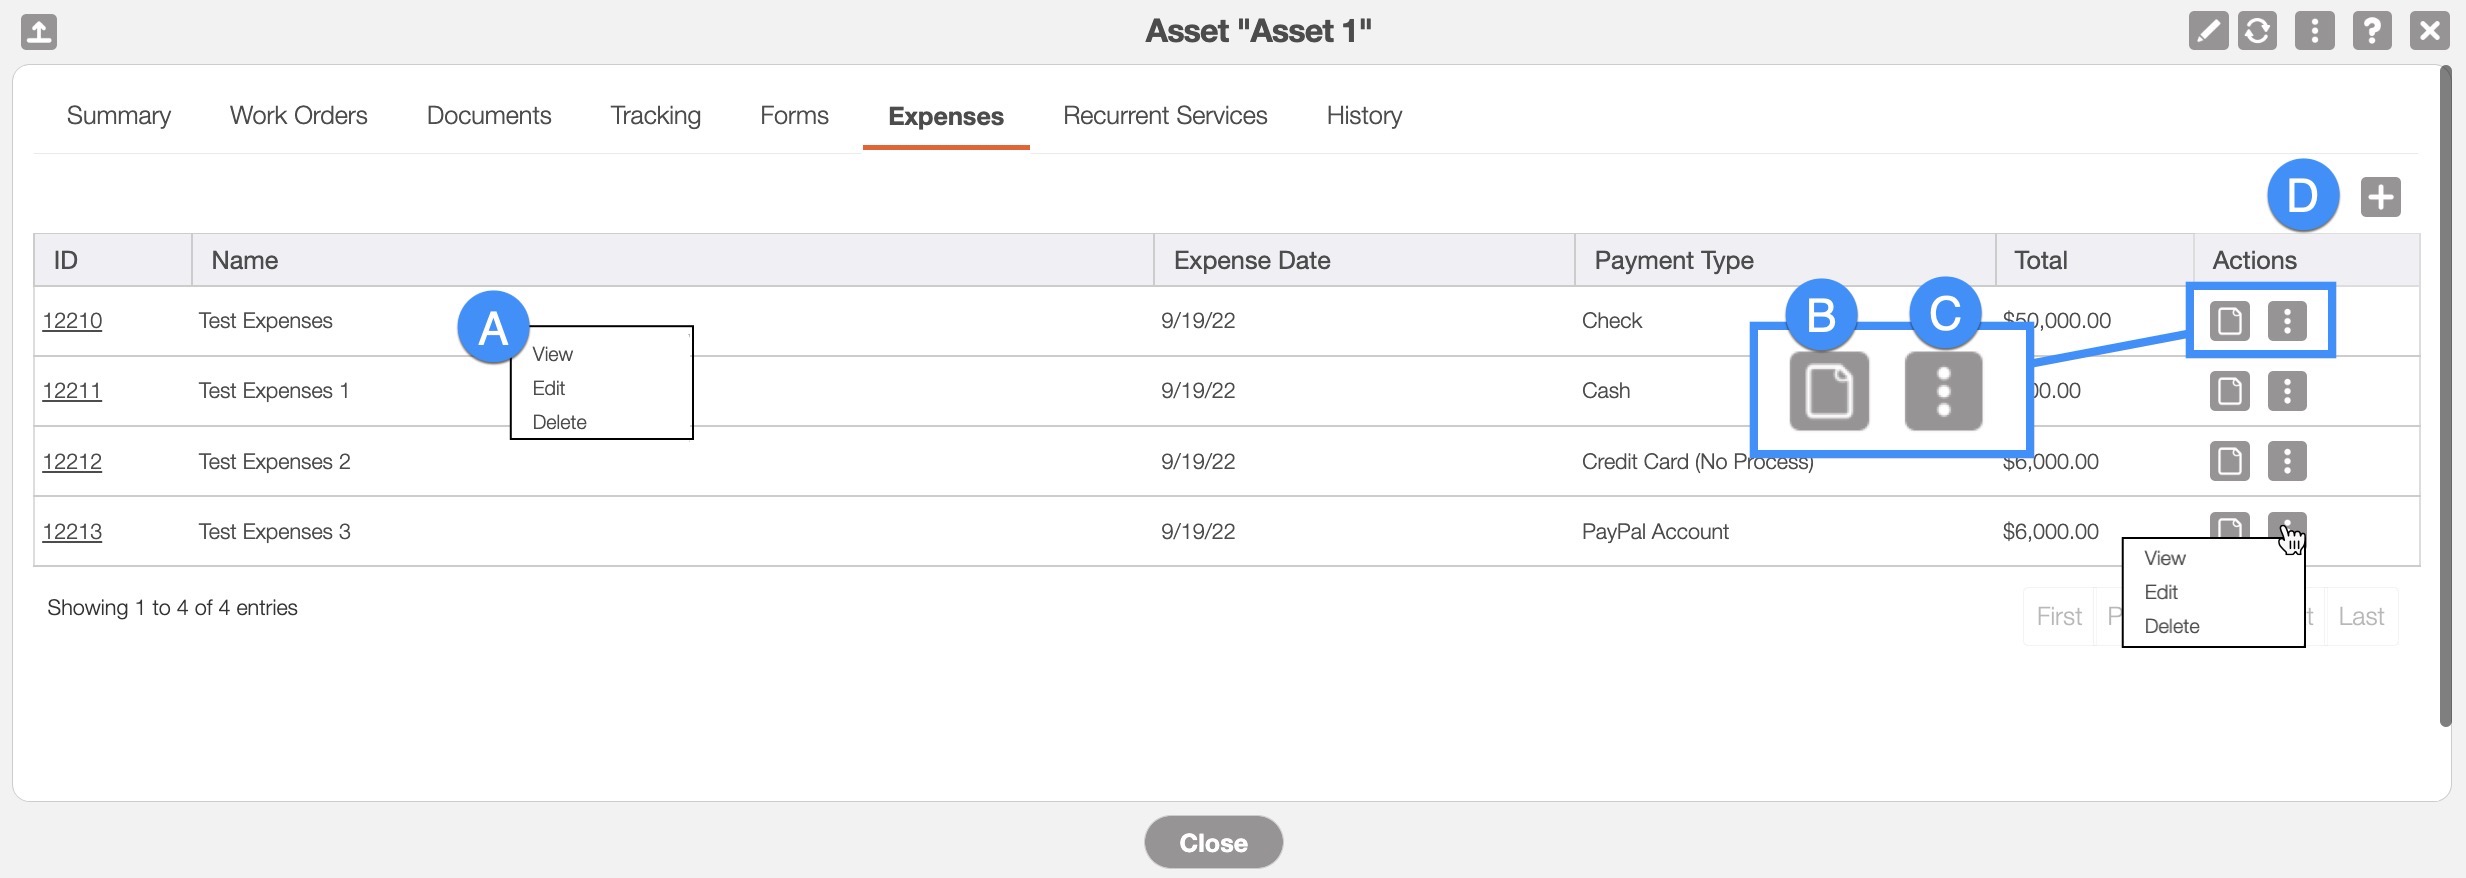
By right-clicking you will bring up the right-click actions. These actions are identical to the Individual Actions and will allow you to view, edit, or delete the expense associated with the asset.
The View icon will allow you to open the View Expense pop-up window.
The Individual Actions (the three dots next to the View icon) are identical to the right-click actions and will allow you to view, edit, or delete the expense associated with the asset.
The Plus Sign button will allow you to add a new expense.
All the terms from the "Expenses" tab are defined below:
| Name: | Description: |
|---|---|
| "ID" | The ID number of the expense. |
| "Name" | The name of the expense. |
| "Expense Date" | The date that the expense was created. |
| "Payment Type" | How the expense was paid for (e.g., cash). |
| "Total" | The total cost of the expense. |
| "Actions" | Will allow you to view, edit, or delete the expense. |
The "Recurrent Services" tab will list all the recurrent services that the asset is associated with.
From this tab you can generate additional recurrent services associated with the asset, view the recurrent services that are listed, or create work orders from a specified recurrent service:
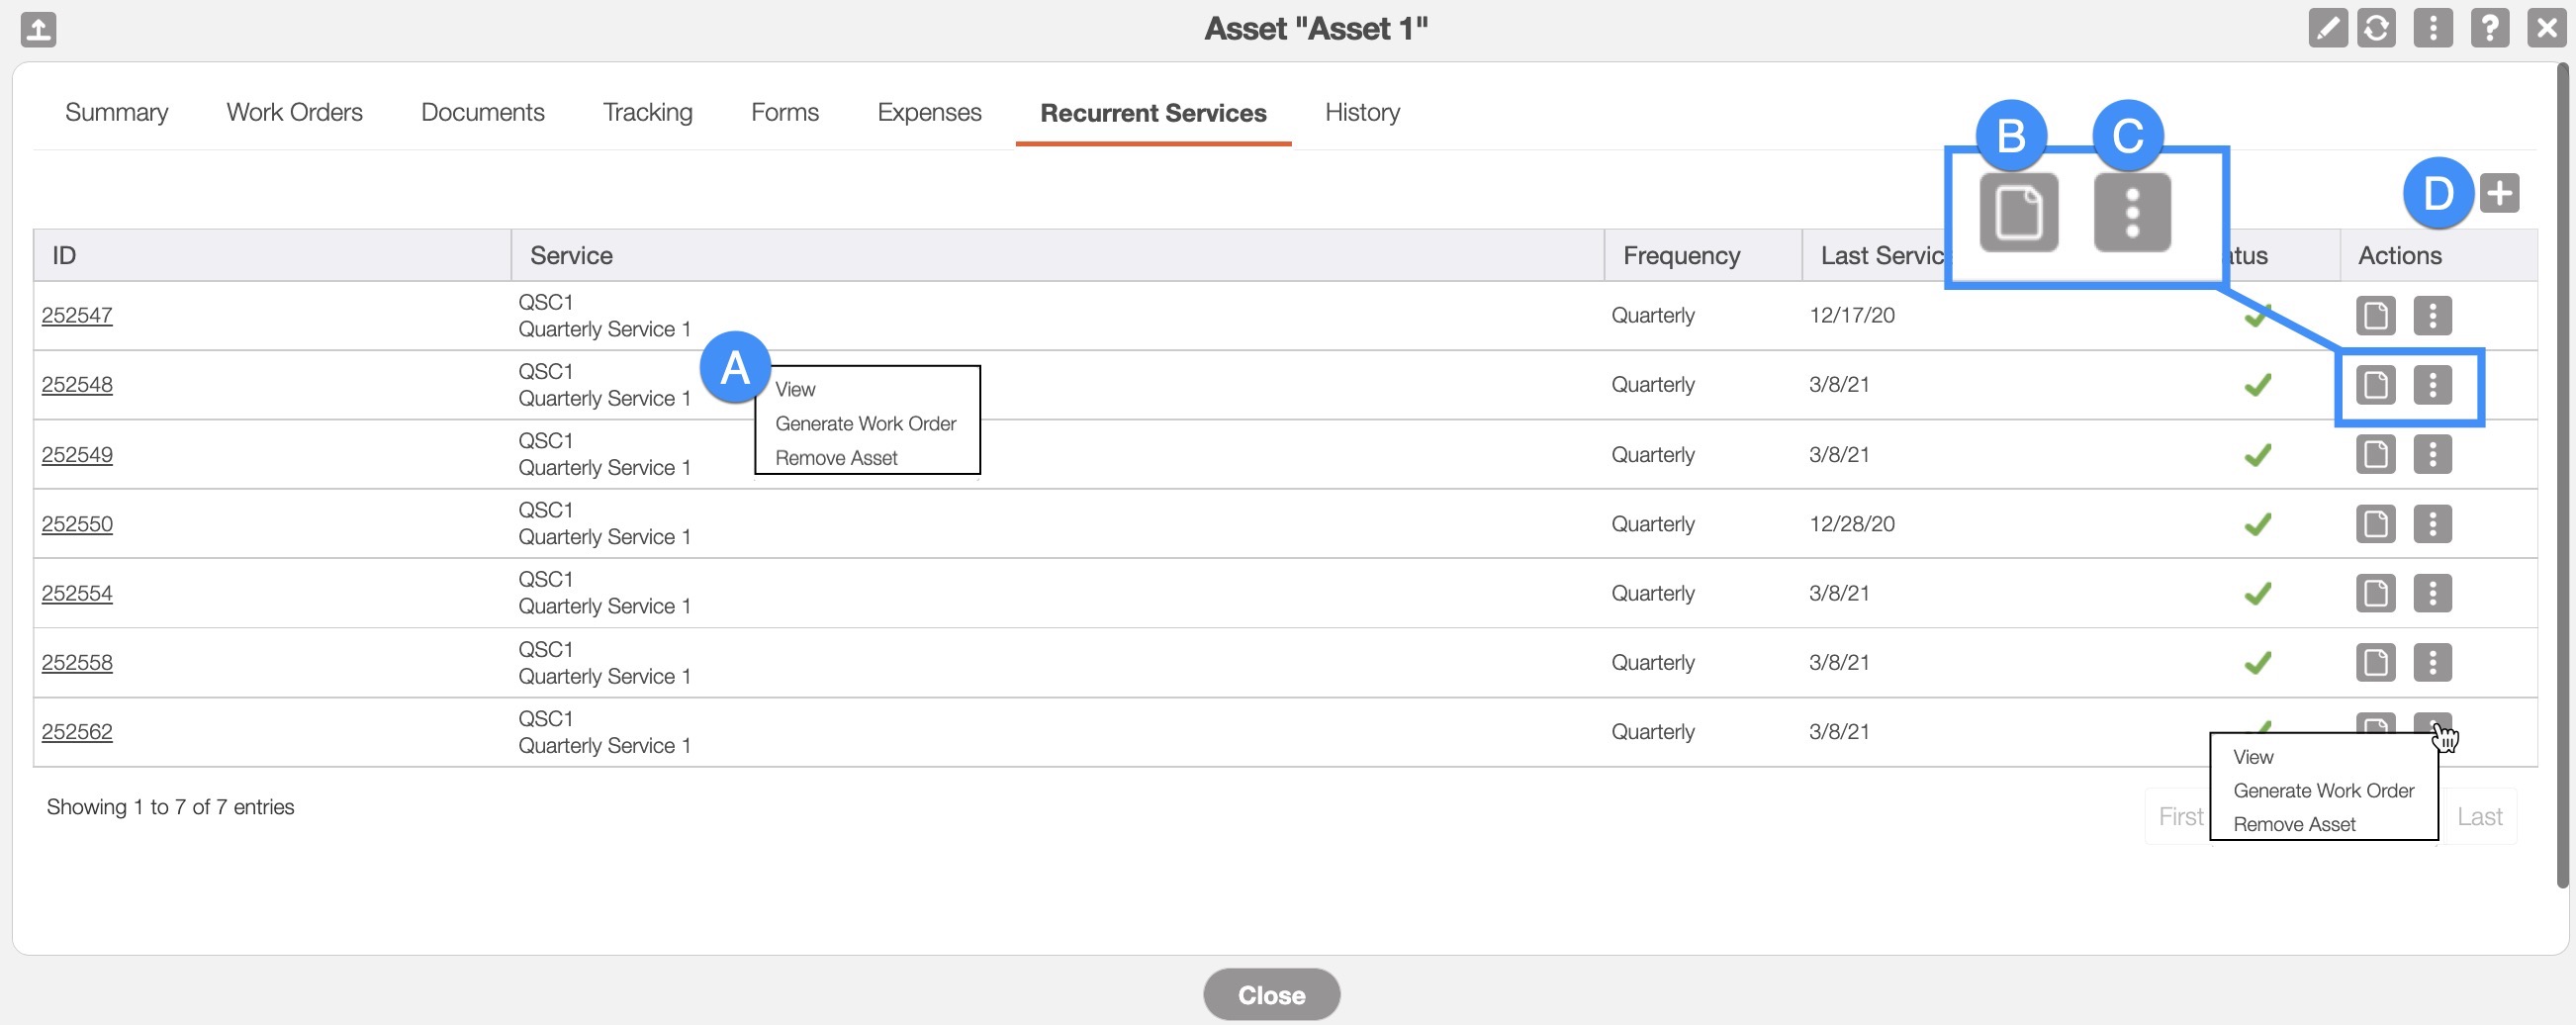
By right-clicking you will bring up the right-click actions. These actions are identical to the Individual Actions and will allow you to view, generate a work order, or remove the asset from the recurrent service.
The View icon will allow you to open the View Recurrent Service pop-up window.There are several ways you can edit an asset within MobiWork.
The Individual Actions (the three dots next to the View icon) are identical to the right-click actions and will allow you to view, generate a work order, or remove the asset from the recurrent service.
The Plus Sign button will allow you to add a new recurrent service.
All the terms from the "Recurrent Services" tab are defined below:
| Name: | Description: |
|---|---|
| "ID" | The ID number of the recurrent service. |
| "Service" | The type of service type that the recurrent service is listed under (e.g., Quarterly, Yearly, etc.). |
| "Frequency" | How often the recurrent service should be performed. |
| "Last Service Date" | The last time that the recurrent service was performed. |
| "Status" | The status of the recurrent service. |
| "Actions" | Allows you to open the View Recurrent Service pop-up window, generate a work order, or remove the asset from the recurrent service. |