In order to access the different dispatch modes, you will first need to access the Dispatch Work Order pop-up window. For more information on how to access this window, please see the How to Access the Dispatch Feature page.
The Dispatch Work Order pop-up window will appear. In this pop-up window you will be able to select your desired dispatch mode from the "Dispatch Mode" drop-down:
Please see the Repeat Work Order for more information about repeating a dispatched work order.
When dispatching a work order, you can specify the desired date and time in the "Schedule Date" field:
You can use the "Time" drop-down menu to fine-tune when the work order should be dispatched. There are five different time selections you can choose from:
Specific Time - Allows you to input a specific time for the work order.
First Available - This action takes into account any existing work orders and schedules the new work order in the first available time slot in the user's schedule.
First Position - Schedules the work order at the start of the day. The start time is dependent on global business hours and does not consider existing work orders.
Last Position - Schedules the work order at the end of the day. The end time is dependent on the global business hours you have set up in MobiWork.
Closest Distance - Schedules the work order next to the one closest in location to that specific work order.
Depending on the selection that you choose, the work order will be scheduled for that specified time. Please note these selections are for a one-time dispatch and are not saved for future route optimization.
If you need to ensure that a specific customer is serviced at a particular time and date, make sure the appropriate constraints are set up. For more information about constraints, please see the Constraints section.
The "User" dispatch is the default mode of the Dispatch Work Order pop-up window. From this pop-up window you will be able to assign a single user to a work order:
In the "User(s)" selection, click on the user you would like assigned to the work order. Once you are satisfied with the user and the rest of the dispatch data click the Dispatch button.
The time zone drop-down will automatically use the time zone where the customer resides; you can modify the time zone selected by choosing a new time zone from the drop-down.
The "Multiple Users" dispatch mode will allow you to dispatch multiple users to a single work order:
To highlight more than one user click the Command Key (Mac) or Control Key (Windows) on your keyboard. While you are holding down on the appropriate keyboard button, click on the desired users you would like to assign to the work order.
The time zone drop-down will automatically use the time zone where the customer resides; you can modify the time zone selected by choosing a new time zone from the drop-down.
Edit Lead User
If multiple users are assigned to a work order, you can designate the lead user responsible for overseeing the work order through the View Work Order pop-up window. Please see the View Work Order page for more information on how to access the View Work Order pop-up window.
In the "Scheduling & Dispatching" panel, you can access the "Set Crew Leader Role" option by right-clicking or accessing the drop-down menu from the Individual Actions button:
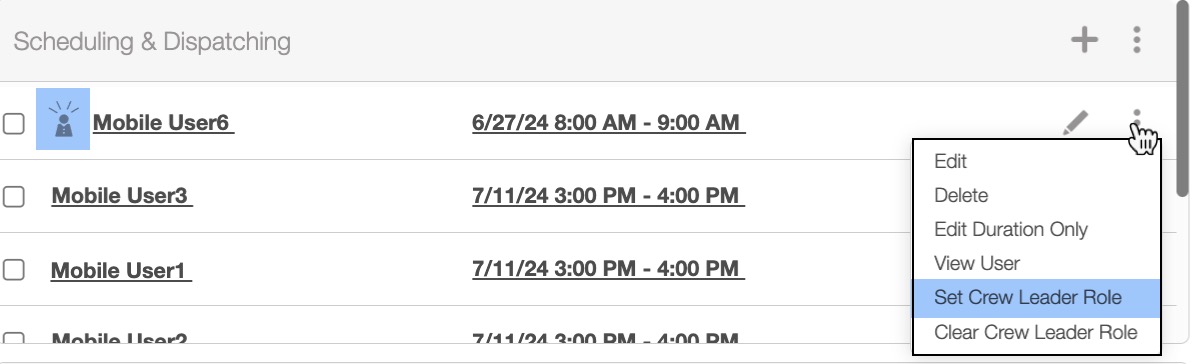
The lead user will have a Person icon next to their name.
To remove the lead role from a user, select "Clear Crew Leader Role" option by right-clicking or accessing the drop-down menu from the Individual Actions button. The role will then automatically be removed from the user.
Note: The designated lead user for a work order has the ability to manage time tracking for other users on the team. For more details on crew time tracking, please refer to the Crew Time Tracking page.
The "User Current Location" mode will allow you to automatically find the user closest to the work order. This mode is ideal for any emergency:
Once you select the closest user and input the planned duration of the work order, click the Dispatch button.
The time zone drop-down will automatically use the time zone where the customer resides; you can modify the time zone selected by choosing a new time zone from the drop-down.
The "User Base Location" mode will allow you to dispatch users directly from the office location closest to the work order site:
Once you select the closest user to the work order location and input the rest of the dispatch data click the Dispatch button.
Note: The base location is derived from the listed address on the User profile. For more information about the User profile please see the View User page.
The time zone drop-down will automatically use the time zone where the customer resides; you can modify the time zone selected by choosing a new time zone from the drop-down.
The "Closest in a Given Day" mode allows you to view the schedules of all your users for a single day. You can then dispatch the user closest to the work order location on the specified date. You will be able to set the date under the "Mode" field:
The time zone drop-down will automatically use the time zone where the customer resides; you can modify the time zone selected by choosing a new time zone from the drop-down.
The "Closest in 7 Days" mode will allow you to view the schedule of all your users within the next seven days. You can then dispatch the user closest to the work order location within that time frame:
Once you have selected the desired user, click on the Dispatch button to finalize.
The time zone drop-down will automatically use the time zone where the customer resides; you can modify the time zone selected by choosing a new time zone from the drop-down.
The "Closest in 30 Days" mode will allow you to view the schedule of all your users within the next thirty days. You can then dispatch the user closest to the work order location within that time frame:
Once you have selected the desired user, click on the Dispatch button to finalize.
The time zone drop-down will automatically use the time zone where the customer resides; you can modify the time zone selected by choosing a new time zone from the drop-down.
The "Closest in 30 to 90 Days" mode will allow you to view the schedule of all your users within the next thirty to ninety days. You can then dispatch the user closest to the work order location within that time frame:
Once you have selected the desired user, click on the Dispatch button to finalize.
The time zone drop-down will automatically use the time zone where the customer resides; you can modify the time zone selected by choosing a new time zone from the drop-down.
The "Skills" field will allow you to find the user with the appropriate skill set (e.g., technical skills, certifications, insurance policy, etc.) closest to the work order location. Simply select the desired skill and the appropriate user will be displayed in the "Available Users" field:
Once you have selected the user with the desired skill set, click on the Dispatch button to finalize. When work orders are dispatched by skill, MobiWork will display technicians with at least one matching skill from the list, even if they have multiple skills associated with their profile.
Set Up User Skills
To set up your users with the appropriate skills for dispatching, you will need to:
Navigate to your Users Settings page. For more information on how to access this page, please see the Users Settings page.
Under the "Skills" section, use the Add button to add specific skills, certifications, etc. to your MobiWork account:
Enter the name, the type of work order the skill is associated with, and any tags. When done, click on the Add Skill button:
- Note: You can assign a set of skills to a particular work order. For example, you might add a machine unit certification as a specific skill required for an installation work order. In this case, the specific skill acts as a subset of a broader skill category.
Once you have the skills set up in the User Settings page, you should then navigate to the View User Profile. In this pop-up window select the "Skills" tab:
- Click the Edit Skills button to bring up the list of skills you can associate with the user:
Select the skills you would like to associate with the user and then when you are finished, click the Save button:
If your customers span multiple time zones or your users are located in different cities, MobiWork enables you to view schedules and dispatch users across various time zones seamlessly.
This ensures that your team operates efficiently and that customers receive timely service, regardless of their location.
The following subsections will explain how to configure the time zone settings for the Schedule feature and for the Dispatch Work Order pop-up window.
Time Zone Schedule View
To view different time zones in the Schedule feature, you first need to add the appropriate time zone from the Schedule Settings page.
In the "Time Zones" section, click the Plus Sign button:
The Add Time Zone pop-up window will appear. Enter the name you would like to refer to this time zone (e.g., Default, EST, Pacific, etc.), and select the desired time zone from the drop-down menu. Once you are satisfied with the information entered, click the Add button:
You can select the desired time zone in the Schedule feature by using the drop-down menu next to the "All Mobile Users" drop-down:
This drop-down will update the displayed times to the specified time zone.
Time Zone Dispatching
To view different time zones in the Dispatch Work Order pop-up window, your customer's address must be in a different time zone than your user.
Only then can you select a different time zone from the "Time Zone" drop-down field:
You can select the desired time zone from the drop-down menu, and the user's schedule will update to reflect the selected time zone.